integration
168 Topics
Azure AI Gateway is now generally available: Ship faster, stay in control
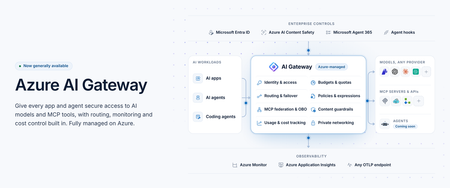
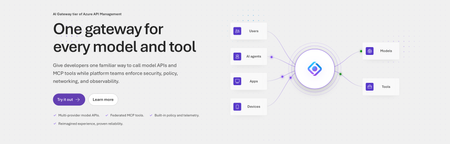
Today at Microsoft Ignite 2026, we're announcing the general availability of Azure AI Gateway, a fully managed Azure service that lets you set up a single, controlled path from your AI applications and agents to models and tools across providers. Developers build with the models and tools they choose, and platform teams manage access, enforce policies, control costs, and monitor usage from one place, without operating gateway infrastructure. Azure AI Gateway, previously in public preview as the AI Gateway tier of Azure API Management, is now a standalone product optimized for governing access to AI models and tools, with a roadmap focused entirely on AI. You can use it by itself with any app or agent, or together with Microsoft Foundry, where you build and run agents, and Microsoft Agent 365, where you manage them. Azure AI Gateway is available today in 17 Azure regions. To make it easy to get started, it offers a freemium, per-use pricing model with 10,000 free requests per gateway each month. Paid billing begins January 1, 2027. See the Regions and pricing section below for details. Why enterprise AI needs a unified governance layer Enterprise AI has moved beyond one app calling one model. Organizations use models from several providers, build agents that act through enterprise tools, and scale AI across teams. When each app manages its own credentials, routing, safety, and usage limits, governance becomes fragmented. Developers struggle to find approved models and tools, and platform teams can't see who is using what, what it costs, or which policies apply. Azure AI Gateway lets you move those controls out of individual apps and into one place, where they apply consistently to every app and agent you connect. How Azure AI Gateway works Apps and agents you connect call the gateway instead of calling each model or tool directly. On every request, the gateway authenticates the caller with Microsoft Entra ID or a gateway access key, enforces access rules and your policies, routes the request to the right model or tool, and records telemetry. Figure 1. Azure AI Gateway sits between callers and backends, governing every request that passes through it. What you can do with Azure AI Gateway Build with models and tools across providers Any model, one name: Use models from Microsoft Foundry, Azure OpenAI, OpenAI, Anthropic, Amazon Bedrock, Google Vertex AI, or any OpenAI-compatible endpoint. Apps call each model by an alias you define, so you can switch models without changing app code. Routing and failover: Route by priority, weight, or custom conditions, with configurable failover, or let Model Router (preview) choose by cost or quality. Consolidated tools: Federate MCP servers and turn OpenAPI specs, connectors, and API Management APIs into MCP tools. Multiple MCP spec versions are supported, including the latest (July 2026). The APIs you know: Call models through an OpenAI-compatible API or the Anthropic Messages API and connect agents to tools from any MCP client. Govern and observe AI interactions Access with Entra ID: Built-in roles control who can use models and tools. Provider keys and tool credentials never reach app code. Safety on every prompt: Screen prompts and responses with Azure AI Content Safety. Only approved tools: Curate and block tools at the gateway, or through Microsoft Agent 365 policies. Protection from poisoned tools (preview): Through the Microsoft Agent 365 integration, Microsoft Defender and Microsoft Purview inspect tool calls and results and block threats before an agent acts. Delegated identity: With on-behalf-of (OBO) authentication, tools act with the signed-in user’s own permissions. Every call on record: Record the caller, target, tokens, and outcome of each model and tool call, trace each call to its agent, and export the data over OpenTelemetry to Application Insights, Datadog, Splunk, Grafana Cloud, or any OTLP endpoint. Private by design: Private Link (preview) for inbound calls, VNet integration (preview) for private backends, IP filtering, and managed identity. Control AI spend as adoption scales See who spends what: Track tokens and estimated cost by user, team, app, agent, provider. Enforced budgets: Cost limits stop new requests once estimated spend reaches a budget. Fair sharing: Token and request limits keep one caller from crowding out the rest. Discover, build, and operate in your existing workflow Coding agent plugin: Developers find approved models and tools and connect their apps from their coding agent. Portal, CLI, Bicep, and REST API: Configure in the portal or with the CLI, then deploy the same setup as code from your CI/CD pipelines with Bicep or the REST API. See Azure AI Gateway in action From connecting models and MCP tools to securing access, controlling costs, and monitoring AI traffic, this demo shows how Azure AI Gateway helps you run AI applications with confidence. Extend AI governance across your Microsoft ecosystem Already using Microsoft Foundry, Microsoft Agent 365, or Azure API Management? Azure AI Gateway works with all three. Microsoft Foundry: Foundry has governance built in for its resources and projects. When AI spreads across teams, Foundry resources, subscriptions, and other providers, the gateway adds a shared layer on top. In a hub-and-spoke model, the gateway is the hub: a central platform team sets the rules once, and developers keep building in their Foundry projects, the spokes, using approved models and tools without managing credentials. Projects can share one deployment, including PTU, and fail over to another Foundry resource or provider. Foundry prompt agents can use gateway models through a model connection (preview), without code changes. Microsoft Agent 365: Agent 365 discovers the gateway’s MCP servers and lets you set tool policies. The gateway enforces those policies, alongside its own, on every tool call, with added threat protection (preview) from Defender and Purview. Regions and pricing Azure AI Gateway is available today in 17 Azure regions: East US, East US 2, East US 2 EUAP, West US, West US 2, Central US, North Central US, South Central US, Canada East, West Europe, North Europe, UK South, France Central, Sweden Central, Australia East, Japan East, and Southeast Asia. Azure AI Gateway offers a freemium, per-use pricing model with 10,000 free requests per gateway each month. Paid billing begins January 1, 2027. Monthly gateway requests Service fee Additional request charges Up to 10,000 Free None More than 10,000, up to 10 million $500 per month, per gateway, billed hourly None (includes 10 million requests) More than 10 million $500 per month, per gateway, billed hourly $20 per additional million requests, billed in increments of 10,000 requests Prices are in US dollars and may vary by region. Exact regional prices will be available when billing begins. Get started with Azure AI Gateway Create a gateway at ai.gateway.azure.com. It’s ready in about a minute and free to start. Then: Connect an existing model and give it an alias. Expose the MCP tools your agents need. Give your team access with an AI Gateway role. Set a cost limit. Point your app or agent at the gateway. Or start from your coding agent. Install the Azure AI Gateway plugin, and it finds approved models and tools and connects your app for you. Explore the documentation and quickstarts at ai.gateway.azure.com/docs.AI Gateway tier of API Management now in public preview
Today, we are introducing the AI Gateway tier of Azure API Management, now in public preview. It gives platform teams a purpose-built experience built specifically for AI workloads - publishing and governing models and MCP servers. Controls are configured through policy cards rather than XML and expressions, and the portal experience and control plane are structured around models, MCP servers, and tools rather than APIs. (For brevity, we refer to the AI Gateway tier as AI Gateway throughout the rest of this article.) AI Gateway is built on Azure API Management, bringing proven operational capabilities to AI workloads. The resource runs in your subscription, uses your Entra tenant, and sends telemetry to destinations you control. The operating model will be familiar to existing API Management customers, but the interface is built around AI workloads. The AI Gateway tier is intended for teams that want this focused experience; other API Management tiers remain the right choice when organizations also need general-purpose API management or capabilities not included in the AI Gateway experience. A practical model for platform teams The AI Gateway gives platform teams a shared place to manage models, MCP servers, policies, and observability destinations, with access controlled through Azure RBAC. For example, a central platform group can connect a set of approved models and tools and publish them for application teams. The application teams can test those assets in the test console and build against them without routing every change through the central group. The platform group still owns the shared guardrails and can see how the assets are being used. After an asset is published, developers can create a named runtime key and begin calling the gateway immediately. Bring the models and tools you already use Most organizations don't standardize on a single model provider. Different models are selected based on quality, latency, cost, geography, or specialized capabilities. The preview supports models from Microsoft Foundry including OpenAI, Anthropic, Mistral, and other Foundry hosted models, as well as models hosted in AWS Bedrock, Google Vertex AI, OpenAI, and Anthropic. A guided wizard simplifies importing models from Microsoft Foundry. Other providers can be added by configuring a connection, with backend authentication configured as part of that connection. All published models are available under the same stable endpoint. Applications continue to use supported API formats such as OpenAI Chat Completions and Responses or Anthropic Messages directly or via SDKs. The AI Gateway extends governance beyond models to the MCP servers and tools agents use to interact with enterprise systems. You can expose an existing MCP server over SSE or Streamable HTTP, turn all or selected operations from a REST API into an MCP server by uploading its OpenAPI specification, or use more than 1,400 connector-backed tools from the Power Platform and Logic Apps library. You can also federate multiple MCP servers behind a single server, so an agent connects once and sees the tools across those servers. Backend authentication supports an API key, OAuth client credentials, managed identity, or mTLS. Governance that's built in Organizations need consistent governance across models and MCP servers without requiring every application team to implement those capabilities independently. The AI Gateway portal presents governance policies through an intuitive card-based experience rather than requiring policy XML. The same policies are expressed as JSON properties, making them easy to manage as infrastructure as code and to audit and enforce across a fleet with Azure Policy. In the public preview, those cards cover request and token rate limits, token quotas, Azure AI Content Safety, and fallback to a secondary model. Policies are applied per asset, making it clear which controls protect each model or MCP server. OpenTelemetry-based token metrics The AI Gateway emits token-usage metrics through OpenTelemetry, with attributes following GenAI and cloud semantic conventions. Metrics can be sent to Application Insights, Datadog, Splunk, Grafana Cloud, or another OTLP endpoint. The portal provides a monitoring view over Application Insights data. Better together: Microsoft Foundry and AI Gateway With AI Gateway, teams can extend the same governance controls, for example token rate limits and quotas, across models hosted in Microsoft Foundry and models hosted elsewhere. Foundry and non-Foundry models are published through gateway-managed endpoints, giving applications and agents a consistent way to access governed models regardless of where they are hosted. Foundry-hosted agents can consume curated sets of tools from Foundry toolboxes, with access to the underlying MCP servers and APIs governed through AI Gateway. Together, Microsoft Foundry and AI Gateway cover the enterprise application lifecycle: Foundry for building and running AI applications, and AI Gateway for publishing, governing, and observing models, tools, and MCP servers across your AI estate. The new AI Gateway tier will soon be available through the gateway experience in Microsoft Foundry portal. We are working toward a seamless, integrated AI Gateway experience within Foundry portal and will share more about that work separately. Available today in public preview The AI Gateway tier is available today at no cost in public preview in East US 2 and Sweden Central. Pricing will be shared separately. To provision a resource, add a model or MCP server, and make a first call click this to go to the AI Gateway tier portal and try it. If you prefer to start from code, use a sample to deploy all the required resources for a Foundry-hosted agent configured to access its model and tools through AI Gateway. We look forward to your feedback as we continue to rapidly evolve AI Gateway.9.6KViews5likes11CommentsBring-your-own image and Azure Cosmos DB MCP server in Connector Namespace hosted MCP (preview)
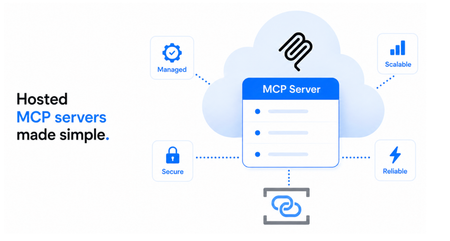
We're excited to announce two new capabilities for hosted MCP servers in Azure Connector Namespace, now available in public preview: Bring-your-own container image (BYO image): Deploy your custom MCP servers without managing the underlying hosting infrastructure. Azure Cosmos DB MCP server: Deploy a prebuilt MCP server from the catalog to give AI agents access to your Azure Cosmos DB for NoSQL data. These additions give developers more flexibility to bring MCP servers to Azure, whether you're building custom tools for your agents or connecting them to existing services. Both capabilities are available in public preview in select Azure regions. Hosted MCP servers As AI agents become more capable, they increasingly need access to external tools and data through MCP servers. However, hosting MCP servers remotely introduces operational complexity. Beyond deploying the server, developers need to provision compute, configure authentication, manage scaling, and monitor the server. The hosted MCP servers capability in Connector Namespace simplify this experience by providing a managed hosting experience. The namespace handles: Infrastructure and scaling: Provision and manage the compute required to run your MCP server. Authentication and access control: Secure MCP endpoints with Microsoft Entra ID authentication and access policies. Monitoring: Integrate with Application Insights to monitor server activity and troubleshoot issues. Server lifecycle: Manage deployed MCP servers as resources within your connector namespace. This lets developers focus on making tools available to their agents rather than operating the infrastructure behind them. With the latest preview updates, you can now bring your own MCP server implementation or choose the prebuilt Azure Cosmos DB server from the catalog. Bring-your-own container image to host custom MCP servers Previously, hosted MCP servers were limited to prebuilt servers available in the Azure Connector Namespace catalog. With the BYO image support, you can now deploy your own MCP server implementation using the same managed hosting experience. This is particularly useful when you want to: Reuse existing MCP servers: Bring an MCP server you've already built or packaged as a container image to Azure. Expose custom tools: Make proprietary APIs, internal systems, or business-specific capabilities accessible to AI agents. Avoid managing hosting infrastructure: Focus on developing and maintaining your server implementation while Azure Connector Namespace manages the underlying runtime. How it works The experience follows the same approach as deploying a prebuilt hosted MCP server. In Azure Connector Namespace portal, select Bring your own MCP server in the MCP catalog, then provide a few configuration details. Click Create, and Connector Namespace takes care of deploying and hosting your server: Once deployed, your custom MCP server benefits from the same hosting capabilities as catalog servers, including authentication, access control, scaling, and monitoring. You retain control over your MCP server's code, tools, and dependencies, while the platform manages the hosting infrastructure. Ready-to-deploy Azure Cosmos DB MCP server We're also expanding the hosted MCP server catalog with a new Azure Cosmos DB MCP server for NoSQL. The prebuilt server enables AI agents to interact with data stored in Azure Cosmos DB through MCP tools. Agents can: Discover databases and containers: Explore available databases and containers in Azure Cosmos DB. Understand data structures: Discover the structure of documents to understand the available data. Retrieve and query data: Access documents and query data stored in Azure Cosmos DB for NoSQL. In Azure Connector Namespace portal, open the MCP server catalog and find the Cosmos DB MCP Server under the Hosted catagory. Provide your database's endpoint and create the server. References Hosted MCP in Connector Namespace Hosted MCP developer guide What is Azure Connector Namespace Summary Whether you want to host your own MCP server or quickly connect AI agents to MCP servers, Azure Connector Namespace provides a managed way to bring MCP tools to your applications. Try out the new capabilities and share your feedback! We'd love to hear about the MCP servers you're building and what you'd like to see next.83Views0likes0CommentsAzure API Management Applications feature now available in public preview to all customers
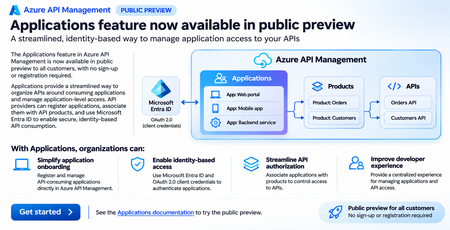
We are excited to announce that the Applications feature in Azure API Management is now available in public preview to all customers, with no sign-up or registration required. Applications introduce a streamlined, application-centric approach to managing API consumption, helping organizations simplify application onboarding, enable identity-based authentication, and manage access to APIs through Azure API Management. With this public preview, customers can explore and use the Applications feature in supported Azure API Management tiers without enrolling in a preview program or requesting access. Simplifying how applications consume APIs As organizations expand their API ecosystems, managing access for different applications, services, and development teams becomes increasingly important. Traditionally, API providers have relied on API subscriptions and subscription keys to manage access to APIs. While subscription keys provide a straightforward mechanism for identifying and controlling API consumption, enterprise applications increasingly use Microsoft Entra ID and OAuth 2.0 for secure, identity-based authentication. Organizations also need a consistent way to understand which applications consume their APIs, manage application access to API products, and simplify onboarding for application developers. The Applications feature in Azure API Management addresses these needs by introducing an application-level abstraction for API consumption. Rather than managing API access solely through subscriptions, API providers can register consuming applications, associate them with API products, and configure Microsoft Entra ID integration to support secure application authentication. This provides a more structured approach to managing API consumers while building on the existing API Management product model. What are Applications in Azure API Management? Applications represent software applications or services that consume APIs published through Azure API Management. An application can be associated with API products, which group APIs and provide a logical boundary for managing API access. With Applications, API providers can: Register API-consuming applications: Create and manage application records directly in Azure API Management, establishing a centralized inventory of applications consuming APIs. Associate applications with API products: Define which API products an application is authorized to consume, simplifying access management across related APIs. Integrate with Microsoft Entra ID: Use Microsoft Entra ID and OAuth 2.0 client credentials to support secure, identity-based authentication for machine-to-machine API communication. Manage application access centrally: Organize application registrations and their associated API products within Azure API Management, reducing the complexity of managing API consumers across multiple APIs. Applications complement the existing API Management capabilities for publishing, securing, and governing APIs, providing an additional application-centric experience for API providers and consumers. Key benefits of the Applications feature 1. Simplify application onboarding Onboarding a new application to consume enterprise APIs can involve multiple steps, including identifying the required APIs, configuring access permissions, and establishing authentication credentials. With Applications, API providers can register consuming applications directly in Azure API Management and associate them with the appropriate API products. This creates a consistent process for organizing application access and reduces the need to manage API consumption independently for every API. 2. Enable secure, identity-based API access Modern enterprise applications increasingly use OAuth 2.0 and Microsoft Entra ID for authentication rather than relying exclusively on shared API keys. Applications support integration with Microsoft Entra ID, enabling API providers to use OAuth 2.0 client credentials for application-to-application authentication. This is particularly valuable for backend services, automated workloads, and other machine-to-machine scenarios where applications access APIs without interactive user sign-in. By using Microsoft Entra ID, organizations can align API authentication with their existing enterprise identity infrastructure and security practices. 3. Streamline API authorization through products Azure API Management products provide a convenient way to group related APIs and make them available to consumers. With Applications, API providers can associate consuming applications with specific products, creating a centralized model for organizing application access. For example, an organization might publish separate products for customer information, order management, and inventory services. Different applications can be associated with the products they need, making it easier to organize API consumption according to business requirements. Combined with appropriate gateway authorization policies, this approach helps organizations manage which applications can access their APIs. 4. Improve visibility and governance of API consumers As API adoption grows, organizations need better visibility into the applications that depend on their APIs. Applications provide a centralized representation of API consumers and their relationships with API products. This helps API providers maintain a clearer inventory of consuming applications, understand application dependencies, and manage API access as applications evolve. The application-centric model also provides a foundation for more consistent governance across enterprise API ecosystems. 5. Improve the developer experience Developers consuming enterprise APIs often need to navigate multiple onboarding processes, authentication configurations, and access requirements. Applications provide a more organized approach by bringing application registration and API product associations into Azure API Management. This helps simplify the experience for application developers while giving API providers a consistent mechanism for managing access to their published APIs. How Applications work Consider an organization exposing APIs for order processing, inventory management, and customer information through Azure API Management. A backend application needs access to the order processing and inventory APIs. Using the Applications feature, the API provider can follow this workflow: Register the consuming application: Create an application record in Azure API Management to represent the backend service. Associate API products: Associate the application with the API products containing the order processing and inventory APIs. Configure application identity: Integrate the application with Microsoft Entra ID and configure OAuth 2.0 client credentials authentication. Obtain an access token: The consuming application requests an OAuth 2.0 access token from Microsoft Entra ID using its configured credentials. Call the APIs: The application sends API requests through Azure API Management, including the access token. Validate and enforce access: Azure API Management validates the token and applies the configured authorization policies before forwarding authorized requests to the backend APIs. This approach combines application registration, product-based access organization, and identity-based authentication to provide a structured model for API consumption. Public preview now open to all customers The Applications feature was previously available through a limited public preview that required customers to register for access. Starting now, the public preview is open to all customers in supported Azure API Management tiers, without any sign-up or registration requirement. Customers can explore the feature, register consuming applications, configure product associations, and evaluate Microsoft Entra ID integration directly in their API Management environments. This expanded availability enables more organizations to evaluate application-centric API access management and provide feedback as we continue to evolve the experience. Get started with Applications To start using the Applications feature: Open your Azure API Management instance in the Azure portal. Navigate to the Applications experience. Register an application that will consume your APIs. Associate the application with the appropriate API products. Configure Microsoft Entra ID integration and the required authentication and authorization policies. Test API access using the application's identity. For detailed configuration steps, supported tiers, and feature requirements, refer to the official documentation. Get started with Applications in Azure API Management Looking ahead Applications represent an important step toward simplifying how organizations onboard, secure, and govern API consumers in Azure API Management. By introducing an application-centric model alongside existing API products and policies, Azure API Management helps organizations move toward more structured, identity-based API consumption. We encourage customers to explore the public preview, evaluate Applications in their API environments, and share feedback to help shape future improvements. Learn more: Azure API Management Applications documentationAzure API Management Premium v2 now available in 35 Azure regions
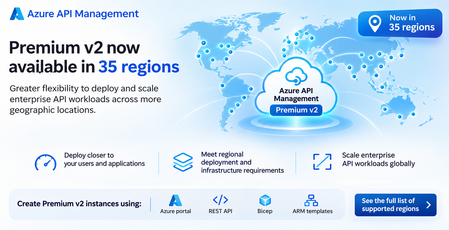
We are excited to announce that Azure API Management Premium v2 is now available in 35 Azure regions, expanding deployment options for organizations building and managing enterprise API workloads on Azure. This expansion marks another milestone in our continued investment in the Azure API Management v2 platform, making it easier for organizations to adopt Premium v2 across more geographic locations while benefiting from its enterprise-grade capabilities, modern infrastructure, and improved scalability. With broader regional availability, customers have greater flexibility to deploy API gateways closer to their applications, backend services, and users, while addressing regional infrastructure requirements and supporting their growing API ecosystems. Expanding the reach of Azure API Management Premium v2 As organizations modernize their applications and adopt cloud-native architectures, APIs have become a critical foundation for connecting applications, services, partners, and increasingly, AI-powered workloads. Enterprise customers often operate across multiple geographic locations, with applications and backend services distributed across Azure regions. Choosing where to deploy API infrastructure is an important architectural decision that can affect application performance, network connectivity, operational consistency, and regional deployment requirements. With Premium v2 now available in 35 Azure regions, organizations have more options to deploy Azure API Management in locations that align with their application architectures and business requirements. This expanded regional footprint provides several benefits: Greater deployment flexibility: Deploy Premium v2 in more Azure regions to align API infrastructure with existing applications, backend services, and enterprise cloud environments. Improved proximity to applications and users: Place API gateways closer to backend services and consumers to help reduce network latency and improve API responsiveness, depending on the network architecture. Support for regional infrastructure requirements: Choose from a broader set of Azure regions to address geographic deployment preferences, data residency considerations, and organizational infrastructure policies. Scalability for growing API workloads: Take advantage of Premium v2 capabilities to support enterprise API traffic as applications and business requirements evolve. Consistent API management across environments: Standardize API security, governance, monitoring, and lifecycle management across deployments using Azure API Management. Built for enterprise API workloads Azure API Management Premium v2 is designed for organizations that require advanced networking, scalability, and enterprise API management capabilities. Built on the v2 infrastructure, Premium v2 provides a modern platform for managing APIs while supporting enterprise scenarios that require private connectivity, network isolation, and integration with backend services hosted in Azure virtual networks. Organizations can use Premium v2 to: Secure API access: Centrally enforce authentication, authorization, rate limiting, and other API policies to protect backend services. Connect to private backend services: Use supported virtual network integration capabilities to securely connect API Management to backend services hosted in private network environments. Support private API architectures: Leverage supported networking capabilities to control API gateway connectivity and align deployments with enterprise network security requirements. Manage API traffic efficiently: Apply policies for request and response transformation, routing, caching, and traffic management. Monitor API operations: Use Azure Monitor and diagnostic capabilities to gain visibility into API traffic, performance, and operational health. The expanded regional availability makes these capabilities accessible to more organizations and workloads across Azure's global infrastructure. Deploy Premium v2 using your preferred tools Customers can create new Azure API Management Premium v2 instances in supported regions using their preferred Azure deployment and automation tools. Azure portal Create and configure Premium v2 instances through the Azure portal using a guided deployment experience. Azure REST API Programmatically provision and manage Premium v2 instances using Azure Resource Manager REST APIs, enabling integration with custom deployment and automation workflows. Bicep Define Premium v2 resources using declarative infrastructure-as-code templates. Bicep helps organizations automate deployments and maintain consistent configurations across environments. Azure Resource Manager (ARM) templates Use ARM templates to deploy Premium v2 instances as part of existing enterprise infrastructure automation and deployment pipelines. These deployment options allow organizations to incorporate Premium v2 into their existing DevOps practices, infrastructure-as-code workflows, and enterprise governance processes. Getting started with Premium v2 If you are planning a new API Management deployment or evaluating Premium v2 for your enterprise API workloads, you can get started by reviewing the supported Azure regions and selecting the location that best aligns with your application architecture. To create a Premium v2 instance: Review the Azure API Management regional availability documentation to confirm that Premium v2 is supported in your preferred region. Choose your deployment method: Azure portal, REST API, Bicep, or ARM templates. Create a new API Management instance and select the Premium v2 pricing tier. Configure networking, security, APIs, and policies based on your application's requirements. Integrate the instance into your existing API management and monitoring workflows. For organizations evaluating a migration from an existing API Management tier, review the supported feature set and networking capabilities to determine whether Premium v2 meets your requirements. What's next? We continue to invest in Azure API Management Premium v2 to support enterprise customers building modern API architectures on Azure. Expanding Premium v2 to 35 Azure regions is an important step toward making the v2 platform available to more customers, providing greater flexibility in where they deploy and manage their API workloads. We encourage customers to explore Premium v2 in their preferred Azure regions and take advantage of its modern infrastructure and enterprise API management capabilities. Learn more: View the full list of Azure API Management supported regions Explore Azure API Management documentationGenerally available: Unified Model API in Azure API Management v2 tiers
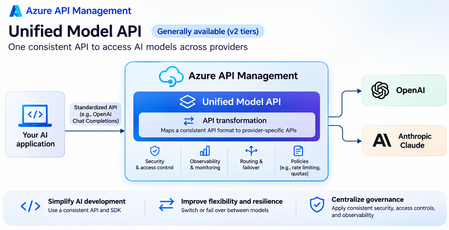
The Unified Model API in Azure API Management is now generally available in v2 tiers, enabling organizations to access and manage AI models from multiple providers through a consistent API interface. This capability simplifies the development of multi-model AI applications by abstracting provider-specific API differences and providing a unified experience for accessing supported large language models (LLMs). As organizations increasingly adopt AI models from multiple providers, developers face challenges integrating different API formats, authentication mechanisms, SDKs, and request and response structures. These differences introduce additional development and maintenance overhead, create dependencies on individual model providers, and make it difficult to switch models or implement multi-model architectures. With the Unified Model API, Azure API Management addresses these challenges by transforming requests and responses between a standardized client-facing API format and provider-specific model APIs. Developers can use a consistent interface, such as the OpenAI Chat Completions API, to interact with supported model providers, including OpenAI and Anthropic, without having to implement and maintain separate integrations for each provider. The Unified Model API also enables organizations to take advantage of Azure API Management's existing gateway capabilities to centrally secure, monitor, and govern AI traffic across model providers. With the Unified Model API, organizations can: Simplify multi-model AI development: Standardize on a single API format and compatible client SDKs to access models from different providers. Reduce provider-specific integration code, accelerate development, and simplify ongoing application maintenance. Improve model portability and flexibility: Switch between supported models and providers without requiring changes to the client-facing API contract. This enables organizations to evaluate and adopt new models based on performance, cost, availability, and evolving business requirements. Build more resilient AI applications: Use Azure API Management's backend management and routing capabilities to distribute requests across supported model backends and implement failover strategies. This helps improve application availability and reduces dependencies on a single model provider. Centralize security and governance: Apply Azure API Management policies to enforce authentication, authorization, rate limiting, and other access controls consistently across supported model providers. Organizations can manage AI model access through a centralized gateway rather than implementing security controls separately for each provider. Improve observability and operational management: Leverage Azure API Management's monitoring, logging, and diagnostics capabilities to gain visibility into AI API traffic, track operational performance, troubleshoot failures, and manage model integrations through a common platform. Accelerate adoption of new AI models: Integrate additional supported model providers behind the same standardized API interface, reducing the effort required to introduce new models into existing applications. By abstracting provider-specific differences behind a unified API and combining model interoperability with enterprise-grade API management capabilities, Azure API Management helps organizations build AI applications that are more portable, resilient, secure, and easier to govern at scale. The Unified Model API is generally available in supported Azure API Management v2 tiers. Get started: Unified Model API documentationTune your Logic Apps Standard runtime from the portal
Until now, the answer lived in host.json . To change a value in Azure, you opened Advanced Tools, went into Kudu, stopped your logic app, hand-edited JSON with a key you copied from the docs, saved, and restarted. Nothing on screen told you the default, or whether someone had already changed it. That's the gap the new Workflow runtime settings tab closes. What is the new configuration experience Workflow runtime settings is a new tab on the Configuration page of every Logic Apps Standard app in the Azure portal. It sits next to General settings, Health check, and Path mappings, and it's generally available today. The tab turns the host and app settings we document for Standard into a form. You get 11 collapsible areas, each with labeled fields that show the value in effect. Every field has an info tooltip with a plain-language description, the exact setting key, and the default. Change one or more values, select Apply, and the portal writes the right setting to host.json or app settings for you, then restarts the host so the new value is live immediately. No Kudu. No hand-edited JSON. No guessing the key. Why it is important Standard gives you a single-tenant runtime, and with it the ability to tune throughput, limits, and retries for your workload. But a setting you can't find is a setting you don't use. The first problem was discoverability. The settings that govern scaling, throttling, and concurrency lived in a long reference table in the docs, with nothing in the portal pointing to them. The second was context: a key like Runtime.FlowTriggerDispatchingJob.MessageProcessingConcurrencyLimit doesn't tell you which behavior it changes or what a sensible value looks like. The third was the baseline. If you didn't know the default, you couldn't tell whether a value had been tuned, or how to put it back. The new tab deals with all three, and it doesn't add new settings to learn. It's a distillation of the settings already published in our docs, presented where you manage the app. Before and after Task Before Now Find the right setting Search the host settings reference in the docs Expand the matching area on the Workflow runtime settings tab See the current value Open host.json in Kudu; a missing key means the default applies The field shows the value in effect Know the default Look it up in the reference table Hover the info icon next to the field Change a value Stop the app, edit host.json in Kudu, save, restart Edit the field and select Apply Back out an edit Edit the JSON again Select Discard before applying, or enter the default shown in the tooltip Walkthrough You will find the new configuration settings under Configuration> Workflow runtime settings tab Follow the steps below to start exploring it: In the Azure portal, open your Standard logic app. On the resource menu, under Settings, select Configuration. Select the Workflow runtime settings tab. The 11 configuration areas appear, collapsed. Expand an area, for example Built-in operations, to see its settings grouped by operation type. Hover the info icon next to any field to read what it does, its setting key, and its default. Change the values you need, then select Apply. Select Discard to drop unsaved edits, or Refresh to reload the current values. You can explore each configuration using the tooltip button. It explains the setting, notes that the default values and also the any range or possible values. It will also provide you the configuration entry this value is adding to your host.json. For example for the HTTP Request Timeout, it gives you Runtime.Backend.HttpOperation.RequestTimeout as the key. The configuration areas Area What it controls Examples (default) Built-in operations Retries, timeouts, and request size for built-in HTTP, HTTP Webhook, and Azure Functions operations HTTP Request Timeout (00:03:45), HTTP Default Retry Count (4) Connectors - Managed Authentication audience, timeouts, retries, and webhook intervals for managed (Azure-hosted) connectors Connector Request Timeout (00:02:00), Connector Webhook Wake-Up Interval (01:00:00) Connectors - Service Provider Settings for the built-in service provider connectors your workflows use Service Bus Message Sender Pool Size Per Processor Count (64), Key Vault Max Secrets To Return (25) Content & message limits Chunking, pagination, input and output size, and when content moves from table storage to blob storage Maximum content size per input or output (104,857,600 bytes), Maximum page count (1,000) Job orchestration & throughput Job dispatchers per processor core and job queue partitioning Workers per processor count (192) Loops & variables For each and Until limits, For each parallelism, and variable size For each degree of parallelism (20), Until limit for stateful workflows (5,000) Retry policy Upper and lower bounds for retry policies on workflow operations Maximum retry count (90), Minimum retry interval (00:00:05) Run lifecycle & history Action and function timeouts, run duration, and history cleanup Action job execution timeout (00:10:00), Flow run timeout (90 days) Scaling Runtime scale monitoring Runtime scale monitoring (On or Off) Storage Retries and timeouts for blob, table, and queue requests from the runtime Blob server timeout (00:00:30), Table and queue server timeout (00:00:16) Triggers Function-based trigger listeners and drain mode, recurrence-based trigger state, and trigger concurrency Maximum Run Concurrency (100), Maximum Waiting Runs (200) Feature highlights Settings for the connectors your app uses The Connectors - Service Provider area doesn't list every built-in connector in Logic Apps. It shows settings for the ones your workflows use. In the walkthrough app, that's Azure Tables, Key Vault, Service Bus, and Service Bus Peek Lock, followed by a short block of switches that apply to all service providers, such as Validate action and trigger operation IDs. That changes what you're looking at. Instead of scanning SFTP or SQL settings in an app that never calls them, you see the settings that can affect your app: for example, Azure Tables Max Entities To Return (255) or Key Vault Max Secrets To Return (25). Managed connectors get their own area, with the authentication audience, request timeout (00:02:00), retry count and intervals, and webhook wake-up interval. Scaling, throttling, and concurrency, out of the config file When a load test shows a bottleneck, these are the settings you reach for. They used to be the hardest to find. Now each one has a field, a default, and a description. Job orchestration & throughput: 192 dispatcher workers per processor core for stateful runs and 192 for stateless runs, 4 partitions in the job definitions table, and 1 job triggers queue. Triggers: Maximum Run Concurrency (100), Maximum Waiting Runs (200), and Message Processing Concurrency Limit (1). For function-based triggers, you also get the list of triggers with concurrency enabled (Service Bus and Event Hubs in the walkthrough app), plus drain mode and dynamic listener timings. Loops & variables: For each degree of parallelism (20). Set it to 1 to run iterations one after another. Scaling: an On or Off switch for runtime scale monitoring. Defaults where you can see them Every field shows the value in effect, and every tooltip shows the default and the setting key. That's three answers on one screen: what the app runs with, what it would run with if nobody had touched it, and the exact key to look for in your project. The key matters if you deploy from source control. host.json travels with your deployment, so a value you change in the portal can be overwritten the next time your pipeline deploys. Once you've found the right value in the portal, copy the key from the tooltip into your project's host.json , under extensions.workflow.Settings : { "version": "2.0", "extensionBundle": { "id": "Microsoft.Azure.Functions.ExtensionBundle.Workflows", "version": "[1.*, 2.0.0)" }, "extensions": { "workflow": { "Settings": { "Runtime.Trigger.MaximumWaitingRuns": "100" } } } } Those values will update the correct file locations (host.json and appsettings). Use the portal to find and test the correct values in the files and apply on your source controled files to keep it. One value, every workflow Before you change anything, keep scope in mind. These are app-level settings. A value you apply here becomes the runtime configuration for every workflow in the logic app, not only the one you're debugging. Trigger concurrency is the clearest example. Set Maximum Run Concurrency to 1, and each qualifying trigger in the app can start one run at a time, with further runs waiting in line up to the Maximum Waiting Runs limit (200 by default). These trigger concurrency settings apply to workflows that start with a recurrence-based trigger for built-in, service provider-based connectors. If only one workflow needs to process one run at a time, configure concurrency on that workflow's trigger instead. Selecting Apply restarts the host. Treat a change the way you'd treat any restart: try it in a nonproduction environment first, and apply it in production when a brief restart won't hurt. Feedback This tab started from a simple observation: the runtime settings were hard to find and easy to get wrong. It's our first pass at putting them where you work, and I want to know how close we got. Which settings do you change most often? Which ones are missing? Which descriptions still leave you guessing? Open an issue on the Logic Apps UX GitHub repo and tell me. I read them, and they shape what we build next. For the full reference behind every field, see Edit app and host settings for Standard logic apps.106Views0likes0CommentsLogic Apps Standard custom code now supports .NET 10
The latest Azure Logic Apps (Standard) extension for Visual Studio Code (VS Code) now supports .NET 10 custom code. You can create new .NET 10 local-function projects and migrate your existing .NET 8 projects without turning them into separate Azure Functions apps. Check your prerequisites Install the Azure Logic Apps (Standard) extension for VS Code, version 5.1013.4 . Use Logic Apps Standard extension bundle 1.194.31 . After the extension's dependency setup completes, the .NET 10 software development kit (SDK) and runtime should be installed in its managed dependencies folder. On Windows, the default .NET location is: %USERPROFILE%\.azurelogicapps\dependencies\DotNetSDK Check that installation, rather than relying on the dotnet command elsewhere on your PATH . If you've customized the extension's dependency location, check the configured location instead. New projects target .NET 10 When you create a new custom-code project through the extension, .NET 10 is now the only supported target. The .NET 8 option has been removed for new projects. Existing .NET 8 projects still need a configuration migration before they target .NET 10. Updating the extension isn't the same as retargeting your project. Unchanged project will continue to run on .NET 8 until the configuration changes below are applied. If you use the C# code action If your workflow uses the C# code action, add the runtime setting to your Logic Apps project's settings - either in a local project or on an Azure application. Set LOGIC_APPS_CUSTOMCODE_DOTNETVERSION to net10.0 . Migrate an existing .NET 8 project You don't need to start with a new workspace. Back up your workspace, including local configuration, before making the changes below. Paths are relative to each project's folder. Changes in the custom-code project File or setting Change Project .csproj : target framework Set TargetFramework to net10.0 . Keep the project as a library. Project .csproj : SDK packages Microsoft.Azure.Workflows.Webjobs.Sdk : 1.4.1 Microsoft.Azure.Functions.Worker.Sdk : 2.0.7 Project .csproj : supporting packages Align dependencies as needed. Our migration required: Microsoft.Azure.Functions.Worker : 2.51.0 Existing Microsoft.Extensions.Logging : 10.0.0 Existing Microsoft.Extensions.Logging.Abstractions : 10.0.0 Project .csproj : dependency copying and publication Set CopyLocalLockFileAssemblies to true . Keep build-triggered publication into the Logic Apps folder. .vscode\settings.json Update the framework segment of azureFunctions.deploySubpath to net10.0 . Those package versions describe the configuration we tested, not a universal minimum dependency set. Resolve the dependencies your project actually needs rather than copying every package from a sample. A sample project file will look like this <Project Sdk="Microsoft.NET.Sdk"> <PropertyGroup> <IsPackable>false</IsPackable> <TargetFramework>net10.0</TargetFramework> <AzureFunctionsVersion>v4</AzureFunctionsVersion> <OutputType>Library</OutputType> <PlatformTarget>AnyCPU</PlatformTarget> <LogicAppFolderToPublish>$(MSBuildProjectDirectory)\..\{your logic app target folder}</LogicAppFolderToPublish> <CopyToOutputDirectory>Always</CopyToOutputDirectory> <SelfContained>false</SelfContained> <CopyLocalLockFileAssemblies>true</CopyLocalLockFileAssemblies> </PropertyGroup> <ItemGroup> <PackageReference Include="Microsoft.Azure.Functions.Worker.Extensions.Abstractions" Version="1.3.0"/> <PackageReference Include="Microsoft.Azure.Functions.Worker" Version="2.51.0"/> <PackageReference Include="Microsoft.Azure.Functions.Worker.Sdk" Version="2.0.7"/> <PackageReference Include="Microsoft.Azure.Workflows.Webjobs.Sdk" Version="1.4.1"/> <PackageReference Include="Microsoft.Extensions.Logging.Abstractions" Version="10.0.0"/> <PackageReference Include="Microsoft.Extensions.Logging" Version="10.0.0"/> </ItemGroup> <Target Name="TriggerPublishOnBuild" AfterTargets="Build"> <CallTarget Targets="Publish"/> </Target> </Project> Changes in the Logic Apps project File or setting Change local.settings.json : custom-code runtime Set Values.LOGIC_APPS_CUSTOMCODE_DOTNETVERSION to net10.0 . local.settings.json : host runtime flag Keep Values.FUNCTIONS_INPROC_NET8_ENABLED set to 1 . This is still required. .vscode\launch.json : coordinated debugging Use a launch configuration with: type=logicapp and request=launch funcRuntime=coreclr customCodeRuntime=coreclr isCodeless=true Verify the migration Save all files, restore, and build. Confirm publication under lib\custom\net10.0 in the Logic Apps folder, then run the workflow that calls your edited function and verify its breakpoint. Use the ready-made migration skill We've prepared the logicapps-custom-code-net10-migration skill to guide a coding agent through the same process. It inspects your workspace, plans configuration changes before applying them, and guides build and publication verification. It preserves your function and workflow implementations rather than rewriting them. The skill is available in Awesome Copilot. With GitHub CLI (command-line interface) version 2.90.0 or later, inspect the skill and install it for Copilot across projects. These skill commands are currently in preview. gh skill preview github/awesome-copilot logicapps-custom-code-net10-migration gh skill install github/awesome-copilot logicapps-custom-code-net10-migration --agent github-copilot --scope user Installation makes the skill available to Copilot; it doesn't run the migration. After installation, you can ask your agent: Migrate this Logic Apps Standard .NET 8 custom-code workspace to .NET 10 using the logicapps-custom-code-net10-migration skill. Preserve my workflows, back up the project first, and include coordinated VS Code debugging. Keep the host and deployment settings in view The custom-code target framework isn't the Logic Apps host runtime. Keep the existing host settings, including FUNCTIONS_WORKER_RUNTIME=dotnet . Don't switch the host to dotnet-isolated just because the custom code targets .NET 10. Preserving your existing code is the migration's starting point, not a guarantee that it will build and run unchanged. Use the build and an executed local function to check the result. For Azure execution, the deployed Logic Apps application settings must include both LOGIC_APPS_CUSTOMCODE_DOTNETVERSION=net10.0 and FUNCTIONS_INPROC_NET8_ENABLED=1 . The .NET 8 host flag is still required even though your custom code targets .NET 10. When you deploy through the Logic Apps extension in VS Code, these settings are copied to the Azure app. If you deploy through a pipeline, make sure your deployment configuration explicitly includes both application settings. A local settings file alone doesn't configure the Azure app, so verify the deployed runtime configuration after deployment. The migration skill doesn't change Azure resources as a side effect. Try the updated extension with one of your custom-code projects. If migration or debugging needs a step we've missed, share the configuration and the symptom in the comments, without credentials or private data. I want to hear where the build or debugging experience still gets in your way.1.1KViews0likes15CommentsMigrate NuGet-based Logic Apps Standard apps and custom built-in connectors to .NET 10
Less than you might fear. You don't change a line of C#, and you don't touch your workflow definitions. The work is retargeting your projects, resolving a couple of dependency conflicts, running the right host locally, and changing a handful of app settings in Azure. Those last two are where people get stuck, so I spend most of this post on them. This is a companion to Logic Apps Standard custom code now supports .NET 10. That post covers custom-code (local function) projects. This one covers NuGet-based applications and the custom built-in connectors they consume, and it answers the questions you left in the comments on the custom code post. We validated every step below end to end, locally and in Azure, with a NuGet-based sample app and a custom built-in connector. Which post do you need? Your Logic Apps Standard app What to do Workflows only, bundle-based No project changes. The platform moves the app to the out-of-proc host. Workflows plus a custom-code (local function) project Follow the custom code .NET 10 post. NuGet-based project, with or without custom built-in connectors Follow this post. NuGet-based project that also has a custom-code project Use this post for the app and connectors, and the custom code post for the function project. Your code stays the same Your code don't change. Keep the [assembly: WebJobsStartup] attribute, your IWebJobsStartup.Configure method and your IServiceOperationsProvider implementation exactly as they are. Your workflow definitions don't change either. You don't add an isolated worker project or a Program.cs file. We validated this with a sample custom built-in connector that exposes an action, locally and in Azure. That tells you the model works. It doesn't tell you your connector works. Your connectors and their dependencies still need application-specific testing, and I come back to that in the limitations section. First, understand which host runs your app A connector built for net10.0 needs a .NET 10 host. The .NET 8 host can't load it: every type fails with a missing System.Runtime 10.0.0.0 reference. So the whole migration comes down to two things: building for net10.0 , and making sure a .NET 10 host runs the result. Azure and your local tools choose that host in different ways, and this is the part that catches people out: Where FUNCTIONS_WORKER_RUNTIME What selects the .NET 10 host Azure dotnet (unchanged) Removing LOGICAPP_INPROC_REDIRECT . Without it, the platform runs your app on the out-of-proc host on .NET 10. Local (Azure Functions Core Tools) dotnet-isolated Core Tools ignores LOGICAPP_INPROC_REDIRECT . With dotnet it always picks its .NET 8 in-process host. With dotnet-isolated , Core Tools 4.16.0 or later uses its main host, which runs on .NET 10. dotnet-isolated doesn't move you to the isolated worker model. The Workflows runtime and your connector still load into the host process; the value only changes which host Core Tools starts. That's also why it's a local-only value. Keep it out of your Azure app settings and deployment templates. This is a current limitation of the the extension and we are working to remove this extra configuration step. Check your prerequisites The .NET 10 SDK, version 10.0.403 or later. The Azure Logic Apps (Standard) extension for VS Code, version 5.1013.4, installs it in the extension's managed dependencies folder. On Windows the default is %USERPROFILE%\.azurelogicapps\dependencies\DotNetSDK . Azure Functions Core Tools 4.16.0 or later, the first version whose main host runs on .NET 10. The extension installs a managed copy in %USERPROFILE%\.azurelogicapps\dependencies\FuncCoreTools . An older copy installed through npm and earlier on your PATH (4.12.0 in our testing) runs on .NET 8 and fails to start the app. Microsoft.Azure.Workflows.WebJobs.Extension 1.170.91 or later. The current version at the time of this post on NuGet is 1.194.31, which is the version we validated. Use the latest version you have available as it will have the latest product improvements and fixes. Microsoft.NET.Sdk.Functions 4.5.0 or later. We validated 4.5.0 and 4.6.0. Write access to the package feed where you publish your connector packages. A build agent image with the .NET 10 SDK for your pipeline. Keep your current deployment stable while you migrate If your app runs on .NET 8 today, leave its app settings alone until your .NET 10 build is validated and ready to deploy. Retaining the existing app settings preserves the current compatibility configuration while you prepare and validate the migration. For NuGet-based apps, that includes LOGICAPP_INPROC_REDIRECT=1 , the setting that keeps your app on the legacy .NET 8 in-proc host. Remove it early and the app moves to the new host on its next restart, before your .NET 10 build is in place. Check your pipelines too. A release that rebuilds app settings from a template can drop the redirect without anyone noticing. Don't treat this as a reason to wait. .NET 8 apps keep running after end of support, but they no longer receive security fixes. Plan the migration now. Update your project files Work on a branch, and back up any local configuration before you start. This table lists every file that changed in our validated migration. Repeat the connector changes for every connector project your app consumes. File Change global.json (repository root and Logic Apps project folder) Set the SDK version to 10.0.403 or later, with rollForward set to latestPatch . A leftover 8.0 pin fails the build with NETSDK1045 . Connector .csproj Set TargetFramework to net10.0 . Reference Microsoft.Azure.Workflows.WebJobs.Extension 1.194.31. Add direct references for any NU1605 downgrades restore reports. Increment the package version (2.0.0 in our sample) so you can tell which connector loaded. Connector startup and provider classes No change. Connector test projects Set TargetFramework to net10.0 . Logic Apps .csproj Set TargetFramework to net10.0 . Reference Microsoft.NET.Sdk.Functions 4.5.0 or later, Microsoft.Azure.Workflows.WebJobs.Extension 1.194.31 and your new connector package version. Keep the targets that copy the lib folder and your artifacts into the publish output. host.json Remove any extensionBundle section. Keep version 2.0 and your existing logging and settings. local.settings.json Set FUNCTIONS_WORKER_RUNTIME to dotnet-isolated . .vscode/settings.json Point deploySubpath at bin\Release\net10.0\publish . .vscode/tasks.json Set the cwd of the func host start task to bin\Debug\net10.0 , in every operating system block. Build and deployment scripts Replace net8.0 output paths with net10.0 . Pin the SDK Update global.json in the repository root and in the Logic Apps project folder: { "sdk": { "version": "10.0.403", "rollForward": "latestPatch" } } Retarget the connector and resolve downgrades Restore is where the first failure shows up. In our sample, retargeting the connector with Workflows 1.194.31 produced NU1605 package downgrade errors, and two direct references fixed them: net10.0 true Contoso.LogicApps.Connectors.Inventory 2.0.0 Those were the right pins for our connector's dependency graph. Yours may need different ones, so read the NU1605 output and pin what it names rather than copying ours. If restore also reports vulnerability warnings, review them; don't suppress them as part of the migration. Then build, pack, and publish the new version to your feed: dotnet build -c Release dotnet pack -c Release -o ./nupkg dotnet nuget push ./nupkg/Contoso.LogicApps.Connectors.Inventory.2.0.0.nupkg --source If your Logic Apps project references the connector as a project reference rather than a package, skip the pack and push. The retarget and the dependency fixes still apply. Retarget the Logic Apps project The relevant parts of the project file: <Project Sdk="Microsoft.NET.Sdk"> <PropertyGroup> <TargetFramework>net10.0</TargetFramework> <AzureFunctionsVersion>v4</AzureFunctionsVersion> </PropertyGroup> <ItemGroup> <PackageReference Include="Microsoft.NET.Sdk.Functions" Version="4.5.0" /> <PackageReference Include="Microsoft.Azure.Workflows.WebJobs.Extension" Version="1.194.31" /> <PackageReference Include="Contoso.LogicApps.Connectors.Inventory" Version="2.0.0" /> </ItemGroup> <!-- Keep your existing None/Update items and CopyDynamicLibraries target. --> </Project> Don't remove Microsoft.NET.Sdk.Functions . It generates bin\extensions.json , which registers your connector with the host. Without it, the connector is missing from the build output. A NuGet-based app loads the Workflows runtime from your package, not from an extension bundle, so host.json needs no bundle: { "version": "2.0" } Version 5.1013.4 of the extension have a configuration bug. It is ignoring the following extension configuration set: "azureLogicAppsStandard.enableProjectConsistencyChecks": false With that your host.json file will include the extension bundle setting again when the project opens: "extensionBundle": { "id": "Microsoft.Azure.Functions.ExtensionBundle.Workflows", "version": "[1.*, 2.0.0)" } Remove it before pushing to source control or running the application. We are working on a fix for this issue which will ship with the next version of the bundle. Why a net8.0 package works in a net10.0 project Microsoft.Azure.Workflows.WebJobs.Extension targets net8.0 . That doesn't stop a net10.0 project from referencing it: NuGet treats net10.0 as compatible and selects the package's net8.0 assets. What has to be .NET 10 is the host that runs your app. There's one side effect worth knowing about. On net10.0 , the SDK resolves the package's ASP.NET Core framework reference to version 10, which already contains Microsoft.Extensions.DependencyInjection and related assemblies, so the build leaves the package copies out of your output. That's expected. The .NET 10 host supplies them, which is one more reason the app only runs on that host. Run and verify locally Set the worker runtime in local.settings.json and keep your other values as they are: { "IsEncrypted": false, "Values": { "FUNCTIONS_WORKER_RUNTIME": "dotnet-isolated" } } Make sure Core Tools 4.16.0 or later is the func that runs. If you start the host from a terminal or a script, check that the managed copy, not an older npm install, comes first on your PATH . The version banner tells you which one started. Stop the host serving this project if it's running, then restore and build the Logic Apps project. Start the host from bin\Debug\net10.0 . Check the host log. There should be no '/serviceProviders/' ... is not valid error, and your workflows should be listed. Run a workflow for every operation you ship, triggers included, and check the run history. Optionally, open a workflow in the designer, select Built-in, and confirm your connector's operations appear. You may see Could not find the .azurefunctions folder in the deployed artifacts of a .NET isolated function app in the log. It's a warning that comes with the dotnet-isolated selection, and the workflows still run. Update the Azure app settings In Azure, the platform selects the .NET 10 host when LOGICAPP_INPROC_REDIRECT is absent, and FUNCTIONS_WORKER_RUNTIME stays dotnet . These are the settings we changed and the ones we left alone: Setting Action AzureFunctionsJobHost__extensionBundle__id Delete. AzureFunctionsJobHost__extensionBundle__version Delete. App settings override host.json , so removing the bundle from the file alone isn't enough. LOGICAPP_INPROC_REDIRECT Delete if present. It forces the legacy .NET 8 host. FUNCTIONS_WORKER_RUNTIME Keep dotnet . dotnet-isolated is the local-only value. FUNCTIONS_EXTENSION_VERSION Keep ~4 . APP_KIND Keep workflowApp . FUNCTIONS_INPROC_NET8_ENABLED Not required. It's harmless if it's left over from .NET 8. netFrameworkVersion (site configuration) No change. It stays v8.0 and doesn't decide which runtime loads. The extension bundle settings are the easiest to miss. Apps created in the Azure portal usually get them by default. If either is present, the host loads the Workflows runtime from the bundle instead of your package, your connector never registers, and the log reports that '/serviceProviders/' is not valid. Your deployed package can be perfectly correct and still fail this way. Keep your deployment template at dotnet as well, and make sure it doesn't add the bundle settings or the redirect back on the next release. Deploy and verify in Azure Update your pipeline to build with the .NET 10 SDK, publish a Release build, and deploy the contents of bin\Release\net10.0\publish . Deploy to a non-production app or deployment slot first. For an existing app, stop it, change the app settings, deploy the .NET 10 package, and then start it. In that order, the new package never starts under the old configuration. Check the host log for the '/serviceProviders/' ... is not valid error. It shouldn't be there. Confirm that each workflow that uses your connector shows its callback URL, and that a test run succeeds. Optionally, open Process Explorer in Kudu and confirm the loaded modules: CoreCLR 10, your connector DLL at its new version, and the Workflows runtime at 1.194.31. That's the reliable way to see which runtime is running, because the settings don't tell you. Compare run history with the .NET 8 version, then promote the same build and the same settings to production. A local settings file doesn't configure the Azure app. After each deployment, check the app settings on the deployed resource rather than trusting the template. If you need to roll back, redeploy the .NET 8 package and restore LOGICAPP_INPROC_REDIRECT=1 . Restoring the setting on its own isn't enough, because the .NET 8 host can't run a .NET 10 connector. Symptoms and causes If something fails, start here. These are the errors we hit during validation: Symptom Cause and fix NETSDK1045: The current .NET SDK does not support targeting .NET 10.0 A global.json pin or the selected SDK is still 8.0. Pin 10.0.403 or later. NU1605 package downgrade errors on restore Transitive dependency versions in your connector. Add direct references for the packages restore names. Locally: Could not load file or assembly 'Microsoft.Extensions.DependencyInjection, Version=9.0.0.0' FUNCTIONS_WORKER_RUNTIME is dotnet , so Core Tools started its .NET 8 in-process host. Set dotnet-isolated in local.settings.json . Locally: Could not load file or assembly 'System.Text.Json, Version=9.0.0.0' An older Core Tools whose host runs on .NET 8 is first on your PATH . Use 4.16.0 or later. '/serviceProviders/' ... is not valid , and no callback URL An extension bundle is configured in host.json or in the AzureFunctionsJobHost__extensionBundle__* app settings. Remove both. Connector and bin\extensions.json missing from the build output Microsoft.NET.Sdk.Functions was removed from the Logic Apps project. Add it back. Use the migration skill We've prepared the logicapps-nuget-connector-net10-migration skill to guide a coding agent through the same process. It inspects your solution, plans configuration changes before applying them, and guides build and test verification. It preserves your connector code and workflows rather than rewriting them, and it doesn't change Azure resources: it lists the app-setting changes for you to make. The skill is available in the custom-connector-migration-net10 repository, with a working sample. The main branch holds the migrated .NET 10 version and the net8.0 branch holds the .NET 8 baseline, so you can try the skill on the sample before your own projects. With GitHub CLI (command-line interface) version 2.90.0 or later, inspect the skill and install it for Copilot across projects. These skill commands are currently in preview. gh skill preview wsilveiranz/custom-connector-migration-net10 logicapps-nuget-connector-net10-migration gh skill install wsilveiranz/custom-connector-migration-net10 logicapps-nuget-connector-net10-migration --agent github-copilot --scope user Installation makes the skill available to Copilot; it doesn't run the migration. After installation, you can ask your agent: Migrate this NuGet-based Logic Apps Standard app and its custom built-in connector to .NET 10 using the logicapps-nuget-connector-net10-migration skill. Preserve my connector code and workflows, back up the projects first, and list the Azure app settings I need to change. Note: we're submitting this skill to Awesome Copilot. When it's available there, we'll update this post with the new install commands. Your questions, answered Do I need to change how my custom built-in connector registers? No. The existing registration model remains applicable: retain your IWebJobsStartup registration and IServiceOperationsProvider implementation. We validated a custom built-in connector with this model on the .NET 10 host, locally and in Azure. Your connectors and their dependencies still need application-specific testing. Microsoft.Azure.Workflows.WebJobs.Extension targets net8.0. Can a net10.0 app reference it? Yes. The package's net8.0 target doesn't prevent a net10.0 application from referencing it. A target framework isn't a requirement that the consuming application use exactly that framework. What does have to be .NET 10 is the host that runs your app. You still need to validate dependency compatibility, and restore tells you where to look. I'm already on 1.194.31. Do I need to downgrade to 1.170.91? No. 1.194.31 is newer than the 1.170.91 minimum in our migration guidance, and it's the version we validated. Stay where you are. Do I need to move to the isolated worker model? No. You don't add a worker project or a Program.cs file, and your connector still loads into the host process. dotnet-isolated is only the value that makes Core Tools start its .NET 10 host on your machine. In Azure, FUNCTIONS_WORKER_RUNTIME stays dotnet . What should I do with my existing .NET 8 deployment in the meantime? Keep its existing app settings. They preserve the current compatibility configuration while you prepare and validate the migration. Remove LOGICAPP_INPROC_REDIRECT when you deploy the .NET 10 package, not before. When will the official documentation cover NuGet-based apps and custom built-in connectors? We know you need explicit guidance for this scenario, and this post is that guidance today. We don't have a confirmed publication date for the Microsoft Learn update. Don't wait for it: migrate to .NET 10 at your earliest opportunity. Before you migrate: what we haven't covered We validated a sample connector with an action, not yours, and not a connector with triggers. Connectors that implement IServiceOperationsTriggerProvider , connectors with their own converters, and connectors with third-party libraries that pin older framework versions are where I'd expect surprises. Test every operation. We haven't validated an app that combines a NuGet-based project with a custom-code project. In our sample, the generateDebugSymbols prelaunch task in VS Code failed, because it looks up an extension bundle path and a NuGet-based project doesn't have one. Don't add a bundle to work around it; start the host from bin\Debug\net10.0 instead. We are working on a fix for this problem. The Microsoft Learn article Create custom built-in connectors for Standard workflows still describes a .NET Core 3.1 class library project. Until it's updated, use this post as the reference for the target framework. Don't pin your app to a specific extension bundle or Functions host version. Pinned apps needed manual updates during the out-of-proc migration, and they will again every time the platform moves. Call to action Retarget one connector this week and run it against a non-production app. If something fails, check the symptoms table first. If your error isn't there, post the connector shape (actions, triggers, converters), the package versions, and the error in the comments, without credentials or private data. I'll take the patterns back to the team and fold them into this post and the skill.254Views0likes0Comments
Easy Auth Configuration for Logic App Standard through CI/CD
Problem Statement When Easy Auth (Azure App Service’s built-in authentication and authorization) is enabled on a Logic App Standard, users frequently report that they cannot open the run history. Specifically, the inputs and outputs of the trigger and actions fail to load on the run details page, even though the workflow itself runs and the user has access to the resource. Background — How Easy Auth Interacts with Logic Apps Easy Auth is a feature of Azure App Service. Every request that reaches a Logic App Standard is first routed through the App Service layer, and only then handed off to the Logic App runtime for further processing. When Easy Auth is enabled, App Service authenticates each incoming request and decides whether it should be allowed or blocked — before the Logic App runtime ever sees it. This dual-layer model is what causes the run-history symptom: The Logic App runtime authenticates run-history requests using a SAS token specific to that run, generated from the Logic App access keys. The portal calls that load the inputs and outputs of historical runs do not carry a bearer token — they carry the SAS. Because App Service only knows how to validate Easy Auth tokens (not SAS), it blocks these requests whenever unauthenticatedClientAction is set to disallow unauthenticated traffic. The request never reaches the runtime, so the runtime cannot apply its SAS validation, and the inputs/outputs panel stays empty. Solution There are two ways to fix this, depending on what your security policy allows. Option 1 — Allow unauthenticated requests The simplest fix is to configure Easy Auth to allow unauthenticated requests. This does not mean anyone can invoke the workflow. Instead, all calls (failed and successful) are routed through to the Logic App runtime, and the runtime decides how to handle them: A workflow trigger call with no token → the runtime applies its own auth (SAS, AAD, etc.) and rejects unauthorized invocations. A run-history call carrying a valid SAS → App Service marks it as “failed Easy Auth” but still forwards it; the runtime sees the valid SAS and returns the data. The underlying App Service platform has no knowledge of SAS or any other Logic-App-specific auth scheme, so letting the runtime arbitrate is what makes the run-history experience work. Option 2 — Keep Easy Auth strict, but exclude the runtime paths In many enterprises the security team will not permit “Allow unauthenticated requests.” For those cases, you can leave authentication required but add the runtime endpoints to the excludedPaths list, so App Service skips Easy Auth specifically for those calls. The Logic App runtime continues to authenticate them via SAS. Important: The Azure portal lets you toggle Easy Auth, but it does not expose the excludedPaths setting. You must configure it through ARM, Bicep, the REST API, or CLI — which is exactly why this needs to live in your CI/CD pipeline. There are two ways to apply this through CI/CD. Approach 1 — ARM Template ( Microsoft.Web/sites/config ) Add a Microsoft.Web/sites/config resource of type authsettingsV2 to the same ARM template that deploys the Logic App. Below is the sample template: { "$schema": "https://schema.management.azure.com/schemas/2019-04-01/deploymentTemplate.json#", "contentVersion": "1.0.0.0", "parameters": { "logicAppName": { "type": "string" }, "location": { "type": "string", "defaultValue": "[resourceGroup().location]" }, "tenantID": { "type": "string" }, "ClientID": { "type": "string" } }, "variables": {}, "resources": [ { "type": "Microsoft.Web/sites", "apiVersion": "2022-03-01", "name": "[parameters('logicAppName')]", "location": "[parameters('location')]", "kind": "functionapp,workflowapp", "identity": { "type": "SystemAssigned" }, "properties": { "serverFarmId": "<App Service Plan ID>", "siteConfig": { "appSettings": [ { "name": "FUNCTIONS_EXTENSION_VERSION", "value": "~4" }, { "name": "FUNCTIONS_WORKER_RUNTIME", "value": "dotnet" }, { "name": "AzureWebJobsStorage", "value": "<Storage Account Connection String>" }, { "name": "APP_KIND", "value": "workflowApp" } ] }, "httpsOnly": true } }, { "type": "Microsoft.Web/sites/config", "apiVersion": "2021-02-01", "name": "[concat(parameters('logicAppName'), '/authsettingsV2')]", "location": "[parameters('location')]", "properties": { "platform": { "enabled": true, "runtimeVersion": "~1" }, "globalValidation": { "requireAuthentication": true, "unauthenticatedClientAction": "Return401", "excludedPaths": ["/runtime/*"] }, "identityProviders": { "azureActiveDirectory": { "enabled": true, "registration": { "openIdIssuer": "[concat('https://sts.windows.net/', parameters('tenantID'), '/v2.0')]", "clientId": "parameters('ClientID')", "clientSecretSettingName": "OVERRIDE_USE_MI_FIC_ASSERTION_CLIENTID" }, "login": { "disableWWWAuthenticate": false }, "validation": { "jwtClaimChecks": {}, "allowedAudiences": [], "defaultAuthorizationPolicy": { "allowedPrincipals": {}, "allowedApplications": ["<LIST OF ALLOWED APPLICATIONS ID>"] } } } } }, "dependsOn": [ "[resourceId('Microsoft.Web/sites', parameters('logicAppName'))]" ] } ], "outputs": {} } Key things to notice in the template: requireAuthentication: true and unauthenticatedClientAction: Return401 keep Easy Auth strict for the public surface. excludedPaths: ["/runtime/*"] carves out the runtime endpoints so the SAS-authenticated run-history calls aren’t blocked. allowedApplications lets you whitelist specific AAD app IDs that are allowed to call the workflow. Reference: Microsoft.Web/sites/config — authsettingsV2 (ARM template) · Bicep variant This is the easiest way to add or update Easy Auth on a new or existing Logic App. Approach 2 — REST API call as a post-deployment pipeline step If you’d rather keep your infra template lean (or you’re updating Easy Auth on a Logic App that already exists), add a step to your CI/CD pipeline that calls the App Service authsettingsV2 REST API after the Logic App infra deployment completes. The payload mirrors the properties block from the ARM example above — including excludedPaths: ["/runtime/*"] . This approach is useful when: The Logic App is provisioned by a different pipeline or team than the one owning auth configuration. You need to update Easy Auth settings without redeploying the site. You want to apply environment-specific values (tenant ID, client ID, allowed application list) at release time rather than template-compile time. Reference: Web Apps - Update Auth Settings V2 - REST API (Azure App Service) | Microsoft Learn · GlobalValidation Summary The “inputs/outputs don’t load on run history” symptom after enabling Easy Auth is caused by App Service blocking SAS-authenticated runtime calls before the Logic App runtime can see them. Either allow unauthenticated requests (and let the runtime do all the auth), or keep Easy Auth strict and exclude /runtime/* . Because the portal doesn’t expose excludedPaths , the production-grade fix is to deploy it through CI/CD — either by adding an authsettingsV2 config resource to your ARM template or by calling the App Service auth REST API as a pipeline step after deployment.