hosted agents
20 TopicsCI/CD for AI Agents on Microsoft Foundry
Introduction Building an AI agent is the straightforward part. Shipping it reliably to production with version control, evaluation-driven quality gates, multi-environment promotion, and enterprise governance is where most teams run into friction. Microsoft Foundry changes this. It is Microsoft's AI app and agent factory: a fully managed platform for building, deploying, and governing AI agents at scale. It provides a first-class agent runtime with built-in lifecycle management, making it possible to apply the same CI/CD rigour you already use for application software to AI agents — regardless of whether you are building containerised hosted agents or declarative prompt-based agents. This post walks through a complete, production-ready reference architecture for doing exactly that. You will find the GitHub Actions workflow, the Azure DevOps pipeline YAML, and the architecture diagram linked throughout. Reference implementation repository: foundry-agents-lifecycle and CI/CD for AI Agents on Microsoft Foundry Why Agent CI/CD Is Different Traditional software pipelines gate releases on test pass/fail. Agent pipelines require an additional, critical layer: evaluation-driven quality gates. Before any agent version can be promoted to the next environment, it must pass three categories of evaluation: Quality — answer correctness, task completion rate, hallucination rate Safety — grounded responses, policy compliance, tool usage validation Performance — token usage per query, p95 response latency A second key difference is the deployment unit. You are not deploying a binary or a container tag in isolation. You are deploying an agent version — an immutable artefact that bundles the model selection, system instructions, tool definitions, and configuration together. This is what enables deterministic promotion and full auditability across environments. "Agents follow a standard CI/CD pattern, but with a critical shift: promotion happens at the agent version level, and release gates are driven by evaluation outcomes, not just test results." Reference Architecture Figure 1: End-to-end CI/CD reference architecture for hosted and prompt-based agents on Microsoft Foundry. The architecture has five logical layers, flowing from developer commit to production monitoring: Layer 1 — Developer Layer The developer layer is a standard source-controlled repository in GitHub or Azure DevOps. It contains: Agent code written in Python or .NET agent.yaml or prompt definition files for prompt-based agents Tool configurations: MCP servers, REST API connectors, or other integrations Infrastructure as Code: Bicep or ARM templates for provisioning the Foundry project and dependencies Layer 2 — CI Pipeline (Build · Validate · Evaluate) Every push or pull request triggers the CI pipeline. It performs five steps: Docker build — for hosted agents, build and tag the container image Static checks — lint with ruff , security scan with bandit , agent YAML schema validation Unit and tool tests — pytest suites covering agent logic and tool integrations Evaluation gate — run evaluation datasets; fail the pipeline if thresholds are breached Image push — push the validated container to Azure Container Registry (ACR) Prompt-based agents skip the Docker build step. Instead, the YAML definition and prompt bundle are validated against schema and evaluated against golden datasets. Layer 3 — CD Pipeline (Multi-stage Promotion) A single agent version is promoted through three Foundry project environments: Stage Environment Activities Gate Stage 1 Dev Foundry Project Deploy vNext version, smoke tests, developer evals Eval quality thresholds Stage 2 Test / QA Foundry Project Scenario tests, HITL validation, safety evaluation Eval gates + human approval Stage 3 Production Foundry Project Promote version, enable endpoint, post-deploy smoke test Required reviewer approval Rollback is straightforward: switch the active version pointer back to the previous agent version. No re-deployment is needed. Layer 4 — Microsoft Foundry Agent Service The Foundry Agent Service runtime provides: Hosted agent runtime — managed container execution supporting Agent Framework, LangGraph, Semantic Kernel, or custom code Prompt-based agent runtime — declarative agent definitions, no container required Built-in lifecycle operations — version, start, stop, rollback Entra Agent Identity — each deployed version receives a dedicated Microsoft Entra managed identity RBAC and policy enforcement — Azure role-based access controls per project Observability — distributed traces, structured logs, and evaluation signals Layer 5 — Monitoring, Governance, and Control Plane Foundry control plane: agent registry, environment configuration, version history OpenTelemetry forwarded to Azure Monitor and Application Insights Continuous evaluation pipelines for ongoing quality, grounding, and safety monitoring Azure Policy and RBAC enforcement at the platform level Environment Topology There are two topology options. We recommend Option A for all production workloads: Option Structure Best for Trade-off A — Recommended Dev Project → Test Project → Prod Project (separate Foundry projects) Enterprise workloads Full isolation, clean RBAC boundaries, easier governance B — Lightweight Single Foundry project with agent version tags (dev/test/prod) Small teams, prototyping Simpler setup, but weaker environment separation Separate projects mean separate RBAC policies, separate connection strings, and separate evaluation signals. A developer service principal has access only to the Dev project; the CI/CD identity has restricted access to promote to Test and Production. Evaluation Gates — The Core Difference Evaluation gates transform a standard software pipeline into an AI-safe deployment pipeline. They run at two points: pre-merge (CI) and pre-promotion (CD). Defining the Gates Category Metric CI threshold Prod threshold Quality Hallucination rate < 5% < 3% Quality Task completion rate > 90% > 95% Safety Grounded response rate > 95% > 98% Safety Policy violations 0 0 Performance p95 latency < 4 000 ms < 3 000 ms Cost Token usage per query Track only Alert on > 20% regression Gate Enforcement (Python) import json import sys def check_gates(results_path: str) -> None: with open(results_path) as f: results = json.load(f) failures = [] if results["hallucination_rate"] > 0.05: failures.append(f"Hallucination rate {results['hallucination_rate']:.1%} exceeds 5% threshold") if results["task_completion_rate"] < 0.90: failures.append(f"Task completion {results['task_completion_rate']:.1%} below 90% threshold") if results["latency_p95_ms"] > 4000: failures.append(f"p95 latency {results['latency_p95_ms']}ms exceeds 4000ms threshold") if results.get("policy_violations", 0) > 0: failures.append(f"Policy violations detected: {results['policy_violations']}") if failures: for f in failures: print(f"GATE FAILED: {f}", file=sys.stderr) sys.exit(1) print("All evaluation gates passed — proceeding to deployment") if __name__ == "__main__": check_gates(sys.argv[1]) Hosted vs Prompt-Based Agents — Pipeline Differences Capability Hosted Agents Prompt-Based Agents Deployment unit Container image + agent definition YAML / prompt configuration bundle Build step required Yes — Docker build + ACR push No — YAML validation only Supported frameworks Agent Framework, LangGraph, Semantic Kernel, custom Foundry declarative runtime Promotion artefact Versioned agent with container image reference Versioned prompt/config bundle CI focus Code quality, tool tests, evaluation Prompt schema validation, evaluation Rollback mechanism Switch active agent version Switch active agent version Runtime management Foundry manages container lifecycle Foundry manages declarative runtime CI Pipeline Walkthrough The following steps are representative of the full GitHub Actions workflow available in github-actions-pipeline.yml alongside this post. Hosted Agent CI # 1. Static checks ruff check . bandit -r src/ -ll python scripts/validate_agent_config.py --config agent.yaml # 2. Tests pytest tests/unit/ -v --tb=short pytest tests/tools/ -v --tb=short # 3. Evaluation gate python scripts/run_evaluations.py \ --dataset eval/datasets/golden_set.jsonl \ --output eval/results/results.json python scripts/check_eval_gates.py \ --results eval/results/results.json \ --max-hallucination 0.05 \ --min-task-completion 0.90 \ --max-latency-p95 4000 # 4. Push container image az acr build \ --registry myregistry.azurecr.io \ --image "myagent:$SHA" \ --file Dockerfile . Prompt-Based Agent CI # Validate YAML / prompt definitions python scripts/validate_agent_config.py --config agent.yaml # Evaluation against golden dataset python scripts/run_evaluations.py \ --dataset eval/datasets/golden_set.jsonl \ --output eval/results/results.json python scripts/check_eval_gates.py \ --results eval/results/results.json CD Pipeline Walkthrough Stage 1 — Dev Deployment python scripts/deploy_agent.py \ --env dev \ --image "myregistry.azurecr.io/myagent:$SHA" \ --foundry-endpoint $FOUNDRY_ENDPOINT_DEV \ --agent-config agent.yaml # Returns the new agent version ID, stored for promotion AGENT_VERSION=$(python scripts/get_active_version.py --env dev) Stage 2 — Promote to Test (after approval gate) python scripts/promote_agent.py \ --from-env dev \ --to-env test \ --agent-version $AGENT_VERSION \ --foundry-endpoint $FOUNDRY_ENDPOINT_TEST # Run scenario tests and safety evaluation python scripts/run_evaluations.py \ --dataset eval/datasets/scenario_set.jsonl \ --output eval/results/test-results.json python scripts/check_eval_gates.py \ --results eval/results/test-results.json \ --max-hallucination 0.03 \ --min-task-completion 0.95 Stage 3 — Promote to Production (after required reviewer approval) python scripts/promote_agent.py \ --from-env test \ --to-env prod \ --agent-version $AGENT_VERSION \ --foundry-endpoint $FOUNDRY_ENDPOINT_PROD # Enable the production endpoint python scripts/enable_agent_endpoint.py \ --agent-version $AGENT_VERSION \ --foundry-endpoint $FOUNDRY_ENDPOINT_PROD Rollback # Switch the active version to the previous known-good version python scripts/promote_agent.py \ --from-env prod \ --to-env prod \ --agent-version $PREVIOUS_AGENT_VERSION \ --foundry-endpoint $FOUNDRY_ENDPOINT_PROD # OR delete the failing version python scripts/delete_agent_version.py \ --agent-version $AGENT_VERSION \ --foundry-endpoint $FOUNDRY_ENDPOINT_PROD Deployment Using the Azure AI Projects SDK The azure-ai-projects SDK provides programmatic control over the full agent lifecycle. This is the recommended approach for CI/CD scripts where you need deterministic, scriptable deployment. from azure.identity import DefaultAzureCredential from azure.ai.projects import AIProjectClient # Connect to the Foundry project client = AIProjectClient( endpoint=FOUNDRY_PROJECT_ENDPOINT, credential=DefaultAzureCredential() ) # List existing agents (useful for idempotent deploy scripts) for agent in client.agents.list(): print(f"Agent: {agent.name} version: {agent.id}") # Create a new agent version (hosted agent) agent = client.agents.create_agent( model="gpt-4o", name="my-enterprise-agent", instructions="You are a helpful assistant ...", tools=[...], # tool definitions metadata={"version": GIT_SHA, "environment": "dev"} ) print(f"Created agent version: {agent.id}") For hosted agents, the SDK call also references the container image pushed to ACR. Refer to the Deploy a hosted agent — Microsoft Foundry documentation for the full SDK flow including container image registration and version polling. Reference Implementation Stack Concern Technology Source control and pipelines GitHub Actions or Azure DevOps Pipelines Infrastructure and agent deployment Azure Developer CLI ( azd up ) Programmatic agent lifecycle azure-ai-projects Python SDK Agent evaluation azure-ai-evaluation Python SDK Agent runtime Microsoft Foundry Agent Service Container registry Azure Container Registry (hosted agents only) Observability OpenTelemetry, Azure Monitor, Application Insights Identity and access Microsoft Entra (Agent ID, OIDC workload identity federation) Governance Azure Policy, RBAC, Foundry control plane Governance and Responsible AI Shipping AI agents at enterprise scale requires governance beyond what a traditional CI/CD pipeline provides. Microsoft Foundry addresses this at the platform level: RBAC per environment — each Foundry project has independent access controls. Developers deploy to Dev; only CI/CD service principals (with audited OIDC tokens) can promote to Test and Production. Agent registry and audit trail — the Foundry control plane records which agent version is active in each environment, who deployed it, and when. This satisfies enterprise audit requirements without additional tooling. Content safety and policy enforcement — Azure Policy governs model access, data handling, and content safety rules at the infrastructure level, not just at the application code level. Policy violations block deployment automatically. Entra Agent Identity — each deployed agent version receives a dedicated, short-lived managed identity. Agents authenticate to downstream services using least-privilege credentials scoped to that specific deployment. Continuous evaluation in production — evaluation pipelines run on sampled production traffic, alerting when quality, safety, or cost metrics drift from their baseline. A key trade-off to be transparent about: evaluation datasets must be maintained and updated as the agent's tasks evolve. Stale datasets produce misleading pass/fail signals. Treat your golden evaluation set as a first-class engineering artefact alongside the agent code itself. Pipeline Files Two pipeline files accompany this reference architecture. Both implement the same four-stage pipeline (CI Build, CI Evaluate, CD Dev, CD Test, CD Production) with environment-appropriate approval gates. github-actions-pipeline.yml — GitHub Actions workflow. Uses GitHub Environments for approval gates and OIDC Workload Identity Federation for passwordless Azure authentication. No stored Azure credentials required. azure-devops-pipeline.yml — Azure DevOps multi-stage YAML pipeline. Uses ADO Environments with required approvers and variable groups per environment. Both pipelines share these security practices: OIDC / Workload Identity Federation — no long-lived Azure credentials stored in pipeline secrets Per-environment variable groups, each with scoped connection strings and endpoints Evaluation quality gates enforced before every promotion step Mandatory human approval before production deployment Summary The full pipeline in one view: Developer commit | CI Pipeline ├── Docker build (hosted agents) / YAML validation (prompt agents) ├── Static checks + unit tests + tool tests └── Evaluation gate ← quality · safety · performance | Agent Version created ← immutable, versioned artefact | CD Pipeline ├── Deploy to Dev → smoke tests + eval gate ├── Promote to Test → scenario tests + HITL + approval gate └── Promote to Prod → enable endpoint + monitoring | Microsoft Foundry Agent Service └── Versioned runtime · Entra identity · RBAC · Observability | Control Plane └── Agent registry · Governance · Continuous evaluation Microsoft Foundry provides the platform primitives — versioned agent deployments, multi-environment Foundry projects, built-in lifecycle management, and an enterprise observability stack — needed to operate AI agents with the same confidence as any production software system. The key takeaway: treat the agent version as your deployment artefact, and evaluation outcomes as your release gate. The rest follows familiar CI/CD patterns you already know and trust. Next Steps Clone the CI/CD Repo at leestott/foundry-cicd Clone the reference demo: foundry-agents-lifecycle on GitHub Set up your environment: Set up your environment for Foundry Agent Service Deploy your first hosted agent: Quickstart: Deploy your first hosted agent Understand hosted agent concepts: Foundry Hosted Agents concepts Automate deployments in CI/CD: Automate deployment of Microsoft Foundry agents Manage agent versions: Manage hosted agents — Microsoft Foundry Deploy via SDK: Deploy a hosted agent — Microsoft Foundry SDK and endpoint reference: Microsoft Foundry SDK and Endpoints reference Azure AI Projects SDK: azure-ai-projects Python SDK Azure Developer CLI: Azure Developer CLI (azd) overview Microsoft Foundry documentation hub: Microsoft Foundry on Microsoft Learn15KViews8likes0CommentsStop Drawing Architecture Diagrams Manually: Meet the Open-Source AI Architecture Review Agents
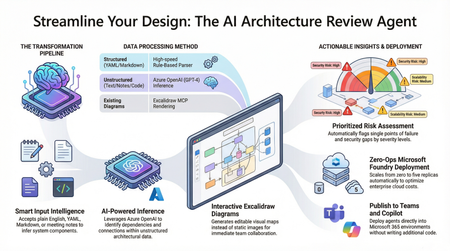
Designing and documenting software architecture is often a battle against static diagrams that become outdated the moment they are drawn. The Architecture Review Agent changes that by turning your design process into a dynamic, AI-powered workflow. In this post, we explore how to leverage Microsoft Foundry Hosted Agents, Azure OpenAI, and Excalidraw to build an open-source tool that instantly converts messy text descriptions, YAML, or README files into editable architecture diagrams. Beyond just drawing boxes, the agent acts as a technical co-pilot, delivering prioritized risk assessments, highlighting single points of failure, and mapping component dependencies. Discover how to eliminate manual diagramming, catch security flaws early, and deploy your own enterprise-grade agent with zero infrastructure overhead.18KViews7likes5CommentsLearn how to use the four IQs: Web IQ, Work IQ, Fabric IQ, Foundry IQ
We just concluded Microsoft IQ Deep Dive with Python, a three-part livestream series all about Microsoft IQ. We showed how to use the four IQs to ground your AI applications and agents: Work IQ: user-specific retrieval of M365 data, like Teams chats, emails, and calendar events. Fabric IQ: retrieval of data stored in OneLake, via Fabric ontologies, graphs, and data agents. Web IQ: real-time web results with super low latency Foundry IQ: multi-source agentic retrieval on search indexes plus remote sources (including Web IQ, Work IQ, and Fabric IQ) The four IQs are all exposed as MCP endpoints, so you can easily integrate into your own agents, or add to your Foundry agents via the Foundry Toolbox. Check out our code samples for Python notebooks and agents that use each of the MCP servers and APIs. All of the materials from our series are available for you to keep learning from, and linked below: Video recordings of each stream PowerPoint slides that you can use for reviewing or even teaching the material to your own community An annotated write-up of each presentation, so you can quickly read through 🙋🏽♂️ Have follow up questions? Join the weekly Python+AI office hours on Foundry Discord. Microsoft IQ Deep Dive with Python: Foundry IQ 📺 Watch YouTube recording In the first session, we dived into Foundry IQ (Azure AI Search), exploring how it helps agents and applications work with curated knowledge and organizational context. We built knowledge bases in Python and connected them to multiple knowledge sources, including file knowledge sources, search indexes built from ingested data, and the Web IQ MCP server. Then we performed multi-source agentic retrieval on those knowledge bases, which executes queries in parallel and merges the results with state-of-the-art ranking models. Finally, we built agents in Python using Microsoft Agent Framework and grounded their responses in Foundry IQ results three different ways: a custom tool calling the knowledge base API, the knowledge base MCP endpoint, and a Foundry Toolbox. We deployed those agents to Foundry Agent Service as hosted agents and published one to Teams. 🖼️ Slides for this session 📝 Write-up for this session 💻 Code repository with examples: iqdeepdive Microsoft IQ Deep Dive with Python: Work IQ 📺 Watch YouTube recording In the second session, we focused on Work IQ and how it brings workplace context into AI-powered experiences. We compared Work IQ to Microsoft Graph, then explored all three protocols it speaks — A2A, MCP, and REST — with runnable Python notebooks for each. We walked through the 10 generic tools that Work IQ exposes over MCP, including ask, which calls Microsoft 365 Copilot directly, and do_action, the only write path. We also connected Work IQ to a Foundry IQ knowledge base as a knowledge source, so a single query returns a blended answer across indexed HR documents and live work context. Then we wired Work IQ into a Microsoft Agent Framework agent as an MCP tool, and finished with Agent 365 autopilots — agents that get their own Microsoft 365 identity, mailbox, and place in the org chart, and act as themselves rather than on behalf of you. A live demo showed the Work Mate autopilot reading its own mailbox in Teams and emailing a customer directly. 🖼️ Slides for this session 📝 Write-up for this session 💻 Code repository with examples: iqdeepdive Microsoft IQ Deep Dive with Python: Fabric IQ 📺 Watch YouTube recording In the final session, we explored Fabric IQ and how it connects AI experiences to structured business data stored in Microsoft Fabric's OneLake. We introduced the key components of Fabric IQ — ontologies, graphs, semantic models, and data agents — and showed how each one helps describe, organize, and reason over operational data. Ontologies provide a shared business vocabulary that maps entity types, properties, and relationships to actual OneLake data. Graphs offer dedicated graph database capabilities for queries requiring extensive relationship traversal. Semantic models expose Power BI analytics through DAX measures on star-schema tables. Data agents combine all of these behind a single conversational interface that selects the right source and query language automatically. For each component, we demonstrated the Ontology MCP server and Data Agent MCP server for agent integration, and showed how to add each as a knowledge source to Foundry IQ knowledge bases for multi-source retrieval. 🖼️ Slides for this session 📝 Write-up for this session 💻 Code repository with examples: iqdeepdive1.9KViews2likes0CommentsDeploying Foundry Hosted Agents from Source Code
Introduction At Microsoft Build, it was announced that Foundry Hosted Agents now support source-code deployments. Previously, Hosted Agents required application code to be packaged in a container for deployment. This new functionality allows you to deploy the agent from a `.zip` file instead of from a container image. This post walks through the process of deploying a source-code Hosted Agent, briefly compares that approach to container-based Hosted Agent deployment, and provides a reusable GitHub Action for CI/CD deployments. It is part of a series of post whose source code is housed in simple-hosted-agent-responses repository. If Hosted Agents are new to you, read the previous posts, "Deploying Foundry Hosted Agents via REST API" and "GitHub Actions for Deploying Hosted Agents." Background A Foundry Hosted Agent helps abstract the management of the compute tier for your agent. It runs in a self-contained Micro-VM sandbox, meaning the Hosted Agent sandbox provides the CPU and memory allocation used to run your agent. Previously, this Micro-VM would download your code from an Azure Container Registry (ACR) and run it on the virtualized platform. Not all customers use container-based workloads today and, let's face it, not everything needs to be a container. So how do those customers and platforms take advantage of Foundry Hosted Agents? The answer is through source-code deployments of Foundry Hosted Agents. What is a Source Code Agent? Source Code Agents are like other Foundry Hosted Agents. The key deployment difference is that the code asset is a .zip file instead of a container image. This also changes the Agent Development Lifecycle compared with the containerized version of Foundry Hosted Agents. An important point of clarity: the way the agent is configured is a data plane operation. As such, taking advantage of Source Code Agent functionality does not require changes to the Foundry infrastructure itself when your Infrastructure as Code (IaC) is only provisioning the supporting resources in Bicep, Terraform, or PowerShell. The deployment change happens through the Foundry data plane. First, let's look at a container-based Foundry Hosted Agent: Now, let's compare it to the source-code version: Deployment Process Now that we've looked at the end result, let's talk through the steps required to deploy a Foundry Hosted Agent via source code. So in Foundry, what does the difference between a container-based and a source-code-based Foundry Hosted Agent look like? The Microsoft Learn docs outline this well: Every source-code deployment follows the same sequence: package -> create or update -> poll until active -> invoke. The source-code path uses `code_configuration` in the agent definition; the image-based path uses `container_configuration` instead--the two are mutually exclusive on a single version. If wanting to confirm and see in more detail one can refer to the Foundry Agent REST API documentation. The source layout can stay familiar, but the deployed artifact changes to a `.zip` file. Packaging the source code into a ZIP is the piece that differs from the container-image flow. The agent deployment to Foundry is also slightly different because it uses source-code configuration instead of container configuration. You can run this via `azd` with a command structured like the following: azd ai agent init --no-prompt --project-id "<project-resource-id>" --deploy-mode code --runtime python_3_13 --entry-point main.py This assumes `azd` is installed and authenticated, and that the authenticated identity has access to the Foundry project. The command initializes a code deployment for the project. However, we recognize that the majority of enterprise organizations will want to use other deployment methods. As such, REST API deployments are supported, as are the Python and C# SDKs for creating the agent. Taking this a step further, and similar to "GitHub Actions for Deploying Hosted Agents," let's create a reusable GitHub Action for deploying source-code-based Hosted Agents. GitHub Action If you are wanting to see the entire action it is part of the repository simple-hosted-agent-responses, which contains source code, IaC, and deployment options. Background First, we need to understand that we cannot reuse the GitHub Action from "GitHub Actions for Deploying Hosted Agents" because, as noted above, the REST API uses mutually exclusive options. In theory, we could add conditional logic across the parameters; however, it is cleaner to create a separate action. Before invoking this action, the workflow must authenticate to Azure because the action calls `az account get-access-token` to acquire a token for the Foundry data plane. Inputs inputs: project_endpoint: description: Foundry project endpoint URL required: true agent_name: description: Name of the hosted agent required: true source_code_zip: description: Path to the local source-code zip artifact required: true model_deployment_name: description: Name of the AI model deployment required: true cpu: description: CPU allocation for the hosted agent container required: false default: '0.25' memory: description: Memory allocation for the hosted agent container required: false default: '0.5Gi' runtime: description: Source-code runtime for the hosted agent required: false default: 'python_3_13' entry_point: description: Source-code entry point command for the hosted agent required: false default: '["python", "main.py"]' dependency_resolution: description: How Agent Service resolves dependencies for the source-code deployment required: false default: 'remote_build' max_polling_seconds: description: Maximum time to wait for the source-code deployment to reach active status required: false default: '600' For our inputs, `project_endpoint`, `agent_name`, `source_code_zip`, and `model_deployment_name` are required. The CPU, memory, runtime, entry point, dependency resolution, and max polling values are configurable properties with defaults set in the action. The source-code-specific inputs populate the `code_configuration` properties of the REST payload. These include `source_code_zip`, `runtime`, `entry_point`, and `dependency_resolution`. This information tells Foundry how to run the code from the `.zip` package. Outputs We should output values that make sense for downstream workflows. Every workflow may not use them, but it is useful to expose non-secret values when they can support later steps. In this case, we are creating a new version of the agent, so let's output that version ID. outputs: agent_version: description: Version ID returned by the Foundry data plane value: ${{ steps.post.outputs.agent_version }} Action The action maps the inputs to environment variables as the first step. After that, it gets an access token from Azure and calls the REST API endpoint. Once we have this, we prepare the body of the call. Verify against the API for all valid properties. For this example, I chose not to set `rai_config` and `tools` to keep things simple. runs: using: composite steps: - name: Create source-code metadata id: metadata shell: bash env: AGENT_NAME: ${{ inputs.agent_name }} MODEL_DEPLOYMENT_NAME: ${{ inputs.model_deployment_name }} CPU: ${{ inputs.cpu }} MEMORY: ${{ inputs.memory }} RUNTIME: ${{ inputs.runtime }} ENTRY_POINT: ${{ inputs.entry_point }} DEPENDENCY_RESOLUTION: ${{ inputs.dependency_resolution }} run: | METADATA_FILE=$(mktemp) ENTRY_POINT_JSON=$(python3 -c 'import json,sys; print(json.dumps(json.loads(sys.argv[1])))' "$ENTRY_POINT") jq -n \ --arg model "$MODEL_DEPLOYMENT_NAME" \ --arg cpu "$CPU" \ --arg memory "$MEMORY" \ --arg runtime "$RUNTIME" \ --arg dep_resolution "$DEPENDENCY_RESOLUTION" \ --argjson entry_point "$ENTRY_POINT_JSON" \ '{ description: "Hosted agent deployed from source code", definition: { kind: "hosted", protocol_versions: [{protocol: "responses", version: "1.0.0"}], cpu: $cpu, memory: $memory, code_configuration: { runtime: $runtime, entry_point: $entry_point, dependency_resolution: $dep_resolution }, environment_variables: {AZURE_AI_MODEL_DEPLOYMENT_NAME: $model} } }' > "$METADATA_FILE" echo "metadata_file=${METADATA_FILE}" >> "$GITHUB_OUTPUT" echo "Metadata file created at ${METADATA_FILE}" - name: Post source-code agent deployment to Foundry data plane id: post shell: bash env: PROJECT_ENDPOINT: ${{ inputs.project_endpoint }} AGENT_NAME: ${{ inputs.agent_name }} SOURCE_CODE_ZIP: ${{ inputs.source_code_zip }} METADATA_FILE: ${{ steps.metadata.outputs.metadata_file }} MAX_POLLING_SECONDS: ${{ inputs.max_polling_seconds }} run: | if [[ ! -f "$SOURCE_CODE_ZIP" ]]; then echo "Error: Source code zip not found at ${SOURCE_CODE_ZIP}" exit 1 fi CODE_ZIP_SHA256=$(sha256sum "$SOURCE_CODE_ZIP" | awk '{print $1}') echo "Source code SHA256: ${CODE_ZIP_SHA256}" FOUNDRY_TOKEN=$(az account get-access-token \ --resource "https://ai.azure.com/" \ --query accessToken -o tsv) # POST /agents/{name}/versions auto-creates the agent if it doesn't # exist and adds a new version if it does, so a single call covers # both first-deploy and update scenarios (matches update-agent). HTTP_STATUS=$(curl -s -o /tmp/source_code_response.json \ -w "%{http_code}" \ -X POST \ "${PROJECT_ENDPOINT}/agents/${AGENT_NAME}/versions?api-version=2025-11-15-preview" \ -H "Authorization: Bearer ${FOUNDRY_TOKEN}" \ -H "Accept: application/json" \ -H "Foundry-Features: CodeAgents=V1Preview,HostedAgents=V1Preview" \ -H "x-ms-agent-name: ${AGENT_NAME}" \ -H "x-ms-code-zip-sha256: ${CODE_ZIP_SHA256}" \ -F "metadata=@${METADATA_FILE};type=application/json" \ -F "code=@${SOURCE_CODE_ZIP};type=application/zip;filename=${AGENT_NAME}.zip") echo "HTTP ${HTTP_STATUS}: $(cat /tmp/source_code_response.json)" if [[ "$HTTP_STATUS" -lt 200 || "$HTTP_STATUS" -ge 300 ]]; then echo "Error: Foundry data plane returned HTTP ${HTTP_STATUS}" exit 1 fi RESPONSE=$(cat /tmp/source_code_response.json) AGENT_VERSION=$(echo "$RESPONSE" | python3 -c 'import sys,json; print(json.load(sys.stdin)["version"])') echo "agent_version=${AGENT_VERSION}" >> "$GITHUB_OUTPUT" echo "Agent version resolved as ${AGENT_VERSION}" START_TIME=$(date +%s) while true; do ELAPSED=$(($(date +%s) - START_TIME)) if [[ $ELAPSED -gt $MAX_POLLING_SECONDS ]]; then echo "Error: Agent version did not reach active state within ${MAX_POLLING_SECONDS} seconds" exit 1 fi VERSION_STATUS=$(curl -s \ -X GET \ "${PROJECT_ENDPOINT}/agents/${AGENT_NAME}/versions/${AGENT_VERSION}?api-version=2025-11-15-preview" \ -H "Authorization: Bearer ${FOUNDRY_TOKEN}" \ -H "Accept: application/json" \ -H "Foundry-Features: CodeAgents=V1Preview,HostedAgents=V1Preview" \ | python3 -c 'import sys,json; data=json.load(sys.stdin); print(data.get("status", "unknown"))' 2>/dev/null) echo "Current status: ${VERSION_STATUS} (elapsed ${ELAPSED}s)" if [[ "$VERSION_STATUS" == "active" ]]; then echo "Agent version ${AGENT_VERSION} is active" break fi if [[ "$VERSION_STATUS" == "failed" ]]; then echo "Error: Agent version reached failed status" exit 1 fi sleep 5 done Building the Source-Code Artifact Before calling the source-code Hosted Agent action, create the ZIP artifact that will be passed into `source_code_zip`. source-code: name: Build source-code artifact runs-on: ubuntu-latest permissions: contents: read steps: - name: Checkout uses: actions/checkout@v6 - name: Create source-code zip artifact run: | git archive --format=zip --output=source-code.zip HEAD:src/agent-framework/responses/basic - name: Upload source-code artifact uses: actions/upload-artifact@v7 with: name: source-code path: source-code.zip Calling the Action Now that we have the action, how can we scale this across multiple workflows? We pass in the required parameters and the ZIP artifact path. - name: Update agent with source code uses: ./.github/actions/update-agent-source-code with: project_endpoint: ${{ needs.deploy-iac.outputs.project_endpoint }} # Source-code agent shares the same Foundry project as the image-based # agent; the `-src` suffix keeps them as distinct agent versions. agent_name: ${{ inputs.agent_name }}-src source_code_zip: ./.artifacts/source-code/source-code.zip model_deployment_name: ${{ needs.deploy-iac.outputs.model_deployment_name }} And just to show we can call the same action multiple times, here are two examples that do just that: Deploy (Bicep) and Deploy (Terraform). Conclusion Source-code deployments give Foundry Hosted Agents another deployment path for teams that do not want, or do not need, to package every agent as a container image. By using a .zip artifact, teams can keep a familiar source-code packaging flow while still taking advantage of the managed compute abstraction that Hosted Agents provide. The reusable GitHub Action shown in this post turns that deployment process into a repeatable CI/CD step: package the source code, post the deployment to the Foundry data plane, poll until the new version is active, and expose the resulting agent version for downstream workflow steps. This keeps the deployment flexible while fitting into existing enterprise pipeline patterns. For organizations already using container-based Hosted Agents, source-code deployments do not replace that model; they expand the options available. Choose the deployment approach that best fits how your teams package, govern, and operate their agent workloads.Building AI Agents from Zero to Production
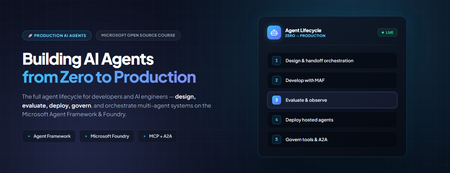
Building AI Agents from Zero to Production Most agent demos stop at "it answered my question." Production doesn't. The gap between a notebook that calls an LLM and a governed, observable, multi-agent system your organisation can actually depend on is where real engineering happens, evaluation, deployment, data sovereignty, tool governance, and cross-team interoperability. Microsoft's open-source course Building AI Agents from Zero to Production walks that entire arc in seven lessons, using one realistic use case and the Microsoft Agent Framework (MAF) plus Microsoft Foundry. This post is a developer-focused tour of what it teaches, the architecture decisions behind each stage, and the code patterns that matter when you move from prototype to production. Who this is for AI engineers building their first or first production, agent system. Backend and full-stack developers integrating agents into real applications and CI/CD. Cloud architects who need data sovereignty, private networking, and governance around agent workloads. Technical leads deciding how to standardise tools and orchestration across multiple teams. The samples are Python 3.12+, served through Microsoft Foundry using GPT-5 series models (for example gpt-5.1 ). Lesson 4 adds a TypeScript/React frontend. You will want an Azure subscription and the Azure CLI. The AI Agent Development Lifecycle The course is organised around a lifecycle rather than a feature list. Each lesson is a stage, and each stage assumes the previous one is solved: # Stage The production question it answers 1 Agent Design What should each agent do, and how do they hand off? 2 Agent Development How do I build and run them with the Agent Framework? 3 Agent Evaluations How do I know they actually work — and keep working? 4 Agent Deployment How do I ship one as a hosted service with a UI and CI gate? 5 Production Hosted Agents How do I meet enterprise data, network, and governance needs? 6 Microsoft Toolbox How do I govern tools once, and reuse them across teams? 7 Multi-Agent & A2A How do agents from different teams interoperate safely? The thread running through all seven is a single scenario: a Developer Onboarding agent system that helps a new hire find the right teammates, get a sensible first task, and pull learning resources and code snippets. It is deliberately mundane, which is exactly why it exposes the production concerns that flashy demos hide. Lesson 1 — Agent Design: three components, one graph The course defines an agent by three parts: an LLM for reasoning, tools to act, and memory to retain context. The design work is context engineering — making sure the right information reaches the model at the right moment, no more and no less. Rather than one monolithic assistant, the onboarding system is split into specialists coordinated by a triage agent using handoff orchestration: Agent Job Tool Employee Search Answer org and people questions Foundry file search over an employee-directory vector store Task Recommendation Suggest 1–3 GitHub issues for the new dev GitHub MCP Server (reads recent commits + open issues) Code Assistant Provide resources and runnable snippets Microsoft Learn MCP + Code Interpreter Architecturally this is a directed graph: User → Triage → [Employee, Learning, Coding] . Splitting responsibilities early pays off later, each agent gets a tightly scoped prompt (less hallucination), can be evaluated independently, and can be upgraded without touching its peers. Lesson 2 — Development: standalone agents with MAF Here the design becomes code. Each specialist is a small, independently runnable service built with the Microsoft Agent Framework, authenticated to Foundry with your Azure CLI login. Setup is deliberately boring: az login az account set --subscription "<your-subscription-id>" cp .env.example .env # Fill FOUNDRY_PROJECT_ENDPOINT and FOUNDRY_MODEL (e.g. gpt-5.1) # Create the employee-directory vector store once; note the printed VECTOR_STORE_ID python lesson-2-agent-development/setup_vector_store.py # Start an agent — serves on http://localhost:8090 python lesson-2-agent-development/employee-search-agent.py The FoundryChatClient auto-reads any FOUNDRY_ -prefixed environment variables and uses AzureCliCredential , so there are no keys in code. The lesson ships six samples, each on its own port, so you can chat with them individually in the local DevUI before wiring them together: Sample Tool Port employee-search-agent.py Foundry file search / vector store 8090 task-recommendation-agent.py GitHub MCP Server 8095 azure-learning-agent.py Microsoft Learn MCP 8092 coding-agent.py Code Interpreter 8093 learning-recommendation-agent.py Learn MCP + reasoning 8091 agent-orchestration.py Multi-agent handoff 8094 Why this matters: keeping each agent as its own process with its own port is a testability decision, not an accident. You can smoke-test one specialist in isolation, then compose them in agent-orchestration.py . Lesson 3 — Evaluation: you can't unit-test a probability distribution This is the lesson that separates a demo from a product. Agents are non-deterministic, so traditional assertions don't fit. The course uses three complementary layers: Observability / tracing — always on, via OpenTelemetry to Application Insights. Smoke tests — fast, run on every deploy. Evaluations — deeper, model-based scoring run on-demand or nightly. Turning on tracing is a single call: from agent_framework.foundry import FoundryChatClient client = FoundryChatClient() client.configure_azure_monitor() # export traces + metrics to Application Insights For quality it uses Foundry's built-in "LLM-as-a-judge" evaluators against real persisted responses (identified by response_id ), not freshly regenerated ones: Evaluator evaluator_name Measures Relevance builtin.relevance Does the response address the request? Groundedness builtin.groundedness Is it supported by retrieved data (no hallucination)? Tool-call accuracy builtin.tool_call_accuracy Were the right tools called with the right arguments? Tool-output utilization builtin.tool_output_utilization Did the agent actually use tool results? The judge model is set independently via AZURE_AI_MODEL_DEPLOYMENT_NAME , so you can evaluate a cheap production model with a stronger one. The run prints a report_url that deep-links into the Foundry portal. Lesson 4 — Deployment: a hosted agent, a UI, and a CI gate Now the agent becomes a managed service. It is deployed as a Foundry Hosted Agent a Microsoft-managed execution environment and fronted by an OpenAI ChatKit React UI talking to a FastAPI backend: ChatKit React (3000) → FastAPI backend (8001) → Foundry Hosted Agent → tools Building the agent is declarative attach tools, name it, serve it: agent = client.as_agent( name="DevOnboardingAgent", instructions="...", tools=[file_search_tool, learn_mcp_tool], ) # served with: from_agent_framework(agent).run() The recommended deploy path is the Azure Developer CLI: cd hosted-agent azd auth login azd agent deploy The genuinely production-minded part is the smoke test as a post-deploy CI gate. Six cases cover reachability, each scenario, off-topic prompt adherence, and multi-turn threading (verifying state via previous_response_id ). The GitHub Action runs them against the freshly deployed agent: export FOUNDRY_TOKEN=$(az account get-access-token \ --resource https://ai.azure.com/ --query accessToken -o tsv) python runner.py \ --project-endpoint "https://<account>.services.ai.azure.com/api/projects/<project>" \ --agent-name dev-onboarding \ --tests-file tests/smoke-tests.json Pitfall to remember: the token audience must be https://ai.azure.com/ . A cognitiveservices.azure.com token is rejected by the Responses API — a mistake that costs many engineers an afternoon. Lesson 5 — Production: separating where an agent runs from where its data lives The pivotal concept for enterprise readiness is the distinction between a Hosted Agent (compute, scaling, identity) and a Capability Host (where conversation history, files, and embeddings actually reside): Concern Hosted Agent Capability Host Compute / scaling / identity ✅ Provided — Conversation history Microsoft-managed default Redirect to your Azure Cosmos DB File uploads Microsoft-managed default Redirect to your Azure Storage Vector embeddings Microsoft-managed default Redirect to your Azure AI Search Required to run the agent? ✅ Yes ❌ Optional Required for data sovereignty? ❌ Not sufficient ✅ Yes "Basic" setup uses Microsoft-managed storage and is perfect for getting started. "Standard" setup redirects each data plane to your own Azure resources through a project-level capability host, this is how you keep customer data in your tenant, inside your network boundary: PUT .../accounts/{account}/projects/{project}/capabilityHosts/{name}?api-version=2025-06-01 { "properties": { "capabilityHostKind": "Agents", "threadStorageConnections": ["my-cosmosdb-connection"], "vectorStoreConnections": ["my-ai-search-connection"], "storageConnections": ["my-storage-connection"] } } Operational constraints worth internalising before you provision: there is one capability host per scope (a second attempt returns 409 Conflict ), configuration is immutable (delete and recreate to change it), deletion is destructive, and the account-level host must exist before the project-level one. Lesson 6 — Toolbox: govern tools once, reuse everywhere Left unchecked, every team re-implements the same tools, scatters credentials, and loses governance visibility. The Microsoft Foundry Toolbox solves this by exposing a curated, versioned set of tools behind a single MCP-compatible endpoint, with credentials held in Foundry connections rather than agent code. You build a toolbox version once: from azure.ai.projects.models import MCPTool, ToolboxSearchPreviewTool, WebSearchTool toolbox_version = project.toolboxes.create_toolbox_version( name="agent-tools", description="Web search + an MCP server + tool search", tools=[ WebSearchTool(), MCPTool( server_label="myserver", server_url="https://your-mcp-server.example.com", require_approval="never", project_connection_id="my-key-auth-connection", # credentials live in Foundry ), ToolboxSearchPreviewTool(), ], ) And every agent consumes it through one endpoint, no per-team tool code: from agent_framework import MCPStreamableHTTPTool mcp_tool = MCPStreamableHTTPTool( name="toolbox", url=TOOLBOX_ENDPOINT, # {project_endpoint}/toolboxes/{name}/mcp?api-version=v1 http_client=http_client, load_prompts=False, ) agent = chat_client.as_agent(name="my-toolbox-agent", instructions="...", tools=[mcp_tool]) Versioning is blue/green: create a new version, test it on its version-specific endpoint, then promote it to default and every consumer picks it up with zero code changes. A Guardrail (RAI) policy can be applied at the toolbox layer, independent of model-level content filters. Note the toolbox management APIs are currently preview; the portal or VS Code Foundry Toolkit are practical alternatives for creation today. Lesson 7 — Multi-Agent & A2A: agents as networked peers The final lesson contrasts two ways agents collaborate: Handoff / Workflow — in-process, same codebase, fastest, tightest coupling. Agent-to-Agent (A2A) — cross-process over an open protocol, so agents from different teams, orgs, or frameworks interoperate. A2A gives each agent a discoverable Agent Card at /.well-known/agent-card.json and a task lifecycle (submitted → working → completed/failed). The elegant part: A2AExecutor wraps an existing MAF agent with no changes to that agent's code. from agent_framework.a2a import A2AExecutor from a2a.server.apps import A2AStarletteApplication from a2a.server.tasks import InMemoryTaskStore agent_card = AgentCard( name="Coding Assistant", url="http://localhost:9000/", version="1.0.0", capabilities=AgentCapabilities(streaming=True), skills=[AgentSkill(id="generate-code", name="Generate code", tags=["code"])], ) request_handler = DefaultRequestHandler( agent_executor=A2AExecutor(agent), # wraps your existing MAF agent unchanged task_store=InMemoryTaskStore(), ) app = A2AStarletteApplication(agent_card=agent_card, http_handler=request_handler).build() Consuming a remote agent then looks exactly like calling a local one: from agent_framework.a2a import A2AAgent remote_agent = A2AAgent(name="remote-coding-assistant", url="http://localhost:9000") result = await remote_agent.run("Write a Python function that reverses a string.") Because an A2AAgent can be a participant inside a HandoffBuilder workflow, you can mix in-process routing with remote services in the same orchestration. For enterprise use, A2AAgent accepts an auth_interceptor for bearer tokens, and the Agent Card carries security_schemes . Responsible and secure by design Production readiness in this course is not just uptime, it is governance: Identity over keys — AzureCliCredential and managed identity throughout; no secrets in code. Least privilege — CI runners get a scoped Azure AI User role assignment on the specific project. Data sovereignty — capability hosts keep conversation history, files, and embeddings in your own Cosmos DB, Storage, and AI Search. Tool approval and guardrails — MCP approval_mode and toolbox-level RAI policy gate what agents can do. Grounded evaluation — groundedness and tool-utilization scoring catch hallucination and unused-tool behaviour before users do. Cost hygiene — the lessons create real Azure resources; delete the resource group when done: az group delete --name <rg> --yes --no-wait . Key takeaways Design as a graph of specialists. Handoff orchestration with tightly scoped agents beats one monolith on reliability and testability. One .run() contract, many backends. The Agent Framework keeps orchestration code stable from local dev to hosted production. Evaluate continuously. Tracing + smoke tests + model-based evaluators are three layers, not alternatives. Separate compute from data. Hosted Agents run the agent; Capability Hosts give you sovereignty — you need both for enterprise. Govern tools centrally. A versioned toolbox behind one MCP endpoint kills tool sprawl and credential duplication. Open protocols for interop. A2A lets agents cross team, org, and framework boundaries without rewrites. Get started Clone the repo (skip the 50+ translations for a faster download) and work through the lessons in order: git clone --filter=blob:none --sparse https://github.com/microsoft/Building-AI-Agents-From-Zero-To-Production.git cd Building-AI-Agents-From-Zero-To-Production git sparse-checkout set --no-cone '/*' '!translations' '!translated_images' References Building AI Agents from Zero to Production — course repo Microsoft Agent Framework Microsoft Foundry documentation Agent-to-Agent (A2A) protocol specification a2a-python SDK AI Agents for Beginners MCP for Beginners Microsoft Foundry DiscordStep-by-Step: Deploy the Architecture Review Agent Using AZD AI CLI
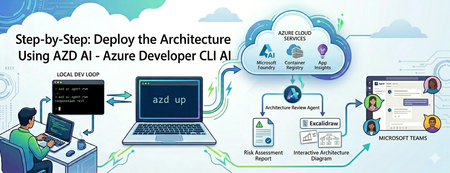
Building an AI agent is easy; operating it is an infrastructure trap. Discover how to use the azd ai CLI extension to streamline your workflow. From local testing to deploying a live Microsoft Foundry hosted agent and publishing it to Microsoft Teams—learn how to do it all without writing complex deployment scripts or needing admin permissions.849Views1like0Comments