functions
39 TopicsAzure Function App — Queue-Based Architecture for Long-Running Sync Jobs
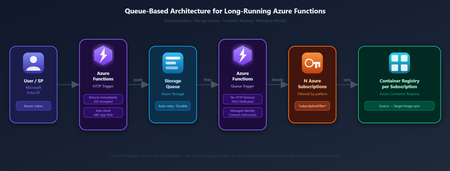
The Problem: HTTP Triggers and Long-Running Jobs Don't Mix Here's a situation you've probably run into: you have a job that needs to loop over dozens of Azure resources, call APIs, and do real work. You wrap it in an HTTP-triggered Azure Function so it can be called on demand. It works great and after a few minutes, the caller gets a 504 Gateway Timeout. The 230-second limit is enforced by Azure Front Door / the platform load balancer. It cannot be overridden by app settings or host configuration. Any HTTP trigger that runs longer than ~3.5 minutes will timeout for the caller. In our case, the job iterates over 30+ Azure subscriptions — for each one it switches context, lists resources, and triggers image imports. Total runtime: anywhere from 2 to 10 minutes depending on how many ACRs need updating. Way over the limit. The Solution: Decouple Request from Execution via a Queue The fix is clean once you see it: the HTTP trigger shouldn't do the work — it should just accept the work and hand it off. That's what a queue is for. The flow splits into two independent phases: Request phase — The HTTP trigger validates the caller (JWT + app role check), packages the job parameters into a queue message, and returns 202 Accepted. This takes under 3 seconds. Execution phase — A Queue Trigger picks up the message and runs the actual sync. No HTTP connection involved, so there's no timeout. On a Dedicated (P-series) plan, execution time is unlimited. Approach What the caller gets Result HTTP trigger → run sync inline Waits for the full job to complete 504 TIMEOUT after 230 seconds HTTP trigger → Queue → Queue Trigger 202 Accepted immediately NO TIMEOUT job runs as long as needed 🤸♀️There's an added bonus - Reliability in Azure Queue Storage: Azure Storage Queues give you automatic retry out of the box. If the job crashes halfway through, the message becomes visible again after a visibility timeout and the Queue Trigger picks it up for a retry — up to 5 attempts before the message is moved to the poison queue. No retry logic to write 🤸♀️. Locking Down the Endpoint Since the HTTP trigger is the public entry point, it needs solid auth. We layer two things: ⭐Use EasyAuth for the "is this a real Entra ID token?" check, and a custom App Role for the "is this person allowed to trigger syncs?" check. These are independent concerns and should stay that way. Layer What it does How EasyAuth (Entra ID) Rejects requests without a valid Entra ID Bearer token — before your code even runs Configured at the Function App level via the Authentication blade App Role check Validates that the token contains the SyncJob.Execute role — only assigned users/SPs can trigger the job Decoded in the function code from the JWT roles claim Managed Identity Authenticates the Function App to Azure APIs (no credentials in code) Connect-AzAccount -Identity — identity assigned via RBAC One gotcha worth knowing: when using v2 tokens (which is the default with modern App Registrations), the aud claim in the token is the raw App ID GUID — not the api:// prefixed URI. You need to explicitly add both forms to your allowedAudiences in EasyAuth, otherwise valid tokens get rejected. APP_ID="<your-app-id>" TENANT_ID="<your-tenant-id>" FUNCTION_APP_URL="https://<your-function-app>.azurewebsites.net" # Interactive login (device code flow — works from any terminal) az login --tenant "${TENANT_ID}" \ --scope "api://${APP_ID}/.default" \ --use-device-code TOKEN=$(az account get-access-token \ --scope "api://${APP_ID}/.default" \ --query accessToken -o tsv) # Trigger the sync — returns 202 immediately curl -s -X POST "${FUNCTION_APP_URL}/api/SyncContainerRegistryHttpTrigger" \ -H "Authorization: Bearer ${TOKEN}" \ -H "Content-Type: application/json" Passing Parameters Through the Queue One nice property of this pattern: the queue message is just JSON, so you can pass whatever parameters the job needs. In our case, we pass a subscriptionFilter wildcard so callers can target a subset of subscriptions without touching any code. The parameter travels the full chain: HTTP body → queue message → Queue Trigger → PowerShell script parameter. Here's how each step handles it. Step 1 — HTTP Trigger reads the body and enqueues the message using the Push-OutputBinding output binding. Azure Functions wires the binding to the queue automatically — no SDK call needed: param($Request, $TriggerMetadata) # ... decode the JWT, check role assignment $queuePayload = @{ triggeredBy = $decoded.Payload.upn ?? $decoded.Payload.oid triggeredAt = (Get-Date -Format 'o') subscriptionFilter = if ($body.subscriptionFilter) { $body.subscriptionFilter } else { "*" } } | ConvertTo-Json -Compress Push-OutputBinding -Name QueueMessage -Value $queuePayload Push-OutputBinding -Name Response -Value ([HttpResponseContext]@{ StatusCode = [System.Net.HttpStatusCode]::Accepted Body = @{ message = "Sync job queued. Check Azure Monitor logs for execution status." } }) ⭐Push-OutputBinding is how Azure Functions PowerShell workers write to output bindings (queues, blobs, HTTP responses…). The binding name QueueMessage maps to the queue defined in function.json — the runtime handles serialisation and delivery. Step 2 — Queue Trigger passes the filter to the script as a named parameter: param($QueueItem, $TriggerMetadata) Write-Host "Triggered SyncContainerRegistry via Storage Queue. Payload: $QueueItem" $subscriptionFilter = if ($QueueItem.subscriptionFilter) { $QueueItem.subscriptionFilter } else { "*" } $SubscriptionFilter = $subscriptionFilter . "$PSScriptRoot/../SyncContainerRegistry/run.ps1" Step 3 — Long running job with the filter as parameter: param($Timer) if (-not $SubscriptionFilter) { $SubscriptionFilter = "*" } $subscriptions = Get-AzSubscription | Where-Object { $_.Name -like $SubscriptionFilter } foreach ($subscription in $subscriptions) { Set-AzContext -SubscriptionId $subscription.Id | Out-Null # ... do the work } Targeting a subset of subscriptions # Sync all subscriptions (default — omit the body) curl -s -X POST "${FUNCTION_APP_URL}/api/SyncContainerRegistryHttpTrigger" \ -H "Authorization: Bearer ${TOKEN}" \ -H "Content-Type: application/json" # Sync only subscriptions matching a pattern curl -s -X POST "${FUNCTION_APP_URL}/api/SyncContainerRegistryHttpTrigger" \ -H "Authorization: Bearer ${TOKEN}" \ -H "Content-Type: application/json" \ -d '{"subscriptionFilter": "*project-alpha*"}' ⭐PowerShell's -like operator uses * as a wildcard anywhere in the string. The pattern *project-alpha* matches sub-mycompany-project-alpha-prd, sub-mycompany-project-alpha-dev, etc. A pattern without a leading * only matches from the start of the string — keep this in mind when naming subscriptions. Pushing a Message Directly via PowerShell You can also push a message straight to the queue without going through the HTTP trigger — useful for testing, scripting, or bypassing the auth layer in a controlled environment. Connect-AzAccount # or -Identity for a Managed Identity context $storageAccount = "<your-storage-account>" $queueName = "sync-job-queue" # Build the payload — same shape the HTTP trigger produces $payload = @{ triggeredBy = $env:USERNAME triggeredAt = (Get-Date -Format 'o') subscriptionFilter = "*project-alpha*" # or "*" for all } | ConvertTo-Json -Compress # Get a queue client via the connected account (no key needed) $ctx = New-AzStorageContext -StorageAccountName $storageAccount -UseConnectedAccount $queue = Get-AzStorageQueue -Name $queueName -Context $ctx $queue.QueueClient.SendMessage($payload) ⭐ -UseConnectedAccount authenticates via the current Connect-AzAccount session — no storage key required, as long as your identity has the Storage Queue Data Message Sender role on the storage account. The Queue Message The HTTP trigger packages the caller identity and filter into a simple JSON payload before enqueuing. The Queue Trigger reads it back as a deserialised PowerShell object — no manual JSON parsing needed. { "triggeredBy": "user@company.com", "triggeredAt": "2026-06-01T11:03:55.570+02:00", "subscriptionFilter": "*project-alpha*" } Design Decisions at a Glance Decision Choice Why Async execution Azure Storage Queue HTTP trigger has a hard 230s timeout. The sync job takes 2–10 minutes. The queue decouples acceptance from execution — and gives us retry for free. Authentication EasyAuth + App Role No credentials in code. Access is controlled via Entra ID app roles — revocable per user without touching infrastructure. Azure identity Managed Identity No secrets to rotate or store. The Function App authenticates to Azure APIs using its platform-assigned identity. Job parameter Wildcard filter via queue payload Lets callers target any subscription subset without code changes. The filter travels through the queue — the Queue Trigger just passes it along. Hosting plan Dedicated (P-series) Consumption plan caps function execution at 10 minutes. A Dedicated plan has no execution time limit — essential when the job can run longer. See you in the Cloud JamesdldEnhancing Data Security and Digital Trust in the Cloud using Azure Services.
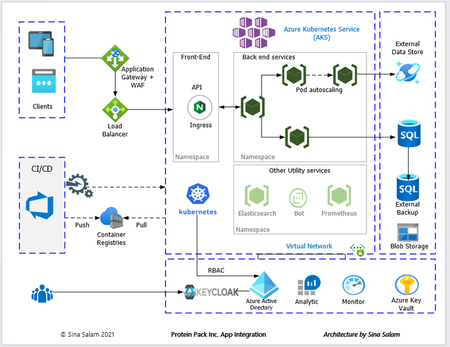
Enhancing Data Security and Digital Trust in the Cloud by Implementing Client-Side Encryption (CSE) using Azure Apps, Azure Storage and Azure Key Vault. Think of Client-Side Encryption (CSE) as a strategy that has proven to be most effective in augmenting data security and modern precursor to traditional approaches. CSE can provide superior protection for your data, particularly if an authentication and authorization account is compromised.Serverless MCP Agent with LangChain.js v1 — Burgers, Tools, and Traces 🍔
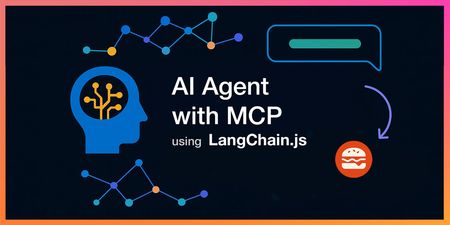
AI agents that can actually do stuff (not just chat) are the fun part nowadays, but wiring them cleanly into real APIs, keeping things observable, and shipping them to the cloud can get... messy. So we built a fresh end‑to‑end sample to show how to do it right with the brand new LangChain.js v1 and Model Context Protocol (MCP). In case you missed it, MCP is a recent open standard that makes it easy for LLM agents to consume tools and APIs, and LangChain.js, a great framework for building GenAI apps and agents, has first-class support for it. You can quickly get up speed with the MCP for Beginners course and AI Agents for Beginners course. This new sample gives you: A LangChain.js v1 agent that streams its result, along reasoning + tool steps An MCP server exposing real tools (burger menu + ordering) from a business API A web interface with authentication, sessions history, and a debug panel (for developers) A production-ready multi-service architecture Serverless deployment on Azure in one command ( azd up ) Yes, it’s a burger ordering system. Who doesn't like burgers? Grab your favorite beverage ☕, and let’s dive in for a quick tour! TL;DR key takeaways New sample: full-stack Node.js AI agent using LangChain.js v1 + MCP tools Architecture: web app → agent API → MCP server → burger API Runs locally with a single npm start , deploys with azd up Uses streaming (NDJSON) with intermediate tool + LLM steps surfaced to the UI Ready to fork, extend, and plug into your own domain / tools What will you learn here? What this sample is about and its high-level architecture What LangChain.js v1 brings to the table for agents How to deploy and run the sample How MCP tools can expose real-world APIs Reference links for everything we use GitHub repo LangChain.js docs Model Context Protocol Azure Developer CLI MCP Inspector Use case You want an AI assistant that can take a natural language request like “Order two spicy burgers and show me my pending orders” and: Understand intent (query menu, then place order) Call the right MCP tools in sequence, calling in turn the necessary APIs Stream progress (LLM tokens + tool steps) Return a clean final answer Swap “burgers” for “inventory”, “bookings”, “support tickets”, or “IoT devices” and you’ve got a reusable pattern! Sample overview Before we play a bit with the sample, let's have a look at the main services implemented here: Service Role Tech Agent Web App ( agent-webapp ) Chat UI + streaming + session history Azure Static Web Apps, Lit web components Agent API ( agent-api ) LangChain.js v1 agent orchestration + auth + history Azure Functions, Node.js Burger MCP Server ( burger-mcp ) Exposes burger API as tools over MCP (Streamable HTTP + SSE) Azure Functions, Express, MCP SDK Burger API ( burger-api ) Business logic: burgers, toppings, orders lifecycle Azure Functions, Cosmos DB Here's a simplified view of how they interact: There are also other supporting components like databases and storage not shown here for clarity. For this quickstart we'll only interact with the Agent Web App and the Burger MCP Server, as they are the main stars of the show here. LangChain.js v1 agent features The recent release of LangChain.js v1 is a huge milestone for the JavaScript AI community! It marks a significant shift from experimental tools to a production-ready framework. The new version doubles down on what’s needed to build robust AI applications, with a strong focus on agents. This includes first-class support for streaming not just the final output, but also intermediate steps like tool calls and agent reasoning. This makes building transparent and interactive agent experiences (like the one in this sample) much more straightforward. Quickstart Requirements GitHub account Azure account (free signup, or if you're a student, get free credits here) Azure Developer CLI Deploy and run the sample We'll use GitHub Codespaces for a quick zero-install setup here, but if you prefer to run it locally, check the README. Click on the following link or open it in a new tab to launch a Codespace: Create Codespace This will open a VS Code environment in your browser with the repo already cloned and all the tools installed and ready to go. Provision and deploy to Azure Open a terminal and run these commands: # Install dependencies npm install # Login to Azure azd auth login # Provision and deploy all resources azd up Follow the prompts to select your Azure subscription and region. If you're unsure of which one to pick, choose East US 2 . The deployment will take about 15 minutes the first time, to create all the necessary resources (Functions, Static Web Apps, Cosmos DB, AI Models). If you're curious about what happens under the hood, you can take a look at the main.bicep file in the infra folder, which defines the infrastructure as code for this sample. Test the MCP server While the deployment is running, you can run the MCP server and API locally (even in Codespaces) to see how it works. Open another terminal and run: npm start This will start all services locally, including the Burger API and the MCP server, which will be available at http://localhost:3000/mcp . This may take a few seconds, wait until you see this message in the terminal: 🚀 All services ready 🚀 When these services are running without Azure resources provisioned, they will use in-memory data instead of Cosmos DB so you can experiment freely with the API and MCP server, though the agent won't be functional as it requires a LLM resource. MCP tools The MCP server exposes the following tools, which the agent can use to interact with the burger ordering system: Tool Name Description get_burgers Get a list of all burgers in the menu get_burger_by_id Get a specific burger by its ID get_toppings Get a list of all toppings in the menu get_topping_by_id Get a specific topping by its ID get_topping_categories Get a list of all topping categories get_orders Get a list of all orders in the system get_order_by_id Get a specific order by its ID place_order Place a new order with burgers (requires userId , optional nickname ) delete_order_by_id Cancel an order if it has not yet been started (status must be pending , requires userId ) You can test these tools using the MCP Inspector. Open another terminal and run: npx -y @modelcontextprotocol/inspector Then open the URL printed in the terminal in your browser and connect using these settings: Transport: Streamable HTTP URL: http://localhost:3000/mcp Connection Type: Via Proxy (should be default) Click on Connect, then try listing the tools first, and run get_burgers tool to get the menu info. Test the Agent Web App After the deployment is completed, you can run the command npm run env to print the URLs of the deployed services. Open the Agent Web App URL in your browser (it should look like https://<your-web-app>.azurestaticapps.net ). You'll first be greeted by an authentication page, you can sign in either with your GitHub or Microsoft account and then you should be able to access the chat interface. From there, you can start asking any question or use one of the suggested prompts, for example try asking: Recommend me an extra spicy burger . As the agent processes your request, you'll see the response streaming in real-time, along with the intermediate steps and tool calls. Once the response is complete, you can also unfold the debug panel to see the full reasoning chain and the tools that were invoked: Tip: Our agent service also sends detailed tracing data using OpenTelemetry. You can explore these either in Azure Monitor for the deployed service, or locally using an OpenTelemetry collector. We'll cover this in more detail in a future post. Wrap it up Congratulations, you just finished spinning up a full-stack serverless AI agent using LangChain.js v1, MCP tools, and Azure’s serverless platform. Now it's your turn to dive in the code and extend it for your use cases! 😎 And don't forget to azd down once you're done to avoid any unwanted costs. Going further This was just a quick introduction to this sample, and you can expect more in-depth posts and tutorials soon. Since we're in the era of AI agents, we've also made sure that this sample can be explored and extended easily with code agents like GitHub Copilot. We even built a custom chat mode to help you discover and understand the codebase faster! Check out the Copilot setup guide in the repo to get started. You can quickly get up speed with the MCP for Beginners course and AI Agents for Beginners course. If you like this sample, don't forget to star the repo ⭐️! You can also join us in the Azure AI community Discord to chat and ask any questions. Happy coding and burger ordering! 🍔Strategic Solutions for Seamless Integration of Third-Party SaaS
Modern systems must be modular and interoperable by design. Integration is no longer a feature, it’s a requirement. Developers are expected to build architectures that connect easily with third-party platforms, but too often, core systems are designed in isolation. This disconnect creates friction for downstream teams and slows delivery. At Microsoft, SaaS platforms like SAP SuccessFactors and Eightfold support Talent Acquisition by handling functions such as requisition tracking, application workflows, and interview coordination. These tools help reduce costs and free up engineering focus for high-priority areas like Azure and AI. The real challenge is integrating them with internal systems such as Demand Planning, Offer Management, and Employee Central. This blog post outlines a strategy centered around two foundational components: an Integration and Orchestration Layer, and a Messaging Platform. Together, these enable real-time communication, consistent data models, and scalable integration. While Talent Acquisition is the use case here, the architectural patterns apply broadly across domains. Whether you're embedding AI pipelines, managing edge deployments, or building platform services, thoughtful integration needs to be built into the foundation, not bolted on later.How to Use Postgres MCP Server with GitHub Copilot in VS Code
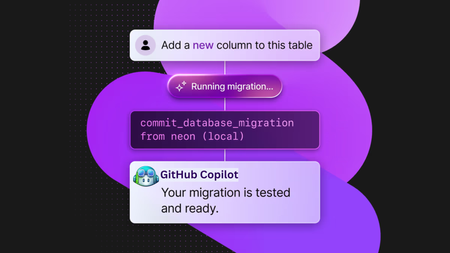
GitHub Copilot has changed how developers write code, but when combined with an MCP (Model Copilot Protocol) server, it also connects your services. With it, Copilot can understand your database schema and generate relevant code for your API, data models, or business logic. In this guide, you'll learn how to use the Neon Serverless Postgres MCP server with GitHub Copilot in VS Code to build a sample REST API quickly. We'll walk through how to create an Azure Function that fetches data from a Neon database, all with minimal setup and no manual query writing. From Code Generation to Database Management with GitHub Copilot AI agents are no longer just helping write code—they’re creating and managing databases. When a chatbot logs a customer conversation, or a new region spins up in the Azure cloud, or a new user signs up, an AI agent can automatically create a database in seconds. No need to open a dashboard or call an API. This is the next evolution of software development: infrastructure as intent. With tools like database MCP servers, agents can now generate real backend services as easily as they generate code. GitHub Copilot becomes your full-stack teammate. It can answer database-related questions, fetch your database connection string, update environment variables in your Azure Function, generate SQL queries to populate tables with mock data, and even help you create new databases or tables on the fly. All directly from your editor, with natural language prompts. Neon has a dedicated MCP server that makes it possible for Copilot to directly understand the structure of your Postgres database. Let's get started with using the Neon MCP server and GitHub Copilot. What You’ll Need Node.js (>= v18.0.0) and npm: Download from nodejs.org. An Azure subscription (create one for free) Install either the stable or Insiders release of VS Code: Stable release Insiders release Install the GitHub Copilot, GitHub Copilot for Azure, and GitHub Copilot Chat extensions for VS Code Azure Functions Core Tools (for local testing) Connect GitHub Copilot to Neon MCP Server Create Neon Database Visit the Neon on Azure Marketplace page and follow the Create a Neon resource guide to deploy Neon on Azure for your subscription. Neon has free plan is more than enough to build proof of concept or kick off a new startup project. Install the Neon MCP Server for VS Code Neon MCP Server offers two options for connecting your VS Code MCP client to Neon. We will use the Remote Hosted MCP Server option. This is the simplest setup—no need to install anything locally or configure a Neon API key in your client. Add the following Neon MCP server configuration to your user settings in VS Code: { "mcp":{ "servers":{ "Neon":{ "command":"npx", "args":[ "-y", "mcp-remote", "https://mcp.neon.tech/sse" ] } } } } Click on Start on the MCP server. A browser window will open with an OAuth prompt. Just follow the steps to give your VS Code MCP client access to your Neon account. Generate an Azure Function REST API using GitHub Copilot Step 1: Create an empty folder (ex: mcp-server-vs-code) and open it in VS Code. Step 2: Open GitHub Copilot Chat in VS Code and switch to Agent mode. You should see the available tools. Step 3: Ask Copilot something like "Create an Azure function with an HTTP trigger”: Copilot will generate a REST API using Azure Functions in JavaScript with a basic setup to run the functions locally. Step 4: Next, you can ask to list existing Neon projects: Step 5: Try out different prompts to fetch the connection string for the chosen database and set it to the Azure Functions settings. Then ask to create a sample Customer table and so on. Or you can even prompt to create a new database branch on Neon. Step 6: Finally, you can prompt Copilot to update the Azure functions code to fetch data from the table: Combine the Azure MCP Server Neon MCP gives GitHub Copilot full access to your database schema, so it can help you write SQL queries, connect to the database, and build API endpoints. But when you add Azure MCP Server into the mix, Copilot can also understand your Azure services—like Blob Storage, Queues, and Azure AI. You can run both Neon MCP and Azure MCP at the same time to create a full cloud-native developer experience. For example: Use Neon MCP for serverless Postgres with branching and instant scale. Use Azure MCP to connect to other Azure services from the same Copilot chat. Even better: Azure MCP is evolving. In newer versions, you can spin up Azure Functions and other services directly from Copilot chat, without ever leaving your editor. Copilot pulls context from both MCP servers, which means smarter code suggestions and faster development. You can mix and match based on your stack and let Copilot help you build real, working apps in minutes. Final Thoughts With GitHub Copilot, Neon MCP server, and Azure Functions, you're no longer writing backend code line by line. It is so fast to build APIs. You're orchestrating services with intent. This is not the future—it’s something you can use today.Feedback Loops in GenAI with Azure Functions, Azure OpenAI and Neon serverless Postgres
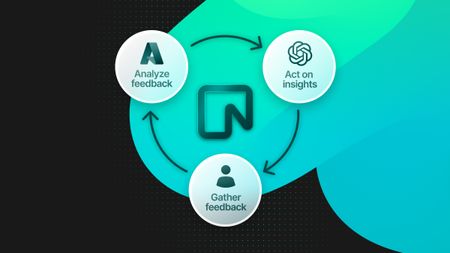
Generative Feedback Loops (GFL) are focused on optimizing and improving the AI’s outputs over time through a cycle of feedback and learning based on the production data. Learn how to build GenAI solution with feedback loops using Azure OpenAI, Azure Functions and Neon Serverless Postgres
Adding users to an AD group with Azure Functions/Logic Apps
I want to add users to an Entra ID/Azure AD group. The list of users will be retrieved from a REST API call with Azure Functions, and then saved into a database, probably Azure SQL. I'm planning on then using Azure Logic Apps to connect the database to the AD group. How can I make the script run every time the REST API changes? Can I add users to the AD group from SQL? Is there a better way to go about this?1.1KViews0likes5CommentsHack Together: RAG Hack - Building RAG Applications with LangChain.js
In the rapidly evolving landscape of Artificial Intelligence and Natural Language Processing, the use of Retrieval Augmented Generation (RAG) has emerged as a powerful solution to enhance the accuracy and relevance of responses generated by language models. In this article, we will explore the talk given during the Hack Together: RAG Hack event, where Glaucia Lemos, a Cloud Advocate at Microsoft, and Yohan Lasorsa, a Senior Cloud Advocate at Microsoft, demonstrated how LangChain.js is revolutionizing the development of RAG applications, making it easier to create intelligent applications that combine large language models (LLMs) with your own data sources.
Using a managed service identity to call into SharePoint Online. Possible?
Hi All, I have been playing around with Managed Service Identity in Azure Logic Apps and Azure Function Apps. I think it is the best thing since sliced bread and am trying to enable various scenarios, one of which is using the MSI to get an app-only token and call into SharePoint Online. Using Logic Apps, I generated a managed service identity for my app, and granted it Sites.readwrite.All on the SharePoint application. When then using the HTTP action I was able to call REST endpoints while using Managed Service Identity as Authentication and using https://<tenant>.sharepoint.com as the audience. I then though I'd take it a step further and create a function app and follow the same pattern. I created the app, generated the MSI, added it the Sites.readwrite.All role same way I did with the Logic App. I then used the code below to retrieve an access token and try and generate a clientcontext: #r "Newtonsoft.Json" using Newtonsoft.Json; using System; using System.Net; using System.Net.Http; using System.Net.Http.Headers; using Microsoft.SharePoint.Client; public static void Run(string input, TraceWriter log) { string resource = "https://<tenant>.sharepoint.com"; string apiversion = "2017-09-01"; using (var client = new HttpClient()) { client.DefaultRequestHeaders.Add("Secret", Environment.GetEnvironmentVariable("MSI_SECRET")); var response = client.GetAsync(String.Format("{0}/?resource={1}&api-version={2}", Environment.GetEnvironmentVariable("MSI_ENDPOINT"), resource, apiversion)).Result; var responseContent = response.Content; string responseString = responseContent.ReadAsStringAsync().Result.ToString(); var json = JsonConvert.DeserializeObject<dynamic>(responseString); string accesstoken = json.access_token.ToString() ClientContext ctx = new ClientContext("<siteurl>"); ctx.AuthenticationMode = ClientAuthenticationMode.Anonymous; ctx.FormDigestHandlingEnabled = false; ctx.ExecutingWebRequest += delegate (object sender, WebRequestEventArgs e){ e.WebRequestExecutor.RequestHeaders["Authorization"] = "Bearer " + accesstoken; }; Web web = ctx.Web; ctx.Load(web); ctx.ExecuteQuery(); log.Info(web.Id.ToString()); } } The bearer token is generated, but requests fail with a 401 access denied (reason="There has been an error authenticating the request.";category="invalid_client") I have tried to change the audience to 00000003-0000-0ff1-ce00-000000000000/<tenant>.sharepoint.com@<tenantid>" but that gives a different 401 error, basically stating it cannot validate the audience uri. ("error_description":"Exception of type 'Microsoft.IdentityModel.Tokens.AudienceUriValidationFailedException' was thrown.). I have also replace the CSOM call with a REST call mimicking the same call I did using the Logic App. My understanding of oauth 2 is not good enough to understand why I'm running into an issue and where to look next. Why is the Logic App call using the HTTP action working, and why is the Function App not working?? Anyone?14KViews1like3Comments