foundry
17 TopicsMicrosoft Foundry Guardrails Getting in Your Way? Here’s How to Dial Them Down
How This All Started So here’s the story. I just got back from a trip and had a pile of footage sitting on my laptop. Being the lazy (sorry, efficient) person I am, I fired up OpenCode and asked GPT-6 Astra, running on Microsoft Foundry, to cut me a travelogue. Nothing fancy: under two minutes, nice lighting, clean transitions, no cringy effects, a quick QA before showing me, and the output in its own folder. Easy, right? Nope. This is what I got instead: “Image processing blocked due to content policy violation.” Seriously? It’s holiday footage! Nothing even remotely dodgy in there. This is a classic false positive from the default guardrails, and the good news is it’s totally fixable. Let me show you how. My Setup Quick context before we dive in: I’ve got two models deployed on Microsoft Foundry, gpt-6-astra and gpt-6-sol. Both were running on Microsoft’s out-of-the-box guardrail. Step 1: Find the Guardrails Page Head over to the Microsoft Foundry portal, click Build, then hit Guardrails in the left menu. You’ll see three guardrails that Microsoft gives you by default: Microsoft.Default, Microsoft.DefaultV2 and Microsoft.MAIDefault. Microsoft.DefaultV2 is the one every new deployment gets, which is why it’s sitting on both of my models. Here’s the catch: you can’t edit or delete these Microsoft-managed defaults. So instead of tweaking them, we’re going to build our own guardrail and swap it in. Step 2: Create Your Own Guardrail Smash that "Create" button and you’ll land on the Create guardrail page. This is where all the knobs and switches live: Every control has three bits: the risk type, the intervention point (does it check what you send in, what the model spits out, or both?) and the action. The magic trick for loosening things up is flipping the action from Block to Annotate. With Annotate, Foundry still scans the content and tags it in the API response, but it stops slamming the door on your request. So What Does Each Setting Actually Do? Before you go on a switching-off spree, it’s worth knowing what each of these does and what you’re giving up when you loosen it. Here’s the quick tour: Jailbreak: This one catches prompts trying to trick the model into ignoring its rules. On Block, those prompts get rejected outright. On Annotate, they go through with a flag. Turn it off completely and you’re trusting the model’s own training to keep it in line. Network (egress rules): Controls which outbound calls a hosted agent is allowed to make. As the portal points out, it only applies to hosted agents, so for plain model deployments like mine it doesn’t change a thing. Indirect prompt injections: Watches user input and tool responses (files, docs, web pages the model reads) for sneaky instructions someone has planted. Leave it on and your agents are protected when they read outside content; switch it off and a dodgy file could quietly hijack your model. For an agentic tool like OpenCode, which reads files and runs shell commands, I’d honestly keep this one on, even if it’s just on Annotate. Spotlighting (Preview): Tags external content inside the prompt so the model can tell your real instructions apart from random untrusted data. Think of it as an extra seatbelt against indirect attacks. Content harms (Hate, Sexual, Self-harm, Violence): Each of these has a severity slider that starts at Medium blocking, meaning anything rated medium or higher gets blocked. Slide it down to Lowest blocking and only the really nasty stuff gets stopped, which kills off most false positives like mine. The asterisk means these four are mandatory: you can turn the dial down, but you can’t switch them off. Blocklists: Want to ban specific words or phrases, like profanity or your competitor’s name? This is where you do it. It’s off by default. Protected material for code and text: Checks whether the model is about to spit out known copyrighted text (song lyrics, articles and so on) or code lifted from public repos. Block stops it; Annotate lets it through with a flag. Switch it off and you’re rolling the dice on your app reproducing someone else’s copyrighted work. Step 3: Pick Your Models Hit Next and Foundry asks which agents and models you want this guardrail on. Any model you’ve already deployed in your project shows up here. For me that’s gpt-6-astra and gpt-6-sol, so I ticked both. Step 4: Name It and Pick a Streaming Mode One more Next and you’re on the Review page. Give your guardrail a name (I went with NoGuardrails, because subtlety isn’t my thing) and pick a streaming mode. You’ve got two choices: Default: Foundry buffers the response and runs it through the guardrail before each chunk goes out. Nothing reaches the user until it’s been checked. Safest option, but you’ll feel a bit of lag when streaming. Asynchronous: Content streams back the moment it’s generated, with the filters running in the background. Much snappier, but flagged content might flash up briefly before the filter catches it, so your app has to clean up after the fact. Microsoft pitches this for low-latency stuff like internal dev tools, which is exactly my use case. Give the summary a quick once-over, then click Create. Done! Did It Work? Yep! With my shiny new guardrail in place, I fired off the exact same request, this time to GPT-6 Sol. And boom: no more content policy error. The model went straight to work scanning my footage and putting the video together. Wrapping Up Look, Microsoft’s default guardrails are a solid starting point, but they can be a bit trigger-happy when you’re doing perfectly legit stuff like video editing, creative work or internal tooling. Since you can’t touch the defaults, the trick is to roll your own: flip Block to Annotate where it makes sense, drag those content harm sliders down, pick the streaming mode that fits your app, and assign it to your deployments. That’s it! One friendly word of warning though: with great power comes great responsibility. Only loosen what you actually need, keep things like indirect prompt injection detection switched on for any agent that reads files or browses the web, and think twice before doing this on anything customer-facing. And if you want to go further than the portal lets you, like switching content filters off completely, you’ll need to apply to Microsoft for approval first. Happy building!414Views1like2CommentsBuilding ShadowQuest: A Multi-Agent RPG
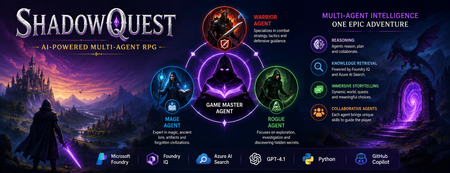
Artificial Intelligence is rapidly evolving beyond traditional chatbots. Today, developers are building intelligent systems where multiple AI agents collaborate, retrieve knowledge, and solve problems together. Microsoft's Agents League Hackathon provided the perfect opportunity to explore this new approach through the Reasoning Agents challenge. For this challenge, I built ShadowQuest, a fantasy role-playing game (RPG) powered by Microsoft Foundry, Foundry IQ, Azure AI Search, GPT-4.1, and GitHub Copilot. The project demonstrates how specialized AI agents can work together while using Retrieval-Augmented Generation (RAG) to deliver accurate and context-aware responses. About the Challenge Microsoft Agents League is a global developer challenge designed to encourage developers to build intelligent AI applications using Microsoft's latest AI technologies. Participants could choose from three tracks: Creative Apps, Reasoning Agents, and Enterprise Agents. I selected the Reasoning Agents track because I wanted to explore how multiple AI agents could collaborate instead of relying on a single large language model. Another important requirement for this year's challenge was integrating at least one Microsoft Intelligence Layer. For ShadowQuest, I chose Foundry IQ as the project's intelligence layer. The Idea Behind ShadowQuest Fantasy RPGs are built around storytelling, exploration, and collaboration between different characters. Every character usually has a unique role, whether it's a warrior protecting the team, a mage interpreting magical knowledge, or a rogue discovering hidden paths. I wanted to recreate this experience using AI. Instead of building one AI assistant responsible for everything, I designed a system where multiple specialized agents collaborate to create a richer and more immersive adventure. ShadowQuest is set in a fantasy world filled with magical artifacts, forgotten kingdoms, mysterious locations, and story-driven quests. Players can ask questions about the world, explore different locations, and learn about the game's lore through conversations with AI agents. Building the Multi-Agent Architecture The architecture follows a simple but scalable design. At the center of the system is the Game Master Agent, which acts as the orchestrator. Every player interaction starts with the Game Master. It receives the player's request, determines what information is needed, retrieves additional knowledge when required, and generates the final response. Supporting the Game Master are three specialized agents: Warrior Agent – Focuses on combat strategy and tactical decisions. Mage Agent – Provides magical knowledge, world lore, and information about ancient artifacts. Rogue Agent – Specializes in exploration, investigation, and discovering hidden information. Each agent has a clearly defined responsibility, making the system easier to understand, maintain, and extend in the future. Using Foundry IQ as the Knowledge Layer One of the most important parts of the project was integrating Foundry IQ. Instead of storing every piece of game information inside prompts, I created a dedicated knowledge base containing information about characters, magical artifacts, locations, quests, and the history of the ShadowQuest world. This approach separates knowledge from reasoning. Whenever a player asks a question, the Game Master Agent first retrieves relevant information from the knowledge base before generating a response. This ensures that answers remain consistent with the game's world while reducing hallucinations. Foundry IQ became the central source of truth for the entire project, making it easy to manage and expand the game world without constantly modifying prompts. Azure AI Search and Retrieval-Augmented Generation To enable intelligent retrieval, I connected Foundry IQ with Azure AI Search. The RPG documents were indexed, and vector embeddings were generated using Microsoft's embedding models. This enables semantic search, allowing the system to understand the meaning behind a player's question instead of relying only on keyword matching. For example, if a player asks about a magical relic without mentioning its exact name, Azure AI Search can still retrieve the correct information based on semantic similarity. The complete workflow looks like this: The player submits a question. The Game Master Agent receives the request. Foundry IQ queries Azure AI Search. Relevant documents are retrieved. GPT-4.1 generates a grounded response using the retrieved context. This Retrieval-Augmented Generation (RAG) approach significantly improves the quality and reliability of responses. Accelerating Development with GitHub Copilot GitHub Copilot played an important role throughout the development process. It helped generate Python classes, improve documentation, create helper functions, and speed up repetitive coding tasks. During the live demonstration, I also showed how Copilot could quickly generate a new Healer Agent, demonstrating how AI-assisted development makes it easier to extend a multi-agent application while maintaining a consistent architecture. Rather than replacing the developer, Copilot acted as an intelligent coding assistant, allowing me to focus more on architecture and design decisions. Demonstrating ShadowQuest During the Microsoft Agents League Reasoning Agents Battle, I demonstrated the Game Master Agent by asking questions about the ShadowQuest world, magical artifacts, and game lore. One of the most interesting parts of the demonstration was observing the retrieval process. Before generating a response, the Game Master Agent called the knowledge retrieval function through Foundry IQ. This confirmed that the system was retrieving relevant information from the indexed knowledge base rather than relying only on GPT-4.1's internal knowledge. This demonstrated how RAG can create more grounded, reliable, and context-aware AI experiences. Lessons Learned Building ShadowQuest taught me that designing multi-agent systems is as much about architecture as it is about AI models. Clearly defining responsibilities for each agent made the application easier to maintain and opened the door for future expansion. I also learned how valuable Retrieval-Augmented Generation can be for applications that depend on structured knowledge. Separating reasoning from knowledge allows AI systems to remain accurate while making it easier to update information over time. Finally, participating in the Microsoft Agents League was an incredible opportunity to experiment with Microsoft's latest AI technologies, learn from other developers, and share ideas with a global community passionate about agentic AI. Looking Ahead ShadowQuest is only the beginning. In future iterations, I plan to expand the project by introducing additional agents such as a Merchant Agent and Healer Agent, implementing persistent player memory, adding dynamic quest generation, improving combat mechanics, and enabling deeper collaboration between agents. These improvements will make the game world more immersive while continuing to explore the possibilities of agent-based AI systems. Conclusion ShadowQuest demonstrates how Microsoft Foundry, Foundry IQ, Azure AI Search, GPT-4.1, and GitHub Copilot can be combined to build intelligent multi-agent applications. More importantly, the project reinforced an important idea: the future of AI is not a single assistant performing every task, but a team of specialized agents collaborating with shared knowledge to solve increasingly complex problems. Participating in the Microsoft Agents League was an inspiring experience that allowed me to explore the next generation of AI development while building a project that combines storytelling, reasoning, and knowledge retrieval. I look forward to continuing this journey and discovering new ways to build intelligent applications using Microsoft's growing AI ecosystem.549Views1like0CommentsFoundry IQ: Give Your AI Agents a Knowledge Upgrade
If you’re learning to build AI agents, you’ve probably hit a familiar wall: your agent can generate text, but it doesn’t actually know anything about your data. It can’t look up your documents, search across your files, or pull facts from multiple sources to answer a real question. That’s the gap Foundry IQ fills. It gives your AI agents structured access to knowledge, so they can retrieve, reason over, and synthesize information from real data sources instead of relying on what’s baked into the model. Why Should You Care? As a student or early-career developer, understanding how AI systems work with external knowledge is one of the most valuable skills you can build right now. Retrieval-Augmented Generation (RAG), knowledge bases, and multi-source querying are at the core of every production AI application, from customer support bots to research assistants to enterprise copilots. Foundry IQ gives you a hands-on way to learn these patterns without having to build all the plumbing yourself. You define knowledge bases, connect data sources, and let your agents query them. The concepts you learn here transfer directly to real-world AI engineering roles. What is Foundry IQ? Foundry IQ is a service within Azure AI Foundry that lets you create knowledge bases, collections of connected data sources that your AI agents can query through a single endpoint. Instead of writing custom retrieval logic for every app you build, you: Define knowledge sources — connect documents, data stores, or web content (SharePoint, Azure Blob Storage, Azure AI Search, Fabric OneLake, and more). Organize them into a knowledge base — group multiple sources behind one queryable endpoint. Query from your agent — your AI agent calls the knowledge base to get the context it needs before generating a response. This approach means the knowledge layer is reusable. Build it once, and any agent or app in your project can tap into it. The IQ Series: A Three-Part Learning Path The IQ Series is a set of three weekly episodes that walk you through Foundry IQ from concept to code. Each episode includes a tech talk, visual doodle summaries, and a companion cookbook with sample code you can run yourself. 👉 Get started: https://aka.ms/iq-series Episode 1: Unlocking Knowledge for Your Agents (March 18, 2026) Start here. This episode introduces the core architecture of Foundry IQ and explains how AI agents interact with knowledge. You’ll learn what knowledge bases are, why they matter, and how the key components fit together. What you’ll learn: The difference between model knowledge and retrieved knowledge How Foundry IQ structures the retrieval layer The building blocks: knowledge sources, knowledge bases, and agent queries Episode 2: Building the Data Pipeline with Knowledge Sources (March 25, 2026) This episode goes deeper into knowledge sources, the connectors that bring data into Foundry IQ. You’ll see how different content types flow into the system and how to wire up sources from services you may already be using. What you’ll learn: How to connect sources like Azure Blob Storage, Azure AI Search, SharePoint, Fabric OneLake, and the web How content is ingested and indexed for retrieval Patterns for combining multiple source types Episode 3: Querying Multi-Source Knowledge Bases (April 1, 2026) The final episode shows you how to bring it all together. You’ll learn how agents query across multiple knowledge sources through a single knowledge base endpoint and how to synthesize answers from diverse data. What you’ll learn: How to query a knowledge base from your agent code How retrieval works across multiple connected sources Techniques for synthesizing information to answer complex questions Get Hands-On with the Cookbooks Every episode comes with a companion cookbook in the GitHub repo, complete with sample code you can clone, run, and modify. This is the fastest way to go from watching to building. 👉 Explore the repo: https://aka.ms/iq-series Inside you’ll find: Episode links — watch the tech talks and doodle recaps Cookbooks — step-by-step code samples for each episode Documentation links — official Foundry IQ docs and additional learning resources What to Build Next Once you’ve worked through the series, try applying what you’ve learned: Study assistant — connect your course materials as knowledge sources and build an agent that can answer questions across all your notes and readings. Project documentation bot — index your team’s project docs and READMEs into a knowledge base so everyone can query them naturally. Research synthesizer — connect multiple data sources (papers, web content, datasets) and build an agent that can cross-reference and summarize findings. Start Learning The IQ Series is designed to take you from zero to building knowledge-driven AI agents. Watch the episodes, run the cookbooks, and start experimenting with your own knowledge bases. 👉 https://aka.ms/iq-series637Views1like0CommentsMicrosoft Foundry Model Router: A Developer's Guide to Smarter AI Routing
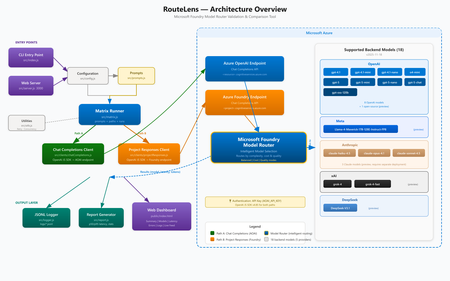
Introduction When building AI-powered applications on Azure, one of the most impactful decisions you make isn't about which model to use, it's about how your application selects models at runtime. Microsoft Foundry Model Router, available through Microsoft Foundry, automatically routes your inference requests to the best available model based on prompt complexity, latency targets, and cost efficiency. But how do you know it's actually routing correctly? And how do you compare its behavior across different API paths? That's exactly the problem RouteLens solves. It's an open-source Node.js CLI and web-based testing tool that sends configurable prompts through two distinct Azure AI runtime paths and produces a detailed comparison of routing decisions, latency profiles, and reliability metrics. In this post, we'll walk through what Model Router does, why it matters, how to use the validator tool, and best practices for designing applications that get the most out of intelligent model routing. What Is Microsoft Founry Model Router? Microsoft Foundry Model Router is a deployment option in Microsoft Foundry that sits between your application and a pool of AI models. Instead of hard-coding a specific model like gpt-4o or gpt-4o-mini , you deploy a Model Router endpoint and let Azure decide which underlying model serves each request. How It Works Your application sends an inference request to the Model Router deployment. Model Router analyzes the request (prompt complexity, token count, required capabilities). It selects the most appropriate model from the available pool. The response is returned transparently — your application code doesn't change. Why This Matters Cost optimization — Simple prompts get routed to smaller, cheaper models. Complex prompts go to more capable (and expensive) ones. Latency reduction — Lightweight prompts complete faster when they don't need a heavyweight model. Resilience — If one model is experiencing high load or throttling, traffic can shift to alternatives. Simplified application code — No need to build your own model-selection logic. The Two Runtime Paths Microsoft Foundry offers two distinct endpoint configurations for hitting Model Router. Even though both use the Chat Completions API, they may have different routing behaviour: Path SDK Endpoint AOAI + Chat Completions OpenAI JS SDK https://.cognitiveservices.azure.com/openai/deployments/ Foundry Project + Chat Completions OpenAI JS SDK (separate client) https://.cognitiveservices.azure.com/openai/deployments/ Understanding whether these two paths produce the same routing decisions is critical for production applications. If the same prompt routes to different models depending on which endpoint you use, that's a signal you need to investigate. Introducing RouteLens RouteLens is a Node.js tool that automates this comparison. It: Sends a configurable set of prompts across categories (echo, summarize, code, reasoning) through both paths. Logs every response to structured JSONL files for post-hoc analysis. Computes statistics including p50/p95 latency, error rates, and model-choice distribution. Highlights routing differences — where the same prompt was served by different models across paths. Provides a web dashboard for interactive testing and real-time result visualization. The Web Dashboard The built-in web UI makes it easy to run tests and explore results without parsing log files: The dashboard includes: KPI Dashboard — Key metrics at a glance: Success Rate, Avg TPS, Gen TPS, Peak TPS, Fastest Response, p50/p95 Latency, Most Reliable Path, Total Tokens Summary view — Per-path/per-category stats with success rate, TPS, and latency Model Comparison — Side-by-side view of which models were selected by each path Latency Charts — Visual bar charts comparing p50 and p95 latencies Error Analysis — Error distribution and detailed error messages Live Feed — Real-time streaming of results as they come in Log Viewer — Browse and inspect historical JSONL log files Model Comparison — See which models were selected by each routing path for every prompt: Live Feed — Real-time streaming of results as they come in: Log Viewer — Browse and inspect historical JSONL log files with parsed table views: Mobile Responsive — The UI adapts to smaller screens: Getting Started Prerequisites Node.js 18+ (LTS recommended) An Azure subscription with a Foundry project Model Router deployed in your Foundry project An API key from your Azure OpenAI / Foundry resource The API version (e.g. 2024-05-01-preview ) Setup # Clone and install git clone https://github.com/leestott/modelrouter-routelens/ cd modelrouter-routelens npm install # Configure your endpoints cp .env.example .env # Edit .env with your Azure endpoints (see below) Configuration The .env file needs these key settings: # Your Foundry / Cognitive Services deployment endpoint # Format: https://<resource>.cognitiveservices.azure.com/openai/deployments/<deployment> # Do NOT include /chat/completions or ?api-version FOUNDRY_PROJECT_ENDPOINT=https://<resource>.cognitiveservices.azure.com/openai/deployments/model-router AOAI_BASE_URL=https://<resource>.cognitiveservices.azure.com/openai/deployments/model-router # API key from your Azure OpenAI / Foundry resource AOAI_API_KEY=your-api-key-here # Azure OpenAI API version AOAI_API_VERSION=2024-05-01-preview</resource></resource></deployment></resource> Running Tests # Full test matrix — sends all prompts through both paths npm run run:matrix # 408 timeout diagnostic — focuses on the Responses path timeout issue npm run run:repro408 # Web UI — interactive dashboard npm run ui # Then open http://localhost:3002 (or the port set in UI_PORT) Understanding the Results Latency Comparison The latency charts show p50 (median) and p95 (tail) latency for each path and prompt category: Key things to look for: Large p50 differences between paths suggest one path has consistently higher overhead. High p95 values indicate tail latency problems — possibly timeouts or retries. Category-specific patterns — If code prompts are slow on one path but fast on another, that's a routing difference worth investigating. Model Comparison The model comparison view shows which models were selected for each prompt: When both paths select the same model, you see a green "Match" indicator. When they differ, it's flagged in red — these are the cases you want to investigate. Error Analysis The errors view helps diagnose reliability issues: Common error patterns: 408 Timeout — The Responses path may take longer for certain prompt categories 401 Unauthorized — Authentication configuration issues 429 Rate Limited — You're hitting throughput limits 500 Internal Server Error — Backend model issues Best Practices for Designing Applications with Model Router 1. Design Prompts with Routing in Mind Model Router makes decisions based on prompt characteristics. To get the best routing: Keep prompts focused — A clear, single-purpose prompt is easier for the router to classify than a multi-part prompt that spans multiple complexity levels. Use system messages effectively — A well-structured system message helps the router understand the task complexity. Separate complex chains — If you have a multi-step workflow, make each step a separate API call rather than one massive prompt. This lets the router use a cheaper model for simple steps. 2. Set Appropriate Timeouts Different models have different latency profiles. Your timeout settings should account for the slowest model the router might select: // Too aggressive — may timeout when routed to a larger model const TIMEOUT = 5000; // 5s // Better — allows headroom for model variation const TIMEOUT = 30000; // 30s // Best — use different timeouts based on expected complexity function getTimeout(category) { switch (category) { case 'echo': return 10000; case 'summarize': return 20000; case 'code': return 45000; case 'reasoning': return 60000; default: return 30000; } } 3. Implement Robust Retry Logic Because the router may select different models on retry, transient failures can resolve themselves: async function callWithRetry(prompt, maxRetries = 3) { for (let attempt = 0; attempt < maxRetries; attempt++) { try { return await client.chat.completions.create({ model: 'model-router', messages: [{ role: 'user', content: prompt }], }); } catch (err) { if (attempt === maxRetries - 1) throw err; // Exponential backoff await new Promise(r => setTimeout(r, 1000 * Math.pow(2, attempt))); } } } 4. Monitor Model Selection in Production Log which model was selected for each request so you can track routing patterns over time: const response = await client.chat.completions.create({ model: 'model-router', messages: [{ role: 'user', content: prompt }], }); // The model field in the response tells you which model was actually used console.log(`Routed to: ${response.model}`); console.log(`Tokens: ${response.usage.total_tokens}`); 5. Use the Right API Path for Your Use Case Based on our testing with RouteLens, consider: Chat Completions path — The standard path for chat-style interactions. Uses the openai SDK directly. Foundry Project path — Uses the same Chat Completions API but through the Foundry project endpoint. Useful for comparing routing behaviour across different endpoint configurations. Note: The Responses API ( /responses ) is not currently available on cognitiveservices.azure.com Model Router deployments. Both paths in RouteLens use Chat Completions. 6. Test Before You Ship Run RouteLens as part of your pre-production validation: # In your CI/CD pipeline or pre-deployment check npm run run:matrix -- --runs 10 --concurrency 4 This helps you: Catch routing regressions when Azure updates model pools Verify that your prompt changes don't cause unexpected model selection shifts Establish latency baselines for alerting Architecture Overview RouteLens sends configurable prompts through two distinct Azure AI runtime paths and compares routing decisions, latency, and reliability. The Matrix Runner dispatches prompts to both the Chat Completions Client (OpenAI JS SDK → AOAI endpoint) and the Project Responses Client ( azure/ai-projects → Foundry endpoint). Both paths converge at Azure Model Router, which intelligently selects the optimal backend model. Results are logged to JSONL files and rendered in the web dashboard. Key Benefits of Model Router Benefit Description Cost savings Automatically routes simple prompts to cheaper models, reducing spend by 30-50% in typical workloads Lower latency Simple prompts complete faster on lightweight models Zero code changes Same API contract as a standard model deployment — just change the deployment name Future-proof As Azure adds new models to the pool, your application benefits automatically Built-in resilience Routing adapts to model availability and load conditions Conclusion Azure Model Router represents a shift from "pick a model" to "describe your task and let the platform decide." This is a natural evolution for AI applications — just as cloud platforms abstract away server selection, Model Router abstracts away model selection. RouteLens gives you the visibility to trust that abstraction. By systematically comparing routing behavior across API paths and prompt categories, you can deploy Model Router with confidence and catch issues before your users do. The tool is open source under the MIT license. Try it out, file issues, and contribute improvements: GitHub Repository Model Router Documentation Microsoft Foundry1.3KViews1like0CommentsFunction Calling with Small Language Models
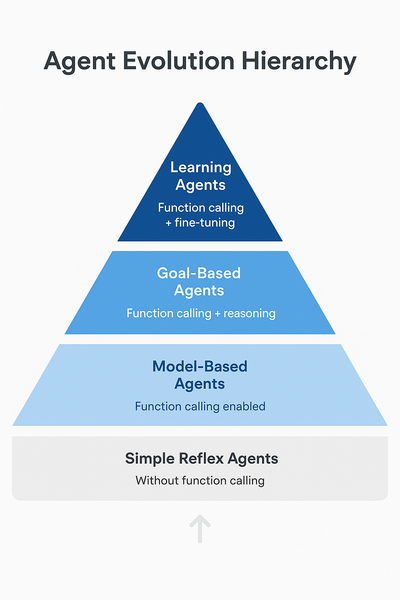
In our previous article on running Phi-4 locally, we built a web-enhanced assistant that could search the internet and provide informed answers. Here's what that implementation looked like: def web_enhanced_query(question): # 1. ALWAYS search (hardcoded decision) search_results = search_web(question) # 2. Inject results into prompt prompt = f"""Here are recent search results: {search_results} Question: {question} Using only the information above, give a clear answer.""" # 3. Model just summarizes what it reads return ask_phi4(endpoint, model_id, prompt) Today, we're upgrading to true function calling. With this, we have ability to transform small language models from passive text generators into intelligent agents that can: Decide when to use external tools Reason which tool bests fit each task Execute real-world actions thrugh apis Function calling represents a significant evolution in AI capabilities. Let's understand where this positions our small language models: Agent Classification Framework Simple Reflex Agents (Basic) React to immediate input with predefined rules Example: Thermostat, basic chatbot Without function calling, models operate here Model-Based Agents (Intermediate) Maintain internal state and context Example: Robot vacuum with room mapping Function calling enables this level Goal-Based Agents (Advanced) Plan multi-step sequences to achieve objectives Example: Route planner, task scheduler Function calling + reasoning enables this Learning Agents (Expert) Adapt and improve over time Example: Recommendation systems Future: Function calling + fine-tuning As usual with these articles, let's get ready to get our hands dirty! Project Setup Let's set up our environment for building function-calling assistants. Prerequisites First, ensure you have Foundry Local installed and a model running. We'll use Qwen 2.5-7B for this tutorial as it has excellent function calling support. Important: Not all small language models support function calling equally. Qwen 2.5 was specifically trained for this capability and provides a reliable experience through Foundry Local. # 1. Check Foundry Local is installed foundry --version # 2. Start the Foundry Local service foundry service start # 3. Download and run Qwen 2.5-7B foundry model run qwen2.5-7b Python Environment Setup # 1. Create Python virtual environment python -m venv venv source venv/bin/activate # Windows: venv\Scripts\activate # 2. Install dependencies pip install openai requests python-dotenv # 3. Get a free OpenWeatherMap API key # Sign up at: https://openweathermap.org/api ``` Create `.env` file: ``` OPENWEATHER_API_KEY=your_api_key_here ``` Building a Weather-Aware Assistant So in this scenario, a user wants to plan outdoor activities but needs weather context. Without function calling, You will get something like this: User: "Should I schedule my team lunch outside at 2pm in Birmingham?" Model: "That depends on weather conditions. Please check the forecast for rain and temperature." However, with fucntion-calling you get an answer that is able to look up the weather and reply with the needed context. We will do that now. Understanding Foundry Local's Function Calling Implementation Before we start coding, there's an important implementation detail to understand. Foundry Local uses a non-standard function calling format. Instead of returning function calls in the standard OpenAI tool_calls field, Qwen models return the function call as JSON text in the response content. For example, when you ask about weather, instead of: # Standard OpenAI format message.tool_calls = [ {"name": "get_weather", "arguments": {"location": "Birmingham"}} ] You get: # Foundry Local format message.content = '{"name": "get_weather", "arguments": {"location": "Birmingham"}}' This means we need to parse the JSON from the content ourselves. Don't worry—this is straightforward, and I'll show you exactly how to handle it! Step 1: Define the Weather Tool Create weather_assistant.py: import os from openai import OpenAI import requests import json import re from dotenv import load_dotenv load_dotenv() # Initialize Foundry Local client client = OpenAI( base_url="http://127.0.0.1:59752/v1/", api_key="not-needed" ) # Define weather tool tools = [ { "type": "function", "function": { "name": "get_weather", "description": "Get current weather information for a location", "parameters": { "type": "object", "properties": { "location": { "type": "string", "description": "The city or location name" }, "units": { "type": "string", "description": "Temperature units", "enum": ["celsius", "fahrenheit"], "default": "celsius" } }, "required": ["location"] } } } ] A tool is necessary because it provides the model with a structured specification of what external functions are available and how to use them. The tool definition contains the function name, description, parameters schema, and information returned. Step 2: Implement the Weather Function def get_weather(location: str, units: str = "celsius") -> dict: """Fetch weather data from OpenWeatherMap API""" api_key = os.getenv("OPENWEATHER_API_KEY") url = "http://api.openweathermap.org/data/2.5/weather" params = { "q": location, "appid": api_key, "units": "metric" if units == "celsius" else "imperial" } response = requests.get(url, params=params, timeout=5) response.raise_for_status() data = response.json() temp_unit = "°C" if units == "celsius" else "°F" return { "location": data["name"], "temperature": f"{round(data['main']['temp'])}{temp_unit}", "feels_like": f"{round(data['main']['feels_like'])}{temp_unit}", "conditions": data["weather"][0]["description"], "humidity": f"{data['main']['humidity']}%", "wind_speed": f"{round(data['wind']['speed'] * 3.6)} km/h" } The model calls this function to get the weather data. it contacts OpenWeatherMap API, gets real weather data and returns it as a python dictionary Step 3: Parse Function Calls from Content This is the crucial step where we handle Foundry Local's non-standard format: def parse_function_call(content: str): """Extract function call JSON from model response""" if not content: return None json_pattern = r'\{"name":\s*"get_weather",\s*"arguments":\s*\{[^}]+\}\}' match = re.search(json_pattern, content) if match: try: return json.loads(match.group()) except json.JSONDecodeError: pass try: parsed = json.loads(content.strip()) if isinstance(parsed, dict) and "name" in parsed: return parsed except json.JSONDecodeError: pass return None Step 4: Main Chat Function with Function Calling and lastly, calling the model. Notice the tools and tool_choice parameter. Tools tells the model it is allowed to output a tool_call requesting that the function be executed. While tool_choice instructs the model how to decide whether to call a tool. def chat(user_message: str) -> str: """Process user message with function calling support""" messages = [ {"role": "user", "content": user_message} ] response = client.chat.completions.create( model="qwen2.5-7b-instruct-generic-cpu:4", messages=messages, tools=tools, tool_choice="auto", temperature=0.3, max_tokens=500 ) message = response.choices[0].message if message.content: function_call = parse_function_call(message.content) if function_call and function_call.get("name") == "get_weather": print(f"\n[Function Call] {function_call.get('name')}({function_call.get('arguments')})") args = function_call.get("arguments", {}) weather_data = get_weather(**args) print(f"[Result] {weather_data}\n") final_prompt = f"""User asked: "{user_message}" Weather data: {json.dumps(weather_data, indent=2)} Provide a natural response based on this weather information.""" final_response = client.chat.completions.create( model="qwen2.5-7b-instruct-generic-cpu:4", messages=[{"role": "user", "content": final_prompt}], max_tokens=200, temperature=0.7 ) return final_response.choices[0].message.content return message.content Step 5: Run the script Now put all the above together and run the script def main(): """Interactive weather assistant""" print("\nWeather Assistant") print("=" * 50) print("Ask about weather or general questions.") print("Type 'exit' to quit\n") while True: user_input = input("You: ").strip() if user_input.lower() in ['exit', 'quit']: print("\nGoodbye!") break if user_input: response = chat(user_input) print(f"Assistant: {response}\n") if __name__ == "__main__": if not os.getenv("OPENWEATHER_API_KEY"): print("Error: OPENWEATHER_API_KEY not set") print("Set it with: export OPENWEATHER_API_KEY='your_key_here'") exit(1) main() Note: Make sure Qwen 2.5 is running in Foundry Local in a new terminal Now let's talk about Model Context Protocol! Our weather assistant works beautifully with a single function, but what happens when you need dozens of tools? Database queries, file operations, calendar integration, email—each would require similar setup code. This is where Model Context Protocol (MCP) comes in. MCP is an open standard that provides pre-built, standardized servers for common tools. Instead of writing custom integration code for every capability, you can connect to MCP servers that handle the complexity for you. With MCP, You only need one command to enable weather, database, and file access npx @modelcontextprotocol/server-weather npx @modelcontextprotocol/server-sqlite npx @modelcontextprotocol/server-filesystem Your model automatically discovers and uses these tools without custom integration code. Learn more: Model Context Protocol Documentation EdgeAI Course - Module 03: MCP Integration Key Takeaways Function calling transforms models into agents - From passive text generators to active problem-solvers Qwen 2.5 has excellent function calling support - Specifically trained for reliable tool use Foundry Local uses non-standard format - Parse JSON from content instead of tool_calls field Start simple, then scale with MCP - Build one tool to understand the pattern, then leverage standards Documentation Running Phi-4 Locally with Foundry Local Phi-4: Small Language Models That Pack a Punch Microsoft Foundry Local GitHub EdgeAI for Beginners Course OpenWeatherMap API Documentation Model Context Protocol Qwen 2.5 Documentation Thank you for reading! I hope this article helps you build more capable AI agents with small language models. Function calling opens up incredible possibilities—from simple weather assistants to complex multi-tool workflows. Start with one tool, understand the pattern, and scale from there.1.4KViews1like0CommentsRunning Phi-4 Locally with Microsoft Foundry Local: A Step-by-Step Guide
In our previous post, we explored how Phi-4 represents a new frontier in AI efficiency that delivers performance comparable to models 5x its size while being small enough to run on your laptop. Today, we're taking the next step: getting Phi-4 up and running locally on your machine using Microsoft Foundry Local. Whether you're a developer building AI-powered applications, an educator exploring AI capabilities, or simply curious about running state-of-the-art models without relying on cloud APIs, this guide will walk you through the entire process. Microsoft Foundry Local brings the power of Azure AI Foundry to your local device without requiring an Azure subscription, making local AI development more accessible than ever. So why do you want to run Phi-4 Locally? Before we dive into the setup, let's quickly recap why running models locally matters: Privacy and Control: Your data never leaves your machine. This is crucial for sensitive applications in healthcare, finance, or education where data privacy is paramount. Cost Efficiency: No API costs, no rate limits. Once you have the model downloaded, inference is completely free. Speed and Reliability: No network latency or dependency on external services. Your AI applications work even when you're offline. Learning and Experimentation: Full control over model parameters, prompts, and fine-tuning opportunities without restrictions. With Phi-4's compact size, these benefits are now accessible to anyone with a modern laptop—no expensive GPU required. What You'll Need Before we begin, make sure you have: Operating System: Windows 10/11, macOS (Intel or Apple Silicon), or Linux RAM: Minimum 16GB (32GB recommended for optimal performance) Storage: At least 5 - 10GB of free disk space Processor: Any modern CPU (GPU optional but provides faster inference) Note: Phi-4 works remarkably well even on consumer hardware 😀. Step 1: Installing Microsoft Foundry Local Microsoft Foundry Local is designed to make running AI models locally as simple as possible. It handles model downloads, manages memory efficiently, provides OpenAI-compatible APIs, and automatically optimizes for your hardware. For Windows Users: Open PowerShell or Command Prompt and run: winget install Microsoft.FoundryLocal For macOS Users (Apple Silicon): Open Terminal and run: brew install microsoft/foundrylocal/foundrylocal Verify Installation: Open your terminal and type. This should return the Microsoft Foundry Local version, confirming installation: foundry --version Step 2: Downloading Phi-4-Mini For this tutorial, we'll use Phi-4-mini, the lightweight 3.8 billion parameter version that's perfect for learning and experimentation. Open your terminal and run: foundry model run phi-4-mini You should see your download begin and something similar to the image below Available Phi Models on Foundry Local While we're using phi-4-mini for this guide, Foundry Local offers several Phi model variants and other open-source models optimized for different hardware and use cases: Model Hardware Type Size Best For phi-4-mini GPU chat-completion 3.72 GB Learning, fast responses, resource-constrained environments with GPU phi-4-mini CPU chat-completion 4.80 GB Learning, fast responses, CPU-only systems phi-4-mini-reasoning GPU chat-completion 3.15 GB Reasoning tasks with GPU acceleration phi-4-mini-reasoning CPU chat-completion 4.52 GB Mathematical proofs, logic puzzles with lower resource requirements phi-4 GPU chat-completion 8.37 GB Maximum reasoning performance, complex tasks with GPU phi-4 CPU chat-completion 10.16 GB Maximum reasoning performance, CPU-only systems phi-3.5-mini GPU chat-completion 2.16 GB Most lightweight option with GPU support phi-3.5-mini CPU chat-completion 2.53 GB Most lightweight option, CPU-optimized phi-3-mini-128k GPU chat-completion 2.13 GB Extended context (128k tokens), GPU-optimized phi-3-mini-128k CPU chat-completion 2.54 GB Extended context (128k tokens), CPU-optimized phi-3-mini-4k GPU chat-completion 2.13 GB Standard context (4k tokens), GPU-optimized phi-3-mini-4k CPU chat-completion 2.53 GB Standard context (4k tokens), CPU-optimized Note: Foundry Local automatically selects the best variant for your hardware. If you have an NVIDIA GPU, it will use the GPU-optimized version. Otherwise, it will use the CPU-optimized version. run the command below to see full list of models foundry model list Step 3: Test It Out Once the download completes, an interactive session will begin. Let's test Phi-4-mini's capabilities with a few different prompts: Example 1: Explanation Phi-4-mini provides a thorough, well-structured explanation! It starts with the basic definition, explains the process in biological systems, gives real-world examples (plant cells, human blood cells). The response is detailed yet accessible. Example 2: Mathematical Problem Solving Excellent step-by-step solution! Phi-4-mini breaks down the problem methodically: 1. Distributes on the left side 2. Isolates the variable terms 3. Simplifies progressively 4. Arrives at the final answer: x = 11 The model shows its work clearly, making it easy to follow the logic and ideal for educational purposes Example 3: Code Generation The model provides a concise Python function using string slicing ([::-1]) - the most Pythonic approach to reversing a string. It includes clear documentation with a docstring explaining the function's purpose, provides example usage demonstrating the output, and even explains how the slicing notation works under the hood. The response shows that the model understands not just how to write the code, but why this approach is preferred - noting that the [::-1] slice notation means "start at the end of the string and end at position 0, move with the step -1, negative one, which means one step backwards." This showcases the model's ability to generate production-ready code with proper documentation while being educational about Python idioms. To exit the interactive session, type `/bye` Step 4: Extending Phi-4 with Real-Time Tools Understanding Phi-4's Knowledge Cutoff Like all language models, Phi-4 has a knowledge cutoff date from its training data (typically several months old). This means it won't know about very recent events, current prices, or breaking news. For example, if you ask "Who won the 2024 NBA championship?" it might not have the answer. The good thing is, there's a powerful work-around. While Phi-4 is incredibly capable, connecting it to external tools like web search, databases, or APIs transforms it from a static knowledge base into a dynamic reasoning engine. This is where Microsoft Foundry's REST API comes in. Microsoft Foundry provides a simple API that lets you integrate Phi-4 into Python applications and connect it to real-time data sources. Here's a practical example: building a web-enhanced AI assistant. Web-Enhanced AI Assistant This simple application combines Phi-4's reasoning with real-time web search, allowing it to answer current questions accurately. Prerequisites: pip install foundry-local-sdk requests ddgs Create phi4_web_assistant.py: import requests from foundry_local import FoundryLocalManager from ddgs import DDGS import json def search_web(query): """Search the web and return top results""" try: results = list(DDGS().text(query, max_results=3)) if not results: return "No search results found." search_summary = "\n\n".join([ f"[Source {i+1}] {r['title']}\n{r['body'][:500]}" for i, r in enumerate(results) ]) return search_summary except Exception as e: return f"Search failed: {e}" def ask_phi4(endpoint, model_id, prompt): """Send a prompt to Phi-4 and stream response""" response = requests.post( f"{endpoint}/chat/completions", json={ "model": model_id, "messages": [{"role": "user", "content": prompt}], "stream": True }, stream=True, timeout=180 ) full_response = "" for line in response.iter_lines(): if line: line_text = line.decode('utf-8') if line_text.startswith('data: '): line_text = line_text[6:] # Remove 'data: ' prefix if line_text.strip() == '[DONE]': break try: data = json.loads(line_text) if 'choices' in data and len(data['choices']) > 0: delta = data['choices'][0].get('delta', {}) if 'content' in delta: chunk = delta['content'] print(chunk, end="", flush=True) full_response += chunk except json.JSONDecodeError: continue print() return full_response def web_enhanced_query(question): """Combine web search with Phi-4 reasoning""" # By using an alias, the most suitable model will be downloaded # to your device automatically alias = "phi-4-mini" # Create a FoundryLocalManager instance. This will start the Foundry # Local service if it is not already running and load the specified model. manager = FoundryLocalManager(alias) model_info = manager.get_model_info(alias) print("🔍 Searching the web...\n") search_results = search_web(question) prompt = f"""Here are recent search results: {search_results} Question: {question} Using only the information above, give a clear answer with specific details.""" print("🤖 Phi-4 Answer:\n") return ask_phi4(manager.endpoint, model_info.id, prompt) if __name__ == "__main__": # Try different questions question = "Who won the 2024 NBA championship?" # question = "What is the latest iPhone model released in 2024?" # question = "What is the current price of Bitcoin?" print(f"Question: {question}\n") print("=" * 60 + "\n") web_enhanced_query(question) print("\n" + "=" * 60) Run It: python phi4_web_assistant.py What Makes This Powerful By connecting Phi-4 to external tools, you create an intelligent system that: Accesses Real-Time Information: Get news, weather, sports scores, and breaking developments Verifies Facts: Cross-reference information with multiple sources Extends Capabilities: Connect to databases, APIs, file systems, or any other tool Enables Complex Applications: Build research assistants, customer support bots, educational tutors, and personal assistants This same pattern can be applied to connect Phi-4 to: Databases: Query your company's internal data APIs: Weather services, stock prices, translation services File Systems: Analyze documents and spreadsheets IoT Devices: Control smart home systems The possibilities are endless when you combine local AI reasoning with real-world data access. Troubleshooting Common Issues Service not running: Make sure Foundry Local is properly installed and the service is running. Try restarting with foundry --version to verify installation. Model downloads slowly: Check your internet connection and ensure you have enough disk space (5-10GB per model). Out of memory: Close other applications or try using a smaller model variant like phi-3.5-mini instead of the full phi-4. Connection issues: Verify that no other services are using the same ports. Foundry Local typically runs on http://localhost:5272. Model not found: Run foundry model list to see available models, then use foundry model run <model-name> to download and run a specific model. Your Next Steps with Foundry Local Congratulations! You now have Phi-4 running locally through Microsoft Foundry Local and understand how to extend it with external tools like web search. This combination of local AI reasoning with real-time data access opens up countless possibilities for building intelligent applications. Coming in Future Posts In the coming weeks, we'll explore advanced topics using Hugging Face: Fine-tuning Phi models on your own data for domain-specific applications Phi-4-multimodal: Analyze images, process audio, and combine multiple data types Advanced deployment patterns: RAG systems and multi-agent orchestration Resources to Explore EdgeAI for Beginners Course: Comprehensive 36-45 hour course covering Edge AI fundamentals, optimization, and production deployment Phi-4 Technical Report: Deep dive into architecture and benchmarks Phi Cookbook on GitHub: Practical examples and recipes Foundry Local Documentation: Complete technical documentation and API reference Module 08: Foundry Local Toolkit: 10 comprehensive samples including RAG applications and multi-agent systems Keep experimenting with Foundry Local, and stay tuned as we unlock the full potential of Edge AI! What will you build with Phi-4? Share your ideas and projects in the comments below!5.2KViews1like1Comment