faq
31 TopicsMGDC for SharePoint FAQ: How to List SharePoint Webs or Subsites?
1. Introduction SharePoint uses a known object hierarchy to store your files, including, in order: Site Collection (site, SPSite) Web (site, subsite, SPWeb) List (SPList, Document Library, SPDocumentLibrary) Folder (SPFolder) List Item (documents, files, SPListItem, SPFile) If you are not familiar with all those, you can read more about them at What is in the Permissions dataset? 2.What we have in MGDC for SharePoint The SharePoint Sites dataset in Microsoft Graph Data Connect offers a list of all sites (site collections) in your tenant. The SharePoint Files will give you details about each file (document). However, there are no MGDC datasets that will give you one object per SharePoint Web (subsite) or SharePoint List (library). There is a workaround, though. If you pay attention to the schema for the SharePoint Sites and SharePoint Files datasets in MGDC, you will find that Sites includes a few interesting details about the Root Web (the main web in the site collection) and the total number of webs (subsites) in each site. Also, the Files dataset includes details about the web (subsite) and the list (library) where the file lives. You could group on these columns to expose more information about webs and lists. 3. One Web These days, if you create a modern SharePoint site, you will get one web (called the Root Web) and no obvious mechanism to create subsites or additional webs. For any sites created in the last few years, you likely have no additional webs outside the Root Web. Your SharePoint might have existed for many years and your company could have sites using old templates with multiple subsites. If you’re trying to find out if that’s the case for your tenant, the information is available in MGDC, if you are willing to dig a little deeper. 4. Finding Old Subsites The main task here is to create a custom query to join the Sites and Files datasets. You would then group that in a particular way to enumerate each subsites (Webs). You might also tag the Webs that are a Root Web, so that you can identify subsites that are not at the top of the Site hierarchy. If you pulled the Sites and Files datasets into a SQL Server or a Lakehouse in Microsoft Fabric, this is what that query could look like: SELECT Webs.SiteId, Sites.RootWeb.Title AS SiteTitle, Sites.Url AS SiteUrl, Sites.WebCount, Webs.WebId, CASE WHEN Root.RootWeb.Id IS NOT NULL THEN 1 ELSE 0 END AS IsRootWeb, Webs.FileCount, Webs.TotalSize, Webs.TotalSizeWithVersions FROM ( SELECT SiteId, WebId, COUNT(*) AS FileCount, SUM(SizeInBytes) AS TotalSize, SUM(SizeInBytesWithVersions) AS TotalSizeWithVersions FROM Files GROUP BY SiteId, WebId ) AS Webs LEFT JOIN Sites AS Sites ON Webs.SiteId = Sites.Id LEFT JOIN Sites AS Root ON Webs.SiteId = Root.Id AND Webs.WebId = Root.RootWeb.Id 4. Empty Webs, Web properties This technique will get you a nice list of Webs, but there are a few problems. First, if a specific web has no files, we won’t see that web in the Files dataset and therefore the query will fail to list that particular web. You would still see that Web counted in the WebCount property of the Sites dataset, but there would be no listing of that web in the query proposed above, since it has no files. Another problem is that there is no way to find in MGDC the details properties of the Web, like the Title. You get some of those for the Root Web in the Sites dataset, but not for the other Webs. For that, you would have to query the Web object using another source like the Graph API or PowerShell. 5. Conclusion I hope this article helped you find details about enumerating SharePoint Webs using the Microsoft Graph Data Connect. For recent deployments of SharePoint Online, you should have only one web per site and the Sites dataset (with Root Web details) should give you plenty of details. However, this might come in handy if you want to manage some of the old subsites of a slightly older SharePoint deployment. Finally, if you’re looking for a challenge, I would suggest adapting the SQL code above to enumerate all the document libraries using the Files dataset. It can be done following a similar pattern…MGDC for SharePoint FAQ: Dataset types and features
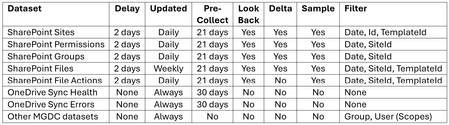
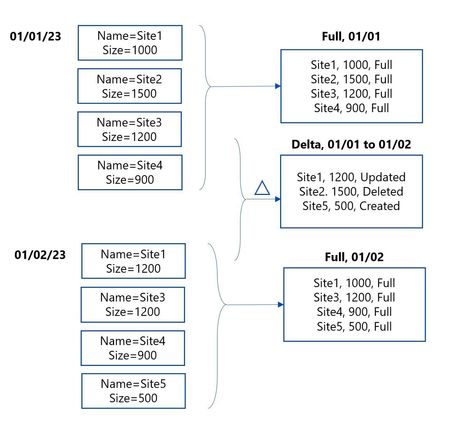
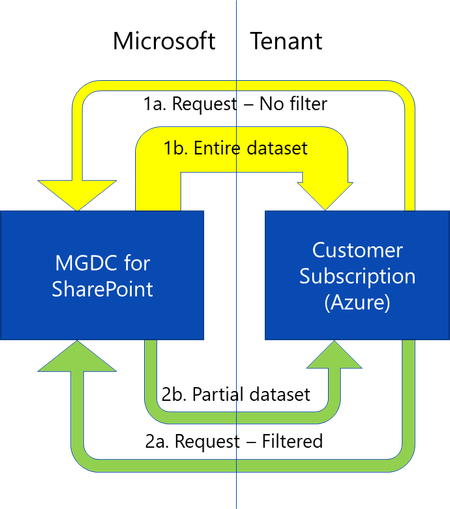
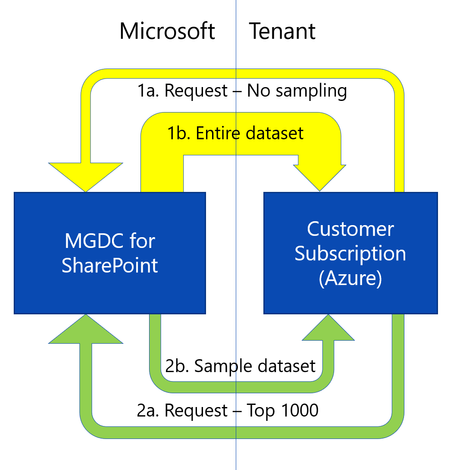
In this post, we’ll discuss the different types of datasets on Microsoft Graph Data Connect (MGDC) for SharePoint and which specific features apply to each one, including deltas, sampling and filtering. If you’re new to MGDC, get an overview at https://aka.ms/SharePointData.MGDC for SharePoint FAQ: How to use Excel for analytics
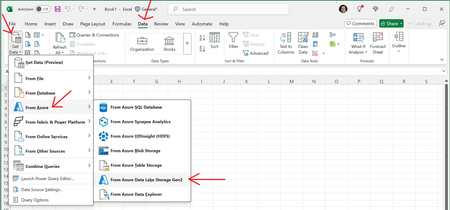
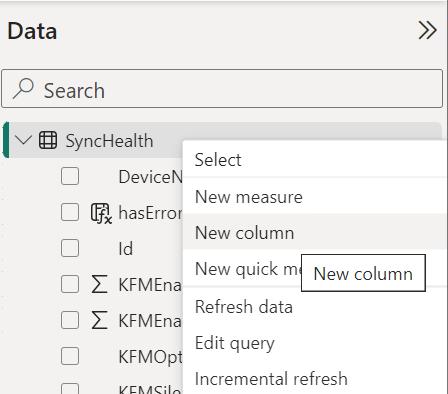
MGDC for SharePoint – Dataset types and features In this post, we’ll discuss how to use Microsoft Excel to consume the data from Microsoft Graph Data Connect (MGDC) for SharePoint. If you’re new to MGDC, get an overview at https://aka.ms/SharePointData. 1. Introduction In most examples on how to analyze the data from MGDC for SharePoint, we use Azure Synapse in combination with Power BI Desktop, which is a very capable tool that can turn your data into coherent, visually immersive, and interactive insights. But keep in mind that, when pulling datasets from MGDC with Azure Synapse, the data becomes available in an Azure storage account as a set of JSON files. From there, you can use many different tools beyond Power BI. In this article, we will focus on how to read and analyze that data using Microsoft Excel. 2. Get the data into Azure storage The first step in the process is to get your data from MGDC. I have a blog post that describes that process at Step-by-step: (Synapse) Gather a detailed dataset on SharePoint Sites using MGDC. Section 1 if that blog shows how to setup the Microsoft Graph Data Connect and section 2 describes how to run an Azure Synapse pipeline to pull the data. If you complete these first two sections, you will end up with your SharePoint Sites data in Azure. You can skip section 3 of that blog, that describes how to get the data into a Power BI dashboard. You will replace that section with the information in this article, which takes the data to Microsoft Excel instead. 3. Bring the data from Azure storage to Excel Next, you need to bring the data in the JSON files from the Azure storage account to your Excel spreadsheet. Fortunately, Excel has the perfect set of tools to bring in that data. You should start with a blank spreadsheet. Select the “Data” tab in the ribbon and use the option to “Get Data”. Then select the option “from Azure” and choose “From Azure Data Lake Storage Gen2”. This will make sure that you’re getting the data in your ADLS Gen2 storage account. > Get Data --> From Azure --> From Azure Data Lake Storage Gen2 Next, you will need to provide the URL to the ADLS Gen2 storage. Provide the full path, with the container and folder in the format: https://account.dfs.core.windows.net/container/folder. The account name is in step 1d of the at step-by-step guide mentioned before. The container and folder names are in step 1f of the guide. You can also find the URL in the Azure Portal, under the Settings/Endpoints section of the storage account. Once you provide the URL and click OK, you will need to authenticate. Select the option to use the storage account key and type in the key you saved in step 1d of the at step-by-step guide. You can find the key in the Azure Portal, under the “Security + Networking” / “Access Keys” section of the storage account. Once you have typed the account key, click “Connect”. At this point, you want to click on the “Transform Data” button to filter for the specific files you want. This will open the “Power Query Editor” window, where you can apply specific steps to filter the data coming in. The easiest way to filter out the metadata files is to scroll right until you find the “Folder Path” column and filter that column for paths that do not contain the word “metadata”. > down arrow --> Text filters --> Does not contain... After that, you can scroll left to the “Content” column and click on the button to “Combine files”. After that, the query will pull in the content of the files and expand all the columns from the JSON. > Content --> Combine files Finally, you can click on the “Close & Load” button to bring the data into a sheet. & Load With that, you can play with the data in Excel. 4. Create PivotTables Once the data is imported into your Excel spreadsheet, you will be able to create data visualizations from it. The most interesting way to do this is to use Excel PivotTables. For instance, here’s a pivot table with storage (Storage Used) by site type (RootWeb.WebTemplate) on the different dates you pulled data (SnapShotDate). See the sample PivotTable below after some adjustments and formatting. 5. Tips Here are a few additional comments. Distinct types of authentication: As you might have noticed, there are multiple ways to authenticate to get access to the Azure storage account. In addition to using a key to the entire storage account as shown here, you could use Azure to grant specific permissions to a user and log in as that user. This will help restrict access to specific folders and grant limited permissions (like read-only). Create custom columns: To help with your data analysis, you might want to add a few custom or calculated columns. You can in many ways, including transformations in Power Query, formulas in the Excel sheet or in the pivot table itself. You can read more about it at How to create custom columns in Power BI (this says Power BI but applies to Excel as well). More than one million rows: If you’re using this to visualize data from the SharePoint Sites dataset, you are likely to have fewer than one million rows, which is the Microsoft Excel limit. If you’re one of the few tenants that will have more than one million sites or if you’re analyzing a larger dataset like Permissions or Files, you can only pull the first one million rows into a sheet. To overcome this, you can load the data into a model and use that to drive your pivot tables. You can read more about it at Loading CSV/text files with more than a million rows into Excel (this says text files but applies to JSON as well). 6. Conclusion I hope this post helped you understand how to use Microsoft Excel to pull JSON data from an Azure storage account used by MGDC for SharePoint. For more information, visit https://aka.ms/SharePointData.