exchange 2007
622 TopicsIntroducing: Log Parser Studio
To download the Log Parser Studio, please see the attachment on this blog post. Anyone who regularly uses Log Parser 2.2 knows just how useful and powerful it can be for obtaining valuable information from IIS (Internet Information Server) and other logs. In addition, adding the power of SQL allows explicit searching of gigabytes of logs returning only the data that is needed while filtering out the noise. The only thing missing is a great graphical user interface (GUI) to function as a front-end to Log Parser and a ‘Query Library’ in order to manage all those great queries and scripts that one builds up over time. Log Parser Studio was created to fulfill this need; by allowing those who use Log Parser 2.2 (and even those who don’t due to lack of an interface) to work faster and more efficiently to get to the data they need with less “fiddling” with scripts and folders full of queries. With Log Parser Studio (LPS for short) we can house all of our queries in a central location. We can edit and create new queries in the ‘Query Editor’ and save them for later. We can search for queries using free text search as well as export and import both libraries and queries in different formats allowing for easy collaboration as well as storing multiple types of separate libraries for different protocols. Processing Logs for Exchange Protocols We all know this very well: processing logs for different Exchange protocols is a time consuming task. In the absence of special purpose tools, it becomes a tedious task for an Exchange Administrator to sift thru those logs and process them using Log Parser (or some other tool), if output format is important. You also need expertise in writing those SQL queries. You can also use special purpose scripts that one can find on the web and then analyze the output to make some sense of out of those lengthy logs. Log Parser Studio is mainly designed for quick and easy processing of different logs for Exchange protocols. Once you launch it, you’ll notice tabs for different Exchange protocols, i.e. Microsoft Exchange ActiveSync (MAS), Exchange Web Services (EWS), Outlook Web App (OWA/HTTP) and others. Under those tabs there are tens of SQL queries written for specific purposes (description and other particulars of a query are also available in the main UI), which can be run by just one click! Let’s get into the specifics of some of the cool features of Log Parser Studio … Query Library and Management Upon launching LPS, the first thing you will see is the Query Library preloaded with queries. This is where we manage all of our queries. The library is always available by clicking on the Library tab. You can load a query for review or execution using several methods. The easiest method is to simply select the query in the list and double-click it. Upon doing so the query will auto-open in its own Query tab. The Query Library is home base for queries. All queries maintained by LPS are stored in this library. There are easy controls to quickly locate desired queries & mark them as favorites for quick access later. Library Recovery The initial library that ships with LPS is embedded in the application and created upon install. If you ever delete, corrupt or lose the library you can easily reset back to the original by using the recover library feature (Options | Recover Library). When recovering the library all existing queries will be deleted. If you have custom/modified queries that you do not want to lose, you should export those first, then after recovering the default set of queries, you can merge them back into LPS. Import/Export Depending on your need, the entire library or subsets of the library can be imported and exported either as the default LPS XML format or as SQL queries. For example, if you have a folder full of Log Parser SQL queries, you can import some or all of them into LPS’s library. Usually, the only thing you will need to do after the import is make a few adjustments. All LPS needs is the base SQL query and to swap out the filename references with ‘[LOGFILEPATH]’ and/or ‘[OUTFILEPATH]’ as discussed in detail in the PDF manual included with the tool (you can access it via LPS | Help | Documentation). Queries Remember that a well-written structured query makes all the difference between a successful query that returns the concise information you need vs. a subpar query which taxes your system, returns much more information than you actually need and in some cases crashes the application. The art of creating great SQL/Log Parser queries is outside the scope of this post, however all of the queries included with LPS have been written to achieve the most concise results while returning the fewest records. Knowing what you want and how to get it with the least number of rows returned is the key! Batch Jobs and Multithreading You’ll find that LPS in combination with Log Parser 2.2 is a very powerful tool. However, if all you could do was run a single query at a time and wait for the results, you probably wouldn’t be making near as much progress as you could be. In lieu of this LPS contains both batch jobs and multithreaded queries. A batch job is simply a collection of predefined queries that can all be executed with the press of a single button. From within the Batch Manager you can remove any single or all queries as well as execute them. You can also execute them by clicking the Run Multiple Queries button or the Execute button in the Batch Manager. Upon execution, LPS will prepare and execute each query in the batch. By default LPS will send ALL queries to Log Parser 2.2 as soon as each is prepared. This is where multithreading works in our favor. For example, if we have 50 queries setup as a batch job and execute the job, we’ll have 50 threads in the background all working with Log Parser simultaneously leaving the user free to work with other queries. As each job finishes the results are passed back to the grid or the CSV output based on the query type. Even in this scenario you can continue to work with other queries, search, modify and execute. As each query completes its thread is retired and its resources freed. These threads are managed very efficiently in the background so there should be no issue running multiple queries at once. Now what if we did want the queries in the batch to run concurrently for performance or other reasons? This functionality is already built-into LPS’s options. Just make the change in LPS | Options | Preferences by checking the ‘Process Batch Queries in Sequence’ checkbox. When checked, the first query in the batch is executed and the next query will not begin until the first one is complete. This process will continue until the last query in the batch has been executed. Automation In conjunction with batch jobs, automation allows unattended scheduled automation of batch jobs. For example we can create a scheduled task that will automatically run a chosen batch job which also operates on a separate set of custom folders. This process requires two components, a folder list file (.FLD) and a batch list file (.XML). We create these ahead of time from within LPS. For more details on how to do that, please refer to the manual. Charts Many queries that return data to the Result Grid can be charted using the built-in charting feature. The basic requirements for charts are the same as Log Parser 2.2, i.e. The first column in the grid may be any data type (string, number etc.) The second column must be some type of number (Integer, Double, Decimal), Strings are not allowed Keep the above requirements in mind when creating your own queries so that you will consciously write the query to include a number for column two. To generate a chart click the chart button after a query has completed. For #2 above, even if you forgot to do so, you can drag any numbered column and drop it in the second column after the fact. This way if you have multiple numbered columns, you can simply drag the one that you’re interested in, into second column and generate different charts from the same data. Again, for more details on charting feature, please refer to the manual. Keyboard Shortcuts/Commands There are multiple keyboard shortcuts built-in to LPS. You can view the list anytime while using LPS by clicking LPS | Help | Keyboard Shortcuts. The currently included shortcuts are as follows: Shortcut What it does CTRL+N Start a new query. CTRL+S Save active query in library or query tab depending on which has focus. CTRL+Q Open library window. CTRL+B Add selected query in library to batch. ALT+B Open Batch Manager. CTRL+B Add the selected queries to batch. CTRL+D Duplicates the current active query to a new tab. CTRL+ALT+E Open the error log if one exists. CTRL+E Export current selected query results to CSV. ALT+F Add selected query in library to the favorites list. CTRL+ALT+L Open the raw Library in the first available text editor. CTRL+F5 Reload the Library from disk. F5 Execute active query. F2 Edit name/description of currently selected query in the Library. F3 Display the list of IIS fields. Supported Input and Output types Log Parser 2.2 has the ability to query multiple types of logs. Since LPS is a work in progress, only the most used types are currently available. Additional input and output types will be added when possible in upcoming versions or updates. Supported Input Types Full support for W3SVC/IIS, CSV, HTTP Error and basic support for all built-in Log Parser 2.2 input formats. In addition, some custom written LPS formats such as Microsoft Exchange specific formats that are not available with the default Log Parser 2.2 install. Supported Output Types CSV and TXT are the currently supported output file types. Log Parser Studio - Quick Start Guide Want to skip all the details & just run some queries right now? Start here … The very first thing Log Parser Studio needs to know is where the log files are, and the default location that you would like any queries that export their results as CSV files to be saved. 1. Setup your default CSV output path: a. Go to LPS | Options | Preferences | Default Output Path. b. Browse to and select the folder you would like to use for exported results. c. Click Apply. d. Any queries that export CSV files will now be saved in this folder. NOTE: If you forget to set this path before you start the CSV files will be saved in %AppData%\Microsoft\Log Parser Studio by default but it is recommended that y ou move this to another location. 2. Tell LPS where the log files are by opening the Log File Manager. If you try to run a query before completing this step LPS will prompt and ask you to set the log path. Upon clicking OK on that prompt, you are presented with the Log File Manager. Click Add Folder to add a folder or Add File to add a single or multiple files. When adding a folder you still must select at least one file so LPS will know which type of log we are working with. When doing so, LPS will automatically turn this into a wildcard (*.xxx) Indicating that all matching logs in the folder will be searched. You can easily tell which folder or files are currently being searched by examining the status bar at the bottom-right of Log Parser Studio. To see the full path, roll your mouse over the status bar. NOTE: LPS and Log Parser handle multiple types of logs and objects that can be queried. It is important to remember that the type of log you are querying must match the query you are performing. In other words, when running a query that expects IIS logs, only IIS logs should be selected in the File Manager. Failure to do this (it’s easy to forget) will result errors or unexpected behavior will be returned when running the query. 3. Choose a query from the library and run it: a. Click the Library tab if it isn’t already selected. b. Choose a query in the list and double-click it. This will open the query in its own tab. c. Click the Run Single Query button to execute the query The query execution will begin in the background. Once the query has completed there are two possible outputs targets; the result grid in the top half of the query tab or a CSV file. Some queries return to the grid while other more memory intensive queries are saved to CSV. As a general rule queries that may return very large result sets are probably best served going to a CSV file for further processing in Excel. Once you have the results there are many features for working with those results. For more details, please refer to the manual. Have fun with Log Parser Studio! & always remember – There’s a query for that! Kary Wall Escalation Engineer Microsoft Exchange Support472KViews8likes37CommentsHow to Export and Import mailboxes to PST files in Exchange 2007 SP1
There might be times when an Exchange Administrator will need to export the contents of individual mailboxes to offline files in order to present specific users with a format that is easily portable and ready to consume using Outlook clients. To fulfill this need Exchange 2007 SP1 will have a new set of features to export and import mailboxes to and from PST files. As I know you will ask - yes, those PST files can be bigger than 2 GB, which was a limitation of Exmerge tool used for this purpose in previous versions of Exchange. Export/Import to PST Requirements In order to export or import mailboxes to PST files the following requirements must be met: Export/Import to PST must be run from a 32 bit client machine with Exchange Management Tools installed (Version Exchange 2007 SP1 or later). The 32bit requirement comes from a dependency with the Outlook client. Either Outlook 2003 or Outlook 2007 must be installed on the client machine. The user running the task must be an Exchange Organization Admin or an Exchange Server Admin on the server where the mailbox to export/import lives. Exporting mailboxes to PST files The most basic cmdlet to export a mailbox to a PST file is as follows: Export-Mailbox –Identity <mailboxUser> -PSTFolderPath <pathToSavePST> PSTFolderPath must be a full path pointing either to a directory or to a (.pst) file. If a directory is specified a PST file named after the mailbox alias will be used as the target of the export. Note that if the PST file already exists the contents of the mailbox will be merged into it. Example: After the cmdlet finishes execution, the .pst file will be ready in the specified location: To export multiple mailboxes to their respective .pst files at once you can pipe in the identities of those mailboxes to the export task. Notice that when bulk exporting the PSTFolderPath parameter must forcefully point to a directory since one .pst file will be created for each mailbox. Example: Get-Mailbox -Database 'MDB' | Export-Mailbox -PSTFolderPath D:\PSTs Importing mailboxes from PST files The process for importing mailbox contents from a PST file is quite similar: Import-Mailbox -Identity <mailboxUser> -PSTFolderPath <PSTFileLocation> Again, PSTFolderPath must be the full path to the directory where the .pst file lives or to the (.pst) file itself. In the case where PSTFolderPath points to a directory the cmdlet will try to match the mailbox alias with the name of an existing .pst file in the specified directory and import the content of that file. Example: Just as with the export to PST scenario, when bulk importing mailboxes the PSTFolderPath must forcefully point to a directory and the task logic will try to match mailboxes alias with the .pst file names under that location. If no match is found for a particular mailbox, that mailbox will be skipped. Example: Get-Mailbox -Database 'MDB' | Import-Mailbox -PSTFolderPath D:\PSTs Filtering content in Export/Import to PST When only specific content is desired in the PST file (or back into the mailbox) a common set of filters can be used to leave out the rest of the messages. Export/Import to PST support the following filters: Locale, StartDate, EndDate, ContentKeywords, SubjectKeywords, AttachmentFileNames, AllContentKeywords, SenderKeywords, and RecipientKeywords. Example: Import only those messages that were created between 1/1/06 and 12/1/06 and contain the word "review" in the subject and any of the words {"project","alpha"} in the body. Import-mailbox -Identity ricardr -PSTFolderPath D:\PSTs -StartDate 1/1/06 -EndDate 12/1/06 -SubjectKeywords:'review' -ContentKeywords:'project','alpha' Now, we realize that you would like to try this today, but please be patient! - Ricardo Rosales Guerrero338KViews0likes55CommentsAllowing application servers to relay off Exchange Server 2007
From time to time, you need to allow an application server to relay off of your Exchange server. You might need to do this if you have a SharePoint, a CRM application like Dynamics, or a web site that sends emails to your employees or customers. You might need to do this if you are getting the SMTP error message "550 5.7.1 Unable to relay" The top rule is that you want to keep relay restricted as tightly as possible, even on servers that are not connected to the Internet. Usually this is done with authentication and/or restricting by IP address. Exchange 2003 provides the following relay restrictions on the SMTP VS: Here are the equivalent options for how to configure this in Exchange 2007. Allow all computers which successfully authenticate to relay, regardless of the list above Like its predecessor, Exchange 2007 is configured to accept and relay email from hosts that authenticate by default. Both the "Default" and "Client" receive connectors are configured this way out of the box. Authenticating is the simplest method to submit messages, and preferred in many cases. The Permissions Group that allows authenticated users to submit and relay is the "ExchangeUsers" group. The permissions that are granted with this permissions group are: NT AUTHORITY\Authenticated Users {ms-Exch-SMTP-Submit} NT AUTHORITY\Authenticated Users {ms-Exch-Accept-Headers-Routing} NT AUTHORITY\Authenticated Users {ms-Exch-Bypass-Anti-Spam} NT AUTHORITY\Authenticated Users {ms-Exch-SMTP-Accept-Any-Recipient} The specific ACL that controls relay is the ms-Exch-SMTP-Accept-Any-Recipient. Only the list below (specify IP address) This option is for those who cannot authenticate with Exchange. The most common example of this is an application server that needs to be able to relay messages through Exchange. First, start with a new custom receive connector. You can think of receive connectors as protocol listeners. The closest equivalent to Exchange 2003 is an SMTP Virtual Server. You must create a new one because you will want to scope the remote IP Address(es) that you will allow. The next screen you must pay particular attention to is the "Remote Network settings". This is where you will specify the IP ranges of servers that will be allowed to submit mail. You definitely want to restrict this range down as much as you can. In this case, I want my two web servers, 192.168.2.55 & 192.168.2.56 to be allowed to relay. The next step is to create the connector, and open the properties. Now you have two options, which I will present. The first option will probably be the most common. Option 1: Make your new scoped connector an Externally Secured connector This option is the most common option, and preferred in most situations where the application that is submitting will be submitting email to your internal users as well as relaying to the outside world. Before you can perform this step, it is required that you enable the Exchange Servers permission group. Once in the properties, go to the Permissions Groups tab and select Exchange servers. Next, continue to the authentication mechanisms page and add the "Externally secured" mechanism. What this means is that you have complete trust that the previously designated IP addresses will be trusted by your organization. Caveat: If you do not perform these two steps in order, the GUI blocks you from continuing. Do not use this setting lightly. You will be granting several rights including the ability to send on behalf of users in your organization, the ability to ResolveP2 (that is, make it so that the messages appear to be sent from within the organization rather than anonymously), bypass anti-spam, and bypass size limits. The default "Externally Secured" permissions are as follows: MS Exchange\Externally Secured Servers {ms-Exch-SMTP-Accept-Authoritative-Domain} MS Exchange\Externally Secured Servers {ms-Exch-Bypass-Anti-Spam} MS Exchange\Externally Secured Servers {ms-Exch-Bypass-Message-Size-Limit} MS Exchange\Externally Secured Servers {ms-Exch-SMTP-Accept-Exch50} MS Exchange\Externally Secured Servers {ms-Exch-Accept-Headers-Routing} MS Exchange\Externally Secured Servers {ms-Exch-SMTP-Submit} MS Exchange\Externally Secured Servers {ms-Exch-SMTP-Accept-Any-Recipient} MS Exchange\Externally Secured Servers {ms-Exch-SMTP-Accept-Authentication-Flag} MS Exchange\Externally Secured Servers {ms-Exch-SMTP-Accept-Any-Sender} Basically you are telling Exchange to ignore internal security checks because you trust these servers. The nice thing about this option is that it is simple and grants the common rights that most people probably want. Option 2: Grant the relay permission to Anonymous on your new scoped connector This option grants the minimum amount of required privileges to the submitting application. Taking the new scoped connector that you created, you have another option. You can simply grant the ms-Exch-SMTP-Accept-Any-Recipient permission to the anonymous account. Do this by first adding the Anonymous Permissions Group to the connector. This grants the most common permissions to the anonymous account, but it does not grant the relay permission. This step must be done through the Exchange shell: Get-ReceiveConnector "CRM Application" | Add-ADPermission -User "NT AUTHORITY\ANONYMOUS LOGON" -ExtendedRights "ms-Exch-SMTP-Accept-Any-Recipient" In addition to being more difficult to complete, this step does not allow the anonymous account to bypass anti-spam, or ResolveP2. Although it is completely different from the Exchange 2003 way of doing things, hopefull y you find the new SMTP permissions model to be sensible. More information See the following for more information: Receive Connectors Exchange 2007 Transport Permissions Model - Scott Landry296KViews0likes16CommentsReleased: March 2016 Quarterly Exchange Updates
The Exchange team is happy to announce our spring quarterly updates for Exchange Server are now available on the Microsoft Download Center. Exchange Server 2016 receives its first Cumulative Update, and Exchange Server 2013 Cumulative Update 12 is also released. Exchange Server 2007 and Exchange Server 2010 Update Rollups provide an updated OWA S/MIME control signed with a SHA-2 certificate. More information and highlights of all these releases can be found below. Updated OWA S/MIME control All of the packages released today include an update to the OWA S/MIME control. The control itself has not changed, but has now been signed with a SHA-2 compliant certificate. All of the updates released will install the updated control onto the Exchange Server. Users who have installed the control into their browser will need to re-install this onto devices where the previous version was installed. Installing the control is straight forward and can be done quickly using OWA Options, Exchange Control Panel or Exchange Admin Center depending upon the release of Exchange you are using. New distribution package for Exchange Server 2016 updates With the introduction of Cumulative Updates for Exchange Server 2016, we are making a change to the update package type for this product version. Previous versions of Exchange used self-extracting packages to deliver service packs and cumulative updates. We have heard requests to release these updates as .ISO’s. With the capability to mount .ISO’s directly in Windows Server 2012 and later, we think it makes sense to ship Cumulative Updates as .ISO’s. At this time, we are not planning to do this for Exchange Server 2013 Cumulative Updates but could be persuaded to do so if enough people ask for it. One down side to this approach is that the package is much larger. However, copying a single .ISO vs. the ever growing number of files and folders over the network is much more efficient and faster. We hope you like this change. Change to Mailbox Anchoring for Remote PowerShell We heard your feedback on the changes to load balancing Remote PowerShell introduced into Exchange Server 2013 and 2016. As announced by Ross here, we have reverted this behavior in the Cumulative Updates being released today. Additional languages for Outlook on the Web Exchange Server 2016 Cumulative Update 1 adds support for 17 additional languages in Outlook on the Web. These languages will appear automatically in the language selection drop down after a server is updated to Cumulative Update 1. .Net 4.6.1 Support We know that many of you have been asking about .Net 4.6.1 and Exchange. Rest assured we are working closely with the .Net Framework team to resolve issues preventing us from supporting .Net 4.6.1 with Exchange Server. While we are not there yet, we hope to be very soon. Support for .Net 4.6.1 is planned for future Cumulative Updates for Exchange Server 2013 and 2016. Slow installations on Windows Server 2012 R2 For customers who are running Exchange on Windows Server 2012 R2, we want to make certain you are aware of a condition which can substantially increase the amount of time it takes to install Exchange Updates on this OS. Working with the .Net team, we have discovered that systems which have applied Windows Update KB3097966 can take 50% more time to install Exchange. The .Net team is working on a resolution to this and will include a fix in a future product update. In the meantime, customers who have deployed this Windows update can take a one-time action on their server before installing Exchange or a Cumulative Update to bring installation time back to normal. This procedure needs to be done once on every Exchange server running Windows Server 2012 R2. The command to execute is: “%windir%\Microsoft.NET\Framework64\v4.0.30319\ngen.exe update” Errors and warnings encountered running this command can be safely ignored provided the final exit status code of 0 is reported in the output. Support for Standalone Hybrid Configuration Wizard in Exchange Server 2010 Customers using Exchange Server 2010 in Hybrid mode with Office 365 will notice a new link in the EMC to use the Updated Standalone Hybrid Configuration Wizard. We encourage all customers to use this updated version of the Hybrid Configuration Wizard. Release Details KB articles which contain greater depth on what each release includes are available as follows: Exchange Server 2016 Cumulative Update 1 (KB3134844), Download, UM Lang Packs Exchange Server 2013 Cumulative Update 12 (KB3108023), Download, UM Lang Packs Exchange Server 2010 Service Pack 3 Update Rollup 13 (KB3141339), Download Exchange Server 2007 Service Pack 3 Update Rollup 19 (KB3141352), Download Note: Documentation may not be fully available at the time this post was published. Exchange Server 2016 Cumulative Update 1 does include updates to Active Directory Schema. These updates will apply automatically during setup if the permissions and AD requirements are met during installation. If the Exchange Administrator lacks permissions to update Active Directory Schema, a Schema Admin should execute SETUP /PrepareSchema before installing Cumulative Update 1 on your first server. The Exchange Administrator should also execute SETUP /PrepareAD to ensure RBAC roles are updated correctly. Exchange Server 2013 Cumulative Update 12 does not include updates to Active Directory or additional RBAC changes. However, depending on the version you are upgrading from, it may be required. PrepareAD will run automatically during the first server upgrade if Setup detects this is required and the logged on user has sufficient permission, otherwise, setup will require you to re-run setup with sufficient permissions. Additional Information Microsoft recommends all customers test the deployment of any update in their lab environment to determine the proper installation process for your production environment. For information on extending the schema and configuring Active Directory, please review the appropriate TechNet documentation. Also, to prevent installation issues you should ensure that the Windows PowerShell Script Execution Policy is set to “Unrestricted” on the server being upgraded or installed. To verify the policy settings, run the Get-ExecutionPolicy cmdlet from PowerShell on the machine being upgraded. If the policies are NOT set to Unrestricted you should use the resolution steps in KB981474 to adjust the settings. Reminder: Customers in hybrid deployments where Exchange is deployed on-premises and in the cloud, or who are using Exchange Online Archiving (EOA) with their on-premises Exchange deployment are required to deploy the most current (e.g., CU12) or the prior (e.g., CU11) Cumulative Update release. For the latest information on Exchange Server and product announcements please see What's New in Exchange Server 2016 and Exchange Server 2016 Release Notes. You can also find updated information on Exchange Server 2013 in What’s New in Exchange Server 2013, Release Notes and product documentation available on TechNet. The Exchange Team276KViews0likes40CommentsHow does Outlook Anywhere work (and not work)?
EDIT 8/22/2008: Corrected a typo in a "DisabledComponents" registry key name. It's been a while since I've been thinking of writing a blog post about various aspects of Outlook Anywhere that people have been asking questions about. Somehow, I keep getting myself caught up in one thing or another, and have consequently delayed writing this blog post by almost 4 months. Ugh. Better late than never I figure. Given how long this blog post is overdue, I plan to cover a lot of topics, from frequently asked questions to common misconceptions to problems with Outlook Anywhere to suggested solutions for different problems. How does Outlook Anywhere work? I won't cover details on the cmdlets that enable and change settings for Outlook Anywhere. There is already a bunch of documentation on it. Instead, let's do a slightly deeper dive than the cmdlet documentation provides. The values that you provide to Outlook Anywhere settings can be classified into 2 types of properties - client facing and server facing. Examples of client facing properties are ClientAuthenticationMethod, External Host Name. Examples of Server facing properties are IISAuthenticationMethods, SSLOffloading. Client facing properties are picked up by Autodiscover and supplied to Outlook to configure client access to the Outlook Anywhere service. Server facing properties are picked up by a servicelet called RpcHttpConfigurator which runs as part of the Microsoft Exchange Service Host service. This servicelet runs every 15 mins by default, but the interval can be adjusted by changing the value of the HKEY_LOCAL_MACHINE\System\CurrentControlSet\Services\MSExchangeServiceHost\RpcHttpConfigurator\PeriodicPollingMinutes regkey. Note that setting this value to 0 turns off the RpcHttpConfigurator. When the RpcHttpConfigurator runs, it picks up the IISAuthenticationMethods and SSLOffloading values from the AD and stamps it on the \rpc vdir settings in the IIS metabase - overwriting any previously set value. This means that if you manually change the settings on this vdir, you should expect to be run over pretty shortly by the RpcHttpConfigurator (unless you have set the reg key to 0). Ok, so that's just part of what the servicelet does. Outlook Anywhere depends on the RPC/HTTP Windows component to do the marshalling and unmarshalling of the RPC packets from the client to the CAS server. A client side RPC component is responsible for marshalling every RPC packet into an HTTP tunnel and sending it over to the \rpc vdir on the CAS server. RPCProxy is an ISAPI extension that unmarshals the RPC packet, retrieves the RPC endpoint that the client wants to talk to and forwards the packet to the endpoint. But imagine if you were able to connect to any server in the organization if you were able to auth against an IIS box running RPCProxy. By the weakest link theory, all you'd need to do would be hack into a single IIS server and you'd have free access to all servers in the org. Ouch ! To alleviate this problem, RPCProxy only allows connections to be made to servers and ports that are in a trusted list. This list is maintained through the HKEY_LOCAL_MACHINE\Software\Microsoft\Rpc\RpcProxy\ValidPorts regkey and contains all the servers/ports that RPCProxy is allowed to talk to. So, the other part of what the RpcHttpConfigurator servicelet does it that is queries the AD for all mailbox servers and stamps them in the ValidPorts regkey allowing access to ports 6001, 6002, 6004 for both FQDN and Netbios access. So, you will typically see something like mbx1:6001-6002;mbx1:6004;mbx1.contoso.com:6001-6002;mbx1.contoso.com:6004 as the value for the key. As new mailbox servers are added to the org, they will be picked up when the servicelet runs and be added to the key. Again, if you manually change this regkey, you should expect to be bulldozed by the servicelet. Note that the ValidPorts key is only used by RPCProxy as a filter to disallow communication with unlisted server ports. It is not used to determine which server to send requests to. For the same reason, the order in which servers are listed in this key does not matter. I just thought I'd clarify this since I was recently told that there was confusion on what this key accomplished. Ok, simple enough, now that all the configuration is done, how does Outlook Anywhere actually establish its connections. The following diagram may help: As you see above, the client specifies the VIP of the Load balancer (or direct CAS FQDN if the CAS is exposed to the Internet) as the HTTP endpoint and the mailbox server as the RPC endpoint. The query string is somewhat like this: http://nlb.contoso.com/rpc/rpcproxy.dll?mbx1.contoso.com:6001 This tells the RPCProxy on CAS1 that the client is trying to connect to server mbx1.contoso.com on port 6001. RPCProxy looks up the ValidPorts key and if mbx1.contoso.com:6001 is listed there, it allows the connection to go through. The blue and red arrows above represent the 2 different connections spawned by the RPC/HTTP client component to represent a single RPC connection. This is done because HTTP connections are half duplex (i.e. they either allow you to send information or receive information, not both at the same time). In the case of RPC, connections need to be long lived and full duplex, so the RPC_IN_DATA connection acts as the sending half duplex connection, while the RPC_OUT_DATA connection acts as the receiving half duplex connection. Since HTTP requires that each connection be given a max length, each of these connections are 1GB "long" and are terminated when this limit is reached. Each of these connections is tagged with a client session id. When the RPC server component receives the RPC_IN_DATA and RPC_OUT_DATA with the same client session id, it knows that for any request received on the RPC_IN_DATA connection, it must reply back on the RPC_OUT_DATA connection. That's magic. Ok, so you already know this, but I'll reiterate - the mailbox server has 3 ports that are used for RPC/HTTP: port 6001 is used for Mail connections, port 6002 is used for directory referral, port 6004 is used for proxying directory connections to AD. The Referral Service running on port 6002 and DSProxy running on port 6004 are part of the same mad.exe process, and the Referral Service just refers clients back to DSProxy to establish their Directory connections. If you Ctrl+Right Click the Outlook icon and click on Connection Status, it will tell you what connections exist (Mail vs. Directory), what server they are going to and what protocol they are using (HTTPS vs. TCP(direct Exchange RPC connection)). I have conveniently omitted any discussion around certificates, since that can take up another few blog posts. As some would say, that is beyond the scope of this article and is left as an exercise to the reader. How do I know Outlook Anywhere is working? Simple... when no one is complaining! Seriously though, it is preferable is to run diagnostics on Outlook Anywhere before subjecting it to thousands of users. The one tool that works pretty well in most cases is rpcping. Yes, it has a lot of parameters and is confusing, but it does provide pretty good diagnostic information and as long as you have the KB open, you can figure out where problems lie. Start by pinging just the RPCProxy by using the -E option. Once that works, move onto testing the mailbox server endpoints by removing the -E and adding -e 6001 instead. Similarly for 6002, 6004. A typical command line would be something like this. Refer to http://support.microsoft.com/kb/831051 for usage details rpcping -t ncacn_http -o RpcProxy=cas1.contoso.com -P "user,domain,password" -H 1 -F 3 -a connect -u 9 -v 3 -s mailbox.contoso.com -I " user,domain,password " -e 6004 How does Outlook Anywhere not work? Unfortunately, there are some cases where Outlook Anywhere does not work without requiring manual tweaks. This is the part I wish I had blogged about earlier. I'm sure there are poor folks out there that have hit these issues and wasted their time figuring out what I had already learned... DSProxy and IPv6 As of E12 SP1, Outlook Anywhere on Windows 2008 requires that IPv6 be manually turned off on the CAS server. This is because the DSProxy component that listens on port 6004 (mad.exe) for directory connections does not listen on the IPv6 stack. If you do a netstat -ano | findstr 6004, you will see only 1 LISTENING entry - the one that corresponds to the IPv4 stack. Contrast this with ports 6001 and 6002 that have 2 entries. (As most of you already know, if you are running your Mailbox role on the same machine as a DC, lsass.exe not mad.exe listens on port 6004, so this problem will not surface since lsass.exe listens on both protocol stacks.) How do you turn off IPv6 ? It depends on whether you are running CAS and Mailbox on the same server or different ones. If you're in a multi-server scenario where the RPCProxy is not on the same server as the Mailbox, then you need to do the following: Unselect IPv6 from the properties of your NIC (on the RPC-over-HTTP Proxy machine); that will force the RPC-over-HTTP Proxy to use IPv4 to talk to Exchange and everything will be fine. In most cases, this step suffices. If it does not, continue with steps 2 and 3. Under the regkey HKLM\SYSTEM\CurrentControlSet\Services\Tcpip6\Parameters, add a 32 bit DWORD with the name DisabledComponents and value 0xFF Reboot the machine If you're in a single-server scenario where the RPCProxy and Mailbox are on the same machine, then the above does not work since the loopback interface still uses IPv6. In this case, you need to make the following changes in the system32\drivers\etc\hosts file: Comment out the line ":::1 localhost" Add the following two lines: <IPv4 address> <hostname of the computer> <IPv4 address> <FQDN of the computer> Thanks to Kevin Reeuwijk and others for finding and reporting the issue and solution. A fix (make DSProxy listen on the IPv6 stack) is on the way and is expected to be available in Exchange 2007 SP1 RU4 in Q3 2008. DSProxy and Split RPC_IN_DATA, RPC_OUT_DATA connections In the diagram above, you will notice that I have used a Source IP Loadbalancing layer. This ensures that the RPC_IN_DATA and RPC_OUT_DATA connections coming from a single Outlook instance are always affinitized to the same CAS server. However, there are some legitimate scenarios where Source IP affinity is not viable for customers. A typical example is when a large number of end users are behind NAT devices causing all connections to end up with the same IP and hence the same CAS server... yay load balancing! Outlook Anywhere does not support cookies, so cookie based Load balancing cannot be used either. The only way of spreading load across the server farm is to use with no affinity or SSL-ID based affinity. However, this has the problem that the RPC_IN_DATA and RPC_OUT_DATA connections could (and most likely would) end up on different CAS servers as shown in the diagram below: If you've been reading closely, you'll remember my earlier mention that the RPC server component is well aware of client session IDs and can reply on RPC_OUT_DATA for any requests on RPC_IN_DATA. And if that's the case, we should still be fine since Outlook always specifies the mailbox server as it's RPC endpoint. Well, almost. We are fine for ports 6001 and 6002 which are real RPC end points. The issue is with port 6004 where DSProxy pretends to be an RPC endpoint, but is just a proxy as the name implies. DSProxy only proxies client connections through to the DC. In the example above, RPC_IN_DATA is proxied to DC1 while RPC_OUT_DATA is proxied to DC2. The DCs are the real RPC endpoints. However, now that the 2 connections have been split, neither of the DCs is aware of the other connection and requests sent on RPC_IN_DATA are lost in oblivion. We call this split connectivity and it is a problem surfaced by SSL-ID or no affinity load balancing. While I would recommend not using these configurations if avoidable, it is clear as described earlier that these may be the only alternatives. Think hard if this is the case since the workaround that I am describing below will be tedious to maintain. The goal of these steps is to eliminate the possibility of split connectivity by (1) having clients bypass DSProxy wherever possible and (2) constrain DSProxy to talking to a single DC for any requests to DSProxy. First off, you need to avoid using DSProxy wherever possible. Normally, the Referral Service running on port 6002 refers clients to DSProxy on port 6004. By setting the following regkey, you instruct Referral Service to not send clients to DSProxy, but instead give them a referral to a DC for directory connections. So, instead of client connections going from Client to RPCProxy to DSProxy to DC, the path would be from Client to RPCProxy to DC. Note that the client is not directly connecting to the DC, so it is not required to publish the DCs to the internet or open any new firewall ports. See KB http://support.microsoft.com/kb/872897 for details: On the Mailbox servers: a DWORD entry needs to be created on each Mailbox server named "Do Not Refer HTTP to DSProxy" at HKLM\System\CCS\Services\MSExchangeSA\Parameters\ and the value set to 1 Next, as indicated earlier, the RPCProxy will block access to the DC servers unless there servers are included in the ValidPorts regkey. So, set the following on the Client Access Servers The ValidPorts setting at HKLM\Software\Microsoft\RPC\RPCProxy needs setting so that the entries referring to 6004 point to DC servers in addition to the mailbox server. The PeriodicPollingMinutes key at HKEY_LOCAL_MACHINE\System\CurrentControlSet\Services\MSExchangeServiceHost\RpcHttpConfigurator\ needs setting to zero to prevent RpcHttpConfigurator from updating the Valid Ports key automatically. Finally, you need to make sure that the DCs are listening on port 6004: On the Global Catalog servers: a REG_MULTI_SZ entry needs to be created on each GC named NSPI interface protocol sequences at HKLM\System\CCS\Services\NTDS\Parameters\ and the value set to ncacn_http:6004 These fixes will make sure that all directory connections bypass DSProxy and terminate at the DCs, thereby allowing the DC RPC server side component to receive both the RPC_IN_DATA and RPC_OUT_DATA connections. There is 1 last thing to deal with in this SSL-ID load balanced configuration. Outlook profile creation hard codes a call to DSProxy on 6004. Which means that we can get split connectivity during profile creation. To deal with this minimal volume of traffic, there is 1 final regkey that should be set on the mailbox servers: On the Mailbox Servers - set the HKLM\System\CCS\Services\MSExchangeSA \Parameters key "NSPI Target Server" to the FQDN of the DC that profile creation should use. By using only 1 DC for profile creation, all DSProxy calls will be proxied into that single DC, once again avoiding split connectivity. That's it folks! Of course, subsequent releases will provide cleaner solutions for such topologies, but for now, rest assured that having gone through the above steps multiple times, I feel your pain. That's pretty much it. I hope that adds some clarity to how Outlook Anywhere works and hasn't succeeded in confusing everyone even more. Until the next post - Hasta Luego! - Sid191KViews0likes42CommentsHow to Create and configure a meeting room mailbox with Exchange Server 2007
On a recent project I had to consider how to implement meeting rooms in Exchange 2007 SP1. I read all of the available TechNet articles and posts and then I realized that it was not necessarily easy to set up meeting rooms with correct policies on the first try. So, I made a synthesis on how to quickly create the meeting room of your dreams, in hopes that this can help you. Resource Mailbox Overview Resource mailboxes are specific types of mailboxes that can represent meeting rooms or shared equipment and can be included as resources in meeting requests. The Active Directory user that is associated with a resource mailbox is a disabled account. The different types of resource mailboxes in Microsoft Exchange Server 2007 are: Room mailbox: a resource mailbox that is assigned to a meeting location, such as a conference room, auditorium, or training room. Room mailboxes can be included as resources in meeting requests. Equipment mailbox: a resource mailbox that is assigned to a non-location specific resource, such as a portable computer projector, microphone, or a company car. Equipment mailboxes can be included as resources in meeting requests. Shared mailbox: a mailbox that is not primarily associated with a single user and is generally configured to allow logon access for multiple users. After a shared mailbox is created (by using the Exchange Management Shell), you must grant permissions to all users that require access to the shared mailbox. Even if this is not a resource mailbox, I mention it here because companies commonly use that kind of mailbox for collaboration or business needs. Example 1: How to create a resource mailbox Create a Room mailbox: New-Mailbox -database "Storage Group 1\Mailbox Database 1" -Name ConfRoom1 -OrganizationalUnit "Conference Rooms" -DisplayName "ConfRoom1" -UserPrincipalName ConfRoom1@contoso.com -Room Create an Equipment mailbox: New-Mailbox -database "First Storage Group\Mailbox Database" -Name VCR1 -OrganizationalUnit Equipment -DisplayName "VCR1" - UserPrincipalName VCR1@contoso.com -Equipment Create a Shared mailbox: New-Mailbox -database "Storage Group 1\Mailbox Database 1" -Name SharedMailbox01 -OrganizationalUnit "Resource Mailboxes" -DisplayName "SharedMailbox01" -UserPrincipalName SharedMailbox01@contoso.com -Shared (from http://technet.microsoft.com/en-us/library/bb201680.aspx) Resource Mailbox Properties You can configure resource mailbox properties for resource mailboxes. For example, you can use the ResourceCapacity, Office, and ResourceCustom parameters with the Set-Mailbox cmdlet to configure some of these settings. Custom resource properties can help users select the most appropriate room or equipment by providing additional information about the resource. For example, you can create a custom property for room mailboxes called AV. You can add this property to all rooms that have audio-visual equipment. This allows users to identify which conference rooms have audio-visual equipment available. A custom resource cannot contain a value; it's only a flag that can be added to a resource mailbox, flags are defined globally for the Exchange organization. Before you can assign custom resource properties to a room or equipment mailbox, you must first create these properties by modifying the resource configuration of your Exchange organization. Custom resource can be added with the Set-ResourceConfig cmdlet. Note: All entries provided to the Set-ResourceConfig cmd-let must start with either Room/ or Equipment/. Setting a new entry using the Set-ResourceConfig cmdlet will overwrite all existing entries, and not add a new entry to the list. Use the Get-ResourceConfig cmdlet to query the existing entries, and then append to the list. For every custom resource property you create in your organization, you must specify to which resource mailbox type it applies (room or equipment). When you are managing a resource mailbox, you can assign only those custom resource properties that apply to that specific resource mailbox type. For example, if you are configuring a room mailbox, you can assign only the custom resource properties that apply to room mailboxes. In Microsoft Exchange Server 2003 and earlier versions, LDAP filtering syntax is used to create custom address lists, global address lists (GALs), e-mail address policies, and distribution groups. In Exchange Server 2007, the new OPATH filtering syntax replaces the LDAP filtering syntax. For example a new address lists can only be based on properties filterable by the -RecipientFilter parameter (complete list: http://technet.microsoft.com/en-us/library/bb738157.aspx ). Other properties, including any customer schema extensions, cannot be used in the -RecipientFilter parameter. So LDAP attributes defined to search for rooms or create Address Book views must be included in OPATH properties to allow for a wide use within Exchange 2007. Example 2: Create Custom Properties for Resource Mailbox Set-ResourceConfig -ResourcePropertySchema ("Room/TV", "Room/VCR", "Equipment/Auto") Example 3 : Configure Resource Mailbox Properties Set-Mailbox -Identity "ResourceMailbox01" -ResourceCustom ("TV","VCR") -ResourceCapacity 50 (from http://technet.microsoft.com/en-us/library/aa996915.aspx) Room Mailbox Settings Before explaining how to create the different types of room mailbox, we must focus on the settings that can be done with Set-MalboxCalendarSettings. With this cmdlet you can configure many parameters on the resource mailbox (maximum meeting duration allowed, default reminder time, etc...). A complete list with description is available at http://technet.microsoft.com/en-us/library/aa996340.aspx. The main parameter that interests us is AutomateProcessing which allows enabling or disabling calendar management on the resource mailbox. The three possible values are: None Both resource booking and Calendar Attendant will be disabled on the mailbox. (Meeting requests will not be processed and stacked in the inbox of room mailbox). AutoUpdate This is the default value. The Calendar Attendant will process meeting requests which will sit in the calendar of the room in a "tentative state" waiting a delegate approval. (The meeting organizer will receive only the decision of the delegate) AutoAccept Resource booking will be enabled on the room mailbox. This means that the room will take into account the policies for the incoming requests (who can schedule.). (With automatic booking configuration, the organizer will receive the decision of the room. Otherwise organizer will first receive a message of recognition pending delegate approval). Note: Calendar Attendant automatically places new meetings on the calendar as tentative appointments, updates existing meetings with new information, and deletes out-of-date meeting requests without any client interaction. The Calendar Attendant also processes meeting forward notifications by sending a notification when a meeting request is forwarded and adding meeting attendees to the calendar when a meeting notification is received. Resource Booking Attendant automates acceptance and declination of resource booking requests. Policies can be set up for each resource based upon by whom, when, and for how long a resource can be booked. The AutoAccept value enables the resource booking policies to manage who can book the room and under what conditions. For each room mailbox, each user can be member of different policies: BookInPolicy: List of users who are allowed to submit in-policy meeting requests. In-policy requests from these users will automatically be approved; RequestInPolicy: List of users who are allowed to submit in-policy meeting requests. In-policy requests from these users will be subject to approval by a delegate; RequestOutOfPolicy: List of users who are allowed to submit out-of-policy meeting requests. Out-of-policy requests from these users will be subject to approval by a delegate; In the context of resource mailboxes, InPolicy and OutOfPolicy simply mean whether or not the meeting invitation matches any restrictions enabled on the resource mailbox. There are also policies to specify permissions for all users (AllBookInPolicy, AllRequestInPolicy, AllRequestOutOfPolicy). For example MaximumDurationInMinutes value for the resource mailbox is 30 minutes, any meeting invitation longer than 30 minutes would be OutOfPolicy. Using the RequestOutOfPolicy field, you can manually add users that are allowed to request meetings that are not within the policy. Figure 1 : Booking Policy - Who can schedule a resource for an Auto-Accept resource mailbox Room Mailbox Main Scenarios Now that we know how to create a meeting room with ideas a little clearer on strategies, let's look at main scenarios of room mailbox that we can implement: Room with automatic booking; Room with meeting requests forwarded to a delegate; Room requiring the logon of a delegate to manage the meeting requests. Room with automatic booking To set automatic booking , set AutomateProcessing to AutoAccept to enable resource booking policies. With the default configuration of room policies, all users will then be allowed to send in-policy meeting requests. These requests will be processed automatically by the room. Example 4: How to enable automatic booking on a Resource Mailbox Set-MailboxCalendarSettings -Identity "Conference Room" -AutomateProcessing AutoAccept (from http://technet.microsoft.com/en-us/library/bb123495.aspx) Room with meeting requests forwarded to a delegate To set the room forwarding the incoming meeting requests to a delegate for approval, you must enable and configure policies, and define a delegate: Enable policies: set AutomateProcessing to AutoAccept; All incoming meeting request must be approved by a delegate: set AllRequestInPolicy to True and AllBookInPolicy to False ; Define a delegate under ResourceDelegates parameter. A Resource delegate will have the following permission: Editor on the Calendar folder of the resource mailbox; Editor on the "FreeBusy Data" system folder of the resource mailbox; Ability of "Send on behalf" of resource mailbox. Example 5: How to set a Room to forward request to a delegate Set-MailboxCalendarSettings -Identity "Training Room" -AutomateProcessing AutoAccept -ResourceDelegates "Isabelle Dupont" -AllBookInPolicy:$false -AllRequestInPolicy:$true The delegate can now manage meeting requests forwarded by the room mailboxes from his own mailbox by accepting or rejecting them. He can also access to the calendar folder of the room mailbox (by the "Open other user's folder" feature of Outlook client). It should be noted that the responses received by the organizers will be from the delegate on behalf of the room mailbox. Note: When the Set-MailboxCalendarSettings cmdlet is re-run to modify any settings the original delegate's permissions are removed. The delegate is still displayed when running the 'Get-MailboxCalendarSettings' cmdlet however if you look at the permissions on the resource calendar, the delegate's permissions have been removed. To re-grant permissions on the resource calendar you must run a "Set-MailboxCalendarSettings resource_alias -ResourceDelegates:$null" command. Afterwards you can re-grant permissions to the intended user. Until this problem is fixed, we would recommend running this command before making any changes to resource delegates. Room whose management is done directly by the delegate It's the default of a newly created room with the AutomateProcessing parameter set to AutoUpdate. The Calendar Attendant will process meeting requests which will sit in the calendar of the room in a "tentative state" waiting a delegate approval. The delegate needs permissions to connect to the resource mailbox and manage the meeting requests: "Full Mailbox Access" to access the resource mailbox and for example "Send-As" to respond to requests in a transparent manner. Example 6: The delegate manage the request from the resource mailbox Set-MailboxCalendarSettings -Identity "Conference Room" -AutomateProcessing AutoUpdate Add-MailboxPermission -AccessRights FullAccess -Identity "Conference Room" -User "Isabelle Dupont" Add-ADPermission -Identity "Conference Room" -User "Isabelle Dupont" -ExtendedRights Send-As Note: "Send As" versus "Send on Behalf" Send As permission will allow a user to send as another user. Send on Behalf permission will allow a user to send on behalf of another user. This means that the recipient knows who really sent the message because it is clearly stated in the message. Synthesis Based on the previously detailed main scenarios the minimum parameters to set are the following: Resource Calendar Settings (set-mailboxcalendarsettings) Automate Processing All Book In Policy All Request In Policy Resource Delegate Room Mailbox Automatic Booking AutoAccept True (default value) False (default value) None (default value) Room Mailbox Manual Approval Request forwarded to delegates AutoAccept False True List of Delegates Room Mailbox Manual Approval Delegates approve from room mailbox AutoUpdate (default value) True (default value) False (default value) None (default value) Whatever the scenario, a delegate can modify the resource booking parameter (except the delegate's part) by accessing the resource mailbox with Outlook Web Access (https://mail.contonso.com/room@contoso.com). To do this, the delegate needs the "Full Mailbox Access" permission to the resource mailbox. Figure 2 : Resource Mailbox Settings with Outlook Web Access For further reading and the most up-to-date information: Understanding Recipients: http://technet.microsoft.com/en-us/library/bb201680.aspx Managing Resource Mailboxes: http://technet.microsoft.com/en-us/library/bb124374.aspx How to Set Resource Booking Policies: http://technet.microsoft.com/en-us/library/bb124987.aspx Set-MailboxCalendarSettings: http://technet.microsoft.com/en-us/library/aa996340.aspx Resource scheduling in Exchange Server 2007: http://msexchangeteam.com/archive/2007/05/14/438944.aspx French version of this post : http://blogs.technet.com/frmcsuc/pages/exchange-2007-room-mailbox.aspx -- Murat Gunyar173KViews0likes18CommentsAutomatic Processing of Recurring Meeting Requests with Conflicting Instances
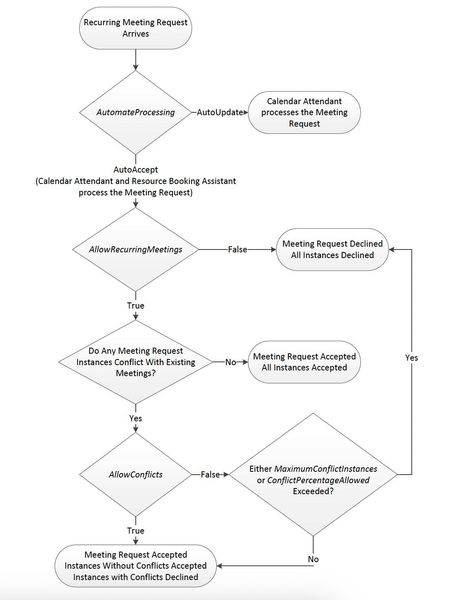
The behavior of the Resource Booking Attendant may seem confusing when it comes to processing a recurring meeting request where individual recurrences conflict with existing calendar items. Some administrators have tried working with calendar processing settings in the hopes of allowing double booking rooms with recurring meetings, as can be done with non-recurring meeting requests. As we'll see, double-booking a room with recurring meetings and the Resource Booking Attendant is impossible. If anyone's still confused hopefully this post will clear up what's going on. Recurring meeting request processing is handled according to the settings from Set-MailboxCalendarSettings in Exchange 2007 and Set-CalendarProcessing in Exchange 2010. Since each version uses the same options to deal with recurring meeting requests, let's use the Exchange 2010 SP1 documentation for Set-CalendarProcessing: Parameter Description ConflictPercentageAllowed The ConflictPercentageAllowed parameter specifies the maximum percentage of meeting conflicts for new recurring meeting requests. Valid input for this parameter is an integer from 0 through 100. If a new recurring meeting request conflicts with existing reservations for the resource more than the percentage specified by the ConflictPercentAllowed value, the recurring meeting request is automatically declined. When the value is 0, no conflicts are permitted for new recurring meeting requests. MaximumConflictInstances The MaximumConflictInstances parameter specifies the maximum number of conflicts for new recurring meeting requests when the AllowRecurringMeetings parameter is set to $true. Valid input for this parameter is an integer from 0 through 2147483647. If a new recurring meeting request conflicts with existing reservations for the resource more than the number of times specified by the MaximumConflictInstances value, the recurring meeting request is automatically declined. When the value is 0, no conflicts are permitted for new recurring meeting requests. When active, these two settings apply to whether Exchange accepts a recurring meeting request in its entirety, the whole series, but not whether individual instances are accepted. Individual recurring meeting instances are always declined. Examples So, for example, say a room mailbox is configured with the following settings: AutomateProcessing : AutoAccept AllowConflicts : False AllowRecurringMeetings : True ConflictPercentageAllowed : 40 MaximumConflictInstances : 6 A recurring meeting request which repeats 10 times (10 instances) is sent to the mailbox. Now let's suppose 5 out of 10 (or half) of the instances for that recurring meeting occur at the same time other meetings are scheduled in the calendar. In this case, the 50% conflict ratio exceeds the ConflictPercentageAllowed setting of 40. The result: The entire meeting request is rejected and the room sends a message back to the meeting organizer with the subject Declined All. The five conflicting instances are declined, as are the other five instances that didn't conflict with another meeting. Another meeting request is sent where there are 100 instances of a recurring meeting and 10 of them conflict with existing bookings. In this case the ConflictPercentageAllowed is not exceeded by the 10% conflict rate. However, we exceed the MaximumConflictInstances setting of 6. The result: Once again, the entire meeting request is rejected and all 100 instances are declined. For our last example, a recurring meeting request comes to this room where there are 10 instances and only 2 of them conflict with existing bookings. The result: Since we don't exceed either MaximumConflictInstances or ConflictPercentageAllowed, the room mailbox accepts the recurring meeting request series but declines to book the two instances that conflict. The meeting instances that don't conflict are accepted and booked and the room sends three emails back to the organizer, one with Accepted in the subject stating the recurring meeting request was accepted, and two with Declined in the subject for the two conflicting instances. So by these examples we see how a recurring meeting request with conflicting instances can be accepted or declined based on the calendar processing settings. However, it's important to repeat that a recurring meeting request instance that conflicts with another booking is ALWAYS declined. How all the settings work together Now I'd like to touch lightly on how all the settings that affect recurring meeting request processing work together, including the above discussed ConflictPercentageAllowed and MaximumConflictInstances, along with the AutomateProcessing, AllowConflicts, and AllowRecurringMeetings settings. AutomateProcessing: Must be set to AutoAccept to allow automatic booking of any meeting requests, recurring or not. Note, the default is AutoUpdate. AllowRecurringMeetings: Set to True by default. If it's changed to False, all recurring meeting requests are rejected. AllowConflicts: The parameter determines whether conflicting meeting requests are allowed. If set to True, sets the calendar to ignore the ConflictPercentageAllowed and MaximumConflictInstances settings. In this case, the calendar accepts all recurring meeting requests. Conflicting instances are always declined, but the number or percentage of conflicting instances don't have any impact on the entire series. If set to False (the default), we must turn to ConflictPercentageAllowed and MaximumConflictInstances to decide whether the entire recurring meeting request series is declined or not. This flowchart presents how a recurring meeting request is processed based on these settings. Figure 1: How recurring meeting requests are processed So what if an administrator wants the ability to double book a room? What alternatives are there? Use non-recurring meetings for instances that conflict. Set the mailbox to be managed by a delegate instead of the ResourceBookingAttendant alone. A delegate could then allow double-booking of conflicting recurring meeting instances. To summarize, a recurring meeting request with conflicting instances can be accepted or declined based on the calendar processing settings for the mailbox, which are configured using the Set-CalendarProcessing (Exchange 2010) or Set-MailboxCalendarSettings (Exchange 2007) cmdlets. However, individual instances of the recurring meeting request that conflict with another calendar item are ALWAYS declined. Thanks to Kristi Starr, Chris Korff, and Tom Kern for assistance with this material. Jesse Tedoff168KViews1like9CommentsNeed help converting your LDAP filters to OPATH?
After installing Exchange 2007 into your existing Exchange organization, the address lists and recipient policies must have OPATH filters specified in order to administer them from the Exchange 2007 tools. As discussed in the earlier blog post, OPATH is the basis for the filtering syntax used by PowerShell, and is therefore the filtering syntax used by Exchange Server 2007. Reading up on OPATH syntax can be a considerable time sink for an administrator who just wants to get his policies upgraded. I've written a PowerShell script that will perform these conversions for you, allowing you to save the OPATH documentation for the next time you're having trouble getting to sleep. To use the script, just drop it somewhere on the Exchange 2007 server, change the extension to ps1, and change to that folder at the PowerShell prompt. The top of the script shows some various syntax examples, ranging from the simple conversion of a manually entered filter to the automatic upgrading of every existing legacy filter. Of course, before you just automatically upgrade every filter and call it a day, you should consider testing the script in your lab and saving your existing filters, just in case. One of the syntax examples shows how to write out the name, legacy LDAP filter, and suggested OPATH filter for each legacy object to a tab-delimited file, which you could then open in Excel for viewing. This is one of several ways you could save out your old filters before upgrading. Some notes about the script: All syntax examples assume you've changed into the folder where the script is, and that it's not in the path. If you drop the script in Exchange Server\bin you can eliminate the .\ that precedes the script name in the examples. Some LDAP attributes are not available in OPATH. If the script encounters such an attribute in one of your filters it will report, "Could not convert LDAP attribute 'blah' to OPATH", and will fail out. The script does very direct conversions from LDAP to OPATH. For instance, it typically will not use the 'RecipientType' property in OPATH since there is no LDAP equivalent. There is one exception where it looks for a specific string and produces 'RecipientType -eq UserMailbox' in response. The script looks for filters matching the default address list filters and, if it finds one, it skips the normal conversion routine and produces the filter suggested in Evan's earlier post (http://msexchangeteam.com/archive/2007/01/11/432158.aspx). Hopefully this will save you some time during your Exchange 2007 upgrade! The link to the script is below (ConvertFrom-LdapFilter.txt - download and rename to .ps1 to run): LDAP to OPATH filter conversion script - attached to this blog post. - Bill Long163KViews0likes10CommentsExchange releases: December 2014
Editor's Note: Updates added below for important information related to Exchange Server 2010 SP3 Update Rollup 8. The Exchange team is announcing today a number of releases. Today’s releases include updates for Exchange Server 2013, 2010, and 2007. The following packages are now available on the Microsoft download center. Exchange Server 2013 Cumulative Update 7 UM Language Packs for Cumulative Update 7 Exchange Server 2010 SP3 Update Rollup 8 Exchange Server 2007 SP3 Update Rollup 15 These releases represent the latest set of fixes available for each of their respective products. The releases include fixes for customer reported issues and minor feature improvements. The cumulative updates and rollup updates for each product version contain important updates for recently introduced Russian time zones, as well as fixes for the security issues identified in MS14-075. Also available for release today are MS14-075 Security Updates for Exchange Server 2013 Service Pack 1 and Exchange Server 2013 Cumulative Update 6. Exchange Server 2013 Cumulative Update 7 includes updates which make migrating to Exchange Server 2013 easier. These include: Support for Public Folder Hierarchies in Exchange Server 2013 which contain 250,000 public folders Improved support for OAB distribution in large Exchange Server 2013 environments Customers with Public Folders deployed in an environment where multiple Exchange versions co-exist will want to read Brian Day’s post for additional information. Cumulative Update 7 includes minor improvements in the area of backup. We encourage all customers who backup their Exchange databases to upgrade to Cumulative Update 7 as soon as possible and complete a full backup once the upgrade has been completed. These improvements remove potential challenges restoring a previously backed up database. For the latest information and product announcements about Exchange 2013, please read What's New in Exchange 2013, Release Notes and Exchange 2013 documentation on TechNet. Cumulative Update 7 includes Exchange-related updates to Active Directory schema and configuration. For information on extending schema and configuring Active Directory, please review Prepare Active Directory and Domains in Exchange 2013 documentation. Reminder: Customers in hybrid deployments where Exchange is deployed on-premises and in the cloud, or who are using Exchange Online Archiving (EOA) with their on-premises Exchange deployment are required to deploy the most current (e.g., CU7) or the prior (e.g., CU6) Cumulative Update release. Update 12/12/2014: Exchange Server 2010 SP3 Update Rollup 8 has been re-released to the Microsoft download center resolving a regression discovered in the initial release. The update RU8 package corrects the issue which impacted users connecting to Exchange from Outlook. The issue was insulated to the MAPI RPC layer and was able to be isolated to quickly deliver the updated RU8 package. The updated RU8 package is version number 14.03.0224.002 if you need to confirm you have the updated package. The updates for Exchange Server 2013 and 2007 were not impacted by this regression and have not been updated. Update 12/10/2014: An issue has been identified in the Exchange Server 2010 SP3 Update Rollup 8. The update has been recalled and is no longer available on the download center pending a new RU8 release. Customers should not proceed with deployments of this update until the new RU8 version is made available. Customers who have already started deployment of RU8 should rollback this update. The issue impacts the ability of Outlook to connect to Exchange, thus we are taking the action to recall the RU8 to resolve this problem. We will deliver a revised RU8 package as soon as the issue can be isolated, corrected, and validated. We will publish further updates to this blog post regarding RU8. This issue only impacts the Exchange Server 2010 SP3 RU8 update, the other updates remain valid and customers can continue with deployment of these packages. The Exchange Team142KViews0likes98CommentsEverything you wanted to know about read receipts and delivery reports but were (understandably) afraid to ask
A question that comes up often enough to merit a post is: "How does one block read receipts from leaving or entering my org?" Good question. I'm glad you asked! And to answer that we need to go into the way back machine to Exchange 2003. In Exchange 2003 we used the IIS SMTP engine. As you know all the relevant settings were kept in the IIS metabase (taken from AD during the DS2MB 1 way process or natively there) so when it was requested that the ability to block read receipts be put into the product we obliged with a hotfix that allowed the creation of a key in the metabase to block these (after it was discovered that checking off "Do not send delivery reports" on the remote domain object did not accomplish this. More on that later.) You can read about this in all its glory here. While you are reading that you may notice the first sentence which mentions how editing the Remote Domain "Do not send delivery reports" will NOT block read receipts from entering/leaving your org (told you we'd come back to that). Without getting too much into RFCs, a read receipt is not a delivery report. A delivery report is defined in RFC 1891. The mime content type of a delivery report is a multipart/report; report-type=delivery-status. Actual shot of a delivery report below: A read receipt is defined in RFC 2298 and has a mime content type of multipart/report; report-type=disposition-notification. Actual read receipt found in the wild below: A further thing to note is that delivery reports originate from the system administrator or postmaster or Microsoft Exchange Recipient account (depending on which version of Exchange we are talking about) while Read Receipts come from the recipient that has requested a receipt. Still with me? Ok so if we circle back to the original Exchange 2003 kb it should be noted that those instructions only prevent INCOMING read receipts from entering your org. They do NOT stop internal users from sending read receipts to each other or from requesting read receipts of external users. What adding that key to the metabase actually accomplishes is stripping of the Disposition-Notification-To mime header from incoming read receipt requests. Read that again: read receipt REQUESTS. Going back to the RFCs (I'll be quick I promise) there is a difference between the actual read receipt itself and the read receipt request (same goes for delivery reports and the initial delivery report request). A read receipt request contains a Disposition-Notification-To header like the one below: This is an important distinction as it is the read receipt request that causes the receiver to generate a Read Receipt. This is what causes the receiver of the request to see this pop-up in Outlook: If we strip that header the receiver is never prompted for a Read Receipt and thus never generates one. Doing this for incoming messages is easy in Exchange 2003 since it is just a mime header we can strip. Outgoing is not possible as the header is now a tnef MAPI property and part of the message structure. Stopping outgoing read receipt requests requires a much greater code change investment and ultimately was never possible in exchange 2003 (for the curious and for completeness sake - a delivery report also has a corresponding delivery report request which is identified by the NOTIFY=SUCESS,FAILURE,DELAY parameters after a RCPT TO:. However unchecking "Allow Delivery Reports" on the remote domain object effectively blocks all Delivery Reports from coming out.) Enter Exchange 2007. Yippee! With Exchange 2007 we now have transport rules so we can totally block Read Receipts from leaving and entering, right? Well, sort of. For incoming read receipt requests we can create a transport rule to strip the Disposition-Notification-To header. Such a rule might look like this: For outgoing Read Receipt requests we fall into a new twist on the Exchange 2003 issue. Certain properties of an outgoing internally originated message are kept in a special x-header called X-ExtendedProps and you guessed it, Read Receipt request information is one of them. This is a "pesudo-base64" encoded header that Exchange hub transport servers stamp on internal messages and which gets stripped out later by header firewall. You can see this header by suspending the submission queue on a hub and export one of the suspended messages in there. You will see something like this: I'd like to pause here for a brief break and say that you will not see this header if you do a pipeline trace. It will only be visible if you export the message from the queue. The reason for this is that due to certain issues with custom transport agents in Exchange 2007 SP 1 we moved the content conversion stage further down the transport pipeline in Categorizer so a pipeline trace will only show you the state of a message PRE-conversion. Ok, break over. Since we have all the Read Receipt request info in this X-ExtendedProps header having a rule strip the Disposition-Notification-To header will have no effect. And transport rules cannot act on the system X-header (and even if they could very bad things may happen if you try to strip them. Just sayin'). Really the best way to strip outgoing Read Receipt requests is to stand up an Edge Transport server and have the identical rule above as an Edge rule. As stated earlier, once the message leaves the org Header Firewall will strip the X-header and replace it (in our case) with the standard RFC Disposition-Notification-TO. This will prevent external recipients from receiving the dreaded pop-up (shown here again for effect) which will generate a incoming read receipt: A second option is to deploy the Office ADM template in a GPO to remove the ability of users to send out read receipt requests. (You will still need the hub transport rule to block incoming Read Receipt requests). Now we can move on to Exchange 2010 (can I hear a double yippee?). With Exchange 2010 we have many new additions to transport rules which would make the subject of a great blog post on its own. The one new addition we are concerned with here is the ability to act on messages based on class. Specifically here we are concerned with the read receipt class. With Exchange 2010 we can craft a transport rule to drop messages based on the read receipt class as shown below: Now the above Exchange 2010 rule should solve our issue! This is great and wonderful! Finally no read receipt requests leaving OR entering my org! Well... not so fast. < p>You see, what the above rule does is block the actual read receipt (the multipart/report; report-type=disposition-notification content type. Check the beginning of this blog post if you forgot. Its ok I'll wait). This rule will not block the original read receipt request (shown here again because I believe in learning through repetition): So we are back to either: Create an incoming rule on your hub and an outgoing rule on your Edge to remove the header. Set an incoming rule on your hub and use the Outlook ADM file to create a GPO to remove the option to request Read Receipts So at the end of all this we've learned that while finally in Exchange 2010 we can block actual read receipts with ease, it still takes a bit of doing to block the read receipt request and be rid of all types of RRs entirely. But it is possible. Tom Kern133KViews0likes14Comments