excel
45095 TopicsPut multiple values in one cell with lists and arrays in Excel
Throughout Excel's 40-year history, you've only been able to put one value per cell. In this announcement, we're excited to share how that's changing with the release of lists, arrays in cells, and nested arrays, initially to Microsoft Excel for Windows and Mac Beta Channels. Many workbooks already try to pack multiple values into one cell. A project might list "Carlos, Henrietta, Jacob" as three owners, or a Forms survey might return "2:00 PM; 2:30 PM; 3:00 PM" as one response. With lists, you can keep those values in one cell, while also keeping them separate for filtering, calculation and more. Later in this post, we'll explore arrays in cells and nested arrays in more depth. NOTE: These are preview features. Their behavior may change before general release based on your feedback. We don't recommend using them in important workbooks until they're generally available. Lists Lists let you put multiple values into one cell. You can create a list by selecting Insert > List or pressing Ctrl+J, then typing or pasting items separated by commas or semicolons, depending on your regional settings. Selecting the icon in the cell shows the individual values. You can add, remove, or edit list items by double-clicking the cell or pressing F2, just like other values. With lists, you can filter by one or more individual items instead of whole text entries. Referencing a list returns all its values for calculations. For example, =B2 spills those values into separate cells. Arrays in cells Lists are useful on their own, but they're part of a much broader change to Excel. For the first time in Excel, arrays can exist natively in cells as values or as formula results. They can be any size or shape and can even contain other arrays. You can now keep the result of any spilling formula in a single cell by "wrapping" the formula body with braces { }. Since the introduction of dynamic arrays, array results have spilled across cells – for example ={1;2;3}. Wrapping the original array with braces creates a 1x1 array around it, so instead of spilling to multiple cells, the array stays in a single cell. Braces have long been used to describe arrays in Excel and this extends that behavior by allowing multiple layers of braces. This gives you more flexibility when building spreadsheets. Instead of leaving room for a formula to spill, you can keep the result in one cell. Arrays inside arrays, or nested arrays Arrays can now also "nest" inside other arrays. For example: ={{1,2,3};{4,5,6}} Previously, a formula that produced an array of arrays would return a truncated result or #CALC! error. Now, supported formulas return the complete nested result. In the example below, you can see how TEXTSPLIT behaves with and without nested arrays. Without nested arrays, Excel only returns the first item for each row. With nested arrays, the result spills, one array per row. The arrays in each row can then be used in further calculations. Four new functions: FLATTEN, HAS, HASANY, HASALL To help you work with arrays more easily, we've added four functions. FLATTEN(array, [pad_value], [levels]) simplifies nested arrays by removing one or more levels of nesting. Continuing from the prior example, FLATTEN lets you simplify the nested array output, spilling the individual results into the grid. We used an empty string ("") for pad_value so rows with fewer items show blanks in the remaining columns. Three HAS functions check whether values are in an array: HAS(array, value) returns TRUE if value appears anywhere in array, and FALSE otherwise. HASANY(array, values) returns TRUE if any of the values appear anywhere in array, and FALSE otherwise. HASALL(array, values) returns TRUE if all of the values appear anywhere in array, and FALSE otherwise. Do more with spreadsheets using arrays in cells and nested arrays Arrays in cells open up spreadsheet designs that weren't practical before. The run tracker below captures split times (how long it takes to run each kilometer) in a table with one run per row. The number of splits depends on the length of the run. Stats for each run are calculated right in the same table. For more examples, I recommend looking to your favorite Excel communities on LinkedIn, YouTube, Reddit, or elsewhere. Enabling nested array calculations in a workbook Compatibility Version 3 will be released alongside arrays in cells and is required for most calculations involving nested arrays. You can set Compatibility Version for each workbook in by selecting Formula > Calculation Options. See compatibility versions for more information. Some existing formulas return different results in Compatibility Version 3. If your workbook doesn't behave as expected, you can keep it set to Compatibility Version 1 or 2. Known limitations As this feature rolls out to Beta Channel, the following limitations apply: Conditional formatting doesn't inspect array contents unless you use a formula Data validation can't use a list or array as dropdown items Charts don't expand an array into data points PivotTables don't read array values as source data Power Query doesn't load or emit array-valued columns Find & Replace can't replace list/array items Availability These improvements are rolling out to Beta Channel users running: Windows: Version 2610 (Build 20520.20000) or later Mac: Version 16.114 (Build 26092111) or later Features covered on this blog roll out over time to enable us to monitor quality and performance, so some preview features may not be available to you right away. Also note that features may be paused, adjusted, or removed as part of that process. Feedback Click Help > Feedback in Excel to tell us what you think.36KViews14likes52Comments
Dynamic table
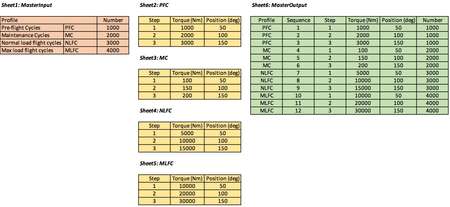
Hello, I want to create a dynamic table as shown in "sheet6". Sheet1 is the major overview with different load spectrums and number of occurrences. Sheet2-5 is specific load details for each spectrum, showing different load steps. Sheet6 take the table from sheet1 and add steps from sheet2-5. The column "number" in Sheet6 could be between profile and sequence. Order is not that important, just to show example. If anyone could help me to solve this, I would be very grateful! If possible, without using any code, just normal Excel functions. I'm thinking like a "lookup", where "Profile" in Sheet6 go to "Profile" in Sheet1, if match, extract complete table from sheet2-5 (depending of match). See overview below. Regards, Albin67Views0likes6Comments
Normalizing a text with numbers
Hello, i am looking for a fast ans simple (even VBA) solution to normalize text in a column. Let's say i have column B with values in the pattern A.9.1.1 What i want is every number to have two digits with a leading zero. It is easy to replace .1. with .01. with a vba macro in a loop. But the number at the end is difficult. I can not replace .1 with .01 as for example A.10.01.1 would become to A.010.1. You can see my problem? Of course i could loop through each cell value, grab the text after teh last dot an check if it is one or two digits. If it is one digit i can add the trailing zero. Is this the only way or ist there some secret function that will do this for me faster?Solved2.1KViews0likes7Comments
Excel & Word not working suspect temp folder error
My products are Microsoft Home & Student 2019 on Windows 11 Background: Yesterday accidently clicked on a link with the "screenconnect" virus. Was able to get it stopped before it downloaded on my computer. In attempting to stop it, I ran Microsoft virus check. I also went into Windows Privacy and Security and started Data Encryption, which I stopped after probably less than a minute and it did not complete. At some point received an error "make sure your temp folder is valid" NSIS error. Part of the NSIS error fix said to clear the temp folder, which I did. As a result of all the above, my Excel and Microsoft Word stopped working. I have tried all of the following fixes: Quick repair Complete repair Uninstalling program and reinstalling Recovered all the temp files from the recycle bin that were deleted and reloaded them into the temp file Checked Add-Ins in Excel - none are being used Made sure the temp folder is not set to read only Ran full virus scan Verified TEMP/TMP location Tried to find the folder "C:\users\"myname"\appdata\local\microsoft\windows\INetCache, but can't find INetCache file even when turning on hidden items Ran a complete disc check to check for disc errors In Excel, sometimes a document will open, other times it won't open at all and the program freezes. Even if I can open a document, I cannot modify it at all. I cannot create any new documents. When I attempt to create a new document, I get an error saying there isn't enough available memory or disc space (I have plenty of space on my hard drive). Prior to yesterday, I often had quite a few Excel files open at the same time. Also, all my templates disappeared before reinstalling the program. They reappeared when I reinstalled the program, but if I try and open them, an error says they are corrupted. Microsoft Word is also corrupted. These are some of the errors message I have received since reinstalling: Error writing temporary file. Make sure your temp folder is valid Microsoft Excel cannot access the file "C:\Users\"my name"\OneDrive\Documents\"file name". What should be the file name just appears as a number. The error message continues: "There are several possible reasons: - the file name or path does not exist. - the file is being used by another program. - the workbook you are trying to save has the same name as a currently open workbook" When trying to do a "save as" in Excel to try and create a new file get this error: C:\users\"myname"\onedrive\documents\"file name". File not found. Check the file name and try again "hardwareMonitorWindow: WINWORD.EXE - Application error: The exception unknown software exception (0xe00000002) occurred in the application at location....... then a big string of letters and numbers Microsoft Word: Word cannot save or create this file. Make sure that the disk you want to save the file on is not full, write-protected, or damaged." Microsoft Word: Word could not create the work file. Check the temp environment variable" I really don't know what to do at this point. Any help is appreciated. Thank you50Views0likes2CommentsHow to Use Checkboxes and In-Cell Lists for Interactive Project Tracking in Excel (Microsoft 365)
If you are using Excel solely for basic data entry, you are missing out on modern interactive capabilities available in Microsoft 365. Two standout features—Checkboxes and In-Cell Lists—make it much simpler to build dynamic status dashboards, track completion rates, and manage categorical values directly within cells. Below is a breakdown of how to implement both features in real business scenarios. 1. Interactive Checkboxes & Task Trackers When managing a project template or task list, you can replace plain text inputs with functional checkboxes. - Inserting Checkboxes: Select the target range in your task table and insert a checkbox from the ribbon. - Creating a Dynamic Status Column: A checked box returns TRUE, while an unchecked box returns FALSE. You can leverage this directly using a standard IF statement (for example, in cell F3 referencing checkbox cell D3): =IF(D3, "Completed", "Pending") Copy this formula down using Ctrl + D. Toggling the checkbox will instantly flip the status between Completed and Pending. - Calculating Real-Time Completion Percentages: To display an overall completion rate across all tasks: 1. Add a summary cell at the top of your sheet. 2. Use COUNTIF alongside COUNTA: =COUNTIF(D3:D20, TRUE) / COUNTA(D3:D20) 3. Format the cell as Percentage (%). Whenever a task is checked off, your completion metric updates automatically, giving teams and stakeholders immediate visibility into project progress. 2. In-Cell Lists for Skill and Tag Management Instead of creating messy text strings or sprawling columns to capture multiple skills or tags per employee: - Select the relevant cell under your dataset. - Go to Insert > List. - Enter your values (such as Power BI, SQL, Python). - Hit Enter. Hovering over the cell reveals the clean, consolidated list directly in place, keeping your dataset structured and readable.24Views0likes0Comments
Excel formula not pulling correct data
In my cell# CN I have formula =IFERROR(IF(XLOOKUP($D25,GSS!$A:$A,GSS!$AP:$AP)=0,"-",XLOOKUP($D25,GSS!$A:$A,GSS!$AP:$AP)),"-") and my result should be CFS or FCL. Then in another cell I have formula =IF(CN25="CFS",(CP25),(CO25)), but my result doesn't change based in cell CN. Please help!44Views0likes2CommentsPivot table option issues in MS office 365
I am using Microsoft Office 365 on my machine and need to use the PivotTable option to summarize the Late Hours and Extension Hours in my report. However, recently the PivotTable is not displaying the Sum option/value correctly for these fields. The values are currently not being summarized as expected. Could you please review this issue and advise me on how to resolve it? I would appreciate your guidance on the required Excel settings or data-format changes needed to display the Sum of Late Hours and Extension Hours correctly in the PivotTable.82Views0likes4Comments
PivotTable regression in Version 2609. Duration fields formatted [h]:mm:ss no longer allow Sum.
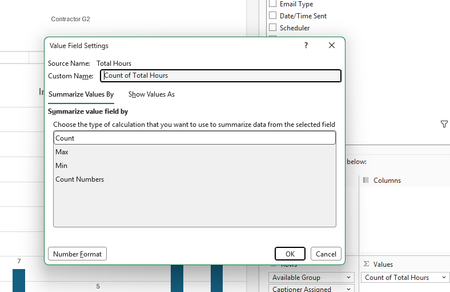
Excel 365 Version 2609 (Build 16.0.20430.20032) appears to have changed PivotTable handling of duration fields formatted as mm:ss. New PivotTables default to Count of Total Hours and Value Field Settings only shows Count, Max, Min, and Count Numbers; Sum is missing. Existing PivotTables using Sum of Total Hours still calculate correctly, even after refresh, but Sum no longer appears in their settings. Numeric helper field =[@[Total Hours]]*24 restores Sum functionality. Appears to be a regression affecting duration fields. I have verified that Excel is treating the data formatted as [h]:mm:ss as numeric and yet still will not allow sums as before.34Views0likes1CommentAutoSave disabled when opening SharePoint-synced files from Finder after macOS Tahoe 26.6 update
Files stored in SharePoint Online and synchronized locally through OneDrive are opened as local documents when launched from Finder. Office applications display "Saved to my Mac" and AutoSave is turned off by default. However, opening the exact same files through Word/Excel > Open > Sites, or via SharePoint "Open in Desktop App", correctly identifies them as cloud documents. In that scenario, AutoSave is enabled and collaboration/version history features work as expected. Troubleshooting already performed: OneDrive reset and re-linked SharePoint library re-synced Signed out and back into both Office and OneDrive Removed Microsoft credentials from macOS Keychain and re-authenticated Recreated local OneDrive sync relationships Verified OneDrive File Provider extensions are enabled Verified Office applications and OneDrive are fully up to date Tested with newly created files and existing files Tested "Always Keep on This Device" with no change in behavior The issue appears to be specific to the Finder-to-Office launch path after upgrading to macOS Tahoe 26.6. Before upgrading to macOS Tahoe 26.6, opening the same SharePoint-synchronized files directly from Finder correctly preserved cloud document identity and AutoSave was enabled as expected. I discussed this issue in detail with Apple Support, but they quickly dismissed it, saying that the problem is not on Apple's side and that I should contact Microsoft instead.3.5KViews13likes38Comments