docker
73 Topics
Konto got hacked and the hacker deleted it
A few weeks ago my email konto got hacked. The hacker also also deleted it. Now i cant log in in video games and in microsoft itsself but in like Disney or Gmail. I also went to the microsoft support but it dont work because they want to sent a code to a phone number or email(the email has @neplys in it) I dont know. Does somebody know my problem and could help me?124Views0likes0CommentsStep-by-step: Integrate Ollama Web UI to use Azure Open AI API with LiteLLM Proxy
Introductions Ollama WebUI is a streamlined interface for deploying and interacting with open-source large language models (LLMs) like Llama 3 and Mistral, enabling users to manage models, test them via a ChatGPT-like chat environment, and integrate them into applications through Ollama’s local API. While it excels for self-hosted models on platforms like Azure VMs, it does not natively support Azure OpenAI API endpoints—OpenAI’s proprietary models (e.g., GPT-4) remain accessible only through OpenAI’s managed API. However, tools like LiteLLM bridge this gap, allowing developers to combine Ollama-hosted models with OpenAI’s API in hybrid workflows, while maintaining compliance and cost-efficiency. This setup empowers users to leverage both self-managed open-source models and cloud-based AI services. Problem Statement As of February 2025, Ollama WebUI, still do not support Azure Open AI API. The Ollama Web UI only support self-hosted Ollama API and managed OpenAI API service (PaaS). This will be an issue if users want to use Open AI models they already deployed on Azure AI Foundry. Objective To integrate Azure OpenAI API via LiteLLM proxy into with Ollama Web UI. LiteLLM translates Azure AI API requests into OpenAI-style requests on Ollama Web UI allowing users to use OpenAI models deployed on Azure AI Foundry. If you haven’t hosted Ollama WebUI already, follow my other step-by-step guide to host Ollama WebUI on Azure. Proceed to the next step if you have Ollama WebUI deployed already. Step 1: Deploy OpenAI models on Azure Foundry. If you haven’t created an Azure AI Hub already, search for Azure AI Foundry on Azure, and click on the “+ Create” button > Hub. Fill out all the empty fields with the appropriate configuration and click on “Create”. After the Azure AI Hub is successfully deployed, click on the deployed resources and launch the Azure AI Foundry service. To deploy new models on Azure AI Foundry, find the “Models + Endpoints” section on the left hand side and click on “+ Deploy Model” button > “Deploy base model” A popup will appear, and you can choose which models to deploy on Azure AI Foundry. Please note that the o-series models are only available to select customers at the moment. You can request access to the o-series models by completing this request access form, and wait until Microsoft approves the access request. Click on “Confirm” and another popup will emerge. Now name the deployment and click on “Deploy” to deploy the model. Wait a few moments for the model to deploy. Once it successfully deployed, please save the “Target URI” and the API Key. Step 2: Deploy LiteLLM Proxy via Docker Container Before pulling the LiteLLM Image into the host environment, create a file named “litellm_config.yaml” and list down the models you deployed on Azure AI Foundry, along with the API endpoints and keys. Replace "API_Endpoint" and "API_Key" with “Target URI” and “Key” found from Azure AI Foundry respectively. Template for the “litellm_config.yaml” file. model_list: - model_name: [model_name] litellm_params: model: azure/[model_name_on_azure] api_base: "[API_ENDPOINT/Target_URI]" api_key: "[API_Key]" api_version: "[API_Version]" Tips: You can find the API version info at the end of the Target URI of the model's endpoint: Sample Endpoint - https://example.openai.azure.com/openai/deployments/o1-mini/chat/completions?api-version=2024-08-01-preview Run the docker command below to start LiteLLM Proxy with the correct settings: docker run -d \ -v $(pwd)/litellm_config.yaml:/app/config.yaml \ -p 4000:4000 \ --name litellm-proxy-v1 \ --restart always \ ghcr.io/berriai/litellm:main-latest \ --config /app/config.yaml --detailed_debug Make sure to run the docker command inside the directory where you created the “litellm_config.yaml” file just now. The port used to listen for LiteLLM Proxy traffic is port 4000. Now that LiteLLM proxy had been deployed on port 4000, lets change the OpenAI API settings on Ollama WebUI. Navigate to Ollama WebUI’s Admin Panel settings > Settings > Connections > Under the OpenAI API section, write http://127.0.0.1:4000 as the API endpoint and set any key (You must write anything to make it work!). Click on “Save” button to reflect the changes. Refresh the browser and you should be able to see the AI models deployed on the Azure AI Foundry listed in the Ollama WebUI. Now let’s test the chat completion + Web Search capability using the "o1-mini" model on Ollama WebUI. Conclusion Hosting Ollama WebUI on an Azure VM and integrating it with OpenAI’s API via LiteLLM offers a powerful, flexible approach to AI deployment, combining the cost-efficiency of open-source models with the advanced capabilities of managed cloud services. While Ollama itself doesn’t support Azure OpenAI endpoints, the hybrid architecture empowers IT teams to balance data privacy (via self-hosted models on Azure AI Foundry) and cutting-edge performance (using Azure OpenAI API), all within Azure’s scalable ecosystem. This guide covers every step required to deploy your OpenAI models on Azure AI Foundry, set up the required resources, deploy LiteLLM Proxy on your host machine and configure Ollama WebUI to support Azure AI endpoints. You can test and improve your AI model even more with the Ollama WebUI interface with Web Search, Text-to-Image Generation, etc. all in one place.13KViews1like4CommentsDeploy Open Web UI on Azure VM via Docker: A Step-by-Step Guide with Custom Domain Setup.
Introductions Open Web UI (often referred to as "Ollama Web UI" in the context of LLM frameworks like Ollama) is an open-source, self-hostable interface designed to simplify interactions with large language models (LLMs) such as GPT-4, Llama 3, Mistral, and others. It provides a user-friendly, browser-based environment for deploying, managing, and experimenting with AI models, making advanced language model capabilities accessible to developers, researchers, and enthusiasts without requiring deep technical expertise. This article will delve into the step-by-step configurations on hosting OpenWeb UI on Azure. Requirements: Azure Portal Account - For students you can claim $USD100 Azure Cloud credits from this URL. Azure Virtual Machine - with a Linux of any distributions installed. Domain Name and Domain Host Caddy Open WebUI Image Step One: Deploy a Linux – Ubuntu VM from Azure Portal Search and Click on “Virtual Machine” on the Azure portal search bar and create a new VM by clicking on the “+ Create” button > “Azure Virtual Machine”. Fill out the form and select any Linux Distribution image – In this demo, we will deploy Open WebUI on Ubuntu Pro 24.04. Click “Review + Create” > “Create” to create the Virtual Machine. Tips: If you plan to locally download and host open source AI models via Open on your VM, you could save time by increasing the size of the OS disk / attach a large disk to the VM. You may also need a higher performance VM specification since large resources are needed to run the Large Language Model (LLM) locally. Once the VM has been successfully created, click on the “Go to resource” button. You will be redirected to the VM’s overview page. Jot down the public IP Address and access the VM using the ssh credentials you have setup just now. Step Two: Deploy the Open WebUI on the VM via Docker Once you are logged into the VM via SSH, run the Docker Command below: docker run -d --name open-webui --network=host --add-host=host.docker.internal:host-gateway -e PORT=8080 -v open-webui:/app/backend/data --restart always ghcr.io/open-webui/open-webui:dev This Docker command will download the Open WebUI Image into the VM and will listen for Open Web UI traffic on port 8080. Wait for a few minutes and the Web UI should be up and running. If you had setup an inbound Network Security Group on Azure to allow port 8080 on your VM from the public Internet, you can access them by typing into the browser: [PUBLIC_IP_ADDRESS]:8080 Step Three: Setup custom domain using Caddy Now, we can setup a reverse proxy to map a custom domain to [PUBLIC_IP_ADDRESS]:8080 using Caddy. The reason why Caddy is useful here is because they provide automated HTTPS solutions – you don’t have to worry about expiring SSL certificate anymore, and it’s free! You must download all Caddy’s dependencies and set up the requirements to install it using this command: sudo apt install -y debian-keyring debian-archive-keyring apt-transport-https curl -1sLf 'https://dl.cloudsmith.io/public/caddy/stable/gpg.key' | sudo gpg --dearmor -o /usr/share/keyrings/caddy-stable-archive-keyring.gpg curl -1sLf 'https://dl.cloudsmith.io/public/caddy/stable/debian.deb.txt' | sudo tee /etc/apt/sources.list.d/caddy-stable.list sudo apt update && sudo apt install caddy Once Caddy is installed, edit Caddy’s configuration file at: /etc/caddy/Caddyfile , delete everything else in the file and add the following lines: yourdomainname.com { reverse_proxy localhost:8080 } Restart Caddy using this command: sudo systemctl restart caddy Next, create an A record on your DNS Host and point them to the public IP of the server. Step Four: Update the Network Security Group (NSG) To allow public access into the VM via HTTPS, you need to ensure the NSG/Firewall of the VM allow for port 80 and 443. Let’s add these rules into Azure by heading to the VM resources page you created for Open WebUI. Under the “Networking” Section > “Network Settings” > “+ Create port rule” > “Inbound port rule” On the “Destination port ranges” field, type in 443 and Click “Add”. Repeat these steps with port 80. Additionally, to enhance security, you should avoid external users from directly interacting with Open Web UI’s port - port 8080. You should add an inbound deny rule to that port. With that, you should be able to access the Open Web UI from the domain name you setup earlier. Conclusion And just like that, you’ve turned a blank Azure VM into a sleek, secure home for your Open Web UI, no magic required! By combining Docker’s simplicity with Caddy’s “set it and forget it” HTTPS magic, you’ve not only made your app accessible via a custom domain but also locked down security by closing off risky ports and keeping traffic encrypted. Azure’s cloud muscle handles the heavy lifting, while you get to enjoy the perks of a pro setup without the headache. If you are interested in using AI models deployed on Azure AI Foundry on OpenWeb UI via API, kindly read my other article: Step-by-step: Integrate Ollama Web UI to use Azure Open AI API with LiteLLM Proxy5.1KViews2likes1Comment
Question about Kubernetes Deployment tutorial on Microsoft Learn
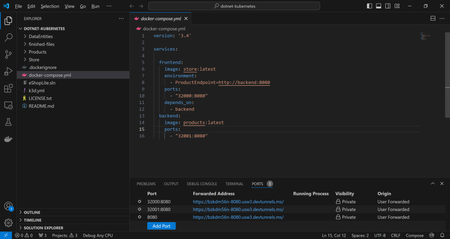
I am going through the tutorial Module on Microsoft Learn titled "Deploy a .NET Microservice to Kubernetes" and am on the third unit located here: https://learn.microsoft.com/en-us/training/modules/dotnet-deploy-microservices-kubernetes/3-exercise-push-to-docker-hub. I am stuck under the "Verify the Docker images by creating containers in the codespace" heading on the fourth step. It tells you to select the port for the front end and open the service in a browser. However, there were no ports here that the step seemed to suggest were already there and I had to set it up. Given that the port for the frontend service of this tutorial is 32000:8080 according to the docker-compose.yml file for this tutorial project, is this what I should put in the ports tab? If so, the service does not display in my browser when I click on the globe icon as instructed by the tutorial and all I see is an HTTP 502 message. What should I do so that I can view the service? The repository for this tutorial service is located at https://github.com/MicrosoftDocs/mslearn-dotnet-cloudnative in the dotnet-kubernetes folder and I have attached images as well of the discussed configuration and error message below:224Views0likes0Comments
Exploring the Advanced RAG (Retrieval Augmented Generation) Service
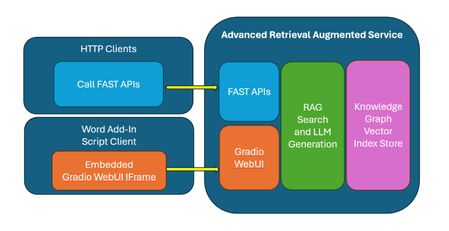
In the ever-evolving landscape of AI, LLM + RAG (Retrieval Augmented Generation) is a typical use scenario. Retrieving accurate related chunked data from complicated docs and then improving LLM response quality becomes challenge. There is no a silver bullet RAG can address all requirements so far. Developers need to verify different advanced RAG techs to find out which is a proper one for their scenarios considering accuracy, response speed, costs, etc. In order to solve this, with Azure Intelligent Document, Azure OpenAI, LlamaIndex, LangChain, Gradio..., I developed this AdvancedRAG service. This service is encapsulated in a Docker container, offers a streamlined way to experiment with different indexing techniques, evaluate their accuracy, and optimize performance for various RAG use cases. Whether you're building a quick MVP, a proof of concept, or simply exploring different indexing strategies, this service provides a versatile playground.9.5KViews3likes0CommentsVulnerability Assessment on Azure Container Registry with Microsoft Defender and Docker Hub
Azure Container Registry: Microsoft Defender for Containers and Docker Scout. Rather than comparing these tools, I want to highlight how they complement each other to enhance container security on ACR. Containers revolutionize the way applications are deployed, providing a consistent and efficient way to package code and dependencies. However, with this convenience comes the critical need for robust security measures. In this post, we'll explore why container security is essential, focusing on preventing malicious code, avoiding vulnerabilities, and managing configuration and deployment risks.4.2KViews3likes2CommentsHost and Deploy Images on Azure Container Registries (ACR) via App Service - A step-by-step guide
Ready to unlock the full potential of Azure for your web applications? Join me, Suzaril Shah, as I take you through a comprehensive guide on hosting images in Azure Container Registry and deploying them through an App Service plan. Whether you’re a seasoned developer or new to cloud services, this step-by-step tutorial will equip you with the skills to streamline your deployments and enhance your project’s infrastructure. Don’t miss out—let's elevate your Azure proficiency together!5.7KViews0likes1Comment
Open Source Microservices Platform Now Available
Hello! I have recently published a new open source microservices platform on GitHub. It is available under the MIT permissive license and is free to use for commercial purposes. I'm asking the .NET community for some help. https://ServiceBricks.com I am currently BETA testing and I'm looking for developers and architects to help me with the final push to make it production ready. I could use another set of eyes to help shore up the last remaining bits. ServiceBricks is a powerful platform designed to streamline the development, deployment, and maintenance of distributed systems. It provides domain-driven design, event-based architecture and a wealth of features to rapidly build new microservices and application quickly. Deploy single monoliths or distributed, multi-web applications using docker or kubernetes. There are several pre-built microservices to start from to build your own application infrastructures. They are also open source and all source code is available. Please drop me a line if you would like to help! I'm looking for discussions on microservices architecture and how they are implemented in code. Thanks! Danny484Views1like0Comments