cloud security best practices
27 TopicsModernizing Terraform Pipelines on Azure: OIDC Federation for GitHub Actions and Azure DevOps
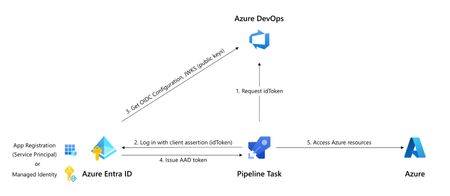
The secret nobody wants to rotate Most Terraform-on-Azure pipelines we see still authenticate the same way they did three years ago. A long-lived ARM_CLIENT_SECRET sitting in GitHub Actions or Azure DevOps, set once, copied around, and rotated only when something breaks. It's the most ignored credential in the cloud, and statistically the most likely one to leak. A developer screenshots a variable group. A pipeline log echoes a value. A fork inherits a secret. Or the secret simply expires on a Friday evening and takes production deployments with it. Workload Identity Federation (WIF) makes this whole class of problem go away. The pipeline mints a short-lived token at runtime, exchanges it for an Azure access token via Microsoft Entra, and never touches a secret. GitHub Actions has supported it since 2021. Azure DevOps service connections went GA with WIF in February 2024. The azurerm Terraform provider has supported it since v3.7. This post walks through the pattern end-to-end, for both GitHub Actions and Azure DevOps, the way I've rolled it out across multiple customer estates. How the exchange actually works Before any YAML, it helps to picture what's happening: The CI system (GitHub or ADO) signs a short-lived JWT describing exactly what's running- which repo, which branch, which environment, which service connection. The pipeline sends that JWT to Microsoft Entra ID. Entra checks it against a federated identity credential you've configured on a managed identity or app registration. The iss, sub, and aud claims must match case-sensitively. If it matches, Entra returns an Azure access token valid for the duration of the job. Terraform uses it. The job ends. The token expires. Nothing persists. The token is bound to a specific subject like repo:contoso/platform:environment:prod or sc://contoso/platform/azure-prod. It can't be reused from another repo, branch, or pipeline. Recommended Architecture A few choices that usually hold up in production: Decision Choice Identity type User-assigned managed identity (UAMI), not app registration Identity granularity One UAMI per environment (not per pipeline) Trust scope Pinned to the environment claim, not the branch RBAC scope Resource group, not subscription Remote state OIDC + use_azuread_auth = true, shared key access disabled Why UAMIs? They live in your subscription, don't need Application Administrator rights to manage, and follow the lifecycle of the resource group they belong to. Why one per environment? Pipeline-per-identity explodes into hundreds of identities. Environment-per-identity maps cleanly to deployment scopes. Part 1 - GitHub Actions Step 1: Create the identity and federate it Two commands per environment. That's it. az identity create -g rg-platform-identity -n id-tf-prod -l eastus az identity federated-credential create \ --name github-prod \ --identity-name id-tf-prod \ --resource-group rg-platform-identity \ --issuer https://token.actions.githubusercontent.com \ --subject repo:contoso/platform:environment:prod \ --audiences api://AzureADTokenExchange Repeat for nonprod. No secret is created anywhere. Step 2: Wire it up in GitHub In repo Settings → Environments, create nonprod and prod. On prod, add required reviewers and a branch rule restricting deployments to main. Then add three environment variables (not secrets - these aren't sensitive): AZURE_CLIENT_ID, AZURE_TENANT_ID, AZURE_SUBSCRIPTION_ID. The workflow itself stays small: permissions: id-token: write contents: read jobs: apply: runs-on: ubuntu-latest environment: prod env: ARM_USE_OIDC: "true" ARM_CLIENT_ID: ${{ vars.AZURE_CLIENT_ID }} ARM_TENANT_ID: ${{ vars.AZURE_TENANT_ID }} ARM_SUBSCRIPTION_ID: ${{ vars.AZURE_SUBSCRIPTION_ID }} steps: - uses: actions/checkout@v4 - uses: hashicorp/setup-terraform@v3 - run: terraform init && terraform apply -auto-approve Three things make this secure: id-token: write is the only elevated permission, and it doesn't grant write access to anything in GitHub, it just lets the runner mint a JWT. The environment: line picks the right AZURE_CLIENT_ID and drives the sub claim. The federation refuses anything else. No azure/login step is needed for Terraform. The azurerm provider reads GitHub's OIDC environment variables automatically. Part 2 - Azure DevOps The model is identical. The mechanics are different. ADO offers two creation paths for a WIF service connection: automatic (it creates an app registration for you) and manual (you bring your own UAMI). For platform teams, manual + UAMI is almost always the better choice to ensure identity lives where governance lives. The flow is a small dance between the two portals: In Azure DevOps, create a new ARM service connection → choose Workload Identity Federation (manual) → fill in your UAMI's client ID, tenant ID, and subscription. Save as draft. ADO shows you an issuer URL and a subject identifier. In Azure, on the UAMI, add a federated credential using the values ADO showed you. The subject looks like sc://contoso/platform/azure-prod. Back in ADO, click Verify and save. In the pipeline, the service connection only "activates" if a task in the job loads it. The simplest way is the AzureCLI@2 task: - task: AzureCLI@2 inputs: azureSubscription: azure-prod # the WIF service connection scriptType: bash scriptLocation: inlineScript inlineScript: | terraform init && terraform apply -auto-approve env: ARM_USE_OIDC: "true" ARM_CLIENT_ID: $(AZURE_CLIENT_ID) ARM_TENANT_ID: $(AZURE_TENANT_ID) ARM_SUBSCRIPTION_ID: $(AZURE_SUBSCRIPTION_ID) ARM_ADO_PIPELINE_SERVICE_CONNECTION_ID: $(SERVICE_CONNECTION_ID) SYSTEM_ACCESSTOKEN: $(System.AccessToken) SYSTEM_OIDCREQUESTURI: $(System.OidcRequestUri) For teams converting dozens of legacy connections, the Azure DevOps team published a PowerShell helper that walks every ARM service connection in a project and converts them in place. There's a 7-day rollback window on each connection, which makes the migration genuinely low-risk. Don't forget the state file The Terraform state is your real blast radius. With OIDC, it's almost free to lock it down too. The same UAMI can read and write blob data without the storage account key: backend "azurerm" { resource_group_name = "rg-tfstate" storage_account_name = "sttfstateprodeastus" container_name = "platform-prod" key = "platform.tfstate" use_oidc = true use_azuread_auth = true } Grant the UAMI Storage Blob Data Contributor on the container (not the account), disable shared key access on the storage account, and you've removed the last secret in the pipeline. RBAC and break-glass Federation removes a credential, not a privilege. A few habits worth keeping: Scope role assignments to resource groups, not subscriptions. The whole point of federation is that scoping is now trivially easy. Use Role Based Access Control Administrator instead of User Access Administrator if your Terraform creates role assignments. It's a more recent, narrower role. Have a documented break-glass. If GitHub or ADO has a token-service incident, you still need a path to ship a hotfix. A single hardware-key-protected emergency app registration in a separate identity boundary works well, audited monthly. Monitor sign-ins. Every federated exchange shows up in Entra sign-in logs as a service principal sign-in. Pipe these to Sentinel and alert on anomalies like sign-ins outside expected hours, or from IPs outside GitHub's published ranges. The errors you will hit (and what they really mean) Symptom What it actually is AADSTS70021: No matching federated identity record found Case-sensitive mismatch in iss, sub, or aud. Almost always a trailing slash or a capitalised character AADSTS700016: Application not found in directory Wrong client ID or tenant. Not a federation problem 403 on a resource even though token exchange worked Federation is fine. Your RBAC isn't. Check the exact scope Unable to determine OIDC token (ADO) No task in the job loaded the service connection. Add an AzureCLI@2 step Works on main, fails on tags You pinned sub to a branch ref. Add a second federated credential for tags, or move to environment-based scoping Migrating without a maintenance window You almost never get to do this on a greenfield repo. The order that has worked for me on legacy estates: Create the new UAMI alongside the old service principal, with the same role assignments. Federate one canary pipeline. Verify it deploys equivalently. Cut over pipelines in waves, lowest-risk environment first. Once a full release cycle passes cleanly, disable the old SP's secret. Wait another cycle. Then delete the SP entirely. Add a CI gate that fails any new pipeline introducing ARM_CLIENT_SECRET. The old and new auth methods coexist on the same subscription throughout. There's no hard cutover and no maintenance window, just a steady drift toward zero secrets. Wrapping up If you do nothing else after reading this, do one thing: search your CI variable groups for ARM_CLIENT_SECRET. Every result is an outage or a breach waiting to happen. Federation is one of those rare changes that's both more secure and less work to operate. Once you've set it up, you stop thinking about credential rotation, secret expiry, and quarterly access reviews for service principals. The pipeline simply runs, and the audit trail is in Entra where it belongs. That's a good trade.1.7KViews17likes10CommentsBuilding Azure Right: A Practical Checklist for Infrastructure Landing Zones
When the Gaps Start Showing A few months ago, we walked into a high-priority Azure environment review for a customer dealing with inconsistent deployments and rising costs. After a few discovery sessions, the root cause became clear: while they had resources running, there was no consistent foundation behind them. No standard tagging. No security baseline. No network segmentation strategy. In short—no structured Landing Zone. That situation isn't uncommon. Many organizations sprint into Azure workloads without first planning the right groundwork. That’s why having a clear, structured implementation checklist for your Landing Zone is so essential. What This Checklist Will Help You Do This implementation checklist isn’t just a formality. It’s meant to help teams: Align cloud implementation with business goals Avoid compliance and security oversights Improve visibility, governance, and operational readiness Build a scalable and secure foundation for workloads Let’s break it down, step by step. 🎯 Define Business Priorities Before Touching the Portal Before provisioning anything, work with stakeholders to understand: What outcomes matter most – Scalability? Faster go-to-market? Cost optimization? What constraints exist – Regulatory standards, data sovereignty, security controls What must not break – Legacy integrations, authentication flows, SLAs This helps prioritize cloud decisions based on value rather than assumption. 🔍 Get a Clear Picture of the Current Environment Your approach will differ depending on whether it’s a: Greenfield setup (fresh, no legacy baggage) Brownfield deployment (existing workloads to assess and uplift) For brownfield, audit gaps in areas like scalability, identity, and compliance before any new provisioning. 📜 Lock Down Governance Early Set standards from day one: Role-Based Access Control (RBAC): Granular, least-privilege access Resource Tagging: Consistent metadata for tracking, automation, and cost management Security Baselines: Predefined policies aligned with your compliance model (NIST, CIS, etc.) This ensures everything downstream is both discoverable and manageable. 🧭 Design a Network That Supports Security and Scale Network configuration should not be an afterthought: Define NSG Rules and enforce segmentation Use Routing Rules to control flow between tiers Consider Private Endpoints to keep services off the public internet This stage sets your network up to scale securely and avoid rework later. 🧰 Choose a Deployment Approach That Fits Your Team You don’t need to reinvent the wheel. Choose from: Predefined ARM/Bicep templates Infrastructure as Code (IaC) using tools like Terraform Custom Provisioning for unique enterprise requirements Standardizing this step makes every future deployment faster, safer, and reviewable. 🔐 Set Up Identity and Access Controls the Right Way No shared accounts. No “Owner” access to everyone. Use: Azure Active Directory (AAD) for identity management RBAC to ensure users only have access to what they need, where they need it This is a critical security layer—set it up with intent. 📈 Bake in Monitoring and Diagnostics from Day One Cloud environments must be observable. Implement: Log Analytics Workspace (LAW) to centralize logs Diagnostic Settings to capture platform-level signals Application Insights to monitor app health and performance These tools reduce time to resolution and help enforce SLAs. 🛡️ Review and Close on Security Posture Before allowing workloads to go live, conduct a security baseline check: Enable data encryption at rest and in transit Review and apply Azure Security Center recommendations Ensure ACC (Azure Confidential Computing) compliance if applicable Security is not a phase. It’s baked in throughout—but reviewed intentionally before go-live. 🚦 Validate Before You Launch Never skip a readiness review: Deploy in a test environment to validate templates and policies Get sign-off from architecture, security, and compliance stakeholders Track checklist completion before promoting anything to production This keeps surprises out of your production pipeline. In Closing: It’s Not Just a Checklist, It’s Your Blueprint When implemented well, this checklist becomes much more than a to-do list. It’s a blueprint for scalable, secure, and standardized cloud adoption. It helps teams stay on the same page, reduces firefighting, and accelerates real business value from Azure. Whether you're managing a new enterprise rollout or stabilizing an existing environment, this checklist keeps your foundation strong. Tags - Infrastructure Landing Zone Governance and Security Best Practices for Azure Infrastructure Landing Zones Automating Azure Landing Zone Setup with IaC Templates Checklist to Validate Azure Readiness Before Production Rollout Monitoring, Access Control, and Network Planning in Azure Landing Zones Azure Readiness Checklist for Production6.4KViews6likes3Comments
Building Cost-Aware Azure Infrastructure Pipelines: Estimate Costs Before You Deploy
The Problem: Cost Is a Blind Spot in IaC Reviews Code reviews for Bicep or Terraform templates typically focus on correctness, security, and compliance. But cost is rarely part of the review process because: Developers don't have easy access to pricing data at review time Azure pricing depends on region, tier, reservation status, and more There's no built-in "cost diff" in any IaC tool This means cost regressions slip through the same way bugs do when there are no tests. iac-review-gap Architecture Overview Here's the pipeline we'll build: architecture-overview Step 1: Use Bicep What-If to Detect Changes Azure's what-if deployment mode shows you exactly what resources will be created, modified, or deleted — without actually deploying anything. az deployment group what-if --resource-group rg-myapp-prod --template-file main.bicep --parameters main.bicepparam --result-format ResourceIdOnly --out json > what-if-output.json The JSON output contains a changes array where each entry has: resourceId — the full ARM resource ID changeType — one of Create, Modify, Delete, NoChange, Deploy before and after — the full resource properties for modifications This is the foundation: the what-if output tells us what is changing, and we can use that to look up what it costs. what-if-cli-output Step 2: Map Resources to Pricing with the Retail Prices API The Azure Retail Prices API is a free, unauthenticated REST API that returns pay-as-you-go pricing for any Azure service. Here's a Python script that takes a VM SKU and region and returns the monthly cost: import requests def get_vm_price(sku_name: str, region: str = "eastus") -> float | None: """Query the Azure Retail Prices API for a Linux VM's pay-as-you-go hourly rate.""" api_url = "https://prices.azure.com/api/retail/prices" odata_filter = ( f"armRegionName eq '{region}' " f"and armSkuName eq '{sku_name}' " f"and priceType eq 'Consumption' " f"and serviceName eq 'Virtual Machines' " f"and contains(meterName, 'Spot') eq false " f"and contains(productName, 'Windows') eq false" ) response = requests.get(api_url, params={"$filter": odata_filter}) response.raise_for_status() items = response.json().get("Items", []) if not items: return None hourly_rate = items[0]["retailPrice"] monthly_estimate = hourly_rate * 730 # avg hours per month return round(monthly_estimate, 2) # Example usage before_cost = get_vm_price("Standard_D4s_v5") # e.g., $140.16/mo after_cost = get_vm_price("Standard_D8s_v5") # e.g., $280.32/mo delta = after_cost - before_cost # +$140.16/mo You can extend this pattern for other resource types — App Service Plans, Azure SQL databases, managed disks, etc. — by adjusting the serviceName and meterName filters. Step 3: Build the GitHub Actions Workflow Here's a complete GitHub Actions workflow that ties it all together: name: Cost Estimate on PR on: pull_request: paths: - "infra/**" permissions: id-token: write # For Azure OIDC login contents: read pull-requests: write # To post comments jobs: cost-estimate: runs-on: ubuntu-latest steps: - name: Checkout code uses: actions/checkout@v4 - name: Azure Login (OIDC) uses: azure/login@v2 with: client-id: ${{ secrets.AZURE_CLIENT_ID }} tenant-id: ${{ secrets.AZURE_TENANT_ID }} subscription-id: ${{ secrets.AZURE_SUBSCRIPTION_ID }} - name: Run Bicep What-If run: | az deployment group what-if \ --resource-group ${{ vars.RESOURCE_GROUP }} \ --template-file infra/main.bicep \ --parameters infra/main.bicepparam \ --out json > what-if-output.json - name: Setup Python uses: actions/setup-python@v5 with: python-version: "3.12" - name: Install dependencies run: pip install requests - name: Estimate cost delta id: cost run: | python infra/scripts/estimate_costs.py \ --what-if-file what-if-output.json \ --output-format github >> "$GITHUB_OUTPUT" - name: Comment on PR uses: marocchino/sticky-pull-request-comment@v2 with: header: cost-estimate message: | ## 💰 Infrastructure Cost Estimate | Resource | Change | Before ($/mo) | After ($/mo) | Delta | |----------|--------|---------------|--------------|-------| ${{ steps.cost.outputs.table_rows }} **Estimated monthly impact: ${{ steps.cost.outputs.total_delta }}** _Prices are pay-as-you-go estimates from the Azure Retail Prices API. Actual costs may vary with reservations, savings plans, or hybrid benefit._ - name: Gate on budget threshold if: ${{ steps.cost.outputs.delta_value > 500 }} run: | echo "::error::Monthly cost increase exceeds $500 threshold. Requires finance team approval." exit 1 Step 4: The Cost Estimation Script Here's the core of infra/scripts/estimate_costs.py that parses the what-if output and queries prices: #!/usr/bin/env python3 """Parse Bicep what-if output and estimate cost deltas using Azure Retail Prices API.""" import json import argparse import requests PRICE_API = "https://prices.azure.com/api/retail/prices" # Map ARM resource types to Retail API service names RESOURCE_TYPE_MAP = { "Microsoft.Compute/virtualMachines": "Virtual Machines", "Microsoft.Compute/disks": "Storage", "Microsoft.Web/serverfarms": "Azure App Service", "Microsoft.Sql/servers/databases": "SQL Database", } def get_price(service_name: str, sku: str, region: str) -> float: """Query Azure Retail Prices API and return monthly cost estimate.""" odata_filter = ( f"armRegionName eq '{region}' " f"and armSkuName eq '{sku}' " f"and priceType eq 'Consumption' " f"and serviceName eq '{service_name}'" ) resp = requests.get(PRICE_API, params={"$filter": odata_filter}) resp.raise_for_status() items = resp.json().get("Items", []) if not items: return 0.0 return items[0]["retailPrice"] * 730 def parse_what_if(filepath: str) -> list[dict]: """Extract resource changes from what-if JSON output.""" with open(filepath) as f: data = json.load(f) results = [] for change in data.get("changes", []): change_type = change.get("changeType", "") resource_type = change.get("resourceId", "").split("/providers/")[-1].split("/")[0:2] resource_type_str = "/".join(resource_type) if len(resource_type) == 2 else "" if resource_type_str not in RESOURCE_TYPE_MAP: continue before_sku = (change.get("before") or {}).get("sku", {}).get("name", "") after_sku = (change.get("after") or {}).get("sku", {}).get("name", "") region = (change.get("after") or change.get("before") or {}).get("location", "eastus") service = RESOURCE_TYPE_MAP[resource_type_str] before_price = get_price(service, before_sku, region) if before_sku else 0.0 after_price = get_price(service, after_sku, region) if after_sku else 0.0 results.append({ "resource": change.get("resourceId", "").split("/")[-1], "change_type": change_type, "before": round(before_price, 2), "after": round(after_price, 2), "delta": round(after_price - before_price, 2), }) return results def main(): parser = argparse.ArgumentParser() parser.add_argument("--what-if-file", required=True) parser.add_argument("--output-format", default="text", choices=["text", "github"]) args = parser.parse_args() changes = parse_what_if(args.what_if_file) total_delta = sum(c["delta"] for c in changes) if args.output_format == "github": rows = [] for c in changes: sign = "+" if c["delta"] >= 0 else "" rows.append( f"| {c['resource']} | {c['change_type']} " f"| ${c['before']:.2f} | ${c['after']:.2f} " f"| {sign}${c['delta']:.2f} |" ) print(f"table_rows={'chr(10)'.join(rows)}") sign = "+" if total_delta >= 0 else "" print(f"total_delta={sign}${total_delta:.2f}/mo") print(f"delta_value={total_delta}") else: for c in changes: print(f"{c['resource']}: {c['change_type']} " f"${c['before']:.2f} → ${c['after']:.2f} " f"(Δ ${c['delta']:+.2f})") print(f"\nTotal monthly delta: ${total_delta:+.2f}") if __name__ == "__main__": main() What the Developer Experience Looks Like Once this pipeline is in place, every PR that touches infrastructure files gets an automatic cost comment: Resource Change Before ($/mo) After ($/mo) Delta vm-api-prod Modify $140.16 $280.32 +$140.16 disk-data-01 Create $0.00 $73.22 +$73.22 plan-webapp NoChange $69.35 $69.35 +$0.00 Estimated monthly impact: +$213.38/mo If the delta exceeds a configurable threshold (e.g., $500/mo), the pipeline fails and requires explicit approval — just like a failing test. Extending This Further Here are some ways to take this pipeline to the next level: Support Azure Savings Plans and Reservations — Query the Prices API with priceType eq 'Reservation' and show both pay-as-you-go and committed pricing Track cost trends over time — Store estimates in Azure Table Storage or a database and build a dashboard showing cost trajectory per environment Add Slack/Teams notifications — Alert the team channel when a PR exceeds the threshold Tag-based cost allocation — Parse resource tags from Bicep to attribute costs to teams or projects Multi-environment estimates — Run the pipeline against dev, staging, and prod parameter files to show total organizational impact Key Takeaways Azure's What-If API gives you a deployment preview without making changes — use it as the foundation for any pre-deployment validation The Azure Retail Prices API is free, requires no authentication, and returns granular pricing data you can query programmatically Cost gates in CI/CD treat budget overruns the same way you treat test failures — as merge blockers that require explicit action Shift cost left — just like security and testing, catching cost issues at PR time is 10x cheaper than catching them on the monthly bill Infrastructure cost is infrastructure quality. By integrating cost estimation into your pull request workflow, you give every developer on the team visibility into the financial impact of their changes — before a single resource is deployed.1.2KViews5likes1CommentInfrastructure Landing Zone - Implementation Decision-Making:
🚀 Struggling to choose the right Infrastructure Landing Zone for your Azure deployment? This guide breaks down each option—speed, flexibility, security, and automation—so you can make the smartest decision for your cloud journey. Don’t risk costly mistakes—read now and build with confidence! 🔥4.6KViews4likes7CommentsZero-Trust Kubernetes: Enforcing Security & Multi-Tenancy with Custom Admission Webhooks
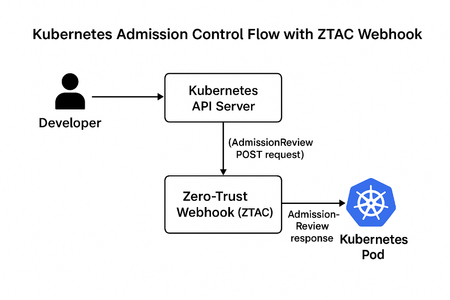
Admission controllers act as Kubernetes’ built-in gatekeepers that intercept API requests after authentication/authorization but before they're persisted to etcd. They can validate or mutate incoming objects, ensuring everything that enters your cluster meets defined policies. We strengthen this mechanism with OPA Gatekeeper (policy-as-code, integrated with Azure Policy on AKS), Kyverno (YAML-based policy engine), and custom admission webhooks that uphold Zero Trust rules. By implementing admission controls, security policies become automated and proactive. Every deployment or change is evaluated in real time against your rules, preventing misconfigurations or risky settings from ever reaching the cluster. This dynamic enforcement greatly reduces the chance of human error opening a security gap. (Refer to Admission Control in Kubernetes for more details) Embracing Zero-Trust Principles in Kubernetes In our security strategy, “Never trust, always verify” is a guiding philosophy. In a Kubernetes context, adopting a Zero-Trust model means no component or request is inherently trusted, even if already inside the cluster perimeter. Every action must be authenticated, authorized, and within policy. Here are few Zero Trust Enforcement Rules for Kubernetes: Enforce Least-Privilege Access Grant only the minimum required permissions using Kubernetes RBAC. Every workload gets its own ServiceAccount with only the permissions it needs and avoid using cluster-admin roles. Restrict to Trusted Container Images Permit images only from approved internal registries or signed sources. Block unverified images from public hubs using admission controllers or Azure Policy Deny Privileged Containers and Host Access Prevent pods from running in privileged mode or mounting sensitive host paths such as /etc or /var/run/docker.sock. Default-Deny Network Policies Apply a default deny-all ingress/egress posture per namespace and allow traffic only where explicitly required. Eliminates lateral movement. Enable Mutual TLS (mTLS) for Pod Communication Use a service mesh (Istio/Linkerd) to enforce encrypted and authenticated workload communication. Continuous Policy Auditing and Drift Detection Run admission controllers like OPA Gatekeeper or Kyverno in audit mode to detect policy violations in existing resources. Enforce Runtime Security Controls Integrate tools like Falco or Azure Defender for Kubernetes to monitor runtime behavior and detect anomalies such as unexpected system calls or privilege escalations. Secure API Server Access Restrict access to the Kubernetes API server using IP whitelisting, Azure AD integration, and role-based access. By enforcing these Zero-Trust controls, the attack surface is drastically reduced. Even if an attacker gains initial access, layered guardrails prevent privilege escalation and block any lateral movement within the cluster. This is a sample enforcement scenario to demonstrate how a Custom Admission Controller can apply Zero-Trust rules on Pods. In this example, the webhook enforces: Images must originate from testtech.azurecr.io Pod must include the label environment Implementation Steps Refer to the sample code here: Kubernetes Custom Admission Controller Step 1 — Build the Flask-based webhook webhook.py processes AdmissionReview requests, evaluates the Pod spec against security rules, and returns the admission decision (allow/deny). def validate(): request_info = request.get_json() uid = request_info["request"]["uid"] pod = request_info["request"]["object"] violations = [] # --- Rule 1: Allow only images from trusted registries --- trusted_registries = ["testtech.azurecr.io"] for container in pod.get("spec", {}).get("containers", []): image = container.get("image", "") if not any(image.startswith(reg) for reg in trusted_registries): violations.append(f"Image {image} not from trusted registry.") # --- Rule 2: Require 'environment' label --- labels = pod.get("metadata", {}).get("labels", {}) if "environment" not in labels: violations.append("Pod missing required label: environment") This ensures pods from public registries like docker.io are blocked and deployed with required labels. Step 2 — Create and Mount TLS Certificates Kubernetes API Server only communicates with HTTPS webhooks. We generate certificates (self-signed or via cert-manager) but the key point is: The certificate must include the Kubernetes service DNS name as SAN (Subject Alternative Name) openssl req -x509 -newkey rsa:4096 -sha256 -days 365 -nodes -keyout tls.key -out tls.crt -subj "/CN=ztac-webhook.ztac-system.svc" -addext "subjectAltName = DNS:ztac-webhook.ztac-system.svc" Then we store the cert in a Kubernetes secret: kubectl create secret tls ztac-tls --cert=tls.crt --key=tls.key -n ztac-system Step 3 — Deploy Webhook + Service Deployment runs (refer to deployment.yaml & service.yaml in sample code): Docker image, mounts the TLS certificates (ztac-tls secret) and exposes port 8443. Service (ClusterIP) exposes webhook inside the cluster. kubectl apply -f manifests/deployment.yaml kubectl apply -f manifests/service.yaml Step 4 — Register ValidatingWebhookConfiguration This informs Kubernetes API to call your webhook for every Pod request: (refer to validatingwebhook.yaml). 'CA Bundle' ensures the API Server trusts your webhook TLS certificate. webhooks: - name: ztac.security.example.com clientConfig: service: name: ztac-webhook namespace: ztac-system path: /validate caBundle: <CA-BUNDLE-HERE> # Base64 encoded CA cert admissionReviewVersions: ["v1"] sideEffects: None timeoutSeconds: 5 kubectl apply -f manifests/validatingwebhook.yaml Step 5 — Test the Webhook #Case1: In this example, the Pod pulls the image from a trusted registry, but since the required label is missing, the admission webhook rejects the Pod. (See the sample-testing folder.) apiVersion: v1 kind: Pod metadata: name: pod-allow namespace: ztac-system spec: containers: - name: nginx image: testtech.azurecr.io/nginx:latest Error below: #Case2: Likewise, when a Pod references an image from an untrusted registry, the admission webhook blocks its creation. Refer to pod-deny-image.yaml in the sample folder. #Case3: The Pod creation is permitted only when it complies with all defined Zero-Trust enforcement rules. Securing Multi-Tenant & Shared Environments (AKS) In shared AKS clusters, tenant isolation is critical to prevent cross-team compromise. Key strategies include: Namespace Isolation: Assign separate namespaces per team, enforce RBAC and NetworkPolicies at namespace level. Tenant-Specific RBAC: Scope roles to namespaces, integrate Azure AD for identity-based access control. Network Fencing: Apply default-deny NetworkPolicies, restrict inter-namespace traffic and use Azure VNet segmentation. Resource Quotas: Limit CPU, memory, and storage per namespace to prevent resource exhaustion. Admission Controls: Use OPA Gatekeeper to enforce namespace-specific policies. Ingress/Egress Security: Isolate ingress with TLS and SANs, restrict egress traffic per namespace to prevent data exfiltration. Extending an example with Multi tenancy that “Webhook can check actual NetworkPolicy object existence under namespace” def namespace_policy_is_secure(namespace): api = client.NetworkingV1Api() policies = api.list_namespaced_network_policy(namespace) found_secure_policy = False for policy in policies.items: has_ingress = bool(policy.spec.ingress) has_egress = bool(policy.spec.egress) # Require both ingress and egress rules if not (has_ingress and has_egress): continue # Validate ingress rules (must not allow open/any traffic) for rule in policy.spec.ingress: if not rule._from or rule._from == [{}]: # empty means allow all return False # Validate egress rules (must not allow open/any traffic) for rule in policy.spec.egress: if not rule.to or rule.to == [{}]: # empty means allow all return False found_secure_policy = True return found_secure_policy # --- Rule: Enforce secure NetworkPolicy for multi-tenant isolation --- if not namespace_policy_is_secure(namespace): violations.append( f"Namespace '{namespace}' does not enforce secure network isolation " "(requires NetworkPolicy with ingress + egress + deny-all default rules)." ) Second example would like to bring on “Dynamic Resource Quota Enforcement” means your Admission Controller checks how much CPU/Memory a tenant (namespace) has already consumed and rejects any Pod that exceeds the remaining quota. # --- Multi-tenant ResourceQuota enforcement --- quotas = core_api.list_namespaced_resource_quota(namespace).items for quota in quotas: hard = quota.status.hard or {} used = quota.status.used or {} limit_cpu = float(hard.get("requests.cpu", 0)) limit_mem = convert_to_mi(hard.get("requests.memory", "0Mi")) used_cpu = float(used.get("requests.cpu", 0)) used_mem = convert_to_mi(used.get("requests.memory", "0Mi")) # Calculate remaining quota capacity remaining_cpu = limit_cpu - used_cpu remaining_mem = limit_mem - used_mem # Compare requested pod resources vs remaining namespace quota if requested_cpu > remaining_cpu or requested_mem > remaining_mem: violations.append( f"ResourceQuota exceeded in namespace '{namespace}'. " f"Remaining CPU={remaining_cpu}, Memory={remaining_mem}Mi | " f"Requested CPU={requested_cpu}, Memory={requested_mem}Mi" ) Together, these controls allow AKS to function as a secure multi-tenant platform. Each namespace (tenant) is treated under Zero-Trust, no workload is trusted by default, and no communication occurs without explicit policy. Teams can share infrastructure while maintaining strong isolation, ensuring that risks in one environment can’t propagate into another. Additional Best Practices and Conclusion Beyond the core focus areas, here are a few additional advanced security practices worth highlighting: Secure the Supply Chain: Integrate image-scanning tools like Trivy or Clair into CI/CD to detect vulnerabilities early. Enforce that only signed, verified, and trusted images from approved registries can be deployed. Detect Runtime Threats: Use runtime security tools such as Falco to monitor container behavior (e.g., unexpected exec shells, privilege escalations, or unusual network activity) and trigger alerts on anomalies in real time. Enable Unified Observability & Visibility: Use Prometheus/Grafana for metrics and centralized logging via Elasticsearch or Microsoft Sentinel to quickly spot unauthorized access and policy violations across workloads and namespaces. Be Incident-Ready: Maintain tested incident response playbooks, perform regular etcd backups, and define clear processes for isolating risky workloads, rotating secrets, and restoring cluster operations without downtime. In summary, securing Kubernetes requires a multi-layered, Zero-Trust approach — especially in environments where multiple teams or tenants share the same cluster. While tools like OPA Gatekeeper and Kyverno provide strong policy enforcement frameworks, custom admission controllers unlock deeper control and flexibility. They enable enforcement of context-aware, organization-specific rules such as tenant-based isolation, dynamic validations driven by external systems, and security decisions based on real-time signals. By combining custom admission logic with Zero-Trust principles (“never trust, always verify”), every pod deployment becomes a security checkpoint, ensuring that only compliant, authorized, and safe workloads are allowed into the cluster. This shifts security from reactive monitoring to proactive enforcement, reducing risk and strengthening compliance in complex Kubernetes environments.1KViews3likes2CommentsCheck Azure AI Service Models and Features by Region in Excel Format
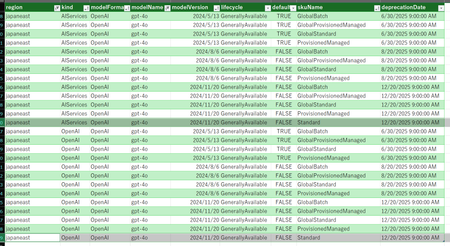
Introduction While Microsoft's documentation provides information on the OpenAI models available in Azure, it can be challenging to determine which features are included in which model versions and in which regions they are available. There can be occasional inaccuracies in the documentation. I believe this is the limitations of natural language documentation, thus I found that we should investigate directly within the actual Azure environment. This idea led to the creation of this article. You need available Azure subscription, then you can retrieve a list of models available in a specific region using the az cognitiveservices model list command. This command allows you to query the Azure environment directly to obtain up-to-date information on available models. In the following sections, we'll explore how to analyze this data using various examples. Please note that the PowerShell scripts in this article are intended to be run with PowerShell Core. If you execute them using Windows PowerShell, they might not function as expected. Using Azure CLI to List Available AI Models To begin, let's check what information can be retrieved. By executing the following command: az cognitiveservices model list -l westus3 You'll receive a JSON array containing details about each model available in the West US3 region. Here's a partial excerpt from the output: PS C:\Users\xxxxx> az cognitiveservices model list -l westus3 [ { "kind": "OpenAI", "model": { "baseModel": null, "callRateLimit": null, "capabilities": { "audio": "true", "scaleType": "Standard" }, "deprecation": { "fineTune": null, "inference": "2025-03-01T00:00:00Z" }, "finetuneCapabilities": null, "format": "OpenAI", "isDefaultVersion": true, "lifecycleStatus": "Preview", "maxCapacity": 9999, "name": "tts", "skus": [ { "capacity": { "default": 3, "maximum": 9999, "minimum": null, "step": null }, "deprecationDate": "2026-02-01T00:00:00+00:00", "name": "Standard", "rateLimits": [ { "count": 1.0, "key": "request", "renewalPeriod": 60.0, "rules": null } ], "usageName": "OpenAI.Standard.tts" } ], "source": null, "systemData": { "createdAt": "2023-11-20T00:00:00+00:00", "createdBy": "Microsoft", "createdByType": "Application", "lastModifiedAt": "2023-11-20T00:00:00+00:00", "lastModifiedBy": "Microsoft", "lastModifiedByType": "Application" }, "version": "001" }, "skuName": "S0" }, { "kind": "OpenAI", "model": { "baseModel": null, "callRateLimit": null, "capabilities": { "audio": "true", "scaleType": "Standard" }, "deprecation": { "fineTune": null, "inference": "2025-03-01T00:00:00Z" }, "finetuneCapabilities": null, "format": "OpenAI", "isDefaultVersion": true, "lifecycleStatus": "Preview", "maxCapacity": 9999, "name": "tts-hd", "skus": [ { "capacity": { "default": 3, "maximum": 9999, "minimum": null, "step": null }, "deprecationDate": "2026-02-01T00:00:00+00:00", "name": "Standard", "rateLimits": [ { "count": 1.0, "key": "request", "renewalPeriod": 60.0, "rules": null } ], "usageName": "OpenAI.Standard.tts-hd" } ], "source": null, "systemData": { "createdAt": "2023-11-20T00:00:00+00:00", "createdBy": "Microsoft", "createdByType": "Application", "lastModifiedAt": "2023-11-20T00:00:00+00:00", "lastModifiedBy": "Microsoft", "lastModifiedByType": "Application" }, "version": "001" }, "skuName": "S0" }, From the structure of the JSON output, we can derive the following insights: Model Information: Basic details about the model, such as model.format, model.name, and model.version, can be obtained from the format respectively. Available Capabilities: The model.capabilities field lists the functionalities supported by the model. Entries like chat-completion and completions indicate support for Chat Completion and text generation features. If a particular capability isn't supported by the model, it simply won't appear in the capabilities array. For example, if imageGeneration is not listed, it implies that the model doesn't support image generation. Deployment Information: Model's deployment options can be found in the model.skus field, which outlines the available SKUs for deploying the model. Service Type: The kind field indicates the type of service the model belongs to, such as OpenAI, MaaS, or other Azure AI services. By querying each region and extracting the necessary information from the JSON response, we can effectively analyze and understand the availability and capabilities of Azure AI models across different regions. Retrieving Azure AI Model Information Across All Regions To gather model information across all Azure regions, you can utilize the Azure CLI in conjunction with PowerShell. Given the substantial volume of data and to avoid placing excessive load on Azure Resource Manager, it's advisable to retrieve and store data for each region separately. This approach allows for more manageable analysis based on the saved files. While you can process JSON data using your preferred programming language, I personally prefer PowerShell. The following sample demonstrates how to execute Azure CLI commands within PowerShell to achieve this task. # retrieve all Azure regions $regions = az account list-locations --query [].name -o tsv # Use this array if you retrive only specific regions # $regions = @('westus3', 'eastus', 'swedencentral') # retrieve all region model data and put as JSON file $idx = 1 $regions | foreach { $json = $null write-host ("[{0:00}/{1:00}] Getting models for {2} " -f $idx++, $regions.Length, $_) try { $json = az cognitiveservices model list -l $_ } catch { # skip some unavailable regions write-host ("Error getting models for {0}: {1}" -f $_, $_.Exception.Message) } if($json -ne $null) { $models = $json | ConvertFrom-Json if($models.length -gt 0) { $json | Out-File -FilePath "./models/$($_).json" -Encoding utf8 } else { # skip empty array Write-Host ("No models found for region: {0}" -f $_) } } } Summarizing the Collected Data Let's load the previously saved JSON files and count the number of models available in each Azure region. The following PowerShell script reads all .json files from the ./models directory, converts their contents into PowerShell objects, adds the region information based on the filename, and then groups the models by region to count them: # Load all JSON files, convert to objects, and add region information $models = Get-ChildItem -Path "./models" -Filter "*.json" | ForEach-Object { $region = $_.BaseName Get-Content -Path $_.FullName -Raw | ConvertFrom-Json | ForEach-Object { $_ | Add-Member -NotePropertyName 'region' -NotePropertyValue $region -PassThru } } # Group models by region and count them $models | Group-Object -Property region | ForEach-Object { Write-Host ("{0} models in {1}" -f $_.Count, $_.Name) } This script will output the number of models available in each region. For example: 228 models in australiaeast 222 models in brazilsouth 206 models in canadacentral 222 models in canadaeast 89 models in centralus ... Which Models Are Deployable in Each Azure Region? One of the first things you probably want is a list of which models and versions are available in each Azure region. The following script uses -ExpandProperty to unpack the model property array. Additionally, it expands the model.sku property to retrieve information about deployment models. Please note that you have to remove ./model/global.json before running the following script. # Since using 'select -ExpandProperty' modifies the original object, it’s a good idea to reload data from the files each time Get-ChildItem -Path "./models" -Filter "*.json" ` | foreach { Get-Content -Path $_.FullName ` | ConvertFrom-Json ` | Add-Member -NotePropertyName 'region' -NotePropertyValue $_.Name.Split(".")[0] -PassThru } | sv models # Expand model and model.skus, and extract relevant fields $models | select region, kind -ExpandProperty model ` | select region, kind, @{l='modelFormat';e={$_.format}}, @{l='modelName';e={$_.name}}, @{l='modelVersion'; e={$_.version}}, @{l='lifecycle';e={$_.lifecycleStatus}}, @{l='default';e={$_.isDefaultVersion}} -ExpandProperty skus ` | select region, kind, modelFormat, modelName, modelVersion, lifecycle, default, @{l='skuName';e={$_.name}}, @{l='deprecationDate ';e={$_.deprecationDate }} ` | sort-object region, kind, modelName, modelVersion ` | sv output $output | Format-Table | Out-String -Width 4096 $output | Export-Csv -Path "modelList.csv" Given the volume of data, viewing it in Excel or a similar tool makes it easier to analyze. Let’s ignore the fact that Excel might try to auto-convert model version numbers into dates—yes, that annoying behavior. For example, if you filter for the gpt-4o model in the japaneast region, you’ll see that the latest version 2024-11-20 is now supported with the standard deployment SKU. Listing Available Capabilities While the model.capabilities property allows us to see which features each model supports, it doesn't include properties for unsupported features. This omission makes it challenging to determine all possible capabilities and apply appropriate filters. To address this, we'll aggregate the capabilities from all models across all regions to build a comprehensive dictionary of available features. This approach will help us understand the full range of capabilities and facilitate more effective filtering and analysis. # Read from files again Get-ChildItem -Path "./models" -Filter "*.json" ` | foreach { Get-Content -Path $_.FullName ` | ConvertFrom-Json ` | Add-Member -NotePropertyName 'region' -NotePropertyValue $_.Name.Split(".")[0] -PassThru } | sv models # list only unique capabilities $models ` | select -ExpandProperty model ` | select -ExpandProperty capabilities ` | foreach { $_.psobject.properties.name} ` | select -Unique ` | sort-object ` | sv capability_dictionary The result is as follows: allowProvisionedManagedCommitment area assistants audio chatCompletion completion embeddings embeddingsMaxInputs fineTune FineTuneTokensMaxValue FineTuneTokensMaxValuePerExample imageGenerations inference jsonObjectResponse jsonSchemaResponse maxContextToken maxOutputToken maxStandardFinetuneDeploymentCount maxTotalToken realtime responses scaleType search Creating a Feature Support Matrix for Each Model Now, let's use this list to build a feature support matrix that shows which capabilities are supported by each model. This matrix will help us understand the availability of features across different models and regions. # Read from JSON files Get-ChildItem -Path "./models" -Filter "*.json" ` | foreach { Get-Content -Path $_.FullName ` | ConvertFrom-Json ` | Add-Member -NotePropertyName 'region' -NotePropertyValue $_.Name.Split(".")[0] -PassThru } | sv models # Outputting capability properties for each model (null if absent) $models ` | select region, kind -ExpandProperty model ` | select region, kind, format, name, version -ExpandProperty capabilities ` | select (@('region', 'kind', 'format', 'name', 'version') + $capability_dictionary) ` | sort region, kind, format, name, version ` | sv model_capabilities # output as csv file $model_capabilities | Export-Csv -Path "modelCapabilities.csv" Finding Models That Support Desired Capabilities To identify models that support specific capabilities, such as imageGenerations, you can open the CSV file in Excel and filter accordingly. Upon doing so, you'll notice that support for image generation is quite limited across regions. When examining models that support the Completion endpoint in the eastus region, you'll find names like ada, babbage, curie, and davinci. These familiar names bring back memories of earlier models. It also reminds that during the GPT-3.5 Turbo era, models supported both Chat Completion and Completion endpoints. Conclusion By retrieving data directly from the actual Azure environment rather than relying solely on documentation, you can ensure access to the most up-to-date information. In this article, we adopted an approach where necessary information was flattened and exported to a CSV file for examination in Excel. Once you're familiar with the underlying data structure, this method allows for investigations and analyses from various perspectives. As you become more accustomed to this process, it might prove faster than navigating through official documentation. However, for aspects like "capabilities," which may be somewhat intuitive yet lack clear definitions, it's advisable to contact Azure Support for detailed information.1.7KViews3likes0CommentsMicrosoft Azure Cloud HSM is now generally available
Microsoft Azure Cloud HSM is now generally available. Azure Cloud HSM is a highly available, FIPS 140-3 Level 3 validated single-tenant hardware security module (HSM) service designed to meet the highest security and compliance standards. With full administrative control over their HSM, customers can securely manage cryptographic keys and perform cryptographic operations within their own dedicated Cloud HSM cluster. In today’s digital landscape, organizations face an unprecedented volume of cyber threats, data breaches, and regulatory pressures. At the heart of securing sensitive information lies a robust key management and encryption strategy, which ensures that data remains confidential, tamper-proof, and accessible only to authorized users. However, encryption alone is not enough. How cryptographic keys are managed determines the true strength of security. Every interaction in the digital world from processing financial transactions, securing applications like PKI, database encryption, document signing to securing cloud workloads and authenticating users relies on cryptographic keys. A poorly managed key is a security risk waiting to happen. Without a clear key management strategy, organizations face challenges such as data exposure, regulatory non-compliance and operational complexity. An HSM is a cornerstone of a strong key management strategy, providing physical and logical security to safeguard cryptographic keys. HSMs are purpose-built devices designed to generate, store, and manage encryption keys in a tamper-resistant environment, ensuring that even in the event of a data breach, protected data remains unreadable. As cyber threats evolve, organizations must take a proactive approach to securing data with enterprise-grade encryption and key management solutions. Microsoft Azure Cloud HSM empowers businesses to meet these challenges head-on, ensuring that security, compliance, and trust remain non-negotiable priorities in the digital age. Key Features of Azure Cloud HSM Azure Cloud HSM ensures high availability and redundancy by automatically clustering multiple HSMs and synchronizing cryptographic data across three instances, eliminating the need for complex configurations. It optimizes performance through load balancing of cryptographic operations, reducing latency. Periodic backups enhance security by safeguarding cryptographic assets and enabling seamless recovery. Designed to meet FIPS 140-3 Level 3, it provides robust security for enterprise applications. Ideal use cases for Azure Cloud HSM Azure Cloud HSM is ideal for organizations migrating security-sensitive applications from on-premises to Azure Virtual Machines or transitioning from Azure Dedicated HSM or AWS Cloud HSM to a fully managed Azure-native solution. It supports applications requiring PKCS#11, OpenSSL, and JCE for seamless cryptographic integration and enables running shrink-wrapped software like Apache/Nginx SSL Offload, Microsoft SQL Server/Oracle TDE, and ADCS on Azure VMs. Additionally, it supports tools and applications that require document and code signing. Get started with Azure Cloud HSM Ready to deploy Azure Cloud HSM? Learn more and start building today: Get Started Deploying Azure Cloud HSM Customers can download the Azure Cloud HSM SDK and Client Tools from GitHub: Microsoft Azure Cloud HSM SDK Stay tuned for further updates as we continue to enhance Microsoft Azure Cloud HSM to support your most demanding security and compliance needs.7.3KViews3likes2Comments
Private DNS and Hub–Spoke Networking for Enterprise AI Workloads on Azure
Introduction As organizations deploy enterprise AI platforms on Azure, security requirements increasingly drive the adoption of private-first architectures. Private networking only Centralized firewalls or NVAs Hub–and–spoke virtual network architectures Private Endpoints for all PaaS services While these patterns are well understood individually, their interaction often exposes hidden failure modes, particularly around DNS and name resolution. During a recent production deployment of a private, enterprise-grade AI workload on Azure, several issues surfaced that initially appeared to be platform or service instability. Closer analysis revealed the real cause: gaps in network and DNS design. This post shares a real-world technical walkthrough of the problem, root causes, resolution steps, and key lessons that now form a reusable blueprint for running AI workloads reliably in private Azure environments. Problem Statement The platform was deployed with the following characteristics: Hub and spoke network topology Custom DNS servers running in the hub Firewall / NVA enforcing strict egress controls AI, data, and platform services exposed through Private Endpoints Azure Container Apps using internal load balancer mode Centralized monitoring, secrets, and identity services Despite successful infrastructure deployment, the environment exhibited non-deterministic production issues, including: Container Apps intermittently failing to start or scale AI platform endpoints becoming unreachable from workload subnets Authentication and secret access failures DNS resolution working in some environments but failing in others Terraform deployments stalling or failing unexpectedly Because the symptoms varied across subnets and environments, root cause identification was initially non-trivial. Root Cause Analysis After end-to-end isolation, the issue was not AI services, authentication, or application logic. The core problem was DNS resolution in a private Azure environment. 1. Custom DNS servers were not Azure-aware The hub DNS servers correctly resolved: Corporate domains On‑premises records However, they could not resolve Azure platform names or Private Endpoint FQDNs by default. Azure relies on an internal recursive resolver (168.63.129.16) that must be explicitly integrated when using custom DNS. 2. Missing conditional forwarders for private DNS zones Many Azure services depend on service-specific private DNS zones, such as: privatelink.cognitiveservices.azure.com privatelink.openai.azure.com privatelink.vaultcore.azure.net privatelink.search.windows.net privatelink.blob.core.windows.net Without conditional forwarders pointing to Azure’s internal DNS, queries either: Failed silently, or Resolved to public endpoints that were blocked by firewall rules 3. Container Apps internal DNS requirements were overlooked When Azure Container Apps are deployed with: internal_load_balancer_enabled = true Azure does not automatically create supporting DNS records. The environment generates: A default domain .internal subdomains for internal FQDNs Without explicitly creating: A private DNS zone matching the default domain *, @, and *.internal wildcard records internal service-to-service communication fails. 4. Private DNS zones were not consistently linked Even when DNS zones existed, they were: Spread across multiple subscriptions Linked to some VNets but not others Missing links to DNS server VNets or shared services VNets As a result, name resolution succeeded in one subnet and failed in another, depending on the lookup path. Resolution No application changes were required. Stability was achieved entirely through architectural corrections. ✅ Step 1: Make custom DNS Azure-aware On all custom DNS servers (or NVAs acting as DNS proxies): Configure conditional forwarders for all Azure private DNS zones Forward those queries to: 168.63.129.16 This IP is Azure’s internal recursive resolver and is mandatory for Private Endpoint resolution. ✅ Step 2: Centralize and link private DNS zones A centralized private DNS model was adopted: All private DNS zones hosted in a shared subscription Linked to: Hub VNet All spoke VNets DNS server VNet Any operational or virtual desktop VNets This ensured consistent resolution regardless of workload location. ✅ Step 3: Explicitly handle Container Apps DNS For Container Apps using internal ingress: Create a private DNS zone matching the environment’s default domain Add: * wildcard record @ apex record *.internal wildcard record Point all records to the Container Apps Environment static IP Add a conditional forwarder for the default domain if using custom DNS This step alone resolved multiple internal connectivity issues. ✅ Step 4: Align routing, NSGs, and service tags Firewall, NSG, and route table rules were aligned to: Allow DNS traffic (TCP/UDP 53) Allow Azure service tags such as: AzureCloud CognitiveServices AzureActiveDirectory Storage AzureMonitor Ensure certain subnets (e.g., Container Apps, Application Gateway) retained direct internet access where required by Azure platform services Key Learnings 1. DNS is a Tier‑0 dependency for AI platforms Many AI “service issues” are DNS failures in disguise. DNS must be treated as foundational platform infrastructure. 2. Private Endpoints require Azure DNS integration If you use: Custom DNS ✅ Private Endpoints ✅ Then forwarding to 168.63.129.16 is non‑negotiable. 3. Container Apps internal ingress has hidden DNS requirements Internal Container Apps environments will not function correctly without manually created DNS zones and .internal records. 4. Centralized DNS prevents environment drift Decentralized or subscription-local DNS zones lead to fragile, inconsistent environments. Centralization improves reliability and operability. 5. Validate networking first, then the platform Before escalating issues to service teams: Validate DNS resolution Verify routing Check Private Endpoint connectivity In many cases, the perceived “platform issue” disappears. Quick Production Validation Checklist Before go-live, always validate: ✅ Private FQDNs resolve to private IPs from all required VNets ✅ UDR/NSG rules allow required Azure service traffic ✅ Managed identities can access all dependent resources ✅ AI portal user workflows succeed (evaluations, agents, etc.) ✅ terraform plan shows only intended changes Conclusion Running private, enterprise-grade AI workloads on Azure is absolutely achievable—but it requires intentional DNS and networking design. By: Making custom DNS Azure-aware Centralizing private DNS zones Explicitly handling Container Apps DNS Aligning routing and firewall rules an unstable environment was transformed into a repeatable, production-ready platform pattern. If you are building AI solutions on Azure with Private Endpoints and hub–spoke networking, getting DNS right early will save weeks of troubleshooting later.982Views2likes0Comments
Deploying Azure Redis Enterprise with Geo-Replication Using Terraform
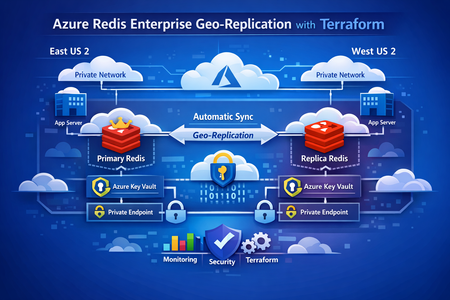
This post walks through a production‑proven pattern for running stateful services across Azure regions using Terraform. We’ll cover a primary–replica Redis architecture, regional isolation with Key Vault and networking, and a clean Terraform parameterization strategy that scales from development to production without duplication. Why Multi‑Region State Is Hard Running applications globally is easy when everything is stateless—if something fails, you redeploy. But stateful services tell a different story. Caches, message brokers, and data stores can’t be treated as disposable. They hold business‑critical data, and downtime or inconsistency quickly becomes customer‑visible. In real‑world systems, common requirements include: Low‑latency reads from multiple regions Automatic recovery when a region becomes unavailable Predictable data consistency Repeatable infrastructure from dev through production Manually configuring this per region doesn’t scale. Drift sets in. Failover is unclear. Backups get forgotten. That’s where Terraform + Azure Managed Redis geo‑replication shines. Github Link : https://github.com/vsakash5/Managed-redis.git High‑Level Architecture We use a primary–replica Redis Enterprise model: Primary Redis Single write endpoint Highly available inside its region Source of truth Replica Redis Read‑only Asynchronously synced from primary Can be promoted during disaster recovery Each region is fully isolated: Separate subnets Separate Key Vaults Private Endpoints only (no public exposure) This prevents shared failure domains and allows each region to operate independently if needed. The Terraform Design Principle Instead of maintaining separate Terraform stacks per region, the key idea is: One reusable module, one tfvars file per environment, multiple regions inside it. The module is written once. Regional differences are supplied via parameter suffixes like: _replica _secondary _tertiary This keeps logic centralized and environments consistent. Core Parameter Layers 1. Environment Identity (Shared) Terraform environment = "dev" # dev | staging | prod context_prefix = "app" Show more lines These values are reused everywhere—names, tags, and identifiers. 2. Primary Region Terraform location = "eastus2" resource_group_name = "rg-app-dev-primary" Show more lines 3. Replica Region Terraform location_replica = "uksouth" resource_group_name_replica = "rg-app-dev-replica" The symmetry is intentional. Terraform can now apply the same module twice without branching logic. Regional Isolation: Networking and Secrets Why isolation matters Geo‑replication copies data, not dependencies. If both Redis instances depend on: the same subnet the same Key Vault then a failure in one region can cascade into the other. Networking (One Subnet per Region) Benefits: Independent NSGs Independent routing Independent capacity planning Key Vault (One per Region) Why this matters: Redis credentials are not replicated Each region stores its own secrets A Key Vault outage doesn’t take both regions down Redis Configuration Primary Redis (Writes Enabled) The geo‑replication group name must match. That’s the logical binding Azure uses to link instances. Private Endpoint‑Only Access No Redis instance is exposed publicly. Each region uses: A private endpoint A workload subnet Internal DNS resolution This means: No public IPs No inbound attack surface Traffic stays on the Azure backbone Linking Primary and Replica Terraform explicitly defines the relationship: Terraform managed_redis_geo_replication_config = { primary_to_replica = { primary_redis_key = "primary" replica_keys = ["replica"] } } Terraform ensures: Primary is created first Replica is deployed second Geo‑replication is established last Environment Scaling: Dev → Staging → Prod The infrastructure pattern never changes. Only values do. Environment Group Name Dev dev-grp Staging stg-grp Prod prod-grp This is how you avoid “snowflake” environments. Disaster Recovery Strategy If the primary region fails: Applications fail over to the replica read endpoint Terraform configuration is updated to: Remove geo‑replication Promote replica config to primary Traffic is fully restored Once the original region recovers, roles can be re‑established cleanly. No click‑ops. No guesswork. Key Lessons Learned 1. Naming is Infrastructure Predictable names enable automation, discovery, and auditing. 2. Key Vault Isolation Beats Availability A shared Key Vault is a shared outage. 3. Parameterization Beats Copy‑Paste Fix once → benefit everywhere. 4. Geo‑Replication Is a Contract Matching replication group names is non‑negotiable. 5. The tfvars File Is the Source of Truth If it’s not in Terraform, it’s not real. Final Thoughts Running stateful services in multiple regions doesn’t require magic— it requires discipline: Isolate aggressively Parameterize consistently Automate everything Test failure often With this approach, adding a new region becomes configuration—not redesign. That’s how infrastructure scales.228Views1like0CommentsEnterprise UAMI Design in Azure: Trust Boundaries and Blast Radius
As organizations move toward secretless authentication models in Azure, Managed Identity has become the preferred approach for enabling secure communication between services. User Assigned Managed Identity (UAMI) in particular offers flexibility that allows identity reuse across multiple compute resources such as: Azure App Service Azure Function Apps Virtual Machines Azure Kubernetes Service While this flexibility is beneficial from an operational perspective, it also introduces architectural considerations that are often overlooked during initial implementation. In enterprise environments where shared infrastructure patterns are common, the way UAMI is designed and assigned can directly influence the effective trust boundary of the deployment. Understanding Identity Scope in Azure Unlike System Assigned Managed Identity, a UAMI exists independently of the compute resource lifecycle and can be attached to multiple services across: Resource Groups Subscriptions Environments This capability allows a single identity to be reused across development, testing, or production services when required. However, identity reuse across multiple logical environments can expand the operational trust boundary of that identity. Any permission granted to the identity is implicitly inherited by all services to which the identity is attached. From an architectural standpoint, this creates a shared authentication surface across isolated deployment environments. High-Level Architecture: Shared Identity Pattern In many enterprise Azure deployments, it is common to observe patterns where: A single UAMI is assigned to multiple App Services The same identity is reused across automation workloads Identities are provisioned centrally and attached dynamically While this simplifies management and avoids identity sprawl, it may also introduce unintended privilege propagation across services. For example: In this architecture: Multiple App Services across environments share the same managed identity. Each compute instance requests an access token from Microsoft Entra ID using Azure Instance Metadata Service (IMDS). The issued token is then used to authenticate against downstream platform services such as: Azure SQL Database Azure Key Vault Azure Storage Because RBAC permissions are assigned to the shared identity rather than the compute instance itself, the effective authentication boundary becomes identity‑scoped instead of environment‑scoped. As a result, any compromised lower‑tier environment such as DEV may obtain an access token capable of accessing production‑level resources if those permissions are assigned to the shared identity. This expands the operational trust boundary across environments and increases the potential blast radius in the event of identity misuse. Blast Radius Considerations Blast radius refers to the potential impact scope of a security or configuration compromise. When a shared UAMI is used across multiple services, the following conditions may increase the blast radius: Design Pattern Potential Risk Single UAMI across environments Cross‑environment access Subscription‑wide RBAC assignment Broad privilege scope Identity used for automation pipelines Lateral movement Shared identity across teams Ownership ambiguity Because Managed Identity authentication relies on Azure Instance Metadata Service (IMDS), any compromised compute resource with access to IMDS may request an access token using the attached identity. This token can then be used to authenticate with downstream Azure services for which the identity has RBAC permissions. Enterprise Design Recommendations: Environment‑Isolated Identity Model To reduce identity blast radius in enterprise deployments, the following architectural principles may be considered: Environment‑Scoped Identity Provision separate UAMIs per environment: UAMI‑DEV UAMI‑UAT UAMI‑PROD Avoid reusing the same identity across isolated lifecycle stages. Resource‑Level RBAC Assignment Prefer assigning RBAC permissions at: Resource Resource Group instead of Subscription scope wherever feasible. Identity Ownership Model Ensure ownership clarity for identities assigned across shared workloads. Identity lifecycle should be aligned with: Application ownership Service ownership Deployment boundary Least Privilege Assignment Assign roles such as: Key Vault Secrets User Storage Blob Data Reader instead of broader roles such as: Contributor Owner Recommended High‑Level Architecture In this architecture: Each App Service instance is attached to an environment‑specific managed identity. RBAC assignments are scoped at the resource or resource group level. Microsoft Entra ID issues tokens independently for each identity. Trust boundaries remain aligned with deployment environments. A compromised DEV compute instance can only obtain a token associated with UAMI‑DEV. Because UAMI‑DEV does not have RBAC permissions for production resources, lateral access to PROD dependencies is prevented. Blast Radius Containment: This design significantly reduces the potential blast radius by ensuring that: Identity compromise remains environment‑scoped. Token issuance does not grant unintended cross‑environment privileges. RBAC permissions align with application ownership boundaries. Authentication trust boundaries match deployment lifecycle boundaries. Conclusion User Assigned Managed Identity offers significant advantages for secretless authentication in Azure environments. However, architectural considerations related to identity reuse and scope of assignment must be evaluated carefully in enterprise deployments. By aligning identity design with trust boundaries and minimizing the blast radius through scoped RBAC and environment isolation, organizations can implement Managed Identity in a way that balances operational efficiency with security governance.409Views1like0Comments