azuresql
28 TopicsGetting Started with Azure SQL Data Sync Using User-Assigned Managed Identity (UAMI)
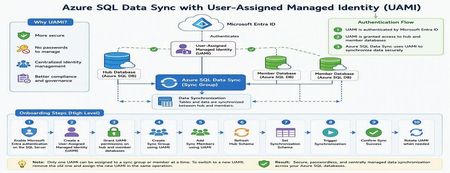
Azure SQL Data Sync is a powerful service that enables data synchronization across multiple Azure SQL Databases. Traditionally, Data Sync relied on SQL Authentication, requiring administrators to manage usernames and passwords for both hub and member databases. With the introduction of User-Assigned Managed Identity (UAMI) support, Azure SQL Data Sync now provides a more secure and modern authentication model built on Microsoft Entra ID. This enhancement reduces credential management overhead, eliminates password storage concerns, and helps organizations strengthen their security posture. In this article, we'll explore how to onboard Azure SQL Data Sync with UAMI, configure the required permissions, create synchronization components, and review best practices for long-term management. Why Use UAMI with Azure SQL Data Sync? User-Assigned Managed Identity offers several advantages over traditional SQL authentication: Eliminates password storage and rotation requirements Reduces credential exposure risks Integrates with Microsoft Entra ID authentication Supports centralized identity management Improves compliance and security posture Simplifies operational maintenance Whether you're deploying a new synchronization topology or modernizing an existing Data Sync environment, UAMI provides a secure cloud-native alternative to password-based authentication. Architecture Overview A typical UAMI-enabled Azure SQL Data Sync deployment looks like this: Authentication Method: Microsoft Entra ID via User-Assigned Managed Identity The same managed identity can be used by Data Sync to authenticate against all participating databases. Prerequisites Before configuring Azure SQL Data Sync with UAMI, ensure the following prerequisites are completed: 1. Enable Microsoft Entra Authentication The Azure SQL Server hosting both Hub and Member databases must have Microsoft Entra authentication enabled and an Entra administrator configured. 2. Create a User-Assigned Managed Identity Create a UAMI within Azure and collect the following information: Managed Identity Name Client ID Resource ID These values will be required during configuration. 3. Install the Required PowerShell Module UAMI support requires the Azure SQL preview PowerShell module: Install-Module Az.Sql -RequiredVersion 6.6.0-preview ` -AllowPrerelease ` -Force ` -AllowClobber Or a later version that includes Data Sync UAMI support. Phase 1: Configure Database Access Before Data Sync can use a managed identity, the identity must be granted access to all databases participating in synchronization. Connect to each Hub and Member database using a Microsoft Entra administrator account and create a user for the managed identity. Example: DECLARE @MSIname SYSNAME = '<UAMI_NAME>'; DECLARE @dbName SYSNAME = DB_NAME(); DECLARE @clientId UNIQUEIDENTIFIER = '<CLIENT_ID>'; -- Create User -- Grant db_datareader -- Grant db_datawriter -- Grant CONTROL permissions The UAMI must be created and granted permissions on every database participating in synchronization. Phase 2: Create the Sync Group After permissions are configured, create the Sync Group using UAMI authentication. Example PowerShell: New-AzSqlSyncGroup ` -ResourceGroupName $resourceGroup ` -ServerName $serverName ` -DatabaseName $hubDatabase ` -Name $syncGroup ` -HubDatabaseAuthenticationType UserAssigned ` -ResourceId $identityResourceId Key Parameters Parameter Description HubDatabaseAuthenticationType Authentication method for Hub Database UserAssigned Enables UAMI authentication ResourceId Full ARM Resource ID of the UAMI Phase 3: Add Sync Members Once the Sync Group is created, add member databases and specify UAMI authentication. Example: New-AzSqlSyncMember ` -ResourceGroupName $resourceGroup ` -ServerName $serverName ` -DatabaseName $hubDatabase ` -SyncGroupName $syncGroup ` -Name $memberName ` -MemberDatabaseAuthenticationType UserAssigned ` -ResourceId $identityResourceId At this stage, both Hub and Member databases are configured to authenticate using the managed identity. Phase 4: Configure Synchronization Refresh Hub Schema Refresh the schema metadata before selecting tables for synchronization. Update-AzSqlSyncSchema ` -ResourceGroupName $resourceGroup ` -ServerName $serverName ` -DatabaseName $hubDatabase ` -SyncGroupName $syncGroup Configure the Synchronization Schema Data Sync requires an explicit schema definition specifying which tables and columns will participate in synchronization. Example schema: { "Tables": [ { "QuotedName": "[dbo].[contacts]", "Columns": [ { "QuotedName": "[id]" }, { "QuotedName": "[name]" } ] } ] } Apply the schema: Update-AzSqlSyncGroup ` -ResourceGroupName $resourceGroup ` -ServerName $serverName ` -DatabaseName $hubDatabase ` -Name $syncGroup ` -HubDatabaseAuthenticationType UserAssigned ` -ResourceId $identityResourceId ` -SchemaFile "C:\schema.json" Trigger Synchronization After configuration is complete, trigger the initial synchronization. Start-AzSqlSyncGroupSync ` -ResourceGroupName $resourceGroup ` -ServerName $serverName ` -DatabaseName $hubDatabase ` -SyncGroupName $syncGroup Phase 5: Rotating UAMIs Over time, organizations may need to replace an existing managed identity. UAMI_v1 → UAMI_v2 Only one UAMI can be assigned to a Sync Group or Sync Member at a time. To rotate identities: Grant required database permissions to the new UAMI. Remove the current UAMI. Assign the new UAMI in the same operation. Update Sync Group Update-AzSqlSyncGroup ` -HubDatabaseAuthenticationType UserAssigned ` -ResourceId $newUamiResourceId ` -RemoveIdentityResourceId $oldUamiResourceId Update Sync Member Update-AzSqlSyncMember ` -MemberDatabaseAuthenticationType UserAssigned ` -ResourceId $newUamiResourceId ` -RemoveIdentityResourceId $oldUamiResourceId Common Pitfalls During implementation, the following issues are commonly encountered: Pitfall #1: Missing Entra Administrator If the SQL Server does not have an Entra administrator configured, UAMI authentication will fail. Pitfall #2: Missing Database Permissions The managed identity must be created and granted permissions in every participating database. Pitfall #3: Multiple UAMIs Assigned Azure SQL Data Sync supports only one UAMI per Sync Group or Sync Member at a time. Pitfall #4: Identity Included During PATCH Updates When updating schemas through REST APIs, avoid re-submitting the identity block if the managed identity is already assigned. This may result in a DataSyncMultipleIdentities error. Validation Checklist Before moving to production, verify the following: Microsoft Entra administrator configured UAMI created successfully UAMI user created in all Hub and Member databases Required permissions granted Sync Group configured with UserAssigned authentication Sync Members configured with UserAssigned authentication Schema refreshed successfully Synchronization schema applied Initial synchronization completed successfully Data synchronized correctly between Hub and Member databases Best Practices For secure and scalable deployments: Prefer UAMI over SQL Authentication for new deployments. Use dedicated managed identities for Data Sync workloads. Follow least-privilege access principles where possible. Test configuration changes in non-production environments first. Maintain documentation for identity ownership and rotation procedures. Monitor synchronization health after identity updates. Standardize naming conventions for managed identities. References The following Microsoft resources provide additional details for implementing Azure SQL Data Sync with User-Assigned Managed Identities: 1. Configure Microsoft Entra Authentication for Azure SQL Database Configure an Entra administrator for Azure SQL Database, which is a prerequisite for UAMI-based authentication. https://learn.microsoft.com/azure/azure-sql/database/authentication-aad-configure 2. Manage User-Assigned Managed Identities Learn how to create and manage User-Assigned Managed Identities in Azure. Managed identities eliminate the need to manage credentials in code and can be reused across multiple Azure resources. Manage user-assigned managed identities using the Azure portal explains the process and prerequisites. [Manage use...soft Learn | Learn.Microsoft.com] 3. Connect to Azure SQL Using Microsoft Entra Authentication Configure and validate Entra-based connectivity for Azure SQL Database before granting permissions to the managed identity. https://learn.microsoft.com/azure/azure-sql/database/authentication-microsoft-entra-connect-to-azure-sql 4. Azure SQL Data Sync PowerShell Documentation Review PowerShell cmdlets used to create Sync Groups, Sync Members, refresh schemas, and trigger synchronization. 5. Azure SQL REST API Documentation Use REST APIs for automation and Infrastructure-as-Code deployment scenarios involving Azure SQL Data Sync. Conclusion User-Assigned Managed Identity support represents a significant security enhancement for Azure SQL Data Sync. By eliminating dependency on stored credentials and leveraging Microsoft Entra authentication, organizations can improve security, simplify operations, and reduce administrative overhead. Whether you're building a new synchronization topology or migrating from SQL Authentication, UAMI provides a modern, scalable, and cloud-native authentication model for Azure SQL Data Sync. As cloud environments continue to adopt identity-first security practices, implementing UAMI for Azure SQL Data Sync is an important step toward a more secure and manageable data platform.729Views0likes0CommentsAzure SQL Data Sync Fails with "Cannot Insert NULL": Understanding the Root Cause
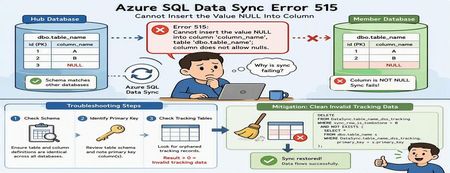
Azure SQL Data Sync is a powerful service that enables data synchronization across multiple Azure SQL Databases. While synchronization failures are relatively uncommon, one error that administrators occasionally encounter is SQL Server Error 515, indicating that a NULL value cannot be inserted into a non-nullable column. At first glance, this appears to be a straightforward data-quality problem. However, in many cases, the actual root cause lies elsewhere: inconsistencies between Azure SQL Data Sync tracking metadata and the underlying source data. This article explains: Common causes of Error 515 during synchronization How to troubleshoot the issue How to identify invalid tracking records Safe mitigation approaches to restore synchronization The Error A synchronization operation may fail with an error similar to the following: SqlException Error Code: -2146232060 SqlError Number: 515 Message: Cannot insert the value NULL into column 'column_name', table 'dbo.table_name'; column does not allow nulls. INSERT fails. SqlError Number: 3621 The statement has been terminated. Although the error references a NULL value being inserted into a destination table, the root cause is not always missing data. In many cases, the issue originates from synchronization metadata maintained by Azure SQL Data Sync. How Azure SQL Data Sync Tracks Changes Azure SQL Data Sync relies on internal tracking tables to detect and replicate data changes between Hub and Member databases. Whenever rows are inserted, updated, or deleted, synchronization metadata is recorded in tracking tables. Data Sync uses this metadata to determine what changes need to be propagated to other databases. If the tracking metadata becomes inconsistent with the actual source table contents, Data Sync may attempt to synchronize invalid records, resulting in failures such as: Cannot insert the value NULL into column... Common Root Causes Scenario 1: Schema Mismatch Between Databases One of the most common causes of synchronization failures is a schema mismatch between synchronized databases. For example: Database Column Definition Hub NULL Allowed Member A NOT NULL Member B NOT NULL If Data Sync replicates a row containing a NULL value from the Hub database, synchronization will fail when the destination database does not allow NULL values. Areas to Validate Ensure the following are identical across all synchronized databases: Column nullability (NULL vs NOT NULL) Data types Column length Constraints Primary key definitions Even small schema differences can cause synchronization failures. Scenario 2: Invalid Tracking Metadata A less obvious but frequently encountered scenario involves orphaned records in Data Sync tracking tables. This can occur when: Primary key values are updated directly Data is modified outside expected application workflows Historical tracking records become disconnected from source data Synchronization metadata references rows that no longer exist When Data Sync processes these stale entries, synchronization may fail with Error 515 even though the source data itself appears valid. Troubleshooting Process Step 1: Verify Column Definitions Begin by examining the affected table and column identified in the error message. For example: sp_help 'dbo.table_name' Review the schema on both Hub and Member databases and verify that: The affected column has the same definition everywhere NULL settings are identical Data types and lengths match If discrepancies exist, align the schemas across all synchronized databases before proceeding. Step 2: Review the Table Schema If the schema appears consistent, review the complete definition of the affected table. Pay particular attention to: Primary key columns Identity columns Constraints Nullable settings Identifying the primary key is especially important for the next validation step. Step 3: Check for Orphaned Tracking Records Run the following query against both Hub and Member databases. Replace: table_name primary_key with the actual table and primary key column names. SELECT COUNT(*) FROM DataSync.table_name_dss_tracking t WHERE sync_row_is_tombstone = 0 AND NOT EXISTS ( SELECT * FROM dbo.table_name s WHERE t.primary_key = s.primary_key ); For tables with composite primary keys, include all key columns in the comparison. How to Interpret the Results Result > 0 One or more orphaned tracking records exist. This indicates that the tracking table contains entries that reference records no longer present in the source table. This is a strong indicator that invalid synchronization metadata is causing the failure. Result = 0 No orphaned records were detected. If the synchronization error persists, further investigation should focus on schema consistency, data quality, and additional synchronization diagnostics. Mitigation Option 1: Correct Schema Differences If schema inconsistencies are found: Align the table definition across all synchronized databases. Ensure NULL and NOT NULL settings are consistent. Verify primary key definitions match. Reinitialize synchronization if necessary. After schema alignment, synchronization can typically resume successfully. Mitigation Option 2: Clean Invalid Tracking Data If orphaned tracking records are identified, remove the invalid synchronization metadata. Important: Always validate and test cleanup operations in a non-production environment before executing them in production. The following query removes tracking entries that no longer correspond to records in the source table: DELETE FROM DataSync.table_name_dss_tracking WHERE sync_row_is_tombstone = 0 AND NOT EXISTS ( SELECT * FROM dbo.table_name s WHERE DataSync.table_name_dss_tracking.primary_key = s.primary_key ); Replace: table_name primary_key with the appropriate values for your environment. After cleanup, Data Sync can rebuild valid change tracking information and synchronization typically returns to a healthy state. Additional Validation Query The following query can help identify historical deletion records that exist in tracking tables: SELECT tr.id1 FROM DataSync.table2_dss_tracking tr LEFT JOIN dbo.table2 orig ON tr.id1 = orig.id1 WHERE tr.sync_row_is_tombstone = 1 AND orig.id1 IS NULL AND tr.last_change_datetime > DATEADD(day, -20, GETUTCDATE()); This can provide additional insight into how synchronization metadata is tracking deleted records. Understanding the Underlying Cause The most important takeaway is that the NULL value reported in the synchronization error is often not the actual problem. A common sequence looks like this: A primary key value is modified directly. UPDATE dbo.table_name SET primary_key = new_value; Data Sync tracking metadata continues to reference the original key value. The source table and tracking table become inconsistent. During synchronization, Data Sync attempts to process the stale tracking record. The synchronization operation fails and surfaces a "Cannot insert the value NULL into column" error. In these scenarios, cleaning invalid tracking records resolves the inconsistency and restores successful synchronization. Best Practices to Prevent Recurrence To minimize the likelihood of synchronization failures: Keep schemas identical across all synchronized databases Avoid updating primary key values whenever possible Use surrogate keys for synchronized tables Validate schema consistency before deploying schema changes Periodically investigate Data Sync tracking tables when troubleshooting synchronization failures Test schema modifications in non-production environments before deployment Conclusion When Azure SQL Data Sync reports a: Cannot insert the value NULL into column... error, it is important not to assume that the problem is caused by missing data in the source table. A structured troubleshooting approach should include: Verifying schema consistency across synchronized databases Reviewing primary key definitions Investigating Data Sync tracking tables for orphaned records Cleaning invalid synchronization metadata when appropriate In many real-world cases, stale tracking records are the true root cause. Identifying and removing these invalid entries can restore synchronization quickly and avoid unnecessary application or schema changes. Have you encountered similar Azure SQL Data Sync issues in your environment? Share your experience and troubleshooting techniques in the comments below.262Views0likes0CommentsUnderstanding Microsoft Entra ID Group Membership Caching and Azure SQL Authentication Timing
Contributor: hudajazmawi Executive Summary Organizations frequently use Microsoft Entra ID groups to manage access to Azure SQL databases. This approach simplifies administration, improves security, and supports just-in-time access models. In some scenarios, users may experience temporary authentication failures shortly after being granted access through a Microsoft Entra ID group. These failures can appear inconsistent, especially when access succeeds to one database while failing against another. Understanding how group membership caching works during authentication can help explain this behavior and reduce unnecessary troubleshooting efforts. This article explains a real-world scenario involving temporary authentication failures after group assignment, describes the underlying authentication behavior, and provides practical recommendations for validation and mitigation. Issue Description A user was granted access to Azure SQL through membership in a Microsoft Entra ID group. Shortly afterward, the user attempted to connect using Microsoft Entra authentication. The observed behavior was: Authentication to certain databases succeeded immediately. Authentication to other databases failed temporarily. The issue appeared shortly after the group membership was granted. Access eventually began working without any configuration changes. The behavior resolved after a period of time without additional intervention. At first glance, the results appeared inconsistent because some connection attempts were successful while others failed, even though the same user credentials and group assignments were being used. Technical Background Azure SQL supports Microsoft Entra authentication, allowing access to be granted through users, groups, and service principals managed within Microsoft Entra ID. When a user authenticates, Azure SQL must determine the user's effective permissions. For users who belong to many Microsoft Entra groups, membership information may be cached to improve authentication efficiency and reduce repeated directory lookups. Caching is a common design pattern used throughout distributed systems to improve performance, scalability, and reliability. However, because caches contain information retrieved at a specific point in time, there can be a temporary delay before recently changed security information becomes visible to all authentication requests. This behavior is particularly important to understand when organizations use: Just-in-time access workflows Privileged access management processes Temporary group assignments Automated access provisioning Frequent permission validation testing Root Cause The investigation determined that the authentication failures were caused by Microsoft Entra ID group membership caching. A login attempt occurred before the user was added to the required Microsoft Entra ID group. During that earlier authentication attempt, the user's group memberships were retrieved and cached. After the user was added to the required group, subsequent authentication attempts continued using the previously cached membership information until the cache expired. As a result, authentication requests temporarily evaluated permissions using outdated group membership data. Because the newly assigned group membership had not yet been reflected in the cached information, authentication failed even though access had already been granted. Once the cached membership information expired and fresh group membership data was retrieved, authentication succeeded without any additional configuration changes. Detailed Explanation To understand the behavior, consider the following simplified sequence: Step 1: Initial Authentication A user attempts to connect to Azure SQL before being added to the required Microsoft Entra ID group. During this process: The user's current group memberships are evaluated. Membership information is cached. The required access group is not yet present. Authentication behavior reflects the permissions available at that moment. Step 2: Group Membership Change The user is added to the appropriate Microsoft Entra ID group. From an administrative perspective, the access assignment has been completed successfully. However, any previously cached authentication information may still reflect the user's earlier membership state. Step 3: Immediate Retesting The user immediately attempts another connection. Although the directory now contains the new group membership, the authentication process may still reference cached membership information created before the change occurred. The result can be a temporary authentication failure. Step 4: Cache Expiration After the cached data expires or is refreshed, authentication retrieves updated membership information. The newly assigned group is now visible during authorization evaluation. At this point, authentication succeeds as expected. Why Some Databases May Behave Differently One of the most confusing aspects of these scenarios is that different databases may appear to behave differently even when they use identical group assignment models. This typically occurs because authentication state and cache usage can differ depending on the sequence and timing of connection attempts. For example: Database A may be accessed for the first time after the group assignment occurs. Database B may have received a connection attempt before the group assignment occurred. As a result: Database A may evaluate fresh membership information and allow access. Database B may continue referencing previously cached membership information until the cache expires. This can create the appearance of inconsistent behavior even though the system is operating as designed. Mitigation and Recommendations The following practices can help reduce the likelihood of encountering similar authentication timing scenarios. 1. Assign Access Before Testing Whenever possible, add users to the required Microsoft Entra ID groups before any authentication attempts are made against Azure SQL resources. This helps ensure that fresh membership information is used during the first authentication request. 2. Avoid Immediate Validation After Permission Changes If a user has recently been granted group-based access, consider allowing time for authentication cache refresh behavior before conducting validation testing. Immediate testing can sometimes produce results based on older membership information. 3. Plan for Temporary Authentication Delays Organizations implementing just-in-time access should account for the possibility of short propagation and cache refresh intervals when designing operational procedures. 4. Use DBCC FLUSHAUTHCACHE When Appropriate For controlled testing and validation scenarios, administrators may use: DBCC FLUSHAUTHCACHE; DBCC FLUSHAUTHCACHE; This command can help refresh authentication cache behavior during troubleshooting and validation activities. As with any administrative operation, testing should be performed according to organizational change-management procedures. 5. Capture Precise Timing Information When investigating authentication behavior, collecting exact timestamps is extremely valuable. Recommended data points include: Time the user was added to the Microsoft Entra ID group Time of each authentication attempt Database target of each connection attempt Time any cache refresh operation was performed Time authentication eventually succeeded Accurate timestamps help establish a clear correlation between group membership changes and authentication behavior. Validation Guidance If you need to verify whether group membership caching is influencing authentication results, consider the following approach: Record the exact time a user is added to the required Microsoft Entra ID group. Record the time of every authentication attempt. Identify whether any login attempts occurred before the group membership change. Observe whether successful authentication occurs after a period of time without configuration changes. Where appropriate, perform controlled tests using authentication cache refresh procedures. Compare authentication outcomes against the timeline of group membership updates. This structured approach often helps determine whether the observed behavior is related to authentication caching rather than a permission configuration issue. Key Takeaways Temporary authentication failures immediately after group-based access assignment do not necessarily indicate a configuration problem. Authentication behavior may be influenced by previously cached Microsoft Entra ID group membership information. Login attempts that occur before a group membership change can affect subsequent authentication behavior until cached data expires. Different databases may appear to behave differently if they are accessed at different points in the authentication timeline. Capturing precise timestamps significantly improves troubleshooting accuracy. Proper testing practices and awareness of cache behavior can reduce confusion and accelerate issue resolution. Closing Summary Microsoft Entra ID group-based authorization provides a powerful and scalable way to manage Azure SQL access. However, like many modern cloud authentication systems, caching is used to optimize performance and improve efficiency. When group memberships change immediately before authentication testing, temporary differences between cached and current membership information may lead to short-lived authentication failures. Understanding this behavior can help administrators accurately interpret results, design effective validation procedures, and avoid unnecessary troubleshooting. By assigning permissions before authentication attempts, allowing appropriate time for cache refresh behavior, and capturing precise timing information during investigations, organizations can more effectively manage Microsoft Entra-based access and streamline their operational workflows. As always, when troubleshooting authentication scenarios, focusing on the exact sequence and timing of events often provides the clearest path to identifying the underlying cause and validating a successful resolution. Further Reading To learn more about Microsoft Entra authentication and Azure SQL security, review the following Microsoft documentation: Microsoft Entra authentication for Azure SQL https://learn.microsoft.com/azure/azure-sql/database/authentication-aad-overview Explains how Microsoft Entra authentication works with Azure SQL and the benefits of group-based access management. DBCC FLUSHAUTHCACHE (Transact-SQL) https://learn.microsoft.com/sql/t-sql/database-console-commands/dbcc-flushauthcache-transact-sql Describes how to clear the database authentication cache and notes that it clears cached Microsoft Entra group membership data stored in the database.Unexpected PITR Charges from restorableDroppedDatabases After BC → Hyperscale Migration
Why This Behavior Is by Design When migrating an Azure SQL Database from Business Critical (BC) to Hyperscale using a manual cutover, some customers notice unexpected Point-in-Time Restore (PITR) backup storage charges appearing under the following resource: /Microsoft.Sql/servers/<server>/restorableDroppedDatabases/<database> At first glance, this can be confusing—especially when: No customer-initiated drop or delete was performed The database is online and healthy post-migration Test migrations may not have shown similar charges This post explains why this happens, why it is expected by design, and how these charges naturally expire. The Observed Scenario After a BC → Hyperscale manual cutover, customers may see PITR charges tied to: restorableDroppedDatabases/<database-name> Despite the database being active and available in Hyperscale, these charges start appearing immediately after the migration cutover and gradually decrease over time. Why Does the Database Appear as “Dropped”? During a manual cutover migration, Azure SQL performs an internal platform-driven workflow to complete the transition between architectures. From a control-plane perspective: The source Business Critical logical database is internally dropped This drop is not initiated by the customer It is a required system step to complete the Hyperscale migration Telemetry confirms that the migration workflow transitions through states such as: Internal drop of the source physical and logical database Cleanup of metadata and completion of the migration This entire sequence completes within seconds and is fully platform managed. Why Are Backup Charges Generated? Although the source BC database is internally dropped, its pre-migration PITR backups are still retained according to the configured backup retention period. Here’s the key point: Backups taken before upgrading to Hyperscale are retained and billed using the dropped-database backup billing model. Because the source database is now considered dropped (from the BC perspective): The 1× database-size discount no longer applies The full data file size is added to the billable backup size Charges appear under restorableDroppedDatabases This behavior is explicitly documented as expected in internal Azure SQL billing guidance. Why Do Charges Decrease Over Time? These charges are not permanent. They: Decrease daily Continue only while the pre-migration PITR backups are retained Automatically stop once the retention window expires In practical terms: Charges stop when: days_since_migration > configured_backup_retention_days No cleanup action is required from the customer—the platform handles this automatically. Why Didn’t Test Migrations Show Similar Charges? In many reported cases, test or smaller databases migrated using the same method did not generate noticeable charges. This can be explained by two documented optimizations: Backup size threshold – very small backup footprints are not charged Low activity optimization – inactive or low-change databases generate fewer snapshots As a result, smaller or lightly used test databases may fall below the billing threshold, while larger production databases do not. Is This a Billing Error or Credit Scenario? No. Although the operation is platform-driven: The behavior is by design The charges are for temporary retention of valid PITR backups They naturally expire based on retention Therefore, this scenario is not considered a billing defect and does not typically warrant credits. How Can Customers Reduce Charges Faster? If needed, customers can: Reduce the PITR backup retention period (minimum is 1 day) Wait up to 24 hours for billing to reflect the change This shortens how long the pre-migration backups are retained and billed. FAQ – restorableDroppedDatabases Charges After BC → Hyperscale Migration Q1: Why am I seeing PITR charges for restorableDroppedDatabases when my database is still online? A: During a Business Critical → Hyperscale manual cutover, Azure SQL internally drops the source BC database as part of the migration workflow. While the Hyperscale database is active and healthy, the pre‑migration BC backups are retained and billed under restorableDroppedDatabases. Q2: Did the customer initiate a drop or delete operation? A: No. This drop is platform‑driven and required to complete the migration. It is not initiated by the customer. Q3: What exactly is being billed? A: The charges are for Point‑in‑Time Restore (PITR) backups taken before the migration. These backups are retained according to the configured backup retention period and are billed using the dropped database billing model. Q4: Why does the cost appear higher than expected? A: Once a database is considered “dropped” (from the BC perspective), the 1× database-size discount no longer applies, and the full data file size is included in the billable backup size. Q5: Will these charges continue indefinitely? A: No. The charges decrease daily and automatically stop once the pre‑migration backups expire based on the configured PITR retention period. Q6: Why didn’t this happen with smaller or test databases? A: Smaller or low‑activity databases may fall below the backup billing threshold, or benefit from low‑activity snapshot optimizations, resulting in no visible charges. Q7: Is this a billing bug or credit-worthy scenario? A: No. This behavior is by design and expected. The charges reflect valid backup retention and do not typically qualify for credits. Q8: Can the customer reduce these charges sooner? A: Yes. The customer can reduce the PITR backup retention period (minimum 1 day). Billing changes usually reflect within up to 24 hours. Key Takeaways The behavior is expected and by design Charges come from pre-migration BC backups, not the active Hyperscale database The database was internally dropped as part of migration, not by the customer Charges decrease daily and stop automatically No action is required unless the customer wants to reduce retention early Final Note As of the time of writing, this behavior is not clearly described in public customer-facing documentation, which explains why it often appears unexpected. Awareness of this mechanism can help set correct expectations when planning BC → Hyperscale manual cutover migrations.275Views0likes0CommentsAzure SQL (LTR): You Don’t Need to Copy LTR Backups Across Regions to Restore Them
Summary Customers sometimes attempt to copy Azure SQL Long-Term Retention (LTR) backups across regions using Copy-AzSqlDatabaseLongTermRetentionBackup, only to hit the error: LongTermRetentionMigrationRequestNotSupported LTR backup migration copy feature is not supported on subscription This blog clarifies why this happens, when LTR backup copy is actually supported, and most importantly the correct and supported way to restore an LTR backup into a different region without copying it. The Common Scenario A customer has: An LTR backup stored in Region A A need to restore the database into Region B The assumption that the LTR backup must first be copied cross-region They attempt: Copy-AzSqlDatabaseLongTermRetentionBackup and immediately receive a platform validation error stating the feature isn’t supported on their subscription. Why This Error Happens The key misunderstanding is what the LTR backup copy API is actually for. Copy-AzSqlDatabaseLongTermRetentionBackup is NOT a general-purpose feature This API is: Backend-gated Allowlist-only Intended only for region decommissioning scenarios In other words: It is not supported for normal customer-driven migrations There is no portal toggle or feature registration Subscriptions are only allowlisted when Microsoft is retiring a region, and LTR backups must be preserved elsewhere. Because of this, most subscriptions - will receive: LongTermRetentionMigrationRequestNotSupported The Correct & Supported Solution Good news: You do NOT need to copy the LTR backup to another region to restore it there. Azure SQL allows you to: Restore an LTR backup directly to any Azure SQL logical server, in any region. Supported Approach: Restore LTR Backup Directly Use Restore-AzSqlDatabase with the -FromLongTermRetentionBackup switch. Example (PowerShell) Restore-AzSqlDatabase ` -FromLongTermRetentionBackup ` -ResourceId $ltrBackup.ResourceId ` -ServerName $serverName ` -ResourceGroupName $resourceGroup ` -TargetDatabaseName "Test" ` -ServiceObjectiveName P1 This works across regions No backend enablement required Fully supported and documented How This Works (Important Concept) LTR backups are stored in geo-redundant storage The restore operation does not depend on the original region The platform automatically handles data access and restores placement So, while the backup physically originated in Region A, you are free to restore it to Region B, C, or any supported Azure region without copying it first. When Is LTR Backup Copy Actually Used? Only in this scenario: Microsoft-initiated region decommissioning In that case: LTR backups must be relocated to remain available Subscriptions are temporarily allowlisted Copy-AzSqlDatabaseLongTermRetentionBackup is enabled at the backend Outside of this scenario, the API is intentionally restricted. Key Takeaways You can restore an LTR backup to any region directly You do not need (and usually cannot use) LTR backup copy Backup copy is gated and reserved for region retirement scenarios Use Restore-AzSqlDatabase -FromLongTermRetentionBackup instead Final Recommendation for Customers If customers encounter this error: Reassure them this is not a misconfiguration or permission issue Explain that LTR restore is the correct solution Avoid escalation for feature enablement unless a region retirement is involved259Views0likes0CommentsAzure Data Sync: Fixing “Cannot find the user ‘DataSync_executor’” When Creating a New Sync Group
Summary When creating a new Azure SQL Data Sync group, customers may encounter the following error during setup—even when no active sync groups exist: “Failed to perform data sync operation: Cannot find the user 'DataSync_executor', because it does not exist or you do not have permission.” This failure typically occurs during certificate and symmetric key creation as Azure attempts to grant permissions to the DataSync_executor role. In this post, we’ll walk through: The common scenario where this issue appears Why cleanup scripts alone may not fix it A supported, reliable resolution approach to restore Data Sync successfully The Problem Scenario A customer attempts to create a brand-new Azure SQL Data Sync group (hub + members), but the operation fails with an error similar to: Cannot find the user 'DataSync_executor', because it does not exist or you do not have permission. Creating certificate Creating symmetric key Granting permission to [DataSync_executor] on certificate Key observations from affected cases: No active sync group exists Cleanup scripts (including Data Sync complete cleanup.sql) were already executed The failure persists even after retrying the setup Why This Happens Azure SQL Data Sync depends on system-managed database roles that must be created and configured only by the Azure Data Sync service itself. If these roles (or related permissions) are: Missing Partially deleted Left in an inconsistent state then Data Sync may fail while attempting to create certificates or grant required permissions. Important: Manually creating or partially restoring these roles is not supported and often leads to repeated failures. How to Detect the Issue Before troubleshooting further, confirm whether the required Data Sync roles are missing. 1. Run the Data Sync Health Checker Ask the customer to run Data Sync Health Checker, then review SyncDB_Log. Common warnings include: DataSync_reader IS MISSING DataSync_executor IS MISSING Missing EXECUTE/SELECT permissions on dss and TaskHosting schemas This confirms the root cause is role and permission inconsistency. Supported and Effective Resolution Step 1: Verify Roles Are Missing Run the following query on each affected database (hub and members): SELECT name FROM sys.database_principals WHERE name IN ('DataSync_executor', 'DataSync_reader'); If no rows are returned, the roles are missing and must be recovered by Azure Data Sync itself - not manually. Step 2: Fully Clean Up Leftover Data Sync Objects Do this only if the database is not actively syncing -- Remove roles if partially present DROP ROLE IF EXISTS DataSync_executor; DROP ROLE IF EXISTS DataSync_reader; -- Drop DataSync schema IF EXISTS (SELECT 1 FROM sys.schemas WHERE name = 'DataSync') BEGIN DROP SCHEMA DataSync; END This ensures there are no partial or orphaned Data Sync objects left behind that could interfere with setup. Step 3: Recreate the Sync Group (Critical Step) Do not manually recreate roles or permissions Instead: Delete the existing (failed) Sync Group from the Azure Portal Recreate the Sync Group from scratch Re-add the hub and member databases During this process, Azure will automatically: Recreate DataSync_executor and DataSync_reader Assign all required permissions Deploy the correct schemas, certificates, and procedures Key Takeaways DataSync_executor and DataSync_reader are service-managed roles Cleanup scripts alone may not fully reset a broken state Manual role creation is not supported Deleting and recreating the Sync Group is the only reliable recovery method once roles are missing Final Recommendation If you encounter Data Sync setup failures referencing DataSync_executor, always: Validate role existence Fully clean up broken artifacts Let Azure Data Sync recreate everything by rebuilding the Sync Group This approach consistently resolves the issue and restores a healthy Data Sync deployment.227Views0likes0CommentsTroubleshooting Azure SQL Data Sync Failure: SQL Error 8106 During Bulk Insert
Azure SQL Data Sync is widely used to maintain consistency across distributed databases in hub–member topologies. However, synchronization may occasionally fail due to schema mismatches between participating databases — even when everything appears correctly configured at first glance. In this post, we’ll walk through a real-world troubleshooting scenario involving a Data Sync failure caused by a schema inconsistency related to an IDENTITY column, and how it was mitigated. Sample Error: sync_7726d6cb22124c0f901192c434f49106bd618f8ab16343b2adc03250f8367ff4\3953fb7d-1dba-4656-8150-83153d5d019b.batch. See the inner exception for more details. Inner exception: Failed to execute the command 'BulkInsertCommand' for table 'schema.table_name'; the transaction was rolled back. Ensure that the command syntax is correct. Inner exception: SqlException ID: e19b3677-d67e-4c8e-bc49-13d3df61ad0e, Error Code: -2146232060 - SqlError Number:8106, Message: SQL error with code 8106 For more information, provide tracing ID ‘92e76130-f80a-4372-9a48-ec0ede8b0288’ to customer support." Scenario Overview A synchronization operation began failing for a specific table within an Azure SQL Data Sync group. The failure was observed during the sync process when applying changes using a batch file. The error surfaced as part of a failed BulkInsertCommand execution on a synced table, causing the transaction to roll back. Further investigation revealed the following SQL exception: SqlError Number: 8106 Table does not have the identity property. Cannot perform SET operation. Initial Troubleshooting Steps Before identifying the root cause, the following actions were taken: The affected table was removed from the sync group. A sync operation was triggered. The table was re-added to the sync group. Sync was triggered again. Despite performing these steps, the issue persisted with the same error. This indicated that the failure was not related to sync metadata or temporary configuration inconsistencies. Root Cause Analysis After reviewing the table definitions across the sync topology, it was discovered that: The synchronized table had an IDENTITY column defined on one side of the topology (Hub or Member) but not on the other. This schema mismatch led to the sync service attempting to apply SET IDENTITY_INSERT operations during the bulk insert phase — which failed on the database where the column lacked the identity property. Azure SQL Data Sync relies on consistent schema definitions across all participating databases. Any deviation — particularly involving identity columns — can interrupt data movement operations. Mitigation Approach To resolve the issue, the following corrective steps were applied: Remove the affected table from the sync group and save the configuration. Refresh the sync schema. Recreate the table to include the appropriate IDENTITY property. Add the corrected table back to the sync group. Trigger a new sync operation. These steps ensured that the table definitions were aligned across all sync participants, allowing the synchronization process to proceed successfully. Best Practices to Avoid Similar Issues To prevent identity-related sync failures in Azure SQL Data Sync: ✅ Ensure table schemas are identical across all participating databases before onboarding them into a sync group. ✅ Pay special attention to: IDENTITY properties Primary keys Data types Nullable constraints ✅ Always validate schema consistency when: Adding new tables to a sync group Modifying existing table definitions Final Thoughts Schema mismatches — especially those involving identity columns — are a common but often overlooked cause of Data Sync failures. By ensuring consistent table definitions across your hub and member databases, you can significantly reduce the risk of synchronization errors and maintain reliable data movement across regions.173Views0likes0CommentsUnderstanding and Monitoring Class 2 Transactions in Azure SQL Database
During a recent customer engagement, we investigated sustained transaction log growth in Azure SQL Database without obvious large user transactions. The customer was familiar with PostgreSQL diagnostics and wanted to understand how similar insights can be obtained in Azure SQL Database—especially around Class 2 (system) transactions. This post summarizes what we discussed, explains why Azure SQL behaves differently, and walks through practical DMV‑based monitoring patterns you can use today. Azure SQL Database vs. PostgreSQL: Diagnostic Model Differences One of the first clarifications we made is that Azure SQL Database does not expose diagnostic settings equivalent to PostgreSQL’s system‑level log diagnostics. Azure SQL Database is a fully managed PaaS service, and many internal operations—such as checkpoints, version store cleanup, and background maintenance—are abstracted from direct control. Instead of low‑level engine logs, Azure SQL provides cumulative Dynamic Management Views (DMVs) that expose the effects of system activity rather than the internal implementation. What Are Class 2 Transactions? In Azure SQL Database, Class 2 transactions generally refer to system‑generated transactions, not directly initiated by user workloads. These commonly include: Checkpoint operations Version store cleanup Ghost record cleanup Background metadata maintenance Although they are not user‑driven, these transactions still generate transaction log activity, which can be surprising when log usage grows steadily without large user transactions. Key DMVs to Monitor Class 2 Activity 1. Transaction Log Usage SELECT * FROM sys.dm_db_log_space_usage; This DMV provides: Total log size Used log space Used log percentage If log usage grows steadily without large user transactions, it is often a signal that background system activity (Class 2 transactions) is responsible. Checkpoint Activity SELECT * FROM sys.dm_exec_requests WHERE command = 'CHECKPOINT'; Frequent checkpoints result in: More frequent log flushes Increased system log writes In Azure SQL Database, checkpoint frequency is system‑managed and cannot be tuned through configuration or diagnostic settings. Version Store Usage (Common Class 2 Contributor) SELECT * FROM sys.dm_tran_version_store_space_usage; High version store usage often leads to: Background cleanup tasks Increased system transactions Additional transaction log generation This is especially common in workloads using: Snapshot Isolation Read Committed Snapshot Isolation (RCSI) Long‑running transactions or readers Automating Monitoring with Azure Elastic Jobs Because these DMVs are cumulative, capturing them over time is key. During the call, we discussed automating data collection using Azure Elastic Jobs. Elastic Jobs allow you to: Schedule DMV snapshots Store historical trends Correlate spikes with workload patterns Microsoft provides full guidance on creating and managing Elastic Jobs using T‑SQL here: Create and manage Elastic Jobs using T‑SQL Index Management and Class 2 Impact Index maintenance can indirectly increase Class 2 activity by: Increasing version store usage Triggering additional background cleanup Instead of manual index tuning, we recommended enabling Query Performance Insight – Index recommendations in the Azure Portal. This allows Azure SQL Database to automatically: Suggest index creation Suggest index removal based on real workload patterns. Why Checkpoints Cannot Be Tuned A common question is whether checkpoint frequency can be reduced to lower system log activity. In Azure SQL Database: Checkpoints are engine‑managed There is no diagnostic or configuration setting to control their frequency This design ensures platform stability and predictable recovery behavior As a result, monitoring—not tuning—is the correct approach. Practical Takeaways From this case, the key lessons are: Not all transaction log growth is user‑driven Class 2 transactions are a normal part of Azure SQL Database DMVs provide the best visibility into system behavior Trend‑based monitoring is more valuable than point‑in‑time checks Automation via Elastic Jobs is essential for long‑term analysis Conclusion Class 2 transactions are often misunderstood because they operate quietly in the background. By using the right DMVs and collecting data over time, you can clearly distinguish expected system behavior from genuine workload issues. If you’re coming from PostgreSQL or on‑prem SQL Server, the key mindset shift is this: Azure SQL Database exposes outcomes, not internals—and that’s by design.198Views0likes0CommentsUnderstanding Azure SQL Data Sync Firewall Requirements
Why IP Whitelisting Is Required and What Customers Should Know Azure SQL Data Sync is commonly used to synchronize data between on‑premises SQL Server databases and Azure SQL Database. While the setup experience is generally straightforward, customers sometimes encounter connectivity or configuration issues that are rooted in network security and firewall behavior. This blog explains why Azure SQL Data Sync requires firewall exceptions, what type of IP addresses may appear in audit logs, and how to approach this topic from a security and documentation standpoint—based on real troubleshooting discussions within the Azure SQL Data Sync ecosystem. The Scenario: Sync Agent Configuration Fails Despite Valid Setup A frequently reported issue occurs when the Azure SQL Data Sync Agent (installed on an on‑premises server) fails to save its configuration. The error typically indicates that a valid agent key is required—even when: The agent key was freshly generated from the Azure SQL Data Sync portal Connection tests succeed The agent has been reinstalled or the server restarted New sync groups were created Despite these efforts, synchronization does not proceed until a specific public IP address is allowed through the Azure SQL Database firewall. Why Firewall Rules Matter for Azure SQL Data Sync Azure SQL Database is protected by a server‑level firewall that blocks all inbound traffic by default. Any external client—including the Data Sync Agent—must be explicitly allowed to connect. In Azure SQL Data Sync: The Data Sync Agent runs on‑premises It connects outbound over TCP port 1433 It uses the public endpoint of the Azure SQL logical server The Azure SQL firewall must allow the public IP address used by the agent If this IP is not allowed, the agent cannot complete configuration or perform synchronization operations—even if authentication and permissions are otherwise correct. Identifying the Required IP Address In the referenced discussion, the required IP address was identified by reviewing Azure SQL audit logs, which revealed connection attempts being blocked at the firewall layer. Once this IP address was added to the Azure SQL server firewall rules, synchronization completed successfully. This highlights an important point: Audit logs can be a reliable way to identify which IP address must be whitelisted when Data Sync connectivity fails. Is This IP Address Owned by Microsoft? Can It Change? A natural follow‑up question is whether the observed IP address is Microsoft‑owned, and whether it can change. From the discussion: Azure SQL Data Sync relies on Microsoft‑managed service infrastructure Some outbound connectivity may originate from Azure service IP ranges Microsoft publishes official IP ranges and service tags for transparency However, documentation does not guarantee that a single static IP will always be used. Customers should therefore treat firewall configuration as a network security requirement, not a one‑time exception. Related Microsoft Resources While Azure SQL Data Sync documentation focuses on setup and troubleshooting, firewall requirements are often implicit rather than explicitly called out. The following Microsoft resources were referenced in the discussion to help customers understand Azure service IP ownership and ranges: Gateway IP addresses – Azure Synapse Analytics Download Azure IP Ranges and Service Tags – Public Cloud These resources can help security teams validate Microsoft‑owned IPs and plan firewall policies accordingly. Key Takeaways for Customers ✅ Azure SQL Data Sync requires firewall access to Azure SQL Database ✅ The public IP used by the Data Sync Agent must be explicitly allowed ✅ Audit logs are useful for identifying blocked IPs ✅ IP addresses may belong to Microsoft infrastructure and can change over time ✅ Firewall configuration is a security prerequisite, not an optional step Closing Thoughts Azure SQL Data Sync operates securely by design, leveraging Azure SQL Database firewall protections. While this can introduce configuration challenges, understanding the network flow and firewall requirements can significantly reduce setup friction and troubleshooting time. If you're implementing Azure SQL Data Sync in a locked‑down network environment, we recommend involving your network and security teams early and validating firewall rules as part of the initial deployment checklist.Troubleshooting Azure SQL Data Sync Groups Stuck in Progressing State
Azure SQL Data Sync is commonly used to synchronize data across Azure SQL Databases and on‑premises SQL Server environments. While the service works well in many scenarios, customers may occasionally encounter a situation where a Sync Group remains stuck in a “Progressing” state and cannot be started, stopped, or refreshed. This blog walks through a real-world troubleshooting scenario, highlights the root cause, and outlines practical remediation steps based on actual support investigation and collaboration. Problem Overview In this scenario, the customer reported that: The Sync Group was stuck in “Progressing” for multiple days Sync operations could not be started or stopped Tables could not be refreshed or reconfigured Azure Activity Logs showed operations as Succeeded, yet sync never progressed Our backend telemetry showed the Sync Group as Active, while hub and member databases were in Reprovisioning state The last successful sync occurred on XX day, after which the sync pipeline stopped making progress. Initial Investigation Findings During the investigation, several key observations were made: 1. High DATA IO Utilization Telemetry and backend checks revealed that DATA IO utilization was pegged at 100% on one of the sync member databases starting XX day. Despite no noticeable change in application workload, the database was under sustained IO pressure, which directly impacted Data Sync operations. 2. Deadlocks During Sync Processing Our backend telemetry showed repeated deadlock errors: Transaction was deadlocked on lock resources with another process and has been chosen as the deadlock victim. These deadlocks were observed for multiple Sync Member IDs starting the same day IO saturation began. This aligned with the hypothesis that resource contention, not a Data Sync service failure, was the underlying issue. 3. Metadata Database Was Healthy The Sync metadata database was running on a serverless Azure SQL Database (1 vCore) and showed healthy resource usage, ruling it out as a bottleneck. Recommended Troubleshooting Steps Based on the findings, the following steps were recommended and validated: ✅ Step 1: Address Database Resource Constraints First Before attempting to recreate or reset the Sync Group, the focus was placed on resolving DATA IO saturation on the affected database. Actions included: Scaling up the database (DTUs / vCores) Monitoring IO utilization after scaling Ensuring sufficient headroom for sync operations This was identified as the primary remediation step. ✅ Step 2: Use the Azure SQL Data Sync Health Checker The Azure SQL Data Sync Health Checker was recommended to validate: Sync metadata integrity Table-level configuration issues Agent and connectivity status GitHub tool: AzureSQLDataSyncHealthChecker ✅ Step 3: Validate Sync Group and Agent State via PowerShell PowerShell was used to confirm: Sync Group state Last successful sync time On‑premises Sync Agent connectivity Example commands used: Get-AzureRmSqlSyncGroup ` -ResourceGroupName "ResourceGroup01" ` -ServerName "Server01" ` -DatabaseName "Database01" | Format-List Get-AzureRmSqlSyncAgent ` -ResourceGroupName "ResourceGroup01" ` -ServerName "Server01" | Select ResourceGroupName, SyncState, LastSyncTime Resolution After the customer increased the database size, DATA IO utilization dropped, sync operations resumed normally, and the customer confirmed that the issue was resolved.228Views0likes0Comments