azuredatasync
3 TopicsGetting Started with Azure SQL Data Sync Using User-Assigned Managed Identity (UAMI)
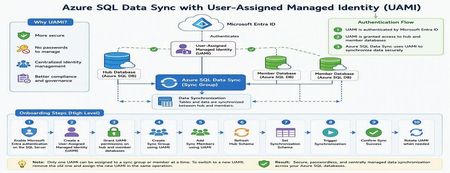
Azure SQL Data Sync is a powerful service that enables data synchronization across multiple Azure SQL Databases. Traditionally, Data Sync relied on SQL Authentication, requiring administrators to manage usernames and passwords for both hub and member databases. With the introduction of User-Assigned Managed Identity (UAMI) support, Azure SQL Data Sync now provides a more secure and modern authentication model built on Microsoft Entra ID. This enhancement reduces credential management overhead, eliminates password storage concerns, and helps organizations strengthen their security posture. In this article, we'll explore how to onboard Azure SQL Data Sync with UAMI, configure the required permissions, create synchronization components, and review best practices for long-term management. Why Use UAMI with Azure SQL Data Sync? User-Assigned Managed Identity offers several advantages over traditional SQL authentication: Eliminates password storage and rotation requirements Reduces credential exposure risks Integrates with Microsoft Entra ID authentication Supports centralized identity management Improves compliance and security posture Simplifies operational maintenance Whether you're deploying a new synchronization topology or modernizing an existing Data Sync environment, UAMI provides a secure cloud-native alternative to password-based authentication. Architecture Overview A typical UAMI-enabled Azure SQL Data Sync deployment looks like this: Authentication Method: Microsoft Entra ID via User-Assigned Managed Identity The same managed identity can be used by Data Sync to authenticate against all participating databases. Prerequisites Before configuring Azure SQL Data Sync with UAMI, ensure the following prerequisites are completed: 1. Enable Microsoft Entra Authentication The Azure SQL Server hosting both Hub and Member databases must have Microsoft Entra authentication enabled and an Entra administrator configured. 2. Create a User-Assigned Managed Identity Create a UAMI within Azure and collect the following information: Managed Identity Name Client ID Resource ID These values will be required during configuration. 3. Install the Required PowerShell Module UAMI support requires the Azure SQL preview PowerShell module: Install-Module Az.Sql -RequiredVersion 6.6.0-preview ` -AllowPrerelease ` -Force ` -AllowClobber Or a later version that includes Data Sync UAMI support. Phase 1: Configure Database Access Before Data Sync can use a managed identity, the identity must be granted access to all databases participating in synchronization. Connect to each Hub and Member database using a Microsoft Entra administrator account and create a user for the managed identity. Example: DECLARE @MSIname SYSNAME = '<UAMI_NAME>'; DECLARE @dbName SYSNAME = DB_NAME(); DECLARE @clientId UNIQUEIDENTIFIER = '<CLIENT_ID>'; -- Create User -- Grant db_datareader -- Grant db_datawriter -- Grant CONTROL permissions The UAMI must be created and granted permissions on every database participating in synchronization. Phase 2: Create the Sync Group After permissions are configured, create the Sync Group using UAMI authentication. Example PowerShell: New-AzSqlSyncGroup ` -ResourceGroupName $resourceGroup ` -ServerName $serverName ` -DatabaseName $hubDatabase ` -Name $syncGroup ` -HubDatabaseAuthenticationType UserAssigned ` -ResourceId $identityResourceId Key Parameters Parameter Description HubDatabaseAuthenticationType Authentication method for Hub Database UserAssigned Enables UAMI authentication ResourceId Full ARM Resource ID of the UAMI Phase 3: Add Sync Members Once the Sync Group is created, add member databases and specify UAMI authentication. Example: New-AzSqlSyncMember ` -ResourceGroupName $resourceGroup ` -ServerName $serverName ` -DatabaseName $hubDatabase ` -SyncGroupName $syncGroup ` -Name $memberName ` -MemberDatabaseAuthenticationType UserAssigned ` -ResourceId $identityResourceId At this stage, both Hub and Member databases are configured to authenticate using the managed identity. Phase 4: Configure Synchronization Refresh Hub Schema Refresh the schema metadata before selecting tables for synchronization. Update-AzSqlSyncSchema ` -ResourceGroupName $resourceGroup ` -ServerName $serverName ` -DatabaseName $hubDatabase ` -SyncGroupName $syncGroup Configure the Synchronization Schema Data Sync requires an explicit schema definition specifying which tables and columns will participate in synchronization. Example schema: { "Tables": [ { "QuotedName": "[dbo].[contacts]", "Columns": [ { "QuotedName": "[id]" }, { "QuotedName": "[name]" } ] } ] } Apply the schema: Update-AzSqlSyncGroup ` -ResourceGroupName $resourceGroup ` -ServerName $serverName ` -DatabaseName $hubDatabase ` -Name $syncGroup ` -HubDatabaseAuthenticationType UserAssigned ` -ResourceId $identityResourceId ` -SchemaFile "C:\schema.json" Trigger Synchronization After configuration is complete, trigger the initial synchronization. Start-AzSqlSyncGroupSync ` -ResourceGroupName $resourceGroup ` -ServerName $serverName ` -DatabaseName $hubDatabase ` -SyncGroupName $syncGroup Phase 5: Rotating UAMIs Over time, organizations may need to replace an existing managed identity. UAMI_v1 → UAMI_v2 Only one UAMI can be assigned to a Sync Group or Sync Member at a time. To rotate identities: Grant required database permissions to the new UAMI. Remove the current UAMI. Assign the new UAMI in the same operation. Update Sync Group Update-AzSqlSyncGroup ` -HubDatabaseAuthenticationType UserAssigned ` -ResourceId $newUamiResourceId ` -RemoveIdentityResourceId $oldUamiResourceId Update Sync Member Update-AzSqlSyncMember ` -MemberDatabaseAuthenticationType UserAssigned ` -ResourceId $newUamiResourceId ` -RemoveIdentityResourceId $oldUamiResourceId Common Pitfalls During implementation, the following issues are commonly encountered: Pitfall #1: Missing Entra Administrator If the SQL Server does not have an Entra administrator configured, UAMI authentication will fail. Pitfall #2: Missing Database Permissions The managed identity must be created and granted permissions in every participating database. Pitfall #3: Multiple UAMIs Assigned Azure SQL Data Sync supports only one UAMI per Sync Group or Sync Member at a time. Pitfall #4: Identity Included During PATCH Updates When updating schemas through REST APIs, avoid re-submitting the identity block if the managed identity is already assigned. This may result in a DataSyncMultipleIdentities error. Validation Checklist Before moving to production, verify the following: Microsoft Entra administrator configured UAMI created successfully UAMI user created in all Hub and Member databases Required permissions granted Sync Group configured with UserAssigned authentication Sync Members configured with UserAssigned authentication Schema refreshed successfully Synchronization schema applied Initial synchronization completed successfully Data synchronized correctly between Hub and Member databases Best Practices For secure and scalable deployments: Prefer UAMI over SQL Authentication for new deployments. Use dedicated managed identities for Data Sync workloads. Follow least-privilege access principles where possible. Test configuration changes in non-production environments first. Maintain documentation for identity ownership and rotation procedures. Monitor synchronization health after identity updates. Standardize naming conventions for managed identities. References The following Microsoft resources provide additional details for implementing Azure SQL Data Sync with User-Assigned Managed Identities: 1. Configure Microsoft Entra Authentication for Azure SQL Database Configure an Entra administrator for Azure SQL Database, which is a prerequisite for UAMI-based authentication. https://learn.microsoft.com/azure/azure-sql/database/authentication-aad-configure 2. Manage User-Assigned Managed Identities Learn how to create and manage User-Assigned Managed Identities in Azure. Managed identities eliminate the need to manage credentials in code and can be reused across multiple Azure resources. Manage user-assigned managed identities using the Azure portal explains the process and prerequisites. [Manage use...soft Learn | Learn.Microsoft.com] 3. Connect to Azure SQL Using Microsoft Entra Authentication Configure and validate Entra-based connectivity for Azure SQL Database before granting permissions to the managed identity. https://learn.microsoft.com/azure/azure-sql/database/authentication-microsoft-entra-connect-to-azure-sql 4. Azure SQL Data Sync PowerShell Documentation Review PowerShell cmdlets used to create Sync Groups, Sync Members, refresh schemas, and trigger synchronization. 5. Azure SQL REST API Documentation Use REST APIs for automation and Infrastructure-as-Code deployment scenarios involving Azure SQL Data Sync. Conclusion User-Assigned Managed Identity support represents a significant security enhancement for Azure SQL Data Sync. By eliminating dependency on stored credentials and leveraging Microsoft Entra authentication, organizations can improve security, simplify operations, and reduce administrative overhead. Whether you're building a new synchronization topology or migrating from SQL Authentication, UAMI provides a modern, scalable, and cloud-native authentication model for Azure SQL Data Sync. As cloud environments continue to adopt identity-first security practices, implementing UAMI for Azure SQL Data Sync is an important step toward a more secure and manageable data platform.Azure SQL Data Sync Fails with "Cannot Insert NULL": Understanding the Root Cause
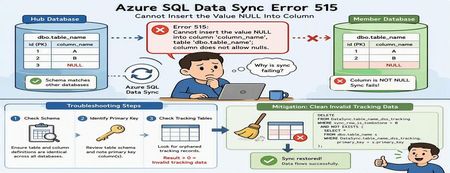
Azure SQL Data Sync is a powerful service that enables data synchronization across multiple Azure SQL Databases. While synchronization failures are relatively uncommon, one error that administrators occasionally encounter is SQL Server Error 515, indicating that a NULL value cannot be inserted into a non-nullable column. At first glance, this appears to be a straightforward data-quality problem. However, in many cases, the actual root cause lies elsewhere: inconsistencies between Azure SQL Data Sync tracking metadata and the underlying source data. This article explains: Common causes of Error 515 during synchronization How to troubleshoot the issue How to identify invalid tracking records Safe mitigation approaches to restore synchronization The Error A synchronization operation may fail with an error similar to the following: SqlException Error Code: -2146232060 SqlError Number: 515 Message: Cannot insert the value NULL into column 'column_name', table 'dbo.table_name'; column does not allow nulls. INSERT fails. SqlError Number: 3621 The statement has been terminated. Although the error references a NULL value being inserted into a destination table, the root cause is not always missing data. In many cases, the issue originates from synchronization metadata maintained by Azure SQL Data Sync. How Azure SQL Data Sync Tracks Changes Azure SQL Data Sync relies on internal tracking tables to detect and replicate data changes between Hub and Member databases. Whenever rows are inserted, updated, or deleted, synchronization metadata is recorded in tracking tables. Data Sync uses this metadata to determine what changes need to be propagated to other databases. If the tracking metadata becomes inconsistent with the actual source table contents, Data Sync may attempt to synchronize invalid records, resulting in failures such as: Cannot insert the value NULL into column... Common Root Causes Scenario 1: Schema Mismatch Between Databases One of the most common causes of synchronization failures is a schema mismatch between synchronized databases. For example: Database Column Definition Hub NULL Allowed Member A NOT NULL Member B NOT NULL If Data Sync replicates a row containing a NULL value from the Hub database, synchronization will fail when the destination database does not allow NULL values. Areas to Validate Ensure the following are identical across all synchronized databases: Column nullability (NULL vs NOT NULL) Data types Column length Constraints Primary key definitions Even small schema differences can cause synchronization failures. Scenario 2: Invalid Tracking Metadata A less obvious but frequently encountered scenario involves orphaned records in Data Sync tracking tables. This can occur when: Primary key values are updated directly Data is modified outside expected application workflows Historical tracking records become disconnected from source data Synchronization metadata references rows that no longer exist When Data Sync processes these stale entries, synchronization may fail with Error 515 even though the source data itself appears valid. Troubleshooting Process Step 1: Verify Column Definitions Begin by examining the affected table and column identified in the error message. For example: sp_help 'dbo.table_name' Review the schema on both Hub and Member databases and verify that: The affected column has the same definition everywhere NULL settings are identical Data types and lengths match If discrepancies exist, align the schemas across all synchronized databases before proceeding. Step 2: Review the Table Schema If the schema appears consistent, review the complete definition of the affected table. Pay particular attention to: Primary key columns Identity columns Constraints Nullable settings Identifying the primary key is especially important for the next validation step. Step 3: Check for Orphaned Tracking Records Run the following query against both Hub and Member databases. Replace: table_name primary_key with the actual table and primary key column names. SELECT COUNT(*) FROM DataSync.table_name_dss_tracking t WHERE sync_row_is_tombstone = 0 AND NOT EXISTS ( SELECT * FROM dbo.table_name s WHERE t.primary_key = s.primary_key ); For tables with composite primary keys, include all key columns in the comparison. How to Interpret the Results Result > 0 One or more orphaned tracking records exist. This indicates that the tracking table contains entries that reference records no longer present in the source table. This is a strong indicator that invalid synchronization metadata is causing the failure. Result = 0 No orphaned records were detected. If the synchronization error persists, further investigation should focus on schema consistency, data quality, and additional synchronization diagnostics. Mitigation Option 1: Correct Schema Differences If schema inconsistencies are found: Align the table definition across all synchronized databases. Ensure NULL and NOT NULL settings are consistent. Verify primary key definitions match. Reinitialize synchronization if necessary. After schema alignment, synchronization can typically resume successfully. Mitigation Option 2: Clean Invalid Tracking Data If orphaned tracking records are identified, remove the invalid synchronization metadata. Important: Always validate and test cleanup operations in a non-production environment before executing them in production. The following query removes tracking entries that no longer correspond to records in the source table: DELETE FROM DataSync.table_name_dss_tracking WHERE sync_row_is_tombstone = 0 AND NOT EXISTS ( SELECT * FROM dbo.table_name s WHERE DataSync.table_name_dss_tracking.primary_key = s.primary_key ); Replace: table_name primary_key with the appropriate values for your environment. After cleanup, Data Sync can rebuild valid change tracking information and synchronization typically returns to a healthy state. Additional Validation Query The following query can help identify historical deletion records that exist in tracking tables: SELECT tr.id1 FROM DataSync.table2_dss_tracking tr LEFT JOIN dbo.table2 orig ON tr.id1 = orig.id1 WHERE tr.sync_row_is_tombstone = 1 AND orig.id1 IS NULL AND tr.last_change_datetime > DATEADD(day, -20, GETUTCDATE()); This can provide additional insight into how synchronization metadata is tracking deleted records. Understanding the Underlying Cause The most important takeaway is that the NULL value reported in the synchronization error is often not the actual problem. A common sequence looks like this: A primary key value is modified directly. UPDATE dbo.table_name SET primary_key = new_value; Data Sync tracking metadata continues to reference the original key value. The source table and tracking table become inconsistent. During synchronization, Data Sync attempts to process the stale tracking record. The synchronization operation fails and surfaces a "Cannot insert the value NULL into column" error. In these scenarios, cleaning invalid tracking records resolves the inconsistency and restores successful synchronization. Best Practices to Prevent Recurrence To minimize the likelihood of synchronization failures: Keep schemas identical across all synchronized databases Avoid updating primary key values whenever possible Use surrogate keys for synchronized tables Validate schema consistency before deploying schema changes Periodically investigate Data Sync tracking tables when troubleshooting synchronization failures Test schema modifications in non-production environments before deployment Conclusion When Azure SQL Data Sync reports a: Cannot insert the value NULL into column... error, it is important not to assume that the problem is caused by missing data in the source table. A structured troubleshooting approach should include: Verifying schema consistency across synchronized databases Reviewing primary key definitions Investigating Data Sync tracking tables for orphaned records Cleaning invalid synchronization metadata when appropriate In many real-world cases, stale tracking records are the true root cause. Identifying and removing these invalid entries can restore synchronization quickly and avoid unnecessary application or schema changes. Have you encountered similar Azure SQL Data Sync issues in your environment? Share your experience and troubleshooting techniques in the comments below.Monitoring Azure SQL Data Sync Errors Using PowerShell
Azure SQL Data Sync is a powerful service that enables data synchronization between multiple databases across Azure SQL Database and on‑premises SQL Server environments. It supports hybrid architectures and distributed applications by allowing selected data to synchronize bi‑directionally between hub and member databases using a hub‑and‑spoke topology. However, one of the most common operational challenges faced by support engineers and customers using Azure SQL Data Sync is: ❗ Lack of proactive monitoring for sync failures or errors By default, Azure SQL Data Sync does not provide native alerting mechanisms that notify administrators when synchronization operations fail or encounter issues. This can result in silent data drift or synchronization delays that may go unnoticed in production environments. In this blog, we’ll walk through how to monitor Azure SQL Data Sync activity and detect synchronization errors using Azure PowerShell commands. Why Monitoring Azure SQL Data Sync Matters Azure SQL Data Sync works by synchronizing data between: Hub Database (must be Azure SQL Database) Member Databases (Azure SQL Database or SQL Server) Sync Metadata Database (stores sync configuration and logs) All synchronization activity—including errors, failures, and successes—is logged internally within the Sync Metadata Database and exposed through Azure SQL Sync Group logs. Monitoring these logs enables: Detection of sync failures Identification of schema mismatches Validation of sync completion Troubleshooting of sync group issues Verification of last successful sync activity Prerequisites Before monitoring Azure SQL Data Sync activity, ensure the following: Azure PowerShell module (Az.Sql) is installed You have access to the Azure SQL Data Sync resources Proper authentication and subscription context are configured Install and import the required module if not already available: # Install Azure PowerShell module if not already installed Install-Module -Name Az -Repository PSGallery -Force # Import the SQL module Import-Module Az.Sql Authenticate to Azure: # Login to Azure Connect-AzAccount -TenantId "<tenant-id>" # Set subscription context Set-AzContext -SubscriptionId "<subscription-id>" These commands enable access to Azure SQL Sync Group monitoring operations. Monitoring Sync Group Status To retrieve Sync Group details, define the required variables: # Define variables $resourceGroup = "rg-datasync-demo" $serverName = "<hub-server-name>" $databaseName = "HubDatabase" $syncGroupName = "SampleSyncGroup" # Get sync group details Get-AzSqlSyncGroup -ResourceGroupName $resourceGroup ` -ServerName $serverName ` -DatabaseName $databaseName ` -SyncGroupName $syncGroupName | Format-List Note: The LastSyncTime property returned by Get-AzSqlSyncGroup may sometimes display a value such as 1/1/0001, even when synchronization operations are completing successfully. To obtain accurate synchronization timestamps, it is recommended to use Sync Group Logs instead. Monitoring Sync Activity Using Logs (Recommended) To monitor synchronization activity and retrieve detailed sync status, use: # Get sync logs for the last 24 hours $startTime = (Get-Date).AddHours(-24).ToString("yyyy-MM-ddTHH:mm:ssZ") $endTime = (Get-Date).ToString("yyyy-MM-ddTHH:mm:ssZ") Get-AzSqlSyncGroupLog -ResourceGroupName $resourceGroup ` -ServerName $serverName ` -DatabaseName $databaseName ` -SyncGroupName $syncGroupName ` -StartTime $startTime ` -EndTime $endTime This command retrieves: Sync operation timestamps Sync status Error messages Activity details Sync Group Logs provide more reliable monitoring information than the Sync Group status output alone. Retrieving the Last Successful Sync Time To determine the most recent successful synchronization operation: # Get the most recent successful sync timestamp $startTime = (Get-Date).AddDays(-7).ToString("yyyy-MM-ddTHH:mm:ssZ") $endTime = (Get-Date).ToString("yyyy-MM-ddTHH:mm:ssZ") Get-AzSqlSyncGroupLog -ResourceGroupName $resourceGroup ` -ServerName $serverName ` -DatabaseName $databaseName ` -SyncGroupName $syncGroupName ` -StartTime $startTime ` -EndTime $endTime | Where-Object { $_.Details -like "*completed*" -or $_.Type -eq "Success" } | Select-Object -First 1 Timestamp, Type, Details This helps administrators validate whether synchronization is occurring as expected across the sync topology. Filtering for Synchronization Errors To identify failed or problematic sync operations: # Get only error logs Get-AzSqlSyncGroupLog -ResourceGroupName $resourceGroup ` -ServerName $serverName ` -DatabaseName $databaseName ` -SyncGroupName $syncGroupName ` -StartTime $startTime ` -EndTime $endTime | Where-Object { $_.LogLevel -eq "Error" } Filtering logs by error type allows for: Rapid identification of failed sync attempts Analysis of failure causes Early detection of data consistency risks Key Takeaways Azure SQL Data Sync does not provide native alerting for sync failures Sync Group Logs offer detailed monitoring of sync operations Get-AzSqlSyncGroupLog provides accurate timestamps and status Monitoring logs enables detection of silent sync failures PowerShell can be used to proactively monitor synchronization health References Azure SQL Data Sync Error Monitoring GitHub Repository What is SQL Data Sync for Azure?138Views0likes0Comments