azure virtual machines
39 TopicsExpanding access to specialized GPU infrastructure through Dapple and Azure
Enterprise AI has entered a new phase. For much of the past decade, the challenge was building enough compute for machine learning. Today, organizations need platforms for foundation model training, fine-tuning, large-scale inference, agentic systems, and enterprise AI. As these workloads grow in scale and sophistication, the infrastructure supporting them is undergoing a fundamental transformation. The defining characteristic of modern AI infrastructure is no longer compute alone. It is topology. Training state-of-the-art AI models requires coordinated communication across hundreds or thousands of accelerators. Performance increasingly depends on how GPUs are interconnected, how data moves across the network fabric, and how efficiently distributed systems synchronize at scale—making network architecture as critical as compute performance. This shift is driving purpose-built AI infrastructure built around tightly coupled GPU fabrics, accelerated networking back-end interconnects, specialized storage architectures, and operational models that treat physical topology as a first-class concern. The challenge is turning this infrastructure into AI production without creating a separate operational domain or adding complexity for platform teams, application developers, and infrastructure operators. A new approach to scaling purpose-built AI infrastructure Microsoft is expanding access to purpose-built GPU capacity through infrastructure partners, including Dapple. Customers can use this specialized infrastructure within the Azure environment they already rely on to operate and govern their workloads. Through our collaboration, Dapple’s dedicated, topology-aware GPU infrastructure (Dapple Private AI Cloud | Microsoft Marketplace) is integrated into an Azure-native operating model that preserves Azure governance, security, and operational consistency. This model for purpose-built AI infrastructure can benefit any organization running compute-intensive AI workloads, including large-scale pre-training, fine-tuning, and distributed inference. Why purpose-built AI infrastructure matters AI workloads place demands on infrastructure that differ fundamentally from traditional enterprise applications. Conventional cloud architectures support a broad range of workloads across diverse infrastructure pools. Large-scale AI training environments, by contrast, depend on highly deterministic infrastructure characteristics, including GPU proximity, network topology, bandwidth consistency, and low-latency communication across thousands of accelerators. As model sizes continue to grow, the efficiency of the underlying GPU fabric becomes a critical determinant of training performance, infrastructure utilization, and overall time-to-results. For this reason, many AI deployments are increasingly built around purpose-designed GPU clusters featuring: Fixed infrastructure topology Dedicated InfiniBand fabrics High-bandwidth, low-latency communication paths Topology-optimized storage architectures Rack-scale and cluster-scale operational boundaries These systems are designed as integrated AI platforms rather than collections of independent compute nodes. Purpose-built GPU infrastructure is organized around validated cluster blocks: groups of compute, network, and related resources managed as a single topology, readiness, and maintenance boundary within InfiniBand fabric domains. Kubernetes nodes remain workload-scheduling objects, while cluster blocks represent the infrastructure unit on which distributed-job performance and availability depend. Figure 1 highlights an important distinction between traditional cloud infrastructure and modern AI systems. In conventional environments, compute resources are often treated as interchangeable units. Distributed AI workloads operate differently. GPU placement, rack boundaries, InfiniBand connectivity, and cluster block relationships can directly influence training throughput, communication efficiency, and overall job completion time. Physical topology therefore becomes a first-class operational consideration. The scheduler must account not only for resource availability, but also for how GPUs, racks, fabric domains, and cluster blocks relate to one another. Extending Azure beyond traditional cloud boundaries Addressing this challenge requires more than connecting specialized AI infrastructure to Azure. Purpose-built infrastructure must operate as a natural extension of the Azure environment, with the governance, security, and operational experience customers already use. This is where Azure and enterprise AI clouds such as Dapple are taking a different approach. Rather than treating large-scale GPU clusters as isolated infrastructure islands, the architecture extends the Azure operational model into dedicated AI environments. Customers can continue using familiar Azure governance frameworks, security models, and operational tools while leveraging infrastructure specifically optimized for large-scale AI workloads. The result is an architecture that combines two complementary capabilities: Purpose-built AI infrastructure optimized for topology-aware GPU workloads An Azure-native operational experience that preserves governance, security, and lifecycle consistency This model enables organizations to focus on AI innovation without creating a separate operational domain for their most demanding AI infrastructure. The role of Azure Kubernetes Service as the operational control plane As AI infrastructure evolves, the role of Kubernetes is evolving alongside it. Kubernetes has become the dominant platform for orchestrating cloud-native applications, AI services, and distributed workloads. Increasingly, it is also becoming the operational abstraction layer that enables organizations to manage heterogeneous infrastructure through a consistent interface. Azure Kubernetes Service (AKS) plays a critical role in this evolution. In the Azure and Dapple architecture, AKS serves as the primary operational control plane for AI workloads running on purpose-built GPU infrastructure. The physical infrastructure remains optimized around the realities of large-scale AI systems, including GPU topology, InfiniBand fabrics, hardware maintenance domains, and infrastructure lifecycle management. At the same time, platform teams continue to interact through familiar Kubernetes constructs for workload deployment, scheduling policies, governance, and lifecycle management. Organizations gain access to infrastructure designed specifically for modern AI workloads while preserving the operational consistency of a Kubernetes-based platform. In practice, enterprises rarely operate a single orchestrator. Kubernetes provides the common substrate, but the layers above it differ by team: batch schedulers for large training runs, workflow engines for data and fine-tuning pipelines, and internal control planes built around a specific operating model. Many organizations run several of these concurrently. For this reason, orchestration is best treated as a customer-owned concern. The infrastructure layer remains responsible for presenting consistent topology, readiness, and lifecycle semantics to whichever orchestrators an organization already operates. Extending Kubernetes into topology-aware infrastructure While Kubernetes excels at abstracting infrastructure, large-scale AI systems frequently require orchestration platforms that understand physical topology, maintenance boundaries, network fabrics, and hardware relationships. Simply exposing GPUs to a scheduler is no longer sufficient. Infrastructure operations must account for cluster blocks, fabric domains, rack boundaries, node recovery workflows, and physical lifecycle management activities that do not naturally exist within traditional Kubernetes environments. To bridge this challenge, Azure and Dapple are collaborating on an architecture that extends Kubernetes operations into topology-aware AI infrastructure while maintaining a clear separation between workload intent and infrastructure intent. Within this model, AKS remains the authoritative control plane for Kubernetes operations. Platform teams continue to leverage: Kubernetes APIs GitOps workflows Policy management Application lifecycle operations Multi-cluster governance AI workload orchestration At the infrastructure layer, Dapple maintains awareness of: Cluster-block composition GPU fabric topology Network-domain relationships Hardware lifecycle operations Infrastructure maintenance events Recovery and repave workflows The Dapple Operator serves as the integration layer between these domains. Rather than exposing infrastructure complexity directly to platform teams, the operator translates Azure-native operational intent into topology-aware infrastructure actions while synchronizing infrastructure state back into the Kubernetes environment. When hardware maintenance, node replacement, cluster recovery, or lifecycle events occur, the operator coordinates state transitions across both layers, helping ensure that infrastructure operations and workload operations remain aligned. FlexNode connects external workers to AKS, while the Dapple Operator synchronizes cluster block identity, topology, fabric health, maintenance intent, and rejoin evidence with the underlying Dapple infrastructure. This architecture reflects an important design principle: AKS remains responsible for workload intent, while Dapple remains responsible for infrastructure intent. The result is a unified operational model that preserves the architectural characteristics of purpose-built AI infrastructure while enabling Azure-native operations. Learn more Dapple Private AI Cloud | Microsoft Marketplace Dapple | The Enterprise OS Cloud859Views2likes0CommentsSafely Migrating Terraform Managed Disks on Azure Using Stable Keys and Copilot
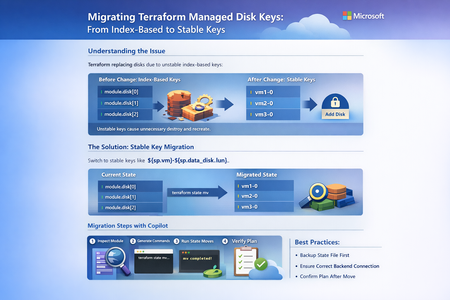
The Root Cause: Index-Based "for_each" Keys: Many Terraform modules flatten VM and disk definitions into a list and use the list index as the for_each key: for_each = { for index, sp in local.managed_disks : index => sp } This pattern looks harmless, but the index is not stable: Adding a disk to one VM shifts downstream indices Reordering environment JSON changes flatten order Terraform treats shifted indices as new resources The result: Terraform plans to destroy and recreate all affected managed disks—even though nothing changed in Azure. Why This Is Especially Risky on Azure: Azure managed disks are often: Attached to stateful application tiers Used for databases, middleware, or batch workloads Deployed across zones for resiliency A forced disk replacement can mean: Data loss Extended outages Failed change windows This makes state stability a first-class design concern—not an implementation detail. The Stable Key Pattern: The fix is conceptually simple: use a domain-stable identifier for each disk. A proven pattern is: "${sp.vm}-${sp.data_disk.lun}" This key is: Deterministic Independent of ordering Human-readable Stable across environments Example: VM LUN Stable Key vm1 0 vm1-0 vm1 1 vm1-1 vm2 0 vm2-0 Once applied, adding a new disk results in exactly one new resource, with zero churn. The Migration Challenge: Terraform State: Changing for_each keys alone is not enough. Terraform tracks resources by their state address, not by Azure resource ID. When keys change, Terraform believes: “The old disks were deleted, and new ones must be created.” To prevent this, we must move the state, not recreate the resource. That is where terraform state mv comes in. Automating the Migration with GitHub Copilot Skills: To remove risk and human error, the team created a reusable Copilot skill for managed disk key migration. What the Skill Does: Inspects Terraform modules for index-based for_each Reads environment JSON files (such as ALZ variable abstractions) Reconstructs the exact flatten order used by Terraform Generates precise terraform state mv commands This ensures: No guessing No manual address mapping No production surprises The skill is stored directly inside the repository under .github/skills, making it: Discoverable Versioned Shareable across teams Example: Generating State Move Commands: Based on environment JSON, Copilot can generate commands like: terraform state mv \ 'module.managed_disk_windowsvm_app["0"]' \ 'module.managed_disk_windowsvm_app["vm1-0"]' This is repeated deterministically for every existing disk—before any plan or apply. Recommended Migration Workflow: Confirm clean state terraform plan shows no pending changes Update the module Replace index-based keys with stable keys Back up the state Especially critical with remote backends (Azure Storage) Run terraform state mv Only after terraform init is connected to the correct backend Re-run plan Existing disks should show no changes Add new disks safely Terraform creates only the new disk CI/CD and Remote Backend Considerations: A critical finding from this migration: terraform state mv always modifies the currently initialized backend. In pipeline-driven environments: Ensure the correct environment is initialized Run migrations once per environment Never merge stable-key code before migrating all environments Failing to align code and state can cause disk destruction in production. Key Takeaways: Index-based for_each keys are unsafe for long-lived Azure disks Stable keys such as vm-lun eliminate accidental resource churn State migration is mandatory—not optional Copilot skills are powerful for institutionalizing safe patterns Small Terraform design choices can have enterprise-scale impact Closing Thoughts: This pattern is broadly applicable beyond disks—to NICs, extensions, and any resource where identity must outlive ordering. By combining: Stable Terraform design State-aware migrations GitHub Copilot automation Teams can make infrastructure changes boring again—and that is the ultimate reliability goal.277Views0likes0Comments
CI/CD as a Platform: Shipping Microservices and AI Agents with Reusable GitHub Actions Workflows
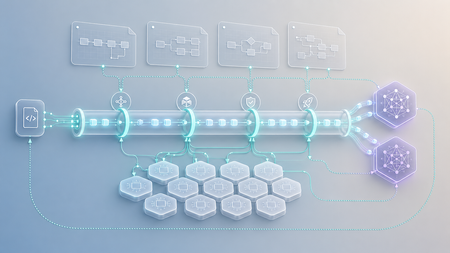
The Architecture Two repositories. Clear ownership. No duplicated logic. The platform repo owns all delivery logic — reusable, versioned workflows callable by any application team. The application repo is intentionally thin: one workflow file that calls the platform via GitHub's workflow_call mechanism. ci-platform/ ← owned by platform team .github/workflows/ test-python.yml build.yml deploy.yml evaluate-agent.yml ← added for AI fastapi-app/ ← owned by application team .github/workflows/ release.yml ← calls ci-platform workflows src/ Dockerfile workflow_call lets one workflow invoke another across repositories. The application passes inputs; the platform owns the implementation. Same contract as an API. The pipeline moves through four stages: Test → Build → Deploy Staging → Deploy Production. One image built once, promoted immutably across environments. The Git SHA is the image tag — every running container traces to a specific commit. Azure infrastructure: ACR (image store) + Azure Container Apps (managed runtime), provisioned via Bicep and deployed to separate resource groups for staging and production. Platform Repo — Reusable Workflows Three workflows. One infrastructure file. Workflow Responsibility test-python.yml Install dependencies and run tests build.yml Build Docker image and push to ACR deploy.yml Deploy a specific image to a specific environment test-python.yml name: test-python on: workflow_call: jobs: test: runs-on: ubuntu-latest steps: - uses: actions/checkout@v4 - uses: actions/setup-python@v5 with: python-version: "3.11.9" - run: pip install -r requirements.txt - run: pytest Python version is pinned to 3.11.9 — not a floating 3.11. Every service tests against an identical runtime. The workflow_call trigger makes this unreachable except via uses: — it cannot be triggered directly. build.yml name: build on: workflow_call: outputs: image_tag: value: ${{ jobs.build.outputs.image_tag }} jobs: build: runs-on: ubuntu-latest outputs: image_tag: ${{ steps.meta.outputs.tag }} permissions: id-token: write contents: read steps: - uses: actions/checkout@v4 - id: meta run: echo "tag=${GITHUB_SHA}" >> $GITHUB_OUTPUT - uses: azure/login@v2 with: client-id: ${{ secrets.AZURE_CLIENT_ID }} tenant-id: ${{ secrets.AZURE_TENANT_ID }} subscription-id: ${{ secrets.AZURE_SUBSCRIPTION_ID }} - run: az acr login --name ${{ secrets.ACR_NAME }} - run: | docker build -t ${{ secrets.ACR_LOGIN_SERVER }}/app:${{ github.sha }} . docker push ${{ secrets.ACR_LOGIN_SERVER }}/app:${{ github.sha }} Key design decisions: id-token: write — enables OIDC-based Azure authentication. No long-lived secrets. GitHub mints a short-lived token at runtime; Azure trusts it via federated identity. Credentials never stored. ${GITHUB_SHA} as image tag — every container is traceable to its exact source commit. image_tag output — the SHA flows downstream to deploy jobs without being hardcoded anywhere. deploy.yml name: deploy on: workflow_call: inputs: environment: required: true type: string image_tag: required: true type: string app_name: required: true type: string jobs: deploy: runs-on: ubuntu-latest environment: ${{ inputs.environment }} steps: - uses: azure/login@v2 with: client-id: ${{ secrets.AZURE_CLIENT_ID }} tenant-id: ${{ secrets.AZURE_TENANT_ID }} subscription-id: ${{ secrets.AZURE_SUBSCRIPTION_ID }} - run: | az containerapp update \ --name ${{ inputs.app_name }} \ --resource-group ${{ secrets.AZURE_RESOURCE_GROUP }} \ --image ${{ secrets.ACR_LOGIN_SERVER }}/app:${{ inputs.image_tag }} environment: ${{ inputs.environment }} is the key line. It binds the job to a GitHub Environment at runtime, meaning all protection rules — required reviewers, wait timers, deployment policies — apply automatically based on what the caller passes. One workflow handles every environment. No hardcoded logic. Azure Infrastructure — Bicep Two resources. One file. Deployed twice (staging and production) into isolated resource groups. param location string = resourceGroup().location resource acr 'Microsoft.ContainerRegistry/registries@2023-01-01-preview' = { name: 'myregistry' location: location sku: { name: 'Basic' } } resource containerApp 'Microsoft.App/containerApps@2023-05-01' = { name: 'my-app' location: location identity: { type: 'SystemAssigned' } properties: { configuration: { ingress: { external: true targetPort: 8000 } } } } // Grant the Container App's managed identity permission to pull images from ACR var acrPullRoleId = '7f951dda-4ed3-4680-a7ca-43fe172d538d' resource acrPullAssignment 'Microsoft.Authorization/roleAssignments@2022-04-01' = { name: guid(acr.id, containerApp.id, acrPullRoleId) scope: acr properties: { roleDefinitionId: subscriptionResourceId('Microsoft.Authorization/roleDefinitions', acrPullRoleId) principalId: containerApp.identity.principalId principalType: 'ServicePrincipal' } } ACR stores every image tagged with its Git SHA. Both environments pull from the same registry — same artifact, guaranteed. external: true — Container Apps auto-provisions a public FQDN and TLS certificate. targetPort: 8000 — must match the --port in the Dockerfile CMD. identity: { type: 'SystemAssigned' } — gives the Container App a managed identity at provisioning time acrPullRoleId — the built-in AcrPull role ID, scoped to the ACR resource acrPullAssignment — binds the role to the Container App's identity so it can pull images without a stored password az deployment group create --resource-group rg-ciplatform-staging --template-file infra/main.bicep az deployment group create --resource-group rg-ciplatform-production --template-file infra/main.bicep OIDC setup (run once): az ad app create --display-name "github-actions-platform" az ad app federated-credential create \ --id <app-id> \ --parameters '{ "name": "github-actions", "issuer": "https://token.actions.githubusercontent.com", "subject": "repo:your-org/fastapi-app:ref:refs/heads/main", "audiences": ["api://AzureADTokenExchange"] }' Required GitHub secrets: AZURE_CLIENT_ID, AZURE_TENANT_ID, AZURE_SUBSCRIPTION_ID, AZURE_RESOURCE_GROUP, ACR_NAME, ACR_LOGIN_SERVER Application Repo — Release Workflow The application's entire CI/CD surface is one file: name: release on: push: branches: [main] permissions: id-token: write contents: read jobs: test: uses: ns-github-design/ci-platform/.github/workflows/test-python.yml@v2 build: needs: test uses: ns-github-design/ci-platform/.github/workflows/build.yml@v2 secrets: inherit deploy-staging: needs: build uses: ns-github-design/ci-platform/.github/workflows/deploy.yml@v2 with: environment: staging image_tag: ${{ needs.build.outputs.image_tag }} app_name: my-app-staging secrets: inherit deploy-prod: needs: [build, deploy-staging] uses: ns-github-design/ci-platform/.github/workflows/deploy.yml@v2 with: environment: production image_tag: ${{ needs.build.outputs.image_tag }} app_name: my-app-prod secrets: inherit The @v2 tag pins to a specific platform version. Application teams are insulated from breaking changes; platform teams can ship improvements independently. image_tag flows from build → deploy-staging → deploy-prod as a single SHA — one artifact, promoted immutably. The FastAPI app exposes a /version endpoint that surfaces GITHUB_SHA and APP_ENV as runtime values, making deployment verification trivial without inspecting container logs: app.get("/version") def version(): return { "version": os.getenv("GITHUB_SHA", "dev"), "environment": os.getenv("APP_ENV", "local") } The Dockerfile base image (python:3.11.9-slim) intentionally matches the platform's test-python.yml runtime — the same Python version runs in CI and in production, eliminating an entire class of environment-specific failures. Why AI Breaks This Model The platform above is complete for deterministic software. AI agents break its core assumption. Characteristic Traditional Software AI / Agent Systems Behavior Deterministic Probabilistic Definition of success Binary pass/fail Continuous score Change surface Source code Prompt + model + data Validation method Unit tests Semantic evaluation Failure modes Exceptions, wrong output Hallucination, drift, bias A unit test can assert that code returns the right value. It cannot assert that an LLM response is accurate, factual, or safe. A prompt change that silently degrades quality will pass every existing test and deploy cleanly. The pipeline needs a new gate: evaluation. Evaluation as a Deployment Gate What testing is to code, evaluation is to AI. We add a fourth reusable workflow — evaluate-agent.yml — to the platform repo. It runs before any deployment. # ci-platform/.github/workflows/evaluate-agent.yml name: evaluate-agent on: workflow_call: inputs: score_threshold: required: false type: number default: 0.8 outputs: score: value: ${{ jobs.evaluate.outputs.score }} jobs: evaluate: runs-on: ubuntu-latest outputs: score: ${{ steps.eval.outputs.score }} steps: - uses: actions/checkout@v4 - uses: actions/setup-python@v5 with: python-version: "3.11.9" - run: pip install -r eval/requirements.txt - id: eval env: AZURE_OPENAI_ENDPOINT: ${{ secrets.AZURE_OPENAI_ENDPOINT }} AZURE_OPENAI_KEY: ${{ secrets.AZURE_OPENAI_KEY }} AZURE_OPENAI_DEPLOYMENT: ${{ secrets.AZURE_OPENAI_DEPLOYMENT }} run: | score=$(python eval/eval.py) echo "score=$score" >> $GITHUB_OUTPUT echo "$score" > eval_score.txt python -c "import sys; sys.exit(0 if float('$score') >= ${{ inputs.score_threshold }} else 1)" - name: Upload evaluation score if: always() uses: actions/upload-artifact@v4 with: name: eval-score path: eval_score.txt If the score falls below the threshold, the step exits non-zero. GitHub cancels all downstream jobs. No deployment occurs. The score is logged as a build artifact. eval/requirements.txt openai>=1.0.0 eval/dataset.json A minimal golden dataset — inputs the agent should handle, paired with the expected response used by the judge to score quality: [ { "input": "What is the return policy?", "expected": "Items can be returned within 30 days of purchase with a receipt." }, { "input": "How do I reset my password?", "expected": "Click 'Forgot Password' on the login page and follow the email instructions." }, { "input": "What are your support hours?", "expected": "Support is available Monday to Friday, 9am to 6pm EST." } ] Extend this file as the agent's scope grows. The pipeline scores every entry on every run — regression is caught automatically. eval.py — What Evaluation Looks Like This is a complete, runnable LLM-as-judge implementation. It calls your agent, then asks an Azure OpenAI model to score each response against the expected answer. import json import os from openai import AzureOpenAI client = AzureOpenAI( azure_endpoint=os.environ["AZURE_OPENAI_ENDPOINT"], api_key=os.environ["AZURE_OPENAI_KEY"], api_version="2024-02-01", ) JUDGE_PROMPT = """\ You are a strict evaluator. Given an agent response and an expected answer, score the response from 0.0 to 1.0 based on accuracy and relevance. Return only a float between 0.0 and 1.0. No explanation. No other text.\ """ def call_agent(user_input: str) -> str: """Call your agent. Replace this with your actual agent endpoint or SDK call.""" system_prompt = open("prompts/system_v1.txt").read() response = client.chat.completions.create( model=os.environ["AZURE_OPENAI_DEPLOYMENT"], messages=[ {"role": "system", "content": system_prompt}, {"role": "user", "content": user_input}, ], ) return response.choices[0].message.content def score_response(response: str, expected: str) -> float: """Ask the LLM judge to score the response against the expected answer.""" result = client.chat.completions.create( model=os.environ["AZURE_OPENAI_DEPLOYMENT"], messages=[ {"role": "system", "content": JUDGE_PROMPT}, {"role": "user", "content": f"Response: {response}\nExpected: {expected}"}, ], temperature=0, ) try: return float(result.choices[0].message.content.strip()) except ValueError: return 0.0 def evaluate_agent() -> float: dataset = json.load(open("eval/dataset.json")) scores = [score_response(call_agent(s["input"]), s["expected"]) for s in dataset] return round(sum(scores) / len(scores), 4) if __name__ == "__main__": print(evaluate_agent()) Three required secrets in your GitHub repo: AZURE_OPENAI_ENDPOINT, AZURE_OPENAI_KEY, AZURE_OPENAI_DEPLOYMENT. The same Azure OpenAI resource acts as both the agent under test and the judge — swap call_agent() for your real agent SDK call when ready. Integrating the Evaluation Stage The AI application's release workflow becomes: name: release on: push: branches: [main] permissions: id-token: write contents: read jobs: test: uses: ns-github-design/ci-platform/.github/workflows/test-python.yml@v2 build: needs: test uses: ns-github-design/ci-platform/.github/workflows/build.yml@v2 secrets: inherit evaluate: needs: build uses: ns-github-design/ci-platform/.github/workflows/evaluate-agent.yml@v2 with: score_threshold: 0.85 deploy-staging: needs: evaluate uses: ns-github-design/ci-platform/.github/workflows/deploy.yml@v2 with: environment: staging image_tag: ${{ needs.build.outputs.image_tag }} app_name: my-agent-staging secrets: inherit deploy-prod: needs: [evaluate, deploy-staging] uses: ns-github-design/ci-platform/.github/workflows/deploy.yml@v2 with: environment: production image_tag: ${{ needs.build.outputs.image_tag }} app_name: my-agent-prod secrets: inherit Control flow: Test → Build → Evaluate → Deploy. A score below 0.85 blocks at the evaluate stage. Nothing reaches staging or production. The score, prompt version, model checkpoint, and dataset revision are all logged as artifacts — every release decision is auditable. Foundry Integration With evaluation gates in place, we integrate Microsoft Foundry as the AI agent runtime. Foundry provides managed agent execution, LLM-as-judge evaluation services, and live telemetry — extending the platform from delivery into observability. The platform repo gains a fourth workflow: monitor.yml, which polls Foundry for post-deployment metrics and can trigger re-evaluation if production performance degrades. Workflow Foundry Capability build.yml Model packaging & versioning evaluate-agent.yml Offline evaluation / LLM-as-judge deploy.yml Agent deployment to Foundry runtime monitor.yml Live telemetry, drift detection, re-evaluation trigger monitor.yml — Full Definition name: monitor on: workflow_call: inputs: foundry_project: required: true type: string alert_threshold: required: false type: number default: 0.75 app_name: required: true type: string environment: required: true type: string jobs: monitor: runs-on: ubuntu-latest steps: - uses: actions/checkout@v4 - uses: azure/login@v2 with: client-id: ${{ secrets.AZURE_CLIENT_ID }} tenant-id: ${{ secrets.AZURE_TENANT_ID }} subscription-id: ${{ secrets.AZURE_SUBSCRIPTION_ID }} - name: Fetch production evaluation score from App Insights id: metrics run: | score=$(az monitor app-insights query \ --app ${{ secrets.APPINSIGHTS_NAME }} \ --analytics-query "customEvents \ | where name == 'agent_eval_score' \ | where tostring(customDimensions.project) == '${{ inputs.foundry_project }}' \ | where tostring(customDimensions.app) == '${{ inputs.app_name }}' \ | summarize avg(todouble(customDimensions.score)) \ | project avg_score" \ --query "tables[0].rows[0][0]" \ --output tsv 2>/dev/null || echo "1.0") echo "score=$score" >> $GITHUB_OUTPUT - name: Check score against alert threshold run: | python - <<'EOF' import sys, os score = float(os.environ["SCORE"]) threshold = float("${{ inputs.alert_threshold }}") print(f"Production score: {score} | Threshold: {threshold}") if score < threshold: print(f"::error::Score {score} is below threshold {threshold}.") print("::notice::Consider triggering re-evaluation or rolling back.") sys.exit(1) print("Score is within acceptable range.") EOF env: SCORE: ${{ steps.metrics.outputs.score }} - name: Write monitoring result to file if: always() run: echo "${{ steps.metrics.outputs.score }}" > monitor_score.txt - name: Upload monitoring result if: always() uses: actions/upload-artifact@v4 with: name: monitor-score-${{ inputs.environment }} path: monitor_score.txt The `APPINSIGHTS_NAME` secret points to the Azure Application Insights resource where your agent emits `agent_eval_score` custom events. The `foundry_project` input is logged in the step output and can be used to scope the App Insights query to a specific Foundry project namespace. The workflow queries the last average, compares against `alert_threshold`, and fails the job — blocking any downstream auto-promotion — if the score has drifted below the acceptable floor. A Foundry-aware pipeline in an agent repo: deploy-prod: needs: [evaluate, deploy-staging] uses: ns-github-design/ci-platform/.github/workflows/deploy.yml@v2 with: environment: production image_tag: ${{ needs.build.outputs.image_tag }} app_name: my-agent-prod secrets: inherit monitor: needs: deploy-prod uses: ns-github-design/ci-platform/.github/workflows/monitor.yml@v2 with: foundry_project: my-ai-agent alert_threshold: 0.75 app_name: my-agent-prod environment: production secrets: inherit Foundry telemetry feeds back into the pipeline — if production scores drift below alert_threshold, monitor.yml can open a GitHub issue, trigger a re-evaluation run, or auto-rollback via the deploy workflow. GitHub Actions owns delivery; Foundry owns runtime and observability. Together they close the loop. Advanced Practices for AI Delivery Prompts Are Code — Version Them A single token change in a system prompt can shift agent behavior as dramatically as a logic rewrite. Store prompts in git alongside code: /prompts/ system_v1.txt system_v2.txt Reference the active version explicitly in pipeline metadata and experiment.json artifacts. Re-runs of a specific commit must reproduce identical behavior — that's only possible if prompts are versioned and immutable per release. `eval.py` reads `prompts/system_v1.txt` as the system prompt at evaluation time. A minimal starting point: You are a helpful customer support assistant. Answer questions accurately and concisely. If you do not know the answer, say so. Do not fabricate information. Commit this file alongside code. Change the filename (`system_v2.txt`) when the prompt changes — never edit in place. Treat (Code, Prompt, Model) as One Release Unit For AI systems, rollback has three dimensions: Dimension Rollback Mechanism Code Redeploy previous container image Prompt Revert to earlier prompt file in git Model Reuse prior checkpoint or model deployment ID Version them together as a single immutable release triple. GitHub tags + evaluation artifacts = auditable rollback point. Continuous Evaluation After Deployment The evaluation gate fires pre-deployment. But model APIs update, data distributions shift, and agent quality can degrade in production without any code change. Schedule post-deployment evaluation jobs: on: schedule: - cron: "0 */6 * * *" # every 6 hours Feed live production traces back into the evaluation dataset. If scores fall below threshold, auto-trigger re-evaluation or alert. This closes the MLOps loop: deploy → monitor → evaluate → re-deploy or rollback. Governance by Design Combine GitHub's native controls with Foundry's policy hooks: Branch protections prevent unreviewed prompt changes from reaching main Required reviewers on the production GitHub Environment gate human approval Foundry policies restrict which teams can promote evaluated agents Minimum score thresholds are enforced in evaluate-agent.yml — not in a wiki, not in a checklist Governance embedded in code scales. Governance in documentation doesn't. Maturity Model Stage Delivery Mechanism Validation CI/CD as Automation Per-repo YAML Tests CI/CD as Product Reusable versioned workflows Tests + Approval gates CI/CD as Governance Platform repo + GitHub Environments Tests + Reviews + Traceability AI Delivery Platform Evaluation gates + Foundry runtime Semantic scoring + Drift monitoring Each stage is additive — the platform repo from stage 2 powers all subsequent stages. No rebuild required. Conclusion The same architectural principle scales from microservices to AI agents: centralize delivery logic, version it, expose it as a reusable interface. What changes for AI is the definition of "correct" — from binary pass/fail to continuous behavioral scoring. The platform built here enforces that at every layer: evaluate-agent.yml blocks probabilistic quality failures before deployment Foundry's LLM-as-judge and telemetry close the observability loop post-deployment Versioned (code, prompt, model) triples make every release reproducible and rollback-safe Governance is code, not process The result isn't a better pipeline. It's a delivery system that treats AI behavior as a first-class engineering constraint.1.3KViews0likes0Comments
Entra ID Login via Azure Bastion Fails After VM Recreation
However, you may encounter a confusing scenario where: An Entra ID user attempts to sign in to a Windows VM through Azure Bastion The connection appears to succeed in the backend logs The session is disconnected within a second Bastion returns a generic sign-in error to the user At first glance, everything looks correctly configured. Terraform applies cleanly, permissions are in place, and Bastion access is allowed. This blog walks through a real-world troubleshooting journey that exposes a non-obvious Entra ID device registration issue, explains the root cause, and provides a clean resolution. Scenario We manage Azure infrastructure using Terraform, with Entra ID login enabled via the AADLoginForWindows VM extension. Azure Bastion is used to provide secure, inbound‑port‑free access to Windows VMs. After deleting and recreating a Windows VM with the same hostname, Entra ID login through Bastion started failing. Traditional local admin login worked, but Entra ID–based access did not. Key Terraform Configuration The VM was deployed with Entra ID login enabled using Infrastructure as Code: AADLoginForWindows extension Role assignments: Virtual Machine Administrator Login or Virtual Machine User Login Bastion configured for Entra ID authentication From an IaC perspective, nothing was misconfigured. Symptoms Observed The issue manifested in multiple subtle ways: Bastion login using Entra ID fails with a generic error message Backend logs show authentication success Session disconnects immediately after connection establishment Running the following on the VM: dsregcmd /status shows: IsDeviceJoined: NO This explains why Entra ID authentication succeeds initially but instantly fails during session creation. Root Cause Explained When a Windows VM is joined to Microsoft Entra ID, a device object is created in Entra ID, keyed to the VM’s Windows hostname. If the VM is later deleted without removing the device object, and a new VM is recreated using the same hostname, the Entra ID join process fails silently due to a hostname collision. Key points: The old Entra ID device object still exists The new VM cannot complete Entra ID registration Bastion authentication succeeds, but authorization fails immediately The VM therefore disconnects the session This is why backend logs look “successful” even though the user experience is not. Resolution Steps Identify the Stale Device Object Navigate to: Azure Portal → Microsoft Entra ID → Devices → All devices Search for the VM hostname (for example, VM01) Open the device object and note the Object ID Confirm it matches the Object ID referenced in the extension logs. Delete the Stale Device This does not delete the VM or any Azure resources. Only the Entra ID registration is removed. You can delete the device using either method: Azure Portal Select the device Choose Delete Azure CLI az ad device delete --id <ObjectId> Retry the Entra ID Join Restart the VM or restart the AADLoginForWindows extension Wait for the extension to re‑execute Verify the join status: dsregcmd /status Expected output: IsDeviceJoined: YES Retry Bastion login using Entra ID The session should now remain connected and function normally Why This Issue Is Easy to Miss Azure VM deletion does not automatically clean up Entra ID device objects Terraform recreations with identical hostnames are common in non‑prod environments Bastion logs are not explicit about device join failures Authentication succeeds, but authorization fails post‑connection Key Takeaways Deleting a device from Microsoft Entra ID does not impact the VM itself Always check for stale Entra ID device objects when reusing hostnames dsregcmd /status is the fastest way to validate join state AADLoginForWindows extension logs are critical for root cause analysis Bastion disconnections immediately after login often indicate identity‑level issues, not networking problems References Troubleshoot Microsoft Entra ID device registration issues Manage and delete stale Entra ID devices AADLoginForWindows extension documentation613Views0likes0CommentsDemystifying On-Demand Capacity Reservations
About On-Demand Capacity Reservations Introducing the “parking garage” metaphor There are dozens of VM types available in Azure which span multiple generations of CPU across vendors and architectures. Within each Azure region are datacenters hosting pools of hardware which runs Azure services, such as virtual machines, of those types. As VMs are started and stopped by customers there is a constant ebb and flow of available capacity to run each type of VM within the region. Available capacity is driven by the rhythms of the business day, which creates variations in utilization on an hour-to-hour and even minute-to-minute basis. Longer cycles of demand such as holiday seasons, school calendars and other real-world events are also a factor. When you command an Azure Virtual Machine (VM) to start, the Azure Resource Manager (ARM) – the “engine” that manages resources in the Microsoft cloud -- needs to do a few things to make it happen. The most important of these is that it needs to identify hardware within the target region with sufficient capacity to bring the desired type and size of VM online at that moment in time. If ARM finds space for the desired VM size, the VM starts normally. However, if there is no room to start the desired VM, you will see an error similar to this one: This process of finding a place to start up an Azure VM has a lot of similarities to finding a place to park a vehicle. Parking facilities are built to handle typical demand for their location. If something is going on nearby, such as a large sporting event, which causes the need for parking to be much higher than normal then you might be out of luck when you try to find a spot because the garage is simply full. During periods of high demand in Azure this can result in VMs failing to start simply because there is nowhere to run them at that particular moment. If this happens to a VM which needed to be stopped for a configuration change or other reasons this can cause impact to your environment which you certainly want to avoid. On-Demand Capacity Reservations Azure has a resource called an On-Demand Capacity Reservation, or ODCR, which allows you to reserve a spot for a VM in the appropriate hardware within a region for a specific VM size. This is similar to “owning" a parking space: It’s a reserved place exclusively for the use of a specific VM. At a high level, the way this works is that you create an ODCR which matches the Azure region, availability zone and specific VM type, such as for a VM of type D16s_v6 in availability zone 2 of the Canada Central Azure region. Once the reservation is created, an Azure VM that matches that configuration can be associated to it so the VM now “owns” that “parking space”. This gives that VM priority over others of the same type when it needs to start because it already has a “parking space” assigned to it that can't be used by another one. More detail about VM startup Before we get further into what ODCRs are and how they work, it’s important to know a few more things about starting up a VM. Azure does not provide an explicit SLA for VM startup for virtual machines without an ODCR. The process of finding a hypervisor slot to boot up a VM is purely a “best effort” action on Azure’s part. Having quota headroom does not help with VM startup. Quota in Azure is your "credit limit" for creating VMs. Quota grants permission to create up to a certain number of cores’ worth of Virtual Machines from a particular family (like Ds_v6) but has no effect on whether you can actually start the machine once it’s created. Similarly, having a Reserved Instance purchase or a Savings Plan for a particular number of cores of a given VM family does not have any impact on the ability to start a VM either. These mechanisms are a discount mechanism only where the customer pre-pays for a certain amount of VM cores to be running 24x7 at a discounted rate. Assigning an ODCR to a virtual machine applies a formal SLA on startup for it. VMs with ODCRs get priority over ones that don’t so the likelihood of a successful startup is much higher for VMs that have one compared to those that do not, especially during times when Azure is experiencing a period of high demand for that particular VM type. The actual language of the ODCR SLA can be found in Microsoft's Service Level Agreements for Online Services document which can be downloaded from the linked site. Cost Implications of ODCRs These are the key points that you need to know about how billing works for ODCRs: The compute cost for the parking space capacity reservation for a VM is exactly the same as a running VM of the same size. There is no “double billing” for a VM to have an ODCR associated with it. Billing for the ODCR starts immediately if the quantity of reserved "parking spaces" is greater than zero. Stopping a VM that has an ODCR associated with it does not impact cost. This is because the ODCR is holding the reserved hypervisor slot even if the VM is not running. Having a Reserved Instance purchase or Savings Plan which covers the same scope as the ODCR means that the VM will be billed at the discounted rate. Are there any cases where using ODCRs results in paying more for a VM? There are two cases that I’ve identified where you pay for two ODCRs for the same VM. First, if you are using Azure Site Recovery to protect a VM in Azure by replicating it to another location, you have the option to associate the remote replica of the VM with a capacity reservation. This helps ensure that the replica will start when it’s called upon because it has a pre-allocated spot reserved for it. In this situation, if the original VM also is associated with an ODCR you are paying for both the original (running) VM and also for the reservation being held for its replica. Second, and similarly, when setting up replication for a VM that is preparing for migration into Azure via Azure Migrate, you can associate a capacity reservation with the replica for similar reasons to the above ASR example -- to ensure that the VM will start when its migrated replica is activated. If the source machine is also in Azure then you are again paying twice for the same machine. When should I use them? Capacity Reservations are an important element when designing for resiliency. They help ensure that VMs will be online when needed, even if they have to be shut down for some reason. For example, there was an incident where a customer had to shut down a VM that was serving as a firewall appliance to make an adjustment to its configuration and it failed to start up afterwards because of a capacity-related failure. This resulted in significant impact due to the loss of connectivity for systems dependent on the firewall for connectivity until they were able to bring it back online. Based on field experience and resiliency assessments, applying ODCRs to VMs that must be available 24x7 is strongly recommended. Examples of this include key functions like AD domain controllers, application servers and database servers. Also, any VM-based appliances that may be running as firewalls, load balancers or other infrastructure-support services should be considered as well. Microsoft offers assessments which review a workload for gaps that impact resiliency in many dimensions including outages in Azure. These assessments include checks for the presence of capacity reservations and will report any VM’s that do not have them as a high-risk finding. Not all VM stops in Azure are voluntary Even if you are careful to never stop a VM yourself it can sometimes happen. Not every shutdown of a VM in Azure is user-initiated. Involuntary shutdowns are rare but they can occur due to predictive hardware failures or other events which ARM will respond to by stopping the VM in order to move it out of harm's way. Creating On-Demand Capacity Reservations This section covers the components of an ODCR, the process of creating them and why creating them can fail. Components of an ODCR: An ODCR has two components to it. The first part is a Capacity Reservation Group (CRG) which is simply a "bucket" for any number of capacity reservations. To create a CRG you only need to provide its name, the region that it will be used for and which availability zones within that region it will have access to. The second -- and more important -- component is the actual Capacity Reservation which is created within a CRG. The capacity reservation requires: The name of the reservation. Including the VM size and other details in the name is useful to reduce ambiguity. An example could be “Zone1_D16s_v5” The specific VM size the reservation is for, such as “D16s_v5” The availability zone of the reservation. You can also create a regional reservation, where the VM is “zoneless”, as well. The number of parking spaces instances that the reservation holds. ODCRs can be created via the Azure portal, from the command line using PowerShell or the Azure CLI or deployed through IaC tools such as Bicep or Terraform. CRGs also can also be shared across subscriptions, which allows a CRG created and managed in one subscription to be utilized by VMs in a different subscription. When the ODCR is created, if the number of instances it contains is higher than zero then ARM will attempt to allocate the desired number of instances of the specified VM type in the target region/zone. If there is capacity available for this then the creation succeeds and you can move on to associating machines with it to give them the protection of the ODCR. If creating the ODCR is unsuccessful, the cause can be a variety of things, including: No open hypervisor slots for the desired VM in the target location – the “parking lot” was full at the moment the request was submitted. This can result from outages within Azure that reduce capacity as well as demand pressure. There is insufficient quota in the subscription to claim the necessary number of VM cores for the reservation in the region. The VM type is simply not available in the target region or AZ. Since not all Azure regions are provisioned with identical hardware this can be the cause, especially for VM types other than the popular D, E and F series machines. A restriction is applied to the subscription, zone or region that blocks creation of the reservation for some reason. What you can do if creating an ODCR fails Some things that may help if creating a capacity reservation fails and you know that quota or other restrictions are not a factor are below. Not coincidentally, these are the same recommendations that you should try when a VM fails to start because the same ARM action – finding and allocating hardware with free capacity to start the VM – is taking place. IN GENERAL, creating an ODCR outside of business hours has a higher probability of success. Demand for Azure services typically drops off at the end of the business day where the region is located. Consider using a different VM type, availability zone or a different Azure region. A script or other automation that retries at intervals until the reservation succeeds in claiming the desired number of spots can help, though it can take an unknown amount of time before this works. It may need to run for days or even weeks before it succeeds. Submitting a support ticket will create visibility to your situation from Microsoft. If the root cause is something other than capacity, support can identify that cause and provide guidance on how to resolve it. If the issue truly is a capacity squeeze, the ability of support to help get the reservation created is extremely limited because the support folks, while helpful, are not able to create capacity where none exists. In this case the support teams will usually refer you to the three options above. Protecting a VM with an ODCR Once you have the ODCR created, applying it to a VM is straightforward. To do this from the portal, open the configuration tab on the VM’s screen. Then scroll to the bottom of the panel that appears to find the “Capacity reservations” section. Select “Capacity reservation group” from the list. The list of capacity reservation groups that match the VM will appear in a drop-down menu below. Select the CRG that the VM should use and click “Apply”. If you are using an Infrastructure-as-Code approach such as Bicep or Terraform, an Azure VM is linked to a CRG by specifying the resource ID of the CRG in the appropriate property on the VM definition. Impact of associating a virtual machine with an ODCR: If the VM is not running then the change takes effect immediately. If the VM is running and has no zone assignment (a “regional” VM) then it must be stopped and restarted for the protection of the ODCR to apply. If the VM is running and has a zone assignment then the change is immediate and there is no disruption to the VM. Important note for Terraform users: There appears to be a critical behavior difference between how the AzureRM provider and the Azapi provider handle this change. If you use the AzureRM provider, Terraform will always perform an immediate stop/deallocate of the VM, apply the change and then start the VM up again. The Azapi provider works as documented above. I believe this a result of how Hashicorp coded the AzureRM provider to manage Azure resources. Where an ODCR is not the right answer ODCRs are most effective when they are used to protect VMs that need to always be running because they are providing essential services. Examples include AD domain controllers, firewall or load balancer appliances, database servers, integration servers that support workflows and the like. The primary thing to keep in mind is the cost impact of the ODCRs and whether they are necessary for the service to be functioning. Environments where machines come and go frequently, such as scale in/out setups used to minimize cost, are not ideal for ODCRs. For example, if you have a pool of app servers configured for scale-out, using ODCRs to cover the entire size of the pool means you would be paying for all machines, whether they are actually online or not. A possible approach in a scale-out environment is to determine the minimum number of VMs necessary for the service to be available -- even in a degraded state -- and use an ODCR to protect that number of instances. This way you can have confidence that at least that number of machines in the pool will always be running even if an attempt to scale out fails. Working with On-Demand Capacity Reservations (and three interesting behaviors that you should know about) This section discusses some ins and outs of working with ODCRs in your environment, especially if you need to apply them to existing machines. This is a common scenario when you are attempting to improve the resiliency of a set of VMs against impacts from maintenance, outages or other situations that may cause VMs to restart. “Associated” vs “Allocated” A capacity reservation group will always have ownership of some number of "parking spots" within a region. The number that it holds is referred to as the reservation's capacity which is expressed as a number of allocated instances. When you link a VM to a CRG, the VM becomes associated with the CRG and can take advantage of the protection that it offers from matching reservations that it contains. It is possible to associate more VMs to a CRG than it has allocated capacity for. This is called overallocation. When a CRG is overallocated, the VMs associated with it are protected on a first-come-first-served basis based on when they were started. If, for example, there are four VMs associated with a CRG but the CRG only has an allocated capacity of two, the first two associated machines which were started will receive protection but the others will not. “Interesting” On-Demand Capacity Reservation behavior #1: Here is the first of three interesting behaviors that you can use to your advantage when working with ODCRs. You can add a running VM to a capacity reservation group. As mentioned previously, if the VM is zonal then the change is immediate and nondisruptive. If the VM is regional then the VM must be stopped and restarted for the change to take effect. This is conceptually different from other Azure mechanisms used for resiliency such as Availability Sets. You can only add a VM to an availability set at the time the VM is created but you can add or remove a VM from a Capacity Reservation Group at any time whether the VM is running or not. “Interesting” On-Demand Capacity Reservation behavior #2 Interesting behavior #2 is deceptively simple. When creating a reservation, you can specify a capacity (number of allocated instances) of zero. This should always succeed because Azure needs to take no action to fulfill it -- this is just a metadata adjustment for the reservation within the CRG. This seems to not be terribly useful at first glance but keep reading. “Interesting” On-Demand Capacity Reservation behavior #3 If the number of associated VMs is higher than the allocated capacity of the reservation, you can increase the capacity of the reservation to cover the running VMs. Why does this work? Because running VMs, by definition, have a parking spot hypervisor allocation already so Azure doesn’t need to find one for it -- Azure can simply link the capacity reservation to the hypervisor slot that the running VM is using. The payoff! Or, using these three behaviors to your advantage Because ODCRs are relatively new and have not yet been adopted widely, a common finding to emerge from field resiliency assessments of running workloads is that the VMs that support the workload need to have ODCRs applied to them. In large environments there may be dozens or even hundreds of VMs that need to be protected. The process for doing this can seem daunting to a technical team that is not familiar with ODCRs. Thankfully, these three behaviors make it possible to easily protect any number of running machines with a very high probability of success -- and zero disruption if they are zonal VMs -- by proceeding in this order: Create a CRG with a reservation for the region, AZ and VM type for the machine(s) that need to be covered with a quantity of zero. (Interesting behavior #2) Associate the VMs to the capacity reservation group. At this point the CRG is overallocated so the machines are not yet protected. Remember that if the VMs are regional, a restart is required to finalize the ODCR assignment. (Interesting behavior #1) Update the reservation within the CRG to increase the number of allocated instances to match the number of running VMs. (Interesting behavior #3) When the number of instances on the reservation is equal to or higher than the number of VMs associated with it, all of the associated VMs are protected and you’re done! Final thoughts This leads to a final piece of advice about working with ODCRs, especially when you know that capacity is a challenge in the target region: As a field CSA, I recommend that you bring VMs online first, then apply a capacity reservation to them. Why? If you already have a set of running VMs that need to be protected then following what seems like the obvious process: Creating a CRG, creating reservations within it for the correct number of instances and then associating the VMs with the reservation – has a risk of failure at the step of creating the ODCR because Azure needs to find and allocate additional hypervisor slots for the reservation to own. This can be challenging when there is a lot of demand for the VM type. As the example in the previous section showed, it’s much easier to protect VMs that are already online by associating them with an existing capacity reservation, even if it doesn’t have enough instances allocated to it, and then increasing the capacity of the ODCR to cover the running machines. References: On-Demand Capacity Reservations Overview Monitor the list of restrictions on VM eligibility because it changes frequently SLA Details for On-Demand Capacity Reservations Legal fine print is in the consolidated SLA for Online Services (.docx) Some details about Overallocating capacity reservations Information on creating a Capacity Reservation Group via Bicep, Terraform or ARM template.2.1KViews4likes0Comments
Migrating On-prem Windows & Linux VMs to Azure Confidential Virtual Machines via Azure Migrate
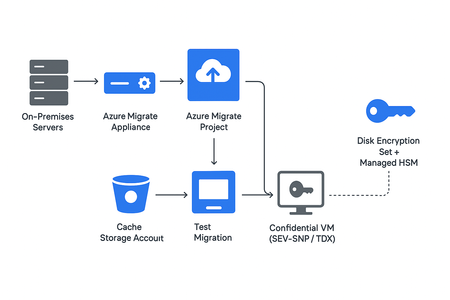
1. Executive Summary Enterprise cloud adoption increasingly prioritizes trust boundaries that extend beyond traditional infrastructure isolation. While encryption at rest and in transit are foundational, modern organizations must also ensure that data in use (data actively processed in CPU or system memory) remains protected. Azure Confidential Computing (ACC) mitigates emerging threats by enabling hardware-backed Trusted Execution Environments (TEEs). These environments isolate VM memory, CPU state, and I/O paths from Azure’s hypervisor, host operating system, and even privileged Azure administrators. Azure Confidential Virtual Machines (CVMs) bring ACC to general-purpose workloads without requiring application modification, providing: Memory encryption (per-VM keys) Isolation from the hypervisor and cloud fabric Secure VM boot with platform attestation Cryptographically enforced key release from Azure Managed HSM Lift-and-shift compatibility using Azure Migrate This whitepaper offers a complete lifecycle framework for secure migration, including governance models, deep technical implementation guidance, and operational readiness. 2. Business Drivers & Compliance Alignment 2.1 Risk & Threat Landscape Threat Category Scenario Traditional VM Protection CVM Protection Hypervisor compromise Host OS breach ❌ ✔ Isolated TEE Privileged insider Cloud admin access to guest memory ❌ ✔ SEV-SNP/TDX isolation DMA attacks PCIe-level memory scraping ❌ ✔ Memory encrypted in hardware Supply-chain compromise Pre-boot firmware tampering ⚠️ ✔ Attestation-gated boot Side-channel attacks Spectre-like memory leakage ⚠️ ✔ Strong hardware isolation 2.2 Business Outcomes Strongest possible protection for mission-critical workloads Accelerates regulated workload migration Supports Zero Trust goals: assume breach, verify explicitly Reduces privileged-access risk and insider threat profiles 3. Solution Architecture Overview 3.1 End-to-End Architecture Diagram The diagram represents an End-to-End Architecture for migrating workloads from an on-premises environment to Azure using Azure Migrate, with a strong focus on security and confidentiality. Here’s a detailed explanation of each section: On-Premises Environment: Components: Windows Servers Linux Servers These are your existing workloads that need to be migrated. Azure Migrate Appliance: Acts as a bridge between on-premises servers and Azure. Uses a private connection for secure data transfer. Azure Landing Zone: This is the target environment in Azure where migrated workloads will reside. It includes: Private Endpoints Azure Migrate – For migration orchestration. Cache Storage Account (Blob) – Temporary storage for replication data. Managed HSM (Hardware Security Module) – For cryptographic key management. Private DNS Zones privatelink.blob.core.windows.net privatelink.managedhsm.azure.net These ensure name resolution for private endpoints without exposing them publicly. Migration Workflow: Azure Migrate Project: Discover on-premises servers. Replicate workloads to Azure. Cached Replication Data → Private Blob Storage: Replication data is stored securely in a private blob before cutover. Test Migration: Performed in an isolated VNet to validate functionality before production cutover. Production Cutover: Migrated workloads run as Confidential VMs in Azure. Security Enhancements: SEV-SNP or TDX TEE: Hardware-based Trusted Execution Environments for isolation. Confidential OS + Data Disk via DES HSM Key: Ensures encryption and integrity. Attestation-Gated Boot via Managed HSM: Verifies VM integrity before booting. 4. Azure Components Category Component Purpose Migration Azure Migrate Appliance Discovery, replication, orchestration Compute Confidential VM (SEV-SNP/TDX) Secure execution environment Security Managed HSM CMK storage & attestation-gated key release Storage Cache Storage Account Replication staging via private endpoint Encryption Disk Encryption Sets CMK-bound OS/data disk encryption Networking Private Endpoints & Private DNS Fully private transport Identity Confidential VM Orchestrator Validates attestation to enable boot 5. Confidential VM Requirements 5.1 Hardware Requirements AMD SEV-SNP (DCasv6, ECasv6) Memory encryption with per-VM keys Nested page table protection RMP validation preventing host tampering Guest attestation report with measurement register integrity Intel TDX (DCesv6, ECesv6) Encryption + integrity-protected guest memory Hardware-isolated module to validate TEE launch Boot measurement and module verification 5.2 VM Configuration Requirements Generation 2 (Gen2) virtual machine UEFI + Secure Boot vTPM enabled Confidential VM security type enabled via Azure Migrate or ARM templates 5.3 Disk Requirements OS will be Confidential Disk Data disks encrypted via Disk Encryption Set (DES) DES bound to RSA-HSM keys Managed HSM with purge protection Key Release Policy requiring attestation Disk should always be Premium for all Confidential VMs, required for performance and compatibility with confidential disk encryption 6. End-to-End Migration Framework A nine-phase sequential model aligned with CAF, Azure architecture best practices, and enterprise migration standards. Phase 1: Azure Migrate - Connectivity, Private Endpoints & DNS Azure Migrate Requirements & Setup Prerequisites: Azure subscription with contributor/owner access Resource Group for Azure Migrate project and resources Replication Appliance pre-requisites Deploy Windows server 2022 as the replication appliance. Component Requirement CPU cores 16 RAM 32 GB Number of disks 2, including the OS disk - 80 GB and a data disk - 620 GB Setup Steps: Deploy Azure Migrate appliance on-premises Register appliance with Azure Migrate project Discover on-premises VMs (Windows/Linux) Click Discover → Choose a discovery method: Agent-based: Install the Azure Migrate agent on the source VMs. Agentless (vSphere/Hyper-V): Use credentials to discover VMs. Ensure all VMs to be migrated are discovered. Click Assess → Configure assessment: Target VM size: Choose Confidential VM-compatible sizes for CVMs. Target Azure region. Disk recommendations: Premium SSD or Premium SSD v2 for CVMs. Validate connectivity to private endpoints, including: Cache storage accounts Managed HSM Cache Storage Account: Cache storage accounts can use ZRS for redundancy. If ASR replication is required, use a separate LRS cache storage account. All storage must be private endpoint-enabled and encrypted with CMKs from Azure Managed HSM. Verify VMs appear in Azure Migrate project are ready for replication Required Private Endpoints: Service Endpoint Requirement Azure Migrate Yes Cache Storage Account Yes (Blob PE only) Managed HSM Yes Private DNS Zones: privatelink.blob.core.windows.net privatelink.managedhsm.azure.net privatelink.azurewebsites.net Connectivity Requirements: ExpressRoute or Site-to-Site VPN No public endpoints allowed Azure Migrate Appliance must resolve all private FQDNs Phase 2: OS Readiness Assessment Windows Workloads MBR to GPT Validation: C:\Windows\System32>MBR2GPT.exe /validate /allowFullOS Requirements: No dynamic disks VSS and WinRM operational Drivers must support Gen2 migration OS disk ≤128GB Validation Commands: Get-Volume Get-PhysicalDisk Get-WindowsOptionalFeature -Online -FeatureName SecureBoot Linux Workloads Requirements: UUIDs used in /etc/fstab Avoid multi-PV LVM expansion across disks Ensure kernel supports SEV-SNP or TDX Ensure UEFI bootloader integrity Validation Commands: lsblk blkid cat /etc/fstab dmesg | grep -i sev Phase 3: Network Security & Firewall Matrix Source Destination Port(s) Direction Purpose On-prem Servers Migrate Appliance 443, 9443 Outbound Discovery & agentless replication Appliance Windows VMs 5985 Outbound WinRM Appliance Linux VMs 22 Outbound SSH Appliance Cache Storage 443 Outbound Replication writes Appliance Azure Migrate 443 Outbound Control-plane operations All connections route via private endpoints. Phase 4: CMK Encryption & Managed HSM Governance Managed HSM Creation: Enable purge protection Configure RBAC-only access Disable all public access Key Creation: az keyvault key create --exportable true --hsm-name <HSM> --kty RSA-HSM --name cvmKey --policy "./public_SKR_policy.json" Disk Encryption Set (DES) Creation: az disk-encryption-set create --name <DES> --resource-group <RG> --key-url <HSM Key URL> --identity-type SystemAssigned Role Assignment to DES: Managed HSM Crypto Service Encryption User Key Release Policy requiring attestation Phase 5: Confidential VM Orchestrator (CVO) The Confidential VM Orchestrator is a built-in Azure service principal used by Azure Compute to securely manage disk encryption keys for Confidential VMs (CVMs). During boot, it validates the VM’s attestation evidence (SEV-SNP or TDX) and requests the Managed HSM to release the disk encryption key only to a verified CVM. It requires only Managed HSM Crypto Service Encryption User permissions. This ensures that customer-managed keys (CMKs) are released exclusively to attested CVMs and never to the hypervisor or platform operators. Responsibilities: Validate the Trusted Execution Environment (TEE) measurement. Approve or deny key release based on attestation. Enforce cryptographic linkage between the VM and HSM key, ensuring keys are only accessible to legitimate CVMs. Identity Setup: New-MgServicePrincipal -AppId bf7b6499-ff71-4aa2-97a4-f372087be7f0 Role Assignment: az keyvault role assignment create --hsm-name <HSM> --assignee <CVO ID> --role "Managed HSM Crypto Service Release User" --scope /keys Phase 6: Replication Enablement (Credential-Less) Configuration Steps: Go to the Azure portal → Search for Azure Migrate. Select your Azure Migrate project Navigate to Replicate. Select Credential-less replication. Choose the target subscription and resource group. Select Confidential VM-compatible size for the VMs. Assign Disk Encryption Sets (DES) for each disk. Validate private endpoint connectivity to ensure replication can access the target subnet securely. Begin Initial Sync + Delta Replication: All OS/data disks for CVMs must be Premium SSD or Premium SSD v2. Phase 7: Test Migration (Isolated Validation) Validation Checklist: VM boots successfully without intervention CVM security type = Confidential CMK encryption applied on all disks Attestation logs verified on first boot Applications tested and functional No unexpected public endpoints NIC, routing, NSGs, UDRs verified Phase 8: Production Cutover Cutover Sequence: Announce downtime Freeze transactions Run Planned Failover Validate immediately: Boot integrity Disk encryption Guest Attestation Extension security type is Confidential Switch application traffic Decommission source systems Phase 9: Post-Migration Hardening & Governance Azure Policy Enforcement: Allowed VM SKUs → CVM only Enforce CMK-only disk encryption Deny public IP creation Require private endpoints Restrict Managed HSM access Logging & Monitoring: Managed HSM logs Attestation logs Azure Monitor Defender for Cloud (CVM coverage) Microsoft Sentinel (optional) Operational Governance: HSM key rotation schedule Quarterly attestation validation DES lifecycle management Zero-trust identity auditing “Break glass” procedure definition 7. Confidential VM Limitations & Workarounds OS Disk Size Limit: Confidential disk encryption is only supported for OS disks at this stage. No support for Data Disks. Confidential disk encryption with CMK is not supported for disks larger than 128 GB. Workaround: Perform migration using SSE (Server-Side Encryption) with Platform-Managed Keys (PMK). Stop and deallocate the VM post-migration. Update encryption settings of OS disk to use SSE Disk Encryption Set (DES) using CMK for encryption. Operating System Support: Windows 2019 and later supported RHEL 9.4 and later supported Ubuntu 22.04+ supported (depending on SKU) For full list, check the CVM OS Support Matrix For additional details on limitations, please refer CVM Limitations 8. Conclusion Azure Confidential Virtual Machines represent a generational shift in cloud security providing encryption, isolation, and attestation at the hardware boundary. Combined with Azure Migrate, DES/CMK encryption, Managed HSM, private networking, and robust governance, enterprises can securely modernize mission-critical workloads without application rewrites.876Views5likes1CommentBuilding Reusable Custom Images for Azure Confidential VMs Using Azure Compute Gallery
Overview Azure Confidential Virtual Machines (CVMs) provide hardware-enforced protection for sensitive workloads by encrypting data in use using AMD SEV-SNP technology. In enterprise environments, organizations typically need to: Create hardened golden images Standardize baseline configurations Support both Platform Managed Keys (PMK) and Customer Managed Keys (CMK) Version and replicate images across regions This guide walks through the correct and production-supported approach for building reusable custom images for Confidential VMs using: PowerShell (Az module) Azure Portal Disk Encryption Sets (CMK) Azure Compute Gallery Key Design Principles Before diving into implementation steps, it is important to clarify that during real-world implementations, two important architectural truths become clear: ✅1️⃣ The Same Image Supports PMK and CMK The encryption model (PMK vs CMK) is not embedded in the image. Encryption is applied: At VM deployment time Through disk configuration (default PMK or Disk Encryption Set for CMK) This means: You build one golden image. You deploy it using PMK or CMK depending on compliance requirements. This simplifies lifecycle management significantly. ✅2️⃣ Confidential VM Image Versions Must Use Source VHD When publishing to Azure Compute Gallery: Confidential VMs require Source VHD (Mandatory Requirement) This is a platform requirement for Confidential Security Type support. Therefore, the correct workflow is: Deploy base Confidential VM Harden and configure Generalize Export OS disk as VHD Upload to storage Publish to Azure Compute Gallery Deploy using PMK or CMK Security Stack Breakdown Protection Area Technology Data in Use AMD SEV-SNP Boot Integrity Secure Boot + vTPM Image Lifecycle Azure Compute Gallery Disk Encryption PMK or CMK Compliance Control Disk Encryption Set (CMK) Implementation Steps 🖥️ Step 1 – Deploy a Base Windows Confidential VM This VM will serve as the image builder. Key Requirements Gen2 Image Confidential SKUs (similar to DCasv5 or ECasv5 series) SecurityType = ConfidentialVM Secure Boot enabled vTPM enabled Confidential OS Encryption enabled Reference Code Snippets (PowerShell) $rg = "rg-cvm-gi-pr-sbx-01" $location = "NorthEurope" $vmName = "cvmwingiprsbx01" New-AzResourceGroup -Name $rg -Location $location $cred = Get-Credential $vmConfig = New-AzVMConfig ` -VMName $vmName ` -VMSize "Standard_DC2as_v5" ` -SecurityType "ConfidentialVM" $vmConfig = Set-AzVMOperatingSystem ` -VM $vmConfig ` -Windows ` -ComputerName $vmName ` -Credential $cred $vmConfig = Set-AzVMSourceImage ` -VM $vmConfig ` -PublisherName "MicrosoftWindowsServer" ` -Offer "WindowsServer" ` -Skus "2022-datacenter-azure-edition" ` -Version "latest" $vmConfig = Set-AzVMOSDisk ` -VM $vmConfig ` -CreateOption FromImage ` -SecurityEncryptionType "ConfidentialVM_DiskEncryptedWithPlatformKey" New-AzVM -ResourceGroupName $rg -Location $location -VM $vmConfig 📸 Reference Screenshots 🔧 Step 2 – Harden and Customize the OS This is where you: Install monitoring agents Install Defender for Endpoint Apply CIS baseline Install security agents Remove unwanted services Install application dependencies This is your enterprise golden baseline depending on the individual organizational requirements. 🔄 Step 3 – Generalize the Windows Confidential VM (Production-Ready Method) Confidential VMs often enable BitLocker automatically. Improper Sysprep handling can cause failures. Generalizing a Windows Confidential VM properly is critical to avoid: Sysprep failures BitLocker conflicts Image corruption Deployment errors later Follow these steps carefully inside the VM and later through Azure PowerShell. 1. Remove Panther Folder The Panther folder stores logs from previous Sysprep operations. If leftover logs exist, Sysprep can fail. This safely removes old Sysprep metadata. rd /s /q C:\Windows\Panther ✔ This step prevents common “Sysprep was not able to validate your Windows installation” errors. 2. Run Sysprep Navigate to Sysprep directory and run sysprep command: cd %windir%\system32\sysprep sysprep.exe /generalize /shutdown Parameters explained: Parameter Purpose /generalize Removes machine-specific info (SID, drivers) /shutdown Powers off VM after completion ⚠️ Handling BitLocker Issues (Common in Confidential VMs): Confidential VMs may automatically enable BitLocker. If Sysprep fails due to encryption, follow the next steps to resolve the issue and execute sysprep again. 3. Check BitLocker Status & Turn Off BitLocker manage-bde -status If Protection Status is 'Protection On': manage-bde -off C: Wait for decryption to complete fully. ⚠️ Do not run Sysprep again until decryption reaches 100%. 4. Reboot and Run Sysprep Again After decryption completes: Reboot the VM Open Command Prompt as Administrator Navigate to Sysprep folder and run sysprep command: cd %windir%\system32\sysprep sysprep.exe /generalize /shutdown ✔ VM will shut down automatically. 5. Mark VM as Generalized in Azure Now switch to Azure PowerShell: Stop-AzVM -Name $vmName -ResourceGroupName $rg -Force Set-AzVM -Name $vmName -ResourceGroupName $rg -Generalized ✔ This marks the VM as ready for image capture. 🧠 Why These Extra Steps Matter in Confidential VMs Confidential VMs differ from standard VMs because: They use vTPM They may auto-enable BitLocker They enforce Secure Boot They use Gen2 images Improper handling can cause: Sysprep failures Image capture errors Deployment failures from image “VM provisioning failed” issues These cleanup steps dramatically increase success rate. 💾 Step 4 – Export OS Disk as VHD Azure Gallery Image Definitions with Security Type as 'TrustedLaunchAndConfidentialVmSupported' require Source VHD as the support for Source Image VM is not available. Generate the SAS URL for OS Disk of the Virtual Machine. Copy to Storage Account as a .vhd file. Use Get-AzStorageBlobCopyState to validate the copy status and wait for completion. $vm = Get-AzVM -Name $vmName -ResourceGroupName $rg $osDiskName = $vm.StorageProfile.OsDisk.Name $sas = Grant-AzDiskAccess ` -ResourceGroupName $rg ` -DiskName $osDiskName ` -Access Read ` -DurationInSecond 3600 $storageAccountName = "stcvmgiprsbx01" $storageContainerName = "images" $destinationVHDFileName = "cvmwingiprsbx01-OsDisk-VHD.vhd" $destinationContext = New-AzStorageContext -StorageAccountName $storageAccountName Start-AzStorageBlobCopy -AbsoluteUri $sas.AccessSAS -DestContainer $storageContainerName -DestContext $destinationContext -DestBlob $destinationVHDFileName Get-AzStorageBlobCopyState -Blob $destinationVHDFileName -Container $storageContainerName -Context $destContext 🏢 Step 5 – Create Azure Compute Gallery & Image Version Instead of creating a standalone managed image, we will: Create an Azure Compute Gallery Create an Image Definition Publish a Gallery Image Version from the generalized Confidential VM This enables: Versioning Regional replication Staged rollouts Enterprise image lifecycle management 1. Create Azure Compute Gallery $galleryName = "cvmImageGallery" New-AzGallery ` -GalleryName $galleryName ` -ResourceGroupName $rg ` -Location $location ` -Description "Confidential VM Image Gallery" 2. Create Image Definition for Windows Confidential VM Important settings: OS State = Generalized OS Type = Windows HyperV Generation = V2 Security Type = TrustedLaunchAndConfidentialVmSupported $imageDefName = "img-win-cvm-gi-pr-sbx-01" $ConfidentialVMSupported = @{Name='SecurityType';Value='TrustedLaunchAndConfidentialVmSupported'} $Features = @($ConfidentialVMSupported) New-AzGalleryImageDefinition ` -GalleryName $galleryName ` -ResourceGroupName $rg ` -Location $location ` -Name $imageDefName ` -OsState Generalized ` -OsType Windows ` -Publisher "prImages" ` -Offer "WindowsServerCVM" ` -Sku "2022-dc-azure-edition" ` -HyperVGeneration V2 ` -Feature $features ✔ HyperVGeneration must be V2 for Confidential VMs. 📸 Reference Screenshot 3. Create Gallery Image Version from Generalized VM Now publish version 1.0.0 from the generalized VM OS Disk VHD to the Image Definition: There is no support for performing this step using Azure PowerShell, hence the Azure Portal needs to be used Ensure the right network and RBAC access on the storage account is in place Replication can be enabled on the Image Version to multiple regions for enterprises ✅ Why Azure Compute Gallery is the Right Choice Feature Managed Image Azure Compute Gallery Versioning ❌ ✅ Cross-region replication ❌ ✅ Enterprise lifecycle Limited Full Recommended for production ❌ ✅ For enterprise confidential workloads, Azure Compute Gallery is strongly recommended. 🚀 Step 6 – Deploy Confidential VM from Gallery Image 🔹 Using PMK (Default) If you do not specify a Disk Encryption Set, Azure uses Platform Managed Keys automatically. $imageId = (Get-AzGalleryImageVersion ` -GalleryName $galleryName ` -GalleryImageDefinitionName $imageDefName ` -ResourceGroupName $rg ` -Name "1.0.0").Id $vmConfig = New-AzVMConfig ` -VMName "cvmwingiprsbx02" ` -VMSize "Standard_DC2as_v5" ` -SecurityType "ConfidentialVM" $vmConfig = Set-AzVMOSDisk ` -VM $vmConfig ` -CreateOption FromImage ` -SecurityEncryptionType "ConfidentialVM_DiskEncryptedWithPlatformKey" $vmConfig = Set-AzVMSourceImage -VM $vmConfig -Id $imageId $vmConfig = Set-AzVMOperatingSystem -VM $vmConfig -Windows -ComputerName "cvmwingiprsbx02" -Credential (Get-Credential) New-AzVM -ResourceGroupName $rg -Location $location -VM $vmConfig 🔹 Using CMK (Same Image!) If compliance requires CMK: Create Disk Encryption Set Associate with Key Vault or Managed HSM Attach DES during deployment $vmConfig = Set-AzVMOSDisk ` -VM $vmConfig ` -CreateOption FromImage ` -SecurityEncryptionType "ConfidentialVM_DiskEncryptedWithCustomerKey" ` -DiskEncryptionSetId $des.Id ✔ Same image ✔ Different encryption model ✔ Encryption applied at deployment 🔎 Validation Check Confidential Security: Get-AzVM -Name "cvmwingiprsbx02" -ResourceGroupName $rg | Select SecurityProfile Check disk encryption: Get-AzDisk -ResourceGroupName $rg Architectural Summary Confidential VM security is independent of disk encryption model Encryption choice is applied at deployment One image supports multiple compliance models Source VHD is required for Confidential VM gallery publishing Azure Compute Gallery enables enterprise lifecycle �� PMK vs CMK Decision Matrix Scenario Recommended Model Standard enterprise workloads PMK Financial services / regulated CMK BYOK requirement CMK Simplicity prioritized PMK 🏢 Enterprise Recommendations ✔ Always use Azure Compute Gallery ✔ Use semantic versioning (1.0.0, 1.0.1) ✔ Automate using Azure Image Builder ✔ Enforce Confidential VM via Azure Policy ✔ Enable Guest Attestation ✔ Monitor with Defender for Cloud Final Thoughts Creating custom images for Azure Confidential VMs allows organizations to combine the security benefits of Confidential Computing with the operational efficiency of standardized deployments. By baking security baselines, monitoring agents, and required configurations directly into a golden image, every new VM starts from a consistent and trusted foundation. A key advantage of this approach is flexibility. The custom image itself is independent of the disk encryption model, meaning the same image can be deployed using Platform Managed Keys (PMK) for simplicity or Customer Managed Keys (CMK) to meet stricter compliance requirements. This allows platform teams to maintain a single image pipeline while supporting multiple security scenarios. By publishing images through Azure Compute Gallery, organizations can version, replicate, and manage their Confidential VM images more effectively. Combined with proper VM generalization and hardening practices, custom images become a reliable way to ensure secure, consistent, and scalable deployments of Confidential workloads in Azure. As Confidential Computing continues to gain adoption across industries handling sensitive data, investing in a well-designed custom image pipeline will enable organizations to scale securely while maintaining consistency, compliance, and operational efficiency across their cloud environments.464Views1like0CommentsProactive Resiliency in Azure for Specialized Workload i.e. Citrix VDI on Azure Design Framework.
In this post, I’ll share my perspective on designing cloud architectures for near-zero downtime. We’ll explore how adopting multi-region strategies and other best practices can dramatically improve reliability. The discussion will be technically and architecturally driven covering key decisions around network architecture, data replication, user experience continuity, and cost management but also touch on the business angle of why this matters. The goal is to inform and inspire you to strengthen your own systems, and guide you toward concrete actions such as engaging with Microsoft Cloud Solution Architects (CSAs), submitting workloads for resiliency reviews, and embracing multi-region design patterns. Resilience as a Shared Responsibility One fundamental truth in cloud architecture is that ensuring uptime is a shared responsibility between the cloud provider and you, the customer. Microsoft is responsible for the reliability of the cloud in other words, we build and operate Azure’s core infrastructure to be highly available. This includes the physical datacenters, network backbone, power/cooling, and built-in platform features for redundancy. We also provide a rich toolkit of resiliency features (think availability sets, Availability Zones, geo-redundant storage, service failover capabilities, backup services, etc.) that you can leverage to increase the reliability of your workloads. However, the reliability in the cloud of your specific applications and data is up to you. You control your application architecture, deployment topology, data replication, and failover strategies. If you run everything in a single region with no backups or fallbacks, even Azure’s rock-solid foundation can’t save you from an outage. On the other hand, if you architect smartly (using multiple regions, zones, and Azure resiliency features properly), you can achieve end-to-end high availability even through major platform incidents. In short: Microsoft ensures the cloud itself is resilient, but you must design resilience into your workload. It’s a true partnership one where both sides play a critical role in delivering robust, continuous services to end-users. I emphasize this because it sets the mindset: proactive resiliency is something we do with our customers. As you’ll see, Microsoft has programs and people (like CSAs) dedicated to helping you succeed in this shared model. Six Layers of Resilient Cloud Architecture for Citrix VDI workloads To systematically approach multi-region resiliency, it helps to break the problem down into layers. In my work, I arrived at a six-layer decision framework for designing resilient architectures. This was originally developed for a global Citrix DaaS deployment on Azure (hence some VDI flavor in the examples), but the principles apply broadly to cloud solutions. The layers ensure we cover everything from the ground-up network connectivity to the operational model for failover. 1. Network Fabric (the global backbone) Establish high-performance, low-latency links between regions. Preferred: Use Global VNet Peering for simplified any-to-any connectivity with minimal latency over Microsoft’s backbone (ideal for point-to-point replication traffic), rather than a more complex Azure Virtual WAN unless your topology demands it. 2. Storage Foundation (the bedrock ) In any distributed computing environment, storage is the "heaviest" component. Moving compute (VDAs) is instantaneous; moving data (profiles, user layers) is governed by bandwidth and the speed of light. The success of a multi-region DaaS deployment hinges on the performance and synchronization of the underlying storage subsystem. Use storage that can handle cross-region workload needs, especially for user data or state. In case of Citrix Daas, preferred approach is Azure NetApp Files (ANF) for consistent sub-millisecond latency and high throughput. ANF provides enterprise-grade performance (critical during “login storms” or peak I/O) and features like Cool Access tiering to optimize cost, outperforming standard Azure Files for this scenario. 3. User Profile & State (solving data gravity) Enable active-active availability of user data or application state across regions. Solution: FSLogix Cloud Cache (in a VDI context) or similar distributed caching/replication tech, which allows simultaneous read/write of profile data in multiple regions. In our case, Cloud Cache insulates the user session from WAN latency by writing to a local cache and asynchronously replicating to the secondary region, overcoming the challenge of traditional file locking. The principle extends to databases or state stores: use geo-replication or distributed databases to avoid any single-region state. 4. Access & Ingress (the intelligent front door) Ensure users/customers connect to the right region and can fail over seamlessly. Preferred: Deploy a global traffic management solution under your control e.g. customer-managed NetScaler (Citrix ADC) with Global Server Load Balancing (GSLB) to direct users to the nearest available datacenter. In our design, NetScaler’s GSLB uses DNS-based geo-routing and supports Local Host Cache for Citrix, meaning even if the cloud control plane (Citrix Cloud) is unreachable, users can still connect to their desktop apps. The general point: use Azure Front Door, Traffic Manager, or third-party equivalents to steer traffic, and avoid any solution that introduces a new single point of failure in the authentication or gateway path. 5. Master Image (ensuring global consistency) : If you rely on VM images or similar artifacts, replicate them globally. Use: Azure Compute Gallery (ACG) to manage and distribute images across regions. In our case, we maintain a single “golden” image for virtual desktops: it’s built once, then the Compute Gallery replicates it from West Europe to East US (and any other region) automatically. This ensures that when we scale out or recover in Region B, we’re launching the exact same app versions and OS as Region A. Consistency here prevents failover from causing functionality regressions. 6. Operations & Cost (smart economics at scale) Run an efficient DR strategy you want readiness without paying 2x all the time. Approach: Warm Standby with autoscaling. That means the secondary region isn’t serving full traffic during normal operations (some resources can be scaled down or even deallocated), but it can scale up rapidly when needed. For our scenario, we leverage Citrix Autoscale to keep the DR site in a minimal state only a small buffer of machines is powered on, just enough to handle a sudden failover until load-based scaling brings up the rest. This “active/passive” model (or hot-warm rather than hot-hot) strikes a balance: you pay only for what you use, yet you can meet your RTO (Recovery Time Objective) because resources spin up automatically on trigger. In cloud-native terms, you might use Azure Automation or scale sets to similar effect. The key is to avoid having an idle full duplicate environment incurring full costs 24/7, while still being prepared. Each of these layers corresponds to critical architectural choices that determine your overall resiliency. Neglect any one layer, and that’s where Murphy’s Law will strike next. For example, you might perfectly replicate your data across regions, but if you forgot about network connectivity, a regional hub outage could still cut off access. Or you have every system duplicated, but if users can’t be rerouted to the backup region in time, the benefit is lost. The six-layer framework helps make sure we cover all bases. Notably, these design best practices align very closely with Azure’s Well-Architected Framework (especially the Reliability pillar), and they’re exactly the kind of prescriptive guidance we provide through programs like the Proactive Resiliency Initiative. In fact, the PRI playbook essentially prioritizes these same steps for customers: First, harden the network foundation e.g. ensure ExpressRoute gateways are zone-redundant and circuits are “multi-homed” in at least two locations (so no single datacenter failure breaks connectivity). Next, address in-region resiliency – make sure critical workloads are distributed across Availability Zones and not vulnerable to a single zone outage. (As an aside: Microsoft’s internal data shows a huge payoff here; when we configured our top Azure services for zonal resilience, we saw a 68% reduction in platform outages that lead to support incidents!) Then, enable multi-region continuity (BCDR) – for those tier-0 and tier-1 workloads, set up cross-regional failover so even a region-wide disruption won’t take you down. Multi-region is described as the complement to (not a substitute for) zonal design: it’s about surviving the “black swan” of a region-level event, and also about supporting geo-distributed users and future growth. In other words, if you follow the six-layer approach, you’re doing exactly what our structured resiliency programs recommend.549Views1like0CommentsAnnouncing Cobalt 200: Azure’s next cloud-native CPU
By Selim Bilgin, Corporate Vice President, Silicon Engineering, and Pat Stemen, Vice President, Azure Cobalt Today, we’re thrilled to announce Azure Cobalt 200, our next-generation Arm-based CPU designed for cloud-native workloads. Cobalt 200 is a milestone in our continued approach to optimize every layer of the cloud stack from silicon to software. Our design goals were to deliver full compatibility for workloads using our existing Azure Cobalt CPUs, deliver up to 50% performance improvement over Cobalt 100, and integrate with the latest Microsoft security, networking and storage technologies. Like its predecessor, Cobalt 200 is optimized for common customer workloads and delivers unique capabilities for our own Microsoft cloud products. Our first production Cobalt 200 servers are now live in our datacenters, with wider rollout and customer availability coming in 2026. Azure Cobalt 200 SoC and platform Building on Cobalt 100: Leading Price-Performance Our Azure Cobalt journey began with Cobalt 100, our first custom-built processor for cloud-native workloads. Cobalt 100 VMs have been Generally Available (GA) since October of 2024 and availability has expanded rapidly to 32 Azure datacenter regions around the world. In just one year, we have been blown away with the pace that customers have adopted the new platform, and migrated their most critical workloads to Cobalt 100 for the performance, efficiency, and price-performance benefits. Cloud analytics leaders like Databricks and Snowflake are adopting Cobalt 100 to optimize their cloud footprint. The compute performance and energy-efficiency balance of Cobalt 100-based virtual machines and containers has proven ideal for large-scale data processing workloads. Microsoft’s own cloud services have also rapidly adopted Azure Cobalt for similar benefits. Microsoft Teams achieved up to 45% better performance using Cobalt 100 than their previous compute platform. This increased performance means less servers needed for the same task, for instance Microsoft Teams media processing uses 35% fewer compute cores with Cobalt 100. Designing Compute Infrastructure for Real Workloads With this solid foundation, we set out to design a worthy successor – Cobalt 200. We faced a key challenge: traditional compute benchmarks do not represent the diversity of our customer workloads. Our telemetry from the wide range of workloads running in Azure (small microservices to globally available SaaS products) did not match common hardware performance benchmarks. Existing benchmarks tend to skew toward CPU core-focused compute patterns, leaving gaps in how real-world cloud applications behave at scale when using network and storage resources. Optimizing Azure Cobalt for customer workloads requires us to expand beyond these CPU core benchmarks to truly understand and model the diversity of customer workloads in Azure. As a result, we created a portfolio of benchmarks drawn directly from the usage patterns we see in Azure, including databases, web servers, storage caches, network transactions, and data analytics. Each of our benchmark workloads includes multiple variants for performance evaluation based on the ways our customers may use the underlying database, storage, or web serving technology. In total, we built and refined over 140 individual benchmark variants as part of our internal evaluation suite. With the help of our software teams, we created a complete digital twin simulation from the silicon up: beginning with the CPU core microarchitecture, fabric, and memory IP blocks in Cobalt 200, all the way through the server design and rack topology. Then, we used AI, statistical modelling and the power of Azure to model the performance and power consumption of the 140 benchmarks against 2,800 combinations of SoC and system design parameters: core count, cache size, memory speed, server topology, SoC power, and rack configuration. This resulted in the evaluation of over 350,000 configuration candidates of the Cobalt 200 system as part of our design process. This extensive modelling and simulation helped us to quickly iterate to find the optimal design point for Cobalt 200, delivering over 50% increased performance compared to Cobalt 100, all while continuing to deliver our most power-efficient platform in Azure. Cobalt 200: Delivering Performance and Efficiency At the heart of every Cobalt 200 server is the most advanced compute silicon in Azure: the Cobalt 200 System-on-Chip (SoC). The Cobalt 200 SoC is built around the Arm Neoverse Compute Subsystems V3 (CSS V3), the latest performance-optimized core and fabric from Arm. Each Cobalt 200 SoC includes 132 active cores with 3MB of L2 cache per-core and 192MB of L3 system cache to deliver exceptional performance for customer workloads. Power efficiency is just as important as raw performance. Energy consumption represents a significant portion of the lifetime operating cost of a cloud server. One of the unique innovations in our Azure Cobalt CPUs is individual per-core Dynamic Voltage and Frequency Scaling (DVFS). In Cobalt 200 this allows each of the 132 cores to run at a different performance level, delivering optimal power consumption no matter the workload. We are also taking advantage of the latest TSMC 3nm process, further improving power efficiency. Security is top-of-mind for all of our customers and a key part of the unique innovation in Cobalt 200. We designed and built a custom memory controller for Cobalt 200, so that memory encryption is on by default with negligible performance impact. Cobalt 200 also implements Arm’s Confidential Compute Architecture (CCA), which supports hardware-based isolation of VM memory from the hypervisor and host OS. When designing Cobalt 200, our benchmark workloads and design simulations revealed an interesting trend: several universal compute patterns emerged – compression, decompression, and encryption. Over 30% of cloud workloads had significant use of one of these common operations. Optimizing for these common operations required a different approach than just cache sizing and CPU core selection. We designed custom compression and cryptography accelerators – dedicated blocks of silicon on each Cobalt 200 SoC – solely for the purpose of accelerating these operations without sacrificing CPU cycles. These accelerators help reduce workload CPU consumption and overall costs. For example, by offloading compression and encryption tasks to the Cobalt 200 accelerator, Azure SQL is able to reduce use of critical compute resources, prioritizing them for customer workloads. Leading Infrastructure Innovation with Cobalt 200 Azure Cobalt is more than just an SoC, and we are constantly optimizing and accelerating every layer in the infrastructure. The latest Azure Boost capabilities are built into the new Cobalt 200 system, which significantly improves networking and remote storage performance. Azure Boost delivers increased network bandwidth and offloads remote storage and networking tasks to custom hardware, improving overall workload performance and reducing latency. Cobalt 200 systems also embed the Azure Integrated HSM (Hardware Security Module), providing customers with top-tier cryptographic key protection within Azure’s infrastructure, ensuring sensitive data stays secure. The Azure Integrated HSM works with Azure Key Vault for simplified management of encryption keys, offering high availability and scalability as well as meeting FIPS 140-3 Level 3 compliance. An Azure Cobalt 200 server in a validation lab Looking Forward to 2026 We are excited about the innovation and advanced technology in Cobalt 200 and look forward to seeing how our customers create breakthrough products and services. We’re busy racking and stacking Cobalt 200 servers around the world and look forward to sharing more as we get closer to wider availability next year. Check out Microsoft Ignite opening keynote Read more on what's new in Azure at Ignite Learn more about Microsoft's global infrastructure26KViews11likes0Comments