azure sql mi
7 TopicsPrinciple 'XYZ' could not be found or this principal type is not supported - Azure SQL DB and MI
In this blog article, we will be discussing the possible scenarios to get the error "Principle 'XYZ' could not be found or this principal type is not supported" while adding an AAD user or group to your Azure SQL database or Azure SQL managed instance.82KViews4likes8CommentsTesting connectivity against a Managed Instance using a CNAME
As documented here. We can change the SQL Managed Instance default DNS zone ".database.windows.net" to any of your choice. However, the instance name part of the FQDN is mandatory. Whether you are connecting through a public or private endpoint, the virtual cluster manages the connection and then either proxies or redirects it to the appropriate SQL MI resident within the same cluster based on the connection type configured. The virtual cluster utilizes the hostname part of the FQDN in the connection string to lookup for the MI. If the instance name doesn't match an existing one, the connection attempt will fail. For instance, if the FQDN is sqlmi01.a1b2c3d4.database.windows.net and the CNAME is db01.contoso.com it will not work A workaround is to create a 'user@sqlmi01' login on sqlmi01 and pass it in the connection string using SQL Server authentication. This explicitly tells the virtual cluster to disregard the hostname in the FQDN and look up a managed instance called sqlmi01. Another option is to use the same hostname in the CNAME record, so sqlmi01.contoso.com would work. Although this won't suit multiple SQL MIs because SQL MI names are globally unique. One thing to note is that when using option 2 from the section above, is that all encrypted connections will fail by default. Reason being that the server-side certificate will not match with the FQDN provided in the connection string. There are a few ways around this. The first one is to use set the property trustServerCertificate to true. Although we should mention that this is not a recommended setting as that option is inherently insecure. Recently, there were some new releases and announcements for ODBC and OLEDB drivers, I was curious enough to set a test with a CNAME pointing to a managed instance public endpoint and perform some tests with the new settings of said drivers. Specifically, the hostNameInCertificate setting, that could help us with the problem described in option 2 above. As explained on the articles linked above the new releases of ODBC (18) and OLEDB (19) have a few breaking changes, that could impact the connectivity for your particular scenario. Below are the results of my tests using SSMS (.Net SqlClient), ODBC (17 and 18) and OLEDB (18 and 19). Test # Tool Version Authentication Encrypt Connection Encrypt Value Trust Server Certificate Hostname in Certificate Result 1 SSMS (.Net SqlClient) 18.11.1 SQL FALSE N/A FALSE N/A Success 2 SSMS (.Net SqlClient) 18.11.1 SQL TRUE N/A FALSE N/A Failure 3 SSMS (.Net SqlClient) 18.11.1 SQL TRUE N/A TRUE N/A Success 4 SSMS (.Net SqlClient) 18.11.1 AAD FALSE N/A FALSE N/A Failure 5 SSMS (.Net SqlClient) 18.11.1 AAD TRUE N/A FALSE N/A Failure 6 SSMS (.Net SqlClient) 18.11.1 AAD TRUE N/A TRUE N/A Success 7 ODBC 17.9.1.1 SQL FALSE N/A FALSE N/A Success 8 ODBC 17.9.1.1 SQL TRUE N/A FALSE N/A Failure 9 ODBC 17.9.1.1 SQL TRUE N/A TRUE N/A Success 10 ODBC 17.9.1.1 AAD FALSE N/A FALSE N/A Success 11 ODBC 17.9.1.1 AAD TRUE N/A FALSE N/A Failure 12 ODBC 17.9.1.1 AAD TRUE N/A TRUE N/A Success 13 OLEDB 18.6.3 SQL FALSE N/A FALSE N/A Success 14 OLEDB 18.6.3 SQL TRUE N/A FALSE N/A Failure 15 OLEDB 18.6.3 SQL TRUE N/A TRUE N/A Success 16 OLEDB 18.6.3 AAD FALSE N/A FALSE N/A Failure 17 OLEDB 18.6.3 AAD TRUE N/A FALSE N/A Failure 18 OLEDB 18.6.3 AAD TRUE N/A TRUE N/A Failure 19 ODBC 18.0.1.1 SQL FALSE Optional FALSE Blank Failure 20 ODBC 18.0.1.1 SQL FALSE Optional FALSE Set Success 21 ODBC 18.0.1.1 SQL FALSE Optional TRUE Blank Success 22 ODBC 18.0.1.1 SQL TRUE Mandatory FALSE Blank Failure 23 ODBC 18.0.1.1 SQL TRUE Mandatory FALSE Set Success 24 ODBC 18.0.1.1 SQL TRUE Mandatory TRUE Blank Success 25 ODBC 18.0.1.1 SQL TRUE Strict N/A Blank Failure 26 ODBC 18.0.1.1 SQL TRUE Strict N/A Set Failure 27 ODBC 18.0.1.1 AAD FALSE Optional FALSE Blank Failure 28 ODBC 18.0.1.1 AAD FALSE Optional FALSE Set Success 29 ODBC 18.0.1.1 AAD FALSE Optional TRUE Blank Success 30 ODBC 18.0.1.1 AAD TRUE Mandatory FALSE Blank Failure 31 ODBC 18.0.1.1 AAD TRUE Mandatory FALSE Set Success 32 ODBC 18.0.1.1 AAD TRUE Mandatory TRUE Blank Success 33 ODBC 18.0.1.1 AAD TRUE Strict N/A Blank Failure 34 ODBC 18.0.1.1 AAD TRUE Strict N/A Set Failure 35 OLEDB 19.0.0 SQL FALSE Optional FALSE Blank Failure 36 OLEDB 19.0.0 SQL FALSE Optional FALSE Set Success 37 OLEDB 19.0.0 SQL FALSE Optional TRUE Blank Failure 38 OLEDB 19.0.0 SQL TRUE Mandatory FALSE Blank Failure 39 OLEDB 19.0.0 SQL TRUE Mandatory FALSE Set Success 40 OLEDB 19.0.0 SQL TRUE Mandatory TRUE Blank Failure 41 OLEDB 19.0.0 SQL TRUE Strict N/A Blank Failure 42 OLEDB 19.0.0 SQL TRUE Strict N/A Set Failure 43 OLEDB 19.0.0 AAD FALSE Optional FALSE Blank Failure 44 OLEDB 19.0.0 AAD FALSE Optional FALSE Set Success 45 OLEDB 19.0.0 AAD FALSE Optional TRUE Blank Failure 46 OLEDB 19.0.0 AAD TRUE Mandatory FALSE Blank Failure 47 OLEDB 19.0.0 AAD TRUE Mandatory FALSE Set Success 48 OLEDB 19.0.0 AAD TRUE Mandatory TRUE Blank Failure 49 OLEDB 19.0.0 AAD TRUE Strict N/A Blank Failure 50 OLEDB 19.0.0 AAD TRUE Strict N/A Set Failure As we can see there might be a difference on the result depending on the driver, the settings and the version used. Whenever possible try updating and testing your drivers to ensure the stability of your connections Cheers!9.5KViews0likes4Comments
SQL MI Restore with valid SAS key failing with Operating System Error 86
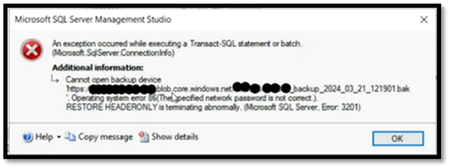
We will provide details about a workaround for resolving the "Operating System Error 86" encountered during database restoration from Azure Storage on SQL Managed Instance. In this scenario, the Storage Account was not behind firewall and the credential already had a valid SAS token.3.2KViews0likes1Comment
How to setup alerts for deadlocks using Log Analytics
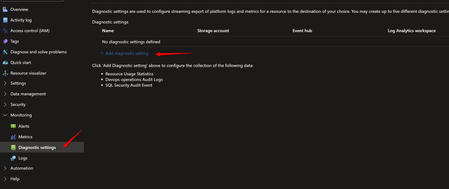
Managed Instance diagnostic events do not support sending deadlock information to Log Analytics. However, through auditing, it's possible to query failed queries along with their reported error messages—though this does not include deadlock XML. We will see how we can send information to Log Analytics and setup an alert for when a deadlock occurs. Step 1 - Deploy Log Analytics Create a Log Analytics workspace if you currently don't have one Create a Log Analytics workspace Step 2 - Add diagnostic setting On the Azure Portal, open the Diagnostic settings of your Azure SQL Managed Instance and choose Add diagnostic setting Select SQL Security Audit Event and choose has destination your Log Analytics workspace Step 3 - Create a server audit on the Azure SQL Managed Instance Run the query below on the Managed Instance Rename the server audit and server audit specification to a name of your choice. CREATE SERVER AUDIT [audittest] TO EXTERNAL_MONITOR GO -- we are adding Login audit, but only BATCH_COMPLETED_GROUP is necessary for query execution CREATE SERVER AUDIT SPECIFICATION audit_server FOR SERVER AUDIT audittest ADD (SUCCESSFUL_LOGIN_GROUP), ADD (BATCH_COMPLETED_GROUP), ADD (FAILED_LOGIN_GROUP) WITH (STATE = ON) GO ALTER SERVER AUDIT [audittest] WITH (STATE = ON) GO Step 4 - Check events on Log Analytics It may take some time for records to begin appearing in Log Analytics. Open your Log Analytics workspace and choose Logs To verify if data is being ingested, run the following query in Log Analytics and wait until you start getting the first results: Make sure that you change servername with your Azure SQL Managed Instance name AzureDiagnostics | where LogicalServerName_s == "servername" | where Category == "SQLSecurityAuditEvents" | take 10 Example: Step 5 - (Optional) Create a deadlock event for testing Create a deadlock scenario so you can see a record on log analytics. Example: Open SSMS and a new query window under the context of a user database (you can create a test database just for this test). create a table on a user database and insert 10 records: create table tb1 (id int identity(1,1) primary key clustered, col1 varchar(30)) go insert into tb1 values ('aaaaaaa') go 10 You can close the query window or reuse for the next step. Open a new query window (or reuse the first query window) and run (leave the query window open after executing): begin transaction update tb1 set col1 = 'bbbb' where id = 1 Open a second query window and run (leave the query window open after executing): begin transaction update tb1 set col1 = 'bbbb' where id = 2 Go back to the first query window opened and run (the query will be blocked - will stay executing): update tb1 set col1 = 'bbbb' where id = 2 Go back to the second query window opened and run (this transaction will be victim of deadlock): update tb1 set col1 = 'bbbb' where id = 1 You can rollback and close all windows after the deadlock exception. Step 6 - (Optional) Check the deadlock exception on Log Analytics Note: the record can take some minutes to appear on Log Analytics Use the query below to obtain the Deadlock events for the last hour (we are looking for Error 1205) Make sure that you change servername with your Azure SQL Managed Instance name AzureDiagnostics | where TimeGenerated > ago(1h) | where LogicalServerName_s == "servername" | where Category == "SQLSecurityAuditEvents" | where succeeded_s == "false" | where additional_information_s contains "Err 1205, Level 13" Step 7 - Use query to Create an Alert Use the query below to create an Alert on Azure Log Analytics Make sure that you change servername with your Azure SQL Managed Instance name. The query checks for deadlocks that occurred on the previous hour. AzureDiagnostics | where TimeGenerated > ago(1h) | where LogicalServerName_s == "servername" | where Category == "SQLSecurityAuditEvents" | where succeeded_s == "false" | where additional_information_s contains "Err 1205, Level 13" Run the query and click on New alert rule Create the alert with the desired settingsSQL Server 2016 Reaches End of Support: A Customer Engineer's Perspective on What's Next
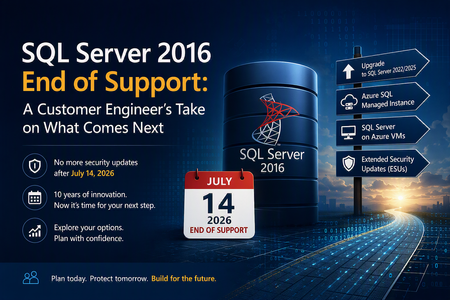
Why This Day Matters July 14, 2026 marks the end of Extended Support for SQL Server 2016. After today, organizations running SQL Server 2016 will no longer receive security updates, non-security hotfixes, or product support unless they have a specific support strategy in place. As a Customer Engineer, I've spent years helping customers navigate technology lifecycle events. This one feels particularly significant because SQL Server 2016 remains heavily deployed across enterprise environments. For official lifecycle dates and milestones, see the Microsoft Lifecycle Policy for SQL Server 2016: Reference: https://learn.microsoft.com/lifecycle/products/sql-server-2016 Why SQL Server 2016 Feels Different SQL Server 2016 introduced capabilities that many organizations still rely on today, including: Query Store Always Encrypted Native JSON Support Stretch Database Enhanced security and performance capabilities For many businesses, SQL Server 2016 became the standard data platform supporting ERP systems, billing applications, healthcare workloads, manufacturing systems, and custom line-of-business applications. Ten years is a long time in IT. During that period, databases often evolve from "just another server" into business-critical infrastructure. Learn more about SQL Server 2016 features: Reference: https://learn.microsoft.com/sql/sql-server/what-s-new-in-sql-server-2016 What "End of Support" Really Means One of the most common misconceptions I hear is: "Will my SQL Server stop working tomorrow?" No. The server will continue running. Applications will continue connecting. What changes is your risk profile. Organizations will no longer receive: Security updates Product fixes Technical support Regulatory assurance associated with supported software Microsoft's official guidance on end-of-support considerations can be found here: Reference: https://learn.microsoft.com/sql/sql-server/end-of-support/sql-server-end-of-support-overview Option 1: Upgrade to a Supported SQL Server Version For many organizations, the most straightforward path is upgrading to SQL Server 2022 or SQL Server 2025. Benefits include: Continued support Latest security protections Performance improvements New AI and data platform capabilities Before upgrading, review compatibility considerations and perform application testing. Reference: https://learn.microsoft.com/sql/database-engine/install-windows/upgrade-sql-server Reference: https://learn.microsoft.com/sql/sql-server/sql-server-release-notes Option 2: Move to Azure SQL Managed Instance Azure SQL Managed Instance is often my recommendation when customers want to reduce operational overhead while maintaining high SQL Server compatibility. Advantages include: Automated patching Built-in high availability Automated backups Near full SQL Server compatibility Reduced infrastructure management Learn more: Reference: https://learn.microsoft.com/azure/azure-sql/managed-instance/sql-managed-instance-paas-overview Option 3: Lift and Shift to SQL Server on Azure Virtual Machines For organizations seeking minimal application changes, SQL Server on Azure Virtual Machines can provide a familiar environment while eliminating hardware refresh requirements. This option also enables customers to take advantage of Extended Security Updates through Azure while planning broader modernization initiatives. Reference: https://learn.microsoft.com/azure/azure-sql/virtual-machines/windows/sql-server-on-azure-vm-iaas-what-is-overview Option 4: Purchase Extended Security Updates (ESUs) If immediate migration is not possible, Extended Security Updates provide up to three additional years of Critical security updates. ESUs can be valuable when: Vendor certification delays upgrades Hardware refresh projects are underway Business priorities prevent immediate migration However, ESUs should be viewed as a temporary bridge rather than a long-term strategy. Reference: https://learn.microsoft.com/sql/sql-server/end-of-support/sql-server-extended-security-updates Don't Skip the Assessment Phase The most successful migration projects begin with discovery and assessment. Common issues identified include: Deprecated features Compatibility concerns Linked Server dependencies SQL Agent jobs CLR integrations Legacy SSIS and SSRS workloads Resources that can help: https://learn.microsoft.com/azure/migrate/migrate-services-overview https://learn.microsoft.com/sql/sql-server/azure-arc/overview https://learn.microsoft.com/sql/dma/dma-overview Migration Tools Worth Evaluating Different migration scenarios require different tools. Microsoft provides several options: Data Migration Assistant (DMA) SQLPackage Azure Database Migration Service Managed Instance Link Distributed Availability Groups Comprehensive migration guidance: https://techcommunity.microsoft.com/blog/microsoftdatamigration/microsoft-options-to-migrate-sql-server-databases/4407666 https://learn.microsoft.com/azure/dms/dms-overview https://learn.microsoft.com/sql/tools/sqlpackage/sqlpackage Lessons Learned from Customer Engagements After supporting numerous SQL Server modernization projects, several themes consistently emerge: The database is rarely the hardest part. Applications and dependencies drive complexity. Downtime requirements significantly influence migration strategy. Organizations that start 6–9 months early typically experience smoother transitions. ESUs buy time, but they do not replace a modernization plan. For migration planning best practices: https://learn.microsoft.com/azure/cloud-adoption-framework/migrate/ Final Thoughts If you're reading this on or shortly after July 14, 2026, and SQL Server 2016 is still running in your environment, you're not alone. Whether your path forward is: SQL Server 2025 Azure SQL Managed Instance SQL Server on Azure Virtual Machines Extended Security Updates the most important step is to begin with an assessment and establish a modernization plan. SQL Server 2016 served organizations exceptionally well for nearly a decade. The conversation now is not about the end of SQL Server 2016. It's about preparing your data platform for the next decade.699Views3likes1CommentCreating alerts for custom errors with auditing and Log Analytics
Errors are an inherent part of any application. As a database professional managing an Azure SQL Managed Instance, you may be interested in understanding when specific errors occur and how to leverage user-generated errors to respond swiftly when particular scenarios arise. On this post we will see how we can setup alerts for scenarios like query blocking and long open transactions. This will be an extend of what is described on How to setup alerts for deadlocks using Log Analytics | Microsoft Community Hub Step 1 - Setup Log Analytics and auditing Follow steps 1, 2, 3 and 4 described on How to setup alerts for deadlocks using Log Analytics | Microsoft Community Hub Step 2 - Create a table to save the details of the blocking chain / long open transaction Getting an alert itself is not useful if you don`t have a way of getting details for later analysis. Create the table on a database of your choice. If you are interested on blocking: CREATE TABLE [dbo].[blocking_report] ( [DateTime] [datetime] NULL ,[HeadBlocker] [varchar](1) NOT NULL ,[SessionID] [smallint] NOT NULL ,[Login] [nvarchar](128) NOT NULL ,[Database] [nvarchar](128) NULL ,[BlockedBy] [smallint] NULL ,[OpenTransactions] [int] NULL ,[Status] [nvarchar](30) NOT NULL ,[WaitType] [nvarchar](60) NULL ,[WaitTime_ms] [bigint] NULL ,[WaitResource] [nvarchar](256) NULL ,[WaitResourceDesc] [nvarchar](3072) NULL ,[Command] [nvarchar](32) NULL ,[Application] [nvarchar](128) NULL ,[TotalCPU_ms] [int] NOT NULL ,[TotalPhysicalIO_MB] [bigint] NULL ,[MemoryUse_KB] [int] NULL ,[LoginTime] [datetime] NOT NULL ,[LastRequestStartTime] [datetime] NOT NULL ,[HostName] [nvarchar](128) NULL ,[QueryHash] [binary](8) NULL ,[BlockerQuery_or_MostRecentQuery] [nvarchar](max) NULL ) If you are interested on open transactions: CREATE TABLE [dbo].[opentransactions]( [CapturedTime] [datetime] NOT NULL, [tran_elapsed_time_seconds] [int] NULL, [transaction_begin_time] [datetime] NOT NULL, [session_id] [int] NOT NULL, [database_name] [nvarchar](128) NULL, [open_transaction_count] [int] NOT NULL, [host_name] [nvarchar](128) NULL, [program_name] [nvarchar](128) NULL, [login_name] [nvarchar](128) NULL, [status] [nvarchar](30) NULL, [text] [nvarchar](max) NULL ) Step 3 - Create a SQL Agent job Schedule the two SQL Agent jobs using the queries below. You might be interested on schedule that runs every X amount of seconds/minutes. Describing very briefly what each query does: if a query is being blocked for more than 60 seconds, save the blocking chain on a table and raise an error if a transaction is open for more than 120 seconds, save the query details on a table and raise an error Make the necessary adjustments according to your goals. Query for blocking: IF ( SELECT count(*) FROM sys.dm_exec_requests WHERE wait_type LIKE 'LCK%' AND wait_time > 60000 ) > 0 -- checks for queries waiting to obtain a lock for more than 30 seconds BEGIN INSERT INTO database_name.dbo.Blocking_report -- make sure that you change the database_name value SELECT ( SELECT getdate() ) ,[HeadBlocker] = CASE WHEN r2.session_id IS NOT NULL AND ( r.blocking_session_id = 0 OR r.session_id IS NULL ) THEN '1' ELSE '' END ,[SessionID] = s.session_id ,[Login] = s.login_name ,[Database] = db_name(p.dbid) ,[BlockedBy] = w.blocking_session_id ,[OpenTransactions] = r.open_transaction_count ,[Status] = s.STATUS ,[WaitType] = w.wait_type ,[WaitTime_ms] = w.wait_duration_ms ,[WaitResource] = r.wait_resource ,[WaitResourceDesc] = w.resource_description ,[Command] = r.command ,[Application] = s.program_name ,[TotalCPU_ms] = s.cpu_time ,[TotalPhysicalIO_MB] = (s.reads + s.writes) * 8 / 1024 ,[MemoryUse_KB] = s.memory_usage * 8192 / 1024 ,[LoginTime] = s.login_time ,[LastRequestStartTime] = s.last_request_start_time ,[HostName] = s.host_name ,[QueryHash] = r.query_hash ,[BlockerQuery_or_MostRecentQuery] = txt.TEXT FROM sys.dm_exec_sessions s LEFT OUTER JOIN sys.dm_exec_connections c ON (s.session_id = c.session_id) LEFT OUTER JOIN sys.dm_exec_requests r ON (s.session_id = r.session_id) LEFT OUTER JOIN sys.dm_os_tasks t ON ( r.session_id = t.session_id AND r.request_id = t.request_id ) LEFT OUTER JOIN ( SELECT * ,ROW_NUMBER() OVER ( PARTITION BY waiting_task_address ORDER BY wait_duration_ms DESC ) AS row_num FROM sys.dm_os_waiting_tasks ) w ON (t.task_address = w.waiting_task_address) AND w.row_num = 1 LEFT OUTER JOIN sys.dm_exec_requests r2 ON (s.session_id = r2.blocking_session_id) LEFT OUTER JOIN sys.sysprocesses p ON (s.session_id = p.spid) OUTER APPLY sys.dm_exec_sql_text(ISNULL(r.[sql_handle], c.most_recent_sql_handle)) AS txt WHERE s.is_user_process = 1 AND ( r2.session_id IS NOT NULL AND ( r.blocking_session_id = 0 OR r.session_id IS NULL ) ) OR blocked > 0 ORDER BY [HeadBlocker] DESC ,s.session_id; THROW 50000 ,'There are queries being blocked for more than 60 seconds' ,1; END Query for open transactions: DECLARE @count INT = ( SELECT count(*) FROM sys.dm_tran_active_transactions at INNER JOIN sys.dm_tran_session_transactions st ON st.transaction_id = at.transaction_id LEFT OUTER JOIN sys.dm_exec_sessions sess ON st.session_id = sess.session_id LEFT OUTER JOIN sys.dm_exec_connections conn ON conn.session_id = sess.session_id OUTER APPLY sys.dm_exec_sql_text(conn.most_recent_sql_handle) AS txt WHERE DATEDIFF(SECOND, transaction_begin_time, GETDATE()) > 120 -- 120 seconds ) IF @count > 0 BEGIN INSERT INTO database_name.dbo.opentransactions -- change database_name to where the table was created SELECT GETDATE() AS CapturedTime ,DATEDIFF(SECOND, transaction_begin_time, GETDATE()) AS tran_elapsed_time_seconds ,at.transaction_begin_time ,st.session_id ,DB_NAME(sess.database_id) AS database_name ,st.open_transaction_count ,sess.host_name ,sess.program_name ,sess.login_name ,sess.STATUS ,txt.TEXT FROM sys.dm_tran_active_transactions at INNER JOIN sys.dm_tran_session_transactions st ON st.transaction_id = at.transaction_id LEFT OUTER JOIN sys.dm_exec_sessions sess ON st.session_id = sess.session_id LEFT OUTER JOIN sys.dm_exec_connections conn ON conn.session_id = sess.session_id OUTER APPLY sys.dm_exec_sql_text(conn.most_recent_sql_handle) AS txt WHERE DATEDIFF(SECOND, transaction_begin_time, GETDATE()) > 120 --120 seconds ORDER BY tran_elapsed_time_seconds DESC; THROW 50000 ,'There are open transactions for more than 120 seconds' ,1; END Step 4 - Create the alert based on a Log Analytics query Just as described on steps 6 and 7 of How to setup alerts for deadlocks using Log Analytics | Microsoft Community Hub, you can create the two separate alerts using the queries below. For blocking: AzureDiagnostics | where TimeGenerated > ago(15m) //last 15 minutes | where LogicalServerName_s == "server_name" //server name | where Category == "SQLSecurityAuditEvents" | where additional_information_s contains "There are queries being blocked for more" | project TimeGenerated, LogicalServerName_s, database_name_s, additional_information_s For open transactions: AzureDiagnostics | where TimeGenerated > ago(15m) //last 15 minutes | where LogicalServerName_s == "server_name" //server name | where Category == "SQLSecurityAuditEvents" | where additional_information_s contains "There are open transactions for more than" | project TimeGenerated, LogicalServerName_s, database_name_s, additional_information_s299Views0likes0Comments
Creating LinkedServer between On-Prem SQL to Azure SQL MI
Hi, is it possible to use security option (Be made using the login's current security context )with lnikedserver from on-prem SQL to MI ? Our MI is enabled for windows auth and we are successfully connect MI in SSMS using windows auth from on-prem client. when I use this option in linkedserver and try to access linked server with windows auth I get following error. Login failed for user '<token-identified principal>'. Reason: Could not find a user matching the name provided115Views0likes1Comment