azure service bus
107 TopicsWhat the Azure API Management integration means for Azure Service Bus
Azure API Management now provides a generally available policy for sending messages to Azure Service Bus. Using the send-service-bus-message policy, an API request can send a message directly to a Service Bus queue or topic. This allows you to put a governed HTTP API in front of an asynchronous messaging solution, without adding an intermediary service just to translate and forward the request. The API Management announcement explains how to configure the policy. In this post, we look at the Service Bus patterns you can use behind that API. Add an asynchronous boundary to your API An API often needs to accept a request without making the caller wait for all the work behind it to finish. For example, submitting an order might start inventory checks, payment processing, fulfillment, and customer notifications. A file upload might start validation and several other workflows. API Management handles the synchronous API boundary. It can authenticate and authorize callers, validate or transform requests, and apply quotas and rate limits. The policy then sends the message to a pre-created Service Bus queue or topic, where consumers can process it independently. This means the API can return an acceptance response while Service Bus holds the work for downstream processing. Producers and consumers can run at different rates, and a temporary issue in a consumer does not have to become an API failure. API Management authenticates to Service Bus using a system-assigned or user-assigned managed identity with the Azure Service Bus Data Sender role. Applications calling the API only need access to the API, not to the Service Bus namespace. Queue-backed APIs for commands and work items A queue fits when an API request represents a command or work item that one consumer should complete. Examples include process this order, generate this document, or import this file. The producer and consumer do not have to be available at the same time. Once Service Bus accepts the message, the consumer can process it independently of the original API request. This is useful for long-running work and integrations where the downstream system has limited availability. A queue also provides load leveling. It absorbs bursts of requests while consumers process messages at a sustainable rate. Multiple competing consumers can share the work, and you can scale those consumers without changing the public API. For workflows where the caller needs the final result, the API can expose a status endpoint or the application can send a notification when processing completes. Send commands to the right processor A queue fits when every command follows the same processing path. Use a topic when the same API sends work to different processors. For example, a document API can add the document type, tenant, region, or priority to the message properties. Subscription filters then direct each message to the right processor while callers continue to use one HTTP API. Each subscription has its own consumers and message state, so every processing path can scale independently. You can add or change the routing without changing the public API. Carry messaging information across the API boundary The policy can set the message body, application properties, message ID, session ID, and time-to-live. This allows the API to include information that Service Bus and downstream consumers can use: Add properties such as command type, tenant, region, or schema version for routing and filtering. Set a valid GUID as the message ID, such as the API Management request ID, when using Service Bus duplicate detection. Consumers should still process messages idempotently, as retries can happen elsewhere in the workflow. Set a valid GUID as the session ID to process related messages in order. The queue or topic subscription must have sessions enabled, and the consumer must accept the session. Set a time-to-live when work is no longer useful after a specific period. API Management can also store the result of the send in a policy variable. A send failure normally enters API Management error handling, or you can configure the policy to continue and handle the result in the API flow. Where this pattern fits This integration is useful when callers use HTTP while the system behind the API uses asynchronous messaging. Partners, web applications, mobile applications, and webhook producers can call a governed API without needing an AMQP library or access to Service Bus. Behind the API, you can use queues and topics for buffering, independent scaling, competing consumers, and command routing. The policy covers the send side of the integration. Consumers use the Service Bus SDKs or supported protocol integrations to receive and process the messages. More information can be found in the API Management policy reference, the configuration guide, and the Service Bus queues, topics, and subscriptions documentation.229Views0likes0CommentsSome Azure Service Bus SDK libraries will be retired on 30 September 2026—migrate to the latest SDKs
On 30 September 2026, we'll retire the Azure Service Bus SDK libraries WindowsAzure.ServiceBus, Microsoft.Azure.ServiceBus, and com.microsoft.azure.servicebus. Migrate to the latest Azure SDK libraries, which offer critical security updates and improved capabilities, before that date.11KViews2likes1CommentA message broker is only as reliable as the layer you stopped at
Reliability is easy to reduce to a single number. You find the SLA, you put it on a slide, and you move on. But a service-level agreement describes an outcome, not the set of decisions that produce it. The same Azure Service Bus namespace can keep running when a single server fails, survive the loss of an entire datacenter, or stay available through a regional outage, and which of those is true depends on choices you make, not on a percentage you read. Reliability is a stack of layers you compose to fit the workload, and the only real mistake is stopping at a layer below what the workload needs. That framing matters because the failures you are protecting against are not all the same size. A single host can fail. A whole availability zone can lose power. An entire region can go dark in a way that no amount of in-region redundancy will save you from. Each of those is a different blast radius, and each has a different control that answers it. Treating reliability as one setting leaves you protected against the small failures and exposed to the large ones, which is exactly the situation you do not want to discover during an incident. Why one copy is never enough Start with what the service already does for you, because it sets the baseline. Inside a region, every messaging store that Service Bus keeps for your namespace is held as three copies: one primary and two secondaries, kept in sync for both message data and management operations. If the primary copy fails, the service promotes a secondary to take its place with no downtime for your clients and no action from you. You did not configure this and you cannot turn it off. It is the floor. The floor is high, but it has an edge. Three copies protect you from a failed disk or a failed broker. They do not, on their own, tell you whether those three copies sit in the same building. That question, where the copies live, is what separates a namespace that survives a hardware fault from one that survives the loss of a datacenter, and it is the first real decision in the stack. We learned this in the datacenter too Nobody who ran their own infrastructure trusted a single disk. They put disks in a RAID array so one could fail without taking the data. Then they realized the array lived in one server, so they spread copies across servers. Then the servers lived in one room with one power feed, so they spread across rooms, and eventually across buildings. Each step answered a failure the step before it could not. The cloud did not retire that thinking. It packaged each layer into something you can turn on with far less effort than racking a second datacenter ever took, which means the only thing standing between you and the next layer of protection is deciding to use it. The reliability toolkit in Azure Service Bus Azure Service Bus gives you a set of reliability controls that map directly to those blast radii. As with every other part of the platform, the point is that they layer. You are not picking one. You are deciding how far out you need protection to reach. Built-in redundancy keeps multiple in-sync copies of your data inside the region and fails over between them automatically. Availability zones spread those copies across physically separate datacenters in the region, so the loss of a whole zone is survivable. Geo-Replication extends the namespace across regions, replicating both configuration and messages so you can promote a second region when the first one fails. The sections below walk through each and the failure it answers. Built-in redundancy, availability zones, and Geo-Replication, each protecting against a larger failure Availability zones are on by default Availability zones are physically separate groups of datacenters within a region, each with independent power, cooling, and networking. When a namespace is zone redundant, Service Bus spreads its compute, networking, and storage across zones and replicates message data synchronously between them, so a write is acknowledged only once multiple copies in different zones have it. Lose a zone and the service reroutes to the healthy zones automatically, with no data loss. The Service Bus SDKs already retry transient faults, so to the client it looks like any other brief reconnect. The best part is what you have to do to get it: nothing. Zone redundancy is automatically enabled when you create a namespace in a region that supports availability zones, it applies to every tier, and every namespace in such a region is zone redundant by default. For the overwhelming majority of namespaces, this is the reliability layer you want, and you already have it. Geo-Replication crosses regions with your messages Zones protect you inside a region. They do not help if the whole region is unavailable. For that, Geo-Replication extends a Premium namespace across regions, continuously replicating both the metadata (your queues, topics, subscriptions, and their configuration) and the data (the messages themselves, along with their state and property changes) from a primary region to a secondary. Clients connect to a single namespace hostname that always points at the current primary, so there are no connection string changes and no separate endpoints to juggle. When you need to move, you promote the secondary, the hostname repoints to it, and the old primary becomes the new secondary. Promotion is always yours to initiate. Azure never fails you over automatically, because only you know whether your wider system is ready to move regions. You choose a planned promotion, which waits for replication to catch up so nothing is lost, or a forced promotion, which moves immediately and may lose whatever has not yet replicated. How much a forced promotion can lose depends on the replication mode you configure, which is the real decision underneath Geo-Replication. Synchronous or asynchronous, and what you are really choosing Geo-Replication runs in one of two modes, and the difference is a trade between latency and data assurance. With synchronous replication, every write has to commit in both the primary and the secondary before the client gets its acknowledgment. Your recovery point objective is zero, no acknowledged message is ever lost, but each publish now pays the round trip to the other region, and your write availability depends on the secondary as well as the primary. With asynchronous replication, the primary commits and acknowledges first and replicates a moment later, up to a maximum lag you configure. Latency stays low and the loss of the secondary does not immediately stop the primary, but a forced promotion can lose whatever was still in flight, and if the lag grows past your configured maximum the primary starts throttling so replication can catch up. Which mode fits depends on the workload. Synchronous replication suits data you cannot afford to lose and where the regions are close enough that the latency is tolerable. Asynchronous replication suits workloads that value throughput and primary-region availability and can absorb a bounded amount of data loss on a forced promotion. Keep the primary and secondary close to each other when you run synchronously, because each write then pays the round trip between them. Asynchronous replication moves that round trip off the write path, so distance matters far less. How reliability meets the network Reliability and network security are designed as one system, and Geo-Replication is where they meet most visibly. A namespace locked down with private endpoints has to keep that isolation working through a promotion, and that takes planning. A private endpoint is an IP in a single region, and Azure DNS private zones resolve the namespace name to it. Promote to the secondary region without preparing for it and clients can end up resolving to a private IP that no longer answers. The fix is to create a private endpoint in each region, peer the virtual networks so clients can reach either one, and manage DNS so the namespace name always resolves to the private endpoint in the current primary, updating it as part of the promotion. Service endpoints have it easier, because a subnet rule is not tied to a regional address and keeps working across a promotion untouched. The companion post on network security walks the controls themselves; the point here is that you plan the failover and the network together, never one after the other. Right-size the stack to the workload None of this means every namespace needs every layer. The workload draws the lines. Built-in redundancy and zone redundancy are on by default, so the floor of your reliability stack is already as high as the platform can make it. The decision that takes real thought is whether to cross regions, and that depends on how much data loss the workload can tolerate. A namespace that ingests telemetry you can afford to lose for a few minutes does not need a second region. A payment pipeline that cannot drop a single instruction does, and probably wants synchronous replication on top. So treat reliability the way you treat the rest of the platform: a stack you assemble to the workload, not a number you accept. Take the layers that are already on, reach across zones without thinking about it because the platform already did, and add cross-region replication where the workload's tolerance for an outage demands it. And remember that the higher reliability tiers reward you twice: running Premium in a region with availability zones lifts your availability commitment as well as your actual resilience. The strongest resilience is rarely one dramatic setting. It is the right layer for each size of failure, chosen on purpose. Getting started Open your namespace in the portal and check the region it runs in. If that region supports availability zones, your namespace is already zone redundant and the reliability floor is in place. The decision that takes real thought is whether to cross regions: for any workload that cannot afford to lose messages in a regional outage, enable Geo-Replication on a Premium namespace and choose synchronous or asynchronous replication based on how much data loss it can tolerate. Everything else can stay on the layers that are already on. The reliability documentation covers each step. Match the layer to the failure you actually need to survive.185Views0likes0CommentsSecuring message brokers takes more than turning off public access
Over the last few years, enterprises have done the hard work of locking down their cloud networks. Public endpoints get switched off. Traffic moves onto private IPs inside a virtual network. Shared secrets get replaced with identities that can be governed and revoked. This is the practical shape of a zero-trust strategy, where you assume breach, never trust, and always verify. It is the right direction, and your messaging infrastructure deserves the same protection as the rest of your estate. The instinct, though, is to treat network security as a single switch. Turn off public access, and you are done. Real deployments are not that simple. A namespace that backs a payment pipeline, a namespace that ingests telemetry from thousands of devices, and a throwaway namespace for a nightly batch job do not need the same controls, and they do not need to pay the same price for them. Network security is a set of layers you compose to fit the workload, not one toggle you flip and forget. That matters because a namespace starts out permissive by design. A message broker that you create and walk away from accepts connections from anywhere on the internet so you can get going quickly, authenticated by a key that anyone can copy. Those keys could end up in places they should not, including public source repositories. The job is to move from that open starting point to a posture that fits the workload, with the right controls in front of it. Why a message broker needs more than one control Picture a service that processes orders through a message broker. The clients run inside an Azure virtual network. Some run on premises. A few partner systems need to reach the broker from outside your tenant entirely. There is no single rule that covers all of those callers well. An IP allow list is perfect for the partner with a stable address range and useless for the fleet of autoscaling workers whose addresses change by the hour. A private endpoint is exactly right for the in-network clients and irrelevant to the partner who has no presence in your virtual network at all. This is why network security is layered. Each control answers a different question. Which public addresses may reach this namespace? Which subnets in my virtual network may reach it? Should it have a public surface at all, or should it live entirely on private IPs? And once I have a dozen resources configured this way, how do I manage them as a group rather than one rule at a time? Pick the controls that answer the questions your workload actually asks. We already solved this once on premises Nobody secured a datacenter with a single firewall rule. There was a perimeter, then segmentation inside it, then host-level controls, then identity on top. Each layer was there precisely because the one outside it could be breached. Defense in depth was the whole point, because any single barrier eventually has a gap. The cloud did not change that principle. It just gave us cleaner tools to express it, and a default posture that demands we use them. The network security toolkit in Azure Service Bus Azure Service Bus gives you a full set of network security controls, and the point is that they layer. You are not choosing one. You are assembling the combination that matches the workload. IP firewall rules restrict access to specific public IP addresses or ranges. Service endpoints grant access to specific virtual network subnets. Private endpoints put a private IP from your own virtual network in front of the namespace, so traffic never touches the public internet. Network Security Perimeter draws a logical boundary around the namespace and the other resources it works with, managed as one set of rules. The sections below walk through each, when to reach for it, and how it fits with the others. IP firewall rules, service endpoints, private endpoints, and Network Security Perimeter, layered by the caller each answers IP firewall rules The simplest control is an allow list of public IP addresses. By default, a namespace accepts connections from all networks, which is equivalent to allowing the entire address range. The moment you switch to selected networks and add a rule, the default flips to deny: add even a single address and every other source is blocked, so the allow list becomes the only way in. This is the right tool for callers with stable, known addresses, such as a partner system or a fixed egress IP. It also has the widest reach of these controls: it works on every tier, while service and private endpoints are a Premium capability. For Premium namespaces you set it up in the portal; on Basic and Standard you configure it through Resource Manager templates, the CLI, PowerShell, or the REST API. One caution: a firewall rule can also block Azure services that legitimately need to reach your namespace. Service Bus lets you exempt trusted Microsoft services from the firewall, and you should pair that exemption with a managed identity on the service using it. Service endpoints When your clients live inside Azure virtual networks, service endpoints are the lighter-weight way to secure the namespace. A virtual network rule locks the namespace to specific subnets: every workload in an associated subnet is granted access while the rule exists, and once you pair that with denying public access, the namespace is no longer reachable on a public address at all. Service Bus never makes an outbound connection to your subnet; the trust flows one way. Service endpoints are lightweight and add no moving parts, so when all you need is to keep a namespace reachable only from your own network, this is usually the right choice before you reach for anything heavier. Private endpoints Private endpoints do everything a service endpoint does and add two things it cannot. First, they put a private IP from your virtual network in front of the namespace, so clients on-premises or in peered virtual networks can reach it over the Microsoft backbone on a private address that never touches the public internet. Second, they let you prevent data exfiltration: combined with network policies, a workload in your subnet can be allowed to reach that namespace and nothing else. Resolution depends on Azure DNS private zones, which point the namespace name to the private IP while public DNS still resolves to the public address, so the private path only works where that private zone is in scope. All of this comes with more configuration than a service endpoint, so reach for private endpoints when you need private-IP access from outside the virtual network or exfiltration control, not simply to secure a namespace that a service endpoint could already lock down. A perimeter over the controls you already manage Configuring firewall rules and endpoints one resource at a time becomes its own risk as an estate grows. Network Security Perimeter takes a different approach: you draw a logical boundary and associate your platform resources with it. Inside the perimeter, resources communicate with each other freely, while public access from outside is denied unless an explicit inbound or outbound rule allows it. This is especially useful for keeping a namespace and the resources it depends on, like the Key Vault holding your customer-managed keys, under one consistent set of rules. It is complementary to private endpoints rather than a replacement: private endpoints secure the path from your virtual network into the namespace, while the perimeter secures the namespace's own public surface and its conversations with neighbors. Used together they give you defense in depth, and you can start a resource in transition mode to observe traffic before switching to enforced mode and locking it down. How the network layer meets reliability Geo-Replication requires careful thought about networking, because clients have to keep their access as the primary instance moves from one region to another. Service endpoints make this easy: because the rule lives on your subnet rather than on a region-specific address, it keeps working across a Geo-Replication promotion with no reconfiguration. Private endpoints take more care for a different reason. A private endpoint is regional infrastructure, so a single endpoint can survive the namespace primary role moving but not an outage of the endpoint's own region. The fix is to create a private endpoint in each application region and use a private DNS zone for that region's virtual network, so each region resolves the namespace name to its local endpoint. When you promote the namespace, Service Bus routes traffic through the logical namespace to the new primary; clients keep the same name and do not need a DNS change just because the primary role moved. If you share one private DNS zone across regions, make sure every client network can reach the endpoint that record resolves to. Plan the network and the failover together and the two reinforce each other rather than fight. Identity is the layer on top Network controls decide who can reach the namespace; identity decides who can do what once they arrive. The weakest option is a shared access signature, a string tied to send, listen, or manage rights. It works, and it is far better than nothing, but it is a string, and strings get copied. The stronger path is a managed identity authenticating through Entra ID, which removes the secret from the equation entirely and lets you grant least-privilege roles like Azure Service Bus Data Sender or Data Receiver. Since Entra ID is already part of your subscription, there is rarely a reason not to use it everywhere. Network isolation keeps the wrong callers out; identity makes sure the right ones can only do what they should. Right-size the stack to the workload None of this means turning every control on for every namespace. The workload makes most of the calls for you. IP firewall rules and service endpoints are easy to apply, so there is rarely a reason to leave a namespace open to all networks. Zone redundancy spreads your namespace across availability zones and is on by default in supported regions, so the reliability floor is already in place. Private endpoints and a second region are larger steps you take only where the workload genuinely needs them. A nightly batch namespace does not need private endpoints and a second region. A payment pipeline does. So treat network security as a stack you assemble, not a switch you flip. Start from a namespace that is closed to all networks by default, add the control that matches how your clients actually connect, and put identity on top of all of it. The strongest security is rarely a single dramatic setting. It is the combination of controls, each one assuming the layer in front of it might fail, that makes a namespace genuinely hard to reach for anyone who should not. Getting started Open your namespace's Networking tab in the portal and check one thing first: whether it still accepts traffic from all networks. If it does, that is the change to make today. Switch to selected networks and add the single control that matches how your clients connect, an IP rule for a fixed public address, a service endpoint for a subnet, or a private endpoint for traffic that should never leave the backbone. The network security documentation walks through each control step by step. Pick the one your workload calls for and close the biggest gap first.279Views1like1Comment
Azure Event Grid with ASB
Hi, we need to push Event Grid events for blob creation to an Azure Service Bis queue to deduplicate as the EG guarantee "At least one delivery" pattern, but the problem is that we need to deduplicate with blob name as "MessageId" on ASB side. The problem is that the blob name is not present in the event data. we have only "subject" with the full url that can exceed 128 characters, the limit of ASb Messageid. In some duplicate events I found that the filed "data/storageDiagnostics/batchId" is the same for duplicated events. I'm wonderring if this batchId will be always the same for duplicate events, I can use it as "MessagesId" in "Delivery properties"230Views0likes2CommentsAnnouncing general availability of confidential computing for Azure Service Bus Premium
Today we are excited to announce the general availability of confidential computing for Azure Service Bus Premium. With this capability, your Service Bus namespace processes messages inside hardware-based trusted execution environments (TEEs), preventing unauthorized access to data while it is being processed. This rounds out our protection story alongside existing encryption at rest and in transit, giving customers with regulatory or sensitive workloads a way to protect their messaging data through every stage of its lifecycle. How confidential computing fits with existing Service Bus security Service Bus already provides strong protection for messaging data. TLS encryption protects data in transit, and encryption at rest with optional support for customer-managed keys (CMK) protects data at rest. Network controls such as private endpoints, IP firewall rules, and managed identities restrict who can reach the namespace and how it authenticates to dependent services. Confidential computing fills the remaining gap by adding hardware-level isolation to data in use. When a Service Bus Premium namespace runs on confidential compute hardware, message processing happens inside a TEE, an isolated portion of the processor and memory that even privileged operators cannot access. This is the same model that backs Azure confidential computing for VMs and containers, now applied to managed messaging. Concepts Confidential computing is a namespace-level setting. You enable it when you create a Service Bus Premium namespace, and the setting is immutable for the lifetime of the namespace. After it is enabled, all queues, topics, and subscriptions in that namespace benefit from hardware-isolated processing automatically. No application changes are required, so existing clients and messaging patterns continue to work without modification. Because the setting is immutable, customers who want to move an existing workload to confidential computing need to create a new namespace with the setting enabled and migrate their queues and topics across. Regional availability At general availability, confidential computing for Service Bus Premium is available in Korea Central and UAE North. Getting started You can enable confidential computing on a new Service Bus Premium namespace from the Azure portal: In the Azure portal, open the Create namespace page. Select Premium for the pricing tier. Select a supported region. For Confidential compute, select Enabled. Fill in the remaining fields and select Review + create. You can also enable confidential computing programmatically through Bicep, ARM templates, or any other deployment tooling that supports the platformCapabilities property on the namespace resource. Combine with customer-managed keys for maximum protection For workloads with the strictest requirements, we recommend pairing confidential computing with customer-managed keys backed by Azure Key Vault Managed HSM. This combination protects data in use through the TEE, protects data at rest through validated hardware security modules, and keeps full control of the encryption keys with the customer. Together with private endpoints and managed identities, this gives customers a defense-in-depth posture that meets the most stringent regulatory and compliance requirements. More information on this feature can be found in the documentation.284Views0likes0CommentsAzure Service Bus Premium now offers 99.99% SLA in all Availability Zone regions
Today we are excited to announce an update to the Azure Service Bus Service Level Agreement. Starting May 1, 2026, all Premium namespaces deployed in regions with Availability Zone support will receive a 99.99% uptime SLA. This applies regardless of whether partitioning is enabled on the namespace. Service Bus Premium is the tier customers choose for their most important workloads, where dedicated resources, predictable performance, and strong isolation matter. With this update, the SLA matches the resilience those deployments already have when they run across Availability Zones. What is an Availability Zone Availability Zones are physically separate datacenters within an Azure region, each with independent power, cooling, and networking. A Premium namespace deployed in an Availability Zone region is automatically replicated across multiple zones, so the messaging service stays available even if a full datacenter goes offline. The new 99.99% SLA reflects this zone-redundant deployment model, with no additional configuration required. What changed Previously, the 99.99% SLA was available only for Premium namespaces that had partitioned namespaces enabled and were deployed in a region with Availability Zone support. With this update, we are removing the partitioning requirement. Any Premium namespace in an Availability Zone region now qualifies for the 99.99% SLA - no configuration changes needed. Scenario SLA before May 1 SLA from May 1 Premium, AZ region, partitioned 99.99% 99.99% Premium, AZ region, non-partitioned 99.9% 99.99% All tiers, non-AZ region 99.9% 99.9% For customers already running Premium namespaces in Availability Zone regions without partitioning, this is an automatic improvement - there is nothing to change or reconfigure. Why this matters When we announced general availability of partitioned namespaces in November 2023, we introduced the 99.99% SLA as a benefit tied to both partitioning and Availability Zones. Partitioning helps workloads that need higher throughput, but not every workload requires it. Customers who chose Premium for its dedicated resources, network isolation, and predictable performance - but did not need the throughput scaling of partitioned namespaces - were left at the 99.9% tier despite being deployed with zone redundancy. This update recognizes that the core reliability benefit comes from the Availability Zone deployment itself. Premium namespaces in AZ regions already run on zone-redundant infrastructure, and the SLA now reflects that. What about partitioned namespaces Partitioned namespaces remain fully supported and continue to provide throughput benefits by distributing messaging across multiple brokers. The change here is purely about the SLA eligibility - partitioning is no longer a prerequisite for the higher SLA. If your workload benefits from partitioned namespaces for throughput reasons, we still recommend using them. Getting started If you are already running a Premium namespace in an Availability Zone region, you automatically benefit from the 99.99% SLA starting May 1, 2026. No action is required. If you are running a Standard namespace and your workload demands the higher availability that comes with Premium, consider upgrading to the Premium tier. Premium is built for the workloads where messaging cannot fail, providing dedicated resources, predictable performance, network isolation features like VNet integration and private endpoints, and now a 99.99% SLA in any Availability Zone region. More information can be found in the SLA for Azure Service Bus and the Service Bus Premium tier documentation.698Views0likes0Comments
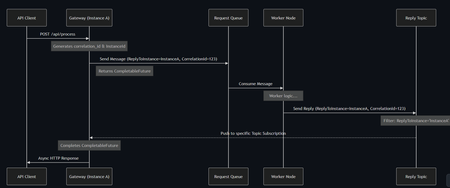
[Architecture Pattern] Scaling Sync-over-Async Edge Gateways by Bypassing Service Bus Sessions
Hi everyone, I wanted to share an architectural pattern and an open-source implementation we recently built to solve a major scaling bottleneck at the edge: bridging legacy synchronous HTTP clients to long-running asynchronous AI workers. The Problem: Stateful Bottlenecks at the Edge When dealing with slow AI generation tasks (e.g., 45+ seconds), standard REST APIs will drop the connection resulting in 504 Gateway Timeouts. The standard integration pattern here is Sync-over-Async. The Gateway accepts the HTTP request, drops a message onto Azure Service Bus, waits for the worker to reply, and maps the reply back to the open HTTP connection. However, the default approach is to use Service Bus Sessions for request-reply correlation. At scale, this introduces severe limitations: 1. Stateful Gateways: The Gateway pod must request an exclusive lock on the session. It becomes tightly coupled to that specific request. 2. Horizontal Elasticity is Broken: If a reply arrives, it must go to the specific pod holding the lock. Other idle pods cannot assist. 3. Hard Limits: A traffic spike easily exhausts the namespace concurrent session limits (especially on the Standard tier). The Solution: Stateless Filtered Topics To achieve true horizontal scale, the API Gateway layer must be 100% stateless. We bypassed Sessions entirely by pushing the routing logic down to the broker using a Filtered Topic Pattern. How it works: 1. The Gateway injects a CorrelationId property (e.g., Instance-A-Req-1) into the outbound request. 2. Instead of locking a session, the Gateway spins up a lightweight, dynamic subscription on a shared Reply Topic with a SQL Filter: CorrelationId = 'Instance-A-Req-1'. 3. The AI worker processes the task and drops the reply onto the shared topic with the same property. 4. The Azure Service Bus broker evaluates the SQL filter and pushes the message directly to the correct Gateway pod. No session locks. No implicit instance affinity. Complete horizontal scalability. If a pod crashes, its temporary subscription simply drops—preventing locked poison messages. Open Source Implementation Implementing dynamic Service Bus Administration clients and receiver lifecycles is complex, so I abstracted this pattern into a Spring Boot starter for the community. It handles all the dynamic subscription and routing logic under the hood, allowing developers to execute highly scalable Sync-over-Async flows with a single line of code returning a CompletableFuture. GitHub Repository: https://github.com/ShivamSaluja/sentinel-servicebus-starter Full Technical Write-up: https://dev.to/shivamsaluja/sync-over-async-bypassing-azure-service-bus-session-limits-for-ai-workloads-269d I would love to hear from other architects in this hub. Have you run into similar session exhaustion limits when building Edge API Gateways? Have you adopted similar stateless broker-side routing, or do you rely on sticky sessions at your load balancers?161Views1like0CommentsAnnouncing general availability of Network Security Perimeter for Azure Service Bus
Today we are excited to announce the general availability of Network Security Perimeter (NSP) support for Azure Service Bus. Network Security Perimeter allows you to define a logical network boundary around your Service Bus namespaces and other Azure PaaS resources, restricting public network access and enabling secure communication between services within the perimeter. This builds on the existing network security options for Service Bus - IP firewall rules, VNet service endpoints, and private endpoints - by providing centralized, perimeter-level control over which resources can communicate with each other. How Network Security Perimeter fits with existing network security Service Bus already provides several options for controlling network access to your namespaces. IP firewall rules let you restrict access to specific IPv4 addresses. VNet service endpoints and private endpoints bring your Service Bus traffic onto the Microsoft backbone network, avoiding the public internet entirely. These features give you fine-grained control at the individual namespace level. Network Security Perimeter takes a different approach. Instead of configuring network rules on each resource individually, you create a perimeter and associate your PaaS resources with it. By default, resources inside the perimeter can communicate with each other, while all public access from outside the perimeter is denied. You then define explicit inbound and outbound access rules for any traffic that needs to cross the perimeter boundary. This means a Service Bus namespace, the Azure Key Vault it uses for customer-managed keys, and any other associated resources can all be managed under one consistent set of network rules. This is complementary to private endpoints. Private endpoints secure traffic between your virtual network and Service Bus; Network Security Perimeter secures the public endpoint of Service Bus itself. Used together, they provide defense-in-depth for your messaging infrastructure. Concepts Network Security Perimeter works with profiles and access rules. A profile is a collection of access rules that applies to the resources associated with it. You can use different profiles within the same perimeter to apply different rule sets to different groups of resources. There are two access modes: - Transition mode - the default mode when you first associate a resource. In this mode, Network Security Perimeter logs access attempts without enforcing restrictions, allowing you to understand your existing traffic patterns before locking things down. - Enforced mode - once you are confident in your access rules, switch to enforced mode. All traffic from outside the perimeter is denied by default unless an explicit access rule permits it. Access rules Access rules control traffic crossing the perimeter boundary: - Inbound rules allow traffic from specific IP address ranges or Azure subscriptions to reach your Service Bus namespace. - Outbound rules allow your Service Bus namespace to communicate with external resources identified by fully qualified domain names (FQDNs). Within the perimeter, PaaS-to-PaaS communication is allowed by default without additional rules. Supported scenarios Network Security Perimeter for Service Bus supports the following scenarios: - Customer-managed keys (CMK) - Service Bus namespaces that use customer-managed keys need to communicate with Azure Key Vault. By placing both the Service Bus namespace and the Key Vault within the same perimeter, this communication is secured without requiring additional network configuration. - Diagnostic logging - Network Security Perimeter provides access logs that record every allowed or denied connection attempt. These logs support audit and compliance requirements by giving you visibility into exactly what is accessing your Service Bus namespace and from where. Getting started You can associate your Service Bus namespace with a Network Security Perimeter directly from the namespace in the Azure portal: On your Service Bus namespace page, select Networking under Settings. Select the Public access tab. In the Network security perimeter section, select Associate. In the Select network security perimeter dialog, search for and select the perimeter you want to associate with the namespace. Select a profile to associate with the namespace. Select Associate to complete the association. We recommend starting in transition mode to understand your existing traffic patterns, then moving to enforced mode once you have configured the appropriate access rules. More information on this feature can be found in the documentation.1.1KViews1like0Comments
Introducing Administration Client Support for the Azure Service Bus Emulator
We’re excited to announce administration client support for the Azure Service Bus emulator, extending the emulator beyond messaging operations to include management capabilities such as creating, updating, and deleting entities locally. Azure Service Bus is a fully managed enterprise message broker that supports reliable messaging through queues and publish‑subscribe topics. Since the introduction of the local emulator, developers have been able to develop and test message flows locally. With this update, the emulator now supports a broader set of workflows that depend on management operations as part of application startup or deployment. Why Administration Client support? Until now, the Service Bus emulator supported declarative entity configuration through a configuration file, allowing developers to define entities before starting the emulator. While this worked well for static setups, it limited workflows that require dynamic, runtime entity creation or management. Administration Client support unlocks on‑the‑fly entity creation and management, enabling developers to create, update, or delete entities while the emulator is running. This removes the need to restart the emulator for common management operations and brings the local development experience closer to real‑world Azure Service Bus usage. How it works By default, the emulator uses port 5300 for management operations. When performing management tasks with the Service Bus Administration Client, be sure to add the port number to the emulator connection string. Declarative configuration using the emulator’s configuration file remains supported and continues to serve as the source of truth during emulator initialization. Any configuration defined in the file is reapplied when the emulator is initialized and overrides entities created through the Administration Client, making it easy to reset or standardize local environments. For the Service Bus emulator, management operations using the Service Bus Administration Client are natively supported in .NET. Language‑specific reference samples are available to help you get started. Getting started The Azure Service Bus emulator is available as a Docker image and runs on Windows, macOS, and Linux. You can interact with the emulator using the latest Service Bus client SDKs for messaging operations, and use the Service Bus Administration Client to manage entities locally during development and testing. To explore administration scenarios, including creating and deleting queues or topics, refer to the Service Bus emulator reference samples. For more details about the emulator and supported features, visit aka.ms/servicebusemulator Share your feedback We appreciate your feedback as we continue to improve the Service Bus emulator. Please share issues, suggestions, or feature requests through the GitHub repository to help us refine the local development experience. Happy building—and may all your local tests pass! 😊1.2KViews0likes0Comments