azure paas
212 TopicsContext Engineering Lessons from Building Azure SRE Agent
We started with 100+ tools and 50+ specialized agents. We ended with 5 core tools and a handful of generalists. The agent got more reliable, not less. Every context decision is a tradeoff: latency vs autonomy, evidence-building vs speed, oversight - and the cost of being wrong. This post is a practical map of those knobs and how we adjusted them for SRE Agent.15KViews22likes2CommentsAnnouncing the reliable web app pattern for .NET
Reliable web app pattern is a set of best practices built on the Azure Well-Architected Framework that helps developers successfully migrate web applications to the cloud and set a foundation for future modernization in Azure.56KViews11likes4CommentsCalculating Chargebacks for Business Units/Projects Utilizing a Shared Azure OpenAI Instance
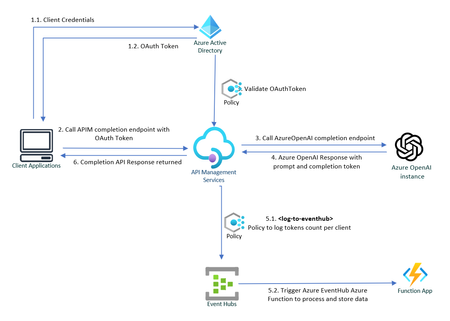
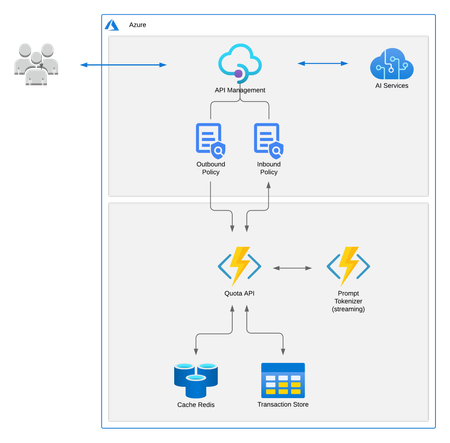
Azure OpenAI Service is at the forefront of technological innovation, offering REST API access to OpenAI's suite of revolutionary language models, including GPT-4, GPT-35-Turbo, and the Embeddings model series. Enhancing Throughput for Scale As enterprises seek to deploy OpenAI's powerful language models across various business units, they often require granular control over configuration and performance metrics. To address this need, Azure OpenAI Service is introducing dedicated throughput, a feature that provides a dedicated connection to OpenAI models with guaranteed performance levels. Throughput is quantified in terms of tokens per second (tokens/sec), allowing organizations to precisely measure and optimize the performance for both prompts and completions. The model of provisioned throughput provides enhanced management and adaptability for varying workloads, guaranteeing system readiness for spikes in demand. This capability also ensures a uniform user experience and steady performance for applications that require real-time responses. Resource Sharing and Chargeback Mechanisms Large organizations frequently provision a singular instance of Azure OpenAI Service that is shared across multiple internal departments. This shared use necessitates an efficient mechanism for allocating costs to each business unit or consumer, based on the number of tokens consumed. This article delves into how chargeback is calculated for each business unit based on their token usage. Leveraging Azure API Management Policies for Token Tracking Azure API Management Policies offer a powerful solution for monitoring and logging the token consumption for each internal application. The process can be summarized in the following steps: ** Sample Code: Refer to this GitHub repository to get a step-by-step instruction on how to build the solution outlined below : private-openai-with-apim-for-chargeback 1. Client Applications Authorizes to API Management To make sure only legitimate clients can call the Azure OpenAI APIs, each client must first authenticate against Azure Active Directory and call APIM endpoint. In this scenario, the API Management service acts on behalf of the backend API, and the calling application requests access to the API Management instance. The scope of the access token is between the calling application and the API Management gateway. In API Management, configure a policy (validate-jwt or validate-azure-ad-token) to validate the token before the gateway passes the request to the backend. 2. APIM redirects the request to OpenAI service via private endpoint. Upon successful verification of the token, Azure API Management (APIM) routes the request to Azure OpenAI service to fetch response for completions endpoint, which also includes prompt and completion token counts. 3. Capture and log API response to Event Hub Leveraging the log-to-eventhub policy to capture outgoing responses for logging or analytics purposes. To use this policy, a logger needs to be configured in the API Management: # API Management service-specific details $apimServiceName = "apim-hello-world" $resourceGroupName = "myResourceGroup" # Create logger $context = New-AzApiManagementContext -ResourceGroupName $resourceGroupName -ServiceName $apimServiceName New-AzApiManagementLogger -Context $context -LoggerId "OpenAiChargeBackLogger" -Name "ApimEventHub" -ConnectionString "Endpoint=sb://<EventHubsNamespace>.servicebus.windows.net/;SharedAccessKeyName=<KeyName>;SharedAccessKey=<key>" -Description "Event hub logger with connection string" Within outbound policies section, pull specific data from the body of the response and send this information to the previously configured EventHub instance. This is not just a simple logging exercise; it is an entry point into a whole ecosystem of real-time analytics and monitoring capabilities: <outbound> <choose> <when condition="@(context.Response.StatusCode == 200)"> <log-to-eventhub logger-id="TokenUsageLogger">@{ var responseBody = context.Response.Body?.As<JObject>(true); return new JObject( new JProperty("Timestamp", DateTime.UtcNow.ToString()), new JProperty("ApiOperation", responseBody["object"].ToString()), new JProperty("AppKey", context.Request.Headers.GetValueOrDefault("Ocp-Apim-Subscription-Key",string.Empty)), new JProperty("PromptTokens", responseBody["usage"]["prompt_tokens"].ToString()), new JProperty("CompletionTokens", responseBody["usage"]["completion_tokens"].ToString()), new JProperty("TotalTokens", responseBody["usage"]["total_tokens"].ToString()) ).ToString(); }</log-to-eventhub> </when> </choose> <base /> </outbound> EventHub serves as a powerful fulcrum, offering seamless integration with a wide array of Azure and Microsoft services. For example, the logged data can be directly streamed to Azure Stream Analytics for real-time analytics or to Power BI for real-time dashboards With Azure Event Grid, the same data can also be used to trigger workflows or automate tasks based on specific conditions met in the incoming responses. Moreover, the architecture is extensible to non-Microsoft services as well. Event Hubs can interact smoothly with external platforms like Apache Spark, allowing you to perform data transformations or feed machine learning models. 4: Data Processing with Azure Functions An Azure Function is invoked when data is sent to the EventHub instance, allowing for bespoke data processing in line with your organization’s unique requirements. For instance, this could range from dispatching the data to Azure Monitor, streaming it to Power BI dashboards, or even sending detailed consumption reports via Azure Communication Service. [Function("TokenUsageFunction")] public async Task Run([EventHubTrigger("%EventHubName%", Connection = "EventHubConnection")] string[] openAiTokenResponse) { //Eventhub Messages arrive as an array foreach (var tokenData in openAiTokenResponse) { try { _logger.LogInformation($"Azure OpenAI Tokens Data Received: {tokenData}"); var OpenAiToken = JsonSerializer.Deserialize<OpenAiToken>(tokenData); if (OpenAiToken == null) { _logger.LogError($"Invalid OpenAi Api Token Response Received. Skipping."); continue; } _telemetryClient.TrackEvent("Azure OpenAI Tokens", OpenAiToken.ToDictionary()); } catch (Exception e) { _logger.LogError($"Error occured when processing TokenData: {tokenData}", e.Message); } } } In the example above, Azure function processes the tokens response data in Event Hub and sends them to Application Insights telemetry, and a basic Dashboard is configured in Azure, displaying the token consumption for each client application. This information can conveniently be used to compute chargeback costs. A sample query used in dashboard above that fetches tokens consumed by a specific client: customEvents | where name contains "Azure OpenAI Tokens" | extend tokenData = parse_json(customDimensions) | where tokenData.AppKey contains "your-client-key" | project Timestamp = tokenData.Timestamp, Stream = tokenData.Stream, ApiOperation = tokenData.ApiOperation, PromptTokens = tokenData.PromptTokens, CompletionTokens = tokenData.CompletionTokens, TotalTokens = tokenData.TotalTokens Azure OpenAI Landing Zone reference architecture A crucial detail to ensure the effectiveness of this approach is to secure the Azure OpenAI service by implementing Private Endpoints and using Managed Identities for App Service to authorize access to Azure AI services. This will limit access so that only the App Service can communicate with the Azure OpenAI service. Failing to do this would render the solution ineffective, as individuals could bypass the APIM/App Service and directly access the OpenAI Service if they get hold of the access key for OpenAI. Refer to Azure OpenAI Landing Zone reference architecture to build a secure and scalable AI environment. Additional Considerations If the client application is external, consider using an Application Gateway in front of the Azure APIM If "streaming" is set to true, tokens count is not returned in response. In that that case libraries like tiktoken (Python), orgpt-3-encoder(javascript) for most GPT-3 models can be used to programmatically calculate tokens count for the user prompt and completion response. A useful guideline to remember is that in typical English text, one token is approximately equal to around 4 characters. This equates to about three-quarters of a word, meaning that 100 tokens are roughly equivalent to 75 words. (P.S. Microsoft does not endorse or guarantee any third-party libraries.) A subscription key or a custom header like app-key can also be used to uniquely identify the client as appId in OAuth token is not very intuitive. Rate-limiting can be implemented for incoming requests using OAuth tokens or Subscription Keys, adding another layer of security and resource management. The solution can also be extended to redirect different clients to different Azure OpenAI instances. For example., some clients utilize an Azure OpenAI instance with default quotas, whereas premium clients get to consume Azure Open AI instance with dedicated throughput. Conclusion Azure OpenAI Service stands as an indispensable tool for organizations seeking to harness the immense power of language models. With the feature of provisioned throughput, clients can define their usage limits in throughput units and freely allocate these to the OpenAI model of their choice. However, the financial commitment can be significant and is dependent on factors like the chosen model's type, size, and utilization. An effective chargeback system offers several advantages, such as heightened accountability, transparent costing, and judicious use of resources within the organization.23KViews10likes10Comments
Use managed identity instead of AzureWebJobsStorage to connect a function app to a storage account
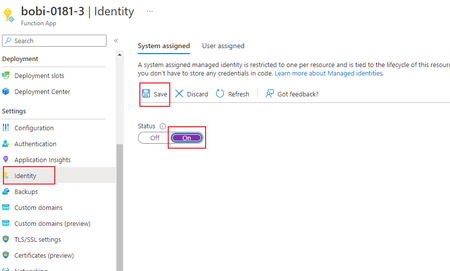
In a function app, usually we use appsetting AzureWebJobsStorage to connect to storage. This blog shows you how to configure a function app using Azure Active Directory identities instead of secrets or connection strings, where possible. Using identities helps you avoid accidentally leaking sensitive secrets and can provide better visibility into how data is accessed. This will not work if the storage account is in a sovereign cloud or has a custom DNS. IMPORTANT! When running in a Consumption or Elastic Premium plan, your app uses the WEBSITE_AZUREFILESCONNECTIONSTRING and WEBSITE_CONTENTSHARE settings when connecting to Azure Files on the storage account used by your function app. Azure Files doesn't support using managed identity when accessing the file share. That is to say, if your functio app is running on Consumption/EP, plan, you can only delete and recreate function app on app service plan to avoid using File Share. For more information, see Azure Files supported authentication scenarios Below are the steps to do configuration. 1. Enable system assigned identity in your function app and save it. 2. Give storage access to your function app. Search for Storage Blob Data Owner, select it. 3. If you configure a blob-triggered function app, repeat the step 2 to add Storage Account Contributor and Storage Queue Data Contributor roles which will be used for blob trigger. 4. Return to Access Control (IAM), click Role assignments, search for your function app name to confirm the roles are added successfully. 5. Navigate to your function app. Select Configuration and edit AzureWebJobsStorage. Change the name to AzureWebJobsStorage__accountname. Change the value to your storage account name. (The new setting uses a double underscore ( __ ), which is a special character in application settings.) 6. Delete the previous AzureWebJobsStorage. Then you will find your function app still works fine.100KViews9likes56CommentsChecklist for Migrating Web Apps to App Service
App Service continues to invest in migration tooling to allow customers to easily migrate their web apps to App Service. The current set of tools enable discovery, assessment, and migration of web apps across various scenarios and scopes viz. standalone web app, single IIS server and even a datacenter.16KViews8likes1CommentThe Agent that investigates itself
Azure SRE Agent handles tens of thousands of incident investigations each week for internal Microsoft services and external teams running it for their own systems. Last month, one of those incidents was about the agent itself. Our KV cache hit rate alert started firing. Cached token percentage was dropping across the fleet. We didn't open dashboards. We simply asked the agent. It spawned parallel subagents, searched logs, read through its own source code, and produced the analysis. First finding: Claude Haiku at 0% cache hits. The agent checked the input distribution and found that the average call was ~180 tokens, well below Anthropic’s 4,096-token minimum for Haiku prompt caching. Structurally, these requests could never be cached. They were false positives. The real regression was in Claude Opus: cache hit rate fell from ~70% to ~48% over a week. The agent correlated the drop against the deployment history and traced it to a single PR that restructured prompt ordering, breaking the common prefix that caching relies on. It submitted two fixes: one to exclude all uncacheable requests from the alert, and the other to restore prefix stability in the prompt pipeline. That investigation is how we develop now. We rarely start with dashboards or manual log queries. We start by asking the agent. Three months earlier, it could not have done any of this. The breakthrough was not building better playbooks. It was harness engineering: enabling the agent to discover context as the investigation unfolded. This post is about the architecture decisions that made it possible. Where we started In our last post, Context Engineering for Reliable AI Agents: Lessons from Building Azure SRE Agent, we described how moving to a single generalist agent unlocked more complex investigations. The resolution rates were climbing, and for many internal teams, the agent could now autonomously investigate and mitigate roughly 50% of incidents. We were moving in the right direction. But the scores weren't uniform, and when we dug into why, the pattern was uncomfortable. The high-performing scenarios shared a trait: they'd been built with heavy human scaffolding. They relied on custom response plans for specific incident types, hand-built subagents for known failure modes, and pre-written log queries exposed as opaque tools. We weren’t measuring the agent’s reasoning – we were measuring how much engineering had gone into the scenario beforehand. On anything new, the agent had nowhere to start. We found these gaps through manual review. Every week, engineers read through lower-scored investigation threads and pushed fixes: tighten a prompt, fix a tool schema, add a guardrail. Each fix was real. But we could only review fifty threads a week. The agent was handling ten thousand. We were debugging at human speed. The gap between those two numbers was where our blind spots lived. We needed an agent powerful enough to take this toil off us. An agent which could investigate itself. Dogfooding wasn't a philosophy - it was the only way to scale. The Inversion: Three bets The problem we faced was structural - and the KV cache investigation shows it clearly. The cache rate drop was visible in telemetry, but the cause was not. The agent had to correlate telemetry with deployment history, inspect the relevant code, and reason over the diff that broke prefix stability. We kept hitting the same gap in different forms: logs pointing in multiple directions, failure modes in uninstrumented paths, regressions that only made sense at the commit level. Telemetry showed symptoms, but not what actually changed. We'd been building the agent to reason over telemetry. We needed it to reason over the system itself. The instinct when agents fail is to restrict them: pre-write the queries, pre-fetch the context, pre-curate the tools. It feels like control. In practice, it creates a ceiling. The agent can only handle what engineers anticipated in advance. The answer is an agent that can discover what it needs as the investigation unfolds. In the KV cache incident, each step, from metric anomaly to deployment history to a specific diff, followed from what the previous step revealed. It was not a pre-scripted path. Navigating towards the right context with progressive discovery is key to creating deep agents which can handle novel scenarios. Three architectural decisions made this possible – and each one compounded on the last. Bet 1: The Filesystem as the Agent's World Our first bet was to give the agent a filesystem as its workspace instead of a custom API layer. Everything it reasons over – source code, runbooks, query schemas, past investigation notes – is exposed as files. It interacts with that world using read_file, grep, find, and shell. No SearchCodebase API. No RetrieveMemory endpoint. This is an old Unix idea: reduce heterogeneous resources to a single interface. Coding agents already work this way. It turns out the same pattern works for an SRE agent. Frontier models are trained on developer workflows: navigating repositories, grepping logs, patching files, running commands. The filesystem is not an abstraction layered on top of that prior. It matches it. When we materialized the agent’s world as a repo-like workspace, our human "Intent Met" score - whether the agent's investigation addressed the actual root cause as judged by the on-call engineer - rose from 45% to 75% on novel incidents. But interface design is only half the story. The other half is what you put inside it. Code Repositories: the highest-leverage context Teams had prewritten log queries because they did not trust the agent to generate correct ones. That distrust was justified. Models hallucinate table names, guess column schemas, and write queries against the wrong cluster. But the answer was not tighter restriction. It was better grounding. The repo is the schema. Everything else is derived from it. When the agent reads the code that produces the logs, query construction stops being guesswork. It knows the exact exceptions thrown, and the conditions under which each path executes. Stack traces start making sense, and logs become legible. But beyond query grounding, code access unlocked three new capabilities that telemetry alone could not provide: Ground truth over documentation. Docs drift and dashboards show symptoms. The code is what the service actually does. In practice, most investigations only made sense when logs were read alongside implementation. Point-in-time investigation. The agent checks out the exact commit at incident time, not current HEAD, so it can correlate the failure against the actual diffs. That's what cracked the KV cache investigation: a PR broke prefix stability, and the diff was the only place this was visible. Without commit history, you can't distinguish a code regression from external factors. Reasoning even where telemetry is absent. Some code paths are not well instrumented. The agent can still trace logic through source and explain behavior even when logs do not exist. This is especially valuable in novel failure modes – the ones most likely to be missed precisely because no one thought to instrument them. Memory as a filesystem, not a vector store Our first memory system used RAG over past session learnings. It had a circular dependency: a limited agent learned from limited sessions and produced limited knowledge. Garbage in, garbage out. But the deeper problem was retrieval. In SRE Context, embedding similarity is a weak proxy for relevance. “KV cache regression” and “prompt prefix instability” may be distant in embedding space yet still describe the same causal chain. We tried re-ranking, query expansion, and hybrid search. None fixed the core mismatch between semantic similarity and diagnostic relevance. We replaced RAG with structured Markdown files that the agent reads and writes through its standard tool interface. The model names each file semantically: overview.md for a service summary, team.md for ownership and escalation paths, logs.md for cluster access and query patterns, debugging.md for failure modes and prior learnings. Each carry just enough context to orient the agent, with links to deeper files when needed. The key design choice was to let the model navigate memory, not retrieve it through query matching. The agent starts from a structured entry point and follows the evidence toward what matters. RAG assumes you know the right query before you know what you need. File traversal lets relevance emerge as context accumulates. This removed chunking, overlap tuning, and re-ranking entirely. It also proved more accurate, because frontier models are better at following context than embeddings are at guessing relevance. As a side benefit, memory state can be snapshotted periodically. One problem remains unsolved: staleness. When two sessions write conflicting patterns to debugging.md, the model must reconcile them. When a service changes behavior, old entries can become misleading. We rely on timestamps and explicit deprecation notes, but we do not have a systemic solution yet. This is an active area of work, and anyone building memory at scale will run into it. The sandbox as epistemic boundary The filesystem also defines what the agent can see. If something is not in the sandbox, the agent cannot reason about it. We treat that as a feature, not a limitation. Security boundaries and epistemic boundaries are enforced by the same mechanism. Inside that boundary, the agent has full execution: arbitrary bash, python, jq, and package installs through pip or apt. That scope unlocks capabilities we never would have built as custom tools. It opens PRs with gh cli, like the prompt-ordering fix from KV cache incident. It pushes Grafana dashboards, like a cache-hit-rate dashboard we now track by model. It installs domain-specific CLI tools mid-investigation when needed. No bespoke integration required, just a shell. The recurring lesson was simple: a generally capable agent in the right execution environment outperforms a specialized agent with bespoke tooling. Custom tools accumulate maintenance costs. Shell commands compose for free. Bet 2: Context Layering Code access tells the agent what a service does. It does not tell the agent what it can access, which resources its tools are scoped to, or where an investigation should begin. This gap surfaced immediately. Users would ask "which team do you handle incidents for?" and the agent had no answer. Tools alone are not enough. An integration also needs ambient context so the model knows what exists, how it is configured, and when to use it. We fixed this with context hooks: structured context injected at prompt construction time to orient the agent before it takes action. Connectors - what can I access? A manifest of wired systems such as Log Analytics, Outlook, and Grafana, along with their configuration. Repositories - what does this system do? Serialized repo trees, plus files like AGENTS.md, Copilot.md, and CLAUDE.md with team-specific instructions. Knowledge map - what have I learned before? A two-tier memory index with a top-level file linking to deeper scenario-specific files, so the model can drill down only when needed. Azure resource topology - where do things live? A serialized map of relationships across subscriptions, resource groups, and regions, so investigations start in the right scope. Together, these context hooks turn a cold start into an informed one. That matters because a bad early choice does not just waste tokens. It sends the investigation down the wrong trajectory. A capable agent still needs to know what exists, what matters, and where to start. Bet 3: Frugal Context Management Layered context creates a new problem: budget. Serialized repo trees, resource topology, connector manifests, and a memory index fill context fast. Once the agent starts reading source files and logs, complex incidents hit context limits. We needed our context usage to be deliberately frugal. Tool result compression via the filesystem Large tool outputs are expensive because they consume context before the agent has extracted any value from them. In many cases, only a small slice or a derived summary of that output is actually useful. Our framework exposes these results as files to the agent. The agent can then use tools like grep, jq, or python to process them outside the model interface, so that only the final result enters context. The filesystem isn't just a capability abstraction - it's also a budget management primitive. Context Pruning and Auto Compact Long investigations accumulate dead weight. As hypotheses narrow, earlier context becomes noise. We handle this with two compaction strategies. Context Pruning runs mid-session. When context usage crosses a threshold, we trim or drop stale tool calls and outputs - keeping the window focused on what still matters. Auto-Compact kicks in when a session approaches its context limit. The framework summarizes findings and working hypotheses, then resumes from that summary. From the user's perspective, there's no visible limit. Long investigations just work. Parallel subagents The KV cache investigation required reasoning along two independent hypotheses: whether the alert definition was sound, and whether cache behavior had actually regressed. The agent spawned parallel subagents for each task, each operating in its own context window. Once both finished, it merged their conclusions. This pattern generalizes to any task with independent components. It speeds up the search, keeps intermediate work from consuming the main context window, and prevents one hypothesis from biasing another. The Feedback loop These architectural bets have enabled us to close the original scaling gap. Instead of debugging the agent at human speed, we could finally start using it to fix itself. As an example, we were hitting various LLM errors: timeouts, 429s (too many requests), failures in the middle of response streaming, 400s from code bugs that produced malformed payloads. These paper cuts would cause investigations to stall midway and some conversations broke entirely. So, we set up a daily monitoring task for these failures. The agent searches for the last 24 hours of errors, clusters the top hitters, traces each to its root cause in the codebase, and submits a PR. We review it manually before merging. Over two weeks, the errors were reduced by more than 80%. Over the last month, we have successfully used our agent across a wide range of scenarios: Analyzed our user churn rate and built dashboards we now review weekly. Correlated which builds needed the most hotfixes, surfacing flaky areas of the codebase. Ran security analysis and found vulnerabilities in the read path. Helped fill out parts of its own Responsible AI review, with strict human review. Handles customer-reported issues and LiveSite alerts end to end. Whenever it gets stuck, we talk to it and teach it, ask it to update its memory, and it doesn't fail that class of problem again. The title of this post is literal. The agent investigating itself is not a metaphor. It is a real workflow, driven by scheduled tasks, incident triggers, and direct conversations with users. What We Learned We spent months building scaffolding to compensate for what the agent could not do. The breakthrough was removing it. Every prewritten query was a place we told the model not to think. Every curated tool was a decision made on its behalf. Every pre-fetched context was a guess about what would matter before we understood the problem. The inversion was simple but hard to accept: stop pre-computing the answer space. Give the model a structured starting point, a filesystem it knows how to navigate, context hooks that tell it what it can access, and budget management that keeps it sharp through long investigations. The agent that investigates itself is both the proof and the product of this approach. It finds its own bugs, traces them to root causes in its own code, and submits its own fixes. Not because we designed it to. Because we designed it to reason over systems, and it happens to be one. We are still learning. Staleness is unsolved, budget tuning remains largely empirical, and we regularly discover assumptions baked into context that quietly constrain the agent. But we have crossed a new threshold: from an agent that follows your playbook to one that writes the next one. Thanks to visagarwal for co-authoring this post.15KViews7likes0CommentsHow to Secure your pro-code Custom Engine Agent of Microsoft 365 Copilot?
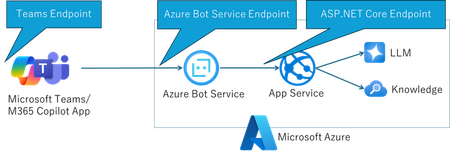
Prerequisite This article assumes that you’ve already gone through a following post. Please make sure to read it before proceeding: Developing a Custom Engine Agent for Microsoft 365 Copilot Chat Using Pro-Code With the article, we have found how to publish a Custom Engine Agent using pro-code approaches such as C#. In this post, I’d like to shift the focus to security, specifically how to protect the endpoint of our custom Microsoft 365 Copilot. Through several architectural explorations, we found an approach that seems to work well. However, I strongly encourage you to review and evaluate it carefully for your production environment. Which Endpoints Can Be Controlled? In the current architecture, there are three key endpoints to consider from a security perspective: Teams Endpoint This is the entry point where users interact with the Custom Engine Agent through Microsoft Teams. Azure Bot Service Endpoint This is the publicly accessible endpoint provided by Azure Bot Service that relays messages between Teams and your bot backend. ASP.NET Core Endpoint In the previous article, we used a local devtunnel for development purposes. In a production environment, however, this would likely be hosted on Azure App Service or others. Each of these endpoints may require different protection strategies, which we’ll explore in the following sections. 1. Controlling the Teams Endpoint When it comes to the Teams endpoint, control ultimately comes down to Teams app management within your Microsoft 365 tenant. Specifically, the manifest file for your custom Teams app (i.e., the Custom Agent) needs to be uploaded in your tenant, and access is governed via the Teams Admin Center. This isn’t about controlling the endpoint, but rather about limiting who can access the app. You can restrict access on a per-user or per-group basis, effectively preventing malicious users inside your organization from using the app. However, you cannot restrict access at the endpoint level, nor could you prevent a malicious external organization from copying the app package. This limitation may pose a concern, especially when thinking about endpoint-level security outside your tenant’s control. 2. Controlling the Azure Bot Service Endpoint The Azure Bot Service endpoint acts as a bridge between the Teams Channel and your pro-code backend. Here, the only available security configuration is to specify the Service Principal that the agent uses. There isn’t much room for granular control here—it’s essentially a relay point managed by Azure Bot Service, and protection depends largely on how you secure the endpoints it connects to. 3. Controlling the ASP.NET Core Endpoint This is where endpoint protection becomes critical. When you configure your bot in Azure Bot Service, you must expose your pro-code endpoint to the public internet. In our earlier article, we used a local devtunnel for development. But in production, you’ll likely use Azure App Service or others, which results in a publicly accessible endpoint. While Microsoft provides documentation on network isolation options for Azure Bot Service, these are currently only supported when using the Direct Line channel - not the Teams channel. This means that when using Teams as the entry point, you cannot isolate the backend endpoint via a private network, making it critical to implement other security measures at the app level (e.g., token validation, IP restrictions, mutual TLS, etc.). https://learn.microsoft.com/en-us/azure/bot-service/dl-network-isolation-concept?view=azure-bot-service-4.0 Let’s Review Other Articles on this Topic There are several valuable resources that describe this topic. Since Microsoft Teams is a SaaS application, the bot endpoint (e.g., https://my-webapp-endpoint.net/api/messages) must be publicly accessible when integrated through the Teams channel. Is it possible to integrate Azure Bot with Teams without public access? How to create Azure Bot Service in a private network? In particular, this article provides an excellent deep dive into the traffic flow between Teams and Azure Bot Service: Azure Bot Service, Microsoft Teams architecture, and message flow In the section titled “Challenge 2: Network isolation vs. Teams connectivity,” the article clearly explains why network-level isolation is fundamentally incompatible with the Teams channel. The article also outlines a practical security approach using Azure Firewall, NSG (Network Security Groups), and JWT token validation at the application level. If you're using the Teams channel, complete network isolation is not feasible—which makes sense, given that Teams itself is a SaaS platform and cannot be brought into your private network. As a result, protecting the backend bot (e.g., the ASP.NET Core endpoint) will require application-level controls, particularly JWT token validation to ensure that only trusted sources can invoke the bot. Let’s now take a closer look at how to implement that in C#. Controlling Endpoints in the ASP.NET Core Application So, what does endpoint control look like at the application level? Let’s return to the ASP.NET Core side of things and take a closer look at the default project structure. If you recall, the Program.cs in the template project contains a specific line worth revisiting. This configuration plays an important role in how the application handles and secures incoming requests. Let’s take a look at that setup. // Register the WeatherForecastAgent builder.Services.AddTransient<WeatherForecastAgent>(); // Add AspNet token validation - ** HERE ** builder.Services.AddBotAspNetAuthentication(builder.Configuration); // Register IStorage. For development, MemoryStorage is suitable. // For production Agents, persisted storage should be used so // that state survives Agent restarts, and operate correctly // in a cluster of Agent instances. builder.Services.AddSingleton<IStorage, MemoryStorage>(); As it turns out, the AddBotAspNetAuthentication method referenced earlier in Program.cs is actually defined in the same project, within a file named AspNetExtensions.cs. This method is where access token validation is implemented and enforced. Let’s take a closer look at a key portion of the AddBotAspNetAuthentication method from AspNetExtensions.cs: public static void AddBotAspNetAuthentication(this IServiceCollection services, IConfiguration configuration, string tokenValidationSectionName = "TokenValidation", ILogger logger = null) { IConfigurationSection tokenValidationSection = configuration.GetSection(tokenValidationSectionName); List<string> validTokenIssuers = tokenValidationSection.GetSection("ValidIssuers").Get<List<string>>(); List<string> audiences = tokenValidationSection.GetSection("Audiences").Get<List<string>>(); if (!tokenValidationSection.Exists()) { logger?.LogError("Missing configuration section '{tokenValidationSectionName}'. This section is required to be present in appsettings.json",tokenValidationSectionName); throw new InvalidOperationException($"Missing configuration section '{tokenValidationSectionName}'. This section is required to be present in appsettings.json"); } // If ValidIssuers is empty, default for ABS Public Cloud if (validTokenIssuers == null || validTokenIssuers.Count == 0) { validTokenIssuers = [ "https://api.botframework.com", "https://sts.windows.net/d6d49420-f39b-4df7-a1dc-d59a935871db/", "https://login.microsoftonline.com/d6d49420-f39b-4df7-a1dc-d59a935871db/v2.0", "https://sts.windows.net/f8cdef31-a31e-4b4a-93e4-5f571e91255a/", "https://login.microsoftonline.com/f8cdef31-a31e-4b4a-93e4-5f571e91255a/v2.0", "https://sts.windows.net/69e9b82d-4842-4902-8d1e-abc5b98a55e8/", "https://login.microsoftonline.com/69e9b82d-4842-4902-8d1e-abc5b98a55e8/v2.0", ]; string tenantId = tokenValidationSection["TenantId"]; if (!string.IsNullOrEmpty(tenantId)) { validTokenIssuers.Add(string.Format(CultureInfo.InvariantCulture, AuthenticationConstants.ValidTokenIssuerUrlTemplateV1, tenantId)); validTokenIssuers.Add(string.Format(CultureInfo.InvariantCulture, AuthenticationConstants.ValidTokenIssuerUrlTemplateV2, tenantId)); } } if (audiences == null || audiences.Count == 0) { throw new ArgumentException($"{tokenValidationSectionName}:Audiences requires at least one value"); } bool isGov = tokenValidationSection.GetValue("IsGov", false); bool azureBotServiceTokenHandling = tokenValidationSection.GetValue("AzureBotServiceTokenHandling", true); // If the `AzureBotServiceOpenIdMetadataUrl` setting is not specified, use the default based on `IsGov`. This is what is used to authenticate ABS tokens. string azureBotServiceOpenIdMetadataUrl = tokenValidationSection["AzureBotServiceOpenIdMetadataUrl"]; if (string.IsNullOrEmpty(azureBotServiceOpenIdMetadataUrl)) { azureBotServiceOpenIdMetadataUrl = isGov ? AuthenticationConstants.GovAzureBotServiceOpenIdMetadataUrl : AuthenticationConstants.PublicAzureBotServiceOpenIdMetadataUrl; } // If the `OpenIdMetadataUrl` setting is not specified, use the default based on `IsGov`. This is what is used to authenticate Entra ID tokens. string openIdMetadataUrl = tokenValidationSection["OpenIdMetadataUrl"]; if (string.IsNullOrEmpty(openIdMetadataUrl)) { openIdMetadataUrl = isGov ? AuthenticationConstants.GovOpenIdMetadataUrl : AuthenticationConstants.PublicOpenIdMetadataUrl; } TimeSpan openIdRefreshInterval = tokenValidationSection.GetValue("OpenIdMetadataRefresh", BaseConfigurationManager.DefaultAutomaticRefreshInterval); _ = services.AddAuthentication(options => { options.DefaultAuthenticateScheme = JwtBearerDefaults.AuthenticationScheme; options.DefaultChallengeScheme = JwtBearerDefaults.AuthenticationScheme; }) .AddJwtBearer(options => { options.SaveToken = true; options.TokenValidationParameters = new TokenValidationParameters { ValidateIssuer = true, ValidateAudience = true, ValidateLifetime = true, ClockSkew = TimeSpan.FromMinutes(5), ValidIssuers = validTokenIssuers, ValidAudiences = audiences, ValidateIssuerSigningKey = true, RequireSignedTokens = true, }; // Using Microsoft.IdentityModel.Validators options.TokenValidationParameters.EnableAadSigningKeyIssuerValidation(); options.Events = new JwtBearerEvents { // Create a ConfigurationManager based on the requestor. This is to handle ABS non-Entra tokens. OnMessageReceived = async context => { string authorizationHeader = context.Request.Headers.Authorization.ToString(); if (string.IsNullOrEmpty(authorizationHeader)) { // Default to AadTokenValidation handling context.Options.TokenValidationParameters.ConfigurationManager ??= options.ConfigurationManager as BaseConfigurationManager; await Task.CompletedTask.ConfigureAwait(false); return; } string[] parts = authorizationHeader?.Split(' '); if (parts.Length != 2 || parts[0] != "Bearer") { // Default to AadTokenValidation handling context.Options.TokenValidationParameters.ConfigurationManager ??= options.ConfigurationManager as BaseConfigurationManager; await Task.CompletedTask.ConfigureAwait(false); return; } JwtSecurityToken token = new(parts[1]); string issuer = token.Claims.FirstOrDefault(claim => claim.Type == AuthenticationConstants.IssuerClaim)?.Value; if (azureBotServiceTokenHandling && AuthenticationConstants.BotFrameworkTokenIssuer.Equals(issuer)) { // Use the Bot Framework authority for this configuration manager context.Options.TokenValidationParameters.ConfigurationManager = _openIdMetadataCache.GetOrAdd(azureBotServiceOpenIdMetadataUrl, key => { return new ConfigurationManager<OpenIdConnectConfiguration>(azureBotServiceOpenIdMetadataUrl, new OpenIdConnectConfigurationRetriever(), new HttpClient()) { AutomaticRefreshInterval = openIdRefreshInterval }; }); } else { context.Options.TokenValidationParameters.ConfigurationManager = _openIdMetadataCache.GetOrAdd(openIdMetadataUrl, key => { return new ConfigurationManager<OpenIdConnectConfiguration>(openIdMetadataUrl, new OpenIdConnectConfigurationRetriever(), new HttpClient()) { AutomaticRefreshInterval = openIdRefreshInterval }; }); } await Task.CompletedTask.ConfigureAwait(false); }, OnTokenValidated = context => { logger?.LogDebug("TOKEN Validated"); return Task.CompletedTask; }, OnForbidden = context => { logger?.LogWarning("Forbidden: {m}", context.Result.ToString()); return Task.CompletedTask; }, OnAuthenticationFailed = context => { logger?.LogWarning("Auth Failed {m}", context.Exception.ToString()); return Task.CompletedTask; } }; }); } From examining the code, we can see that it reads configuration settings from the appsettings.{your-env}.json file and uses them during token validation. In particular, the following line stands out: TokenValidationParameters.ValidAudiences = audiences; This ensures that only tokens issued for the configured audience (i.e., your Azure Bot Service's Service Principal) will be accepted. Any requests carrying tokens with mismatched audiences will be rejected during validation. One critical observation is that if no access token is provided at all, the code effectively lets the request through without enforcing validation. This means that if the Service Principal is misconfigured or lacks proper permissions, and therefore no token is issued with the request, the bot may still continue processing it without rejecting the request. This could potentially create a security loophole, especially if the backend API is publicly accessible. OnMessageReceived = async context => { string authorizationHeader = context.Request.Headers.Authorization.ToString(); if (string.IsNullOrEmpty(authorizationHeader)) { // Default to AadTokenValidation handling context.Options.TokenValidationParameters.ConfigurationManager ??= options.ConfigurationManager as BaseConfigurationManager; await Task.CompletedTask.ConfigureAwait(false); return; } Additional Security Concerns and Improvements Another point worth noting about the current code is that the Custom Engine Agent app can be copied and uploaded to a different Entra ID tenant, and it would still work. (Admittedly, this might be intentional since the architecture assumes providing Custom Engine Agent services to multiple organizations.) The project template and Teams settings raise two key security concerns that we should address: Reject requests when the token is missing - token should not be empty. Block access from unknown or unauthorized Entra ID tenants. To enforce the above, you will need to update the Service Principal configuration accordingly. Specifically, open the Service Principal's API permissions tab and add the following permission: User.Read.All Without this permission, access tokens will not be issued, making token validation impossible. After updating the Service Principal permissions, run your ASP.NET Core app and set a breakpoint around the following code to inspect the contents of the token included in the Authorization header. This will help you verify whether the token is correctly issued and contains the expected claims. string authorizationHeader = context.Request.Headers.Authorization.ToString(); The token is Base64 encoded, so let’s decode it to inspect its contents. I asked Copilot to help us decode the token so we can better understand the claims and data included inside. Let's inspect the token contents. After decoding the token (some parts are redacted for privacy), we can see that: The aud (audience) claim contains the Service Principal’s client ID. The serviceurl claim includes the Entra ID tenant ID. I attempted to configure the authorization settings to include the Tenant ID directly in the access token claims, but was not successful this time. Below is a sample code snippet that implements of the following requirements: Reject requests with an empty or missing token. Deny access from unknown Entra ID tenants. This is the sample code for "1. Reject requests with an empty or missing token". I’ve added comments in the code to clearly indicate what was changed. public static void AddBotAspNetAuthentication(this IServiceCollection services, IConfiguration configuration, string tokenValidationSectionName = "TokenValidation", ILogger logger = null) { IConfigurationSection tokenValidationSection = configuration.GetSection(tokenValidationSectionName); List<string> validTokenIssuers = tokenValidationSection.GetSection("ValidIssuers").Get<List<string>>(); List<string> audiences = tokenValidationSection.GetSection("Audiences").Get<List<string>>(); if (!tokenValidationSection.Exists()) { logger?.LogError("Missing configuration section '{tokenValidationSectionName}'. This section is required to be present in appsettings.json",tokenValidationSectionName); throw new InvalidOperationException($"Missing configuration section '{tokenValidationSectionName}'. This section is required to be present in appsettings.json"); } // If ValidIssuers is empty, default for ABS Public Cloud if (validTokenIssuers == null || validTokenIssuers.Count == 0) { validTokenIssuers = [ "https://api.botframework.com", "https://sts.windows.net/d6d49420-f39b-4df7-a1dc-d59a935871db/", "https://login.microsoftonline.com/d6d49420-f39b-4df7-a1dc-d59a935871db/v2.0", "https://sts.windows.net/f8cdef31-a31e-4b4a-93e4-5f571e91255a/", "https://login.microsoftonline.com/f8cdef31-a31e-4b4a-93e4-5f571e91255a/v2.0", "https://sts.windows.net/69e9b82d-4842-4902-8d1e-abc5b98a55e8/", "https://login.microsoftonline.com/69e9b82d-4842-4902-8d1e-abc5b98a55e8/v2.0", ]; string tenantId = tokenValidationSection["TenantId"]; if (!string.IsNullOrEmpty(tenantId)) { validTokenIssuers.Add(string.Format(CultureInfo.InvariantCulture, AuthenticationConstants.ValidTokenIssuerUrlTemplateV1, tenantId)); validTokenIssuers.Add(string.Format(CultureInfo.InvariantCulture, AuthenticationConstants.ValidTokenIssuerUrlTemplateV2, tenantId)); } } if (audiences == null || audiences.Count == 0) { throw new ArgumentException($"{tokenValidationSectionName}:Audiences requires at least one value"); } bool isGov = tokenValidationSection.GetValue("IsGov", false); bool azureBotServiceTokenHandling = tokenValidationSection.GetValue("AzureBotServiceTokenHandling", true); // If the `AzureBotServiceOpenIdMetadataUrl` setting is not specified, use the default based on `IsGov`. This is what is used to authenticate ABS tokens. string azureBotServiceOpenIdMetadataUrl = tokenValidationSection["AzureBotServiceOpenIdMetadataUrl"]; if (string.IsNullOrEmpty(azureBotServiceOpenIdMetadataUrl)) { azureBotServiceOpenIdMetadataUrl = isGov ? AuthenticationConstants.GovAzureBotServiceOpenIdMetadataUrl : AuthenticationConstants.PublicAzureBotServiceOpenIdMetadataUrl; } // If the `OpenIdMetadataUrl` setting is not specified, use the default based on `IsGov`. This is what is used to authenticate Entra ID tokens. string openIdMetadataUrl = tokenValidationSection["OpenIdMetadataUrl"]; if (string.IsNullOrEmpty(openIdMetadataUrl)) { openIdMetadataUrl = isGov ? AuthenticationConstants.GovOpenIdMetadataUrl : AuthenticationConstants.PublicOpenIdMetadataUrl; } TimeSpan openIdRefreshInterval = tokenValidationSection.GetValue("OpenIdMetadataRefresh", BaseConfigurationManager.DefaultAutomaticRefreshInterval); _ = services.AddAuthentication(options => { options.DefaultAuthenticateScheme = JwtBearerDefaults.AuthenticationScheme; options.DefaultChallengeScheme = JwtBearerDefaults.AuthenticationScheme; }) .AddJwtBearer(options => { options.SaveToken = true; options.TokenValidationParameters = new TokenValidationParameters { ValidateIssuer = true, ValidateAudience = true, // this option enables to validate the audience claim with audiences values ValidateLifetime = true, ClockSkew = TimeSpan.FromMinutes(5), ValidIssuers = validTokenIssuers, ValidAudiences = audiences, ValidateIssuerSigningKey = true, RequireSignedTokens = true, }; // Using Microsoft.IdentityModel.Validators options.TokenValidationParameters.EnableAadSigningKeyIssuerValidation(); options.Events = new JwtBearerEvents { // Create a ConfigurationManager based on the requestor. This is to handle ABS non-Entra tokens. OnMessageReceived = async context => { string authorizationHeader = context.Request.Headers.Authorization.ToString(); if (string.IsNullOrEmpty(authorizationHeader)) { // Default to AadTokenValidation handling // context.Options.TokenValidationParameters.ConfigurationManager ??= options.ConfigurationManager as BaseConfigurationManager; // await Task.CompletedTask.ConfigureAwait(false); // return; // // Fail the request when the token is empty context.Fail("Authorization header is missing."); logger?.LogWarning("Authorization header is missing."); return; } string[] parts = authorizationHeader?.Split(' '); if (parts.Length != 2 || parts[0] != "Bearer") { // Default to AadTokenValidation handling context.Options.TokenValidationParameters.ConfigurationManager ??= options.ConfigurationManager as BaseConfigurationManager; await Task.CompletedTask.ConfigureAwait(false); return; } Next, we should implement about "2. Deny access from unknown Entra ID tenants" We can retrieve the Tenant ID inside the MessageActivityAsync method of Bot/WeatherAgentBot.cs. Let’s extend the logic by referring to the following sample code to capture and utilize the Tenant ID within that method. https://github.com/OfficeDev/microsoft-teams-apps-company-communicator/blob/dcf3b169084d3fff7c1e4c5b68718fb33c3391dd/Source/CompanyCommunicator/Bot/CompanyCommunicatorBotFilterMiddleware.cs#L44 Here is how you can extend the logic to retrieve and use the Tenant ID within the MessageActivityAsync method: using MyM365Agent1.Bot.Agents; using Microsoft.Agents.Builder; using Microsoft.Agents.Builder.App; using Microsoft.Agents.Builder.State; using Microsoft.Agents.Core.Models; using Microsoft.SemanticKernel; using Microsoft.SemanticKernel.ChatCompletion; using Microsoft.Extensions.DependencyInjection.Extensions; namespace MyM365Agent1.Bot; public class WeatherAgentBot : AgentApplication { private WeatherForecastAgent _weatherAgent; private Kernel _kernel; private readonly string _tenantId; private readonly ILogger<WeatherAgentBot> _logger; public WeatherAgentBot(AgentApplicationOptions options, Kernel kernel, IConfiguration configuration, ILogger<WeatherAgentBot> logger) : base(options) { _kernel = kernel ?? throw new ArgumentNullException(nameof(kernel)); _logger = logger ?? throw new ArgumentNullException(nameof(logger)); OnConversationUpdate(ConversationUpdateEvents.MembersAdded, WelcomeMessageAsync); OnActivity(ActivityTypes.Message, MessageActivityAsync, rank: RouteRank.Last); // Get TenantId from TokenValidation section var tokenValidationSection = configuration.GetSection("TokenValidation"); _tenantId = tokenValidationSection["TenantId"]; } protected async Task MessageActivityAsync(ITurnContext turnContext, ITurnState turnState, CancellationToken cancellationToken) { // add validation of tenant ID var activity = turnContext.Activity; // Log: Received activity _logger.LogInformation("Received message activity from: {FromId}, AadObjectId:{AadObjectId}, TenantId: {TenantId}, ChannelId: {ChannelId}, ConversationType: {ConversationType}", activity?.From?.Id, activity?.From?.AadObjectId, activity?.Conversation?.TenantId, activity?.ChannelId, activity?.Conversation?.ConversationType); if (activity.ChannelId != "msteams" // Ignore messages not from Teams || activity.Conversation?.ConversationType?.ToLowerInvariant() != "personal" // Ignore messages from team channels or group chats || string.IsNullOrEmpty(activity.From?.AadObjectId) // Ignore if not an AAD user (e.g., bots, guest users) || (!string.IsNullOrEmpty(_tenantId) && !string.Equals(activity.Conversation?.TenantId, _tenantId, StringComparison.OrdinalIgnoreCase))) // Ignore if tenant ID does not match { _logger.LogWarning("Unauthorized serviceUrl detected: {ServiceUrl}. Expected to contain TenantId: {TenantId}", activity?.ServiceUrl, _tenantId); await turnContext.SendActivityAsync("Unauthorized service URL.", cancellationToken: cancellationToken); return; } // Setup local service connection ServiceCollection serviceCollection = [ new ServiceDescriptor(typeof(ITurnState), turnState), new ServiceDescriptor(typeof(ITurnContext), turnContext), new ServiceDescriptor(typeof(Kernel), _kernel), ]; // Start a Streaming Process await turnContext.StreamingResponse.QueueInformativeUpdateAsync("Working on a response for you"); ChatHistory chatHistory = turnState.GetValue("conversation.chatHistory", () => new ChatHistory()); _weatherAgent = new WeatherForecastAgent(_kernel, serviceCollection.BuildServiceProvider()); // Invoke the WeatherForecastAgent to process the message WeatherForecastAgentResponse forecastResponse = await _weatherAgent.InvokeAgentAsync(turnContext.Activity.Text, chatHistory); if (forecastResponse == null) { turnContext.StreamingResponse.QueueTextChunk("Sorry, I couldn't get the weather forecast at the moment."); await turnContext.StreamingResponse.EndStreamAsync(cancellationToken); return; } // Create a response message based on the response content type from the WeatherForecastAgent // Send the response message back to the user. switch (forecastResponse.ContentType) { case WeatherForecastAgentResponseContentType.Text: turnContext.StreamingResponse.QueueTextChunk(forecastResponse.Content); break; case WeatherForecastAgentResponseContentType.AdaptiveCard: turnContext.StreamingResponse.FinalMessage = MessageFactory.Attachment(new Attachment() { ContentType = "application/vnd.microsoft.card.adaptive", Content = forecastResponse.Content, }); break; default: break; } await turnContext.StreamingResponse.EndStreamAsync(cancellationToken); // End the streaming response } protected async Task WelcomeMessageAsync(ITurnContext turnContext, ITurnState turnState, CancellationToken cancellationToken) { foreach (ChannelAccount member in turnContext.Activity.MembersAdded) { if (member.Id != turnContext.Activity.Recipient.Id) { await turnContext.SendActivityAsync(MessageFactory.Text("Hello and Welcome! I'm here to help with all your weather forecast needs!"), cancellationToken); } } } } Since we’re at it, I’ve added various validations as well. I hope this will be helpful as a reference for everyone.1KViews7likes0Comments