azure network security
208 Topics
Secure Native Access to Azure Kubernetes Service (AKS) Private Clusters with Azure Bastion
Written in Collaboration with AvirupChat ShabazShaik Mohit_Kumar YuriDiogenes Introduction: As organizations move toward containerized workloads such as Azure Kubernetes Service (AKS), secure access to cluster resources becomes critical. Making the Kubernetes API server private, therefore, significantly reduces the attack surface. However, it also changes how engineers perform routine management tasks. Operations as simple as running kubectl logs, describing resources, or troubleshooting workloads require connectivity to the virtual network hosting the cluster. This challenge becomes even more apparent during day-to-day operations. An engineer may have the necessary Kubernetes credentials and Azure RBAC permissions yet still be unable to access the cluster because the API server is reachable only from within the private network. Establishing VPN connectivity, using jump hosts, or deploying dedicated management workstations often becomes part of the operational workflow, adding complexity to what should be straightforward administrative tasks. This balance between maintaining strong network isolation and enabling efficient cluster management is exactly what Azure Bastion's native client tunneling support for private AKS clusters is designed to address. Many Azure customers already use Azure Bastion to securely access virtual machines without exposing them to the public internet. Native client tunneling now brings that same secure access model to AKS private clusters. This capability is in public preview currently. Before discussing how it works, it is worth understanding the operational challenges it is designed to solve and how it's done. Bastion for Azure Kubernetes Service (AKS) private clusters: At its core, Azure Bastion is designed to simplify secure access to private Azure resources. Since its launch, it has provided browser-based and native client RDP and SSH connectivity to Azure VMs without exposing management ports to the internet. No public IPs on your VMs. No inbound NSG rules for port 22 or 3389. Just TLS over port 443, routed through a fully managed service that Microsoft patches, scales, and secures on your behalf. When you establish a Bastion tunnel to your private AKS cluster, you are not signing in to an intermediary machine and running kubectl from there. You are opening an encrypted tunnel from your local machine, through Bastion, directly to the private API server endpoint. Your kubeconfig points to localhost on a dynamically assigned port, so local kubectl, helm, and scripts continue to work as they would against a public cluster. You get the developer experience of a public cluster with the security posture of a private one as shown in Figure 1. The high-level flow has three parts: The engineer authenticates to Azure, retrieves cluster credentials, and uses Azure Bastion to establish a managed tunnel into the private network. Local Kubernetes tools then use that tunnel to reach the private API server. This keeps the workflow familiar while removing the need for jump hosts or VPN-based access paths. However, this raises an important question - Does making access easier also make it easier for an attacker to connect? The short answer is no. In fact, Bastion tunneling strengthens the security posture in ways that are worth unpacking. First, the API server itself remains private. There is no public endpoint. There is no public IP address discoverable by scanners. The only network path to the API server runs through Azure's managed infrastructure. Authentication and authorization then depend on the AKS cluster configuration. Second, Bastion eliminates an entire class of infrastructure that itself becomes a security target. Jump box VMs, when not meticulously maintained, accumulate credentials, kubeconfig files, and browser sessions. They are machines that admins log into, which means they are machines that can be compromised. Bastion is not a machine you log into. It is an agentless, managed tunnel you pass through. And for public clusters, there is a related but distinct benefit. Many teams use API server authorized IP ranges to restrict which source IPs can reach their public API endpoint. This is a good practice, but it breaks down quickly when your team works remotely, uses dynamic IPs, or includes contractors. Adding Bastion's stable public IP to the authorized range gives you a consistent, managed access path without the operational toil of constantly updating IP allow lists. With the network path established through Bastion, the next question is how users are authenticated and authorized once they reach the AKS API server. That distinction matters: Bastion provides secure connectivity, while AKS access is governed by the authentication and authorization model configured on the cluster. Authentication and authorization options: When creating an AKS cluster, you can choose from three authentication and authorization modes, as shown in Figure below. That choice shapes everything about how access is granted, audited, and governed over the lifetime of the cluster. ⚠️Local accounts with Kubernetes RBAC is the default if you change nothing. It uses a static certificate that never expires, is shared across all administrators, and has no connection to your corporate identity provider. There is no MFA. No Conditional Access. Note: For most production environments, Microsoft recommends using Microsoft Entra ID integrated authentication rather than local accounts to enable centralized identity, MFA, and auditing. ☑️ Microsoft Entra ID with Kubernetes RBAC moves authentication to Entra ID, which means users sign in with their corporate identity, MFA is enforced, and Conditional Access policies apply. Authorization is handled through native Kubernetes Role and ClusterRole bindings, which reference Entra ID users and groups as subjects. This works well for teams that manage cluster configuration through GitOps, because RBAC manifests live alongside other cluster YAML. The limitation is that these permissions are invisible in Azure IAM — they live only inside the cluster. ✅ Microsoft Entra ID with Azure RBAC is the model we recommend for most production environments. Authentication still flows through Entra ID with full MFA and Conditional Access support. But authorization is handled by Azure RBAC role assignments on the AKS resource itself. Permissions are visible in Azure IAM, participate in access reviews, and integrate with Privileged Identity Management for just-in-time elevation. You can assign the built-in Azure Kubernetes Service RBAC Cluster Admin, Admin, Writer, or Reader roles at either cluster scope or namespace scope. A single subscription-level role assignment can grant access to every cluster in the subscription. The real value is the combination. Bastion provides the encrypted network tunnel. Entra ID provides the identity, MFA, and Conditional Access. Azure RBAC provides centralized, auditable authorization that your security team can review alongside every other Azure resource. For the exact steps to configure Entra ID authentication and Azure RBAC on your AKS cluster, see the AKS identity documentation. End-to-end flow for connectivity to AKS via Bastion: az account set --subscription <subscription ID> Retrieve credentials to your AKS private cluster using the commands below: az aks get-credentials --name <AKSClusterName> --resource-group <ResourceGroupName> Open the tunnel to your target AKS Cluster with the following command: az aks bastion --name <aksClusterName> --resource-group <aksClusterResourceGroup> --bastion <bastionResourceId> Now the default authentication method is Device code authentication i.e., this authentication method prompts the device code for the user to sign in from a browser session. If you want CLI only authentication, you can run the following command next. kubelogin convert-kubeconfig -l azurecli Then go on with your AKS connectivity: kubectl get nodes How to Try It: If you are already running private AKS clusters, getting started is straightforward. You need a Standard or Premium Azure Bastion host deployed in the same VNet as your cluster (or in a peered VNet), with native client support enabled. The aks-preview and bastion CLI extensions handle the rest. The detailed connection steps are documented on Microsoft Learn. We Want Your Feedback Write a comment in this blog or open an issue on the AKS GitHub repository or leave feedback directly on the Microsoft Learn documentation page. We read everything, and it genuinely influences what we prioritize.754Views2likes2CommentsIntroducing the Application Gateway WAF Triage Workbook
The new "Application Gateway WAF Triage" workbook is free of charge and it provides a convenient way to triage WAF events and identify false positives. It gives you the insights you need to better fine-tune your WAF policy. 30KViews6likes35Comments
Azure DDoS Protection & Azure WAF: A Layered Defense for Modern DDoS Attacks
Introduction: The Need for Layered DDoS Defense Organizations today operate in an environment where Distributed Denial of Service (DDoS) attacks continue to evolve across both network and application layers. To help organizations build resilient, internet-facing applications and services, Microsoft Azure provides a comprehensive and layered set of protections designed to address different types of DDoS threats. These capabilities range from platform-level defenses through Azure Infrastructure Protection, dedicated Layer 3/4 DDoS mitigation through Azure DDOS Protection and application-layer protections through Azure Web Application Protection (WAF). Together, these services form a defense-in-depth strategy that helps organizations strengthen availability, improve resilience, and protect critical applications from both large-scale network attacks and sophisticated application-layer threats. This blog explores how these services work together to deliver comprehensive DDoS protection across modern cloud environments. Understanding DDoS at Different Layers: Network vs. Application Not all DDoS attacks are alike. Broadly speaking, network-layer (Layer 3/4) DDoS attacks try to flood a network or transport layer with traffic – for example, overwhelming a server or network connection with a massive volume of packets (think UDP floods, SYN floods, or amplification attacks). These aim to saturate the available bandwidth or crash network devices, knocking entire services offline. On the other hand, application-layer (Layer 7) DDoS attacks strike at the application itself – typically using HTTP(S) requests that appear legitimate but are maliciously crafted. For instance, a botnet might repeatedly hit a search API or login page with valid-looking requests that each trigger expensive operations (database queries, authentication processes, etc.). In short, network-layer DDoS attacks target the plumbing of your infrastructure (bandwidth, network connectivity), whereas application-layer DDoS attacks target the brains of your application (the code and logic handling requests). Because these attack vectors are different, defending against them requires different tools and tactics. Azure’s approach to DDoS defense embraces this reality with a layered model, where each security layer specializes in stopping certain types of attacks and complements the others. Azure’s multi-layered DDoS Protection Strategy Azure provides three main layers of DDoS protection: Azure’s Infrastructure DDoS Protection (Platform Protection) Azure DDoS Protection (Network Protection for customers’ resources) Azure Web Application Firewall (WAF) (App Protection) Let’s explore each layer and how they work together. Azure DDoS Infrastructure Protection (Always-On Baseline) All of the Azure Platform and shared services, automatically benefit from Azure’s built-in DDoS infrastructure protection. Think of this as Azure’s global, always-on “baseline” DDoS defense. It continuously monitors traffic across the Azure network, and if a massive DDoS campaign tries to bring down Azure’s infrastructure or a customer’s public endpoint, Azure will detect and absorb the malicious traffic at the platform level. This baseline protection uses Azure’s global network capacity to scrub much of the unwanted traffic before it ever reaches your resources. There’s no extra cost or configuration needed for this default protection. It’s a fundamental safety net that ensures Azure services (including multi-tenant services like Azure DNS) are not easily taken offline by large-scale DDoS events. However, the platform-level protection is designed primarily to protect Azure’s overall infrastructure and does not provide fine-grained controls or visibility for individual customers. That’s where Azure’s next layer comes in. Azure DDoS Protection: Shielding the Network (L3/L4) To safeguard your own internet-facing resources and workloads against network-layer DDoS attacks beyond the default baseline, Azure offers L3/L4 DDoS Protection (DDoS Network Protection and DDoS IP Protection) against volumetric floods. This is an opt-in service you configure for your Virtual Network or specific Public IP resources. Azure DDoS Protection is purpose-built to handle the classic L3/L4 DDoS scenarios: large volumetric floods, protocol attacks, and other network-level exploits like reflection or amplification attacks. A key benefit of Azure DDoS Protection is its adaptive tuning feature alongside the telemetry it provides. During peacetime, the service establishes a baseline of normal traffic behavior for your services and continuously updates that baseline to reflect changing patterns. When traffic deviates from that baseline and an attack is detected, mitigation is triggered automatically to block or absorb malicious traffic while minimizing false positives. Another important aspect of Azure DDoS Protection is visibility and response capabilities. The service provides detailed metrics, alerts, and attack analytics during and after an event, so your teams can understand what happened. Azure DDoS Network Protection plan also includes support from Azure’s DDoS Rapid Response (DRR) team and offers a cost protection guarantee – credits to offset any unexpected Azure scale-out costs that result from a documented DDoS attack. In short, Azure DDoS Protection is your dedicated shield at the network layer. It's worthwhile to note that Azure DDOS Protection goes beyond just blunt filtering; it employs multiple mitigation techniques like dropping illegitimate packets (for instance, filtering out spoofed source IPs or malformed packets), DDoS booters (e.g. DDoS-for-hire services), protocol compliance checks, and intelligent rate limiting as a last resort. It further employs multiple policies with varied thresholds each for UDP, TCP and TCP SYN due to the nature of attacks for these protocols. The goal is to scrub out the attack traffic while letting legitimate users continue to reach your services with minimal disruption. Azure WAF: Guarding Applications at the HTTP Layer (L7) Azure DDoS Protection defends against network-level floods and protocol exploits, but application-layer attacks like HTTP request floods require separate L7 protection which is available via Azure Web Application Firewall (WAF). Azure WAF is deployed on services like Azure Application Gateway, Azure Front Door and Azure Gateway for Containers to inspect incoming HTTP(S) requests to your web applications. WAF’s primary role is to block common web exploits (e.g., SQL injections, cross-site scripting) via managed rule sets, rate Limit traffic using its Custom Rules as well as providing protection from malicious bots using its Bot Ruleset. Now, Azure WAF also includes the HTTP DDOS Ruleset to protect against application-level DDoS attacks. HTTP DDOS Ruleset is a new adaptive ruleset (currently in public preview for Application Gateway and Front Door services) that uses machine learning to dynamically learn normal HTTP traffic patterns for your application and automatically identify unusual surges in requests. If a burst of traffic appears malicious (for example, a sudden wave of requests to an expensive API call), the WAF can selectively block offending clients by placing them in a temporary “penalty box” without manual intervention. This dynamic approach goes beyond static thresholds, adjusting to your app’s normal load profiles. Along with that, adding the existing approaches such as custom rate limiting that lets you define granular thresholds for incoming requests on specific paths or for specific clients will further enhance the protection against DDOS attacks. For instance, you might limit a single IP to a certain number of login attempts per minute or cap the request rate to an expensive search endpoint. Rate limiting ensures that even if an attacker tries to slowly overwhelm your application with a moderate stream of requests (under the radar of network DDoS detection), WAF can throttle or block them at the application entry point. JavaScript challenges and CAPTCHA-based validation can also serve as effective protection mechanisms against automated bot traffic. These techniques help distinguish legitimate users from non-human clients by requiring the requester to successfully execute browser-based checks or complete a human verification step, making them useful for reducing unwanted bot activity such as scraping, credential stuffing, and abusive request automation. Further, the Bot Protection ruleset that includes integration of Microsoft’s threat intelligence to identify known malicious bot networks automatically block bad bots. Microsoft Threat Intelligence feeds continuously update the list of dangerous bot IPs and prevents these bots from consuming your application’s resources. This is especially useful against DDoS scenarios carried out by automated botnets that have known fingerprints. Together these capabilities enable Azure WAF to act as a critical inner layer of DDoS defense in front of your applications (via an Application Gateway or Front Door). Azure WAF focuses on application-specific attacks, and it can discern whether a burst of requests to your app is likely malicious based on patterns and behavior, not just volume. Combined with network-level DDoS protection, WAF ensures that even low-bandwidth but high-impact attacks (like repeated login attempts or bot-driven scraping) are mitigated. Layered DDOS Protection: Azure’s DDoS strategy is best imagined as a series of concentric rings around your application. The outermost ring is the platform’s infrastructure DDoS protection (automatically absorbing massive network floods aimed at Azure at large). The next ring is Azure DDoS Protection for your environment, which provides dedicated L3/L4 defenses with tuning and telemetry – it will handle the heavy lifting against volumetric and protocol attacks targeted at your specific resources. The next ring inward is your Azure WAF (with its HTTP DDoS ruleset, rate limiting, and bot controls enabled) catching the application-layer anomalies that network defenses can’t see. And finally, the innermost ring might be endpoint-specific configurations or app-level controls (like strict rate limits on crucial API operations or even adaptive app logic) that protect the most sensitive parts of your application from abuse. This layered approach is essential. Each layer addresses different threat vectors and failure modes; together they fill the gaps and provide a robust, end-to-end DDoS mitigation strategy. Quick Comparison: Azure DDoS Protection vs Azure WAF Note: This comparison focuses on Azure DDoS Protection and Azure WAF because they are the paid offerings; Azure DDoS Infrastructure Protection is included by default. To crystallize the differences and synergy between these services, here’s a quick side-by-side comparison of Azure DDoS Protection (Network level) and Azure WAF (Application level) in the context of DDoS defense: Service Azure DDoS Protection (Network-Level) Azure WAF – Application (Layer 7) DDoS Protection Protection Layer Network (OSI Layers 3 & 4): Protects Internet facing resources in virtual networks. Application (OSI Layer 7): Protects web apps and APIs at the HTTP request layer. Protected Resource Internet facing resources in virtual networks. Web apps and API endpoints. Primary Purpose Shield against high-volume network floods (e.g. UDP/TCP floods, SYN floods, amplification attacks) that aim to overwhelm bandwidth or network resources. Ensures your Azure services stay reachable during massive DDoS assaults. Filter and stop malicious HTTP(S) traffic (e.g. HTTP GET/POST floods, bot-driven requests, slowloris attacks) that could exhaust your application’s compute resources. Keeps your web applications responsive even under targeted L7 attack patterns. How It Works Always-on network monitoring. Uses Azure’s global network to absorb and scrub malicious traffic before it reaches your resources. No per-app manual tuning needed – it profiles traffic and triggers mitigation when volumes exceed safe baselines. Employs adaptive techniques (drops spoofed packets, protocol checks, limits rate as last resort) to block attacks while letting legitimate traffic flow. Policy-driven rules integrated at the application edge (via Application Gateway or Front Door). Can rate-limit or block suspicious clients based on IP, behavior, or patterns. Includes managed rule sets for common web threats and a new adaptive HTTP DDoS managed ruleset that auto-learns normal behavior per app and blocks abnormal request surges (reducing need for manual emergency configuration). When to Use Ideal for any Azure resource exposed to the public internet. Especially critical for high-bandwidth endpoints (gaming servers, large websites, etc.) or anything that can’t risk downtime due to massive traffic floods. Typically enabled on Virtual Networks or specific public IP addresses. Essential for any internet-facing web application (websites, web services, REST APIs). Particularly important for applications with resource-intensive operations (e.g., login pages, search functionality) where even moderate traffic spikes can degrade service. Deployed via a WAF Policy on an Application Gateway or Front Door that fronts your app. Role in Defense-in-Depth Handles the “heavy lifting” against bulk traffic attacks at the network edge – drastically reduces attacking traffic volume before it can hit your servers. Prevents upstream network pipe saturation or crashes, ensuring your application gets a chance to handle legitimate user traffic. Provides a fine-grained, application-aware filter for attacks that get past network defenses. Targets “surgical” low-bandwidth attacks that hide within normal traffic patterns. Together with Azure DDoS Protection, WAF completes a full-stack DDoS defense, covering gaps that pure network protection would miss. Conclusion: The key takeaway is that modern DDoS defense is no longer about relying on a single control, but about applying defense-in-depth, the right protection at the right layer. With a layered approach that spans infrastructure, network, and application security, organizations are better positioned to preserve availability, protect user experience, and maintain business continuity even as DDoS attacks grow more sophisticated.833Views0likes0Comments
Designing Cloud Landing Zones by Traffic Flow: A Defence‑in‑Depth, DMZ‑First Architecture
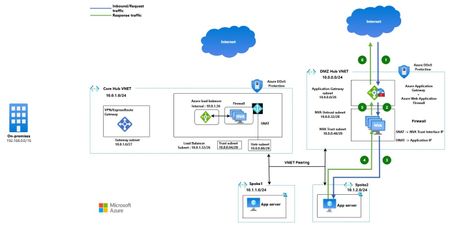
As enterprises adopt Microsoft Azure for large‑scale and regulated workloads, security architecture must be driven by traffic trust boundaries and inspection intent, not connectivity alone. Regulatory frameworks consistently require a clear separation between Internet‑untrusted and private enterprise traffic, enforced through defence‑in‑depth controls aligned to the OSI model. This drives the adoption of a DMZ‑first landing zone architecture, where volumetric protection, application‑layer inspection, and perimeter controls are enforced at well‑defined trust boundaries. Security enforcement is prioritised before access, rather than being an afterthought of connectivity. A distributed hub architecture enables this model at scale, delivering consistent controls while improving resiliency, fault isolation, and operational clarity. Traffic Classification in an Enterprise Landing Zone Enterprise traffic flows are classified based on origin, destination, and trust level, which directly dictates inspection requirements: Internet Inbound (North–South): Traffic from the public Internet to Azure‑hosted applications Internet Outbound (South–North): Egress traffic from private workloads to the Internet East–West: Traffic between virtual networks within or across regions Hybrid Connectivity: Traffic between Azure, on‑premises, and multi‑cloud environments Each flow presents a distinct risk profile, making a uniform connectivity and inspection model unsuitable for enterprise and regulated environments. Hub‑and‑Spoke as the Foundation for Centralised Security Enterprises commonly adopt a Hub‑and‑Spoke topology using VNET peering or Azure Virtual WAN, extending hybrid connectivity via Site‑to‑Site VPN or ExpressRoute. The hub provides a centralised, datapath‑centric layer for shared networking and security services, while spoke VNETs host application workloads and remain private, typically without public IPs. Ingress and egress are handled through shared, centrally managed endpoints. This model consolidates critical controls—Azure Firewall, Azure WAF, and DDoS protection—at controlled entry and exit points, significantly reducing the attack surface. Integration with Microsoft Sentinel enables cross‑layer visibility, threat hunting, and detection of risks such as unauthorised access and data exfiltration. Why a Single Hub Is Not Sufficient Using a single hub to process all traffic types introduces operational and security challenges at scale by forcing Internet‑untrusted and private traffic through the same inspection tier. Key limitations include: Coupled Internet and private security policies Rapid firewall rule sprawl and management overhead A single blast radius across all traffic types Throughput and SNAT scalability constraints Increased difficulty meeting regulatory separation requirements These issues become more pronounced as environments scale across regions and workloads. Multi‑Hub as an Enterprise‑Grade Evolution A multi‑hub architecture resolves these challenges by separating inspection responsibilities across dedicated hubs: DMZ Hub VNET: Internet‑facing traffic and perimeter security enforcement Core Hub VNET: Outbound Internet access, East‑West, and hybrid traffic inspection This separation aligns security controls with traffic intent, reduces policy complexity, limits blast radius, and simplifies operations. In the next section, we explore multi‑hub architecture patterns and examine how each traffic flow is inspected and governed in practice. Scenario 1 – Third‑Party Firewall–Centric Multi‑Hub Design In this scenario, third‑party firewalls provide inspection for all traffic flows—Internet inbound, Internet outbound, East‑West, and hybrid connectivity—while Azure WAF and Azure DDoS Protection are used to defend against volumetric attacks, application‑layer threats, and malicious bot traffic. Architecture Overview The design uses two dedicated hub virtual networks, with spoke VNets peered to both hubs to maintain traffic separation based on trust and inspection requirements: DMZ Hub VNET (Internet Ingress Hub) Core Hub VNET (Egress, East‑West, and Hybrid Hub) DMZ Hub VNET – Internet Inbound (North–South) Traffic The DMZ hub establishes a dedicated perimeter for Internet‑facing applications. Internet traffic lands on a public Application Gateway with Azure WAF, protected by an Azure DDoS Protection Plan applied to the public frontend IP. Third‑party firewalls are deployed behind the Application Gateway to perform deep packet inspection. Firewalls operate in active‑active mode as standalone appliances, using three dedicated network interfaces (Untrust, Trust, and Management), each placed in separate subnets. Application Gateway provides load balancing and health probing, ensuring firewall availability and resiliency. Core Hub VNET – Egress, East‑West, and Hybrid Traffic The core hub handles all non‑Internet‑inbound traffic flows, including private inter‑VNET communication and hybrid connectivity. Third‑party firewalls are deployed behind an internal Azure Load Balancer, which maintains high availability using health probes. Firewalls follow the same active‑active, three‑NIC design for consistent policy enforcement and operational symmetry. Azure NAT Gateway is associated with the firewall Untrust subnet to scale outbound SNAT and simplify Internet egress with deterministic public IP. Site‑to‑site VPN or ExpressRoute terminate in this hub for on‑premises and multi‑cloud connectivity, ensuring private and regulated traffic bypasses Internet‑facing controls. Architecture Patterns - Traffic Flow 1.1 North–South (Internet Inbound) Traffic Flow This flow applies when applications hosted on Azure (VMs, VM Scale Sets, or services behind Internal Load Balancer / Internal Application Gateway) are published to the Internet. As shown in the diagram, Internet-bound client requests enter Azure through a dedicated DMZ Hub, where perimeter security controls are enforced before traffic reaches private application spokes. Inbound Request Flow (Blue Path) Client → Application Gateway (WAF) A client request (for example, app1.example.com) is resolved via DNS and lands on the public endpoint of Azure Application Gateway. Azure WAF performs Layer‑7 inspection, bot protection, and rule evaluation. Application Gateway → Firewall (DMZ Hub) Based on hostname and routing rules, Application Gateway forwards traffic to the firewalls while preserving the client’s real IP using the X‑Forwarded‑For (XFF) header. Firewall → Application (Spoke VNET) The firewall performs DNAT to the internal destination (Internal Application Gateway or Internal Load Balancer) and SNAT to its trust‑interface IP to ensure symmetric return traffic. Traffic is then routed over VNET peering to the private application workload. Response Flow (Green Path) Application → Firewall The application responds using its private IP, with the firewall trust interface as the destination. Firewall → Application Gateway The firewall forwards the response based on its session state. Application Gateway → Client Application Gateway returns the response to the Internet client. DDoS Protection Azure DDoS Protection continuously monitors the Application Gateway public IP and mitigates volumetric attacks before they reach the application stack. Key Design Considerations Application Gateway routing - Use a multi‑site listener with hostname‑based rules to steer traffic to the appropriate firewall backend. Firewall backend mapping - Register firewall VMs in a single backend pool and differentiate applications using distinct backend settings (same protocol, different ports). Application steering at firewall - Firewalls perform port‑based DNAT (or private FQDN‑based DNAT where supported) to forward traffic to the correct application private IP in spoke VNets. Traffic symmetry - Source NAT is applied on the firewall trust interface to maintain symmetric return paths. Protocol support - The same pattern applies to TCP/UDP workloads, using an External Azure Load Balancer instead of Application Gateway where WAF is not required. Client IP visibility Application Gateway enables WAF inspection using the real client IP, preserved downstream via X‑Forwarded‑For. With Azure Load Balancer, client IP is retained up to the firewall for IP‑based enforcement, with Azure DDoS Protection safeguarding the public frontend. 1.2 Hybrid Connectivity Traffic Flow Hybrid connectivity represents communication between Azure workloads and on‑premises environments using Site‑to‑Site VPN or ExpressRoute. Traffic Flow Request (Blue: 1–4): Traffic originates from applications in spoke VNETs and is forwarded via UDRs to the Internal Load Balancer, through active‑active firewalls, and then to on‑premises via VPN or ExpressRoute. Response (Green: 5–8): Return traffic follows the same path in reverse. Key Design Considerations Source and destination IP addresses remain unchanged end‑to‑end, despite firewalls operating behind an Internal Load Balancer. UDRs steer both outbound and inbound hybrid traffic to the Internal Load Balancer as the next hop. Spoke VNET subnets should be associated with custom route tables with Propagate Gateway Routes set to No, preventing gateway-learned routes from bypassing the intended security inspection path configured via UDR. However, VPN Gateway Subnet Route table should have route table with Propagate Gateway Routes set to Yes. Azure Virtual Network Manager can be used to manage and scale UDR deployment centrally across Hub and spoke networks. 1.3 East-West Traffic flow This traffic flow represents the connectivity between resources across VNETs through Firewall. Considerations remain same as “Hybrid Connectivity Traffic flow” mentioned above. 1.4 Egress/Outbound Connectivity Traffic flow This traffic flow represents the connectivity from the resources hosted inside VNETs to Internet through Firewalls deployed behind Internal Load Balancer in Core Hub VNET. Egress/Outbound Connectivity Traffic flow Key Considerations: A default route (0.0.0.0/0) UDR directs Internet-bound traffic to the Internal Load Balancer for firewall inspection. Firewall performs SNAT to its untrusted interface, after which Azure NAT Gateway translates traffic to a fixed public IP. Alternatively, a public IP can be assigned to the firewall untrusted interface to perform SNAT directly, removing the need for NAT Gateway and reducing cost. Spoke VNET subnets should be associated with custom route tables with Propagate Gateway Routes set to No, preventing gateway-learned routes from bypassing the intended security inspection path configured via UDR. However, VPN Gateway Subnet Route table should have route table with Propagate Gateway Routes set to Yes. However, with horizontal firewall scaling, outbound public IPs become non-deterministic. Scenario 2: Third‑Party Firewalls for Ingress, Azure Firewall for Private Flows In this scenario, third‑party firewalls secure Internet‑facing traffic, while Azure Firewall handles Egress, East–West, and Hybrid flows. This separation enables organisations to retain existing perimeter security investments while adopting a fully managed, cloud‑native control and data plane for internal traffic flows. As private traffic patterns scale, particularly for chatty East–West communication, Azure Firewall helps simplify operations and improves scalability by offloading traffic inspection to a managed service. This approach reduces operational overhead and provides consistent policy enforcement across internal and hybrid flows. Setup DMZ Hub design remains unchanged from Scenario 1. Core Hub VNET use Azure Firewall for better scalability, built‑in resilience, and simplified operations. Azure Firewall eliminates the need for load balancers and reduces complexity for chatty east‑west traffic. It requires a single subnet (unless force tunnelling is enabled), optimising IP consumption. Outbound traffic is SNATed by Azure Firewall and further translated via Azure NAT Gateway. Firewall‑based SNAT to public IP can be used to avoid NAT Gateway costs when deterministic egress IPs or higher SNAT scale are not required. Traffic Flow North–South (Internet Inbound) Traffic Flow represented with Numbers. Request flow represented with Blue: 1–3 Response flow represented with Brown: 4–6 Egress/Outbound Connectivity Traffic flow represented with alphabets. Request flow represented with Green: A–C Response flow represented with Blue: D–F Hybrid flow represented with purple Architecture Diagram: Third‑Party Firewalls for Ingress, Azure Firewall for Private Flows Further if you want to use Azure Firewall for the Internet Ingress flow, you can use it as well. Below is the architecture diagram explaining the same pattern. Azure Firewalls for Ingress and Private Flows Key Considerations: Application Gateway behaviour remains the same as Scenario 1; however, backend pools use IP‑based targets. Internal applications should be exposed via internal Application Gateway or internal load balancer to provide stable backend IPs. To optimise traffic flow and avoid unnecessary network address translation, the private IP address of the Application Gateway or internal Load Balancer should be configured in the backend pool of External Load Balancer in DMZ Hub VNET. This design does not need Azure Firewall to perform both source NAT (SNAT) and destination NAT (DNAT) operations. Further, implementing User Defined Routes (UDRs) in the Application Gateway subnet—specifically for spoke VNet CIDR ranges steers traffic routing through the Firewall. For non-web (TCP/UDP) workloads, applications can be directly exposed through the firewall public IP, with Azure DDoS Protection applied to mitigate volumetric attacks. Spoke VNET subnets should be associated with custom route tables with Propagate Gateway Routes set to No, preventing gateway-learned routes from bypassing the intended security inspection path configured via UDR. However, VPN Gateway Subnet Route table should have route table with Propagate Gateway Routes set to Yes. Scenario 3 - Overcoming Peering Complexity at Scale with Azure Virtual WAN In environments where each application is hosted in its own dedicated VNET for isolation and stronger security, a traditional hub‑and‑spoke model quickly becomes complex. With a single hub, "N" spoke VNETs require "N" peering's; introducing multiple hubs increases this to "2N", significantly amplifying operational overhead—especially across multiple regions. Azure Virtual WAN addresses this challenge by eliminating the need for extensive VNET peering. As a global, managed service, it simplifies large‑scale and multi‑region architectures while providing built‑in scalability and operational consistency. Setup DMZ Hub design and components remain unchanged from Scenario 1 keeping defense in depth principles intact for Internet Inbound or North-South traffic. Core Hub VNET is replaced with Azure Virtual WAN Secure Hub which has Azure Firewall inside the managed Secure Hub VNETs. This further eliminates the need for creating Azure Firewall Subnet, Azure NAT Gateway resources for East-West, Egress and Hybrid connectivity and provides same level of security protection as mentioned in Scenario 2. Secure Hub design using Virtual WAN removes the routing and inspection complexity which was unless required in Scenario 2 by removing UDR configurations in Spoke VNETs, Gateway Subnet and Azure Firewall Subnet. This provides simplified design and operations with built-in resiliency by leveraging the managed platform. Azure Firewall eliminates the need for load balancers and reduces complexity for chatty east‑west traffic. East-West, Egress, and Hybrid connectivity happens via VPN Gateway and Express Route Gateway present in Virtual Hub. All private and Internet Egress traffic is inspected by Azure Firewall present in secure Hub. Outbound traffic is SNATed to Public IP by Azure Firewall thus avoiding the need of Azure NAT Gateway. Firewall‑based SNAT to public IP can be used to avoid NAT Gateway costs when deterministic egress IPs or higher SNAT scale are not required. Traffic Flow North–South (Internet Inbound) Traffic Flow represented with Numbers. Request flow represented with Blue: 1–5 Response flow represented with Green: 6–10 Egress/Outbound Connectivity Traffic flow represented with Red Hybrid flow represented with Green East-West connectivity flow represented with black Architecture Diagram: Key Considerations Virtual WAN has additional cost Refer to architecture diagram above for different traffic flows. The DMZ VNET components consideration remains same as per scenario 1 You can use your own managed public IP on Azure Firewall for applying standard IP/Network DDoS protection plan. Benefits of multi-Hub approach over single Hub You can use this table as decision matrix to choose the best option for your application requirements. Dimensions Multi-Hub Design Resiliency · Independent scaling of DMZ and Core firewalls · Failure in Internet inspection does not impact East‑West traffic · Easier multi‑region active‑active designs Security & Compliance Clear trust boundaries Auditable inspection points Easier alignment with Zero Trust & regulatory frameworks Operational Simplicity Smaller, purpose‑built firewall policies Clear ownership (Perimeter vs Core team) Faster troubleshooting due to deterministic flows Cost Optimisation Avoids over‑inspection of East‑West traffic by DMZ firewalls Smaller firewall SKUs per hub Better scale‑unit consumption Performance Efficiency Reduced latency for private traffic No unnecessary hair‑pinning Optimised SNAT and connection tracking Key Takeaways Security‑first landing zones should not be designed as one‑size‑fits‑all networks. By designing hubs based on traffic trust level and inspection intent, rather than convenience, organisations gain: o Stronger security boundaries and better fault isolation o Predictable operations at scale o Lower long‑term cost and complexity o Design for traffic flows, not just connectivity o Use DMZ hubs exclusively for Internet‑untrusted traffic o Use Core hubs for East‑West, outbound, and hybrid connectivity o Map security controls to OSI layers o Avoid single‑hub designs for large, regulated, or multi‑region environments This distributed hub‑and‑DMZ landing zone provides a clean, scalable, and secure foundation for enterprise workloads in any Hyperscaler. For regulated, internet‑exposed, or multi‑region environments, a distributed hub with a dedicated DMZ is no longer optional — it is a foundational architecture decision.5.3KViews1like2CommentsA deep dive into Azure Bastion session recording
If you’ve worked with Azure Bastion’s Premium SKU, you’ve likely encountered one of its most powerful security features: graphical session recording. Capturing RDP and SSH sessions end to end strengthens compliance, supports forensic investigations, and improves operational accountability. How you configure session recording can make a significant difference. It determines whether you must manage manual tokens and expiry settings or benefit from a low-maintenance experience. With the recently announced Public Preview: Managed Identity support for graphical session recording, managing Bastion authentication credentials to store session recordings to a designated storage account is simpler and reduces manual work. In this blog, we’ll explain the Azure Bastion session recording feature, show how to set it up, compare SAS URL and Managed Identity options for storage authentication, and outline why Managed Identity is a great choice for production and enterprise environments. What Is Azure Bastion session recording? Azure Bastion is Microsoft’s fully managed, browser-based RDP/SSH gateway that removes the need for a public IP on your VMs. With the Premium SKU, you get access to session recording, which records graphical activity for every RDP and SSH session and uploads it as a browser playable video within the Bastion resource → Session recordings blade. This gives security teams: An audit trail of admin and user interactions Forensic evidence for incident response Visibility into privileged access across your environment Prerequisites Before you can enable session recording, you need: Requirement Detail Azure Bastion SKU Premium (Developer, Basic, and Standard do not support this feature) Storage Account General Purpose v2, same Azure region as Bastion Permissions Owner or Contributor on the Bastion resource and Blob Data Reader permission on the storage account for users to access the recordings The two configuration options When you enable session recording, Azure Bastion needs a way to authenticate to your Storage Account to upload the recorded sessions. There are two options: SAS URL Managed Identity Let’s look at how to set up each authentication option. Option 1: SAS URL How it works A Shared Access Signature (SAS) is a URI that grants restricted, time-limited access to Azure Storage resources. When using this option for session recording: You navigate to your Storage Account and generate a SAS URL token scoped to your container with at minimum Read, Create, Write, and List permissions. You paste the resulting SAS URL into the Bastion session recording blade. Bastion uses that URL to authenticate and write recordings to a storage container for every session. Prerequisites If you have not configured a storage account container for session recordings, visit Configure storage account container. Ensure you have Session recording and SAS URL selected in Azure Bastion configuration settings. Setup steps Go to your Storage Account. In the left pane, expand Settings, then select Resource sharing (CORS). Create a new policy under Blob service with the following values and save your changes at the top of the page. Next go to your Storage Account → Data Storage → Containers → Choose your container → Select Shared access tokens under Settings Under permissions drop down, select Read, Create, Write, and List. This is the minimum set of privileges required for session recording. Define a start and expiry date and select generate the SAS token and URL. Copy the Blob service SAS URL provided. In your Bastion resource → Session recording → paste the SAS URL and select Upload. New Azure Bastion sessions will now be recorded and available with the option for immediate playback. The challenges of using SAS URLs at scale 🔴 Token expiry overhead: SAS tokens expire after a set period. Once a token expires, Bastion can no longer write recordings, which can silently interrupt your audit trail until someone detects the issue and generates a new token. 🔴 Token access risk: If a SAS URL is accidentally logged or shared, it grants write access to your storage account for anyone who has access to it. 🔴 No Entra ID identity: Because SAS tokens provide preauthorized access for a limited time, they bypass Entra RBAC capabilities entirely. This means they don’t benefit from Conditional Access policies restriction capabilities. 🔴 Manual rotation: Unlike secrets stored in Key Vault with automated rotation, SAS tokens require a human or a custom automation pipeline to regenerate and update the Bastion configuration on a regular cadence. Option 2: Managed Identity How it works Azure Managed Identity is a feature of Microsoft Entra ID that provides Azure services with an automatically managed identity—no passwords, secrets, or tokens required. When Bastion is configured with a Managed Identity for session recording: Bastion’s system-assigned (or user-assigned) managed identity authenticates to the Storage Account via Microsoft Entra ID tokens issued by the Entra ID platform. RBAC controls what that identity can do. Specifically, it requires the Storage Blob Data Contributor role on the storage account. Token issuance, refresh, and lifecycle are all handled automatically by Azure. Setup Steps Go to your Storage Account. In the left pane, expand Settings, then select Resource sharing (CORS). Create a new policy under Blob service with the following values and save your changes at the top of the page. Next navigate to Identity (Preview). In our example, we are using a System Assigned Managed Identity, so we toggle Status to On to enable the Managed Identity to be used by Bastion for session recordings. An object (principal) ID will be generated, which is the unique identifier of the managed identity resources that is registered with Microsoft Entra ID for authentication purposes. Ensure you have Session recording and either System Assigned or User Assigned Managed Identity is selected in Azure Bastion configuration settings. Select the container you would like to store session recordings to and validate Blob Container URI is correctly noted in the configuration and click Apply to perform the configuration changes on the Bastion host. Now we need to allow RBAC permissions for the Managed Identity to store session recordings in our configured Storage Account and Container. Under Permissions select Azure role assignments. Select Add role assignment (Preview) and a new blade will appear. Here, will choose our scope which is Storage, we select our subscription, and target our Storage Account under Resource category, and for Role we will need to choose Storage Blob Data Contributor for the role assignment. Proceed to click Save to see our new role assignment listed. The setup and configuration is complete and Azure Bastion will now use the configured system-assigned managed identity to store session recordings on our Storage Container. Recordings can be found after a session in the Session recordings option under Settings. Benefits of a Managed Identity 🔴 No credentials to manage: No need to worry about credentials leaking or needing rotation. 🔴 No risks of silent failures: SAS tokens can expire and stop recordings without warning. Managed Identity handles tokens automatically, so recording continues without issues. 🔴 Better security visibility: It’s part of Entra ID, so you can see it in access reviews and control it with proper permissions. 🔴 Compliance improvements: It uses a real identity that can be tracked and audited, which aligns better with security and compliance requirements. Conclusion Azure Bastion session recording is essential for organizations that need to monitor privileged access. Using Managed Identity for authentication helps protect against credential leaks and requires no ongoing maintenance after setup, compared to the SAS URL configuration option. References Public Preview: Managed Identity support for graphical session recording | Microsoft Community Hub Azure Bastion: Enterprise-grade secure access made simple | Microsoft Community Hub Managed Identity Support for Azure Bastion - Azure Network Security in the Field #1 Record Bastion sessions - Azure Bastion | Microsoft Learn531Views1like0CommentsHow Azure network security can help you meet NIS2 compliance
With the adoption of the NIS2 Directive EU 2022 2555, cybersecurity obligations for both public and private sector organizations have become more strict and far reaching. NIS2 aims to establish a higher common level of cybersecurity across the European Union by enforcing stronger requirements on risk management, incident reporting, supply chain protection, and governance. If your organization runs on Microsoft Azure, you already have powerful services to support your NIS2 journey. In particular Azure network security products such as Azure Firewall, Azure Web Application Firewall WAF, and Azure DDoS Protection provide foundational controls. The key is to configure and operate them in a way that aligns with the directive’s expectations. Important note This article is a technical guide based on the NIS2 Directive EU 2022 2555 and Microsoft product documentation. It is not legal advice. For formal interpretations, consult your legal or regulatory experts. What is NIS2? NIS2 replaces the original NIS Directive 2016 and entered into force on 16 January 2023. Member states must transpose it into national law by 17 October 2024. Its goals are to: Expand the scope of covered entities essential and important entities Harmonize cybersecurity standards across member states Introduce stricter supervisory and enforcement measures Strengthen supply chain security and reporting obligations Key provisions include: Article 20 management responsibility and governance Article 21 cybersecurity risk management measures Article 23 incident notification obligations These articles require organizations to implement technical, operational, and organizational measures to manage risks, respond to incidents, and ensure leadership accountability. Where Azure network security fits The table below maps common NIS2 focus areas to Azure network security capabilities and how they support compliance outcomes. NIS2 focus area Azure services and capabilities How this supports compliance Incident handling and detection Azure Firewall Premium IDPS and TLS inspection, Threat Intelligence mode, Azure WAF managed rule sets and custom rules, Azure DDoS Protection, Azure Bastion diagnostic logs Detect, block, and log threats across layers three to seven. Provide telemetry for triage and enable response workflows that are auditable. Business continuity and resilience Azure Firewall availability zones and autoscale, Azure Front Door or Application Gateway WAF with zone redundant deployments, Azure Monitor with Log Analytics, Traffic Manager or Front Door for failover Improve service availability and provide data for resilience reviews and disaster recovery scenarios. Access control and segmentation Azure Firewall policy with DNAT, network, and application rules, NSGs and ASGs, Azure Bastion for browser based RDP SSH without public IPs, Private Link Enforce segmentation and isolation of critical assets. Support Zero Trust and least privilege for inbound and egress. Vulnerability and misconfiguration defense Azure WAF Microsoft managed rule set based on OWASP CRS. Azure Firewall Premium IDPS signatures Reduce exposure to common web exploits and misconfigurations for public facing apps and APIs. Encryption and secure communications TLS policy: Application Gateway SSL policy; Front Door TLS policy; App Service/PaaS minimum TLS. Inspection: Azure Firewall Premium TLS inspection Inspect and enforce encrypted communication policies and block traffic that violates TLS requirements. Inspect decrypted traffic for threats. Incident reporting and evidence Azure Network Security diagnostics, Log Analytics, Microsoft Sentinel incidents, workbooks, and playbooks Capture and retain telemetry. Correlate events, create incident timelines, and export reports to meet regulator timelines. NIS2 articles in practice Article 21 cybersecurity risk management measures Azure network controls contribute to several required measures: Prevention and detection. Azure Firewall blocks unauthorized access and inspects traffic with IDPS. Azure DDoS Protection mitigates volumetric and protocol attacks. Azure WAF prevents common web exploits based on OWASP guidance. Logging and monitoring. Azure Firewall, WAF, DDoS, and Bastion resources produce detailed resource logs and metrics in Azure Monitor. Ingest these into Microsoft Sentinel for correlation, analytics rules, and automation. Control of encrypted communications. Azure Firewall Premium provides TLS inspection to reveal malicious payloads inside encrypted sessions. Supply chain and service provider management. Use Azure Policy and Defender for Cloud to continuously assess configuration and require approved network security baselines across subscriptions and landing zones. Article 23 incident notification Build an evidence friendly workflow with Sentinel: Early warning within twenty four hours. Use Sentinel analytics rules on Firewall, WAF, DDoS, and Bastion logs to generate incidents and trigger playbooks that assemble an initial advisory. Incident notification within seventy two hours. Enrich the incident with additional context such as mitigation actions from DDoS, Firewall and WAF. Final report within one month. Produce a summary that includes root cause, impact, and corrective actions. Use Workbooks to export charts and tables that back up your narrative. Article 20 governance and accountability Management accountability. Track policy compliance with Azure Policy initiatives for Firewall, DDoS and WAF. Use exemptions rarely and record justification. Centralized visibility. Defender for Cloud’s network security posture views and recommendations give executives and owners a quick view of exposure and misconfigurations. Change control and drift prevention. Manage Firewall, WAF, and DDoS through Network Security Hub and Infrastructure as Code with Bicep or Terraform. Require pull requests and approvals to enforce four eyes on changes. Network security baseline Use this blueprint as a starting point. Adapt to your landing zone architecture and regulator guidance. Topology and control plane Hub and spoke architecture with a centralized Azure Firewall Premium in the hub. Enable availability zones. Deploy Azure Bastion Premium in the hub or a dedicated management VNet; peer to spokes. Remove public IPs from management NICs and disable public RDP SSH on VMs. Use Network Security Hub for at-scale management. Require Infrastructure as Code for all network security resources. Web application protection Protect public apps with Azure Front Door Premium WAF where edge inspection is required. Use Application Gateway WAF v2 for regional scenarios. Enable the Microsoft managed rule set and the latest version. Add custom rules for geo based allow or deny and bot management. enable rate limiting when appropriate. DDoS strategy Enable DDoS Network Protection on virtual networks that contain internet facing resources. Use IP Protection for single public IP scenarios. Configure DDoS diagnostics and alerts. Stream to Sentinel. Define runbooks for escalation and service team engagement. Firewall policy Enable IDPS in alert and then in alert and deny for high confidence signatures. Enable TLS inspection for outbound and inbound where supported. Enforce FQDN and URL filtering for egress. Require explicit allow lists for critical segments. Deny inbound RDP SSH from the internet. Allow management traffic only from Bastion subnets or approved management jump segments. Logging, retention, and access Turn on diagnostic settings for Firewall, WAF, DDoS, and Application Gateway or Front Door. Send to Log Analytics and an archive storage account for long term retention. Set retention per national law and internal policy. Azure Monitor Log Analytics supports table-level retention and archive for up to 12 years, many teams keep a shorter interactive window and multi-year archive for audits. Restrict access with Azure RBAC and Customer Managed Keys where applicable. Automation and playbooks Build Sentinel playbooks for regulator notifications, ticket creation, and evidence collection. Maintain dry run versions for exercises. Add analytics for Bastion session starts to sensitive VMs, excessive failed connection attempts, and out of hours access. Conclusion Azure network security services provide the technical controls most organizations need in order to align with NIS2. When combined with policy enforcement, centralized logging, and automated detection and response, they create a defensible and auditable posture. Focus on layered protection, secure connectivity, and real time response so that you can reduce exposure to evolving threats, accelerate incident response, and meet NIS2 obligations with confidence. References NIS2 primary source Directive (EU) 2022/2555 (NIS2). https://eur-lex.europa.eu/eli/dir/2022/2555/oj/eng Azure Firewall Premium features (TLS inspection, IDPS, URL filtering). https://learn.microsoft.com/en-us/azure/firewall/premium-features Deploy & configure Azure Firewall Premium. https://learn.microsoft.com/en-us/azure/firewall/premium-deploy IDPS signature categories reference. https://learn.microsoft.com/en-us/azure/firewall/idps-signature-categories Monitoring & diagnostic logs reference. https://learn.microsoft.com/en-us/azure/firewall/monitor-firewall-reference Web Application Firewall WAF on Azure Front Door overview & features. https://learn.microsoft.com/en-us/azure/frontdoor/web-application-firewall WAF on Application Gateway overview. https://learn.microsoft.com/en-us/azure/web-application-firewall/overview Examine WAF logs with Log Analytics. https://learn.microsoft.com/en-us/azure/application-gateway/log-analytics Rate limiting with Front Door WAF. https://learn.microsoft.com/en-us/azure/web-application-firewall/afds/waf-front-door-rate-limit Azure DDoS Protection Service overview & SKUs (Network Protection, IP Protection). https://learn.microsoft.com/en-us/azure/ddos-protection/ddos-protection-overview Quickstart: Enable DDoS IP Protection. https://learn.microsoft.com/en-us/azure/ddos-protection/manage-ddos-ip-protection-portal View DDoS diagnostic logs (Notifications, Mitigation Reports/Flows). https://learn.microsoft.com/en-us/azure/ddos-protection/ddos-view-diagnostic-logs Azure Bastion Azure Bastion overview and SKUs. https://learn.microsoft.com/en-us/azure/bastion/bastion-overview Deploy and configure Azure Bastion. https://learn.microsoft.com/en-us/azure/bastion/tutorial-create-host-portal Disable public RDP and SSH on Azure VMs. https://learn.microsoft.com/en-us/azure/virtual-machines/security-baseline Azure Bastion diagnostic logs and metrics. https://learn.microsoft.com/en-us/azure/bastion/bastion-diagnostic-logs Microsoft Sentinel Sentinel documentation (onboard, analytics, automation). https://learn.microsoft.com/en-us/azure/sentinel/ Azure Firewall solution for Microsoft Sentinel. https://learn.microsoft.com/en-us/azure/firewall/firewall-sentinel-overview Use Microsoft Sentinel with Azure WAF. https://learn.microsoft.com/en-us/azure/web-application-firewall/waf-sentinel Architecture & routing Hub‑spoke network topology (reference). https://learn.microsoft.com/en-us/azure/architecture/networking/architecture/hub-spoke Azure Firewall Manager & secured virtual hub. https://learn.microsoft.com/en-us/azure/firewall-manager/secured-virtual-hub1.5KViews0likes4CommentsAzure WAF Tuning for Web Applications
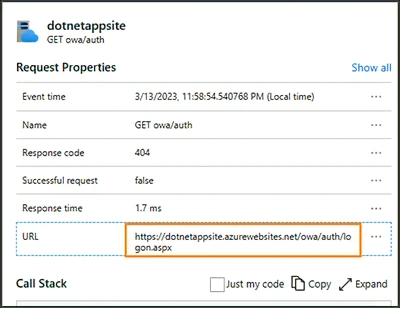
False positives occur when a Web Application Firewall (WAF) erroneously detects legitimate web traffic as malicious and subsequently denies access. For instance, an HTTP request that poses no threat may trigger WAF to classify it as an SQL injection attack due to how characters are passed through the request body, thereby causing the request to be rejected and denying access to the user. Find out in this post some examples to help reduce false positives in your Azure WAF environment.24KViews3likes5CommentsPublic Preview: Managed Identity support for graphical session recording
Overview Azure Bastion provides secure RDP and SSH access to Azure virtual machines directly via the Azure portal or via the native SSH/RDP client already installed on your local computer. Today, we are introducing public preview for managed identity support for session recording, giving administrators a seamless, identity-based way to authenticate Bastion when writing recordings to a designated storage account. Why Managed Identities? With managed identity support, Bastion authenticates directly to your storage account using an Azure identity, no additional credentials to configure or manage. You can use either a system-assigned or user-assigned managed identity depending on your needs. Authentication is handled automatically through Microsoft Entra ID, which means setup is straightforward: enable the identity, assign a role, and point Bastion at your storage container. For organizations operating at scale across many Bastion deployments and regions, this identity-based approach removes the need to manage credentials, aligns with Zero Trust principles, and lets you control access centrally through Azure RBAC. Getting Started in Azure Portal Prerequisites Ensure that Azure Bastion is deployed with the Premium SKU Ensure that a storage account with a dedicated container for session recordings is created Ensure that the storage account has the required CORS policy configured. Click here to set up the storage account for session recordings Ensure that users who need to view recordings have the Storage Blob Data Reader role on the storage account Steps Navigate to your Bastion resource in the Azure portal. Select Identity (Preview) in the left pane and turn the Status to On to enable a system-assigned managed identity. Wait for the configuration to complete. Select Azure role assignments, then select Add role assignment (Preview). Assign the Storage Blob Data Contributor role scoped to your storage account. Select Save, then navigate to the Configuration blade. Under Session Recording Configuration, select System Assigned Managed Identity and enter the Blob Container URI for your storage container. Navigate to the Session recordings blade to view and play back recorded sessions. Next Steps Learn more about configuring session recording with managed identities here and keep up to date with all things Azure Bastion in our What's New page.902Views0likes0CommentsGeneral availability of Default Ruleset (DRS) 2.2 for Web Application Firewall
Introduction As attackers continue to evolve their techniques, organizations require web application security that keeps pace with emerging threats without disrupting legitimate traffic. Azure Web Application Firewall (WAF) continues to evolve to meet these demands and now supports Default Rule Set (DRS) 2.2 across both Azure Front Door and Azure Application Gateway. The latest recommended Azure WAF ruleset, based on OWASP Core Rule Set (CRS) 3.3.4., DRS 2.2 combines OWASP CRS protections with Microsoft-authored rules developed with the Microsoft Threat Intelligence team, delivering broader coverage, updated signatures, reduced false positives, and a more modern security baseline for your internet-facing applications. What is new in DRS 2.2? DRS 2.2 builds on earlier rule sets with improvements focused on three areas: breadth of coverage, quality of detections, and false positive reductions. Broader security coverage DRS 2.2 is based on the OWASP Core Rule Set 3.3.4, delivering improvements in rule accuracy and new protections for common web vulnerabilities. DRS 2.2 contains 18 rule groups, organizing protections across SQL injections, XSS, protocol violations, remote code execution, and more, making it easier to understand and manage the scope of coverage. Notable improvements include: Detection of mismatched content types, where the declared content-type header does not match the actual payload format. This is a common tactic in evasion and obfuscation attacks. Improved Remote Code Execution (RCE) detections to catch increasingly sophisticated payloads used by threat actors. Microsoft Threat Intelligence rules In addition to the OWASP improvements, DRS 2.2 introduces new Microsoft Threat Intelligence rules. These rules expand coverage for: SQL Injection. Cross-Site Scripting (XSS). Advanced application security attack patterns. Improved false positive reduction with paranoia levels One of the standout features of DRS 2.2 is its paranoia level (PL) configuration, which allows you to balance security and usability. Paranoia levels (PL) determine how aggressively rules in the OWASP Core Rule Set (CRS) detect and block potential threats in a Web Application Firewall (WAF). OWASP CRS defines four paranoia levels (PL1–PL4), each offering progressively stricter security controls: PL1 (Default): Offers baseline protection against common web attacks, minimizes false positives, and is appropriate for most applications. PL2: Adds additional rules targeting more sophisticated threats, which may result in more false positives. PL3: Strict detection rules aimed at high-security environments. PL4: Implements the most aggressive security rules, suitable for highly secure environments, requiring extensive management and tuning efforts. Azure WAF currently does not support rules from paranoia levels 3 and 4. For more information on Azure WAF paranoia levels refer to Paranoia Levels. DRS 2.2 ships with paranoia level 1 (PL1) enabled by default. This gives customers the strongest baseline protection with minimal tuning overhead. DRS 2.2 rules configured in paranoia level 2 are disabled by default. Customers can leave PL2 disabled or selectively enable individual PL2 rules based on their threat model and application behavior. Enabling and upgrading to DRS 2.2 Upgrading to DRS 2.2 is straightforward, but there is an important planning consideration: when you assign a new managed ruleset version through the Azure portal, previous managed-ruleset customizations such as rule state overrides, rule action overrides, and rule-level exclusions are reset to the new defaults. Due to this, it is recommended to use PowerShell, CLI, REST API, or templates when you want to preserve overrides and exclusions, and validating changes in a test environment before production rollout. Please refer to Upgrade CRS or DRS Ruleset Version - Azure Web Application Firewall. To use DRS 2.2: Open your WAF policy (associated with your Azure Front Door or Application Gateway). Navigate to Managed Rules. Select “Assign”. Choose DRS 2.2 from the ruleset dropdown. Review enabled rule groups and optionally configure the rule actions. After upgrading, monitor your logs and metrics to understand traffic behavior and fine-tune as required. Figure 1: Enabling DRS 2.2 in Azure Front Door WAF Figure 2: Enabling DRS 2.2 in Azure Front Door WAF Conclusion Default Rule Set 2.2 marks a significant advancement for Azure Web Application Firewall, providing stronger security coverage, improved detection accuracy, and better control over false positives. By bringing the same modern ruleset experience to both Azure Front Door WAF and Application Gateway WAF, customers can apply a consistent web security baseline across global, regional, and internal application architectures. For customers already using Azure WAF, upgrading to DRS 2.2 is the simplest way to benefit from the latest protections while maintaining operational flexibility. References Web Application Firewall (WAF) on Azure Front Door | Microsoft Learn Web Application Firewall on Azure Application Gateway | Microsoft Learn Azure Front Door WAF - DRS and CRS rule groups and rules | Microsoft Learn Azure Application Gateway WAF - DRS and CRS rule groups and rules Azure Front Door WAF - Default Ruleset 2.2 | Microsoft Learn Application Gateway WAF – Default Ruleset 2.2 | Microsoft Learn Upgrade CRS or DRS Ruleset Version - Azure Web Application Firewall | Microsoft Learn1.4KViews0likes0CommentsOrchestrating Intrusion Detection and Prevention Signature overrides in Azure Firewall Premium
Introduction: Azure Firewall Premium provides strong protection with a built-in Intrusion Detection and Prevention System (IDPS). It inspects inbound, outbound, and east-west traffic against Microsoft’s continuously updated signature set and can block threats before they reach your workloads. IDPS works out of the box without manual intervention. However, in many environments administrators need the flexibility to override specific signatures to better align with operational or security requirements. Common reasons include: Compliance enforcement – enforcing policies that require certain threats (such as High severity signatures) to always be blocked, directional tuning or protocol/category-based tuning. Incident response – reacting quickly to emerging vulnerabilities by enabling blocking for newly relevant signatures. Noise reduction – keeping informational signatures in alert mode to avoid false positives while still maintaining visibility. In many environments, signature overrides are typically managed in one of two ways: Using the global IDPS mode Using the Azure portal to apply per-signature overrides individually While these approaches work, managing overrides manually becomes difficult when thousands of signatures are involved. The Azure portal also limits the number of changes that can be applied at once, which makes large tuning operations time-consuming. To simplify this process, this blog introduces an automation approach that allows you to export, filter, and apply IDPS signature overrides in bulk using PowerShell scripts. A Common Operational Scenario: Consider the following scenario frequently encountered by security teams: Scenario A security team wants to move their firewall from Alert → Alert + Deny globally to strengthen threat prevention. However, they do not want Low severity signatures to Deny traffic, because these signatures are primarily informational and may create unnecessary noise or false positives. Example: Signature ID: 2014906 Severity: Low Description: INFO – .exe File requested over FTP This signature is classified as informational because requesting an .exe file over FTP indicates contextual risk, not necessarily confirmed malicious activity. If the global mode is switched to Alert + Deny, this signature may start blocking traffic unnecessarily. The goal therefore becomes: Enable Alert + Deny globally Keep Low severity signatures in Alert mode The workflow described in this blog demonstrates how to achieve this outcome using the IDPS Override script. Automation Workflow: The automation process uses two scripts to export and update signatures. Workflow overview Azure Firewall Policy │ ▼ Export Signatures (ipssigs.ps1) │ ▼ CSV Review / Edit │ ▼ Bulk Update (ipssigupdate.ps1) │ ▼ Updated Firewall Policy Before implementing the workflow, it’s helpful to review the available IDPS modes and severity as seen below, very briefly. IDPS Modes: Severity: Prerequisites: Now that we understand Azure Firewall IDPS concepts and have the context for this script, let's get started with the workings of the script itself. First of all, let us ensure that you are connected to your Azure account and have selected the correct subscription. You can do so by running the following command: Connect-AzAccount -Subscription "<your-subscription-id>" Ensure the following modules are installed which are required for this operation: Az.Accounts Az.Network 💡 Tip: You can check if the above modules are installed by running the following command: Get-Module -ListAvailable Az* or check specific modules using this following commands: Get-module Az.Network | select Name, Version, Path Get-module Az.Accounts | select Name, Version, Path If you need to install/import them, run the following command which downloads all generally available Azure service modules from the PowerShell Gallery, overwriting existing versions without prompting: Import-Module Az.Network Import-Module Az.Accounts Restart PowerShell after installation. Configure ipsconfig.json Now, let's configure the ipsconfig.json file and ensure the configuration file contains your target environment details i.e., target subscription, target firewall policy resource group name, firewall name, firewall policy name, location and rule collection group name. Example: { "subs": "xxxxxxxx-xxxx-xxxx-xxxx-xxxxxxxxxxxx", "rg": "TEST-RG", "fw": "fw", "fwp": "fw-policy", "location": "CentralUS", "rcg": "DefaultNetworkRuleCollectionGroup" } Note: Your account must have permissions to read and update firewall policy and IDPS settings. Running the Script: 1. Export Signatures Now that we have all the prerequisites ready, it's time to run the script. Run the following command in PS in the directory where the script exists: .\ipssigs.ps1 Now, the script should prompt for filtering criteria as shown below and you can input the values as per your requirements: For the example scenario that we considered, we will give the following inputs as shown above in the snapshot: Mode: Alert Severity: Low 💡 Tip: When specifying multiple values, ensure there is space between the 2 values but no comma, otherwise the script may return no results. The script now exports the results to ipssignatures_results.csv file by default (or a custom filename if specified). The exported CSV includes metadata such as severity, direction, group, and protocol, which can help inform tuning decisions. 2. Prepare the CSV Now, we do not need all of these columns when inputting the CSV file to update the Firewall Policy. We only need the following columns. Signature Id Mode Therefore, we will need to remove all other columns while keeping the SignatureId and mode columns along with their headers as seen below: 3. Update the Firewall Policy Now, it's time to update the Firewall Policy with the signature/mode overrides that we need using the above CSV file. However, please note that the script supports two operations: Changing the global IDPS mode Applying bulk signature overrides using the CSV file You can use either option independently or both together. Let's understand this further by looking at these 2 examples. Example 1: Change Global Mode and Override Low Severity Signatures Goal: Set global mode to Alert + Deny Keep Low severity signatures in Alert Command: .\ipssigupdate.ps1 -GlobalMode Deny -InputFile Lowseveritysignatures.csv Result: High and Medium signatures → Alert + Deny Low signatures → Alert Example 2: Override Signatures Only If the global mode should remain unchanged, then run the following command only. .\ipssigupdate.ps1 The script will then prompt for the input CSV file in the next step as seen below: As seen the changed were made to the Azure Firewall in just a few seconds. After the script completes, updated signature actions should appear in the firewall policy. 4. Monitoring Script Execution Please use the following commands to track and monitor the background processes, to verify the status, check for any error and remove completed jobs as seen below: You can check background job status using: Get-Job -Id <#> View results: Receive-Job -Id <#> -Keep Remove completed jobs: Remove-Job -Id <#> Note: Up to 10,000 IDPS rules can be customized at a time 5. Validate the Changes: Now that we finished running the script, it's time to verify the update by confirming: Global IDPS mode in the firewall policy Signature override state Alert or block events in your logging destination (Log Analytics or Microsoft Sentinel) Note: Please note that, while most signatures support Off, Alert, or Deny actions, there are some context-setting signatures, that have fixed actions and cannot be overridden. Conclusion: Azure Firewall Premium makes it straightforward to apply broad IDPS configuration changes through the Azure portal. However, as environments scale, administrators often require more precise and repeatable ways to manage signature tuning. The automation approach described in this blog allows administrators to query, review, and update thousands of signatures in minutes. This enables repeatable tuning workflows, improves operational efficiency, and simplifies large-scale security configuration changes. References: Github Repository for the IDPS scripts Azure Firewall IDPS Azure Firewall IDPS signature rule categories731Views0likes0Comments