azure load testing
78 TopicsWhy Cloud Browsers Are Becoming Enterprise Infrastructure for AI Agents and Automation
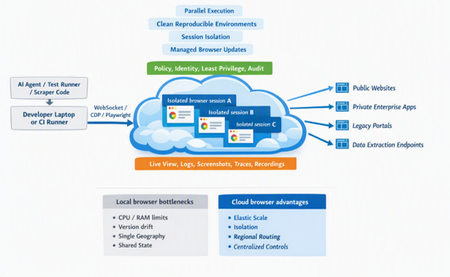
The browser is becoming a new execution environment Over the last decade, enterprises moved compute from desktops to the cloud. Applications that once depended on individual machines now run on scalable, managed infrastructure. A similar shift is beginning to happen with browser automation. Browsers were originally designed for humans. A person opened a browser, navigated through websites, completed transactions, submitted forms, and consumed information. Today, a growing number of those same activities are being performed by automated systems. Test suites validate critical business applications before every release. Business workflows interact with legacy web portals that lack APIs. Most recently, AI agents have begun using browsers to access information and complete tasks on behalf of users. This creates a new question for enterprises: "Where should those browser interactions run?" Running a browser on a developer's laptop may be sufficient for experimentation and small-scale automation. However, it becomes increasingly difficult when hundreds of automated workflows, thousands of test executions, or fleets of AI agents require secure, isolated, observable, and governed browser environments. As organizations operationalize browser automation, the browser itself is evolving from a desktop application into enterprise infrastructure. Enterprise cloud browsers solve a different problem than local browsers Initially browser automation focused primarily on helping developers automate repetitive tasks and run tests. Today's enterprise requirements are significantly broader. Organizations need environments that can safely support autonomous execution while maintaining visibility, compliance, and operational control. Cloud-hosted browsers are changing the landscape for browser automation. Instead of treating the browser as something attached to one machine, they are turning it into an elastic, isolated, observable runtime. Modern automation is no longer about running one script. It is many agents, scrapers, workflows, and tests operating in parallel across websites, regions, identities, and environments. Some real-world problems that enterprises want to solve with the help of browser automation: "We have 300 employees doing thousands of data transcription operations each day, need an alternate for RPA on legacy websites" "I want to get pricing of my SKUs across hundreds of websites, across devices, across geographies, daily & almost real time" "We want to run E2E tests on our app across varied scenarios, geographies so that the quality is always very high for our customers" Security and governance by design Security is often the first concern enterprises raise when evaluating browser-based automation and AI agents. Browsers routinely execute untrusted code, render external content, download files, interact with third-party services, and handle sensitive information. When autonomous agents begin operating those browsers, the risk profile becomes even more significant. Cloud-hosted browsers provide a controlled environment where organizations can apply governance consistently across browser sessions. This includes: Isolated browser sessions Role-based access controls Data residency and compliance controls Network controls Audit logging and activity tracking A governed cloud environment provides a more practical foundation for these controls than unmanaged browser instances running on individual devices. Secure automation on enterprise portals: Finance, procurement, and operations teams can execute transactions on legacy ERP, supplier, and line-of-business applications using managed browser sessions, centralized credentials, and policy controls rather than maintaining dedicated desktops for each workflow. Customer support operations: Service teams can update accounts, process requests, and interact with multiple internal and external systems through individual browser sessions with centralized logging, replay, and live-view capabilities for troubleshooting. Observability becomes critical One of the most significant differences between experimentation and production automation is operational visibility. When a test fails, a workflow breaks, or an AI agent performs an unexpected action, organizations need to understand exactly what happened. This requires more than simply knowing whether the automation succeeded or failed. Key observability features that cloud browser platforms are offering: Live view Screenshots and recordings Audit records Network traces Execution logs Browser console output These capabilities help engineering teams troubleshoot failures, allow operations teams to investigate incidents, and provide governance teams with accountability for automated actions. As browser-based agents become part of critical business processes, observability is becoming a foundational requirement to move to production. KYC and compliance verification: Financial institutions can automate identity checks across registries, verification services, and compliance portals while maintaining isolated customer sessions, auditability, and human review for high-risk decisions. Checkout and payment validation: E-commerce teams can validate end-to-end purchasing journeys using session recordings, traces, screenshots, and live browser visibility to quickly diagnose checkout failures, flaky tests, payment gateway issues, and abandoned transactions. Reproducibility and environment consistency Local browsers often fail due to incorrectly setting up environments to complete the task at hand. One runner may have a different browser version; another may have a stale driver or a missing system package. The browser states from one local browser environment to another may be different due to leftover cookies or cached state. Cloud-hosted browsers move that surface area into a managed environment. They handle the underlying infrastructure setup and complexity, and provide consistent browser versions, dependencies, and clean starting states. This standardization ensures cleaner browser sessions and predictable states, making it easier to reproduce and debug errors. Testing web application workflows: Each run starts with the expected browser version and state, improving consistency and reducing failures caused by stale cookies, cached data, missing packages, or machine-specific configuration. Debugging support incidents: An automated support workflow can replay the same customer journey in a known environment, preserving session artifacts and making intermittent defects easier to reproduce. Geographic distribution and network realism Local browsers originate from one machine and one network. That is a poor match for globally used applications, regional pricing, localized content, and compliance-sensitive traffic paths. Cloud-hosted browsers provide regional execution, IP controls, or geo-targeting. For scraping and data extraction, geography can determine what data is visible. For test automation, geography can expose latency and localization issues. For enterprise workflows, region and network path can affect compliance and access-control requirements. With cloud browsers, all of the above becomes easily configurable. Web data collection at scale: Organizations can gather competitor pricing, product availability, market intelligence, and localized content across thousands of websites by distributing workloads across concurrent browser sessions in multiple geographies. Travel, commerce, and purchasing workflows: Agents can compare offers, inventory, pricing, taxes, and payment options across regions before completing bookings or purchases, with approval checkpoints for consequential actions. Cross-border business processes: Logistics, trade, and operations teams can submit forms, declarations, and regulatory filings through region-specific carrier and government portals while adhering to network, residency, and compliance requirements. Testing digital customer experiences: Engineering and QA teams can validate signup, purchase, and service workflows from multiple regions to identify localization, performance, compliance, and geo-routing issues before they impact customers. Scale and parallel execution Historically, scale was often the primary reason organizations adopted cloud-based automation. Scale remains important. Browser automation benefits largely from scaled execution and parallelism because most automation tasks are independent test cases, page crawls, price checks, form submissions, document downloads, and agent evaluations, that can all run concurrently. Scraping competitor or vendor data: Running web scraping tasks across thousands of websites can be distributed crawls across concurrent browser sessions. RPA transactions: Operations teams can process hundreds of spreadsheet records through a legacy supplier portal in parallel, no need of dedicated desktop infrastructure. Customer onboarding: AI agents running on websites that incur seasonal surge in customer applications can complete form filling without having to worry about scaling their infrastructure. When local browsers still make sense The case for cloud-hosted browsers is strong, but it is not absolute. Local browsers remain useful in a few situations. Debugging automation scripts: Developers debugging one-flow, stepping through script or iterating on selectors, local execution may be fast and simple. Specialized browser modifications: Deep customizations that require patched browser binary, specialized extensions, direct file-system access, GPU behaviour, or unusual OS-level dependencies, local or self-managed infrastructure may be easier. Workloads with very limited scale requirements: If the scale is very small and frequency is occasional, running locally may be cheaper and simpler. The transition point typically occurs when requirements expand beyond a single user and begin involving multiple teams, environments, agents, regions, or when concurrency, reliability, observability, security, or maintenance becomes more important than initial setup simplicity. What customers should look for in a cloud-hosted browser platform A managed cloud browser platform is not just about connecting to browser instances from anywhere. Customers should evaluate: Isolation: Are sessions cleanly separated? Can state be controlled, persisted, or discarded intentionally? Scale: Can the platform handle bursty traffic and parallel execution automatically without having to worry about the scale? Reproducibility: Are browser versions, OS environments, and artifacts consistent and standard across the platform? Observability: Are live view, logs, traces, screenshots, videos, network data, and audit records available? Security: Are the browsers updates managed and kept up-to-date with the latest security patches? Are least privilege, identity, network boundaries, domain controls, and human approval patterns supported? Geography: Can workloads run from relevant regions or network paths? Cost visibility: Is pricing tied to minutes, sessions, data transfer, or concurrency and does that match the expected workload? Looking ahead The browser is now an execution environment. AI agents use browsers to interact with the parts of the web that do not have APIs. Test suites use browsers to validate releases. Data teams use browsers to extract information from the web. Operations teams use browsers to bridge legacy systems that will not be replaced soon. While local browsers helped get the automation started and they will continue to remain useful for prototyping, debugging, and small-scale work, the future of serious production-grade browser automation is cloud-hosted: elastic, isolated, observable, governed, and integrated into the rest of the enterprise platform. To know more: What is Playwright Workspaces? Playwright Workspaces free trial809Views0likes0CommentsAI-Powered Performance Testing
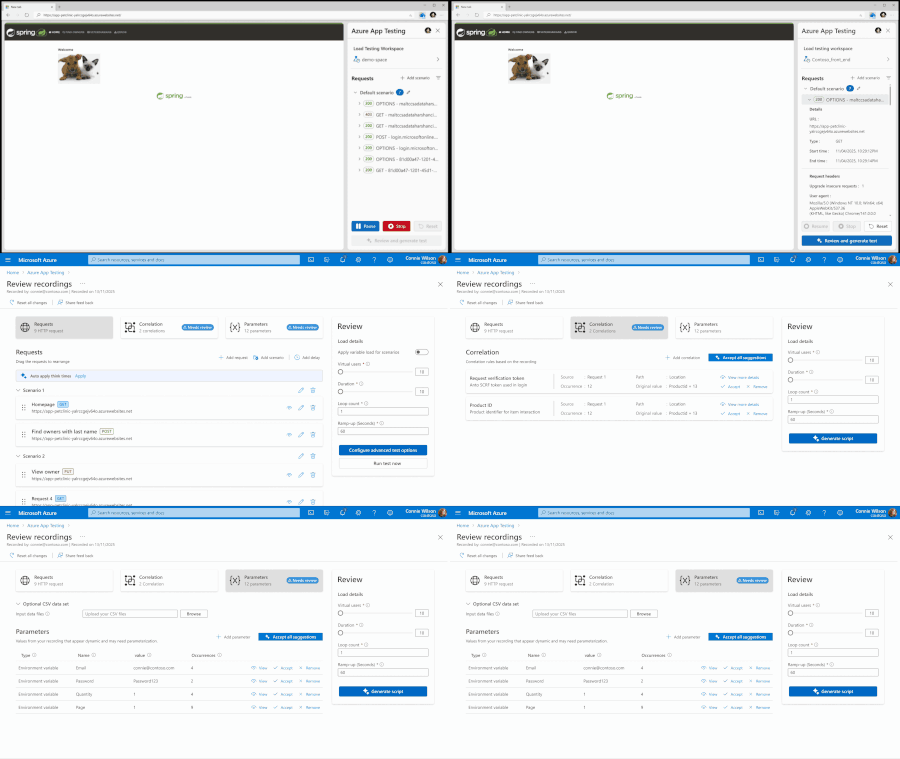
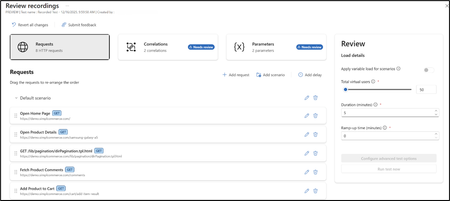
Performance testing is critical for delivering reliable, scalable applications. We have been working on AI-driven innovations in Azure Load Testing that will change how you author and analyze load tests. AI-Assisted Authoring of JMeter Scripts Writing high-quality load test scripts has traditionally required deep expertise. From setting correlations and think times to properly parameterizing inputs, it requires significant time and effort. This manual effort slows teams down, especially when they must recreate real-world scenarios under tight deadlines. With our new AI-assisted authoring, that changes. Now you can simply record your application journey, and Azure Load Testing will do the heavy lifting: Record your scenarios using the browser extension AI automatically suggests correlations to handle dynamic values Intelligent parameterization for more realistic test data Smart request labelling to help you organize flows cleanly Recommended think times to match actual user behavior Once refined, a production-ready JMeter script is generated automatically. You can run this script immediately on Azure Load Testing with the scale and reliability you expect. You can create complex, realistic performance tests created in a fraction of the time, even if you’re not a JMeter expert. AI-Powered Actionable Insights Performance tests don’t stop at execution. Real value comes from understanding what happened and knowing what to do next. We have supercharged our insights experience with AI. Insights for Failed Test Runs: When a test fails, the first question is always: why? Now, Azure Load Testing uses AI to automatically analyze test run logs, detect the root cause, and provide clear guidance on what went wrong and how to fix it. Baseline Comparison Insights: Compare any test run against your defined baseline to immediately see what degraded, what improved, and which requests diverged from expected performance. It also helps understand the root cause for performance degradation. Focused Recommendations for Failed Test Criteria: If any of your pass/fail criteria fail, AI surfaces targeted recommendations so you can take corrective action quickly. You get meaningful insights, even when things don’t go as planned. No more staring at graphs trying to figure out what to do next. The Future of Load Testing Is Intelligent With AI assisting script creation and analyzing test outcomes end-to-end, Azure Load Testing now helps teams: Run real world performance tests faster Troubleshoot with confidence Reduce manual debugging The authoring capability will be available in the next couple of weeks. Meanwhile, you can try out AI-powered insights for your load test run to quickly analyze your results. Please share your feedback here. Happy Load Testing!1.3KViews4likes1CommentLoad testing Copilot Studio agents with Locust and Azure Load Testing
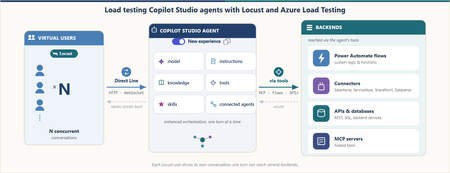
A conversational agent doesn't answer like an API. You send one message. The server returns 200 OK. And then nothing happens. The real answer is still coming, streaming back over a WebSocket as one reply or several. It might take two seconds, or three minutes while the agent thinks, calls a tool, or even builds another agent. So how do you load test an answer that isn't ready when the request says it is? This post builds that test — and one 30-minute run answered it: 253 conversations and 3,212 requests with zero failures, including an agent-creation turn that took 8.68 seconds to reply and 163.71 seconds to finish. Why load test a Copilot Studio agent Conversational agents built with Copilot Studio run on a platform that automatically scales to support increases in demand and load, as documented in Microsoft's performance-testing guidance. That scaling is not infinite. It stays within the environment's capacity, quotas, throttling, and service limits. A turn can also reach custom logic, connectors, and backend services with separate operating limits. Concurrent load can expose latency or failures in either part of the request path. Start by taking a single turn apart. A turn is one user message and everything the agent does to answer it, up to the moment it signals turn.complete. The elapsed time spans several parts of the request path, including the Copilot Studio-managed path and external dependencies. The green zone is the path managed by Copilot Studio: the Direct Line channel that accepts the message, the enhanced orchestration runtime that reasons over the agent's parts (its model, instructions, knowledge, tools, skills, and connected agents), and the reply that streams back one message at a time. The platform automatically scales to support increases in demand and load while coordinating those parts within those same limits. Constraints in this zone can also contribute latency or failures. The amber zone covers everything a turn reaches beyond that managed path. From inside the green zone, the agent's tools call out to these dependencies: custom logic and Power Automate flows; connectors to systems like Salesforce, ServiceNow, SharePoint, and Dataverse; backend APIs and databases; and hosted MCP servers. (A2A connections to remote agents on other platforms existed only for classic agents at the time of this test, so they're out of scope here.) Each dependency has its own configuration and limits. Under load, any part of either zone can add latency or fail; full-agent timings alone do not identify the source. Test each component in isolation Component-level tests help isolate constraints before a full-agent run. Apply representative load directly to the cloud flow, connector, backend API, and MCP server one at a time. The results can show the request rate at which latency rises, throttling appears, or requests begin to fail for that dependency. An isolated run turns a vague "the agent felt slow" into measured component behavior. A full-agent run can then be compared with those results without assuming in advance which part caused the delay. Why test the complete agent under load Testing each component helps find its limit. But users experience the complete conversation, not one component at a time. The agent may take a different path for each message. It may return one reply or several replies. Some steps may also take much longer than others. This is true even when the agent does not call an external system. A load test shows how the complete agent behaves when many users are active. The results help set realistic expectations for response time and reliability: More users can mean slower replies. An agent may respond quickly for one tester but slow down when many conversations run at the same time. Different conversations take different paths. Some work starts only after a user makes a certain choice. A one-message test may never reach that work. The full answer takes longer than the send request. Sending a message is only the start. The response time ends when the agent has returned its last reply for the turn. Real results support better targets. Measured response times and error rates provide a clear baseline for production planning. What this post does This post shows how to build a Python load test for a conversational agent built with Copilot Studio using Locust, a Python load-testing framework that simulates concurrent users. The test communicates with the agent through the Direct Line API, the channel used by the tested client application to exchange messages with the published agent. Direct Line uses HTTP requests to get a token, start a conversation, and send a message. Replies arrive over a WebSocket connection. Each Locust virtual user follows this same path, sends a series of messages, and measures the time until the agent completes each turn. The same Python workload file runs locally and in Azure Load Testing without code changes. Environment-specific settings come from locust.conf locally and locust.azure.conf in Azure. The local validation below uses four virtual users for 15 minutes. The cloud run uses the same two user classes with 16 virtual users for 30 minutes, including text conversations, attachment intake, and selective agent creation. In this post, I: Explain how a conversation works over Direct Line and WebSockets. Build the Locust client one step at a time. Handle complete turns, errors, and file uploads. Run both conversation paths under load: users describing requirements in chat and users submitting requirements as file attachments. Run the same test locally and in Azure Load Testing. The agent under test. The examples use Automatic Agent Creator, a demonstration Copilot Studio agent that reads a business request, asks follow-up questions, and either recommends an integration approach or creates and publishes a new agent. The Direct Line flow can be adapted to other published agents, but conversation behavior, events, and response shapes must be validated for each agent, client, channel configuration, and product version. How a Copilot Studio agent talks over Direct Line The tested agent and client used this shape: open a session, exchange messages while it is alive, and read replies until the agent signals that the turn is done. This load test reproduces that flow end to end so its timings include the reply path, not only the message-send request. Direct Line can deliver replies through a WebSocket stream or HTTP GET polling. Microsoft's performance-testing guidance says to use WebSockets when the client-facing application uses them; HTTP GET remains available when it does not. The tested client used WebSockets, so this harness does too. The base host in every request below is a Direct Line regional endpoint. Get a token Before a client can start a conversation, it needs a conversation token. A Direct Line secret is sent to the token endpoint to request one. Direct Line returns a token for one conversation and an expires_in value that gives the number of seconds until it expires. The client uses this token for the conversation requests that follow. POST {host}/v3/directline/tokens/generate Authorization: Bearer «Direct Line secret» → 200 { "conversationId": "…", "token": "eyJhbGci…", "expires_in": «seconds until expiry» } The tested conversations completed before their returned token expiry. A longer-lived client must use the returned expires_in value and refresh the token before it expires. Start a conversation and open the socket To start a conversation, the client sends the token to Direct Line in an HTTP request. Direct Line returns two important values: a conversationId, which identifies the conversation, and a streamUrl, which is the WebSocket address used to receive replies. The client opens the WebSocket and keeps it open until the conversation ends. POST {host}/v3/directline/conversations Authorization: Bearer «token» → 201 { "conversationId": "…", "streamUrl": "wss://…/stream", "token": "eyJhbGci…" } WS CONNECT wss://…/stream → socket open (HTTP 101) Send a message With the conversation started and the WebSocket open, the client can send the first user message. In Direct Line, a message is represented as an activity. The client sends this activity through an HTTP POST, while the agent's replies return through the open WebSocket. POST {host}/v3/directline/conversations/{id}/activities Authorization: Bearer «token» { "type": "message", "from": { "id": "user-…" }, "text": "…", "locale": "en-US" } → 200 { "id": "…" } The 200 response contains the ID assigned to the activity. It confirms that Direct Line accepted the message, but it does not contain the agent's answer or mean that the agent has finished processing the message. The answer arrives separately through the WebSocket connection. Receive replies until turn.complete After Direct Line accepts the message activity, the agent's replies arrive through the open WebSocket. A turn may contain one agent message or several. When the agent finishes the turn, the stream sends an event named turn.complete. The client ends the read for the current turn when this event arrives. The WebSocket remains open for the next message. Two measurements describe the response time. Although TTFB usually means time to first byte, this harness uses the label for the time to the first complete agent message: TTFB is the time from the start of the send request to the first agent message. ResponseTime is the time from the start of the send request to the last agent message. Note. In this post, TTFB means the time to the first complete agent message, not the first network byte. Typing activities and the turn.complete event are not used as timing endpoints. The first and last agent messages set the measurements. For a turn with one agent message, TTFB and ResponseTime are equal. When the agent first sends an acknowledgment and later sends the completed result, ResponseTime is longer than TTFB. In the Azure run reported later, the agent-creation turn averaged 8.68 seconds to the first message and 163.71 seconds to completion. Note. Direct Line does not provide a general "last message" marker. The standard performance-testing guidance uses replyToId to match replies to the sent message and an inactivity timeout to decide when the response has ended. The new agent experience adds turn.complete as an explicit end-of-turn signal. This client uses that event as the normal stopping point, keeps an overall deadline as a safety check, and uses sender ID because from.role may be missing. Implement one virtual-user conversation One virtual user repeats a small cycle: open a Direct Line conversation, send a turn, receive the replies, record the timing, pause, and close. The excerpts below implement that cycle before Locust adds concurrency. Note. These focused excerpts omit some hardening, debug logging, transcript details, and upload internals. The complete client contains them. The important imports are shown once and reused below: import json # Python standard library: decode WebSocket frames import time # Python standard library: measure turn duration import websocket # websocket-client: open and read the WebSocket from locust import FastHttpUser, between from locust.exception import StopUser json and time come from Python. websocket comes from websocket-client. Locust supplies FastHttpUser, between, and StopUser. Uppercase names such as REPLY_DEADLINE are constants in new_chat_client.py. Open the session: connect() At the top of every task, connect() gives the virtual user a unique id, gets a token, starts a conversation, and opens the WebSocket. The unique id matters later: it's how the client tells the agent's replies apart from its own echoed message. def connect(self): """Get a token, start a conversation, and open the WebSocket.""" self._user_id = "user-" + str(id(self)) self._turn = 0 self._token = self._get_token() if not self._token: raise StopUser() started = self._start_conversation() if not started: raise StopUser() self.conversation_id, stream_url = started self._ws = websocket.create_connection(stream_url, timeout=WS_CONNECT_TIMEOUT) self._ws.settimeout(WS_RECV_TIMEOUT) # each recv() polls for at most a second The token and start calls are ordinary HTTP, wrapped so Locust records each one and marks a bad status as a failure. def _get_token(self): url = self.directline + "/v3/directline/tokens/generate" headers = {"Authorization": "Bearer " + self.direct_line_secret} with self.client.post(url, headers=headers, name=self.label + " token", catch_response=True) as response: if response.status_code != 200: response.failure("token HTTP " + str(response.status_code)) return None body = parse_json(response) if not body or not body.get("token"): response.failure("token response missing 'token'") return None return body["token"] def _start_conversation(self): url = self.directline + "/v3/directline/conversations" with self.client.post(url, headers=self._auth_header(), name=self.label + " start", catch_response=True) as response: if response.status_code not in (200, 201): response.failure("start HTTP " + str(response.status_code)) return None body = parse_json(response) or {} conversation_id = body.get("conversationId") stream_url = body.get("streamUrl") if not conversation_id or not stream_url: response.failure("start response missing conversationId or streamUrl") return None if body.get("token"): self._token = body["token"] return conversation_id, stream_url One turn: say() say() owns one turn: start the clock, send the activity, receive replies, record both timings, and return the last non-empty agent message. metric_name labels the Locust rows, deadline limits the whole turn, and attach selects the upload path. def say(self, text, metric_name=None, deadline=REPLY_DEADLINE, attach=None): """Send one message, wait for the reply, and return the reply text.""" self._turn += 1 start = time.perf_counter() posted_id = self._send(text, attach) if posted_id is None: self._record(start, None, None, metric_name, "", "send failed") raise StopUser() result = self._receive(start, deadline) self._record(start, result.t_first, result.t_final, metric_name, result.text, result.error) if result.error: raise StopUser() return result.text Earlier replies still set the timing boundaries, but result.text contains only the last non-empty message. _send() posts a normal message unless attach selects the upload path explained later. def _send(self, text, attach=None): if attach: return self._send_file(text, attach) # explained in the attachment section activity = {"type": "message", "from": {"id": self._user_id}, "text": text, "locale": "en-US"} url = (self.directline + "/v3/directline/conversations/" + self.conversation_id + "/activities") with self.client.post(url, json=activity, headers=self._auth_header(), name=self.label + " send", catch_response=True) as response: if response.status_code != 200: response.failure("send HTTP " + str(response.status_code)) return None body = parse_json(response) if not body or not body.get("id"): response.failure("send response missing activity id") return None return body["id"] The returned activity ID confirms acceptance, not an answer. The answer arrives on the WebSocket, while Locust records the POST as a separate send row. Read WebSocket frames until the turn ends _receive() reads JSON frames from the open socket. TurnResult keeps the latest text, the first and final message times, and any error: class TurnResult: def __init__(self): self.text = "" # last non-empty agent message self.t_first = None # first agent-message time self.t_final = None # latest agent-message time self.error = "" # non-empty when the turn fails The one-second socket timeout keeps each read responsive; the overall deadline limits the complete turn, including the HTTP send. def _receive(self, start, max_wait=REPLY_DEADLINE): """Read frames until the agent signals 'turn.complete' or the deadline passes.""" result = TurnResult() deadline = start + max_wait while time.perf_counter() < deadline: try: frame = self._ws.recv() except websocket.WebSocketTimeoutException: continue # no data this second; keep waiting if not frame or not frame.strip(): continue payload = json.loads(frame) for activity in payload.get("activities", []): if self._handle_activity(activity, result): return self._finish(result) # saw turn.complete if result.t_final is None and not result.error: result.error = "no final reply (timeout)" return self._finish(result) Each activity has one job: Activity Client action User message echo Ignore it because it came from the virtual user typing Ignore it for response-time measurements Agent message Set the first and latest message times; keep the latest non-empty text trace with an ErrorCode Store the structured turn error event named turn.complete End the read for this turn; keep the WebSocket open _handle_activity() applies the table. _is_bot_reply() filters the user echo and is explained next. def _handle_activity(self, activity, result): activity_type = activity.get("type") if activity_type == "message" and self._is_bot_reply(activity): now = time.perf_counter() if result.t_first is None: result.t_first = now # first reply -> TTFB result.t_final = now # every reply -> ResponseTime result.text = activity.get("text") or result.text return False if activity_type == "trace": code = self._error_code(activity) if code and not result.error: result.error = "bot error: " + describe_error_code(code) return False if activity_type == "event" and activity.get("name") == "turn.complete": return True return False Normally turn.complete ends the read. The deadline is the fallback; a turn with no agent message fails. Record the latency _record() emits TTFB and ResponseTime for a successful turn. A failed turn emits one failed ResponseTime entry instead of a latency value. def _record(self, start, t_first, t_final, metric_name, text, error): name = self.label + " " + (metric_name or ("t" + str(self._turn))) fire = self.environment.events.request.fire if error: fire(request_type="CHAT", name=name + " [ResponseTime]", response_time=None, response_length=0, exception=Exception(error), context={}) return fire(request_type="CHAT", name=name + " [TTFB]", response_time=((t_first or t_final) - start) * 1000, response_length=0, exception=None, context={}) fire(request_type="CHAT", name=name + " [ResponseTime]", response_time=(t_final - start) * 1000, response_length=len(text), exception=None, context={}) Pause between turns and close the conversation The scenario pauses between messages and closes the WebSocket in finally, even when a turn fails. try: self.connect() self.say(requirement, "T01 requirement") self.think(20, 30) self.say("ok", "T02 confirm") finally: self.close() That completes one conversation. Note. This is a trimmed two-turn illustration (T01 requirement then T02 confirm). The demo text scenario reported later runs five turns: T01 requirement, T02 source, T03 target, T04 action (only some conversations reach this branch), and T05 confirm. Assemble the reusable Locust user In new_chat_client.py, the methods above belong to WebSocketChatClient. The class extends FastHttpUser and holds their shared configuration: class WebSocketChatClient(FastHttpUser): """Direct Line WebSocket load client for a new-experience Copilot Studio agent.""" abstract = True host = DIRECTLINE wait_time = between(2, 6) directline = DIRECTLINE direct_line_secret = None # secret mode label = "ws" abstract = True prevents Locust from running the base directly. A scenario subclass supplies the secret, metric label, and messages. wait_time pauses between complete scenario runs, while explicit think() calls pause between turns. Locust can then create many scenario instances that reuse the same conversation methods. Handling the new experience Three behaviors of the new agent experience would quietly break a naive client. Each is a few lines in the methods above. Preview notice. As of July 13, 2026, the Copilot Studio new agent experience is a production-ready preview. Microsoft identifies its documentation as prerelease and subject to change, and states that production-ready previews are subject to the Supplemental Terms of Use for Microsoft Azure Previews. Replies may omit a role In the classic channel, an agent message carries from.role = "bot". In the new experience some replies arrive with only from.id and no role at all. Keying off role == "bot" would drop those messages and report "no reply." The fix treats any message that isn't the client's own echo as a reply: def _is_bot_reply(self, activity): """True if the message is from the agent (role may be missing), not the client's echo.""" sender = activity.get("from") or {} role = sender.get("role") if role == "bot": return True if role == "user": return False return sender.get("id") != self._user_id # role missing -> not the echo -> a reply turn.complete is an explicit end-of-turn event Reading it (rather than waiting out a timeout) is what lets a fast turn finish in a couple of seconds instead of idling. It's the event branch in _handle_activity() above. Errors come back as a structured code When something goes wrong, the agent can send a trace activity carrying a locale-independent ErrorCode. The client maps it against the official code list so a run reports why it failed, not just that a reply never came: def _error_code(self, activity): if activity.get("valueType") != "ErrorCode": return None value = activity.get("value") if isinstance(value, dict) and value.get("ErrorCode"): return value["ErrorCode"] return "error" Attach files with a multipart upload A file-reading turn exercises work that a text-only turn does not. This harness sends one or more files through the Direct Line /upload endpoint as multipart/form-data, with an optional message activity in the same request. The multipart request The request contains one activity part and one file part per attachment: POST {host}/v3/directline/conversations/{id}/upload?userId={from.id} Authorization: Bearer «token» Content-Type: multipart/form-data; boundary=----loadtest-«random» ------loadtest-«random» Content-Disposition: form-data; name="activity" Content-Type: application/vnd.microsoft.activity { "type": "message", "from": { "id": "user-…" }, "text": "" } ------loadtest-«random» Content-Disposition: form-data; name="file"; filename="requirement.csv" Content-Type: text/csv «raw file bytes» ------loadtest-«random»-- → 200 { "id": "…" } (same shape as a normal send) The required userId query parameter identifies the sender. The harness uses the same per-instance ID in userId and activity.from.id, so the echoed activity has the sender ID expected by the reply filter. The activity JSON contains no attachments array. Direct Line adds the separate file parts as attachments to that activity before sending it to the agent. A successful upload returns the same { "id": "…" } shape as a text send, so the existing WebSocket receive and timing path remains unchanged. Building the body by hand Locust's FastHttpUser has no explicit requests-style files= helper. The client therefore assembles the multipart body as bytes. A fresh UUID-based boundary is used for each request, every file is read before the POST begins, and each attachment gets its own file part. The implementation uses four additional standard-library modules: import mimetypes import os import urllib.parse import uuid def _send_file(self, text, attach): """Upload one or more files (optionally with a message) via Direct Line /upload.""" paths = attach if isinstance(attach, list) else [attach] files = [] # read every file first for path in paths: with open(path, "rb") as handle: data = handle.read() name = os.path.basename(path) extension = os.path.splitext(path)[1].lower() mime = UPLOAD_MIME.get(extension) or mimetypes.guess_type(path)[0] or "application/octet-stream" files.append((name, mime, data)) activity = json.dumps({"type": "message", "from": {"id": self._user_id}, "text": text or ""}) boundary = "----loadtest-" + uuid.uuid4().hex # fresh boundary per request dash = ("--" + boundary).encode("utf-8") parts = [ dash + b"\r\n", b'Content-Disposition: form-data; name="activity"\r\n', b"Content-Type: application/vnd.microsoft.activity\r\n\r\n", activity.encode("utf-8") + b"\r\n", ] for name, mime, data in files: # one part per file disposition = _content_disposition("file", name) parts.append(dash + b"\r\n") parts.append(("Content-Disposition: " + disposition + "\r\n").encode("utf-8")) parts.append(("Content-Type: " + mime + "\r\n\r\n").encode("utf-8")) parts.append(data + b"\r\n") parts.append(dash + b"--\r\n") url = (self.directline + "/v3/directline/conversations/" + self.conversation_id + "/upload?userId=" + self._user_id) headers = self._auth_header() headers["Content-Type"] = "multipart/form-data; boundary=" + boundary with self.client.post(url, data=b"".join(parts), headers=headers, name=self.label + " upload", catch_response=True) as response: if response.status_code != 200: response.failure("upload HTTP " + str(response.status_code)) return None posted = parse_json(response) if not posted or not posted.get("id"): response.failure("upload response missing activity id") return None return posted["id"] The media type comes from a small known-types table, then Python's mimetypes, then application/octet-stream. This labels unknown extensions without claiming that every file type or size can be processed by the agent. The client sends the basename in the multipart header; exact preservation of non-ASCII filenames is not assumed. Use the same turn API Scenarios continue to call say(...). _send() chooses the ordinary message endpoint or multipart /upload: def _send(self, text, attach=None): if attach: return self._send_file(text, attach) # multipart /upload # … otherwise the ordinary text Send Activity from earlier Text only — the ordinary Send Activity. Text and a file — a message plus one attachment. A file with no message — pass text="" with an attachment. Several files — pass a list, and each becomes its own file part in one upload. Because /upload returns the same activity-ID shape as a text send, an upload turn is received and timed by the same say() path: # A conversation that hands the agent a requirements file instead of typing it self.say("Here is my requirement", "T01 requirement", attach="requirement_intake.csv") Validate the workload locally first Before running the larger test in Azure, the workload ran locally in one Python process with locust.conf: four virtual users for 15 minutes, starting one user every 30 seconds. This verified both conversation paths, file uploads, pacing, transaction names, and diagnostics. Azure Load Testing then used the same Python workload with locust.azure.conf, increasing the profile to 16 virtual users for 30 minutes and omitting local result paths. The Python environment used three dependencies beyond the standard library: python -m pip install "locust==2.42.6" "python-dotenv>=1.0,<2.0" "websocket-client==1.9.0" The Direct Line secret came from an environment variable in a local .env file, which kept it out of source control: DL_IA_SECRET=<Direct Line secret> The local run-time included the ramp period. The complete profile lived in locust.conf: locustfile = locustfile_discovery_demo.py headless = true users = 4 spawn-rate = 0.0333333333 run-time = 15m stop-timeout = 1200 only-summary = true csv = results/local-15m html = results/local-15m.html The local launch was then two lines: New-Item -ItemType Directory -Force results | Out-Null python -m locust --config locust.conf The 1,200-second stop timeout was an upper bound, not a fixed extension. When the 15-minute window closed, Locust allowed an in-flight conversation to complete instead of interrupting a turn. This mattered because the optional agent-creation turn had a 300-second reply deadline. Each completed conversation wrote a readable transcript under transcripts/; frame-level JSONL was written under transcripts/directline-debug/ because DL_DEBUG_LOG was enabled. Locust reported the token, conversation-start, send, and upload HTTP calls alongside the [TTFB] and [ResponseTime] chat measurements. Transaction names described logical steps rather than individual system combinations, which kept route variants in the same result rows. The local validation completed successfully. Both conversation paths, file uploads, and optional agent creation finished with zero failures or exceptions. Scale the test in Azure Load Testing The Azure test used one engine to run 16 virtual users for 30 minutes. Eight users followed the text conversation scenario and eight followed the file-attachment scenario. Locust started one user every 30 seconds and kept the configured 20–30 second pause between messages. Upload the test files to an Azure Load Testing resource. The YAML disables client-generated transcripts and JSONL files because Azure Load Testing publishes only its supported artifacts: engine logs, raw result CSV, and a dashboard report. version: v0.1 testId: copilot-studio-directline-load displayName: Copilot Studio Direct Line load test description: Load test with text and file conversation scenarios testPlan: locustfile_discovery_demo.py testType: Locust engineInstances: 1 configurationFiles: - new_chat_client.py - requirements.txt - test_attachment/high_route_requirement.docx - test_attachment/high_route_requirement.pdf - test_attachment/high_route_requirement.png properties: userPropertyFile: locust.azure.conf env: - { name: LOCUST_USERS, value: "16" } - { name: LOCUST_SPAWN_RATE, value: "0.0333333333" } - { name: LOCUST_RUN_TIME, value: "1800" } - { name: LOCUST_STOP_TIMEOUT, value: "1200" } - { name: TEXT_USERS, value: "8" } - { name: FILE_USERS, value: "8" } - { name: ATTACHMENT_DIR, value: "." } - { name: DL_TRANSCRIPT, value: "0" } - { name: DL_DEBUG_LOG, value: "0" } failureCriteria: - percentage(error) > 0 Before creating the test, store the Direct Line secret in Azure Key Vault, enable the Azure Load Testing resource's system-assigned managed identity, and grant that identity permission to read the secret. The Azure Load Testing secret guidance covers the identity and Key Vault access steps. In the current Azure CLI, the literal value null (not an omitted or empty argument) tells --keyvault-reference-id to use the load-testing resource's own system-assigned identity. Azure CLI preview. The az load test and az load test-run commands need the load extension and Azure CLI 2.66.0 or later (currently in preview). Check the current Azure CLI load test reference before running them. Create the test definition from the YAML and set that Key Vault reference identity: az load test create ` --load-test-resource "<load-test-resource>" ` --resource-group "<resource-group>" ` --test-id copilot-studio-directline-load ` --load-test-config-file azure-loadtest.yaml ` --keyvault-reference-id null For a new run, pass the Key Vault secret identifier through Azure Load Testing's dedicated --secret parameter. Locust receives a configured secret as an environment variable with the same name, so the Python workload can continue to read DL_IA_SECRET without code changes: $runId = "copilot-azure-$(Get-Date -Format 'yyyyMMdd-HHmmss')" $directLineSecretUri = "https://<key-vault-name>.vault.azure.net/secrets/<secret-name>" $runEnv = @( "LOCUST_USERS=16" "LOCUST_SPAWN_RATE=0.0333333333" "LOCUST_RUN_TIME=1800" "LOCUST_STOP_TIMEOUT=1200" "TEXT_USERS=8" "FILE_USERS=8" "ATTACHMENT_DIR=." "DL_TRANSCRIPT=0" "DL_DEBUG_LOG=0" ) $runSecrets = @("DL_IA_SECRET=$directLineSecretUri") az load test-run create ` --load-test-resource "<load-test-resource>" ` --resource-group "<resource-group>" ` --test-id copilot-studio-directline-load ` --test-run-id $runId ` --env $runEnv ` --secret $runSecrets ` --only-show-errors ` --output none Azure's test-run debug mode was deliberately left off. Debug-mode runs are capped at 10 minutes regardless of the configured Locust duration. After the run command completes, download the engine logs, raw results, and dashboard report: az load test-run download-files ` --load-test-resource "<load-test-resource>" ` --resource-group "<resource-group>" ` --test-run-id $runId ` --path "results/azure/$runId" ` --log --result --report --force The download command creates logs.zip, csv.zip, and reports.zip in the target directory. Security note. The command passes a Key Vault secret identifier, not the Direct Line secret value. Azure Load Testing stores the identifier, retrieves the secret with the configured managed identity for each run, and exposes it to the Locust process as DL_IA_SECRET. Keep --env for non-sensitive settings only. The 2026-07-12 Demo Run passed the secret through --env, which can expose it in run metadata; the recommended command above avoids that. In CI/CD, the Azure Load Testing task or action can instead receive the value through its secrets input from the pipeline's secret store. What the 30-minute Demo Run produced The completed Azure execution is referred to below as the Demo Run. It ran on 2026-07-12 using a single Azure Load Testing engine, with 16 virtual users split evenly between the text and file paths. Treat the Demo Run as a baseline at this load, not a capacity ceiling. The Demo Run completed with a PASSED verdict and no service error details. The Locust engine ran its configured 30-minute window, then allowed in-flight conversations to finish. It reached all 16 users after 7 minutes 30 seconds, then held exactly 16 for the rest of the run. It hit the run-time limit at 10:23:22Z, a steady window of about 22 minutes 30 seconds, and exited cleanly about 1 minute 50 seconds later. Measure Result Virtual users 16: 8 text and 8 file Locust run-time window 30 minutes Full-load window About 22 minutes 30 seconds Completed conversations 253 Text conversations 98 File conversations 155 Recorded request samples 3,212 Failed samples 0 Completed agent-creation turns 5 The 3,212 samples include Direct Line HTTP calls plus the custom [TTFB] and [ResponseTime] entries emitted for chat turns. Every text conversation that started reached T05 confirm, and every file conversation reached T03 confirm. Path Conversations Recorded samples Failures Text discovery 98 1,507 0 File attachment 155 1,705 0 Total 253 3,212 0 Azure Load Testing packages an offline dashboard with per-minute charts, sampler statistics, and error details. The download command in the previous section saves it as reports.zip. Extract the archive and open reports/index.html. For the Locust-based Demo Run, the downloaded dashboard is also published as the Demo Run report and can be viewed directly. The two cards below summarize latency for the text and file scenarios. Teal shows average TTFB, blue shows average ResponseTime, and orange extends from the average ResponseTime to p90. Text conversation latency re within a section, not across sections. Observation. The regular text path peaked at 18.93 seconds p90 for the requirement turn, while agent creation returned its first message in 8.68 seconds on average but needed 163.71 seconds on average, and 202.37 seconds at p90, to complete. File conversation latency Observation. Attachment processing was the slowest file turn at 22.19 seconds average and 27.80 seconds p90; token, conversation-start, send, and upload calls remained at or below 220 milliseconds p90. What the numbers suggest Agent work dominated the measured latency During the Demo Run, Direct Line token, conversation-start, send, and upload operations all stayed below 220 milliseconds p90. Complete chat turns took seconds, while the agent-creation branch took minutes. This shows that most of the measured end-to-end time accumulated after Direct Line accepted the message. The results do not separate orchestration, model, tool, or downstream-service time. TTFB did not describe the complete answer Some turns returned one message, so TTFB and ResponseTime were equal. Others acknowledged the request and kept working. The target turn averaged 3.08 seconds to first reply and 6.62 seconds to completion. The conditional action turn averaged 3.29 seconds to first reply and 9.46 seconds to completion. Agent creation widened that gap to more than two and a half minutes on average. Measuring only the first reply would hide the expensive part of those turns. Equal users did not produce equal conversation totals The user allocation was eight and eight, but the file path completed 155 conversations while the text path completed 98. That difference is consistent with the longer multi-turn text flow and its occasional agent-creation branch. Virtual-user allocation describes concurrency; completed iterations also depend on scenario duration. Assumptions and guardrails A few deliberate choices bound what these numbers mean: Baseline scale, on purpose. The four-user local validation and 16-user Azure profile generate baselines, not a stress test. The guidance warns that load exceeding real user behavior can trigger message-consumption overage and environment throttling, so the Demo Run stayed within confirmed traffic and quota boundaries. WebSocket transport with secret auth. The client uses Direct Line over WebSockets to match the tested client application and exchanges a Direct Line secret for a token. A test for a client that receives activities through HTTP GET should reproduce that transport instead. One agent, one region. The numbers describe a single agent on one Direct Line regional endpoint; a different agent, model, or region will have its own signature. New-experience behavior observed in this run. The client relies on the turn.complete event and role-optional replies observed during the test. Both the product status and response shapes can change while the experience remains in preview. Capacity confirmed first. A larger run requires prior confirmation that the agent, environment, and connected services support the peak throughput, with a limit increase requested when estimates exceed defaults. Limitations Single Azure engine, light load. Sixteen virtual users provide a baseline, not a capacity ceiling. Characterizing saturation needs higher concurrency and multiple Azure Load Testing engines. One Demo Run. The results describe this 30-minute window and should be compared with repeated runs before setting a service-level target. Chat turns only. The harness measures the message turn. It doesn't exercise sign-in cards, adaptive-card submits, or streamed token-by-token rendering. No Azure transcripts. The cloud profile intentionally disabled readable transcripts and client JSONL, so the five agent-creation turns prove completed responses but not an independent resource inventory. One operational note Operational note. Confirm the Copilot Studio environment's quotas and the capacity of every connected dependency before increasing users or engine count. The workload should model expected traffic rather than use production systems as an unrestricted stress target. Wrap-up For the tested Copilot Studio new-experience agent and WebSocket client, a small reusable Locust client captured the observed Direct Line flow. It matched the client's WebSocket transport, treated non-echo messages as replies, stopped on the turn.complete event emitted by the tested product build, and recorded both first-reply and last-reply times so a multi-message turn did not hide behind its acknowledgment. The same Python workload runs unchanged from a laptop and from Azure Load Testing engines. Local settings come from locust.conf; Azure settings come from locust.azure.conf and the test YAML. The Direct Line secret is supplied at run time, and a failureCriteria gate can support a release pipeline. The four-user local run validated the scripts and diagnostics; the Demo Run then held its full steady concurrency with 3,212 samples and zero failures. Further tests can add repeated baselines, more users and engines for saturation, additional attachment types, and a longer soak. Learn more Plan and create a conversational agent performance test — the planning method, workload model, and test-plan structure this post follows. Best practices for improving conversational agent performance — quotas, and the agent-side levers for cutting latency. Agents overview (new experience) — the orchestration model, instructions, knowledge, tools, and connected agents. Locust documentation — the load-testing framework this harness builds on. Azure Load Testing documentation — the managed load-testing service. Get the code The complete runnable example is available in kroy92/copilot-studio-load-testing. The repository contains new_chat_client.py, the two-class locustfile_discovery_demo.py workload, three attachment fixtures, local and Azure Locust configuration files, requirements.txt, and azure-loadtest.yaml. The Direct Line secret stays in the ignored .env file locally. For new Azure Load Testing runs, the recommended command retrieves it from Azure Key Vault through the dedicated secret parameter. The same Python workload runs in both environments, with locust.conf used locally and locust.azure.conf used in Azure.895Views2likes1CommentGive Your AI Agent Eyes: Browser-Harness Meets Playwright Workspaces Remote Browsers
What happens when you hand a coding agent a real browser — not a mock, not an API wrapper, but a full Chromium instance running in the cloud? It fills form for you. It does research for you. It navigates JavaScript-heavy SPAs that would make any REST-based scraper weep. And it does it across 10+ parallel sessions without touching your local machine. This is the story of combining two tools that were built for different worlds — and discovering they're a perfect fit. The Problem Today's coding agents — Codex, Claude Code, Copilot — are extraordinary at reading and writing code. But ask one to product availability on an web site, and it hits a wall. Modern websites are JavaScript-rendered, authentication-gated, geolocation-aware, and hostile to simple HTTP requests. The agent needs a real browser. Not requests.get(). Not a headless puppeteer script you wrote last Tuesday. A browser that renders CSS, executes JavaScript, handles cookies, and lets the agent see what a human would see. Enter Browser-Harness Browser-harness is an open-source tool that gives AI agents direct control over a Chrome browser via the Chrome DevTools Protocol (CDP). It exposes a clean Python API: ● agent: wants to upload a file │ ● agent-workspace/agent_helpers.py → helper missing │ ● agent writes it agent_helpers.py │ + custom helper ✓ file uploaded One websocket to Chrome, nothing between. The agent writes what's missing during execution. The harness improves itself every run. But there's a catch. Where does this browser run? The Infrastructure Gap If the browser runs locally, you've got problems: Your machine is busy. Running Chrome while the agent works eats RAM and CPU. No parallelism. One browser per machine. Want to scrape 10 sites simultaneously? Buy 10 machines. No consistency. Different OS, different Chrome versions, different results. No isolation. Letting the agent run amock on autopilot with your local browser can be risky, it can reuse your creds, stored cookies and sessions No observability. The agent is clicking around in a browser you can't see. What you really want is a browser that runs somewhere else — managed, scalable, observable — and your agent just connects to it over a WebSocket. Enter Playwright Workspaces Playwright Workspaces provides exactly this: remote browser endpoints on Azure. You make an HTTP request, a Chromium instance spins up in the cloud, and you get back a WebSocket URL (wss://...) to connect via CDP. The key insight: browser-harness speaks CDP. Playwright Workspaces serves CDP. They snap together like LEGO. Your Agent → browser-harness → CDP WebSocket → Playwright Workspaces → Cloud Chromium No local Chrome needed. No browser installation. No display server. Just a WebSocket connection to a fully managed browser. The Two-Step Connection Flow Connecting them is surprisingly simple: Step 1: Provision a remote browser def get_connect_options(os_name="linux", run_id=str(uuid.uuid4())) -> tuple[str, dict[str, str]]: service_url = os.getenv("PLAYWRIGHT_SERVICE_URL") service_access_token = os.getenv("PLAYWRIGHT_SERVICE_ACCESS_TOKEN") headers = {"Authorization": f"Bearer {service_access_token}"} service_run_id = os.getenv("PLAYWRIGHT_SERVICE_RUN_ID") ws_endpoint = f"{service_url}?os={os_name}&runId={service_run_id}&api-version=2025-09-01" return ws_endpoint, headers Step 2: Point browser-harness at it export BU_CDP_WS="${session_url}" browser-harness -c "print(page_info())" # → {'url': 'about:blank', 'title': '', 'w': 780, 'h': 441} That's it. Your agent now controls a cloud browser. What This Unlocks: A Real-World Demo We gave a coding agent this prompt: "Go to Website1, search for gifts under ₹500 for 10-year-old kids. Must be useful, reusable (not single-use). Delivery in Bengaluru within 3 days. Must have 5 pieces available." Here's what the agent did — autonomously, with no human intervention: Provisioned a remote Chromium browser via Playwright Workspaces Connected browser-harness to the cloud browser over WebSocket Navigated to FirstCry.com Set delivery location to Bengaluru (pincode 560001) Searched for kids' gifts Applied filters — price ₹0–250 and ₹250–500 via JavaScript DOM interaction Browsed products, rejecting single-use items (greeting cards) in favor of reusable ones (stainless steel water bottles) Checked delivery dates — rejected items with 6-day delivery, found ones with Next Day Delivery Verified stock availability — confirmed ADD TO CART was active with no stock warnings Took screenshots at every step for audit and debugging Result: Found the Brand A 600 Stainless Steel Water Bottle at ₹444.69 with next-day delivery to Bengaluru. All criteria met. The entire workflow ran on a remote browser in Azure — the local machine never launched Chrome. The Power of Remote Endpoints Why does running browsers remotely change everything? 1. Massive Parallelism Spin up multiple remote browsers and work in parallel. Each gets its own isolated Chromium instance. No resource contention, no port conflicts. 2. Zero Local Dependencies No Chrome installation. No chromedriver version mismatches. No --no-sandbox hacks. The browser is a managed service — you just connect to it. 3. Geographic Flexibility Remote browsers run in Azure data centers. Need to see what a website looks like from East US? Or Southeast Asia? Pick your region. The browser's IP and geolocation are in the cloud, not on your laptop. 4. Ephemeral & Secure Each browser session is isolated and destroyed when the WebSocket closes. No leftover cookies, no persistent state leaking between runs. Every session starts clean. The Bigger Picture We're at an inflection point. AI agents are moving from code generation to code execution — and execution means interacting with the real world. Browsers are the universal interface to that world. The combination of browser-harness (agent-to-browser control) and Playwright Workspaces (managed remote browsers) creates a powerful primitive: give any AI agent a browser, anywhere, on demand. Get Started The full sample — including the playwright_service_client.py helper, setup prompts, and environment templates — is available here: 📦 playwright-workspaces/samples/browser-harness Resources: Playwright Workspaces Documentation Browser-Harness GitHub Create a Playwright Workspace1.1KViews3likes0Comments
Performance Tuning and Scaling Optimization for Large-Scale Azure Workloads
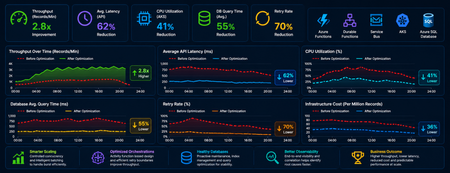
Summary As cloud-native systems scale, performance challenges rarely stem from a single bottleneck. Instead, they emerge from the interaction between compute, orchestration, and data layers under load. This article captures a practical optimization journey of a high-volume Azure-based workload and highlights how controlled scaling, improved orchestration design, and proactive database maintenance can significantly outperform brute-force scaling. Introduction Distributed systems are often designed with the assumption that scaling out will solve performance issues. However, for orchestration-heavy and database-intensive workloads, this approach can introduce more problems than it solves. In this scenario, the system processed millions of transactional records through Azure Functions, Durable Functions, messaging pipelines, APIs, and SQL databases. As the workload grew, the platform began experiencing: CPU and memory spikes Slower SQL queries Service Bus throttling Increased retries and execution delays What stood out was that these issues were not due to insufficient resources, but due to inefficient execution patterns at scale. The optimization effort therefore focused on controlling how the system scaled and executed, rather than simply increasing capacity. Understanding Workload Behavior A critical early step was identifying the nature of the workload—specifically, whether it was CPU-heavy or data-heavy. Rethinking Scaling: More Is Not Always Better One of the most important lessons was that scaling out aggressively can degrade performance. As more function instances processed messages in parallel: Database calls increased sharply API traffic surged Lock contention intensified Retry rates increased This created a cascading effect where retries amplified load, further slowing down the system. To address this, scaling was intentionally controlled using: Concurrency limits on function execution Batch-based processing instead of full parallel fan-out Small delays to smooth traffic spikes Chunking of large datasets into manageable units This shift from maximum parallelism to controlled throughput significantly improved system stability. Compute Optimization: CPU and Memory After stabilizing scaling behavior, the next step was optimizing compute usage. CPU Optimization CPU spikes were largely caused by excessive parallel execution and orchestration overhead. Improvements included: Breaking large workloads into smaller units Reducing unnecessary fan-outs of processes Limiting concurrent executions This resulted in more predictable CPU usage and improved execution consistency. Memory Optimization Memory pressure was primarily driven by large payloads and batch processing. Optimizations focused on: Processing data in smaller chunks Avoiding large in-memory payloads and memory leaks Reducing orchestration state size These changes improved system reliability and reduced execution failures under load. Scaling Approaches: Practical Trade-Offs Both vertical and horizontal scaling were used, but with careful consideration. Scale Up (Vertical Scaling) Quick to implement No architectural changes required Useful for immediate stabilization However, it had cost and scalability limits. Scale Out (Horizontal Scaling) Better suited for long-term scalability Enables workload distribution But without control, it can: Increase database contention Amplify retries Introduce instability Key Insight The most effective approach was not choosing one over the other but combining both with strict control over concurrency and execution patterns. Durable Functions: Orchestration Optimization Durable Functions were central to the system, making orchestration design a key factor in performance. Challenges Observed The initial design relied heavily on nested sub-orchestrators, which introduced: High orchestration overhead Increased replay and persistence operations Slower execution at scale Key Improvements Refactoring unnecessary sub-orchestrators into Activity Functions simplified execution and improved throughput. The benefits included: Reduced orchestration latency Faster execution cycles Lower infrastructure cost Note: However, sub-orchestrators remain the right choice when the design requires composing multiple dependent steps, managing scoped retry/error logic, or isolating orchestration history. The decision should be driven by the complexity and reuse requirements of each workflow segment and not applied as a blanket rule. Improved Retry Strategy Retry behavior was also optimized by redefining execution boundaries. Previously: One activity processed multiple records A single failure triggered a retry of the entire batch After optimization: One activity handled one logical unit of work This enabled: Granular retries Better failure isolation Reduced duplicate processing Database Hygiene: A Critical Foundation The database emerged as a major bottleneck due to fragmentation and stale statistics caused by continuous high-volume operations. Issues Identified Fragmented indexes Inefficient query plans Increased query execution time Optimization Approach A proactive maintenance strategy was implemented using scheduled jobs to: Update statistics regularly Rebuild indexes Maintain query performance consistency Controlled Database Load For heavy long-running workloads in multi-tenant architecture, execution of DB intensive process was intentionally run in singleton fashion at a tenant level to reduce contention. This approach: Prevented concurrent heavy operations Improved overall system stability Delivered more predictable throughput Observability: Finding the Real Problem A major challenge during optimization was distinguishing between symptoms and root causes. For example: Slow APIs were often caused by database contention High retries were triggered by upstream throttling Orchestration delays originated from downstream dependencies To address this, end-to-end observability was established using: Application-level tracing Load testing correlations Cross-service telemetry analysis This enabled accurate root cause identification and prevented misdirected optimization efforts. Key Takeaways Some key principles emerged from this optimization journey: Scaling more does not always mean performing better Controlled parallelism is more effective than unrestricted concurrency Orchestration design directly impacts system performance Database maintenance must be proactive Retry strategies should align with logical units of work Observability is essential for correct diagnosis Conclusion Performance tuning in distributed systems is less about adding resources and more about using them efficiently. By focusing on controlled scaling, simplifying orchestration, maintaining database health, and improving observability, the system achieved higher throughput, lower cost, and significantly improved stability. These lessons are broadly applicable to any Azure-based system handling large-scale, orchestration-heavy workloads and can help teams design more predictable and resilient architectures.867Views5likes0CommentsGain Visibility into Cloud Browser Usage with Browser Activity Logs in Playwright Workspaces
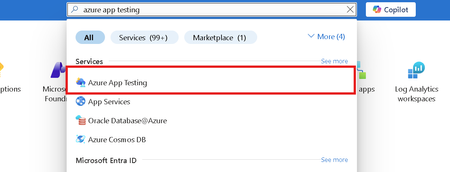
Today, we're announcing a new feature to view the usage metrics for a browser session using the Browser Activity Logs in Playwright Workspaces. Modern test automation and browser-based workflows increasingly rely on cloud-hosted browsers. As teams scale their usage across test runs, automation tools, and AI-driven agents, visibility and traceability into browser usage become critical, not just for debugging, but also for cost awareness and governance. To address this, Browser Activity Logs in Playwright Workspaces provide a centralized view of every cloud browser session provisioned by Playwright Workspaces. In this post, we’ll walk through what Browser Activity Logs are, what insights they offer, and how you can access them from the Azure portal. What is a Browser Session? In Playwright Workspaces, a Browser Session represents any browser instance provisioned by the service, regardless of how it was initiated. This includes browsers started by: Playwright Workspaces test run Browser Automation Tool Other automation clients that connect to the workspace Every time a browser is requested, Playwright Workspaces automatically creates a Browser Session and records it in the Browser Activity Logs in the Azure portal. This ensures that all browser usage (testing and non-testing scenarios) is fully observable from a single view. What are Browser Activity Logs? The Browser Activity Logs page lets you track the full lifecycle of each browser session, from creation to completion. For every session, you can view the following details: Session Name / ID – A unique identifier for the browser session Start Time – When the browser session started End Time – When the browser session ended Billable Time – Total duration of the session that is billable Source Type – The client that initiated the session Playwright Workspaces test run Browser automation tool Others Source ID – Identifier of the initiating client Test run ID Conversation ID Status – Current state of the session. Created Active Completed Failed Browser Type – Browser used for the session Operating System – OS used by the browser Creator Name / ID – User who initiated the session Together, these fields give you end-to-end traceability for every browser instance created in your workspace. Filtering and Analyzing Browser Usage The Browser Activity Logs page includes built-in filters to help you quickly analyze usage patterns. You can filter browser sessions by: Time range Last 30 days Last 60 days Last 90 days Source type Playwright Workspaces test runs Browser automation tools Other sources Source ID Test run ID Conversation ID Status Created Active Completed Failed These filters make it easy to answer common questions such as: How many browser sessions were created by a specific test run? Which automation scenarios are consuming the most browser time? How much billable browser time was used in a given period? How to View Browser Activity Logs in the Azure Portal Prerequisites Before you begin, make sure you have: An Azure account with an active subscription Owner, Contributor, or a classic administrator role on the subscription A Playwright Workspace created in your subscription Reader, Contributor, or Owner access to the Playwright Workspace Step-by-step: Accessing Browser Activity Logs Sign in to the Azure portal. From the home page, search for and select Azure App Testing. In the Azure App Testing hub, select View resources under Playwright Workspaces. Search for and open your Playwright Workspace. In the left navigation pane, select: Browser sessions → Browser activity log Click on the Browser session to see additional details. Use the Source ID filter to narrow down results: Enter a Playwright Workspaces test run ID to view browser sessions for a specific test run. Enter a Foundry conversation ID to view browser sessions created by a browser automation tool. Alternatively, filter by Source type to view all sessions from a specific client. Why Browser Activity Logs Matter Browser Activity Logs unlock three key benefits for teams using Playwright Workspaces: Visibility – See every browser session created across testing and automation scenarios. Traceability – Correlate browser usage back to test runs, tools, or conversations. Cost transparency – Understand billable browser time and optimize usage as you scale. Whether you’re debugging a failed automation workflow, reviewing usage across teams, or tracking costs, Browser Activity Logs give you the clarity you need. Get Started Today Browser Activity Logs in Playwright Workspaces is now available for all Playwright Workspace users. To learn more and start exploring your browser usage, visit the Azure portal and head to the Browser Activity Log page in Playwright Workspaces today. Share your feedback As always, we welcome feedback, let us know what works great for you and what you’d love to see next.470Views0likes0Comments
How AI Is Transforming Performance Testing
Performance testing has always been a cornerstone of software quality engineering. Yet, in today’s world of distributed microservices, unpredictable user behaviour, and global-scale cloud environments, traditional performance testing methods are struggling to keep up. Enter Artificial Intelligence (AI) — not as another industry buzzword, but as a real enabler of smarter, faster, and more predictive performance testing. Why Traditional Performance Testing Is No Longer Enough Modern systems are complex, elastic, and constantly evolving. Key challenges include: Microservices-based architectures Cloud-native and containerized deployments Dynamic scaling and highly event-driven systems Rapidly shifting user patterns This complexity introduces variability in metrics and results: Bursty traffic and nonlinear workloads Frequent resource pattern shifts Hidden performance bottlenecks deep within distributed components Traditional tools depend on fixed test scripts and manual bottleneck identification, which are slower, reactive, and often incomplete. When systems behave in unscripted ways, AI-driven performance testing offers adaptability and foresight. How AI Elevates Performance Testing AI enhances performance testing in five major dimensions: 1.AI-Driven Workload Modelling Instead of guessing load patterns, AI learns real-world user behaviours from production data: Detects actual peak-hour usage patterns Classifies user journeys dynamically Generates synthetic workloads that mirror true behaviour Results: More realistic test coverage Better scalability predictions Improved reliability for production scenarios Example: Instead of a generic “add 100 users per minute” approach, AI can simulate lunch-hour bursts or regional traffic spikes with precision. Intelligent Anomaly Detection AI systems can automatically detect performance deviations by learning what "normal" looks like. Key techniques: Unsupervised learning (Isolation Forest, DBSCAN) Deep learning models (LSTMs, Autoencoders) Real-time correlation with upstream metrics prioritized, actionable recommendations and code-fix suggestions aligned with best practices Example: An AI model can flag a microservice’s 5% latency spike — even when it recurs every 18 minutes — long before a human would notice. Predictive Performance Modelling AI enables you to anticipate performance issues before load tests reveal them. Capabilities: Forecasting resource saturation points Estimating optimal concurrency limits Running “what-if” simulations with ML or reinforcement learning Example: AI predicts system failure thresholds (e.g., CPU maxing out at 22K concurrent users) before that load is ever applied. AI-Powered Root-Cause Analysis When performance degrades, finding the “why” can be challenging. AI shortens this phase by: Mapping cross-service dependencies Correlating metrics and logs automatically Highlighting the most probable root causes Example: AI uncovers that a spike in Service D was due to cache misses in Service B — a connection buried across multiple log streams. Automated Insights and Reporting With the help of Large Language Models (LLMs) like ChatGPT or open-source equivalents: Summarize long performance reports Suggest optimization strategies Highlight anomalies automatically within dashboards This enables faster, data-driven decision-making across engineering and management teams. The Difference Between AIOps and AI-Driven Performance Testing Aspect AIOps AI-Enhanced Performance Testing Primary Focus IT operations automation Performance engineering Objective Detect and resolve incidents Predict and optimize system behaviour Data Sources Logs, infrastructure metrics Testing results, workload data Outcome Self-healing IT systems Pre-validated, performance-optimized code before release Key takeaway: AIOps acts in production; AI-driven testing acts pre-production. Real Tools Adopting AI in Performance Testing Category Tools Capabilities Performance Testing Tools JMeter, LoadRunner, Neoload, Locust (ML Plugins), k6 (AI extensions) Intelligent test design, smart correlation, anomaly detection AIOps & Observability Platforms Dynatrace (Davis AI), New Relic AI, Datadog Watchdog, Elastic ML Metric correlation, predictive analytics, auto-baselining These tools improve log analysis, metric correlation, predictive forecasting, and test script generation. Key Benefits of AI Integration ✅ Faster test design — Intelligent load generation automates script creation ✅ Proactive analytics — Predict failures before release ✅ Higher test accuracy — Real-world traffic reconstruction ✅ Reduced triage effort — Automated root-cause identification ✅ Great scalability — Run leaner, smarter tests Challenges and Key Considerations ⚠ Data quality — Poor or biased input leads to faulty AI insights ⚠ Overfitting — AI assumes repetitive patterns without variability ⚠ Opaque models — Black-box decisions can hinder trust ⚠ Skill gaps — Teams require ML understanding ⚠ Compute costs — ML training adds overhead A balanced adoption strategy mitigates these risks. Practical Roadmap: Implementing AI in Performance Testing Step 1: Capture High-Quality Data Logs, traces, metrics, and user journeys from real environments. Step 2: Select a Use Case Start small — e.g., anomaly detection or predictive capacity modelling. Step 3: Integrate AI-Ready Tools Adopt AI-enabled load testing and observability platforms. Step 4: Create Foundational Models Use Python ML, built-in analytics, or open-source tools to generate forecasts or regressions. Step 5: Automate in CI/CD Integrate AI-triggered insights into continuous testing pipelines. Step 6: Validate Continuously Always align AI predictions with real-world performance measurements. Future Outlook: The Next 5–10 Years AI will redefine performance testing as we know it: Fully autonomous test orchestration Self-healing systems that tune themselves dynamically Real-time feedback loops across CI/CD pipelines AI-powered capacity planning for cloud scalability Performance engineers will evolve from test executors to system intelligence strategists — interpreting, validating, and steering AI-driven insights. Final Thoughts AI is not replacing performance testing — it’s revolutionizing it. From smarter workload generation to advanced anomaly detection and predictive modelling, AI shifts testing from reactive validation to proactive optimization. Organizations that embrace AI-driven performance testing today will lead in speed, stability, and scalability tomorrow.1.7KViews1like0CommentsMinimum Usage in Azure App Testing
Load testing is most effective when it closely mirrors real-world usage and when test infrastructure is used efficiently. We recently launched AI-assisted load test authoring which enables mirroring real-world usage. Today, we are taking another step for the efficient use of test infrastructure. Behind every load test run, there is dedicated infrastructure that needs to be provisioned, managed, and deprovisioned. Low-user or short-lived load test runs lead to inefficient use of test infrastructure. To keep the service cost-effective and ensure judicious use of test infrastructure, we are introducing a minimum usage per test run for load tests in Azure App Testing. Effective March 1, 2026, load tests in Azure App Testing will incur a minimum Virtual User Hours (VUH) charge per test run. For each test run, the minimum VUH will be: 10 Virtual Users (VUs) per engine for the test run duration, or 10 VUs per engine for 10 minutes, if the test run duration is less than 10 minutes If your test run already meets or exceeds this minimum usage, this change doesn’t impact you. Also, this change is only for load tests and does not impact Playwright tests in Azure App Testing. How It Works? Let’s make this concrete with a few examples. Example 1: Low-user, long-duration test Configuration: 5 VUs, 1 engine, 3 hours Actual usage: 15 VUH = 5 VUs × 3 hours × 1 engine Minimum usage: 30 VUH = 10 VUs × 3 hours × 1 engine You will be charged for 30 VUH, since the actual usage is below the minimum. Example 2: Low-user, short-duration test Configuration: 5 VUs, 1 engine, 5 minutes Actual usage: 0.83 VUH = 5 VUs × (5 min / 60) Minimum usage: 1.67 VUH = 10 VUs × (10 min / 60) × 1 engine You will be charged for 1.67 VUH, since the actual usage is below the minimum. Example 3: High-user, short-duration test exceeding the minimum Configuration: 500 VUs, 2 engines, 5 minutes Actual usage: 83.34 VUH = 500 VUs × (5 min / 60) x 2 engines Minimum usage: 3.33 VUH = 10 VUs × (10 min / 60) × 2 engines You will be charged for 83.34 VUH, since your usage exceeds the minimum. What should you do? Based on usage patterns we’ve observed, some of your test runs may fall below the minimum VUH and could incur a minimum charge. To avoid surprises, we recommend reviewing your test configurations: Low-user, high-engine tests? Reduce the engine count. Short-duration or low-user tests? Increase the user count or duration for meaningful load testing. Tests above minimum usage? No action needed! A small configuration tweak can often make your tests both more effective and more cost-efficient. Need Help? The pricing page and pricing calculator will soon be updated to reflect these changes. If you have a support plan and need technical assistance, please create a support request in the Azure portal. For questions or feedback, share it with the product team on Developer Community Happy load testing that is real-world and efficient!570Views0likes0CommentsAI-assisted load test authoring in Azure App Testing
Creating reliable load tests shouldn’t require hours of manual scripting. With AI-assisted load test authoring in Azure App Testing, you can go from a simple browser recording to a production-ready JMeter script in minutes, while staying fully in control of what gets applied. This new experience helps you: Create load tests faster by recording real user journeys directly from the browser Improve script quality automatically with AI-recommended best practices Run more realistic tests that better reflect real user behavior Reduce manual effort without giving up transparency or control Record once. Let AI enhance the script. Using the Azure App Testing browser extension for Edge and Chrome, you can record how users interact with your application. Once uploaded to Azure Load Testing, AI analyzes the recording and suggests improvements you can review and apply with a click. AI helps by: Adding smart labels so scripts and test results are easier to understand Applying think times based on actual user interactions Suggesting correlations for dynamic values to prevent test failures at scale Identifying parameterization opportunities to simulate diverse users and data You can accept, edit, or skip recommendations and still manually fine-tune the script if needed. Run at scale with confidence Once your script is ready, configure load, ramp-up, and duration, and run the test at scale using Azure Load Testing. A JMeter script is generated automatically and can be downloaded for further customization. The result is faster test creation, higher-quality scripts, and more meaningful performance insights. Get started AI-assisted load test authoring is available today in Azure Load Testing. Install the Azure App Testing browser extension, record a user journey, and create realistic load tests with less effort and better results. Learn more about the feature here. Tell us what’s working and what we can improve on developer community or directly from the in-product feedback option. Your feedback helps shape the future of AI-assisted load testing. Happy Load Testing!983Views3likes1Comment
Stop Running Runbooks at 3 am: Let Azure SRE Agent Do Your On-Call Grunt Work
Your pager goes off. It's 2:47am. Production is throwing 500 errors. You know the drill - SSH into this, query that, check these metrics, correlate those logs. Twenty minutes later, you're still piecing together what went wrong. Sound familiar? The On-Call Reality Nobody Talks About Every SRE, DevOps engineer, and developer who's carried a pager knows this pain. When incidents hit, you're not solving problems - you're executing runbooks. Copy-paste this query. Check that dashboard. Run these az commands. Connect the dots between five different tools. It's tedious. It's error-prone at 3am. And honestly? It's work that doesn't require human creativity but requires human time. What if an AI agent could do this for you? Enter Azure SRE Agent + Runbook Automation Here's what I built: I gave SRE Agent a simple markdown runbook containing the same diagnostic steps I'd run manually during an incident. The agent executes those steps, collects evidence, and sends me an email with everything I need to take action. No more bouncing between terminals. No more forgetting a step because it's 3am and your brain is foggy. What My Runbook Contains Just the basics any on-call would run: az monitor metrics – CPU, memory, request rates Log Analytics queries – Error patterns, exception details, dependency failures App Insights data – Failed requests, stack traces, correlation IDs az containerapp logs – Revision logs, app configuration That's it. Plain markdown with KQL queries and CLI commands. Nothing fancy. What the Agent Does Reads the runbook from its knowledge base Executes each diagnostic step Collects results and evidence Sends me an email with analysis and findings I wake up to an email that says: "CPU spiked to 92% at 2:45am, triggering connection pool exhaustion. Top exception: SqlException (1,832 occurrences). Errors correlate with traffic spike. Recommend scaling to 5 replicas." All the evidence. All the queries used. All the timestamps. Ready for me to act. How to Set This Up (6 Steps) Here's how you can build this yourself: Step 1: Create SRE Agent Create a new SRE Agent in the Azure portal. No Azure resource groups to configure. If your apps run on Azure, the agent pulls context from the incident itself. If your apps run elsewhere, you don't need Azure resource configuration at all. Step 2: Grant Reader Permission (Optional) If your runbooks execute against Azure resources, assign Reader role to the SRE Agent's managed identity on your subscription. This allows the agent to run az commands and query metrics. Skip this if your runbooks target non-Azure apps. Step 3: Add Your Runbook to SRE Agent's Knowledge base You already have runbooks, they're in your wiki, Confluence, or team docs. Just add them as .md files to the agent's knowledge base. To learn about other ways to link your runbooks to the agent, read this Step 4: Connect Outlook Connect the agent to your Outlook so it can send you the analysis email with findings. Step 5: Create a Subagent Create a subagent with simple instructions like: "You are an expert in triaging and diagnosing incidents. When triggered, search the knowledge base for the relevant runbook, execute the diagnostic steps, collect evidence, and send an email summary with your findings." Assign the tools the agent needs: RunAzCliReadCommands – for az monitor, az containerapp commands QueryLogAnalyticsByWorkspaceId – for KQL queries against Log Analytics QueryAppInsightsByResourceId – for App Insights data SearchMemory – to find the right runbook SendOutlookEmail – to deliver the analysis Step 6: Set Up Incident Trigger Connect your incident management tool - PagerDuty, ServiceNow, or Azure Monitor alerts and setup the incident trigger to the subagent. When an incident fires, the agent kicks off automatically. That's it. Your agentic workflow now looks like this: This Works for Any App, Not Just Azure Here's the thing: SRE Agent is platform agnostic. It's executing your runbooks, whatever they contain. On-prem databases? Add your diagnostic SQL. Custom monitoring stack? Add those API calls. The agent doesn't care where your app runs. It cares about following your runbook and getting you answers. Why This Matters Lower MTTR. By the time you're awake and coherent, the analysis is done. Consistent execution. No missed steps. No "I forgot to check the dependencies" at 4am. Evidence for postmortems. Every query, every result, timestamped and documented. Focus on what matters. Your brain should be deciding what to do not gathering data. The Bottom Line On-call runbook execution is the most common, most tedious, and most automatable part of incident response. It's grunt work that pulls engineers away from the creative problem-solving they were hired for. SRE Agent offloads that work from your plate. You write the runbook once, and the agent executes it every time, faster and more consistently than any human at 3am. Stop running runbooks. Start reviewing results. Try it yourself: Create a markdown runbook with your diagnostic queries and commands, add it to your SRE Agent's knowledge base, and let the agent handle your next incident. Your 3am self will thank you.1.4KViews1like0Comments