azure for isv and startups
17 Topics
Building Resilient Data Systems with Microsoft Fabric
Introduction Ensuring continuous availability and data integrity is paramount for organizations. This article focuses exclusively on resiliency within Microsoft Fabric, covering high availability (HA), disaster recovery (DR), and data protection strategies. We will explore Microsoft Fabric's resiliency features, including Recovery Point Objective (RPO) and Recovery Time Objective (RTO), and outline mechanisms for recovering from failures in both pipeline and streaming scenarios. As of April 25, 2025, this information reflects the current capabilities of Microsoft Fabric. Because features evolve rapidly, consult the Microsoft Fabric roadmap for the latest updates. Service Resiliency in Microsoft Fabric Microsoft Fabric leverages Azure’s infrastructure to ensure continuous service availability during hardware or software failures. Availability Zones Fabric uses Azure Availability Zones—physically separate datacenters within an Azure region—to automatically replicate resources across zones. This enables seamless failover during a zone outage, without manual intervention. As of Q1 2025, Fabric provides partial support for zone redundancy in selected regions and services. Customers should refer to service-specific documentation for detailed HA guarantees. Cross‑Region Disaster Recovery For protection against regional failures, Microsoft Fabric offers partial support for cross-region disaster recovery. The level of support varies by service: OneLake Data: OneLake supports cross-region data replication in selected regions. Organizations can enable or disable this feature based on their business needs. For more information, see Disaster recovery and data protection for OneLake. Power BI: Power BI includes built-in DR capabilities, with automatic data replication across regions to ensure high availability. For frequently asked questions, review the Power BI high availability, failover, and disaster recovery FAQ. Data Resiliency: RPO and RTO Considerations Fabric offers configurable storage redundancy options—Locally Redundant Storage (LRS), Zone-Redundant Storage (ZRS), and Geo-Redundant Storage (GRS)—each with different RPO/RTO targets. Detailed definitions and SLAs are available in the Azure Storage redundancy documentation. Recovering from Failed Processes Failures can occur in both pipeline and streaming workloads. Microsoft Fabric provides tools and strategies for minimizing disruption. Data Pipelines In Data Factory within Fabric, pipelines are made up of activities that may fail due to source issues or transient network errors. Zone failures are typically handled like standard pipeline errors, while regional failures require manual intervention. See Microsoft Fabric disaster recovery experience specific guidance for a brief discussion. Pipeline resiliency can be improved by implementing retry policies, configuring error-handling blocks, and monitoring execution status using Fabric’s built-in logging features. Streaming Scenarios Spark Structured Streaming: Fabric leverages Apache Spark for real-time processing. Spark Structured Streaming includes built-in checkpointing, but seamless failover depends on cluster configuration. Manual intervention can be required to resume tasks after node or regional failures. Eventstream: Eventstream simplifies streaming data ingestion, but users should currently assume manual steps may be needed for fault recovery. Monitoring and Alerting Microsoft Fabric integrates with tools such as Azure Monitor and Microsoft Defender for Cloud, allowing administrators to track availability metrics and configure alerts. Regular monitoring helps detect anomalies early and ensures that resiliency strategies remain effective. Data Loss Prevention (DLP) As of March 2025, Microsoft Purview extends DLP policy enforcement to Fabric and Power BI workspaces. Organizations can define policies to automatically identify, monitor, and protect sensitive data across the Microsoft ecosystem. For more information, review Purview Data Loss Prevention. Cost Considerations Enhancing resiliency can increase costs. Key considerations include: Geo-Redundancy: While cross-region replication improves resiliency, it also increases storage and transfer costs. Assess which workloads require GRS based on criticality. Egress Charges: Transferring data across regions can generate egress fees. Co-locating compute and storage within the same region helps minimize these charges. Pipeline CU Consumption: Data movement and orchestration in Fabric consume Capacity Units (CUs). Regional data movement may take longer and result in higher CU usage. Understanding these costs helps optimize both performance and budget. For example, data movement between regions can take more time and therefore add additional cost. Enabling Disaster Recovery for Fabric Capacities Disaster recovery must be enabled per Fabric capacity. This can be configured through the Admin Portal. Make sure to enable DR for each capacity that requires protection. For setup details, learn how to Manage your Fabric capacity for DR. Conclusion Microsoft Fabric offers a robust set of features for building resilient data systems. By leveraging its high availability, disaster recovery, and monitoring capabilities—and aligning them with cost-aware planning—organizations can ensure operational continuity and safeguard critical data. For ongoing updates, monitor the Microsoft Fabric documentation and consider subscribing to the Fabric blog for the latest announcements.1.8KViews1like0CommentsFour Methods to Access Azure Key Vault from Azure Kubernetes Service (AKS)
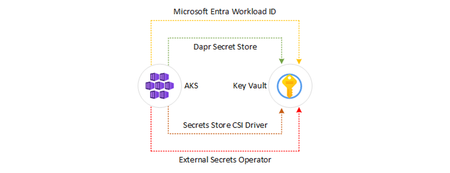
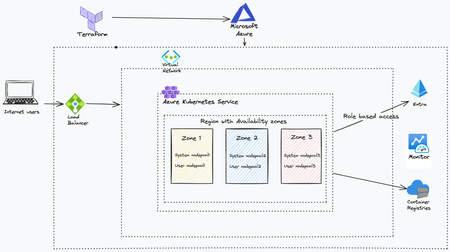
In this article, we will explore various methods that an application hosted on Azure Kubernetes Service (AKS) can use to retrieve secrets from an Azure Key Vault resource. You can find all the scripts on GitHub. Microsoft Entra Workload ID with Azure Kubernetes Service (AKS) In order for workloads deployed on an Azure Kubernetes Services (AKS) cluster to access protected resources like Azure Key Vault and Microsoft Graph, they need to have Microsoft Entra application credentials or managed identities. Microsoft Entra Workload ID integrates with Kubernetes to federate with external identity providers. To enable pods to have a Kubernetes identity, Microsoft Entra Workload ID utilizes Service Account Token Volume Projection. This means that a Kubernetes token is issued and OIDC federation enables Kubernetes applications to securely access Azure resources using Microsoft Entra ID, based on service account annotations. As shown in the following diagram, the Kubernetes cluster becomes a security token issuer, issuing tokens to Kubernetes Service Accounts. These tokens can be configured to be trusted on Microsoft Entra applications and user-defined managed identities. They can then be exchanged for an Microsoft Entra access token using the Azure Identity SDKs or the Microsoft Authentication Library (MSAL). In the Microsoft Entra ID platform, there are two kinds of workload identities: Registered applications have several powerful features, such as multi-tenancy and user sign-in. These capabilities cause application identities to be closely guarded by administrators. For more information on how to implement workload identity federation with registered applications, see Use Microsoft Entra Workload Identity for Kubernetes with a User-Assigned Managed Identity. Managed identities provide an automatically managed identity in Microsoft Entra ID for applications to use when connecting to resources that support Microsoft Entra ID authentication. Applications can use managed identities to obtain Microsoft Entra tokens without having to manage any credentials. Managed identities were built with developer scenarios in mind. They support only the Client Credentials flow meant for software workloads to identify themselves when accessing other resources. For more information on how to implement workload identity federation with registered applications, see Use Azure AD Workload Identity for Kubernetes with a User-Assigned Managed Identity. Advantages Transparently assigns a user-defined managed identity to a pod or deployment. Allows using Microsoft Entra integrated security and Azure RBAC for authorization. Provides secure access to Azure Key Vault and other managed services. Disadvantages Requires using Azure libraries for acquiring Azure credentials and using them to access managed services. Requires code changes. Resources Use Microsoft Entra Workload ID with Azure Kubernetes Service (AKS) Deploy and Configure an AKS Cluster with Workload Identity Configure Cross-Tenant Workload Identity on AKS Use Microsoft Entra Workload ID with a User-Assigned Managed Identity in an AKS-hosted .NET Application Azure Key Vault Provider for Secrets Store CSI Driver in AKS The Azure Key Vault provider for Secrets Store CSI Driver enables retrieving secrets, keys, and certificates stored in Azure Key Vault and accessing them as files from mounted volumes in an AKS cluster. This method eliminates the need for Azure-specific libraries to access the secrets. This Secret Store CSI Driver for Key Vault offers the following features: Mounts secrets, keys, and certificates to a pod using a CSI volume. Supports CSI inline volumes. Allows the mounting of multiple secrets store objects as a single volume. Offers pod portability with the SecretProviderClass CRD. Compatible with Windows containers. Keeps in sync with Kubernetes secrets. Supports auto-rotation of mounted contents and synced Kubernetes secrets. When auto-rotation is enabled for the Azure Key Vault Secrets Provider, it automatically updates both the pod mount and the corresponding Kubernetes secret defined in the secretObjects field of SecretProviderClass. It continuously polls for changes based on the rotation poll interval (default is two minutes). If a secret in an external secrets store is updated after the initial deployment of the pod, both the Kubernetes Secret and the pod mount will periodically update, depending on how the application consumes the secret data. Here are the recommended approaches for different scenarios: Mount the Kubernetes Secret as a volume: Utilize the auto-rotation and sync K8s secrets features of Secrets Store CSI Driver. The application should monitor changes from the mounted Kubernetes Secret volume. When the CSI Driver updates the Kubernetes Secret, the volume contents will be automatically updated. Application reads data from the container filesystem: Take advantage of the rotation feature of Secrets Store CSI Driver. The application should monitor file changes from the volume mounted by the CSI driver. Use the Kubernetes Secret for an environment variable: Restart the pod to acquire the latest secret as an environment variable. You can use tools like Reloader to watch for changes on the synced Kubernetes Secret and perform rolling upgrades on pods. Advantages Secrets, keys, and certificates can be accessed as files from mounted volumes. Optionally, Kubernetes secrets can be created to store keys, secrets, and certificates from Key Vault. No need for Azure-specific libraries to access secrets. Simplifies secret management with transparent integration. Disadvantages Still requires accessing managed services such as Azure Service Bus or Azure Storage using their own connection strings from Azure Key Vault. Cannot utilize Microsoft Entra ID integrated security and managed identities for accessing managed services. Resources Using the Azure Key Vault Provider for Secrets Store CSI Driver in AKS Access Azure Key Vault with the CSI Driver Identity Provider Configuration and Troubleshooting Options for Azure Key Vault Provider in AKS Azure Key Vault Provider for Secrets Store CSI Driver Dapr Secret Store for Key Vault Dapr (Distributed Application Runtime) is a versatile and event-driven runtime that simplifies the development of resilient, stateless, and stateful applications for both cloud and edge environments. It embraces the diversity of programming languages and developer frameworks, providing a seamless experience regardless of your preferences. Dapr encapsulates the best practices for building microservices into a set of open and independent APIs known as building blocks. These building blocks offer the following capabilities: Enable developers to build portable applications using their preferred language and framework. Are completely independent from each other, allowing flexibility and freedom of choice. Have no limits on how many building blocks can be used within an application. Dapr offers a built-in secrets building block that makes it easier for developers to consume application secrets from a secret store such as Azure Key Vault, AWS Secret Manager, and Google Key Management, and Hashicorp Vault. You can follow these steps to use Dapr's secret store building block: Deploy the Dapr extension to your AKS cluster. Set up a component for a specific secret store solution. Retrieve secrets using the Dapr secrets API in your application code. Optionally, reference secrets in Dapr component files. You can watch this overview video and demo to see how Dapr secrets management works. The secrets management API building block offers several features for your application. Configure secrets without changing application code: You can call the secrets API in your application code to retrieve and use secrets from Dapr-supported secret stores. Watch this video for an example of how the secrets management API can be used in your application. Reference secret stores in Dapr components: When configuring Dapr components like state stores, you often need to include credentials in component files. Alternatively, you can place the credentials within a Dapr-supported secret store and reference the secret within the Dapr component. This approach is recommended, especially in production environments. Read more about referencing secret stores in components. Limit access to secrets: Dapr provides the ability to define scopes and restrict access permissions to provide more granular control over access to secrets. Learn more about using secret scoping. Advantages Allows applications to retrieve secrets from various secret stores, including Azure Key Vault. Simplifies secret management with Dapr's consistent API. Supports Azure Key Vault integration with managed identities. Supports third-party secret stores, such as Azure Key Vault, AWS Secret Manager, and Google Key Management, and Hashicorp Vault. Disadvantages Requires injecting a sidecar container for Dapr into the pod, which may not be suitable for all scenarios. Resources Dapr Secrets Overview Azure Key Vault Secret Store in Dapr Secrets management quickstart: Retrieve secrets in the application code from a configured secret store using the secrets management API. Secret Store tutorial: Learn how to use the Dapr Secrets API to access secret stores. Authenticating to Azure for Dapr How-to Guide for Managed Identities with Dapr External Secrets Operator with Azure Key Vault The External Secrets Operator is a Kubernetes operator that enables managing secrets stored in external secret stores, such as Azure Key Vault, AWS Secret Manager, and Google Key Management, and Hashicorp Vault.. It leverages the Azure Key Vault provider to synchronize secrets into Kubernetes secrets for easy consumption by applications. External Secrets Operator integrates with Azure Key vault for secrets, certificates and Keys management. You can configure the External Secrets Operator to use Microsoft Entra Workload ID to access an Azure Key Vault resource. Advantages Manages secrets stored in external secret stores like Azure Key Vault, AWS Secret Manager, and Google Key Management, Hashicorp Vault, and more. Provides synchronization of Key Vault secrets into Kubernetes secrets. Simplifies secret management with Kubernetes-native integration. Disadvantages Requires setting up and managing the External Secrets Operator. Resources External Secrets Operator Azure Key Vault Provider for External Secrets Operator Hands On Labs You are now ready to see each technique in action. Configure Variables The first step is setting up the name for a new or existing AKS cluster and Azure Key Vault resource in the scripts/00-variables.sh file, which is included and used by all the scripts in this sample. # Azure Kubernetes Service (AKS) AKS_NAME="<AKS-Cluster-Name>" AKS_RESOURCE_GROUP_NAME="<AKS-Resource-Group-Name>" # Azure Key Vault KEY_VAULT_NAME="<Key-Vault-name>" KEY_VAULT_RESOURCE_GROUP_NAME="<Key-Vault-Resource-Group-Name>" KEY_VAULT_SKU="Standard" LOCATION="EastUS" # Choose a location # Secrets and Values SECRETS=("username" "password") VALUES=("admin" "trustno1!") # Azure Subscription and Tenant TENANT_ID=$(az account show --query tenantId --output tsv) SUBSCRIPTION_NAME=$(az account show --query name --output tsv) SUBSCRIPTION_ID=$(az account show --query id --output tsv) The SECRETS array variable contains a list of secrets to create in the Azure Key Vault resource, while the VALUES array contains their values. Create or Update AKS Cluster You can use the following Bash script to create a new AKS cluster with the az aks create command. This script includes the --enable-oidc-issuer parameter to enable the OpenID Connect (OIDC) issuer and the --enable-workload-identity parameter to enable Microsoft Entra Workload ID. If the AKS cluster already exists, the script updates it to use the OIDC issuer and enable workload identity by calling the az aks update command with the same parameters. #!/bin/Bash # Variables source ../00-variables.sh # Check if the resource group already exists echo "Checking if [$AKS_RESOURCE_GROUP_NAME] resource group actually exists in the [$SUBSCRIPTION_NAME] subscription..." az group show --name $AKS_RESOURCE_GROUP_NAME &>/dev/null if [[ $? != 0 ]]; then echo "No [$AKS_RESOURCE_GROUP_NAME] resource group actually exists in the [$SUBSCRIPTION_NAME] subscription" echo "Creating [$AKS_RESOURCE_GROUP_NAME] resource group in the [$SUBSCRIPTION_NAME] subscription..." # create the resource group az group create --name $AKS_RESOURCE_GROUP_NAME --location $LOCATION 1>/dev/null if [[ $? == 0 ]]; then echo "[$AKS_RESOURCE_GROUP_NAME] resource group successfully created in the [$SUBSCRIPTION_NAME] subscription" else echo "Failed to create [$AKS_RESOURCE_GROUP_NAME] resource group in the [$SUBSCRIPTION_NAME] subscription" exit fi else echo "[$AKS_RESOURCE_GROUP_NAME] resource group already exists in the [$SUBSCRIPTION_NAME] subscription" fi # Check if the AKS cluster already exists echo "Checking if [$AKS_NAME] AKS cluster actually exists in the [$AKS_RESOURCE_GROUP_NAME] resource group..." az aks show \ --name $AKS_NAME \ --resource-group $AKS_RESOURCE_GROUP_NAME \ --only-show-errors &>/dev/null if [[ $? != 0 ]]; then echo "No [$AKS_NAME] AKS cluster actually exists in the [$AKS_RESOURCE_GROUP_NAME] resource group" echo "Creating [$AKS_NAME] AKS cluster in the [$AKS_RESOURCE_GROUP_NAME] resource group..." # create the AKS cluster az aks create \ --name $AKS_NAME \ --resource-group $AKS_RESOURCE_GROUP_NAME \ --location $LOCATION \ --enable-oidc-issuer \ --enable-workload-identity \ --generate-ssh-keys \ --only-show-errors &>/dev/null if [[ $? == 0 ]]; then echo "[$AKS_NAME] AKS cluster successfully created in the [$AKS_RESOURCE_GROUP_NAME] resource group" else echo "Failed to create [$AKS_NAME] AKS cluster in the [$AKS_RESOURCE_GROUP_NAME] resource group" exit fi else echo "[$AKS_NAME] AKS cluster already exists in the [$AKS_RESOURCE_GROUP_NAME] resource group" # Check if the OIDC issuer is enabled in the AKS cluster echo "Checking if the OIDC issuer is enabled in the [$AKS_NAME] AKS cluster..." oidcEnabled=$(az aks show \ --name $AKS_NAME \ --resource-group $AKS_RESOURCE_GROUP_NAME \ --only-show-errors \ --query oidcIssuerProfile.enabled \ --output tsv) if [[ $oidcEnabled == "true" ]]; then echo "The OIDC issuer is already enabled in the [$AKS_NAME] AKS cluster" else echo "The OIDC issuer is not enabled in the [$AKS_NAME] AKS cluster" fi # Check if Workload Identity is enabled in the AKS cluster echo "Checking if Workload Identity is enabled in the [$AKS_NAME] AKS cluster..." workloadIdentityEnabled=$(az aks show \ --name $AKS_NAME \ --resource-group $AKS_RESOURCE_GROUP_NAME \ --only-show-errors \ --query securityProfile.workloadIdentity.enabled \ --output tsv) if [[ $workloadIdentityEnabled == "true" ]]; then echo "Workload Identity is already enabled in the [$AKS_NAME] AKS cluster" else echo "Workload Identity is not enabled in the [$AKS_NAME] AKS cluster" fi # Enable OIDC issuer and Workload Identity if [[ $oidcEnabled == "true" && $workloadIdentityEnabled == "true" ]]; then echo "OIDC issuer and Workload Identity are already enabled in the [$AKS_NAME] AKS cluster" exit fi echo "Enabling OIDC issuer and Workload Identity in the [$AKS_NAME] AKS cluster..." az aks update \ --name $AKS_NAME \ --resource-group $AKS_RESOURCE_GROUP_NAME \ --enable-oidc-issuer \ --enable-workload-identity \ --only-show-errors if [[ $? == 0 ]]; then echo "OIDC issuer and Workload Identity successfully enabled in the [$AKS_NAME] AKS cluster" else echo "Failed to enable OIDC issuer and Workload Identity in the [$AKS_NAME] AKS cluster" exit fi fi Create or Update Key Vault You can use the following Bash script to create a new Azure Key Vault if it doesn't already exist, and create a couple of secrets for demonstration purposes. #!/bin/Bash # Variables source ../00-variables.sh # Check if the resource group already exists echo "Checking if [$KEY_VAULT_RESOURCE_GROUP_NAME] resource group actually exists in the [$SUBSCRIPTION_NAME] subscription..." az group show --name $KEY_VAULT_RESOURCE_GROUP_NAME &>/dev/null if [[ $? != 0 ]]; then echo "No [$KEY_VAULT_RESOURCE_GROUP_NAME] resource group actually exists in the [$SUBSCRIPTION_NAME] subscription" echo "Creating [$KEY_VAULT_RESOURCE_GROUP_NAME] resource group in the [$SUBSCRIPTION_NAME] subscription..." # create the resource group az group create --name $KEY_VAULT_RESOURCE_GROUP_NAME --location $LOCATION 1>/dev/null if [[ $? == 0 ]]; then echo "[$KEY_VAULT_RESOURCE_GROUP_NAME] resource group successfully created in the [$SUBSCRIPTION_NAME] subscription" else echo "Failed to create [$KEY_VAULT_RESOURCE_GROUP_NAME] resource group in the [$SUBSCRIPTION_NAME] subscription" exit fi else echo "[$KEY_VAULT_RESOURCE_GROUP_NAME] resource group already exists in the [$SUBSCRIPTION_NAME] subscription" fi # Check if the key vault already exists echo "Checking if [$KEY_VAULT_NAME] key vault actually exists in the [$SUBSCRIPTION_NAME] subscription..." az keyvault show --name $KEY_VAULT_NAME --resource-group $KEY_VAULT_RESOURCE_GROUP_NAME &>/dev/null if [[ $? != 0 ]]; then echo "No [$KEY_VAULT_NAME] key vault actually exists in the [$SUBSCRIPTION_NAME] subscription" echo "Creating [$KEY_VAULT_NAME] key vault in the [$SUBSCRIPTION_NAME] subscription..." # create the key vault az keyvault create \ --name $KEY_VAULT_NAME \ --resource-group $KEY_VAULT_RESOURCE_GROUP_NAME \ --location $LOCATION \ --enabled-for-deployment \ --enabled-for-disk-encryption \ --enabled-for-template-deployment \ --sku $KEY_VAULT_SKU 1>/dev/null if [[ $? == 0 ]]; then echo "[$KEY_VAULT_NAME] key vault successfully created in the [$SUBSCRIPTION_NAME] subscription" else echo "Failed to create [$KEY_VAULT_NAME] key vault in the [$SUBSCRIPTION_NAME] subscription" exit fi else echo "[$KEY_VAULT_NAME] key vault already exists in the [$SUBSCRIPTION_NAME] subscription" fi # Create secrets for INDEX in ${!SECRETS[@]}; do # Check if the secret already exists echo "Checking if [${SECRETS[$INDEX]}] secret actually exists in the [$KEY_VAULT_NAME] key vault..." az keyvault secret show --name ${SECRETS[$INDEX]} --vault-name $KEY_VAULT_NAME &>/dev/null if [[ $? != 0 ]]; then echo "No [${SECRETS[$INDEX]}] secret actually exists in the [$KEY_VAULT_NAME] key vault" echo "Creating [${SECRETS[$INDEX]}] secret in the [$KEY_VAULT_NAME] key vault..." # create the secret az keyvault secret set \ --name ${SECRETS[$INDEX]} \ --vault-name $KEY_VAULT_NAME \ --value ${VALUES[$INDEX]} 1>/dev/null if [[ $? == 0 ]]; then echo "[${SECRETS[$INDEX]}] secret successfully created in the [$KEY_VAULT_NAME] key vault" else echo "Failed to create [${SECRETS[$INDEX]}] secret in the [$KEY_VAULT_NAME] key vault" exit fi else echo "[${SECRETS[$INDEX]}] secret already exists in the [$KEY_VAULT_NAME] key vault" fi done Create Managed Identity and Federated Identity Credential All the techniques use Microsoft Entra Workload ID. The repository contains a folder for each technique. Each folder includes the following create-managed-identity.sh Bash script: #/bin/bash # Variables source ../00-variables.sh source ./00-variables.sh # Check if the resource group already exists echo "Checking if [$AKS_RESOURCE_GROUP_NAME] resource group actually exists in the [$SUBSCRIPTION_ID] subscription..." az group show --name $AKS_RESOURCE_GROUP_NAME &>/dev/null if [[ $? != 0 ]]; then echo "No [$AKS_RESOURCE_GROUP_NAME] resource group actually exists in the [$SUBSCRIPTION_ID] subscription" echo "Creating [$AKS_RESOURCE_GROUP_NAME] resource group in the [$SUBSCRIPTION_ID] subscription..." # create the resource group az group create \ --name $AKS_RESOURCE_GROUP_NAME \ --location $LOCATION 1>/dev/null if [[ $? == 0 ]]; then echo "[$AKS_RESOURCE_GROUP_NAME] resource group successfully created in the [$SUBSCRIPTION_ID] subscription" else echo "Failed to create [$AKS_RESOURCE_GROUP_NAME] resource group in the [$SUBSCRIPTION_ID] subscription" exit fi else echo "[$AKS_RESOURCE_GROUP_NAME] resource group already exists in the [$SUBSCRIPTION_ID] subscription" fi # check if the managed identity already exists echo "Checking if [$MANAGED_IDENTITY_NAME] managed identity actually exists in the [$AKS_RESOURCE_GROUP_NAME] resource group..." az identity show \ --name $MANAGED_IDENTITY_NAME \ --resource-group $AKS_RESOURCE_GROUP_NAME &>/dev/null if [[ $? != 0 ]]; then echo "No [$MANAGED_IDENTITY_NAME] managed identity actually exists in the [$AKS_RESOURCE_GROUP_NAME] resource group" echo "Creating [$MANAGED_IDENTITY_NAME] managed identity in the [$AKS_RESOURCE_GROUP_NAME] resource group..." # create the managed identity az identity create \ --name $MANAGED_IDENTITY_NAME \ --resource-group $AKS_RESOURCE_GROUP_NAME &>/dev/null if [[ $? == 0 ]]; then echo "[$MANAGED_IDENTITY_NAME] managed identity successfully created in the [$AKS_RESOURCE_GROUP_NAME] resource group" else echo "Failed to create [$MANAGED_IDENTITY_NAME] managed identity in the [$AKS_RESOURCE_GROUP_NAME] resource group" exit fi else echo "[$MANAGED_IDENTITY_NAME] managed identity already exists in the [$AKS_RESOURCE_GROUP_NAME] resource group" fi # Get the managed identity principal id echo "Retrieving principalId for [$MANAGED_IDENTITY_NAME] managed identity..." PRINCIPAL_ID=$(az identity show \ --name $MANAGED_IDENTITY_NAME \ --resource-group $AKS_RESOURCE_GROUP_NAME \ --query principalId \ --output tsv) if [[ -n $PRINCIPAL_ID ]]; then echo "[$PRINCIPAL_ID] principalId or the [$MANAGED_IDENTITY_NAME] managed identity successfully retrieved" else echo "Failed to retrieve principalId for the [$MANAGED_IDENTITY_NAME] managed identity" exit fi # Get the managed identity client id echo "Retrieving clientId for [$MANAGED_IDENTITY_NAME] managed identity..." CLIENT_ID=$(az identity show \ --name $MANAGED_IDENTITY_NAME \ --resource-group $AKS_RESOURCE_GROUP_NAME \ --query clientId \ --output tsv) if [[ -n $CLIENT_ID ]]; then echo "[$CLIENT_ID] clientId for the [$MANAGED_IDENTITY_NAME] managed identity successfully retrieved" else echo "Failed to retrieve clientId for the [$MANAGED_IDENTITY_NAME] managed identity" exit fi # Retrieve the resource id of the Key Vault resource echo "Retrieving the resource id for the [$KEY_VAULT_NAME] key vault..." KEY_VAULT_ID=$(az keyvault show \ --name $KEY_VAULT_NAME \ --resource-group $KEY_VAULT_RESOURCE_GROUP_NAME \ --query id \ --output tsv) if [[ -n $KEY_VAULT_ID ]]; then echo "[$KEY_VAULT_ID] resource id for the [$KEY_VAULT_NAME] key vault successfully retrieved" else echo "Failed to retrieve the resource id for the [$KEY_VAULT_NAME] key vault" exit fi # Assign the Key Vault Secrets User role to the managed identity with Key Vault as a scope ROLE="Key Vault Secrets User" echo "Checking if [$ROLE] role with [$KEY_VAULT_NAME] key vault as a scope is already assigned to the [$MANAGED_IDENTITY_NAME] managed identity..." CURRENT_ROLE=$(az role assignment list \ --assignee $PRINCIPAL_ID \ --scope $KEY_VAULT_ID \ --query "[?roleDefinitionName=='$ROLE'].roleDefinitionName" \ --output tsv 2>/dev/null) if [[ $CURRENT_ROLE == $ROLE ]]; then echo "[$ROLE] role with [$KEY_VAULT_NAME] key vault as a scope is already assigned to the [$MANAGED_IDENTITY_NAME] managed identity" else echo "[$ROLE] role with [$KEY_VAULT_NAME] key vault as a scope is not assigned to the [$MANAGED_IDENTITY_NAME] managed identity" echo "Assigning the [$ROLE] role with [$KEY_VAULT_NAME] key vault as a scope to the [$MANAGED_IDENTITY_NAME] managed identity..." for i in {1..10}; do az role assignment create \ --assignee $PRINCIPAL_ID \ --role "$ROLE" \ --scope $KEY_VAULT_ID 1>/dev/null if [[ $? == 0 ]]; then echo "Successfully assigned the [$ROLE] role with [$KEY_VAULT_NAME] key vault as a scope to the [$MANAGED_IDENTITY_NAME] managed identity" break else echo "Failed to assign the [$ROLE] role with [$KEY_VAULT_NAME] key vault as a scope to the [$MANAGED_IDENTITY_NAME] managed identity, retrying in 5 seconds..." sleep 5 fi if [[ $i == 3 ]]; then echo "Failed to assign the [$ROLE] role with [$KEY_VAULT_NAME] key vault as a scope to the [$MANAGED_IDENTITY_NAME] managed identity after 3 attempts" exit fi done fi # Check if the namespace exists in the cluster RESULT=$(kubectl get namespace -o 'jsonpath={.items[?(@.metadata.name=="'$NAMESPACE'")].metadata.name'}) if [[ -n $RESULT ]]; then echo "[$NAMESPACE] namespace already exists in the cluster" else echo "[$NAMESPACE] namespace does not exist in the cluster" echo "Creating [$NAMESPACE] namespace in the cluster..." kubectl create namespace $NAMESPACE fi # Check if the service account already exists RESULT=$(kubectl get sa -n $NAMESPACE -o 'jsonpath={.items[?(@.metadata.name=="'$SERVICE_ACCOUNT_NAME'")].metadata.name'}) if [[ -n $RESULT ]]; then echo "[$SERVICE_ACCOUNT_NAME] service account already exists" else # Create the service account echo "[$SERVICE_ACCOUNT_NAME] service account does not exist" echo "Creating [$SERVICE_ACCOUNT_NAME] service account..." cat <<EOF | kubectl apply -f - apiVersion: v1 kind: ServiceAccount metadata: annotations: azure.workload.identity/client-id: $CLIENT_ID azure.workload.identity/tenant-id: $TENANT_ID labels: azure.workload.identity/use: "true" name: $SERVICE_ACCOUNT_NAME namespace: $NAMESPACE EOF fi # Show service account YAML manifest echo "Service Account YAML manifest" echo "-----------------------------" kubectl get sa $SERVICE_ACCOUNT_NAME -n $NAMESPACE -o yaml # Check if the federated identity credential already exists echo "Checking if [$FEDERATED_IDENTITY_NAME] federated identity credential actually exists in the [$AKS_RESOURCE_GROUP_NAME] resource group..." az identity federated-credential show \ --name $FEDERATED_IDENTITY_NAME \ --resource-group $AKS_RESOURCE_GROUP_NAME \ --identity-name $MANAGED_IDENTITY_NAME &>/dev/null if [[ $? != 0 ]]; then echo "No [$FEDERATED_IDENTITY_NAME] federated identity credential actually exists in the [$AKS_RESOURCE_GROUP_NAME] resource group" # Get the OIDC Issuer URL AKS_OIDC_ISSUER_URL="$(az aks show \ --only-show-errors \ --name $AKS_NAME \ --resource-group $AKS_RESOURCE_GROUP_NAME \ --query oidcIssuerProfile.issuerUrl \ --output tsv)" # Show OIDC Issuer URL if [[ -n $AKS_OIDC_ISSUER_URL ]]; then echo "The OIDC Issuer URL of the [$AKS_NAME] cluster is [$AKS_OIDC_ISSUER_URL]" fi echo "Creating [$FEDERATED_IDENTITY_NAME] federated identity credential in the [$AKS_RESOURCE_GROUP_NAME] resource group..." # Establish the federated identity credential between the managed identity, the service account issuer, and the subject. az identity federated-credential create \ --name $FEDERATED_IDENTITY_NAME \ --identity-name $MANAGED_IDENTITY_NAME \ --resource-group $AKS_RESOURCE_GROUP_NAME \ --issuer $AKS_OIDC_ISSUER_URL \ --subject system:serviceaccount:$NAMESPACE:$SERVICE_ACCOUNT_NAME if [[ $? == 0 ]]; then echo "[$FEDERATED_IDENTITY_NAME] federated identity credential successfully created in the [$AKS_RESOURCE_GROUP_NAME] resource group" else echo "Failed to create [$FEDERATED_IDENTITY_NAME] federated identity credential in the [$AKS_RESOURCE_GROUP_NAME] resource group" exit fi else echo "[$FEDERATED_IDENTITY_NAME] federated identity credential already exists in the [$AKS_RESOURCE_GROUP_NAME] resource group" fi The Bash script performs the following steps: It sources variables from two files: ../00-variables.sh and ./00-variables.sh. It checks if the specified resource group exists. If not, it creates the resource group. It checks if the specified managed identity exists within the resource group. If not, it creates a user-assigned managed identity. It retrieves the principalId and clientId of the managed identity. It retrieves the id of the Azure Key Vault resource. It assigns the Key Vault Secrets User role to the managed identity with the Azure Key Vault as the scope. It checks if the specified Kubernetes namespace exists. If not, it creates the namespace. It checks if a specified Kubernetes service account exists within the namespace. If not, it creates the service account with the annotations and labels required by Microsoft Entra Workload ID. It checks if a specified federated identity credential exists within the resource group. If not, it retrieves the OIDC Issuer URL of the specified AKS cluster and creates the federated identity credential. You are now ready to explore each technique in detail. Hands-On Lab: Use Microsoft Entra Workload ID with Azure Kubernetes Service (AKS) Workloads deployed on an Azure Kubernetes Services (AKS) cluster require Microsoft Entra application credentials or managed identities to access Microsoft Entra protected resources, such as Azure Key Vault and Microsoft Graph. Microsoft Entra Workload ID integrates with Kubernetes capabilities to federate with external identity providers. To enable pods to use a Kubernetes identity, Microsoft Entra Workload ID utilizes Service Account Token Volume Projection (service account). This allows for the issuance of a Kubernetes token, and OIDC federation enables secure access to Azure resources with Microsoft Entra ID, based on annotated service accounts. Utilizing the Azure Identity client libraries or the Microsoft Authentication Library (MSAL) collection, alongside application registration, Microsoft Entra Workload ID seamlessly authenticates and provides access to Azure cloud resources for your workload. You can create a user-assigned managed identity for the workload, create federated credentials, and assign the proper permissions to it to read secrets from the source Key Vault using the create-managed-identity.sh Bash script. Then, you can run the following Bash script to retrieve the URL of the Azure Key Vault endpoint and then starts a demo pod in the workload-id-test namespace. The pod receives two parameters via environment variables: KEYVAULT_URL: The Azure Key Vault endpoint URL. SECRET_NAME: The name of a secret stored in Azure Key Vault. #/bin/bash # Variables source ../00-variables.sh source ./00-variables.sh # Retrieve the Azure Key Vault URL echo "Retrieving the [$KEY_VAULT_NAME] key vault URL..." KEYVAULT_URL=$(az keyvault show \ --name $KEY_VAULT_NAME \ --query properties.vaultUri \ --output tsv) if [[ -n $KEYVAULT_URL ]]; then echo "[$KEYVAULT_URL] key vault URL successfully retrieved" else echo "Failed to retrieve the [$KEY_VAULT_NAME] key vault URL" exit fi # Create the pod echo "Creating the [$POD_NAME] pod in the [$NAMESPACE] namespace..." cat <<EOF | kubectl apply -n $NAMESPACE -f - apiVersion: v1 kind: Pod metadata: name: $POD_NAME labels: azure.workload.identity/use: "true" spec: serviceAccountName: $SERVICE_ACCOUNT_NAME containers: - image: ghcr.io/azure/azure-workload-identity/msal-net:latest name: oidc env: - name: KEYVAULT_URL value: $KEYVAULT_URL - name: SECRET_NAME value: ${SECRETS[0]} nodeSelector: kubernetes.io/os: linux EOF exit Below you can read the C# code of the sample application that uses the Microsoft Authentication Library (MSAL) to acquire a security token to access Key Vault and read the value of a secret. // <directives> using System; using System.Threading; using Azure.Security.KeyVault.Secrets; // <directives> namespace akvdotnet { public class Program { static void Main(string[] args) { Program P = new Program(); string keyvaultURL = Environment.GetEnvironmentVariable("KEYVAULT_URL"); if (string.IsNullOrEmpty(keyvaultURL)) { Console.WriteLine("KEYVAULT_URL environment variable not set"); return; } string secretName = Environment.GetEnvironmentVariable("SECRET_NAME"); if (string.IsNullOrEmpty(secretName)) { Console.WriteLine("SECRET_NAME environment variable not set"); return; } SecretClient client = new SecretClient( new Uri(keyvaultURL), new MyClientAssertionCredential()); while (true) { Console.WriteLine($"{Environment.NewLine}START {DateTime.UtcNow} ({Environment.MachineName})"); // <getsecret> var keyvaultSecret = client.GetSecret(secretName).Value; Console.WriteLine("Your secret is " + keyvaultSecret.Value); // sleep and retry periodically Thread.Sleep(600000); } } } } public class MyClientAssertionCredential : TokenCredential { private readonly IConfidentialClientApplication _confidentialClientApp; private DateTimeOffset _lastRead; private string _lastJWT = null; public MyClientAssertionCredential() { // <authentication> // Microsoft Entra ID Workload Identity webhook will inject the following env vars // AZURE_CLIENT_ID with the clientID set in the service account annotation // AZURE_TENANT_ID with the tenantID set in the service account annotation. If not defined, then // the tenantID provided via azure-wi-webhook-config for the webhook will be used. // AZURE_AUTHORITY_HOST is the Microsoft Entra authority host. It is https://login.microsoftonline.com" for the public cloud. // AZURE_FEDERATED_TOKEN_FILE is the service account token path var clientID = Environment.GetEnvironmentVariable("AZURE_CLIENT_ID"); var tokenPath = Environment.GetEnvironmentVariable("AZURE_FEDERATED_TOKEN_FILE"); var tenantID = Environment.GetEnvironmentVariable("AZURE_TENANT_ID"); var host = Environment.GetEnvironmentVariable("AZURE_AUTHORITY_HOST"); _confidentialClientApp = ConfidentialClientApplicationBuilder .Create(clientID) .WithAuthority(host, tenantID) .WithClientAssertion(() => ReadJWTFromFSOrCache(tokenPath)) // ReadJWTFromFS should always return a non-expired JWT .WithCacheOptions(CacheOptions.EnableSharedCacheOptions) // cache the the AAD tokens in memory .Build(); } public override AccessToken GetToken(TokenRequestContext requestContext, CancellationToken cancellationToken) { return GetTokenAsync(requestContext, cancellationToken).GetAwaiter().GetResult(); } public override async ValueTask<AccessToken> GetTokenAsync(TokenRequestContext requestContext, CancellationToken cancellationToken) { AuthenticationResult result = null; try { result = await _confidentialClientApp .AcquireTokenForClient(requestContext.Scopes) .ExecuteAsync(); } catch (MsalUiRequiredException ex) { // The application doesn't have sufficient permissions. // - Did you declare enough app permissions during app creation? // - Did the tenant admin grant permissions to the application? } catch (MsalServiceException ex) when (ex.Message.Contains("AADSTS70011")) { // Invalid scope. The scope has to be in the form "https://resourceurl/.default" // Mitigation: Change the scope to be as expected. } return new AccessToken(result.AccessToken, result.ExpiresOn); } /// <summary> /// Read the JWT from the file system, but only do this every few minutes to avoid heavy I/O. /// The JWT lifetime is anywhere from 1 to 24 hours, so we can safely cache the value for a few minutes. /// </summary> private string ReadJWTFromFSOrCache(string tokenPath) { // read only once every 5 minutes if (_lastJWT == null || DateTimeOffset.UtcNow.Subtract(_lastRead) > TimeSpan.FromMinutes(5)) { _lastRead = DateTimeOffset.UtcNow; _lastJWT = System.IO.File.ReadAllText(tokenPath); } return _lastJWT; } } The Program class contains the Main method, which initializes a SecretClient object using a custom credential class MyClientAssertionCredential. The Main method code retrieves the Key Vault URL and secret name from environment variables, checks if they are set, and then enters an infinite loop where it fetches the secret from Key Vault and prints it to the console every 10 minutes. The MyClientAssertionCredential class extends TokenCredential and is responsible for authenticating with Microsoft Entra ID using a client assertion. It reads necessary environment variables for client ID, tenant ID, authority host, and federated token file path from the respective environment variables injected by Microsoft Entra Workload IDinto the pod. Environment variable Description AZURE_AUTHORITY_HOST The Microsoft Entra ID endpoint (https://login.microsoftonline.com/). AZURE_CLIENT_ID The client ID of the Microsoft Entra ID registered application or user-assigned managed identity. AZURE_TENANT_ID The tenant ID of the Microsoft Entra ID registered application or user-assigned managed identity. AZURE_FEDERATED_TOKEN_FILE The path of the projected service account token file. The class uses the ConfidentialClientApplicationBuilder to create a confidential client application that acquires tokens for the specified scopes. The ReadJWTFromFSOrCache method reads the JWT from the file system and caches it to minimize I/O operations. You can find the code, Dockerfile, and container image links for other programming languages in the table below. Language Library Code Image Example Has Windows Images C# microsoft-authentication-library-for-dotnet Link ghcr.io/azure/azure-workload-identity/msal-net Link ✅ Go microsoft-authentication-library-for-go Link ghcr.io/azure/azure-workload-identity/msal-go Link ✅ Java microsoft-authentication-library-for-java Link ghcr.io/azure/azure-workload-identity/msal-java Link ❌ Node.JS microsoft-authentication-library-for-js Link ghcr.io/azure/azure-workload-identity/msal-node Link ❌ Python microsoft-authentication-library-for-python Link ghcr.io/azure/azure-workload-identity/msal-python Link ❌ The application code retrieves the secret value specified by the SECRET_NAME parameter and logs it to the standard output. Therefore, you can use the following Bash script to display the logs generated by the pod. #!/bin/bash # Variables source ../00-variables.sh source ./00-variables.sh # Check if the pod exists POD=$(kubectl get pod $POD_NAME -n $NAMESPACE -o 'jsonpath={.metadata.name}') if [[ -z $POD ]]; then echo "No [$POD_NAME] pod found in [$NAMESPACE] namespace." exit fi # Read logs from the pod echo "Reading logs from [$POD_NAME] pod..." kubectl logs $POD -n $NAMESPACE The script should generate an output similar to the following: Reading logs from [demo-pod] pod... START 02/10/2025 11:01:36 (demo-pod) Your secret is admin Alternatively, you can use the Azure Identity client libraries in your workload code to acquire a security token from Microsoft Entra ID using the credentials of the registered application or user-assigned managed identity federated with the Kubernetes service account. You can choose one of the following approaches: Use DefaultAzureCredential, which attempts to use the WorkloadIdentityCredential. Create a ChainedTokenCredential instance that includes WorkloadIdentityCredential. Use WorkloadIdentityCredential directly. The following table provides the minimum package version required for each language ecosystem's client library. Ecosystem Library Minimum version .NET Azure.Identity 1.9.0 C++ azure-identity-cpp 1.6.0 Go azidentity 1.3.0 Java azure-identity 1.9.0 Node.js @azure/identity 3.2.0 Python azure-identity 1.13.0 In the following code samples, DefaultAzureCredential is used. This credential type uses the environment variables injected by the Azure Workload Identity mutating webhook to authenticate with Azure Key Vault. .NET C++ Go Java Node.js Python Here is a C# code sample that uses DefaultAzureCredential for user credentials. using Azure.Identity; using Azure.Security.KeyVault.Secrets; string keyVaultUrl = Environment.GetEnvironmentVariable("KEYVAULT_URL"); string secretName = Environment.GetEnvironmentVariable("SECRET_NAME"); var client = new SecretClient( new Uri(keyVaultUrl), new DefaultAzureCredential()); KeyVaultSecret secret = await client.GetSecretAsync(secretName); Hands-On Lab: Azure Key Vault Provider for Secrets Store CSI Driver in AKS The Secrets Store Container Storage Interface (CSI) Driver on Azure Kubernetes Service (AKS) provides various methods of identity-based access to your Azure Key Vault. You can use one of the following access methods: Service Connector with managed identity Workload ID User-assigned managed identity This article outlines focus on the Workload ID option. Please see the documentantion for the other methods. Run the following Bash script to upgrade your AKS cluster with the Azure Key Vault provider for Secrets Store CSI Driver capability using the az aks enable-addons command to enable the azure-keyvault-secrets-provider add-on. The add-on creates a user-assigned managed identity you can use to authenticate to your key vault. Alternatively, you can use a bring-your-own user-assigned managed identity. #!/bin/bash # Variables source ../00-variables.sh source ./00-variables.sh # Enable Addon echo "Checking if the [azure-keyvault-secrets-provider] addon is enabled in the [$AKS_NAME] AKS cluster..." az aks addon show \ --addon azure-keyvault-secrets-provider \ --name $AKS_NAME \ --resource-group $AKS_RESOURCE_GROUP_NAME &>/dev/null if [[ $? != 0 ]]; then echo "The [azure-keyvault-secrets-provider] addon is not enabled in the [$AKS_NAME] AKS cluster" echo "Enabling the [azure-keyvault-secrets-provider] addon in the [$AKS_NAME] AKS cluster..." az aks addon enable \ --addon azure-keyvault-secrets-provider \ --enable-secret-rotation \ --name $AKS_NAME \ --resource-group $AKS_RESOURCE_GROUP_NAME else echo "The [azure-keyvault-secrets-provider] addon is already enabled in the [$AKS_NAME] AKS cluster" fi You can create a user-assigned managed identity for the workload, create federated credentials, and assign the proper permissions to it to read secrets from the source Key Vault using the create-managed-identity.sh Bash script. The next step is creating an instance of the SecretProviderClass custom resource in your workload namespace. The SecretProviderClass is a namespaced resource in Secrets Store CSI Driver that is used to provide driver configurations and provider-specific parameters to the CSI driver. The SecretProviderClass allows you to indicate the client ID of a user-assigned managed identity used to read secret material from Key Vault, and the list of secrets, keys, and certificates to read from Key Vault. For each object, you can optionally indicate an alternative name or alias using the objectAlias property. In this case, the driver will create a file with the alias as the name. You can even indicate a specific version of a secret, key, or certificate. You can retrieve the latest version just by assigning the objectVersion the null value or empty string. #/bin/bash # For more information, see: # https://learn.microsoft.com/en-us/azure/aks/csi-secrets-store-driver # https://learn.microsoft.com/en-us/azure/aks/csi-secrets-store-identity-access # Variables source ../00-variables.sh source ./00-variables.sh # Get the managed identity client id echo "Retrieving clientId for [$MANAGED_IDENTITY_NAME] managed identity..." CLIENT_ID=$(az identity show \ --name $MANAGED_IDENTITY_NAME \ --resource-group $AKS_RESOURCE_GROUP_NAME \ --query clientId \ --output tsv) if [[ -n $CLIENT_ID ]]; then echo "[$CLIENT_ID] clientId for the [$MANAGED_IDENTITY_NAME] managed identity successfully retrieved" else echo "Failed to retrieve clientId for the [$MANAGED_IDENTITY_NAME] managed identity" exit fi # Create the SecretProviderClass for the secret store CSI driver with Azure Key Vault provider echo "Creating the SecretProviderClass for the secret store CSI driver with Azure Key Vault provider..." cat <<EOF | kubectl apply -n $NAMESPACE -f - apiVersion: secrets-store.csi.x-k8s.io/v1 kind: SecretProviderClass metadata: name: $SECRET_PROVIDER_CLASS_NAME spec: provider: azure parameters: clientID: "$CLIENT_ID" keyvaultName: "$KEY_VAULT_NAME" tenantId: "$TENANT_ID" objects: | array: - | objectName: username objectAlias: username objectType: secret objectVersion: "" - | objectName: password objectAlias: password objectType: secret objectVersion: "" EOF The Bash script creates a SecretProviderClass custom resource configured to read the latest value of the username and password secrets from the source Key Vault. You can now use the following Bash script to deploy the sample application. #/bin/bash # Variables source ../00-variables.sh source ./00-variables.sh # Create the pod echo "Creating the [$POD_NAME] pod in the [$NAMESPACE] namespace..." cat <<EOF | kubectl apply -n $NAMESPACE -f - kind: Pod apiVersion: v1 metadata: name: $POD_NAME labels: azure.workload.identity/use: "true" spec: serviceAccountName: $SERVICE_ACCOUNT_NAME containers: - name: nginx image: nginx resources: requests: memory: "32Mi" cpu: "50m" limits: memory: "64Mi" cpu: "100m" volumeMounts: - name: secrets-store mountPath: "/mnt/secrets" readOnly: true volumes: - name: secrets-store csi: driver: secrets-store.csi.k8s.io readOnly: true volumeAttributes: secretProviderClass: "$SECRET_PROVIDER_CLASS_NAME" EOF The YAML manifest contains a volume definition called secrets-store that uses the secrets-store.csi.k8s.io Secrets Store CSI Driver and references the SecretProviderClass resource created in the previous step by name. The YAML configuration defines a Pod with a container named nginx that mounts the secrets-store volume in read-only mode. On pod start and restart, the driver will communicate with the provider using gRPC to retrieve the secret content from the Key Vault resource you have specified in the SecretProviderClass custom resource. You can run the following Bash script to print the value of each files, one for each secret specified in the SecretProviderClass custom resource, from the /mnt/secrets mounted volume. #!/bin/bash # Variables source ../00-variables.sh source ./00-variables.sh # Check if the pod exists POD=$(kubectl get pod $POD_NAME -n $NAMESPACE -o 'jsonpath={.metadata.name}') if [[ -z $POD ]]; then echo "No [$POD_NAME] pod found in [$NAMESPACE] namespace." exit fi # List secrets from /mnt/secrets volume echo "Reading files from [/mnt/secrets] volume in [$POD_NAME] pod..." FILES=$(kubectl exec $POD -n $NAMESPACE -- ls /mnt/secrets) # Retrieve secrets from /mnt/secrets volume for FILE in ${FILES[@]} do echo "Retrieving [$FILE] secret from [$KEY_VAULT_NAME] key vault..." kubectl exec $POD --stdin --tty -n $NAMESPACE -- cat /mnt/secrets/$FILE;echo;sleep 1 done Hands-On Lab: Dapr Secret Store for Key Vault Distributed Application Runtime (Dapr) is is a versatile and event-driven runtime that can help you write and implement simple, portable, resilient, and secured microservices. Dapr works together with Kubernetes clusters such as Azure Kubernetes Services (AKS) and Azure Container Apps as an abstraction layer to provide a low-maintenance and scalable platform. The first step is running the following script to check if Dapr is actually installed on your AKS cluster, and if not, install the Dapr extension. For more information, see Install the Dapr extension for Azure Kubernetes Service (AKS) and Arc-enabled Kubernetes. #!/bin/bash # Variables source ../00-variables.sh source ./00-variables.sh # Install AKS cluster extension in your Azure subscription echo "Check if the [k8s-extension] is already installed in the [$SUBSCRIPTION_NAME] subscription..." az extension show --name k8s-extension &>/dev/null if [[ $? != 0 ]]; then echo "No [k8s-extension] extension actually exists in the [$SUBSCRIPTION_NAME] subscription" echo "Installing [k8s-extension] extension in the [$SUBSCRIPTION_NAME] subscription..." # install the extension az extension add --name k8s-extension if [[ $? == 0 ]]; then echo "[k8s-extension] extension successfully installed in the [$SUBSCRIPTION_NAME] subscription" else echo "Failed to install [k8s-extension] extension in the [$SUBSCRIPTION_NAME] subscription" exit fi else echo "[k8s-extension] extension already exists in the [$SUBSCRIPTION_NAME] subscription" fi # Checking if the the KubernetesConfiguration resource provider is registered in your Azure subscription echo "Checking if the [Microsoft.KubernetesConfiguration] resource provider is already registered in the [$SUBSCRIPTION_NAME] subscription..." az provider show --namespace Microsoft.KubernetesConfiguration &>/dev/null if [[ $? != 0 ]]; then echo "No [Microsoft.KubernetesConfiguration] resource provider actually exists in the [$SUBSCRIPTION_NAME] subscription" echo "Registering [Microsoft.KubernetesConfiguration] resource provider in the [$SUBSCRIPTION_NAME] subscription..." # register the resource provider az provider register --namespace Microsoft.KubernetesConfiguration if [[ $? == 0 ]]; then echo "[Microsoft.KubernetesConfiguration] resource provider successfully registered in the [$SUBSCRIPTION_NAME] subscription" else echo "Failed to register [Microsoft.KubernetesConfiguration] resource provider in the [$SUBSCRIPTION_NAME] subscription" exit fi else echo "[Microsoft.KubernetesConfiguration] resource provider already exists in the [$SUBSCRIPTION_NAME] subscription" fi # Check if the ExtenstionTypes feature is registered in your Azure subscription echo "Checking if the [ExtensionTypes] feature is already registered in the [Microsoft.KubernetesConfiguration] namespace..." az feature show --namespace Microsoft.KubernetesConfiguration --name ExtensionTypes &>/dev/null if [[ $? != 0 ]]; then echo "No [ExtensionTypes] feature actually exists in the [Microsoft.KubernetesConfiguration] namespace" echo "Registering [ExtensionTypes] feature in the [Microsoft.KubernetesConfiguration] namespace..." # register the feature az feature register --namespace Microsoft.KubernetesConfiguration --name ExtensionTypes if [[ $? == 0 ]]; then echo "[ExtensionTypes] feature successfully registered in the [Microsoft.KubernetesConfiguration] namespace" else echo "Failed to register [ExtensionTypes] feature in the [Microsoft.KubernetesConfiguration] namespace" exit fi else echo "[ExtensionTypes] feature already exists in the [Microsoft.KubernetesConfiguration] namespace" fi # Check if Dapr extension is installed on your AKS cluster echo "Checking if the [Dapr] extension is already installed on the [$AKS_NAME] AKS cluster..." az k8s-extension show \ --name dapr \ --cluster-name $AKS_NAME \ --resource-group $AKS_RESOURCE_GROUP_NAME \ --cluster-type managedClusters &>/dev/null if [[ $? != 0 ]]; then echo "No [Dapr] extension actually exists on the [$AKS_NAME] AKS cluster" echo "Installing [Dapr] extension on the [$AKS_NAME] AKS cluster..." # install the extension az k8s-extension create \ --name dapr \ --cluster-name $AKS_NAME \ --resource-group $AKS_RESOURCE_GROUP_NAME \ --cluster-type managedClusters \ --extension-type "Microsoft.Dapr" \ --scope cluster \ --release-namespace "dapr-system" if [[ $? == 0 ]]; then echo "[Dapr] extension successfully installed on the [$AKS_NAME] AKS cluster" else echo "Failed to install [Dapr] extension on the [$AKS_NAME] AKS cluster" exit fi else echo "[Dapr] extension already exists on the [$AKS_NAME] AKS cluster" fi You can create a user-assigned managed identity for the workload, create federated credentials, and assign the proper permissions to it to read secrets from the source Key Vault using the create-managed-identity.sh Bash script. Then, you can run the following Bash script to retrieve the clientId for the user-assigned managed identity used to access Key Vault and create a Dapr secret store component for the secret store CSI driver with Azure Key Vault provider. The YAML manifest of the Dapr component assigns the following values to the component metadata: Key Vault name to the vaultName attribute. Client id of the user-assigned managed identity to the azureClientId attribute. #!/bin/bash # Variables source ../00-variables.sh source ./00-variables.sh # Get the managed identity client id echo "Retrieving clientId for [$MANAGED_IDENTITY_NAME] managed identity..." CLIENT_ID=$(az identity show \ --name $MANAGED_IDENTITY_NAME \ --resource-group $AKS_RESOURCE_GROUP_NAME \ --query clientId \ --output tsv) if [[ -n $CLIENT_ID ]]; then echo "[$CLIENT_ID] clientId for the [$MANAGED_IDENTITY_NAME] managed identity successfully retrieved" else echo "Failed to retrieve clientId for the [$MANAGED_IDENTITY_NAME] managed identity" exit fi # Create the Dapr secret store for Azure Key Vault echo "Creating the secret store for [$KEY_VAULT_NAME] Azure Key Vault..." cat <<EOF | kubectl apply -n $NAMESPACE -f - apiVersion: dapr.io/v1alpha1 kind: Component metadata: name: $SECRET_STORE_NAME spec: type: secretstores.azure.keyvault version: v1 metadata: - name: vaultName value: ${KEY_VAULT_NAME,,} - name: azureClientId value: $CLIENT_ID EOF The next step is deploying the demo application using the following Bash script. The service account used by the Kubernetes deployment is federated with the user-assigned managed identity. Aldo note that the deployment is configured to use Dapr via the following Kubernetes annotations: dapr.io/app-id: The unique ID of the application. Used for service discovery, state encapsulation and the pub/sub consumer ID. dapr.io/enabled: Setting this paramater to true injects the Dapr sidecar into the pod. dapr.io/app-port: This parameter tells Dapr which port your application is listening on. For more information on Dapr annotations, see Dapr arguments and annotations for daprd, CLI, and Kubernetes. #!/bin/bash # Variables source ../00-variables.sh source ./00-variables.sh # Check if the namespace exists in the cluster RESULT=$(kubectl get namespace -o 'jsonpath={.items[?(@.metadata.name=="'$NAMESPACE'")].metadata.name'}) if [[ -n $RESULT ]]; then echo "[$NAMESPACE] namespace already exists in the cluster" else echo "[$NAMESPACE] namespace does not exist in the cluster" echo "Creating [$NAMESPACE] namespace in the cluster..." kubectl create namespace $NAMESPACE fi # Create deployment echo "Creating [$APP_NAME] deployment in the [$NAMESPACE] namespace..." cat <<EOF | kubectl apply -n $NAMESPACE -f - kind: Deployment apiVersion: apps/v1 metadata: name: $APP_NAME labels: app: $APP_NAME spec: replicas: 1 selector: matchLabels: app: $APP_NAME azure.workload.identity/use: "true" template: metadata: labels: app: $APP_NAME azure.workload.identity/use: "true" annotations: dapr.io/enabled: "true" dapr.io/app-id: "$APP_NAME" dapr.io/app-port: "80" spec: serviceAccountName: $SERVICE_ACCOUNT_NAME containers: - name: nginx image: nginx imagePullPolicy: Always ports: - containerPort: 80 resources: requests: memory: "64Mi" cpu: "250m" limits: memory: "128Mi" cpu: "500m" EOF You can run the following Bash script to connect to the demo pod and print out the value of the two sample secrets stored in Key Vault. #!/bin/bash # Variables source ../00-variables.sh source ./00-variables.sh # Get pod name POD=$(kubectl get pod -n $NAMESPACE -o 'jsonpath={.items[].metadata.name}') if [[ -z $POD ]]; then echo 'no pod found, please check the name of the deployment and namespace' exit fi # List secrets from /mnt/secrets volume for SECRET in ${SECRETS[@]} do echo "Retrieving [$SECRET] secret from [$KEY_VAULT_NAME] key vault..." json=$(kubectl exec --stdin --tty -n $NAMESPACE -c $CONTAINER $POD \ -- curl http://localhost:3500/v1.0/secrets/key-vault-secret-store/$SECRET;echo) echo $json | jq . done Hands-On Lab: External Secrets Operator with Azure Key Vault In this sectioon you will see the steps to configure the External Secrets Operator to use Microsoft Entra Workload ID to access an Azure Key Vault resource. You can install the operator to your AKS cluster using Helm, as shown in the following Bash script: #!/bin/bash # Variables source ../00-variables.sh source ./00-variables.sh # Add the external secrets repository helm repo add external-secrets https://charts.external-secrets.io # Update local Helm chart repository cache helm repo update # Deploy external secrets via Helm helm upgrade external-secrets external-secrets/external-secrets \ --install \ --namespace external-secrets \ --create-namespace \ --set installCRDs=true Then, you can create a user-assigned managed identity for the workload, create federated credentials, and assign the proper permissions to it to read secrets from the source Key Vault using the create-managed-identity.sh Bash script. Next, you can run the following Bash script to retrieve the vaultUri of your Key Vault resource and create a secret store custom resource. The YAML manifest of the secret store assigns the following values to the properties of the azurekv provider for Key Vault: authType: WorkloadIdentity configures the provider to utilize user-assigned managed identity with the proper permissions to access Key Vault. vaultUrl: Specifies the vaultUri Key Vault endpoint URL. serviceAccountRef.name: specifies the Kubernetes service account in the workload namespace that is federated with the user-assigned managed identity. #/bin/bash # For more information, see: # https://medium.com/@rcdinesh1/access-secrets-via-argocd-through-external-secrets-9173001be885 # https://external-secrets.io/latest/provider/azure-key-vault/ # Variables source ../00-variables.sh source ./00-variables.sh # Get key vault URL VAULT_URL=$(az keyvault show \ --name $KEY_VAULT_NAME \ --resource-group $KEY_VAULT_RESOURCE_GROUP_NAME \ --query properties.vaultUri \ --output tsv \ --only-show-errors) if [[ -z $VAULT_URL ]]; then echo "[$KEY_VAULT_NAME] key vault URL not found" exit fi # Create secret store echo "Creating the [$SECRET_STORE_NAME] secret store..." cat <<EOF | kubectl apply -n $NAMESPACE -f - apiVersion: external-secrets.io/v1beta1 kind: SecretStore metadata: name: $SECRET_STORE_NAME spec: provider: azurekv: authType: WorkloadIdentity vaultUrl: "$VAULT_URL" serviceAccountRef: name: $SERVICE_ACCOUNT_NAME EOF # Get the secret store kubectl get secretstore azure-store -n $NAMESPACE -o yaml For more information on secret stores for Key Vault, see Azure Key Vault in the official documentation of the External Secrets Operator. #/bin/bash # Variables source ../00-variables.sh source ./00-variables.sh # Create secrets cat <<EOF | kubectl apply -n $NAMESPACE -f - apiVersion: external-secrets.io/v1beta1 kind: ExternalSecret metadata: name: $EXTERNAL_SECRET_NAME spec: refreshInterval: 1h secretStoreRef: kind: SecretStore name: $SECRET_STORE_NAME target: name: $EXTERNAL_SECRET_NAME creationPolicy: Owner dataFrom: # find all secrets starting with user - find: name: regexp: "^user" data: # explicit type and name of secret in the Azure KV - secretKey: password remoteRef: key: secret/password EOF Azure Key Vault manages different object types. The External Secrets Operator supports keys, secrets, and certificates. Simply prefix the key with key, secret, or cert to retrieve the desired type (defaults to secret). Object Type Return Value secret The raw secret value. key A JWK which contains the public key. Azure Key Vault does not export the private key. certificate The raw CER contents of the x509 certificate. You can create one or more ExternalSecret objects in your workload namespace to read keys, secrets, and certificates from Key Vault. To create a Kubernetes secret from the Azure Key Vault secret, you need to use Kind=ExternalSecret. You can retrieve keys, secrets, and certificates stored inside your Key Vault by setting a / prefixed type in the secret name. The default type is secret, but other supported values are cert and key. The following Bash script creates an ExternalSecret object configured to reference the secret store created in the previous step. The ExternalSecret object has two sections: dataFrom: This section contains a find element that uses regular expressions to retrieve any secret whose name starts with user. For each secret, the Key Vault provider will create a key-value mapping in the data section of the Kubernetes secret using the name and value of the corresponding Key Vault secret. data: This section specifies the explicit type and name of the secrets, keys, and certificates to retrieve from Key Vault. In this sample, it tells the Key Vault provider to create a key-value mapping in the data section of the Kubernetes secret for the password Key Vault secret, using password as the key. For more information on external secrets, see Azure Key Vault in the official documentation of the External Secrets Operator. #/bin/bash # Variables source ../00-variables.sh source ./00-variables.sh # Create secrets cat <<EOF | kubectl apply -n $NAMESPACE -f - apiVersion: external-secrets.io/v1beta1 kind: ExternalSecret metadata: name: $EXTERNAL_SECRET_NAME spec: refreshInterval: 1h secretStoreRef: kind: SecretStore name: $SECRET_STORE_NAME target: name: $EXTERNAL_SECRET_NAME creationPolicy: Owner dataFrom: # find all secrets starting with user - find: name: regexp: "^user" data: # explicit type and name of secret in the Azure KV - secretKey: password remoteRef: key: secret/password EOF Finally, you can run the following Bash script to print the key-value mappings contained in the Kubernetes secret created by the External Secrets Operator. #/bin/bash # Variables source ../00-variables.sh source ./00-variables.sh # Print secret values from the Kubernetes secret json=$(kubectl get secret $EXTERNAL_SECRET_NAME -n $NAMESPACE -o jsonpath='{.data}') # Decode the base64 of each value in the returned json echo $json | jq -r 'to_entries[] | .key + ": " + (.value | @base64d)' Conclusions In this article, we explored different methods for reading secrets from Azure Key Vault in Azure Kubernetes Services (AKS). Each technology offers its own advantages and considerations. Here's a summary: Microsoft Entra Workload ID: Transparently assigns a user-defined managed identity to a pod or deployment. Allows using Microsoft Entra integrated security and Azure RBAC for authorization. Provides secure access to Azure Key Vault and other managed services. Azure Key Vault provider for Secrets Store CSI Driver: Secrets, keys, and certificates can be accessed as files from mounted volumes. Optionally, Kubernetes secrets can be created to store keys, secrets, and certificates from Key Vault. No need for Azure-specific libraries to access secrets. Simplifies secret management with transparent integration. Dapr Secret Store for Key Vault: Allows applications to retrieve secrets from various secret stores, including Azure Key Vault. Simplifies secret management with Dapr's consistent API. Supports Azure Key Vault integration with managed identities. Supports third-party secret stores, such as Azure Key Vault, AWS Secret Manager, and Google Key Management, and Hashicorp Vault. External Secrets Operator: Manages secrets stored in external secret stores like Azure Key Vault, AWS Secret Manager, and Google Key Management, Hashicorp Vault, and more. Provides synchronization of Key Vault secrets into Kubernetes secrets. Simplifies secret management with Kubernetes-native integration. Depending on your requirements and preferences, you can choose the method that best fits your use case. Each technology offers unique features and benefits to securely access and manage secrets in your AKS workloads. For more information and detailed documentation on each mechanism, refer to the provided resources in this article.7.3KViews4likes5CommentsAzure Virtual Machine: Centralized insights for smarter management
Introduction Managing Azure Virtual Machines (VMs) can be challenging without the right tools. There are several ways for monitoring, some of which extend beyond the platform's native capabilities. These may include options like installing an agent or utilizing third-party products, though they often require additional setup and may involve extra costs. This workbook is designed to use the native platform capabilities to give you a clear and detailed view of your VMs, helping you make informed decisions confidently without any additional cost. To get started, check out the GitHub repository. Why do you need this Workbook? When managing multiple VMs, understanding usage trends, comparing key metrics, and identifying areas for improvement can be time-consuming. The Azure Virtual Machine Insights Workbook simplifies this process by centralizing essential data into one place from multiple subscriptions and resource groups. It covers inventory to provide you with a clear overview of all your VM resources and platform metrics to help you monitor, analyze, compare, and optimize performance effectively. Scenarios to use this Workbook Here are a few examples of how this workbook can bring value: Management Centralized Inventory Management Easily view all your VMs in one place, ensuring a clear overview of your resources. Performance and Monitoring Performance monitoring Analyze metrics like CPU, memory, network, and disk usage to identify performance bottlenecks and maintain optimal application performance. Performance trends Examine long-term performance trends to understand how your VMs behave over time and identify areas for improvement. Comparing different VM types for the same workload Compare the performance of various VM types running the same workload to determine the best configuration for your needs. Virtual Machines behind a load balancer Monitor and compare the performance of VMs behind a load-balanced to ensure even distribution and optimal resource utilization. Virtual Machines farm Assess and compare the performance of VMs within a server farm to identify outliers and maintain operational efficiency. Cost Cost Optimization Detect and compare underutilized VMs or overprovisioned resources to reduce waste and save on costs. Analyse usage trends over time to determine if an hourly spend commitment through Azure savings plans is feasible. Understand the timeframes for automating the deallocation of non-production VMs, unless Azure Reservations cover them. Independent software vendors (ISVs) ISV managing VMs per customer Compare performance across all customer VMs to identify trends and ensure consistent service delivery for each customer. Trends and Planning Resource Planning Track usage trends over time to better predict future resource needs and ensure your VMs are prepared for business growth. Scalability Planning Utilize insights from trends and metrics to prepare for scaling your VMs during peak demand or business growth. Examples from the workbook Conclusion The Azure Virtual Machine Insights Workbook helps you manage your VMs by bringing key metrics and insights together in one place, using native Azure features at no extra cost. It lets you analyze performance, cut costs, and plan for future growth. Whether you are investigating performance issues, analyzing underused resources, or predicting future needs, this workbook helps you make smart decisions and manage your infrastructure more efficiently. For any queries or to contribute, feel free to connect via the GitHub repo or submit feedback!655Views0likes0CommentsAzure Snapshots: Simplify Management and monitoring
Introduction Managing snapshots in Azure can be challenging when you have large a number of them across different Virtual Machines and subscriptions. Over time, snapshots can accumulate, leading to increased storage costs and making it harder to identify which ones are still needed. This was the trigger to build the Azure Snapshots Insights Workbook, designed to simplify monitoring and management of Azure Snapshots. To get started, check out the GitHub repository. Benefits of using this workbook Centralized Monitoring: Manage all your snapshots in one place across multiple resource groups and subscriptions. Cost Optimization: Reduce storage expenses by identifying and deleting outdated snapshots. Better Insights: Gain a clearer understanding of your snapshot usage patterns by the inventory dashboard. Key features Overview: Monitor important details like snapshot name, source disk, size (GiB), resource group, location, storage type, snapshot type (Full/Incremental), time created, public network access, etc. Inventory: Monitor the snapshot usage count by Subscription ID, Resource Group, Location, Storage type, Source disk size (GiB), Snapshot type, Disk state, Create Option, API Version, Public Network Access, Access policy, Data Access Auth Mode. Filtering: Filter snapshots by specific subscription/s, resource group/s and specific resource/s. Age-Based Filtering: View snapshots by age creation (1, 2, 3, 4, 5, 6 ,7, 14, 30, 60, 90 days ago), making it easy to identify old ones. Snapshot Deletion: Remove outdated or unnecessary snapshots with just a few clicks directly from the workbook. Age-Based Filtering Inventory Best practices for managing Azure Snapshots Cost Optimization Regularly review snapshot usage: Track the number and size of snapshots. This helps avoid unexpected costs and ensures you are not keeping unnecessary snapshots. Monitor snapshot age with the Age-Based filtering: Regularly review the age of your snapshots to identify and delete those that have surpassed your retention period to avoid unnecessary storage costs. Implement a retention policy: Define how long snapshots should be retained based on your organization data retention requirements. Delete older snapshots regularly to avoid accumulating unnecessary costs. Use Incremental snapshots: Whenever possible, use incremental snapshots, which only capture changes since the last snapshot. This approach is more cost-effective and efficient than full snapshots. Monitor snapshot costs: Regularly monitor the cost associated with snapshots and optimize them as needed. Evaluate snapshot storage options: Consider the type of storage account used for snapshots, especially when dealing with large volumes. Premium storage might be necessary for high-performance requirements, while standard storage can be more cost-effective for less critical data. Optimize snapshot frequency: Evaluate your snapshot frequency based on how often your data changes. For example, if your data changes infrequently, taking daily snapshots might not be necessary. Clean up orphaned snapshots: Identify and clean up orphaned snapshots that are no longer associated with any resources to optimize costs. Security Secure your snapshots: Use Azure Role-Based Access Control (RBAC) to restrict access to your snapshots. Ensure that only authorized users have permission to create, manage, or delete them. Performance and Efficiency Store snapshots in the same region: Ensure your snapshots are stored in the same region as the source disk to minimize latency and reduce costs when creating or restoring snapshots. Automate snapshot management: Automate the snapshot creation, deletion, and management processes. Data Protection and Recovery Test snapshot recovery: Periodically test the restoration process to ensure that your snapshots can be successfully used to recover data when needed. Take snapshots before major changes: Always create snapshots before performing significant updates or configurations on your Virtual Machines or managed disks, so you can quickly roll back if something goes wrong. Use Azure Backup for Long-Term Storage: If you need long-term retention, consider using Azure Backup instead of keeping snapshots indefinitely, as it provides more cost-effective and robust data retention. Governance and Management Apply Tags for better organization: Tag your snapshots with relevant information, such as Environment (e.g., "production", "development"), Application, or Owner, to improve management and cost tracking. Use Resource Locks: Apply resource locks to prevent accidental deletion of critical snapshots. This is particularly useful for snapshots that serve as backups for essential data. Check for dependencies: Before deleting a snapshot, ensure it’s not linked to any dependent resources or processes that could be disrupted if the snapshot is removed. Conclusion The Azure Snapshots Insights Workbook offers a streamlined approach to managing and optimizing your Azure snapshots, helping you stay organized and reduce unnecessary storage costs. By leveraging its centralized monitoring, age-based filtering, and deletion capabilities, you can maintain a more efficient cloud environment. Implementing these best practices will ensure your snapshots are always under control, ultimately enhancing your Azure resource management. To get started, check out the GitHub repository. For any queries or to contribute, feel free to connect via the repo or submit feedback!3.5KViews2likes1CommentDeploy Secure Azure AI Studio with a Managed Virtual Network
This article and the companion sample demonstrates how to set up an Azure AI Studio environment with managed identity and Azure RBAC to connected Azure AI Services and dependent resources and with the managed virtual network isolation mode set to Allow Internet Outbound. For more information, see How to configure a managed network for Azure AI Studio hubs. For more information, see: Azure AI Studio Documentation Azure Resources You can use the Bicep templates in this GitHub repository to deploy the following Azure resources: Resource Type Description Azure Application Insights Microsoft.Insights/components An Azure Application Insights instance associated with the Azure AI Studio workspace Azure Monitor Log Analytics Microsoft.OperationalInsights/workspaces An Azure Log Analytics workspace used to collect diagnostics logs and metrics from Azure resources Azure Key Vault Microsoft.KeyVault/vaults An Azure Key Vault instance associated with the Azure AI Studio workspace Azure Storage Account Microsoft.Storage/storageAccounts An Azure Storage instance associated with the Azure AI Studio workspace Azure Container Registry Microsoft.ContainerRegistry/registries An Azure Container Registry instance associated with the Azure AI Studio workspace Azure AI Hub / Project Microsoft.MachineLearningServices/workspaces An Azure AI Studio Hub and Project (Azure ML Workspace of kind 'hub' and 'project') Azure AI Services Microsoft.CognitiveServices/accounts An Azure AI Services as the model-as-a-service endpoint provider including GPT-4o and ADA Text Embeddings model deployments Azure Virtual Network Microsoft.Network/virtualNetworks A bring-your-own (BYO) virtual network hosting a jumpbox virtual machine to manage Azure AI Studio Azure Bastion Host Microsoft.Network/virtualNetworks A Bastion Host defined in the BYO virtual network that provides RDP connectivity to the jumpbox virtual machine Azure NAT Gateway Microsoft.Network/natGateways An Azure NAT Gateway that provides outbound connectivity to the jumpbox virtual machine Azure Private Endpoints Microsoft.Network/privateEndpoints Azure Private Endpoints defined in the BYO virtual network for Azure Container Registry, Azure Key Vault, Azure Storage Account, and Azure AI Hub Workspace Azure Private DNS Zones Microsoft.Network/privateDnsZones Azure Private DNS Zones are used for the DNS resolution of the Azure Private Endpoints You can select a different version of the GPT model by specifying the openAiDeployments parameter in the main.bicepparam parameters file. For details on the models available in various Azure regions, please refer to the Azure OpenAI Service models documentation. The default deployment includes an Azure Container Registry resource. However, if you wish not to deploy an Azure Container Registry, you can simply set the acrEnabled parameter to false . Network isolation architecture and isolation modes When you enable managed virtual network isolation, a managed virtual network is created for the hub workspace. Any managed compute resources you create for the hub, for example the virtual machines of online endpoint managed deployment, will automatically use this managed virtual network. The managed virtual network can also utilize Azure Private Endpoints for Azure resources that your hub depends on, such as Azure Storage, Azure Key Vault, and Azure Container Registry. There are three different configuration modes for outbound traffic from the managed virtual network: Outbound mode Description Scenarios Allow internet outbound Allow all internet outbound traffic from the managed virtual network. You want unrestricted access to machine learning resources on the internet, such as python packages or pretrained models. Allow only approved outbound Outbound traffic is allowed by specifying service tags. You want to minimize the risk of data exfiltration, but you need to prepare all required machine learning artifacts in your private environment. * You want to configure outbound access to an approved list of services, service tags, or FQDNs. Disabled Inbound and outbound traffic isn't restricted. You want public inbound and outbound from the hub. The Bicep templates in the companion sample demonstrate how to deploy an Azure AI Studio environment with the hub workspace's managed network isolation mode configured to Allow Internet Outbound . The Azure Private Endpoints and Private DNS Zones in the hub workspace managed virtual network are automatically created for you, while the Bicep templates create the Azure Private Endpoints and relative Private DNS Zones in the client virtual network. Managed Virtual Network When you provision the hub workspace of your Azure AI Studio with an isolation mode equal to the Allow Internet Outbound isolation mode, the managed virtual network and the Azure Private Endpoints to the dependent resources will not be created if public network access of Azure Key Vault, Azure Container Registry, and Azure Storage Account dependent resources is enabled. The creation of the managed virtual network is deferred until a compute resource is created or provisioning is manually started. When allowing automatic creation, it can take around 30 minutes to create the first compute resource as it is also provisioning the network. For more information, see Manually provision workspace managed VNet. If you initially create Azure Key Vault, Azure Container Registry, and Azure Storage Account dependent resources with public network enabled and then decide to disable it later, the managed virtual network will not be automatically provisioned if it is not already provisioned, and the private endpoints to the dependent resources will not be created. In this case, if you want o create the private endpoints to the dependent resources, you need to reprovision the hub manage virtual network in one of the following ways: Redeploy the hub workspace using Bicep or Terraform templates. If the isolation mode is set to Allow Internet Outbound and the dependent resources referenced by the hub workspace have public network access disabled, this operation will trigger the creation of the managed virtual network, if it does not already exist, and the private endpoints to the dependent resources. Execute the following Azure CLI command az ml workspace provision-network to reprovision the managed virtual network. The private endpoints will be created with the managed virtual network if the public network access of the dependent resources is disabled. az ml workspace provision-network --name my_hub_workspace_name --resource-group At this time, it's not possible to directly access the managed virtual network via the Azure CLI or the Azure Portal. You can see the managed virtual network indirectly by looking at the private endpoints, if any, under the hub workspace. You can proceed as follows: Go to the Azure Portal and select your Azure AI hub. Click on Settings and then Networking . Open the Workspace managed outbound access tab. Expand the section titled Required outbound rules . Here, you will find the private endpoints that are connected to the resources within the hub managed virtual network. Ensure that these private endpoints are active. You can also see the private endpoints hosted by the manage virtual network of your hub workspace inside the Networking settings of individual dependent resources, for example Key Vault: Go to the Azure Portal and select your Azure Key Vault. Click on Settings and then Networking . Open the Private endpoint connections tab. Here, you will find the private endpoint created by the Bicep templates in the client virtual network along with the private endpoint created in the hub managed virtual network of the hub. Also note that when you create a hub workspace with the Allow Internet Outbound isolation mode, the creation of the managed network is not immediate to save costs. The managed virtual network needs to be manually triggered via the az ml workspace provision-network command, or it will be triggered when you create a compute resource or private endpoints to dependent resources. At this time, the creation of an online endpoint does not automatically trigger the creation of a managed virtual network. An error occurs if you try to create an online deployment under the workspace which enabled workspace managed VNet but the managed VNet is not provisioned yet. Workspace managed VNet should be provisioned before you create an online deployment. Follow instructions to manually provision the workspace managed VNet. Once completed, you may start creating online deployments. For more information, see Network isolation with managed online endpoint and Secure your managed online endpoints with network isolation. Limitations The current limitations of managed virtual network are: Azure AI Studio currently doesn't support bringing your own virtual network, it only supports managed virtual network isolation. Once you enable managed virtual network isolation of your Azure AI, you can't disable it. Managed virtual network uses private endpoint connections to access your private resources. You can't have a private endpoint and a service endpoint at the same time for your Azure resources, such as a storage account. We recommend using private endpoints in all scenarios. The managed virtual network is deleted when the Azure AI is deleted. Data exfiltration protection is automatically enabled for the only approved outbound mode. If you add other outbound rules, such as to FQDNs, Microsoft can't guarantee that you're protected from data exfiltration to those outbound destinations. Using FQDN outbound rules increases the cost of the managed virtual network because FQDN rules use Azure Firewall. For more information, see Pricing. FQDN outbound rules only support ports 80 and 443. When using a compute instance with a managed network, use the az ml compute connect-ssh command to connect to the compute using SSH. Pricing According to the documentation, the hub managed virtual network feature is free. However, you will be charged for the following resources used by the managed virtual network: Azure Private Link - Private endpoints used to secure communications between the managed virtual network and Azure resources rely on Azure Private Link. For more information on pricing, see Azure Private Link pricing. FQDN outbound rules - FQDN outbound rules are implemented using Azure Firewall. If you use outbound FQDN rules, charges for Azure Firewall are included in your billing. Azure Firewall SKU is standard. Azure Firewall is provisioned per hub. NOTE The firewall isn't created until you add an outbound FQDN rule. If you don't use FQDN rules, you will not be charged for Azure Firewall. For more information on pricing, see Azure Firewall pricing. Secure Access to the Jumpbox Virtual Machine The jumpbox virtual machine is deployed with Windows 11 operating system and the Microsoft.Azure.ActiveDirectory VM extension, a specialized extension for integrating Azure virtual machines (VMs) with Microsoft Entra ID. This integration provides several key benefits, particularly in enhancing security and simplifying access management. Here's an overview of what the Microsoft.Azure.ActiveDirectory VM extension offers: Microsoft.Azure.ActiveDirectory VM extension is specialized for integrating Azure virtual machines (VMs) with Microsoft Entra ID. This integration provides several key benefits, particularly in enhancing security and simplifying access management. Here's an overview of the features and benefits of this VM extension: Enables users to sign in to a Windows or Linux virtual machine using their Microsoft Entra ID credentials. Facilitates single sign-on (SSO) experiences, reducing the need for managing separate local VM accounts. Supports multi-factor authentication, increasing security by requiring additional verification steps during login. Integrates with Azure RBAC, allowing administrators to assign specific roles to users, thereby controlling the level of access and permissions on the virtual machine. Allows administrators to apply conditional access policies to the VM, enhancing security by enforcing controls such as trusted device requirements, location-based access, and more. Eliminates the need to manage local administrator accounts, simplifying VM management and reducing overhead. For more information, see Sign in to a Windows virtual machine in Azure by using Microsoft Entra ID including passwordless. Make sure to enforce multi-factor authentication on your user account in your Microsoft Entra ID Tenant, as shown in the following screenshot: Then, specify at least an authentication method in addition to the password for the user account, for example the phone number, as shown in the following screenshot: To log in to the jumpbox virtual machine using a Microsoft Entra ID tenant user, you need to assign one of the following Azure roles to determine who can access the VM. To assign these roles, you must have the Virtual Machine Data Access Administrator role, or any role that includes the Microsoft.Authorization/roleAssignments/write action, such as the Role Based Access Control Administrator role. If you choose a role other than the Virtual Machine Data Access Administrator, it is recommended to add a condition to limit the permission to create role assignments. Virtual Machine Administrator Login: Users who have this role assigned can sign in to an Azure virtual machine with administrator privileges. Virtual Machine User Login: Users who have this role assigned can sign in to an Azure virtual machine with regular user privileges. To allow a user to sign in to the jumpbox virtual machine over RDP, you must assign the Virtual Machine Administrator Login or Virtual Machine User Login role to the user at the subscription, resource group, or virtual machine level. The virtualMachine.bicep module assigns the Virtual Machine Administrator Login to the user identified by the userObjectId parameter. To log in to the jumpbox virtual machine via Azure Bastion Host using a Microsoft Entra ID tenant user with multi-factor authentication, you can use the az network bastion rdp command as follows: az network bastion rdp \ --name <bastion-host-name> \ --resource-group <resource-group-name> \ --target-resource-id <virtual-machine-resource-id> \ --auth-type AAD After logging in to the virtual machine, if you open the Edge browser and navigate to the Azure Portal or Azure AI Studio, the browser profile will automatically be configured to the tenant user account used for the VM login. Bicep Parameters Specify a value for the required parameters in the main.bicepparam parameters file before deploying the Bicep modules. Here is the markdown table extrapolating the name, type, and description of the parameters from the provided Bicep code: Name Type Description prefix string Specifies the name prefix for all the Azure resources. suffix string Specifies the name suffix for all the Azure resources. location string Specifies the location for all the Azure resources. hubName string Specifies the name Azure AI Hub workspace. hubFriendlyName string Specifies the friendly name of the Azure AI Hub workspace. hubDescription string Specifies the description for the Azure AI Hub workspace displayed in Azure AI Studio. hubIsolationMode string Specifies the isolation mode for the managed network of the Azure AI Hub workspace. hubPublicNetworkAccess string Specifies the public network access for the Azure AI Hub workspace. connectionAuthType string Specifies the authentication method for the OpenAI Service connection. systemDatastoresAuthMode string Determines whether to use credentials for the system datastores of the workspace workspaceblobstore and workspacefilestore. projectName string Specifies the name for the Azure AI Studio Hub Project workspace. projectFriendlyName string Specifies the friendly name for the Azure AI Studio Hub Project workspace. projectPublicNetworkAccess string Specifies the public network access for the Azure AI Project workspace. logAnalyticsName string Specifies the name of the Azure Log Analytics resource. logAnalyticsSku string Specifies the service tier of the workspace: Free, Standalone, PerNode, Per-GB. logAnalyticsRetentionInDays int Specifies the workspace data retention in days. applicationInsightsName string Specifies the name of the Azure Application Insights resource. aiServicesName string Specifies the name of the Azure AI Services resource. aiServicesSku object Specifies the resource model definition representing SKU. aiServicesIdentity object Specifies the identity of the Azure AI Services resource. aiServicesCustomSubDomainName string Specifies an optional subdomain name used for token-based authentication. aiServicesDisableLocalAuth bool Specifies whether to disable the local authentication via API key. aiServicesPublicNetworkAccess string Specifies whether or not public endpoint access is allowed for this account. openAiDeployments array Specifies the OpenAI deployments to create. keyVaultName string Specifies the name of the Azure Key Vault resource. keyVaultNetworkAclsDefaultAction string Specifies the default action of allow or deny when no other rules match for the Azure Key Vault resource. keyVaultEnabledForDeployment bool Specifies whether the Azure Key Vault resource is enabled for deployments. keyVaultEnabledForDiskEncryption bool Specifies whether the Azure Key Vault resource is enabled for disk encryption. keyVaultEnabledForTemplateDeployment bool Specifies whether the Azure Key Vault resource is enabled for template deployment. keyVaultEnableSoftDelete bool Specifies whether soft delete is enabled for this Azure Key Vault resource. keyVaultEnablePurgeProtection bool Specifies whether purge protection is enabled for this Azure Key Vault resource. keyVaultEnableRbacAuthorization bool Specifies whether to enable the RBAC authorization for the Azure Key Vault resource. keyVaultSoftDeleteRetentionInDays int Specifies the soft delete retention in days. acrEnabled bool Specifies whether to create the Azure Container Registry. acrName string Specifies the name of the Azure Container Registry resource. acrAdminUserEnabled bool Enable admin user that have push/pull permission to the registry. acrPublicNetworkAccess string Specifies whether to allow public network access. Defaults to Enabled. acrSku string Specifies the tier of your Azure Container Registry. acrAnonymousPullEnabled bool Specifies whether or not registry-wide pull is enabled from unauthenticated clients. acrDataEndpointEnabled bool Specifies whether or not a single data endpoint is enabled per region for serving data. acrNetworkRuleSet object Specifies the network rule set for the container registry. acrNetworkRuleBypassOptions string Specifies whether to allow trusted Azure services to access a network-restricted registry. acrZoneRedundancy string Specifies whether or not zone redundancy is enabled for this container registry. storageAccountName string Specifies the name of the Azure Storage Account resource. storageAccountAccessTier string Specifies the access tier of the Azure Storage Account resource. The default value is Hot. storageAccountAllowBlobPublicAccess bool Specifies whether the Azure Storage Account resource allows public access to blobs. The default value is false. storageAccountAllowSharedKeyAccess bool Specifies whether the Azure Storage Account resource allows shared key access. The default value is true. storageAccountAllowCrossTenantReplication bool Specifies whether the Azure Storage Account resource allows cross-tenant replication. The default value is false. storageAccountMinimumTlsVersion string Specifies the minimum TLS version to be permitted on requests to the Azure Storage account. The default value is TLS1_2. storageAccountANetworkAclsDefaultAction string The default action of allow or deny when no other rules match. storageAccountSupportsHttpsTrafficOnly bool Specifies whether the Azure Storage Account resource should only support HTTPS traffic. virtualNetworkResourceGroupName string Specifies the name of the resource group hosting the virtual network and private endpoints. virtualNetworkName string Specifies the name of the virtual network. virtualNetworkAddressPrefixes string Specifies the address prefixes of the virtual network. vmSubnetName string Specifies the name of the subnet which contains the virtual machine. vmSubnetAddressPrefix string Specifies the address prefix of the subnet which contains the virtual machine. vmSubnetNsgName string Specifies the name of the network security group associated with the subnet hosting the virtual machine. bastionSubnetAddressPrefix string Specifies the Bastion subnet IP prefix. This prefix must be within the virtual network IP prefix address space. bastionSubnetNsgName string Specifies the name of the network security group associated with the subnet hosting Azure Bastion. bastionHostEnabled bool Specifies whether Azure Bastion should be created. bastionHostName string Specifies the name of the Azure Bastion resource. bastionHostDisableCopyPaste bool Enable/Disable Copy/Paste feature of the Bastion Host resource. bastionHostEnableFileCopy bool Enable/Disable File Copy feature of the Bastion Host resource. bastionHostEnableIpConnect bool Enable/Disable IP Connect feature of the Bastion Host resource. bastionHostEnableShareableLink bool Enable/Disable Shareable Link of the Bastion Host resource. bastionHostEnableTunneling bool Enable/Disable Tunneling feature of the Bastion Host resource. bastionPublicIpAddressName string Specifies the name of the Azure Public IP Address used by the Azure Bastion Host. bastionHostSkuName string Specifies the name of the Azure Bastion Host SKU. natGatewayName string Specifies the name of the Azure NAT Gateway. natGatewayZones array Specifies a list of availability zones denoting the zone in which the NAT Gateway should be deployed. natGatewayPublicIps int Specifies the number of Public IPs to create for the Azure NAT Gateway. natGatewayIdleTimeoutMins int Specifies the idle timeout in minutes for the Azure NAT Gateway. blobStorageAccountPrivateEndpointName string Specifies the name of the private link to the blob storage account. fileStorageAccountPrivateEndpointName string Specifies the name of the private link to the file storage account. keyVaultPrivateEndpointName string Specifies the name of the private link to the Key Vault. acrPrivateEndpointName string Specifies the name of the private link to the Azure Container Registry. hubWorkspacePrivateEndpointName string Specifies the name of the private link to the Azure Hub Workspace. vmName string Specifies the name of the virtual machine. vmSize string Specifies the size of the virtual machine. imagePublisher string Specifies the image publisher of the disk image used to create the virtual machine. imageOffer string Specifies the offer of the platform image or marketplace image used to create the virtual machine. imageSku string Specifies the image version for the virtual machine. authenticationType string Specifies the type of authentication when accessing the virtual machine. SSH key is recommended. vmAdminUsername string Specifies the name of the administrator account of the virtual machine. vmAdminPasswordOrKey string Specifies the SSH Key or password for the virtual machine. SSH key is recommended. diskStorageAccountType string Specifies the storage account type for OS and data disk. numDataDisks int Specifies the number of data disks of the virtual machine. osDiskSize int Specifies the size in GB of the OS disk of the VM. dataDiskSize int Specifies the size in GB of the data disk of the virtual machine. dataDiskCaching string Specifies the caching requirements for the data disks. enableMicrosoftEntraIdAuth bool Specifies whether to enable Microsoft Entra ID authentication on the virtual machine. enableAcceleratedNetworking bool Specifies whether to enable accelerated networking on the virtual machine. tags object Specifies the resource tags for all the resources. userObjectId string Specifies the object ID of a Microsoft Entra ID user. We suggest reading sensitive configuration data such as passwords or SSH keys from a pre-existing Azure Key Vault resource. For more information, see Create parameters files for Bicep deployment Getting Started To set up the infrastructure for the secure Azure AI Studio, you will need to install the necessary prerequisites and follow the steps below. Prerequisites Before you begin, ensure you have the following: An active Azure subscription Azure CLI installed on your local machine. Follow the installation guide if needed. Appropriate permissions to create resources in your Azure account Basic knowledge of using the command line interface Step 1: Clone the Repository Start by cloning the repository to your local machine: git clone <repository_url> cd bicep Step 2: Configure Parameters Edit the main.bicepparam parameters file to configure values for the parameters required by the Bicep templates. Make sure you set appropriate values for resource group name, location, and other necessary parameters in the deploy.sh Bash script. Step 3: Deploy Resources Use the deploy.sh Bash script to deploy the Azure resources via Bicep. This script will provision all the necessary resources as defined in the Bicep templates. Run the following command to deploy the resources: ./deploy.sh --resourceGroupName <resource-group-name> --location <location> --virtualNetworkResourceGroupName <client-virtual-network-resource-group-name> How to Test By following these steps, you will have Azure AI Studio set up and ready for your projects using Bicep. If you encounter any issues, refer to the additional resources or seek help from the Azure support team. After deploying the resources, you can verify the deployment by checking the Azure Portal or Azure AI Studio. Ensure all the resources are created and configured correctly. You can also follow these instructions to deploy, expose, and call the Basic Chat prompt flow using Bash scripts and Azure CLI.3.4KViews3likes2CommentsEvaluating the quality of AI document data extraction with small and large language models
Evaluating the effectiveness of AI models in document data extraction. Comparing accuracy, speed, and cost-effectiveness between Small and Large Language Models (SLMs and LLMs). Context As the adoption of AI in solutions increases, technical decision-makers face challenges in selecting the most effective approach for document data extraction. Ensuring high quality is crucial, particularly when dealing with critical solutions where minor errors have substantial consequences. As the volume of documents increases, it becomes essential to choose solutions that can scale efficiently without compromising performance. This article evaluates AI document data extraction techniques using Small Language Models (SLMs) and Large Language Models (LLMs). Including a specific focus on structured and unstructured data scenarios. By evaluating models, the article provides insights into their accuracy, speed, and cost-efficiency for quality data extraction. It provides both guidance in evaluating models, as well as the quality of the outputs from models for specific scenarios. Key challenges of effective document data extraction With many AI models available to ISVs and Startups, challenges arise in which technique is the most effective for quality document data extraction. When evaluating the quality of AI models, key challenges include: Ensuring high accuracy and reliability. High accuracy and confidence are crucial, especially for critical applications such as legal or financial documents. Minor errors in data extraction could lead to significant issues. Additionally, robust data validation mechanisms verify the data and minimize false positives and negatives. Getting results in a timely manner. As the volume of documents increases, the selected approach must scale efficiently to handle large document quantities without significant impact. Balancing the need for fast processing speeds with maintaining high accuracy levels is challenging. Balancing cost with accuracy and efficiency. Ensuring high accuracy and efficiency often requires the most advanced AI models, which can be expensive. Evaluating AI models and techniques highlights the most cost-effective solution without compromising on the quality of the data extraction. When choosing an AI model for document data extraction on Azure, there is no one-size-fits-all solution. Depending on the scenario, one may outperform another for accuracy at the sacrifice of cost. While another model may provide sufficient accuracy at a much lower cost. Establishing evaluation techniques for AI models in document data extraction When evaluating AI models for document data extraction, it’s important to understand how they perform for specific use cases. This evaluation focused on structured and unstructured scenarios to provide insights into simple and complex document structures. Evaluation Scenarios Structured Data: Invoices A collection of assorted invoices with varying simple and complex layouts, handwritten signatures, obscured content, and handwritten notes across margins. Unstructured Data: Vehicle Insurance Policy A 10+ page vehicle insurance policy document containing both structured and unstructured data, including natural, domain-specific language with inferred data. This scenario focuses on extracting data by combining structured data with the natural language throughout the document. Models and Techniques This evaluation focused on multiple techniques for data extraction with the language models: Markdown Extraction with Azure AI Document Intelligence. This technique involves converting the document into Markdown using the pre-built layout model in Azure AI Document Intelligence. Read more about this technique in our detailed article. Vision Capabilities of Multi-Modal Language Models. This technique focuses on GPT-4o and GPT-4o Mini models by converting the document pages to images. This leverages the models’ capabilities to analyze both text and visual elements. Explore this technique in more detail in our sample project. Comprehensive Combination. This technique combines both Markdown extraction with vision capable models to enhance the extraction process. Additionally, the layout analysis of Azure AI Document Intelligence will ease the human review of a document if the confidence or accuracy is low. For each technique, the model is prompted using either Structured Outputs in GPT-4o or with inline JSON schemas for other models. This establishes the expected output, improving the overall accuracy of the generated response. The AI models evaluated in this analysis include: Phi-3.5 MoE, an SLM deployed as a serverless endpoint in Azure AI Studio GPT-4o (2024-08-06), an LLM deployed with 10K TPM in Azure OpenAI GPT-4o Mini (2024-07-18), an LLM deployed with 10K TPM in Azure OpenAI Evaluation Methodology To ensure a reliable and consistent evaluation, the following approach was established: Baseline Accuracy. A single source of truth for the data extraction results ensures each model’s output is compared against a standard. This approach, while manually intensive, provides a precise measure for accuracy. Confidence. To demonstrate when an extraction should be raised up to a human for review, each model provides an internal assessment on how certain it is about its predicted output. Azure OpenAI provides these confidence values as logprobs, while Azure AI Document Intelligence returns these confidence scores by default in the response. Execution Time. This is calculated based on the time between the initial request for data extraction to the response, without streaming. For scenarios utilizing the Markdown technique, the time is based on the end-to-end processing, including the request and response from Azure AI Document Intelligence. Cost Analysis. Using the average input and output tokens from each iteration, the estimated cost per 1,000 pages is calculated, providing a clearer picture of cost-effectiveness at scale. Consistent Prompting. Each model has the same system and extraction prompt. The system prompt is consistent across all scenarios as “You are an AI assistant that extracts data from documents”. Each scenario has its own extraction prompt, including the output schema. Multiple Iterations. 10 variants of the document are run per model technique. Every property in the result compares for an exact match against the standard response. This provides the results for accuracy, confidence, execution time, and cost. These metrics establish the baseline evaluation. By establishing the baseline, it is possible to experiment with the prompt, schema, and request configuration. This allows you to compare improvements in the overall quality by evaluating the accuracy, confidence, speed, and cost. For the evaluation outlined in this article, we created a Python test project with multiple test cases. Each test case is a combination of a specific use case and model. Additionally, each test case is run independently. This is to ensure that the speed is evaluated fairly for each request. The tests take advantage of the Python SDKs for both Azure AI Document Intelligence and Azure OpenAI. Evaluating AI Models for Structured Data Complex Invoice Document Model Technique Accuracy (95th) Confidence (95th) Speed (95th) Est. Cost (1,000 pages) GPT-4o Vision 98.99% 99.85% 22.80s $7.45 GPT-4o Vision + Markdown 96.60% 99.82% 22.25s $19.47 Phi-3.5 MoE Markdown 96.11% 99.49% 54.00s $10.35 GPT-4o Markdown 95.66% 99.44% 31.60s $16.11 GPT-4o Mini Vision + Markdown 91.84% 99.99% 56.69s $18.14 GPT-4o Mini Vision 79.31% 99.76% 56.71s $8.02 GPT-4o Mini Markdown 78.61% 99.76% 24.52s $10.41 When processing invoices in our analysis, GPT-4o with Vision capabilities stands out as the most ideal combination. This approach delivers the highest accuracy and confidence scores, effectively handling complex layouts and visual elements. Additionally, it handles this at reasonable speeds at significantly lower costs. Accuracy in our evaluation shows that overall, most models in the evaluation can be regarded as having high accuracy. GPT-4o with Vision processing achieves the highest scores for invoices. While our assumptions that providing the additional document text context would increase this, our analysis showed that it's possible to retain high accuracy without it. Confidence levels are high across models and techniques, demonstrating that combined with high accuracy, these approaches perform well for automated processing with minimal human intervention. Speed is a crucial factor for scalability of a document processing pipeline. For background processing per document, GPT-4o models can process all techniques in a quick timescale. In contrast, small language models like Phi-3.5 MoE are took longer which could impact throughput for large-scale applications. Cost-effectiveness is also essential when building a scalable pipeline to process thousands of document pages. GPT-4o with Vision stands out as the most cost-effective at $7.45 per 1,000 pages. However, all models in Vision or Markdown techniques offer high value when also considering their accuracy, confidence, and speed. One significant benefit of using GPT-4o with Vision processing is its ability to handle visual elements such as handwritten signatures, obscured content, and stamps. By processing the document as an image, the model minimizes false positives and negatives that can arise when relying solely on text-based Markdown processing. Phi-3.5 MoE is a notable highlight when it comes to the use of small language models. The analysis demonstrates these models are just as capable at processing documents into structured JSON outputs as the more advanced large language models. For this Invoice analysis, GPT-4o with Vision provides the best balance between accuracy, confidence, speed, and cost. It is particularly adept at handling documents with complex layouts and visual elements, making it a suitable choice for extracting structured data from a diverse range of invoices. Evaluating AI Models for Unstructured Data Complex Vehicle Insurance Document Model Technique Accuracy (95th) Confidence (95th) Speed (95th) Est. Cost (1,000 pages) GPT-4o Vision + Markdown 100% 99.35% 68.93s $13.96 GPT-4o Markdown 98.25% 89.03% 134.85s $12.24 GPT-4o Vision 97.04% 98.71% 66.24s $2.31 GPT-4o Mini Markdown 93.25% 89.04% 99.78s $10.12 GPT-4o Mini Vision + Markdown 82.99% 99.16% 101.89s $15.71 GPT-4o Mini Vision 67.25% 98.73% 83.01s $5.67 Phi-3.5 MoE Markdown 64.99% 88.28% 102.89s $10.16 When extracting structured data from large, unstructured documents, such as insurance policies, the combination of GPT-4o with both Vision and Markdown techniques proves to be the most ideal solution. This hybrid approach leverages the visual context of the document's layout alongside the structured textual representation, resulting in the highest degrees of accuracy and confidence. It effectively handles the complexity of domain-specific language and inferred fields, providing a comprehensive and precise extraction process. Accuracy is spread across all models when extracting data from larger quantities of unstructured text. GPT-4o utilizing both Vision and Markdown demonstrates the effectiveness of combining visual and textual context for documents containing natural language. Confidence varies also in comparison to the Invoice analysis, with less certainty from the models when extracting from large blocks of text. However, analyzing the confidence scores of GPT-4o for each technique shows that building on them towards a comprehensive approach yields higher confidence. Speed of execution will naturally increase as the number of pages, complexity of layout, and quantity of text increases. These techniques for large, unstructured documents are likely to be reserved for background, batch processing than real-time applications. Cost varies when utilizing multiple Azure services to perform document data extraction. However, the overall cost for GPT-4o with both Vision and Markdown demonstrates where utilizing multiple AI services to achieve a goal can yield exceptional accuracy and confidence. This leads to automated solutions that require minimal human intervention. The combination of Vision and Markdown techniques can offer a highly efficient approach to structured document data extraction. However, while highly accurate, models like GPT-4o and 4o Mini are bound by their maximum context window of 128K tokens. When processing text and images in a single request, you may need to consider chunking or classification techniques to break down large documents into smaller document boundaries. Highlighting the specific capabilities of Phi-3.5 MoE, it falls short in accuracy. This lower performance indicates limitations in handling large, complex natural language that requires understanding and inference to extract data accurately. While optimizations can be made in prompts to improve accuracy, this analysis highlights the importance of evaluating and selecting a model and technique that aligns with the specific demands of your document extraction scenarios. Key Evaluation Findings Accuracy: For most extraction scenarios, advanced large language models like GPT-4o consistently deliver high accuracy and confidence levels. They are particularly effective at managing complex layouts and accurately extracting data from both visual and text context. Cost-Effectiveness: Language models with vision capabilities are highly cost-effective for large-scale processing, with GPT-4o demonstrating costs below $10 per 1,000 pages in all scenarios where vision was used solely. However, the cost-benefit of using a hybrid Vision and Markdown approach can be justified in certain scenarios where high precision is required. Speed: The time of execution for document varies depending on the number of pages, layout complexity, and quantity of text. For most scenarios, using language models for document data extraction demonstrates the capabilities for large-scale background processing, rather than real-time applications. Limitations: Smaller models, like Phi-3.5 MoE, indicate limitations when handling complex documents with large unstructured text. However, they excel with minimal prompting for smaller, structured documents, such as invoices. Comprehensive Techniques: Combining both text and vision techniques provides an effective strategy for highly accurate, highly confident data extraction from documents. The approach enhances the extraction, particularly for documents that include complex layout, visual elements, and complex, domain-specific, natural language. Recommendations for Evaluating AI Models in Document Data Extraction High-Accuracy Solutions. For solutions where accuracy is critical or visual elements must be evaluated, such as medical records, legal cases, or financial reports, explore GPT-4o with both Vision and Markdown capabilities. Its high performance in accuracy and confidence justifies the investment. Text-Based or Self-Hosted Solutions. For text-based document extractions where self-hosting a model is necessary, small open language models, such as Phi-3.5 MoE, can provide high accuracy in data extraction comparable to OpenAI's GPT-4o. Adopt Evaluation Techniques. Implement a rigorous evaluation methodology like the one used in this analysis. Establishing a baseline for accuracy, speed, and cost through multiple iterations and consistent prompting ensures reliable and comparable results. Regularly conduct evaluations when considering new techniques, models, prompts, and configurations. This helps in making informed decisions when opting for an approach in your specific use cases. Read more on AI Document Intelligence Thank you for taking the time to read this article. We are sharing our insights for ISVs and Startups that enable document intelligence in their AI-powered solutions, based on real-world challenges we encounter. We invite you to continue your learning through our additional insights in this series. Optimizing Data Extraction Accuracy with Custom Models in Azure AI Document Intelligence Discover how to enhance data extraction accuracy with Azure AI Document Intelligence by tailoring models to your unique document structures. Using Azure AI Document Intelligence and Azure OpenAI to extract structured data from documents Discover how Azure AI Document Intelligence and Azure OpenAI efficiently extract structured data from documents, streamlining document processing workflows for AI-powered solutions. Using Structured Outputs in Azure OpenAI’s GPT-4o for consistent document data processing Discover how to leverage GPT-4o’s Structured Outputs to ensure reliable, schema-compliant document data processing. Further Reading Phi Open Models - Small Language Models | Microsoft Azure Learn more about the Phi-3 small language models and their potential, including running effectively in offline environments. Prompt engineering techniques with Azure OpenAI | Microsoft Learn Discover how to improve your prompting techniques with Azure OpenAI to maximize the accuracy of your document data extraction. Samples demonstrating techniques for processing documents with Azure AI | GitHub A collection of samples that demonstrate both the document data extraction techniques used in this analysis, as well as techniques for classification.19KViews2likes2CommentsAKS Edge Essentials: A Lightweight “Easy Button” for Linux Containers on Windows Hosts
[Note: This post was revised on November 26, 2024. The change was in the EFLOW section due to product direction changes.] Hello, Mike Bazarewsky writing again, now on our shiny new ISV blog! My topic today is on a product that hasn’t gotten a huge amount of press, but actually brings some really nice capabilities to the table, especially with respect to IoT scenarios as we look to the future with Azure IoT Operations. That product is AKS Edge Essentials, or AKS-EE for short. What did Microsoft have before AKS-EE? AKS-EE is intended to be the “easy button” for running Linux-based and/or Windows-based containers on a Windows host, including a Windows IoT Enterprise host. It’s been possible to run Docker-hosted containers on Windows for a long time, and it’s even been possible to run orchestrators including Kubernetes on Windows for some time now. There’s even formal documentation on how to do so in Microsoft Learn. Meanwhile, in parallel, and specific to IoT use cases, Microsoft offers Azure IoT Edge for Linux on Windows, or EFLOW for short. EFLOW offers the Azure IoT Edge container orchestrator on a Windows host by leveraging a Linux virtual machine. That virtual machine runs a customized deployment of CBL-Mariner, Microsoft’s first-party Linux distribution designed for secure, cloud-focused use cases. As an end-to-end Microsoft offering on a Microsoft platform, EFLOW is updated through Microsoft Update and as such, “plays nice” with the rest of the Windows ecosystem and bringing the benefits of that ecosystem while allowing running targeted Linux containers to run with a limited amount of “ceremony”. What does AKS-EE bring to the table? Taking this information all into account, it’s reasonable to ask “What are the gaps? Why would it make sense to bring another product into the space?” The answer is two-fold: For some ISVs, particularly those coming from traditional development models (e.g. IoT developers, web service developers), the move to “cloud native” technologies such as containers is a substantial shift on its own, before worrying about deployment and management of an orchestrator. However, an orchestrator is still something those ISVs need to be able to get to scalability and observability as they work through their journey of “modernization” around containers. EFLOW works very, very well for its intended target, which is Azure IoT Edge. However, that is a specialized use case that does not generalize well to general application workloads. There is a hidden point here as well. Windows containers are a popular option in many organizations, but Linux containers are more common. At the same time, many enterprises (and thus, ISV customers) prefer the management, hardware support, and long-term OS support paths that Windows offers. Although through technologies such as Windows container hosting, Windows Subsystem for Linux, and Hyper-V allow for running Linux containers on a Windows host, they have different levels of complexity and management overhead, and in some situations, they are not practical. The end result of all of this is that there is a need in the marketplace for a low-impact, easily-deployed, easily-updated container hosting solution for Linux containers on Windows hosts that supports orchestration. This is especially true as we look at a solution like Azure IoT Operations, which is the next-generation, Kubernetes-centric Azure IoT platform, but is also true for customers looking to move from the simplistic orchestration offered by the EFLOW offering to the more sophisticated orchestration offered by Kubernetes. Besides bringing that to the table, AKS-EE builds on top of the standard k3s or k8s implementations, which means that popular Kubernetes management tools such as k9s can be used. It can be Azure Arc enabled, allowing centralized management of the solution in the Azure Portal, Azure PowerShell, or Azure CLI. Azure Arc supports this through an outgoing connection from the cluster to the Azure infrastructure, which means it’s possible to remotely manage the environment, including deploying workloads, collecting telemetry and metrics, and so on, without needing incoming access to the host or the cluster. And, because it’s possible to manage Windows IoT Enterprise using Azure Arc, even the host can be connected to remotely, with centrally managed telemetry and updates (including AKS-EE through Microsoft Update). This means that it’s possible to have an end-to-end centrally managed solution across a fleet of deployment locations, and it means an ISV can offer “management as a service”. An IoT ISV can even offer packaged hardware offerings with Windows IoT Enterprise, AKS-EE, and their workload, all centrally managed through Azure Arc, which is an extremely compelling and powerful concept! What if I am an IoT Edge user using EFLOW today? As you might be able to determine from the way I’ve presented AKS-EE, one possible way to think about AKS-EE is as a direct replacement for EFLOW in IoT Edge scenarios. If you're looking at moving from EFLOW to a Kubernetes-based solution, AKS-EE is a great option to explore! Conclusion Hopefully, this short post gives you a better understanding of the “why” of AKS-EE as an offering and how it relates to some other offerings in the Microsoft space. If you’re looking to evaluate AKS-EE, the next step would be to review the Quickstart guide to get started! Looking forward, if you are interested in production AKS-EE architecture, FastTrack ISV and FastTrack for Azure (Mainstream) have worked with multiple AKS-EE customers at this point, from single host deployments to multi-host scale-out deployments, including leveraging both the Linux and the Windows node capabilities of AKS-EE and leveraging the preview GPU support in the product. Take a look at those sites to learn more about how we can help you with derisking your AKS-EE deployment, or help you decide if AKS-EE is in fact the right tool for you!2.2KViews3likes0Comments
How to deploy a production-ready AKS cluster with Terraform verified module
Do you want to use Terraform to deploy an Azure Kubernetes Service (AKS) cluster that meets the production standards? We have a solution for you! We recently created a Terraform verified module for AKS that allows customers to deploy a production standard AKS cluster along with a Virtual Network and Azure container registry. It provisions an environment sufficient for most production deployments for AKS. The module is available on the Terraform registry and can be found here. You don't have to deal with the complexity of setting up an AKS cluster from the ground up. The module offers opinionated choices and reasonable default settings to deploy an AKS cluster ready for production. What are Azure Verified Modules? Azure Verified Modules enable and accelerate consistent solution development and delivery of cloud-native or migrated applications and their supporting infrastructure by codifying Microsoft guidance (WAF), with best practice configurations. For more information, please visit Azure Verified Modules. What does the module do? The module provisions the following resources: Azure Kubernetes Service (AKS) cluster for production workloads Virtual Network Azure Container Registry To view the full list of resources and their configurations, please visit the module page. How to use the module To use the module, you need to have Terraform installed on your machine. If you don't have Terraform installed, you can download it from their website here. Once you have Terraform installed, you can create a new Terraform configuration file and add the following code: module "avm-ptn-aks-production" { source = "Azure/avm-ptn-aks-production/azurerm" version = "0.1.0" location = <region> name = <cluster-name> resource_group_name = <rg-name> rbac_aad_admin_group_object_ids = ["11111111-2222-3333-4444-555555555555"] } To understand more about the variables and options available, have a look at the GitHub README. Running the module will provision the resources in your Azure subscription. You can view the resources in the Azure portal. How we built the module This module is very opinionated and forces the user into a design that is ready for production. From the experience of supporting users deploying AKS with Terraform with the module "Azure/aks/azurerm", we proposed a much simpler module to help customers deploy scalable and reliable clusters. Here some of the important opinionated choices we made. Create user zonal node pools in all Availability Zones When implementing availability zones with the cluster autoscaler, we recommend using a single node pool for each zone. The use of the "balance_similar_node_groups" parameter enables a balanced distribution of nodes across zones for your workloads during scale up operations. When this approach isn't implemented, scale down operations can disrupt the balance of nodes across zones. Leverage AKS automatic upgrades to keep the cluster secure and supported AKS has a fast release calendar. It is important to keep the cluster on a supported version, and to get security patches quickly. We enforce the "patch" automatic channel upgrade and the node image "node_os_channel_upgrade" to keep the cluster up to date. It is a user's responsibility to plan Kubernetes minor version upgrades. Use Azure CNI Overlay for optimal and simple IP address space management There are many options when it comes to AKS networking. In most customer scenarios, Azure CNI Overlay is the ideal solution. It is easy to plan IP address usage and it provides plenty of options to grow the cluster. Use Private Kubernetes API endpoint and Microsoft Entra authentication for enhanced security We use a layered security approach to protect your Kubernetes API from being hacked. We keep the Kubernetes API safe by putting it in a private network, and we allow Microsoft Entra identities to authenticate (optional: and we turn off local accounts). Bring your own network and force a User Assigned identity Customers scenarios often involve more than one single AKS cluster. The Azure VNet where these clusters exist should be part of a resource group controlled by the customer. Reusing the same User Assigned identity across a fleet of clusters, simplifies the role assignment operations. We wrote this module considering the integration in a real-world customer subscription, rather than considering the AKS cluster as a single isolated entity. Don't use any preview features To prevent breaking changes during production, we avoided the use of any preview features. Development of the module from a Terraform perspective The Azure Verified Module team worked to create effective pipelines for module development. For initial development you will need to fork an already prepared template and use that to develop your module. The template is available on GitHub here. This ensures that all module developers are following the same standards and best practices. It also makes it easier to review and approve modules for publication and make any updates to the templates. The pipeline has in built checks to ensure that the module is following the best practices and standards. It provides a Docker container with all the necessary tools to run the checks locally and as well on GitHub Actions. The pipeline runs the following checks: Checks linting standards that are set and best practices set by the AVM community. Validates that the Terraform code is valid using "terraform validate". Run checks to update the readme if any changes are detected so that you don’t have to manually update them. The e2e tests only need you to give examples of the module's functionality and set up a test environment using GitHub to start them. You can see the steps on how to do this here. For an end-to-end review of the contribution flow and how to setup your module for development using AVM scripts have a look at the Terraform Contribution Guide. Lessons learned The AVM team provides the initial module template and GitHub actions pipeline to develop a new module. Using those resources and attending their office hours meeting enabled us to move faster. When building a new Terraform module for Azure, following the procedure to implement an AVM module saves you a lot of time, ensuring quality and avoiding common mistakes. It adds a lot of value to join the AVM team community calls or look out for the changes mentioned in AVM GitHub repo, to get updates on the latest changes, and to ask any questions you may have. When writing the design document, before starting development, make sure you address all edge cases. For example, not all Azure regions have availability zones, and the module must work in all Azure regions. Dealing with the details before starting the implementation helps to find good solutions without having to make bigger changes in the implementation phase. How can you contribute back Have look at the AVM team blog for updates from the AVM team. Help build a module. Share your learnings with the AVM team. Join the regular external community calls. Conclusion If you face any challenges, please raise an issue on the repo - https://github.com/Azure/terraform-azurerm-avm-ptn-aks-production We would also like to thank Zijie He and Jingwei Wang for their huge contributions and collaboration whilst building this module.7.5KViews6likes0Comments
04 Azure Machine Learning and Custom Models
Azure Machine Learning and Custom Models Azure Machine Learning (AML) is a powerful platform that caters to the needs of customers who already have their own models or are utilizing popular open-source models like SKLearn, PyTorch or XGBoost, and more. In such cases, customers are primarily focused on efficiently managing and tracking their models, along with centralized compute capabilities to support their data science scenarios. AML offers a comprehensive suite of features to meet these requirements, including compute resources, MLFlow integration for model tracking, a Model Registry for organized management, a Feature Store for sharing feature engineering artifacts, and the ability to deploy custom models to online or batch endpoints. With AML, customers can streamline their model management processes and unleash the full potential of their machine learning workflows. Azure Machine Learning Compute Instance Azure Machine Learning offers a fully configured and managed development environment through compute instances. These instances not only serve as your dedicated development and testing environments but can also be utilized as training compute targets. With the ability to run multiple jobs in parallel and a convenient job queue, compute instances provide the flexibility and power you need to streamline your machine learning workflows. It's important to note that compute instances are designed for individual use and cannot be shared with other users in your workspace. Once created, a compute instance becomes a one-time process for your workspace, allowing you to reuse it as a development workstation or as a compute target for training. Furthermore, you have the option to attach multiple compute instances to your workspace, providing even more flexibility in your development setup. When it comes to resource allocation, the dedicated cores per region per VM family quota and total regional quota apply to compute instance creation. It's worth mentioning that stopping a compute instance does not release quota to ensure you can easily restart it when needed. Additionally, please note that it's not possible to change the virtual machine size of a compute instance once it has been created. Compute instances offer a convenient and powerful development environment in the cloud. Not only can you leverage compute instances for development, testing, and training, but you also have access to a range of popular tools to suit your preferences. From the compute instance, you can seamlessly access JupyterLab, Jupyter Notebook, and even VS Code, providing you with flexibility and choice in your coding experience. Whether you prefer the interactive and collaborative nature of Jupyter environments or the robust features of VS Code, Azure Machine Learning compute instances empower you to work efficiently and optimize your productivity. Unlock the full potential of your machine learning workflows with Azure Machine Learning compute instances and your preferred coding environment. Manage a compute instance - Azure Machine Learning | Microsoft Learn Run Jupyter notebooks in your workspace - Azure Machine Learning | Microsoft Learn Azure Machine Learning Compute Cluster In addition to compute instances, Azure Machine Learning offers compute clusters, which provide a managed-compute infrastructure for creating single or multi-node compute environments. Unlike compute instances, compute clusters can be shared with other users in your workspace, promoting collaboration and resource optimization. The compute cluster dynamically scales up as jobs are submitted, ensuring efficient resource allocation. Moreover, compute clusters can be deployed within an Azure Virtual Network, offering enhanced security and control over your workloads. With the option for no public IP deployment and support for containerized environments, compute clusters simplify the execution of jobs while packaging your model dependencies within a Docker container. By leveraging Azure Machine Learning compute clusters, you can effortlessly scale your workloads, securely execute jobs, and streamline your machine learning workflows. Create compute clusters - Azure Machine Learning | Microsoft Learn Azure Machine Learning Serverless Compute Azure Machine Learning introduces a new compute target type, serverless compute, which revolutionizes the training process. With serverless compute, machine learning professionals can effortlessly submit their training jobs and let Azure Machine Learning handle the rest. As a fully managed and on-demand compute option, serverless compute takes care of creating, scaling, and managing the compute infrastructure, freeing you from the complexities of compute setup. By leveraging serverless compute, machine learning professionals can focus on their core expertise of building machine learning models, without the need to worry about compute infrastructure. You can easily specify the resources required for each job, while Azure Machine Learning takes care of managing the compute infrastructure and provides managed network isolation, reducing your workload. Enterprises can optimize costs by specifying the optimal resources for each job, while IT admins can maintain control by setting cores quota at the subscription and workspace level, and applying Azure policies. Serverless compute is not limited to model training. It can be used for various tasks, including fine-tuning models in the model catalog, running jobs from Azure Machine Learning studio, SDK, and CLI, building environment images, and enabling responsible AI dashboard scenarios. Serverless jobs consume the same quota as Azure Machine Learning compute, providing flexibility in resource allocation. You can choose between standard (dedicated) or spot (low priority) VMs, and serverless jobs support both managed identity and user identity. The billing model for serverless compute aligns with Azure Machine Learning compute. Model training on serverless compute - Azure Machine Learning | Microsoft Learn Azure Machine Learning Custom Model Training Azure Machine Learning empowers you to train custom models with ease, giving you the flexibility to choose between running them on your personal compute or utilizing an Azure Machine Learning compute instance or compute cluster. The process remains the same as if you were working in an isolated environment, but with Azure Machine Learning, you have the added advantage of tracking with MLFlow, running hyperparameter tuning, training, and testing on scalable AML compute. To guide you through the process of training SciKitLearn, TensorFlow, Keras, and PyTorch models, we have curated a collection of helpful resources. These links provide step-by-step instructions and best practices to ensure your custom model training journey is smooth and successful. Whether you are a seasoned data scientist or a machine learning enthusiast, Azure Machine Learning simplifies the process, allowing you to focus on refining your models and achieving optimal performance. Train scikit-learn machine learning models (v2) - Azure Machine Learning | Microsoft Learn Train and deploy a TensorFlow model (SDK v2) - Azure Machine Learning | Microsoft Learn Train deep learning Keras models (SDK v2) - Azure Machine Learning | Microsoft Learn Train deep learning PyTorch models (SDK v2) - Azure Machine Learning | Microsoft Learn Hyperparameter tuning a model (v2) - Azure Machine Learning | Microsoft Learn Guidelines for deploying MLflow models - Azure Machine Learning | Microsoft Learn Azure Machine Learning Model Registry After you model is trained Azure Machine Learning seamlessly integrates with MLflow, providing users with a powerful tool for model management. By leveraging MLflow, you can easily support the entire model lifecycle, making it a convenient choice for those already familiar with the MLflow client. Manage models registries in Azure Machine Learning with MLflow - Azure Machine Learning | Microsoft Learn Deploy a Custom Model With Azure Machine Learning, you can seamlessly deploy your MLflow model to an online endpoint, enabling real-time inference. The beauty of this deployment approach is its no-code characteristic, eliminating the need to specify a scoring script or environment. When deploying your MLflow model to an online endpoint, Azure Machine Learning dynamically installs the necessary Python packages from the conda.yaml file during container runtime. Additionally, Azure Machine Learning provides a curated environment and MLflow base image, which includes essential components such as azureml-inference-server-http and mlflow-skinny. To facilitate inference, a scoring script is also included. Deploy MLflow models to real-time endpoints - Azure Machine Learning | Microsoft Learn Deploy MLflow models to Online Endpoints Predictive Maintenance with MLFlow(XGBosot) Predictive Maintenance with MLFlow(PyTorch) Principal author: Shep Sheppard | Senior Customer Engineer, FastTrack for ISV and Startups Other contributors: Yoav Dobrin Principal Customer Engineer, FastTrack for ISV and Startups Jones Jebaraj | Senior Customer Engineer, FastTrack for ISV and Startups Olga Molocenco-Ciureanu | Customer Engineer, FastTrack for ISV and Startups2.8KViews1like0Comments03 Azure Machine Learning and OSS Model Fine tuning
Hyperparameter optimization, also known as hyperparameter tuning, is a fundamental challenge in the field of machine learning. It involves the selection of an optimal set of hyperparameters for a given learning algorithm. Hyperparameters are parameters that dictate the behavior of the learning process, while other parameters, such as node weights, are learned from the data. A machine learning model can often require different constraints, weights, or learning rates to effectively capture diverse data patterns. These adjustable measures, known as hyperparameters, must be carefully tuned to ensure that the model can successfully solve the machine learning problem at hand. Hyperparameter optimization seeks to find a combination of hyperparameters that yields an optimal model, minimizing a predefined loss function on independent data. To achieve this, an objective function is utilized, which takes a set of hyperparameters as input and returns the corresponding loss. The goal is to find the set of hyperparameters that maximizes the generalization performance of the model. Cross-validation is commonly employed to estimate this performance and aid in the selection of optimal hyperparameter values. By maximizing the generalization performance, hyperparameter optimization plays a crucial role in enhancing the overall effectiveness and accuracy of machine learning models. In this post we will cover the open-source tools and Azure Machine learning tools around hyperparameter tuning. There are three main techniques used for hyperparameter, Grid Search, Random Search, Bayesian Search and more commonly used for Neural Networks, gradient based optimization. Grid Search In the realm of hyperparameter optimization, the conventional approach has been to employ grid search or parameter sweep. This technique involves exhaustively exploring a predetermined subset of hyperparameters for a learning algorithm. To guide the grid search algorithm, a performance metric is selected, often determined through cross-validation on the training set or evaluation on a dedicated validation set. Grid search operates by systematically testing different combinations of hyperparameters within the defined subset. This method, however, can become computationally expensive, especially when dealing with a large number of hyperparameters or a wide range of possible values. Despite its limitations, grid search remains widely used due to its simplicity and interpretability. During the grid search process, various performance metrics are measured for each combination of hyperparameters. These metrics aid in assessing the model's effectiveness and allow for the identification of hyperparameter configurations that lead to optimal performance. By evaluating the model's performance on either the training set or a separate validation set, grid search facilitates the selection of the most appropriate hyperparameter values. While grid search has proven to be a valuable technique, alternative methods have emerged to address its shortcomings, such as the computationally efficient and automated approaches of Bayesian optimization and random search. These advanced methods provide more sophisticated ways to explore the hyperparameter space and discover optimal configurations, revolutionizing the field of hyperparameter optimization. sklearn.model_selection.GridSearchCV — scikit-learn 1.4.2 documentation Random Search Random Search offers an alternative to the exhaustive enumeration of all possible combinations of hyperparameters by randomly selecting them. This approach can be applied not only to discrete settings but also to continuous and mixed spaces, providing greater flexibility. Random Search has been found to outperform Grid Search, particularly in scenarios where only a small number of hyperparameters significantly impact the final performance of the machine learning algorithm. In cases where the optimization problem exhibits a low intrinsic dimensionality, Random Search proves to be particularly effective. This refers to situations where the hyperparameters' interdependencies are limited, allowing for a more efficient exploration of the hyperparameter space. Moreover, Random Search lends itself to embarrassingly parallel implementation, meaning that it can be easily distributed across multiple computing resources for faster processing. One of the advantages of Random Search is its ability to incorporate prior knowledge by specifying the distribution from which to sample hyperparameters. This enables domain experts to guide the search process based on their understanding of the problem at hand. Despite its simplicity, Random Search remains a significant baseline against which new hyperparameter optimization methods can be compared. While Random Search has been instrumental in advancing hyperparameter optimization, it is important to note that other sophisticated techniques, such as Bayesian optimization, have emerged as promising alternatives. These methods leverage probabilistic models to intelligently explore the hyperparameter space and efficiently find optimal configurations. The continuous development of new approaches continues to enhance the field of hyperparameter optimization, offering exciting opportunities for improving the performance and efficiency of machine learning models. sklearn.model_selection.RandomizedSearchCV — scikit-learn 1.4.2 documentation Bayesian Search Bayesian optimization is a powerful method for globally optimizing noisy black-box functions. When applied to hyperparameter optimization, Bayesian optimization constructs a probabilistic model that captures the relationship between hyperparameter values, and the objective function evaluated on a validation set. Through an iterative process, Bayesian optimization intelligently selects hyperparameter configurations based on the current model, evaluates their performance, and updates the model to gather valuable information about the function and, more importantly, the location of the optimum. The key idea behind Bayesian optimization is to strike a balance between exploration and exploitation. Exploration involves selecting hyperparameters that yield uncertain outcomes, while exploitation focuses on hyperparameters that are expected to be close to the optimum. By carefully navigating this trade-off, Bayesian optimization effectively explores the hyperparameter space, gradually narrowing down the search to regions with higher potential for optimal performance. In practice, Bayesian optimization has demonstrated superior performance compared to traditional methods such as grid search and random search. This advantage stems from its ability to reason about the quality of experiments before actually running them. By leveraging the probabilistic model, Bayesian optimization can make informed decisions about which hyperparameter configurations are most likely to lead to better results, thereby reducing the number of evaluations required. The efficiency and effectiveness of Bayesian optimization have been widely observed in various domains. Researchers and practitioners have embraced this approach due to its ability to achieve better outcomes with fewer evaluations, making it an invaluable tool for hyperparameter optimization. skopt.BayesSearchCV — scikit-optimize 0.8.1 documentation Hyperparameter optimization - Wikipedia Azure Having familiarized ourselves with the foundational aspects of hyperparameter tuning, a natural inquiry arises: Does Azure Machine Learning (AML) provide support for hyperparameter tuning? The answer to this question is undoubtedly affirmative, as AML offers comprehensive hyperparameter tuning capabilities. Detailed documentation on this topic can be accessed in the link below, providing users with valuable guidance and information. Hyperparameter tuning a model (v2) - Azure Machine Learning | Microsoft Learn AML, through its Python SDK V2, facilitates hyperparameter tuning by offering three distinct algorithms: Grid, Random, and Bayesian. These algorithms empower users to effectively explore the hyperparameter search space and optimize their machine learning models. To leverage the hyperparameter tuning capabilities in AML, the following essential steps can be followed: Define the parameter search space for your trial: Specify the range and feasible values for each hyperparameter that will undergo tuning. Specify the sampling algorithm for your sweep job: Select the desired algorithm that will be employed to sample hyperparameter configurations during the tuning process. Specify the objective to optimize: Define the performance metric or objective function that will be utilized to evaluate and compare the various hyperparameter configurations. Specify an early termination policy for low-performing jobs: Establish criteria that will automatically terminate underperforming jobs during the hyperparameter tuning process. Define limits for the sweep job: Set the maximum number of iterations or allocate resources according to your requirements for the hyperparameter tuning experiment. Launch an experiment with the defined configuration: Initiate the hyperparameter tuning experiment by utilizing the specified settings and parameters. Visualize the training jobs: Monitor and analyze the progress and outcomes of the hyperparameter tuning experiment, including the performance of individual training jobs. Select the best configuration for your model: Upon completion of the hyperparameter tuning experiment, identify the hyperparameter configuration that yielded the most favorable performance, and incorporate it into your machine learning model. Principal author: Shep Sheppard | Senior Customer Engineer, FastTrack for ISV and Startups Other contributors: Yoav Dobrin Principal Customer Engineer, FastTrack for ISV and Startups Jones Jebaraj | Senior Customer Engineer, FastTrack for ISV and Startups Olga Molocenco-Ciureanu | Customer Engineer, FastTrack for ISV and Startups2.1KViews2likes0Comments