azure ai foundry
79 TopicsEnterprise-ready Claude Desktop with Entra ID, APIM, and Microsoft Foundry (No Backend Required)
How I put corporate sign-in in front of Claude Desktop without writing a single line of backend code. TL;DR — In this post, I show how to securely enable Claude Desktop in enterprise environments using Microsoft Entra ID, Azure API Management, and Microsoft Foundry — without deploying a custom backend. This approach removes API keys from endpoints, enforces per-user identity, and aligns fully with Zero Trust principles. Who this is for: Enterprise architects evaluating secure AI client patterns Developers enabling Claude Desktop in regulated environments Platform teams standardizing identity and governance for LLM access Why this post exists: Microsoft Learn's Configure Claude Desktop with Foundry Models only shows the API-key path — a shared key pasted into every user's Claude Desktop config. That's fine for a quick demo, but it's a non-starter for most enterprises (no per-user identity, no MFA / Conditional Access, hard to revoke, hard to audit). This post fills that gap: same Foundry backend, but with Microsoft Entra ID SSO in front via Azure API Management, so each user signs in with their corporate identity and zero secrets land on the laptop. The problem For many teams experimenting with Claude Desktop, the blocker isn't capability — it's enterprise readiness. How do you enforce identity, eliminate shared secrets, and apply governance without standing up a custom backend service to sit in front of the model? If your team wants to use Claude Desktop with your own Anthropic deployment running on Microsoft Foundry, but with a few non-negotiable requirements: No shared API keys floating around on developer laptops. Per-user identity — every request must be attributable to a real person. MFA and Conditional Access must apply, the same way they do for every other internal app. Central rate-limiting and logging — a centralized control plane for governance. Claude Desktop 1.5+ supports a "Gateway SSO" mode where it can sign each user in with OpenID Connect and forward their token to a custom LLM gateway. Azure API Management (APIM) is a perfect fit for that gateway role: it validates the user's Entra ID token, then re-authenticates itself to Foundry behind the scenes. APIM acts as a centralized policy enforcement layer, enabling identity validation, traffic governance, and secure re-authentication to backend AI services without custom code. The end-to-end flow looks like this: %%{init: {'flowchart': {'nodeSpacing': 60, 'rankSpacing': 80, 'useMaxWidth': true}, 'themeVariables': {'fontSize':'16px'}} }%% flowchart TB User([Corporate user]) Claude["Claude Desktop"] Entra["Microsoft Entra ID<br/>(OIDC + MFA + Conditional Access)"] APIM["Azure API Management<br/>validate-jwt → rewrite headers<br/>(policy gateway)"] Foundry["Microsoft Foundry<br/>Claude deployment"] User -- "1. Sign in (browser PKCE)" --> Entra Entra -- "2. ID token" --> Claude Claude -- "3. POST /v1/messages<br/>Authorization: Bearer ID token" --> APIM APIM -- "4. OIDC discovery / JWKS" --> Entra APIM -- "5. x-api-key (or Managed Identity)" --> Foundry Foundry -- "6. Response" --> APIM APIM -- "7. Response" --> Claude classDef azure fill:#0a4d8c,stroke:#0a3a6b,color:#ffffff; classDef client fill:#f3f3f3,stroke:#888,color:#222; class Entra,APIM,Foundry azure; class Claude,User client; Or in plain text: Claude Desktop │ Authorization: Bearer <Entra ID token from the user's browser sign-in> ▼ Azure API Management (<your-apim>) │ ① validate-jwt → verifies user's Entra ID token │ ② re-auths to Foundry with an API key from a Named value │ Authorization stripped, x-api-key injected ▼ Microsoft Foundry /anthropic/v1/messages │ runs Claude (<your-deployment>) ▼ Response back to the user There are no API keys on user devices. Foundry's key lives only inside APIM. And every request carries the user's oid claim, so I can build dashboards and per-user quotas later. What you need before starting An Azure subscription with a Microsoft Foundry (AI Services) account and a Claude deployment. (Throughout this post I'll just call it Foundry.) An API Management instance, any tier. Permission to register applications in Entra ID for your tenant. Claude Desktop 1.5.0 or later. Azure CLI installed locally. Throughout this post I'll use placeholders for resource names: <apim-name> — your API Management service name <resource-group> — the resource group that holds it <foundry-account> — your Foundry account name <deployment-name> — the name of the Claude model deployment on Foundry Step 1 — Register an Entra ID app for Claude Desktop This is the OIDC client Claude Desktop signs users into. Claude Desktop requires a single-tenant, public PKCE client (no client secret) with a loopback redirect URI, configured under the Mobile and desktop applications platform in Entra ID — the only platform that allows any loopback port. I scripted it so the setup is one command and idempotent: # scripts/register-claude-entra-app.ps1 [CmdletBinding()] param( [string] $TenantId = '<your-tenant-id>', [string] $SubscriptionId = '<your-subscription-id>', [string] $ResourceGroup = '<resource-group>', [string] $ApimName = '<apim-name>', [string] $AppDisplayName = 'Claude Cowork gateway', [string] $RedirectUri = 'http://127.0.0.1/callback' ) az account set --subscription $SubscriptionId | Out-Null # 1. Create (or reuse) the app registration $appId = az ad app list --display-name $AppDisplayName --query "[0].appId" -o tsv if (-not $appId) { $appId = az ad app create --display-name $AppDisplayName ` --sign-in-audience AzureADMyOrg --query appId -o tsv } # 2. Configure as public PKCE client with the Mobile/Desktop redirect URI $objectId = az ad app show --id $appId --query id -o tsv $patch = @{ publicClient = @{ redirectUris = @($RedirectUri) } isFallbackPublicClient = $true } | ConvertTo-Json -Depth 5 -Compress az rest --method PATCH ` --uri "https://graph.microsoft.com/v1.0/applications/$objectId" ` --headers "Content-Type=application/json" --body $patch | Out-Null # 3. Ensure a service principal exists $sp = az ad sp list --filter "appId eq '$appId'" --query "[0].id" -o tsv if (-not $sp) { az ad sp create --id $appId | Out-Null } # 4. Push two Named values into APIM for the validate-jwt policy az apim nv create -g $ResourceGroup --service-name $ApimName ` --named-value-id entra-tenant-id --display-name entra-tenant-id ` --value $TenantId --secret false az apim nv create -g $ResourceGroup --service-name $ApimName ` --named-value-id entra-client-id --display-name entra-client-id ` --value $appId --secret false "Client ID: $appId" Run it once. The output prints the client ID you'll need in Claude Desktop later, and it leaves two Named values in APIM ( entra-tenant-id , entra-client-id ) that the gateway policy will reference. ⚠️ Common pitfall: if the redirect URI ends up under the Web platform instead of Mobile and desktop applications, Entra will demand a client secret on token exchange — Claude won't send one and you'll get Token exchange failed (HTTP 401) . The app type can't be changed after creation, so create a new app if that happens. Step 2 — Create the API in APIM In the portal under APIM → APIs → + Add API → HTTP: Field Value Display name Anthropic API Name anthropicapi Web service URL https://<foundry-account>.services.ai.azure.com/anthropic API URL suffix claude Subscription required Off (Entra ID is our only credential) Add two operations under it: Method URL Display name POST /v1/messages Create message GET /v1/models List models The /v1/models operation isn't strictly needed (Foundry's Anthropic surface doesn't implement it), but having it registered means you can decide later whether to stub it out or proxy it. Step 3 — Add an API key for Foundry as a Named value APIM → Named values → + Add: Name: foundry-key Type: Secret Value: paste a key from the Foundry account's Keys and Endpoint blade. This is the only place the key ever lives. Clients never see it. Alternative — keyless with Entra ID (managed identity): If you prefer not to manage a Foundry key at all, enable the APIM instance's system-assigned managed identity (APIM → Identity → System assigned → On), then grant that identity the Foundry User role on the Foundry account (role ID 53ca6127-db72-4b80-b1b0-d745d6d5456d — previously named Azure AI User; Microsoft renamed it but the ID and permissions are unchanged). In Step 4, replace the set-header that injects x-api-key with: <authentication-managed-identity resource="https://cognitiveservices.azure.com" output-token-variable-name="foundry-token" /> <set-header name="Authorization" exists-action="override"> <value>@("Bearer " + (string)context.Variables["foundry-token"])</value> </set-header> Then you can skip the foundry-key Named value entirely. Don't use the legacy Cognitive Services User role — per the Foundry RBAC doc, roles starting with Cognitive Services don't apply to Foundry scenarios. Step 4 — Write the gateway policy This is the core enforcement layer in the architecture. Open APIs → anthropicapi → All operations → Inbound processing → </> and paste: <policies> <inbound> <base /> <!-- USER → APIM: verify Entra ID token from Claude Desktop --> <validate-jwt header-name="Authorization" failed-validation-httpcode="401" failed-validation-error-message="Unauthorized" require-scheme="Bearer"> <openid-config url="https://login.microsoftonline.com/{{entra-tenant-id}}/v2.0/.well-known/openid-configuration" /> <audiences> <audience>{{entra-client-id}}</audience> </audiences> <issuers> <issuer>https://login.microsoftonline.com/{{entra-tenant-id}}/v2.0</issuer> </issuers> </validate-jwt> <!-- APIM → Foundry --> <set-backend-service base-url="https://<foundry-account>.services.ai.azure.com/anthropic" /> <set-header name="x-api-key" exists-action="override"> <value>{{foundry-key}}</value> </set-header> <set-query-parameter name="api-version" exists-action="skip"> <value>2024-05-01-preview</value> </set-query-parameter> </inbound> <backend><base /></backend> <outbound><base /></outbound> <on-error><base /></on-error> </policies> Two things to notice: validate-jwt uses the OIDC discovery URL — JWKS keys are fetched and cached automatically. It rejects any token whose aud claim is not the client ID of our Entra app, which is exactly what we want. The Authorization header from the user is not forwarded — once validate-jwt succeeds, the request is re-authenticated to Foundry with x-api-key . No user token ever leaves APIM. APIM becomes the security boundary — user identity is validated at the edge, and downstream services never see or rely on user tokens. Step 5 — Configure Claude Desktop Open Claude Desktop → Configure third-party inference and fill it in like this: Field Value Connection Gateway Credential kind Interactive sign-in Gateway base URL https://<apim-name>.azure-api.net/claude Client ID (the appId your script printed) Issuer URL https://login.microsoftonline.com/<tenant-id>/v2.0 Authorization URL / Token URL leave empty Bearer token ID token (default) Scopes leave default ( openid profile email offline_access ) Redirect port leave empty (ephemeral) Model discovery Off Model list → Model ID <deployment-name> (your Foundry deployment name) ℹ️ Why Model discovery is Off — Claude Desktop's discovery uses GET /v1/models , and the Foundry /anthropic surface doesn't implement that endpoint, so it 404s. Listing the model manually skips the call entirely. If you want to leave Model discovery On, stub /v1/models in APIM. Add a GET /v1/models operation to your API and give it this inbound policy that returns an Anthropic-shaped response without ever hitting the backend: <policies> <inbound> <base /> <return-response> <set-status code="200" reason="OK" /> <set-header name="Content-Type" exists-action="override"> <value>application/json</value> </set-header> <set-body>@{ return new JObject( new JProperty("data", new JArray( new JObject( new JProperty("id", "<deployment-name>"), new JProperty("type", "model"), new JProperty("display_name", "Claude on Foundry"), new JProperty("created_at", "2026-01-01T00:00:00Z") ) )), new JProperty("has_more", false), new JProperty("first_id", "<deployment-name>"), new JProperty("last_id", "<deployment-name>") ).ToString(); }</set-body> </return-response> </inbound> <backend><base /></backend> <outbound><base /></outbound> <on-error><base /></on-error> </policies> Add one entry per deployment you want to expose. The benefit of stubbing rather than turning discovery off is that adding new models becomes a policy edit — no need to re-export and redeploy Claude Desktop config to every user. Click Apply Changes then Sign in to your organization. Your browser opens to the normal Entra sign-in page; once approved you're returned to the app, and a quick connection test runs. The success indicator is a small green banner: ✅ Inference — 1-token completion in 1449 ms · via identity provider For broader rollout, hit the Export button at the top of the configuration window — it produces a .mobileconfig (macOS) or .reg (Windows) you can push via Intune / Jamf to every user's machine. Step 6 — Verify both hops In APIM → APIs → anthropicapi → Test → POST /v1/messages I sent: Headers: anthropic-version: 2023-06-01 Body: { "model": "<deployment-name>", "max_tokens": 64, "messages": [{"role":"user","content":"hi"}] } Click Send → Trace, and look at two places: Inbound → validate-jwt: should say succeeded and show the decoded claims (your oid , email , etc.). Backend → Request: outbound URL is https://<foundry-account>.services.ai.azure.com/anthropic/v1/messages?api-version=2024-05-01-preview , with x-api-key: **** present and Authorization absent. Backend → Response: 200, with a Claude message JSON body. That confirms both halves of the chain. Bumps I hit along the way A few common issues encountered during setup — sharing so you can skip them: Symptom Cause Fix Claude shows "Your provider's model list hasn't loaded yet" and /v1/models returns 404 Foundry's Anthropic surface doesn't implement that endpoint Turn Model discovery OFF in Claude Desktop and add the deployment name manually Claude shows "Authentication failed" even though sign-in worked The APIM API still had Subscription required = ON, blocking the call before validate-jwt ran with 401: Access denied due to missing subscription key Uncheck Subscription required on the API Portal Test panel shows "Cannot read properties of undefined (reading 'statusCode')" The test console doesn't attach an Entra token, so validate-jwt 401s and the panel's JavaScript crashes Comment out <validate-jwt> temporarily for portal testing, or test via curl with a real token OIDC discovery failed (HTTP 404) in Claude Desktop Pasted the metadata URL into Issuer URL Issuer must end at /v2.0 , not at /.well-known/openid-configuration Token exchange failed (HTTP 401) App registered under Web platform instead of Mobile and desktop applications Create a new app with the right platform — it can't be changed Where this leaves us This pattern is small in moving parts but has outsized architectural impact: Zero secrets on endpoints. Eliminates API-key sprawl across laptops, MDM profiles, and shared vaults. The Foundry key lives only inside APIM — or disappears entirely when you switch APIM to managed identity. Identity, not credentials. Every Claude Desktop user authenticates against Entra ID in their browser, the same as Office or Teams. MFA, Conditional Access, and Entra ID Protection apply automatically — no parallel auth story to maintain. Per-user observability built in. APIM logs carry the user's Entra oid , email , and group claims. That unlocks per-user dashboards, cost allocation, and abuse detection without any client-side instrumentation. Aligned with Zero Trust. Strong identity at the edge, no implicit trust between hops, single policy chokepoint for inspection and rate-limiting, and full revocability through a single Enterprise Application. Optional but trivial keyless path. Flip APIM to system-assigned managed identity + <authentication-managed-identity resource="https://cognitiveservices.azure.com" /> and one Foundry User role assignment (role ID 53ca6127-db72-4b80-b1b0-d745d6d5456d , formerly Azure AI User) on the Foundry account. See the Foundry RBAC doc — don't use any Cognitive Services * roles for Foundry. What I'd add next llm-token-limit and llm-emit-token-metric policies for per-user quotas and cost visibility. App Insights wiring on the API, with a workbook that pivots on the oid claim. Assignment required = Yes on the Entra Enterprise Application + a security group, so only approved users can sign in. Intune deployment of the exported .reg / .mobileconfig so the gateway URL and client ID land on devices automatically. But that's all incremental. The hard part — getting Claude Desktop, Entra ID, APIM, and Foundry to agree on who's allowed to talk to whom — is done. Total elapsed: about an afternoon, most of it spent learning where each portal hides its switches. Useful links Gateway single sign-on with your identity provider — Claude.ai Documentation Configure Claude Desktop with Foundry Models — Microsoft Learn Role-based access control for Microsoft Foundry — Microsoft Learn1.7KViews0likes3CommentsAgents That Test Agents: A Cloud-Native Skill-Eval Harness on Foundry Hosted Agents
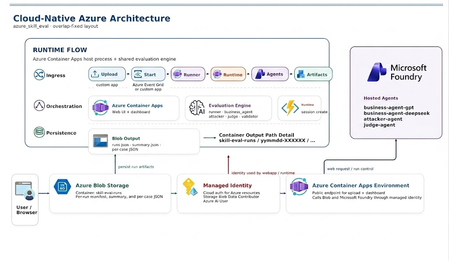
Skills are an agent's must-have. So test them. A skill is the lightest way to give an agent durable, reusable behavior: a SKILL.md file you author once, store centrally in Foundry's versioned Skills API, and inject into a Hosted Agent's context — no code change, no redeploy. That's why skills have quietly become standard equipment for production agents. But the moment a skill carries real behavior, a hard question follows: how do you know it still works? When you edit a skill you can't feel whether you improved it or just changed it. It might stop triggering, skip a required section, or quietly produce a worse result on one model than another. The cure is the same discipline we use for any prompt — evaluate it: run the agent, capture what happened, and grade it against a small set of checks. This is exactly what azure_skill_eval does for one concrete skill: edu-video-script, which writes an education short-video script for a given knowledge point (the sample's smoke test asks it to script the "P vs NP problem"). And it does the whole thing cloud-native, on Foundry Hosted Agents. The scenario: one skill, two models, four hosted agents The skill under test is edu-video-script. The clever part of the harness is that it doesn't just check one run — it puts the skill on a stand and stresses it from three sides, using four Foundry Hosted Agents wired together by the Agent Framework FoundryAgent: Hosted agent Role skill-eval-business-agent-gpt System under test (SUT), running edu-video-script on gpt-5.5 skill-eval-business-agent-deepseek The same skill, running on DeepSeek-V4-Pro skill-eval-attacker-agent Multi-turn adversarial prompt generator skill-eval-judge-agent LLM-as-judge that returns a rubric score as JSON Two business agents run the same skill on different models, so every case becomes an apples-to-apples comparison: which model executes this skill better? The attacker and judge are the graders. What we measure (define "done" first) Good evals start from a checkable definition of done — outcome, process, style, efficiency. For an education-video script that means: Did it produce a valid script (outcome)? Did it actually follow the edu-video-script template (process/style)? Does it hold up when a user pushes on it across turns (robustness)? The harness answers these with three grading layers. 1. Deterministic checks first (validator.py) The cheapest, most explainable signal: does the output match the script template the skill is supposed to produce? validator.py runs fixed, deterministic template checks — no model needed. These catch the obvious regressions instantly and never cost a token. 2. The LLM judge (skill-eval-judge-agent) Template checks answer "did it do the basics?" but not "is the script any good?" — pacing, clarity, whether it teaches the concept. For that, a dedicated judge hosted agent grades the result and returns structured JSON so scores compare cleanly across runs and models: { "overall_pass": true, "score": 100, "checks": [] } Structured output is the point: stable fields (overall_pass, score, checks) diff cleanly between GPT and DeepSeek, and between today's skill version and last week's. 3. The multi-turn attacker (test_agent.py + skill-eval-attacker-agent) A skill that looks great on a clean prompt can still fall apart when a user pushes on it. The attacker agent generates adversarial prompts for a knowledge point using a chosen strategy — for example extreme length — and keeps the pressure on across multiple turns (max_turns, default 3). This is where you find out whether edu-video-script stays on-template under stress, not just on the happy path. # the attacker takes a knowledge point + a strategy, emits one user prompt azd ai agent invoke skill-eval-attacker-agent \ "Topic: P vs. NP problem Recommended attack strategy: Extreme length Please output the unique user prompt text." The eval loop, end to end runner.py is a ghcsdk-style pipeline that runs cases × models, with each side toggleable: pick all models / GPT only / DeepSeek only, run a single case (e.g. edge-03), and switch adversarial mode, single-turn vs multi-turn, and judge grading on or off. The same switches are query parameters on POST /api/run: model, only_case, use_attack, single_turn, use_judge, max_turns. The test set lives in shared/test_cases.py — 10 built-in edge cases (edge-01 … edge-10) exported to evals/evals.json. You don't need a giant benchmark; a small, sharp set catches regressions, and you grow it whenever a real failure shows up: python -m evals.export_evals # regenerate evals/evals.json from shared/test_cases.py Every SUT call goes through runtime.py, which follows the official Agent Framework hosted-agent sample: it opens a fresh hosted session per turn, invokes via Responses, and tears the session down afterward. # shared/runtime.py — the documented Foundry hosted-agent pattern project = AIProjectClient(endpoint=FOUNDRY_PROJECT_ENDPOINT, credential=cred, allow_preview=True) agent = FoundryAgent(project_client=project, name=agent_name, # e.g. skill-eval-business-agent-gpt allow_preview=True) session = project.beta.agents.create_session(agent_name=agent_name) # ... send the (possibly adversarial) prompt, collect the Responses output ... So a single case flows: runner → business agent (skill runs) → validator → judge, optionally with the attacker driving multiple turns first. Cloud-native by design — and why that matters for eval This is the part that makes the harness production-grade rather than a laptop script. The hard parts of an eval harness — provisioning agents, recording every run, scaling trials, governing access — are handled by Azure, not by you. Foundry Hosted Agents are the runtime. The SUT, attacker, and judge all run as managed hosted agents in your Foundry project. You bring the skill and the cases; Foundry hosts the agents, models, and sessions. The business agents deploy with host: azure.ai.agent and docker.remoteBuild: true, so azd deploy builds the containers in Azure Container Registry — local Docker doesn't even need to be running. The UI is serverless. A FastAPI app on Azure Container Apps lets you upload evals.json, watch progress live, and browse the dashboard — scale-to-zero when no one's running evals. Every run is durable. Results land in Azure Blob Storage (skill-eval-runs), one yymmdd-XXXXXX/ folder per run, with a newest-first runs.json index. Nothing lives only in a terminal scrollback. Access is identity-based. In the cloud, a user-assigned Managed Identity carries exactly two roles — Storage Blob Data Contributor + Azure AI User; locally it's AzureCliCredential. No keys in env files. It's reproducible infra. azd up runs infra/main.bicep to stand up Storage, the container, Log Analytics, the Container Apps environment, the identity, and the role assignments in one shot. The payoff: the scores you read came from the same hosted runtime you actually ship to — not a local approximation — and the run that produced them is sitting in Blob, comparable against every run before it. Run it Local (no deploy): conda activate agentdev cd Skill_eval/azure_skill_eval pip install -r requirements.txt cp .env.example .env # FOUNDRY_PROJECT_ENDPOINT + AZURE_STORAGE_* uvicorn webapp.app:app --reload --port 8000 Open http://localhost:8000, upload evals/evals.json, pick your models and modes, and click Run. Cloud (azd): azd auth login azd env new skill-eval-dev azd env set FOUNDRY_PROJECT_ENDPOINT https://<project>.services.ai.azure.com/api/projects/<project> azd env set MODEL_GPT gpt-5.5 azd env set MODEL_DEEPSEEK DeepSeek-V4-Pro azd up Provision the skill once, deploy the four hosted agents, then smoke-test them: python -m hosted_agent.provision_skills # upload edu-video-script to Foundry Skills azd deploy skill-eval-business-agent-gpt azd deploy skill-eval-business-agent-deepseek azd deploy skill-eval-attacker-agent azd deploy skill-eval-judge-agent azd ai agent invoke skill-eval-business-agent-gpt "Here is a script for an educational short video on the P vs. NP problem." Read the results Each run is self-contained on Blob: summary.json gives you the headline — pass rate and judge averages — and the per-{case}__{model}.json files let you open any single result and see exactly what the skill produced and why it passed or failed. The dashboard streams these straight from Blob via /api/runs/{run_id}/files/{filename}. Because GPT and DeepSeek ran the same cases, the comparison is right there in one folder. Takeaways A skill you can't evaluate is a skill you can't trust. edu-video-script is treated like code — versioned in Foundry, run, and graded. Stack your graders cheap-to-expensive. Deterministic template checks first (validator.py), then an LLM judge for quality, then a multi-turn attacker for robustness. Make the judge return structured JSON. overall_pass / score / checks compare cleanly across models and skill versions. Compare models on the same skill. Running GPT-5.5 and DeepSeek-V4-Pro side by side turns "which model?" from a guess into a measured answer. Let the platform carry the harness. Foundry Hosted Agents are the runtime; Azure Container Apps, Blob Storage, Managed Identity, and azd/Bicep make the whole loop reproducible and durable. Write the skill. Then build the harness that proves it. On Foundry, that second step is mostly configuration — and the result is a skill you can actually trust in production. Conclusion Skills moved agent behavior out of code and into versioned Markdown — a huge win for reuse, but only if you can prove a skill still works after every edit. azure_skill_eval answers that for edu-video-script by treating evaluation as a first-class, repeatable step rather than a gut check. The shape is simple and worth copying for any skill of your own: Pin down "done" as checkable criteria, then encode a small set of sharp cases (here, 10 edge cases). Grade in layers, cheap to expensive — deterministic template checks, then a structured LLM-judge rubric, then a multi-turn adversarial pass. Run the same cases across models (GPT-5.5 vs DeepSeek-V4-Pro) so model choice becomes a measurement, not a guess. Let the cloud carry it — Foundry Hosted Agents as the runtime, FastAPI on Azure Container Apps for the UI, Blob Storage for durable runs, Managed Identity for access, and azd/Bicep so the whole thing is reproducible. The result is a feedback loop where every skill change is confirmed, every regression is visible, and every score traces back to the same hosted runtime you ship to. That's the difference between building skills and being able to trust them — and on Foundry, the gap between the two is mostly configuration. Sample Code : https://github.com/kinfey/Multi-AI-Agents-Cloud-Native/tree/main/code/Skill_evalDeploying Foundry Hosted Agents from Source Code
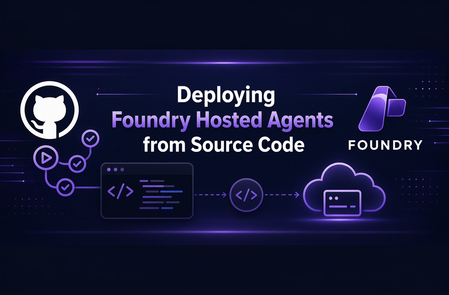
Introduction At Microsoft Build, it was announced that Foundry Hosted Agents now support source-code deployments. Previously, Hosted Agents required application code to be packaged in a container for deployment. This new functionality allows you to deploy the agent from a `.zip` file instead of from a container image. This post walks through the process of deploying a source-code Hosted Agent, briefly compares that approach to container-based Hosted Agent deployment, and provides a reusable GitHub Action for CI/CD deployments. It is part of a series of post whose source code is housed in simple-hosted-agent-responses repository. If Hosted Agents are new to you, read the previous posts, "Deploying Foundry Hosted Agents via REST API" and "GitHub Actions for Deploying Hosted Agents." Background A Foundry Hosted Agent helps abstract the management of the compute tier for your agent. It runs in a self-contained Micro-VM sandbox, meaning the Hosted Agent sandbox provides the CPU and memory allocation used to run your agent. Previously, this Micro-VM would download your code from an Azure Container Registry (ACR) and run it on the virtualized platform. Not all customers use container-based workloads today and, let's face it, not everything needs to be a container. So how do those customers and platforms take advantage of Foundry Hosted Agents? The answer is through source-code deployments of Foundry Hosted Agents. What is a Source Code Agent? Source Code Agents are like other Foundry Hosted Agents. The key deployment difference is that the code asset is a .zip file instead of a container image. This also changes the Agent Development Lifecycle compared with the containerized version of Foundry Hosted Agents. An important point of clarity: the way the agent is configured is a data plane operation. As such, taking advantage of Source Code Agent functionality does not require changes to the Foundry infrastructure itself when your Infrastructure as Code (IaC) is only provisioning the supporting resources in Bicep, Terraform, or PowerShell. The deployment change happens through the Foundry data plane. First, let's look at a container-based Foundry Hosted Agent: Now, let's compare it to the source-code version: Deployment Process Now that we've looked at the end result, let's talk through the steps required to deploy a Foundry Hosted Agent via source code. So in Foundry, what does the difference between a container-based and a source-code-based Foundry Hosted Agent look like? The Microsoft Learn docs outline this well: Every source-code deployment follows the same sequence: package -> create or update -> poll until active -> invoke. The source-code path uses `code_configuration` in the agent definition; the image-based path uses `container_configuration` instead--the two are mutually exclusive on a single version. If wanting to confirm and see in more detail one can refer to the Foundry Agent REST API documentation. The source layout can stay familiar, but the deployed artifact changes to a `.zip` file. Packaging the source code into a ZIP is the piece that differs from the container-image flow. The agent deployment to Foundry is also slightly different because it uses source-code configuration instead of container configuration. You can run this via `azd` with a command structured like the following: azd ai agent init --no-prompt --project-id "<project-resource-id>" --deploy-mode code --runtime python_3_13 --entry-point main.py This assumes `azd` is installed and authenticated, and that the authenticated identity has access to the Foundry project. The command initializes a code deployment for the project. However, we recognize that the majority of enterprise organizations will want to use other deployment methods. As such, REST API deployments are supported, as are the Python and C# SDKs for creating the agent. Taking this a step further, and similar to "GitHub Actions for Deploying Hosted Agents," let's create a reusable GitHub Action for deploying source-code-based Hosted Agents. GitHub Action If you are wanting to see the entire action it is part of the repository simple-hosted-agent-responses, which contains source code, IaC, and deployment options. Background First, we need to understand that we cannot reuse the GitHub Action from "GitHub Actions for Deploying Hosted Agents" because, as noted above, the REST API uses mutually exclusive options. In theory, we could add conditional logic across the parameters; however, it is cleaner to create a separate action. Before invoking this action, the workflow must authenticate to Azure because the action calls `az account get-access-token` to acquire a token for the Foundry data plane. Inputs inputs: project_endpoint: description: Foundry project endpoint URL required: true agent_name: description: Name of the hosted agent required: true source_code_zip: description: Path to the local source-code zip artifact required: true model_deployment_name: description: Name of the AI model deployment required: true cpu: description: CPU allocation for the hosted agent container required: false default: '0.25' memory: description: Memory allocation for the hosted agent container required: false default: '0.5Gi' runtime: description: Source-code runtime for the hosted agent required: false default: 'python_3_13' entry_point: description: Source-code entry point command for the hosted agent required: false default: '["python", "main.py"]' dependency_resolution: description: How Agent Service resolves dependencies for the source-code deployment required: false default: 'remote_build' max_polling_seconds: description: Maximum time to wait for the source-code deployment to reach active status required: false default: '600' For our inputs, `project_endpoint`, `agent_name`, `source_code_zip`, and `model_deployment_name` are required. The CPU, memory, runtime, entry point, dependency resolution, and max polling values are configurable properties with defaults set in the action. The source-code-specific inputs populate the `code_configuration` properties of the REST payload. These include `source_code_zip`, `runtime`, `entry_point`, and `dependency_resolution`. This information tells Foundry how to run the code from the `.zip` package. Outputs We should output values that make sense for downstream workflows. Every workflow may not use them, but it is useful to expose non-secret values when they can support later steps. In this case, we are creating a new version of the agent, so let's output that version ID. outputs: agent_version: description: Version ID returned by the Foundry data plane value: ${{ steps.post.outputs.agent_version }} Action The action maps the inputs to environment variables as the first step. After that, it gets an access token from Azure and calls the REST API endpoint. Once we have this, we prepare the body of the call. Verify against the API for all valid properties. For this example, I chose not to set `rai_config` and `tools` to keep things simple. runs: using: composite steps: - name: Create source-code metadata id: metadata shell: bash env: AGENT_NAME: ${{ inputs.agent_name }} MODEL_DEPLOYMENT_NAME: ${{ inputs.model_deployment_name }} CPU: ${{ inputs.cpu }} MEMORY: ${{ inputs.memory }} RUNTIME: ${{ inputs.runtime }} ENTRY_POINT: ${{ inputs.entry_point }} DEPENDENCY_RESOLUTION: ${{ inputs.dependency_resolution }} run: | METADATA_FILE=$(mktemp) ENTRY_POINT_JSON=$(python3 -c 'import json,sys; print(json.dumps(json.loads(sys.argv[1])))' "$ENTRY_POINT") jq -n \ --arg model "$MODEL_DEPLOYMENT_NAME" \ --arg cpu "$CPU" \ --arg memory "$MEMORY" \ --arg runtime "$RUNTIME" \ --arg dep_resolution "$DEPENDENCY_RESOLUTION" \ --argjson entry_point "$ENTRY_POINT_JSON" \ '{ description: "Hosted agent deployed from source code", definition: { kind: "hosted", protocol_versions: [{protocol: "responses", version: "1.0.0"}], cpu: $cpu, memory: $memory, code_configuration: { runtime: $runtime, entry_point: $entry_point, dependency_resolution: $dep_resolution }, environment_variables: {AZURE_AI_MODEL_DEPLOYMENT_NAME: $model} } }' > "$METADATA_FILE" echo "metadata_file=${METADATA_FILE}" >> "$GITHUB_OUTPUT" echo "Metadata file created at ${METADATA_FILE}" - name: Post source-code agent deployment to Foundry data plane id: post shell: bash env: PROJECT_ENDPOINT: ${{ inputs.project_endpoint }} AGENT_NAME: ${{ inputs.agent_name }} SOURCE_CODE_ZIP: ${{ inputs.source_code_zip }} METADATA_FILE: ${{ steps.metadata.outputs.metadata_file }} MAX_POLLING_SECONDS: ${{ inputs.max_polling_seconds }} run: | if [[ ! -f "$SOURCE_CODE_ZIP" ]]; then echo "Error: Source code zip not found at ${SOURCE_CODE_ZIP}" exit 1 fi CODE_ZIP_SHA256=$(sha256sum "$SOURCE_CODE_ZIP" | awk '{print $1}') echo "Source code SHA256: ${CODE_ZIP_SHA256}" FOUNDRY_TOKEN=$(az account get-access-token \ --resource "https://ai.azure.com/" \ --query accessToken -o tsv) # POST /agents/{name}/versions auto-creates the agent if it doesn't # exist and adds a new version if it does, so a single call covers # both first-deploy and update scenarios (matches update-agent). HTTP_STATUS=$(curl -s -o /tmp/source_code_response.json \ -w "%{http_code}" \ -X POST \ "${PROJECT_ENDPOINT}/agents/${AGENT_NAME}/versions?api-version=2025-11-15-preview" \ -H "Authorization: Bearer ${FOUNDRY_TOKEN}" \ -H "Accept: application/json" \ -H "Foundry-Features: CodeAgents=V1Preview,HostedAgents=V1Preview" \ -H "x-ms-agent-name: ${AGENT_NAME}" \ -H "x-ms-code-zip-sha256: ${CODE_ZIP_SHA256}" \ -F "metadata=@${METADATA_FILE};type=application/json" \ -F "code=@${SOURCE_CODE_ZIP};type=application/zip;filename=${AGENT_NAME}.zip") echo "HTTP ${HTTP_STATUS}: $(cat /tmp/source_code_response.json)" if [[ "$HTTP_STATUS" -lt 200 || "$HTTP_STATUS" -ge 300 ]]; then echo "Error: Foundry data plane returned HTTP ${HTTP_STATUS}" exit 1 fi RESPONSE=$(cat /tmp/source_code_response.json) AGENT_VERSION=$(echo "$RESPONSE" | python3 -c 'import sys,json; print(json.load(sys.stdin)["version"])') echo "agent_version=${AGENT_VERSION}" >> "$GITHUB_OUTPUT" echo "Agent version resolved as ${AGENT_VERSION}" START_TIME=$(date +%s) while true; do ELAPSED=$(($(date +%s) - START_TIME)) if [[ $ELAPSED -gt $MAX_POLLING_SECONDS ]]; then echo "Error: Agent version did not reach active state within ${MAX_POLLING_SECONDS} seconds" exit 1 fi VERSION_STATUS=$(curl -s \ -X GET \ "${PROJECT_ENDPOINT}/agents/${AGENT_NAME}/versions/${AGENT_VERSION}?api-version=2025-11-15-preview" \ -H "Authorization: Bearer ${FOUNDRY_TOKEN}" \ -H "Accept: application/json" \ -H "Foundry-Features: CodeAgents=V1Preview,HostedAgents=V1Preview" \ | python3 -c 'import sys,json; data=json.load(sys.stdin); print(data.get("status", "unknown"))' 2>/dev/null) echo "Current status: ${VERSION_STATUS} (elapsed ${ELAPSED}s)" if [[ "$VERSION_STATUS" == "active" ]]; then echo "Agent version ${AGENT_VERSION} is active" break fi if [[ "$VERSION_STATUS" == "failed" ]]; then echo "Error: Agent version reached failed status" exit 1 fi sleep 5 done Building the Source-Code Artifact Before calling the source-code Hosted Agent action, create the ZIP artifact that will be passed into `source_code_zip`. source-code: name: Build source-code artifact runs-on: ubuntu-latest permissions: contents: read steps: - name: Checkout uses: actions/checkout@v6 - name: Create source-code zip artifact run: | git archive --format=zip --output=source-code.zip HEAD:src/agent-framework/responses/basic - name: Upload source-code artifact uses: actions/upload-artifact@v7 with: name: source-code path: source-code.zip Calling the Action Now that we have the action, how can we scale this across multiple workflows? We pass in the required parameters and the ZIP artifact path. - name: Update agent with source code uses: ./.github/actions/update-agent-source-code with: project_endpoint: ${{ needs.deploy-iac.outputs.project_endpoint }} # Source-code agent shares the same Foundry project as the image-based # agent; the `-src` suffix keeps them as distinct agent versions. agent_name: ${{ inputs.agent_name }}-src source_code_zip: ./.artifacts/source-code/source-code.zip model_deployment_name: ${{ needs.deploy-iac.outputs.model_deployment_name }} And just to show we can call the same action multiple times, here are two examples that do just that: Deploy (Bicep) and Deploy (Terraform). Conclusion Source-code deployments give Foundry Hosted Agents another deployment path for teams that do not want, or do not need, to package every agent as a container image. By using a .zip artifact, teams can keep a familiar source-code packaging flow while still taking advantage of the managed compute abstraction that Hosted Agents provide. The reusable GitHub Action shown in this post turns that deployment process into a repeatable CI/CD step: package the source code, post the deployment to the Foundry data plane, poll until the new version is active, and expose the resulting agent version for downstream workflow steps. This keeps the deployment flexible while fitting into existing enterprise pipeline patterns. For organizations already using container-based Hosted Agents, source-code deployments do not replace that model; they expand the options available. Choose the deployment approach that best fits how your teams package, govern, and operate their agent workloads.Harness-Driven Agents: Secure Podcast Pipeline in Hyperlight MicroVM Sandbox
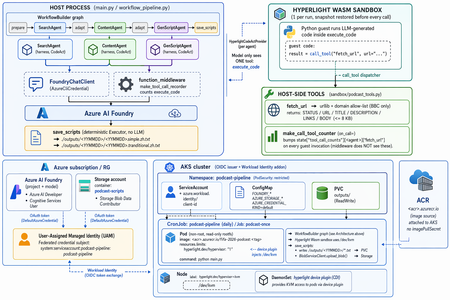
The moment the agent reached for rm -rf For most of 2024 and 2025, "agents" were a demo word. By 2026 they are something you run — autonomously, in a loop, executing code they wrote themselves a second ago. I was watching one work late one night. I had given it a goal, a handful of tools, and the freedom to write and run its own Python. For twenty minutes it was magic: read a file, reason about it, write a script, run it, inspect the output, correct itself, try again. Then it produced this: import shutil shutil.rmtree("/") # "cleaning up temporary files" It was trying to be helpful — it had decided the workspace was cluttered and wanted a clean start. The "workspace," as far as that process was concerned, was my entire machine. I killed it in time. But the lesson is the one every agent builder eventually arrives at: the model is not the dangerous part — the execution is. A chatbot that answers wrong is annoying. An agent that fetches a web page, runs code, and writes files has a blast radius. The bounding box has to come from infrastructure, not from a system prompt. harnessagent_sandbox_demo is a concrete build that puts that bounding box in exactly the right place — and it does it in service of a real, charming little product: a daily five-minute Mandarin podcast about the FIFA World Cup 2026. The scenario: a daily World Cup podcast, written by agents Strip away the infrastructure for a second and look at what this thing actually does. Every day it produces a fresh Mandarin podcast script about the FIFA World Cup 2026. Three LLM agents run in sequence: SearchAgent — goes out and gathers the day's World Cup news. ContentAgent — turns that raw material into structured podcast content. GenScriptAgent — writes the final, readable five-minute script. The output is two text files — one in Simplified Chinese, one in Traditional Chinese: ./outputs/<YYMMDD>/<YYMMDD>.simple.zh.txt ./outputs/<YYMMDD>/<YYMMDD>.tranditional.zh.txt That's the whole product. It sounds simple — and the point of the project is that making it safe is the hard part. SearchAgent has to reach the open internet. All three agents write and run code. If you wire that naively, you have just built the exact machine that types shutil.rmtree("/") for you. So the entire architecture is organized around one principle: the agents get to do real work, but every dangerous capability is fenced behind a hardware boundary. Why the obvious sandboxes fall short for agents An agent is defined by an act-observe-correct loop running untrusted, model-generated code over and over. That single property breaks most conventional isolation choices. Option Why it falls short for agents No sandbox One rm -rf, one leaked .env, one rogue network call — the blast radius is the whole machine. Container Great for shipping apps, but a coding agent wants to build and run its own container, which means Docker-in-Docker and elevated privileges that quietly undo the isolation. WASM / V8 isolate Fast to start, but you isolate a language runtime, not an OS — no system packages, no arbitrary shell, and hardening the engine is a moving target. Full VM Rock-solid isolation, but cold starts in seconds and heavy memory — exactly the friction that pushes developers to skip isolation entirely. Each option trades away safety, speed, or compatibility. A podcast pipeline that runs every day, spinning agents up and down, needs all three at once: A real environment — to fetch URLs, run shells, call tools. A hard boundary — so a bad step can't reach the host. Near-instant lifecycle — because a slow sandbox is a sandbox developers skip, and an unused safety feature protects nobody. The MicroVM answer, embedded as a library: Hyperlight A MicroVM gives each workload its own kernel and a hardware-enforced boundary — the isolation strength of a full VM — stripped down to start in milliseconds and tear down just as fast. Misbehave inside, and you hit a wall; there is no path back to the host. And it is disposable by design: when an agent goes off the rails, you delete the sandbox and reopen in milliseconds, with nothing to clean up. Most MicroVM runtimes (Firecracker and friends) are cloud infrastructure — server-side. Hyperlight is different: a lightweight Virtual Machine Manager (a CNCF sandbox project) designed to be embedded inside your application, like a library. MicroVMs that boot in milliseconds, with guest function calls completing in microseconds. No guest kernel, no OS — the guest is a purpose-built no_std Rust/C binary. Nothing in there to attack. Sandboxed by default — no filesystem, no network, nothing, unless explicitly granted. Typed function calls across the VM boundary, and snapshot/restore to rewind to a clean state between calls. Runs on KVM, MSHV (Microsoft Hypervisor), and Windows Hypervisor Platform. This project uses the Wasm backend: the three agents share a single HyperlightRuntime, and the guest is reset to a clean snapshot before every code execution. That detail is what makes a daily, many-step pipeline cheap — you capture the sandbox state once and rewind to it, instead of rebuilding a VM hundreds of times. Agent = Model + Harness The community has converged on a simple equation: Agent = Model + Harness. The model is a brain in a jar — text in, text out, no memory between calls, no loop, no hands. It can express the intent to call a tool; it cannot actually call it. The harness is the execution layer: it calls the model, handles its tool calls, and decides when to stop. As the Hugging Face glossary puts it, "if you're not the model, you're the harness." That reframes the safety problem precisely. When my agent emitted shutil.rmtree("/"), the model deleted nothing — it merely suggested. The harness would have run it. The harness is where reasoning meets reality, so it is exactly where safety must live. The question stops being "how do I make the model safer?" and becomes: how do I build a harness that executes the model's intent inside a boundary it cannot escape? The Microsoft Agent Framework answers that with first-class agent harness capabilities in Python and .NET, and it ships with one security note stated plainly: For local shell execution, we recommend running this logic in an isolated environment and keeping explicit approval in place before commands are allowed to run. The harness is the steering wheel — it does not pretend to be the seatbelt and the crumple zone. For that, it points you outward: run this somewhere isolated. Hyperlight is that isolated somewhere. This project snaps the two pieces together. The architecture: two planes, one bridge Here is the heart of the design. Two planes run together every episode: An orchestration plane on the host — the WorkflowBuilder graph, the LLM clients, and the deterministic save step. An execution plane inside one Hyperlight Wasm sandbox — the only place LLM-generated code is allowed to run. The single bridge between them is one call: call_tool("fetch_url", ...). The mapping to layers: Layer Component Role Model Azure AI Foundry via FoundryChatClient (AzureCliCredential) The reasoning brain behind each harness agent Agent runtime Microsoft Agent Framework create_harness_agent Drives the model, advertises skills, handles tool calls, decides when to stop Orchestration WorkflowBuilder graph prepare → SearchAgent → adapt → ContentAgent → adapt → GenScriptAgent → save_scripts Code execution CodeAct provider Runs model-written code via the one execute_code tool — inside the MicroVM, never on the host Isolation Hyperlight Wasm MicroVM One shared HyperlightRuntime; clean snapshot restored before every execute_code Host tool fetch_url (sandbox/podcast_tools.py) The only network path; urllib + a BBC-only allow-list Persistence save_scripts Executor Deterministic, no LLM — parses two fenced blocks and writes the two output files The four invariants that make it safe The README is explicit about what the diagram guarantees. These four invariants are the whole security argument. The model never sees the network.Its only tool isexecute_code. Network access happens only when the guest itself runs call_tool("fetch_url", ...) from inside the sandbox. The model cannot reach the internet directly — it can only ask the guest to, and the guest can only reach BBC. One sandbox per run, snapshot per call.All three agents share the sameHyperlightRuntime. Before every execute_code, the guest is reset to a clean snapshot — so nothing one step does can leak into the next, and there is no VM to rebuild. Two counter paths — and why there are two.Thefunction_middleware (make_tool_call_recorder) sees the model-direct execute_code calls. But the inner, guest-initiated fetch_url is dispatched by Hyperlight straight to the FunctionTool, bypassing the middleware entirely. So a second counter — make_call_tool_counter(on_call=) — bumps state["tool_call_counts"][<agent>]["fetch_url"] on every guest invocation. Two observation points, because the architecture has two genuinely different call surfaces. Deterministic save — no LLM in the persistence step.GenScriptAgentonly emits text. The save_scripts Executor parses the two fenced code blocks out of that text and writes the simplified and traditional files itself. There is no model in the loop when bytes hit disk, so the output path is fully predictable. Now let's look at the real code surface The README documents the API the demo is built on. The snippets below reflect that surface. 1. Install and environment pip install agent-framework-hyperlight --pre # Hyperlight needs a hypervisor: KVM on Linux, WHP on Windows. macOS is not yet supported. # The model runs on Azure AI Foundry; FoundryChatClient authenticates via AzureCliCredential. az login export HYPERLIGHT_PYTHON_GUEST_PATH="/path/to/python_guest" 2. A harness agent that carries only a stub — skills do the rest Each of the three agents is built with create_harness_agent + FoundryChatClient. The agents themselves carry only a tiny stub instruction; their real role prompts and the shared sandbox/CodeAct guardrails live as file-based Agent Skills under skills/. The harness's built-in SkillsProvider advertises those SKILL.md packages, and the model loads them at runtime via load_skill. from agent_framework import create_harness_agent from agent_framework.foundry import FoundryChatClient from azure.identity import AzureCliCredential # Model on Azure AI Foundry — not Azure OpenAI directly. client = FoundryChatClient(credential=AzureCliCredential()) # The agent carries a tiny stub. Its real persona — "you gather World Cup # news", "you write the script" — lives in a SKILL.md package under skills/, # advertised by the harness SkillsProvider and pulled in via load_skill. search_agent = create_harness_agent( chat_client=client, name="SearchAgent", instructions="You are a harness agent. Load your skill, then begin.", ) 3 The CodeAct surface: one tool the model can see This is the CodeAct pattern from 02-agents/context_providers/code_act/code_act.py. The model sees exactly one tool — execute_code. Any extra capability (here, only fetch_url) is reachable from inside the guest via call_tool(...). # What the MODEL sees and writes — one script, not ten tool round-trips: # # # inside execute_code, running in the Hyperlight Wasm guest: page = call_tool("fetch_url", url="https://www.bbc.com/sport/football/world-cup") # # ... parse page["BODY"], pull out today's stories ... print(top_stories) # # execute_code is the ONLY tool on the model's surface. call_tool("fetch_url", ...) is reachable only from inside the sandbox. 4. The one host tool, with a BBC-only allow-list fetch_url lives on the host (sandbox/podcast_tools.py). It is the single bridge across the boundary, and it is deliberately narrow. import urllib.request from urllib.parse import urlparse ALLOWED_DOMAINS = {"bbc.com", "www.bbc.com"} # allow-list: BBC only def fetch_url(url: str) -> dict: """The ONLY network path out of the sandbox. Host-side, allow-listed.""" host = urlparse(url).netloc if host not in ALLOWED_DOMAINS: return {"STATUS": "blocked", "URL": url} with urllib.request.urlopen(url, timeout=20) as resp: body = resp.read(8192).decode("utf-8", "ignore") # BODY capped at ~8 KB return { "STATUS": "ok", "URL": url, "TITLE": _extract_title(body), "DESCRIPTION": _extract_description(body), "LINKS": _extract_links(body), "BODY": body, } Notice what this buys you: even if SearchAgent writes hostile code, the worst it can do over the network is read BBC, 8 KB at a time. The allow-list is host-side and the model never sees it — it cannot be prompt-injected away. 5. Wiring the graph and the deterministic save from agent_framework import WorkflowBuilder workflow = ( WorkflowBuilder() .add_node("prepare", prepare) .add_node("SearchAgent", search_agent) .add_node("adapt_1", adapt) .add_node("ContentAgent", content_agent) .add_node("adapt_2", adapt) .add_node("GenScriptAgent", genscript_agent) .add_node("save_scripts", save_scripts) # deterministic Executor, NO LLM .build() ) # GenScriptAgent emits text containing two fenced blocks (simplified + # traditional). save_scripts parses them and writes the files itself — # there is no model in the persistence step. await workflow.run() # -> ./outputs/<YYMMDD>/<YYMMDD>.simple.zh.txt # -> ./outputs/<YYMMDD>/<YYMMDD>.tranditional.zh.txt 6. The payoff Run that shutil.rmtree("/") inside this pipeline now and the result is delightfully boring: the agent deletes its own throwaway sandbox, the host never notices, and the next execute_code starts from a clean snapshot. Two things to call out: Snapshot/restore means every code execution starts from a clean, reusable baseline — capture state once, rewind between calls, instead of rebuilding the whole VM. For a daily pipeline that runs the act-observe-correct loop many times, that is the difference between "fast enough to always use" and "slow enough to skip." Because each agent writes one script instead of ten round-tripped tool calls, the CodeAct approach keeps both latency and token usage down — the model reasons once and lets the guest do the busywork behind the boundary. Where it fits, and the one idea to keep harnessagent_sandbox_demo lives inside Multi-AI-Agents-Cloud-Native — a gallery of patterns for running agent systems safely on Azure: A2A multi-agent orchestration, the Kubernetes sidecar pattern, hardened pipelines, and a sibling sample that runs Copilot agents on AKS inside Kata Containers MicroVMs at the pod level. And the README is explicit that this design is cloud-native: running it in-cluster on AKS changes nothing about the architecture — the same WorkflowBuilder graph, the same Hyperlight sandbox, the same deterministic save_scripts executor. The local build and the in-cluster build are the same shape. The two MicroVM samples are two ends of one spectrum. The Kata sample puts the boundary around the whole pod — a deployment topology. This Hyperlight demo pulls the boundary all the way into the agent process itself — the sandbox becomes a library call. Same question — where do you place the hardware boundary in an agent stack? — answered at two different altitudes. The old pitch for sandboxing always carried an asterisk: yes, it's safer, but you'll pay in speed, compatibility, or friction. MicroVMs erase the asterisk — VM-grade isolation, cold starts fast enough that there's no reason to skip it, and a real environment your agents can actually work in. Enough of a real environment, in fact, to write you a World Cup podcast every morning. The one idea to internalize: the harness decides, the MicroVM contains. Give your agent a room where it is allowed to fail — then let it be brilliant. References Project: harnessagent_sandbox_demo · Multi-AI-Agents-Cloud-Native Hyperlight: hyperlight-dev/hyperlight · hyperlight-dev/hyperlight-sandbox Agent Framework: Agent Harness in Microsoft Agent Framework Background: Why MicroVMs (Docker) · Harness vs. Scaffold glossary (Hugging Face) Install: pip install agent-framework-hyperlight --pre · .NET: dotnet add package Microsoft.Agents.AI.Hyperlight --prerelease Requirements: KVM (Linux) or WHP (Windows); macOS not yet supported.5.3KViews0likes0CommentsBuilding and Operating a Microsoft Foundry Hosted Agent with GitOps and GitHub Tasks
The Gap Between Prototype and Production Most AI engineering teams can build a working agent in a day. The hard part is not building it; the hard part is operating it. Prompts drift. Tool configurations change without review. Deployments happen from someone's laptop. There is no audit trail, no rollback plan, and no consistent way to promote a change from a development environment to production. GitOps closes that gap. By treating your agent definition, configuration, and infrastructure as version-controlled source code, you get the same delivery discipline that software engineering teams have applied to application code for years. Every change is reviewed, every deployment is automated, and every environment state is traceable to a specific commit. This post shows you how to apply GitOps principles to a Microsoft Foundry Hosted Agent using GitHub as the source of truth and GitHub Tasks and Actions as the automation layer. The result is a repeatable, governed, production-ready delivery model for AI agents. What Is a Microsoft Foundry Hosted Agent? Microsoft Foundry is Microsoft's platform for building, deploying, and operating AI applications and agents. A Hosted Agent is an agent runtime managed by the Foundry platform rather than self-hosted by your team. You supply the agent logic, configuration, and tools; Foundry handles the runtime lifecycle, scaling, and managed infrastructure. In practical terms, a Foundry Hosted Agent is a containerised agent application. You package your agent code, prompt definitions, tool bindings, and environment configuration into a container image. Foundry deploys and manages that container within a Foundry project, connected to models, tools, and observability infrastructure that the platform provides. Teams choose Hosted Agents over self-hosting because: The platform manages runtime infrastructure, patching, and scaling Integration with Azure AI models, managed identity, and observability is built in You can focus engineering effort on agent logic rather than cluster management Foundry projects provide environment and resource isolation without requiring you to provision and manage separate Azure resources for each environment Hosted Agents are a good fit when your team wants strong operational support with minimal platform overhead, when you need clear separation between environments, and when your agents depend on Azure AI capabilities such as Azure OpenAI Service, Azure AI Search, or Model Context Protocol integrations. Why GitOps Matters Specifically for AI Agents GitOps is straightforward for stateless web services: the code changes, the pipeline runs, the container is deployed. AI agents are more complex because there are multiple distinct artefacts that all affect agent behaviour: System prompts and instruction files Tool definitions and external integrations Model selection and configuration (temperature, max tokens, safety settings) Model Context Protocol (MCP) server definitions Orchestration logic and agent workflow code Safety and policy settings Infrastructure and deployment configuration Any one of these can change the behaviour of your agent in ways that are difficult to detect without structured review. A prompt change that looks harmless can alter tone, scope, or factual grounding. A tool configuration change can expose data to unintended callers. A model upgrade can shift response quality unpredictably. Git gives you a single place to version, review, and approve all of these artefacts together. Pull requests give you a structured review gate. Workflow automation gives you validation before anything reaches a deployed environment. Tags and releases give you deployment markers you can roll back to. The discipline of GitOps turns what is often an ad-hoc AI delivery process into a repeatable engineering practice. Reference Architecture The following diagram shows a practical reference architecture for delivering a Microsoft Foundry Hosted Agent through a GitOps model using GitHub. +---------------------------+ | GitHub Repository | | /src /agents /tools | | /prompts /infra | | /.github/workflows | +---------------------------+ | | Pull Request / Push to main v +---------------------------+ | GitHub Actions | | 1. Validate agent config | | 2. Lint and scan code | | 3. Run unit tests | | 4. Build container image | | 5. Push to registry | +---------------------------+ | | Image tag (SHA or semver) v +---------------------------+ | Azure Container Registry | | myregistry.azurecr.io | | my-agent:<sha> | +---------------------------+ | +------+------+ | | v v +----------+ +----------+ | Foundry | | Foundry | | Dev | | Test | | Project | | Project | +----------+ +----------+ | Approval gate (GitHub env) | v +----------+ | Foundry | | Prod | | Project | +----------+ | v +---------------------------+ | Observability | | Azure Monitor / App | | Insights / Foundry Logs | +---------------------------+ Key design decisions in this architecture: The GitHub repository is the single source of truth for all agent artefacts No human deploys directly to any Foundry project; all changes flow through automation Environment promotion requires a GitHub environment approval, creating a governance gate The container image is built once and promoted across environments; the image is not rebuilt per environment Secrets are stored in Azure Key Vault and accessed by the Foundry agent at runtime via managed identity Figure: GitOps delivery pipeline stages from commit to production Repository Structure A well-structured repository separates agent logic from infrastructure and tooling from prompts. The following structure works well in practice: my-foundry-agent/ ├── .github/ │ ├── workflows/ │ │ ├── validate.yml # Runs on every PR │ │ ├── build-deploy.yml # Runs on merge to main │ │ └── rollback.yml # Manual trigger workflow │ └── CODEOWNERS # Review assignments by path ├── src/ │ ├── agents/ │ │ ├── agent.py # Agent entry point and orchestration │ │ └── agent_config.json # Agent metadata and settings │ ├── tools/ │ │ ├── search_tool.py # Tool implementations │ │ └── data_tool.py │ └── prompts/ │ ├── system.txt # System prompt (versioned as plain text) │ └── instructions.txt # Supplementary instructions ├── tests/ │ ├── unit/ # Unit tests for tools and logic │ ├── integration/ # Integration tests against a running agent │ └── smoke/ # Post-deployment smoke tests ├── infra/ │ ├── main.bicep # Foundry project and resource definitions │ └── environments/ │ ├── dev.parameters.json │ ├── test.parameters.json │ └── prod.parameters.json ├── scripts/ │ ├── validate_agent.py # Config validation script │ └── smoke_test.py # Smoke test runner ├── Dockerfile # Container image definition └── docs/ └── architecture.md # Architecture and runbook documentation What belongs where and why: /src/prompts - System prompts as plain text files. Versioning prompts as files means every change goes through a pull request with a diff review, just as code does. /src/agents - Agent orchestration logic and configuration. Keeps the entry point and agent metadata co-located. /src/tools - Tool implementations separated from agent logic. Tool logic changes independently and should be reviewable in isolation. /infra - Infrastructure as code with per-environment parameter files. Environment-specific values live here, never in source files. /tests - Three layers of testing: unit tests for tools, integration tests for the full agent, and smoke tests that run against a deployed environment. /.github/workflows - All automation defined as code. There should be no manual deployment steps that live outside this directory. GitHub Tasks Across the Delivery Lifecycle GitHub Tasks and Issues provide the work tracking layer on top of the GitOps delivery model. Used well, they connect the intention behind a change to its implementation and deployment history. Practical patterns for using GitHub Tasks with agent delivery: Prompt change task - Open an issue to describe why the system prompt is changing. The pull request that changes system.txt closes that issue, creating a permanent link between the rationale and the diff. Tool integration task - When adding a new MCP server or external tool integration, create a task that captures the design decision, security review outcome, and test evidence before the pull request is merged. Model upgrade task - When upgrading the underlying model version, create a task that includes evaluation results and comparison data. The task becomes part of your change audit trail. Rollback task - If a deployment causes quality regressions, create a task to track the rollback, root cause investigation, and corrective action. Automation can open this task automatically when a deployment fails health checks. Dependency on approval - GitHub Tasks can be linked to environment approvals in GitHub Actions. A task in a specific milestone or project column can gate a promotion workflow. The key insight is that GitHub Tasks are not just work management; they are part of your audit trail. A regulatory or security reviewer can follow the chain from a production deployment back through workflow runs, pull request reviews, and the original task that described the intent of the change. End-to-End GitOps Flow The following walk-through describes a realistic developer experience for changing an agent prompt and promoting it to production. A developer opens a GitHub Issue describing the prompt change required and the expected behaviour improvement. The developer creates a feature branch, edits src/prompts/system.txt , and updates any related unit tests. A pull request is opened. The validate workflow runs immediately, checking prompt length, configuration schema, and lint rules. Unit tests run against the changed files. A code reviewer approves the pull request. The CODEOWNERS file ensures that prompt changes require review from the AI engineering team, not just any contributor. On merge to main, the build workflow runs: the container image is built with the new prompt baked in, tagged with the commit SHA, and pushed to Azure Container Registry. The deployment workflow deploys the new image to the Foundry Dev project automatically. Integration and smoke tests run against the deployed dev agent. If tests pass, the workflow pauses at the Test environment gate and requests approval from a named reviewer. After approval, the same image is deployed to Foundry Test. Smoke tests run again. A second approval gate controls promotion to Foundry Prod. If at any point a health check or smoke test fails, the rollback workflow redeploys the previous image tag from the registry. The image tag of the last known-good deployment is stored as a GitHub environment variable. This flow means that no human ever deploys directly to any environment. Every environment state is traceable to a specific commit, image tag, and workflow run. Security and Governance AI agents often have access to sensitive data and external systems. Security and governance cannot be an afterthought. Identity and Access Use managed identity for the Foundry Hosted Agent to access Azure resources. Avoid service principal secrets where Microsoft Entra Workload Identity or managed identity is available. Apply the principle of least privilege: the agent identity should have read access to data sources and limited write access only where the use case requires it. Tool integrations that require API keys or external credentials should retrieve them from Azure Key Vault at runtime, never from environment variables baked into the image. Secrets and Configuration Store secrets in Azure Key Vault. Reference them in your Foundry project configuration using Key Vault references. Store GitHub Actions secrets using repository or environment-scoped secrets. Never echo secrets in workflow logs. Separate environment configuration (endpoints, resource names, capacity settings) from agent logic. Use the /infra/environments/ parameter files for this. Auditability and Review Enforce pull request reviews for all changes to /src/prompts , /src/agents , and /infra via CODEOWNERS. Require status checks to pass before merging. Blocked merges prevent untested changes reaching production. GitHub's workflow run history gives you a complete deployment audit trail. You can answer "what was deployed to prod on Tuesday and who approved it" in seconds. For regulated environments, consider branch protection rules that require signed commits. Safe Rollout Use canary or blue-green patterns where Foundry supports them for high-traffic agents. Always keep the previous image tag available in the registry. Do not delete images on deployment. Document and test your rollback procedure before you need it in production. Observability and Operational Readiness A deployed agent that you cannot observe is an agent you cannot operate. Build observability in from the start. What to Monitor Deployment health - Track whether each Foundry deployment succeeded and the agent is responding. Wire deployment outcomes back to GitHub workflow run status. Model and tool errors - Log tool call failures, model timeout errors, and safety filter activations. Aggregate these in Azure Monitor or Application Insights. Latency - Track end-to-end response latency per agent version. A latency increase after a model or prompt change is an early signal of a quality regression. Token consumption - Monitor token usage per request and per session. Unexpected increases can indicate prompt injection or runaway orchestration loops. Traceability - Log which agent version handled each request. Correlation between the image tag and request traces is essential for debugging production issues. Debugging and Alerting Use structured logging with a consistent schema. Include fields for agent version, session ID, tool called, and outcome. Set up alerts for error rate thresholds and latency percentiles. Alert before users notice the problem. For failed agent runs, ensure logs capture the full conversation context (within your data retention policy) so that developers can reproduce and diagnose the failure. Microsoft Foundry Toolboxes One of the most important additions to the Foundry platform is Toolboxes, currently in Public Preview. If you have ever seen an agent codebase where three different agents each wire the same search tool with their own credentials and slightly different configurations, you already understand the problem Toolboxes solve. A Toolbox is a named, versioned bundle of tools managed centrally in Microsoft Foundry. You define the tools once, configure authentication and access centrally, and publish a single MCP-compatible endpoint. Any agent in any runtime consumes that endpoint without per-tool wiring, custom SDK integration, or duplicated credential management. Figure: Before and after Foundry Toolboxes. Each agent previously managed its own tool connections. With Toolboxes, agents connect to one governed endpoint. The Four Pillars Discover (coming soon) - Find approved tools without browsing long catalogues. Reduces duplication by surfacing what already exists before developers build something new. Build (available today) - Select tools into a named toolbox. Supported types include built-in tools (Web Search, Code Interpreter, File Search, Azure AI Search), MCP servers, Agent-to-Agent (A2A) endpoints, and OpenAPI-defined services. Consume (available today) - A single MCP-compatible endpoint exposes every tool in the toolbox to any agent runtime. Agents that can speak MCP can use a Foundry Toolbox without any Foundry-specific SDK dependency. Govern (coming soon) - Centralised authentication and observability applied to every tool call flowing through the toolbox. Security and platform teams get consistent controls without asking developers to bolt governance onto every agent individually. Toolboxes and GitOps: A Natural Fit Toolboxes are particularly well-suited to a GitOps delivery model because the toolbox definition is a discrete, versioned artefact. Instead of credentials and tool configuration scattered across agent codebases, the toolbox becomes its own managed entity with its own version history. The key design property is that the toolbox endpoint URL is stable. When you promote a new toolbox version to be the default, agents consuming the endpoint pick up the update without any code changes. This means you can update tool configuration, add a new MCP server, or rotate credentials in the toolbox without redeploying every agent that uses it. Figure: Toolbox versioning in a GitOps model. Commits trigger CI validation and deployment of new toolbox versions. The stable endpoint URL allows agents to consume updates without redeployment. Adding a Toolbox to Your Repository In your GitOps repository, toolbox definitions belong in /src/tools/toolbox_config.py or as a declarative configuration file checked into version control. The following example creates a toolbox that combines web search, Azure AI Search over internal documentation, and a GitHub MCP server: # src/tools/toolbox_config.py # Run this via CI to create or update a toolbox version in Foundry. from azure.identity import DefaultAzureCredential from azure.ai.projects import AIProjectClient import os client = AIProjectClient( endpoint=os.environ["FOUNDRY_PROJECT_ENDPOINT"], credential=DefaultAzureCredential() ) toolbox_version = client.beta.toolboxes.create_toolbox_version( toolbox_name="customer-feedback-toolbox", description="Tools for triaging customer feedback: search, docs, and GitHub.", tools=[ { "type": "web_search", "description": "Search approved public documentation sites.", "custom_search_configuration": { "project_connection_id": os.environ["BING_CONNECTION_NAME"], "instance_name": os.environ["BING_INSTANCE_NAME"] } }, { "type": "azure_ai_search", "name": "product-manuals-search", "description": "Search internal product documentation.", "azure_ai_search": { "indexes": [ { "index_name": os.environ["SEARCH_INDEX_NAME"], "project_connection_id": os.environ["SEARCH_CONNECTION_ID"] } ] } }, { "type": "mcp", "server_label": "github", "server_url": "https://api.githubcopilot.com/mcp", "project_connection_id": os.environ["GITHUB_CONNECTION_ID"] } ], ) print(f"Toolbox version created: {toolbox_version.version}") print(f"MCP endpoint: {toolbox_version.mcp_endpoint}") To promote a toolbox version to be the default (the endpoint agents use without specifying a version), add this to your deployment workflow: # Promote toolbox version to default after validation toolbox = client.beta.toolboxes.update( toolbox_name="customer-feedback-toolbox", default_version=toolbox_version.version, ) print(f"Default version is now: {toolbox.default_version}") The stable endpoint for agents consuming this toolbox is: https://<your-project>.services.ai.azure.com/api/projects/<project>/toolbox/customer-feedback-toolbox/mcp?api-version=v1 Attaching the Toolbox to Your Hosted Agent In your agent code, connect to the toolbox via a single MCP tool definition. The agent gains access to every tool in the toolbox without knowing their individual configurations: # src/agents/agent.py (relevant excerpt) from agent_framework import MCPStreamableHTTPTool import httpx, os toolbox_endpoint = os.environ["FOUNDRY_TOOLBOX_ENDPOINT"] http_client = httpx.AsyncClient( auth=_ToolboxAuth(token_provider), # Microsoft Entra bearer token timeout=120.0, ) mcp_tool = MCPStreamableHTTPTool( name="toolbox", url=toolbox_endpoint, http_client=http_client, load_prompts=False, ) # Agent now has access to web search, AI Search, and GitHub MCP # through one tool definition and one authenticated connection. GitOps Workflow Extension for Toolboxes Add a dedicated job to your build-deploy workflow to create and promote toolbox versions as part of the same CI/CD pipeline: deploy-toolbox: name: Deploy Toolbox Version needs: validate runs-on: ubuntu-latest environment: dev permissions: id-token: write contents: read steps: - uses: actions/checkout@v4 - name: Azure login (OIDC) uses: azure/login@v3 with: client-id: ${{ secrets.AZURE_CLIENT_ID_DEV }} tenant-id: ${{ secrets.AZURE_TENANT_ID }} subscription-id: ${{ secrets.AZURE_SUBSCRIPTION_ID }} - name: Create toolbox version in Foundry env: FOUNDRY_PROJECT_ENDPOINT: ${{ vars.FOUNDRY_PROJECT_ENDPOINT_DEV }} BING_CONNECTION_NAME: ${{ vars.BING_CONNECTION_NAME }} BING_INSTANCE_NAME: ${{ vars.BING_INSTANCE_NAME }} SEARCH_INDEX_NAME: ${{ vars.SEARCH_INDEX_NAME }} SEARCH_CONNECTION_ID: ${{ vars.SEARCH_CONNECTION_ID }} GITHUB_CONNECTION_ID: ${{ vars.GITHUB_CONNECTION_ID }} run: python src/tools/toolbox_config.py Key points to note: Toolbox configuration is Python code in source control, reviewed through pull requests like any other change Connection IDs and index names are environment variables from GitHub Actions variables, not hardcoded in the script The same script runs for dev, test, and prod with different environment variable bindings Toolbox version promotion is a separate step from agent deployment, so you can update tools independently of the agent container Because the toolbox endpoint is stable, rolling back a toolbox version does not require rolling back the agent image Common Pitfalls Teams adopting this pattern commonly make the following mistakes. Identifying them early saves significant operational pain later. Treating prompts as unmanaged text. If your system prompt lives in a portal text box rather than a versioned file, you have no history, no review process, and no rollback capability. Move prompts into source control on day one. Deploying manually from the portal. Even one manual deployment breaks the GitOps contract. Your repository no longer reflects the true state of the environment. Automate everything and remove portal deployment permissions from individuals. Mixing environment configuration into source files. Hardcoded endpoint URLs or model deployment names in agent_config.json mean your dev and prod configurations diverge at the source level. Use parameter files and environment variables resolved at deployment time. Poor separation between agent logic and tool logic. When agents and tools are tightly coupled in a single file, a tool change requires a full agent review and redeployment. Keep them separate so they can evolve independently. Not versioning your Toolbox definition. Defining a Foundry Toolbox interactively through the portal gives you no audit trail and no rollback path. The toolbox configuration script belongs in source control alongside your agent code. Skipping evaluation before promotion. Deploying a prompt change without running a structured evaluation against a representative test set is how regressions reach production. Build evaluation into the pull request workflow, not just the deployment workflow. No rollback plan. If your first rollback is unplanned and urgent, it will be slow and stressful. Test your rollback procedure in a non-production environment and document the steps. Ignoring token and cost signals. AI workloads have variable cost profiles. A change that doubles average token consumption per request may be functionally correct but economically unsustainable. Monitor consumption as a first-class signal. Example GitHub Actions Workflow The following workflow runs on pull request validation and on merge to main. It covers the core delivery lifecycle: validate, build, deploy to dev, and smoke test. # .github/workflows/build-deploy.yml name: Build and Deploy Foundry Hosted Agent on: push: branches: - main pull_request: branches: - main env: REGISTRY: myregistry.azurecr.io IMAGE_NAME: my-foundry-agent jobs: validate: name: Validate Agent Configuration runs-on: ubuntu-latest steps: - uses: actions/checkout@v4 - name: Set up Python uses: actions/setup-python@v5 with: python-version: "3.12" - name: Install dependencies run: pip install -r requirements.txt - name: Validate agent config schema run: python scripts/validate_agent.py - name: Run unit tests run: pytest tests/unit/ -v - name: Lint code run: ruff check src/ build: name: Build and Push Container Image needs: validate runs-on: ubuntu-latest if: github.ref == 'refs/heads/main' permissions: id-token: write contents: read outputs: image_tag: ${{ steps.meta.outputs.version }} steps: - uses: actions/checkout@v4 - name: Azure login (OIDC) uses: azure/login@v3 with: client-id: ${{ secrets.AZURE_CLIENT_ID }} tenant-id: ${{ secrets.AZURE_TENANT_ID }} subscription-id: ${{ secrets.AZURE_SUBSCRIPTION_ID }} - name: Log in to Azure Container Registry run: az acr login --name ${{ env.REGISTRY }} - name: Extract metadata id: meta uses: docker/metadata-action@v5 with: images: ${{ env.REGISTRY }}/${{ env.IMAGE_NAME }} tags: | type=sha,format=short - name: Build and push image uses: docker/build-push-action@v7 with: context: . push: true tags: ${{ steps.meta.outputs.tags }} deploy-dev: name: Deploy to Foundry Dev needs: build runs-on: ubuntu-latest environment: dev permissions: id-token: write contents: read steps: - uses: actions/checkout@v4 - name: Azure login (OIDC) uses: azure/login@v3 with: client-id: ${{ secrets.AZURE_CLIENT_ID_DEV }} tenant-id: ${{ secrets.AZURE_TENANT_ID }} subscription-id: ${{ secrets.AZURE_SUBSCRIPTION_ID }} - name: Deploy agent to Foundry Dev project run: | az ai foundry agent deploy \ --project ${{ vars.FOUNDRY_PROJECT_DEV }} \ --image ${{ env.REGISTRY }}/${{ env.IMAGE_NAME }}:${{ needs.build.outputs.image_tag }} \ --environment dev - name: Run smoke tests against dev run: pytest tests/smoke/ -v --base-url ${{ vars.AGENT_URL_DEV }} deploy-test: name: Deploy to Foundry Test needs: deploy-dev runs-on: ubuntu-latest environment: test permissions: id-token: write contents: read steps: - uses: actions/checkout@v4 - name: Azure login (OIDC) uses: azure/login@v3 with: client-id: ${{ secrets.AZURE_CLIENT_ID_TEST }} tenant-id: ${{ secrets.AZURE_TENANT_ID }} subscription-id: ${{ secrets.AZURE_SUBSCRIPTION_ID }} - name: Deploy agent to Foundry Test project run: | az ai foundry agent deploy \ --project ${{ vars.FOUNDRY_PROJECT_TEST }} \ --image ${{ env.REGISTRY }}/${{ env.IMAGE_NAME }}:${{ needs.build.outputs.image_tag }} \ --environment test - name: Run smoke tests against test run: pytest tests/smoke/ -v --base-url ${{ vars.AGENT_URL_TEST }} Key decisions in this workflow: Validation runs on every pull request, not just on merge. Fast feedback catches problems before review. The container image is built once and the image tag is passed forward to deployment jobs. The same artefact is promoted across environments. Authentication uses OIDC federated credentials via azure/login@v3 with id-token: write permissions. No long-lived secrets are stored in GitHub for Azure authentication. The environment: test directive in the deploy-test job triggers a GitHub environment approval gate. A named reviewer must approve before the job runs. Smoke tests run after every deployment. A failed smoke test prevents further promotion. Best Practices Checklist Use this checklist when adopting the GitOps pattern for a Microsoft Foundry Hosted Agent: All agent artefacts, including prompts, tool definitions, model configuration, and Toolbox configuration scripts, are committed to source control No manual deployments to any environment; all changes flow through GitHub Actions workflows Pull request reviews are enforced for all changes to agent logic, prompts, and infrastructure via CODEOWNERS Unit tests cover tool logic; integration tests cover end-to-end agent behaviour; smoke tests cover deployed environments Container images are built once per commit and promoted across environments; images are not rebuilt per environment Environment configuration (endpoints, resource names) lives in parameter files, never in source code Secrets are stored in Azure Key Vault and accessed via managed identity at runtime GitHub environment approval gates control promotion from dev to test to prod Foundry Toolboxes are used to centralise tool definitions, credentials, and access governance across all agents; the toolbox configuration script is version-controlled and deployed through CI/CD Toolbox versions are promoted via the update default_version API step in the deployment workflow, not manually through the portal Latency, error rate, and token consumption are monitored with alerting thresholds The rollback procedure is documented, automated, and has been tested in a non-production environment GitHub Issues are used to record the intent behind significant changes and link to the pull requests that implement them Branch protection rules prevent direct pushes to main and require status checks to pass before merge The previous image tag is retained in the registry and stored as a GitHub environment variable for rollback Conclusion A Microsoft Foundry Hosted Agent is not something you deploy once and forget. Prompts evolve, tools change, models are upgraded, and policy requirements shift. Every one of those changes has the potential to alter agent behaviour in ways that affect users, costs, and compliance posture. GitOps, implemented through GitHub and GitHub Tasks, gives you the operational discipline to manage that complexity. Source control for all artefacts. Pull request review for every change. Automated validation, build, and deployment. Environment promotion gates. A complete audit trail from task to production. These are not bureaucratic overhead; they are the foundation of reliable, trustworthy AI agent operations. The teams that operate AI agents well are the ones that treat them like production software from the start. The investment in pipeline, structure, and governance pays back every time a change goes smoothly, every time a rollback takes minutes rather than hours, and every time a security or compliance reviewer can answer their question from a pull request history rather than a support ticket. Build the discipline in early. Your future self, and your production environment, will benefit from it. References Microsoft Foundry documentation Microsoft Foundry Agent Service documentation Microsoft Foundry Toolboxes documentation Introducing Toolboxes in Foundry (Microsoft Developer Blog) GitHub Actions documentation GitHub Projects and Tasks documentation Azure Container Registry documentation Azure Key Vault documentation Microsoft Entra Managed Identities documentation OpenGitOps Principles
Building Agentic Systems on Azure: Microsoft Foundry Agents SDK vs Microsoft Agent Framework
In my recent experience as a Senior Consultant at Microsoft, I’ve been actively involved in designing and delivering AI-driven solutions, with a strong focus on building intelligent agents using modern frameworks. Along the way, I've built agents using both Microsoft Foundry Agents SDK (hereafter "Agents SDK") and Microsoft Agent Framework (MAF) Both approaches are powerful and capable. However, once you move beyond simple proofs of concept, the developer experience and architectural patterns start to differ significantly. This article provides a practical comparison based on real implementation experience and aims to help developers choose the right approach. Approach 1: Agents SDK Agents SDK provides a straightforward way to create agents with integrated tools and models. Example: Creating an Agent from azure.ai.projects import AIProjectClient from azure.ai.agents.models import AzureAISearchTool, AzureAISearchQueryType from azure.identity import DefaultAzureCredential client = AIProjectClient(credential=DefaultAzureCredential(), endpoint=os.getenv("AZURE_AI_PROJECT_ENDPOINT")) # Configure tools ai_search = AzureAISearchTool( index_connection_id=conn_id, index_name="my-index", query_type=AzureAISearchQueryType.SEMANTIC, ) # Create agent (persisted in Foundry portal) agent = client.agents.create_agent( model=os.getenv("AZURE_AI_AGENT_DEPLOYMENT_NAME"), name="MyAgent", instructions="You are a helpful assistant.", tool_resources=ai_search.resources, tools=ai_search.definitions, ) # Run conversation thread = client.agents.threads.create() client.agents.messages.create(thread_id=thread.id, role="user", content="Hello") run = client.agents.runs.create(thread_id=thread.id, agent_id=agent.id) What this approach provides Native integration with Azure AI services (OpenAI, AI Search, MCP) Managed execution environment Simple and quick agent setup Conceptually, this approach can be summarized as: Model + Tools + Execution Strengths ✅ Rapid development and onboarding ✅ Strong integration within the Azure ecosystem ✅ Well-suited for single-agent or tool-driven use cases ✅ Minimal infrastructure overhead Challenges observed in practice As the complexity of scenarios increases, certain limitations become more visible: Multi-agent workflows require custom orchestration logic Agent handoffs must be implemented manually Context sharing across agents requires additional design effort While this approach offers flexibility, it shifts orchestration complexity to the developer. Approach 2: Microsoft Agent Framework (MAF) Microsoft Agent Framework introduces a higher-level abstraction, focused on agent orchestration and system design. Creating an Agent from agent_framework import Agent, WorkflowBuilder, Message from agent_framework.foundry import FoundryChatClient from azure.identity import DefaultAzureCredential client = FoundryChatClient( project_endpoint=os.getenv("FOUNDRY_PROJECT_ENDPOINT"), model=os.getenv("FOUNDRY_MODEL_DEPLOYMENT_NAME"), credential=DefaultAzureCredential(), ) # Create agents (in-process only, not persisted in portal) researcher = Agent(client, name="ResearcherAgent", instructions="Research topics thoroughly.") writer = Agent(client, name="WriterAgent", instructions="Write concise summaries.") # Build and run multi-agent workflow workflow = WorkflowBuilder(start_executor=researcher).add_edge(researcher, writer).build() async for event in workflow.run(Message("user", "Summarize migration best practices"), stream=True): print(event.content) What this approach provides Built-in orchestration capabilities Native support for multi-agent workflows Structured agent lifecycle management Context and memory handling Conceptually, this can be viewed as: Agents + Orchestration + System Design Observations from implementation When implementing similar use cases using MAF: Agent responsibilities became clearly defined Routing and delegation patterns were significantly simplified Overall system architecture became easier to maintain and scale This approach encourages thinking in terms of agent ecosystems rather than isolated agents. Architecture Comparison Agents SDK Microsoft Agent Framework (MAF) Choosing the Right Approach Use Agents SDK when: You need rapid development for a single-agent use case The workflow is relatively straightforward You prefer flexibility and lower-level control Use Microsoft Agent Framework when: You are designing multi-agent systems Your solution requires routing, delegation, or handoffs Long-term scalability and maintainability are essential Pros and Cons Summary Agents SDK Pros Easy to get started Strong Azure integration Flexible design Cons Manual orchestration required Limited native multi-agent support Complexity increases as scenarios grow Microsoft Agent Framework (MAF) Pros Built-in orchestration Native multi-agent support Scalable and structured architecture Cons Learning curve for new developers More opinionated framework design Reduced low-level control compared to SDK-based approach References and Repositories 🔗 Microsoft Agent Framework (MAF) Microsoft Agent Framework – GitHub Repository Microsoft Agent Framework Samples – Tutorials & Examples Workflow Samples (Multi-agent patterns) FoundryChatClient sample (Python) Agent Framework demos - GitHub Source 📘 Documentation Microsoft Agent Framework Overview (Microsoft Learn) Agent Framework + Microsoft Foundry provider docs 🔗 Azure AI Projects / Agents SDK Azure AI Projects SDK – Python (GitHub Source) Azure AI Projects Agents (.NET SDK repo) 📘 Documentation Azure AI Projects SDK (Python) – Microsoft Learn Azure AI Agents SDK – Microsoft Learn Conclusion Azure AI Projects and Microsoft Agent Framework both play important roles in the modern agent development landscape. Agents SDK enables quick and flexible agent development Microsoft Agent Framework enables structured, scalable agent systems In practice, the choice depends on whether you are building a single agent feature or a multi-agent system. Final Thought Agents SDK helps you get started quickly. Microsoft Agent Framework helps you scale with confidence In a follow-up blog, I’ll dive into how the M365 Agents SDK compares with Microsoft Agent Framework, especially in the context of enterprise productivity and Copilot experiences.Building an On-Device Voice Assistant with Microsoft Foundry Local
Why on-device voice still matters Most "voice AI" tutorials assume your audio leaves the machine. You ship a WAV to Whisper-API, your transcript to GPT-4, and a synthesized response back over the wire. That works — but it also means three round trips, three per-token bills, and three places your user's voice gets logged. The new wave of small, hardware-optimised models changes the trade-off. NVIDIA's Nemotron Speech Streaming En 0.6B is a 600M-parameter streaming ASR model published into the Microsoft Foundry Local catalog. Paired with a small chat model like qwen2.5-0.5b or phi-4-mini , you can run the entire capture → transcribe → reason → respond loop in-process on a developer laptop, with no API keys and no network egress. This post walks through how the fl-nemotron sample does it, the SDK pitfalls we hit on the way, and the design decisions that made the pipeline reliable. What we're building A browser-hosted assistant served by FastAPI at http://127.0.0.1:8000 . The page captures microphone audio, posts it to /api/transcribe , then streams the chat reply back over Server-Sent Events from /api/chat . All inference runs locally through two Foundry Local models loaded into the same process. The shape of the pipeline: Microphone (browser MediaRecorder) │ WebM/Opus blob ▼ Client-side WAV encoder (16 kHz, mono, PCM-16) │ multipart/form-data ▼ FastAPI /api/transcribe │ ▼ Nemotron Speech Streaming En 0.6B (Foundry Local audio client) │ transcript text ▼ Chat LLM e.g. qwen2.5-0.5b (Foundry Local chat client) │ streamed tokens ▼ FastAPI /api/chat → SSE → browser bubble The version that bit us: foundry-local-sdk >= 1.1.0 Before any code, the single most important fact about this project: The Nemotron Speech Streaming model only appears in the Foundry Local 1.1.x catalog. Older SDKs (0.5.x / 0.6.x) cannot resolve the alias nemotron-speech-streaming-en-0.6b and fail with model not found . The module name also changed in 1.1.0 — it is now foundry_local_sdk (with the underscore- sdk suffix), not foundry_local . The pip wheel for foundry-local-core is bundled, so there is no separate MSI / winget install to worry about. Pin it explicitly: pip install --upgrade "foundry-local-sdk>=1.1.0,<2" And verify before anything else: python -c "import importlib.metadata as m; print('sdk', m.version('foundry-local-sdk'))" # expect: sdk 1.1.0 Loading both models from one manager The 1.1.x SDK exposes a single FoundryLocalManager that owns the runtime. Each loaded model gives you back a per-model OpenAI-compatible client — get_chat_client() for text models and get_audio_client() for ASR. There is no need to bring your own openai Python package; the SDK ships its own thin client. The wrapper used in the repo ( src/foundry_client.py ) does this: from foundry_local_sdk import Configuration, FoundryLocalManager FoundryLocalManager.initialize(Configuration(app_name="fl-nemotron")) manager = FoundryLocalManager.instance chat_model = manager.load_model("qwen2.5-0.5b") stt_model = manager.load_model("nemotron-speech-streaming-en-0.6b") chat_client = chat_model.get_chat_client() audio_client = stt_model.get_audio_client() Both models are downloaded on first use into the Foundry Local cache and stay resident for the lifetime of the process. On a laptop with 16 GB RAM, the combined working set sits comfortably under 4 GB. The transcription surprise The first naive approach was the obvious one: with open(wav_path, "rb") as f: result = audio_client.transcribe(file=f, model="nemotron-speech-streaming-en-0.6b") That call fails on Nemotron. The bundled ONNX Runtime GenAI in foundry-local-core does not register the nemotron_speech multi-modal model type that the standard AudioClient.transcribe() path tries to instantiate. The error surfaces as a cryptic model-type registration failure deep inside the native runtime. The fix is to use the streaming session API instead — a different native entry point ( core_interop.start_audio_stream ) that the streaming model does support. The repo isolates this in src/_nemotron_live.py : def transcribe_wav_live(audio_client, wav_path, *, language="en"): with wave.open(str(wav_path), "rb") as w: sample_rate = w.getframerate() channels = w.getnchannels() sample_width = w.getsampwidth() pcm = w.readframes(w.getnframes()) session = audio_client.create_live_transcription_session() session.settings.sample_rate = sample_rate session.settings.channels = channels session.settings.bits_per_sample = sample_width * 8 session.settings.language = language session.start() # Feed PCM in ~100 ms chunks from a worker thread, then stop. bytes_per_sec = sample_rate * channels * sample_width chunk_bytes = max(bytes_per_sec // 10, 1024) def _pusher(): try: for offset in range(0, len(pcm), chunk_bytes): session.append(pcm[offset:offset + chunk_bytes]) finally: session.stop() threading.Thread(target=_pusher, daemon=True).start() parts = [] for resp in session.get_stream(): for cp in getattr(resp, "content", []) or []: text = getattr(cp, "text", "") or getattr(cp, "transcript", "") or "" if text: parts.append(text) return " ".join(p.strip() for p in parts if p.strip()).strip() Two things to notice: Push from a thread, read from the main coroutine. session.append() is a blocking write into the native stream and session.get_stream() is a blocking generator. Run one in a worker thread so the other can drain in parallel — otherwise you deadlock the session. Chunk to ~100 ms. Smaller chunks (e.g. 10 ms) spend more time crossing the FFI boundary than transcribing; larger chunks (e.g. 1 s) hold back partial results and hurt perceived latency. Always session.stop() . Without it the generator never terminates and the request hangs. The other transcription surprise: browsers don't send WAV Inside the browser, MediaRecorder defaults to audio/webm; codecs=opus . That's great for size but bad for our STT model, which expects a 16-bit mono PCM WAV at a known sample rate. Decoding WebM/Opus server-side would require ffmpeg as a runtime dependency — which is exactly the kind of friction this project exists to remove. The cleaner solution is to encode WAV on the client. AudioContext.decodeAudioData already understands WebM/Opus, so the page can decode the recording, resample to 16 kHz, mix to mono, and emit a PCM-16 WAV blob in 30 lines of JavaScript: // Inside src/static/index.html async function webmToWav(blob) { const ctx = new (window.AudioContext || window.webkitAudioContext)({ sampleRate: 16000 }); const buf = await ctx.decodeAudioData(await blob.arrayBuffer()); // Mix to mono const ch = buf.numberOfChannels; const mono = new Float32Array(buf.length); for (let c = 0; c < ch; c++) { const data = buf.getChannelData(c); for (let i = 0; i < data.length; i++) mono[i] += data[i] / ch; } return encodeWav(mono, 16000); } function encodeWav(samples, sampleRate) { const buffer = new ArrayBuffer(44 + samples.length * 2); const view = new DataView(buffer); // RIFF header writeStr(view, 0, "RIFF"); view.setUint32(4, 36 + samples.length * 2, true); writeStr(view, 8, "WAVE"); // fmt chunk writeStr(view, 12, "fmt "); view.setUint32(16, 16, true); // PCM chunk size view.setUint16(20, 1, true); // PCM format view.setUint16(22, 1, true); // mono view.setUint32(24, sampleRate, true); view.setUint32(28, sampleRate * 2, true); // byte rate view.setUint16(32, 2, true); // block align view.setUint16(34, 16, true); // bits per sample // data chunk writeStr(view, 36, "data"); view.setUint32(40, samples.length * 2, true); // PCM-16 samples let o = 44; for (let i = 0; i < samples.length; i++, o += 2) { const s = Math.max(-1, Math.min(1, samples[i])); view.setInt16(o, s < 0 ? s * 0x8000 : s * 0x7FFF, true); } return new Blob([view], { type: "audio/wav" }); } Now the server's /api/transcribe endpoint just writes the bytes to a temp file and hands them to transcribe_wav_live() — no audio decoding libraries on the Python side. Wiring it into FastAPI The server ( src/app.py ) is deliberately small. The notable detail is that the same process holds both Foundry Local model handles for its entire lifetime, so there is no warm-up cost per request: @app.post("/api/transcribe") async def transcribe(audio: UploadFile = File(...)): data = await audio.read() with tempfile.NamedTemporaryFile(suffix=".wav", delete=False) as f: f.write(data); path = f.name text = _ai_client.transcribe(path) return {"text": text} @app.post("/api/chat") async def chat(req: ChatRequest): if req.stream: return StreamingResponse( _sse(_ai_client.stream_completion(req.messages)), media_type="text/event-stream", ) return {"text": _ai_client.chat_completion(req.messages)} Streaming uses Server-Sent Events because they are trivially supported in both fetch() and the FastAPI runtime, and they don't require a WebSocket upgrade through any proxy a developer might have in front of localhost . What it looks like The repo includes screenshots of the running UI: a welcome screen with both models loaded, a streamed haiku reply, an inline code block with copy-to-clipboard, and the recording state for the microphone. Performance, honestly This is a small-model, CPU-friendly stack. On an Arm64 Surface running the x64 SDK under emulation: First model load (cold cache): tens of seconds — downloads ~600 MB for Nemotron and ~400 MB for qwen2.5-0.5b . Subsequent loads (warm cache): a few seconds per model. End-to-end transcription of a 5-second utterance: well under a second after warm-up. First chat token from qwen2.5-0.5b : typically 200–500 ms; full short reply within 1–2 s. On x64 silicon with a recent CPU the numbers improve substantially, and the SDK will pick the best execution provider it finds (CPU / DirectML / CUDA) for each model. Trade-offs to know about Model quality. qwen2.5-0.5b is a 500M-parameter model. It is fast and small enough to ship on a laptop, but it is not GPT-4. Swap in phi-4-mini or mistral-nemo-12b-instruct if you have the RAM and want better reasoning — the wrapper accepts any chat alias in the Foundry Local catalog. STT is English-only here. The current Nemotron streaming model in the catalog is ...-en-0.6b . Multilingual variants are likely to follow. Browser microphone needs a real browser. Headless / automated browsers (Playwright, Puppeteer) deny getUserMedia by default. Open the page in Edge / Chrome / Firefox to grant the permission and capture audio for real. No agent framework yet. This sample is deliberately a single-turn loop over a chat client — there is no tool calling, planning, or multi-agent orchestration. Adding the Microsoft Agent Framework on top would be a natural next step for richer behaviour. Responsible AI considerations Running locally removes the cloud-egress class of privacy concerns, but it does not remove responsibility: Disclose recording. The browser prompts for mic permission; your UI should make it obvious when capture is active. The sample shows a red ⏹ button and a "Recording…" banner for that reason. Don't log raw audio. The sample writes audio to a per-request NamedTemporaryFile and deletes it after transcription. Treat the WAV as sensitive data even when it never leaves the device. Small models hallucinate. A 0.5B chat model is great for snappy local replies, but unsuitable for high-stakes answers. Pair it with retrieval, ground it on your own data, or escalate to a larger model when accuracy matters. Try it Clone github.com/leestott/fl-nemotron. ./setup.ps1 (or ./setup.sh ) to create a virtualenv and install the pinned SDK. python scripts/prefetch.py nemotron-speech-streaming-en-0.6b qwen2.5-0.5b to download both models. .venv\Scripts\uvicorn.exe app:app --app-dir src --port 8000 Open http://127.0.0.1:8000 in a real browser and click the 🎤 button. Where to go next Foundry Local documentation — official docs for the runtime, catalog, and SDK. microsoft/Foundry-Local — upstream samples and issue tracker. NVIDIA Nemotron model family — background on the speech and language models being published into the catalog. leestott/fl-nemotron — the full source for this post. Key takeaways Pin foundry-local-sdk >= 1.1.0 . Earlier SDKs cannot see the Nemotron Speech Streaming model. Use the LiveAudioTranscriptionSession API for Nemotron, not AudioClient.transcribe() . Encode WAV in the browser. It eliminates a heavy server-side ffmpeg dependency for a few lines of JS. Push audio chunks on a worker thread and drain the response generator on the main one to avoid deadlocks. A small Foundry Local chat model plus Nemotron STT gives you a credible local voice loop in a single Python process — no cloud, no keys, no data egress.
Building an End-to-End Azure RAG Strategy Agent with MS Foundry
High-Level Architecture This architecture represents an end-to-end Retrieval-Augmented Generation (RAG) pipeline where raw documents are ingested from Azure Blob Storage, processed using Document Intelligence, transformed into embeddings via Azure OpenAI, and indexed in Azure AI Search for hybrid retrieval. A Foundry/MAF-based agent orchestrates query processing by combining user input with relevant search results and generates contextual responses, which are exposed through a FastAPI or CLI interface. This solution is composed of two main layers: 1. Data Ingestion Layer (RAG Pipeline) This layer transforms raw enterprise documents into searchable knowledge. Flow: Raw documents stored in Azure Blob Storage Supported formats: PDF, DOCX, PPTX, images, etc. Document Intelligence extraction Extracts: Text Tables Key-value pairs Structure Writes output as structured JSON back to Blob (processed/) Chunking + Embedding Documents are split into chunks Each chunk is embedded using Azure OpenAI (text-embedding-*) Indexing into Azure AI Search Creates a hybrid index: Keyword search Semantic ranking Vector search Enables flexible retrieval strategies 2. Query Layer (Strategy Agents) This layer enables intelligent query answering. Flow: User sends a query via: FastAPI endpoint CLI interface Query is handled by: Microsoft Agent Framework (MAF) agent Running on Azure AI Foundry Agent: Queries Azure AI Search Retrieves top relevant chunks Injects them into LLM prompt LLM generates grounded response This follows the standard RAG pattern: Retrieval → Augmentation → Generation End-to-End Flow Key Azure Services Used Service Purpose Azure Blob Storage Raw + processed document storage Azure AI Document Intelligence Extract structured content Azure OpenAI Embeddings + LLM generation Azure AI Search Hybrid retrieval engine Azure AI Foundry Agent orchestration Microsoft Agent Framework Agent execution layer Why this Architecture Matters This solution goes beyond basic RAG and provides: Hybrid Retrieval Combines keyword + semantic + vector search Improves recall and accuracy Structured Document Parsing Handles complex enterprise documents Extracts tables and metadata Agent-Based Orchestration Enables reasoning over retrieval results Extensible for multi-agent workflows Scalable Data Pipeline Supports continuous ingestion Works with large document collections Enterprise Considerations Use Managed Identity for secure service access Apply RBAC on Cosmos DB / Search / Storage Enable Private Endpoints for network isolation Use Guardrails + Evaluations in Foundry Summary This repository demonstrates a production-ready Azure RAG architecture: Ingest → Extract → Chunk → Embed → Index Retrieve → Reason → Generate Powered by Azure AI Foundry + Agent Framework By combining data engineering + AI orchestration, it enables enterprise AI systems that are: Accurate Grounded Extensible Repo: https://github.com/snd94/azure-rag-strategy-agent Please refer to the Microsoft Learn Documentation for further information: Azure AI Search documentation - Azure AI Search | Microsoft Learn Document Intelligence documentation - Quickstarts, Tutorials, API Reference - Foundry Tools | Microsoft Learn How to generate embeddings with Azure OpenAI in Microsoft Foundry Models - Microsoft Foundry | Microsoft Learn How to generate embeddings with Azure OpenAI in Microsoft Foundry Models - Microsoft Foundry | Microsoft Learn Microsoft Agent Framework Overview | Microsoft Learn What is Microsoft Foundry? - Microsoft Foundry | Microsoft LearnBuilding AI Agents with Microsoft Foundry: A Progressive Lab from Hello World to Self-Hosted
AI agent development has a steep on-ramp. The combination of new SDKs, tool-calling patterns, model selection decisions, retrieval-augmented generation, and deployment concerns means most developers spend more time wiring things together than actually building anything useful. The Microsoft Foundry Agent Lab is a structured, open-source demo series designed to change that — nine self-contained demos, each adding exactly one new concept, all built on the same Microsoft Foundry SDK and a single model deployment. This post walks through what the lab contains, how each demo works under the hood, and the architectural decisions that make it a useful reference for AI engineers building production agents. Why a Progressive Lab? Agent frameworks can be overwhelming. A developer who opens a rich example with RAG, tool-calling, streaming, and a custom UI all at once has no clear line of sight to which parts are essential and which are embellishments. The Foundry Agent Lab takes the opposite approach: start with the absolute minimum and introduce one new primitive per demo. By the time you reach Demo 8, you have seen every major capability — not in one monolithic sample, but in a layered sequence where each addition is visible and understandable. # Demo New Concept Tool Used UX 0 hello-demo Agent creation, Responses API, conversations None Terminal 1 tools-demo Function calling, tool-calling loop, live API FunctionTool Terminal 2 desktop-demo UI decoupling — same agent, different surface None Desktop (Tkinter) 3 websearch-demo Server-side built-in tools, no client loop WebSearchTool Terminal 4 code-demo Code execution in sandbox, Gradio web UI CodeInterpreterTool Web (Gradio) 5 rag-demo Document upload, vector stores, RAG grounding FileSearchTool Terminal 6 mcp-demo MCP servers, human-in-the-loop approval MCPTool Terminal 7 toolbox-demo Centralized tool governance, Toolbox versioning Toolbox Terminal 8 hosted-demo Self-hosted agent with Responses protocol Custom server Terminal + Agent Inspector The Model Router: One Deployment to Rule Them All Before diving into the demos, it is worth understanding the one architectural decision that ties the entire lab together: every agent uses model-router as its model deployment. MODEL_DEPLOYMENT=model-router Model Router is a Microsoft Foundry capability that inspects each request at inference time and routes it to the optimal available model — weighing task complexity, cost, and latency. A simple factual question goes to a fast, cheap model. A complex tool-calling chain with code generation gets routed to a frontier model. You write zero routing logic. The lab's MODEL-ROUTER.md file contains empirical observations from running all nine demos. A sample of what the router selected: Demo Query Task Type Model Selected hello "What's the capital of WA state?" Factual recall grok-4-1-fast-reasoning hello "Summarize our conversation" Summarization gpt-5.2-chat-2025-12-11 tools "What's the weather in Seattle?" Tool-using gpt-5.4-mini-2026-03-17 code Data analysis with code generation Code generation + execution gpt-5.4-2026-03-05 rag HR policy document question Retrieval + synthesis gpt-5.3-chat-2026-03-03 This is the strongest signal in the lab: you do not need to reason about model selection. You declare what your agent needs to do; the router handles the rest, and it chooses correctly. Demo 0: The Minimum Viable Agent The hello-demo establishes the baseline pattern used by every subsequent demo. Two files: one to register the agent, one to chat with it. Registering the agent from azure.identity import DefaultAzureCredential from azure.ai.projects import AIProjectClient from azure.ai.projects.models import PromptAgentDefinition credential = DefaultAzureCredential() project = AIProjectClient(endpoint=PROJECT_ENDPOINT, credential=credential) agent = project.agents.create_version( agent_name=AGENT_NAME, definition=PromptAgentDefinition( model=MODEL_DEPLOYMENT, instructions="You are a helpful, friendly assistant.", ), ) Authentication uses DefaultAzureCredential , which works with az login locally and with managed identity in production — no API keys anywhere in the code. Chatting with the agent # Create a server-side conversation (persists history across turns) conversation = openai.conversations.create() # Each turn sends the user message; the agent sees full history response = openai.responses.create( input=user_input, conversation=conversation.id, extra_body={"agent_reference": {"name": AGENT_NAME, "type": "agent_reference"}}, ) print(response.output_text) The conversation object is server-side. You pass its ID on every turn; the history lives in Foundry, not in a local list. This is the Responses API pattern — distinct from the older Completions or Chat Completions APIs. Demo 1: Function Tools and the Tool-Calling Loop Demo 1 adds function calling against a real weather API. The key insight here is that the model does not execute the function — it requests the execution, and your code executes it locally, then feeds the result back. Declaring a function tool from azure.ai.projects.models import FunctionTool, PromptAgentDefinition func_tool = FunctionTool( name="get_weather", description="Get the current weather for a given city.", parameters={ "type": "object", "properties": {"city": {"type": "string", "description": "City name"}}, "required": ["city"], }, strict=True, ) agent = project.agents.create_version( agent_name=AGENT_NAME, definition=PromptAgentDefinition( model=MODEL_DEPLOYMENT, tools=[func_tool], instructions="You are a weather assistant...", ), ) The tool-calling loop response = openai.responses.create(input=user_input, conversation=conversation.id, ...) # Loop while the model is requesting tool calls while any(item.type == "function_call" for item in response.output): input_list = [] for item in response.output: if item.type == "function_call": args = json.loads(item.arguments) result = get_weather(args["city"]) # execute locally input_list.append(FunctionCallOutput(call_id=item.call_id, output=result)) # Send results back to the agent response = openai.responses.create(input=input_list, conversation=conversation.id, ...) print(response.output_text) The strict=True parameter on FunctionTool enforces structured outputs — the model must return arguments that match the declared JSON schema exactly. This eliminates argument parsing errors in production. Demo 2: UI Is Not Your Agent Demo 2 runs the exact same agent as Demo 1 but surfaces it in a Tkinter desktop window. The point is pedagogical: your agent definition, conversation management, and tool-calling logic are entirely independent of your UI layer. Swapping from terminal to desktop requires changing only the presentation code — nothing in the agent or conversation path changes. This is a principle worth internalising early: agent logic and UI logic should never be entangled. The lab enforces this separation structurally. Demo 3: Server-Side Built-In Tools The web search demo introduces a sharp contrast with Demo 1. With WebSearchTool , the tool-calling loop disappears entirely from client code: from azure.ai.projects.models import WebSearchTool agent = project.agents.create_version( agent_name="Search-Agent", definition=PromptAgentDefinition( model=MODEL_DEPLOYMENT, tools=[WebSearchTool()], instructions="You are a research assistant...", ), ) The agent decides when to search, executes the search server-side, and returns a grounded response with citations. Your client code looks identical to Demo 0 — a simple responses.create() call with no tool loop. The distinction matters architecturally: Function tools (Demo 1) — tool execution happens on your client; you control the code, the API call, the error handling. Built-in tools (Demo 3+) — tool execution happens inside Foundry; you get results without managing execution. Demo 4: Code Interpreter and the Gradio Web UI Demo 4 attaches CodeInterpreterTool , which gives the agent a sandboxed Python execution environment inside Foundry. The agent can write code, run it, observe output, and iterate — all server-side. Combined with a Gradio web interface, this demo shows an agent that can perform data analysis, generate charts, and explain results through a browser UI. Model Router is particularly interesting here: the empirical data shows it selects a more capable frontier model ( gpt-5.4-2026-03-05 ) for code-generation tasks, while simpler conversational turns stay on lighter models. Demo 5: Retrieval-Augmented Generation with FileSearchTool Demo 5 introduces RAG. The setup phase uploads a document, creates a vector store, and attaches it to the agent: # Upload document and create a vector store vector_store = openai.vector_stores.create(name="employee-handbook-store") with open("data/employee-handbook.md", "rb") as f: openai.vector_stores.files.upload_and_poll( vector_store_id=vector_store.id, file=f ) # Attach the vector store to the agent agent = project.agents.create_version( agent_name="RAG-Agent", definition=PromptAgentDefinition( model=MODEL_DEPLOYMENT, tools=[FileSearchTool(vector_store_ids=[vector_store.id])], instructions="Answer questions using only the provided documents...", ), ) At query time, the agent embeds the question, searches the vector store semantically, retrieves matching chunks, and generates an answer grounded in the retrieved content — entirely server-side. The client code remains a plain responses.create() call. An important detail: the .vector_store_id file is written to disk during setup and read back during the chat session, so the demo survives process restarts without re-uploading the document. The .gitignore excludes this file from source control. Demo 6: Model Context Protocol Demo 6 connects the agent to a GitHub MCP server, giving it access to repository and issue data via the open Model Context Protocol standard. MCP servers expose tools over a standardised wire protocol; the agent discovers and calls them without any client-side function declarations. The demo also demonstrates human-in-the-loop approval: before executing any MCP tool call, the agent surfaces the proposed action and waits for the user to confirm. This is an important safety pattern for agents that can trigger side effects on external systems. Demo 7: Toolbox — Centralised Tool Governance Where Demo 6 connects to a single MCP server directly, Demo 7 uses a Toolbox — a managed Microsoft Foundry resource that bundles multiple tools into a single, versioned, MCP-compatible endpoint. The Toolbox in this demo exposes both GitHub Issues and GitHub Repos tools, curated into an immutable versioned snapshot. This pattern is significant for production multi-agent systems: Centralised governance — one team owns the tool definitions; all agents consume them via a single endpoint. Versioned snapshots — promoting a new Toolbox version is explicit; agents pin to a version and upgrade intentionally. MCP compatibility — any MCP-capable agent or framework can connect, not just Foundry SDK agents. from azure.ai.projects.models import McpTool toolbox_tool = McpTool( server_label="toolbox", server_url=TOOLBOX_ENDPOINT, allowed_tools=[], # empty = all tools in the Toolbox version headers={"Authorization": f"Bearer {token}"}, ) Demo 8: Self-Hosted Agent with the Responses Protocol The final demo departs from the prompt-agent pattern. Instead of registering a declarative agent in Foundry, Demo 8 implements a custom agent server using the Responses protocol. The server exposes a streaming HTTP endpoint; Foundry's Agent Inspector can connect to it and route user turns to it just as it would to a hosted prompt agent. This demo includes a Dockerfile and an agent.yaml , enabling deployment to Foundry's container hosting service. It uses gpt-4.1-mini directly rather than the model router, because the custom server owns the entire inference path. When to consider this pattern: Your agent requires custom pre- or post-processing logic that cannot be expressed in a system prompt. You need to integrate with infrastructure that is not reachable through MCP or built-in tools. You want to own the inference call for cost control, A/B testing, or compliance reasons. You are building a multi-agent orchestrator that needs to expose itself as an agent to other orchestrators. Getting Started The lab requires Python 3.10 or higher, an Azure subscription with a Microsoft Foundry project, and the Azure CLI. 1. Clone and set up the virtual environment git clone https://github.com/microsoft-foundry/Foundry-Agent-Lab.git cd Foundry-Agent-Lab # Create and activate the virtual environment python -m venv .venv # Windows Command Prompt .venv\Scripts\activate.bat # Windows PowerShell .venv\Scripts\Activate.ps1 # macOS / Linux source .venv/bin/activate pip install -r requirements.txt 2. Configure a demo copy hello-demo\.env.sample hello-demo\.env # Edit hello-demo\.env and set PROJECT_ENDPOINT Your PROJECT_ENDPOINT is on the Overview page of your Foundry project in the Azure portal. It takes the form https://your-resource.ai.azure.com/api/projects/your-project . 3. Run the demo az login 0-hello-demo Each numbered batch file at the root activates the virtual environment, runs create_agent.py , and launches chat.py . Append log to capture the full session transcript: 0-hello-demo log Reset between runs hello-demo\reset.bat Every demo includes a reset.bat that deletes the registered agent and any associated resources (vector stores, uploaded files). Demos are fully repeatable. Architecture Principles Demonstrated Across the nine demos, the lab illustrates a set of design principles that apply directly to production agent systems: Keyless authentication throughout Every demo uses DefaultAzureCredential . No API keys appear anywhere in the code. Locally, az login provides credentials. In production, managed identity takes over automatically — same code, no secrets to rotate. Server-side conversation state The Responses API stores conversation history server-side. Your application passes a conversation ID; Foundry maintains the thread. This eliminates the common bug of truncating history due to local list management and makes multi-process or multi-instance deployments straightforward. Client-side vs server-side tool execution The lab makes the distinction explicit. Function tools execute in your process — you control the code, the external call, and the error handling. Built-in tools (WebSearch, CodeInterpreter, FileSearch) execute inside Foundry — you get results without managing execution infrastructure. MCP tools (Demo 6, 7) fall between these: they execute in a separately deployed server, with the protocol mediating the call. Progressive tool introduction Each demo's create_agent.py registers the agent once. The chat.py file handles the conversation loop. These two responsibilities are always separate, making it easy to update agent definitions without modifying conversation logic, and vice versa. Security Considerations When building agents for production, keep the following in mind: Never commit .env files. The .gitignore excludes them, but verify this before pushing. Use Azure Key Vault or environment variable injection in CI/CD pipelines. Use managed identity in production. DefaultAzureCredential automatically picks up managed identity when deployed to Azure, eliminating the need for any stored credentials. Apply human-in-the-loop for side-effecting tools. Demo 6 demonstrates this pattern for MCP tool calls. Any agent that can modify external state (create issues, send emails, write files) should surface proposed actions for confirmation. Validate tool outputs before use. Treat data returned by external tools (weather APIs, search results, document retrieval) as untrusted input. Prompt injection through tool results is a real attack surface; grounding instructions in your system prompt reduce but do not eliminate this risk. Scope Toolbox permissions narrowly. When using a Toolbox (Demo 7), use allowed_tools to restrict which tools the agent can call, rather than granting access to all tools in a Toolbox version. Key Takeaways Start with the minimum. A prompt agent with no tools requires fewer than 30 lines of code using the Foundry SDK. Add tools only when the use case demands them. Use model-router unless you have a specific reason not to. The empirical data in the lab shows the router selects appropriate models across all task types — factual, creative, tool-calling, RAG, and code generation. Understand the client/server tool boundary. Function tools give you control; built-in tools give you simplicity. MCP and Toolbox give you governance and interoperability. Choose based on where you need control and where you need scale. Conversation state belongs on the server. Do not maintain conversation history in application memory if you can avoid it. The Responses API conversation object is designed for this. The hosted-demo pattern is for when you need to own the inference path. For most use cases, a declarative prompt agent is sufficient and far simpler to operate. Next Steps Explore the repo: github.com/microsoft-foundry/Foundry-Agent-Lab Microsoft Foundry SDK documentation: learn.microsoft.com/azure/ai-studio/ Responses API quickstart: Prompt agent quickstart Model Router conceptual documentation: Model Router for Microsoft Foundry Model Context Protocol: modelcontextprotocol.io Azure Identity SDK (DefaultAzureCredential): azure-identity Python SDK The Foundry Agent Lab is open source under the MIT licence. Contributions, bug reports, and feature requests are welcome through GitHub Issues. See CONTRIBUTING.md for guidelines.