agents
132 TopicsChoosing the Right Model in GitHub Copilot: A Practical Guide for Developers
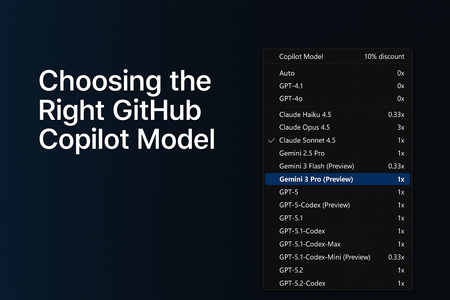
AI-assisted development has grown far beyond simple code suggestions. GitHub Copilot now supports multiple AI models, each optimized for different workflows, from quick edits to deep debugging to multi-step agentic tasks that generate or modify code across your entire repository. As developers, this flexibility is powerful… but only if we know how to choose the right model at the right time. In this guide, I’ll break down: Why model selection matters The four major categories of development tasks A simplified, developer-friendly model comparison table Enterprise considerations and practical tips This is written from the perspective of real-world customer conversations, GitHub Copilot demos, and enterprise adoption journeys Why Model Selection Matters GitHub Copilot isn’t tied to a single model. Instead, it offers a range of models, each with different strengths: Some are optimized for speed Others are optimized for reasoning depth Some are built for agentic workflows Choosing the right model can dramatically improve: The quality of the output The speed of your workflow The accuracy of Copilot’s reasoning The effectiveness of Agents and Plan Mode Your usage efficiency under enterprise quotas Model selection is now a core part of modern software development, just like choosing the right library, framework, or cloud service. The Four Task Categories (and which Model Fits) To simplify model selection, I group tasks into four categories. Each category aligns naturally with specific types of models. 1. Everyday Development Tasks Examples: Writing new functions Improving readability Generating tests Creating documentation Best fit: General-purpose coding models (e.g., GPT‑4.1, GPT‑5‑mini, Claude Sonnet) These models offer the best balance between speed and quality. 2. Fast, Lightweight Edits Examples: Quick explanations JSON/YAML transformations Small refactors Regex generation Short Q&A tasks Best fit: Lightweight models (e.g., Claude Haiku 4.5) These models give near-instant responses and keep you “in flow.” 3. Complex Debugging & Deep Reasoning Examples: Analyzing unfamiliar code Debugging tricky production issues Architecture decisions Multi-step reasoning Performance analysis Best fit: Deep reasoning models (e.g., GPT‑5, GPT‑5.1, GPT‑5.2, Claude Opus) These models handle large context, produce structured reasoning, and give the most reliable insights for complex engineering tasks. 4. Multi-step Agentic Development Examples: Repo-wide refactors Migrating a codebase Scaffolding entire features Implementing multi-file plans in Agent Mode Automated workflows (Plan → Execute → Modify) Best fit: Agent-capable models (e.g., GPT‑5.1‑Codex‑Max, GPT‑5.2‑Codex) These models are ideal when you need Copilot to execute multi-step tasks across your repository. GitHub Copilot Models - Developer Friendly Comparison The set of models you can choose from depends on your Copilot subscription, and the available options may evolve over time. Each model also has its own premium request multiplier, which reflects the compute resources it requires. If you're using a paid Copilot plan, the multiplier determines how many premium requests are deducted whenever that model is used. Model Category Example Models (Premium request Multiplier for paid plans) What they’re best at When to Use Them Fast Lightweight Models Claude Haiku 4.5, Gemini 3 Flash (0.33x) Grok Code Fast 1 (0.25x) Low latency, quick responses Small edits, Q&A, simple code tasks General-Purpose Coding Models GPT‑4.1, GPT‑5‑mini (0x) GPT-5-Codex, Claude Sonnet 4.5 (1x) Reliable day‑to‑day development Writing functions, small tests, documentation Deep Reasoning Models GPT-5.1 Codex Mini (0.33x) GPT‑5, GPT‑5.1, GPT-5.1 Codex, GPT‑5.2, Claude Sonnet 4.0, Gemini 2.5 Pro, Gemini 3 Pro (1x) Claude Opus 4.5 (3x) Complex reasoning and debugging Architecture work, deep bug diagnosis Agentic / Multi-step Models GPT‑5.1‑Codex‑Max, GPT‑5.2‑Codex (1x) Planning + execution workflows Repo-wide changes, feature scaffolding Enterprise Considerations For organizations using Copilot Enterprise or Business: Admins can control which models employees can use Model selection may be restricted due to security, regulation, or data governance You may see fewer available models depending on your organization’s Copilot policies Using "Auto" Model selection in GitHub Copilot GitHub Copilot’s Auto model selection automatically chooses the best available model for your prompts, reducing the mental load of picking a model and helping you avoid rate‑limiting. When enabled, Copilot prioritizes model availability and selects from a rotating set of eligible models such as GPT‑4.1, GPT‑5 mini, GPT‑5.2‑Codex, Claude Haiku 4.5, and Claude Sonnet 4.5 while respecting your subscription level and any administrator‑imposed restrictions. Auto also excludes models blocked by policies, models with premium multipliers greater than 1, and models unavailable in your plan. For paid plans, Auto provides an additional benefit: a 10% discount on premium request multipliers when used in Copilot Chat. Overall, Auto offers a balanced, optimized experience by dynamically selecting a performant and cost‑efficient model without requiring developers to switch models manually. Read more about the 'Auto' Model selection here - About Copilot auto model selection - GitHub Docs Final Thoughts GitHub Copilot is becoming a core part of the developer workflows. Choosing the right model can dramatically improve your productivity, the accuracy of Copilot’s responses, your experience with multi-step agentic tasks, your ability to navigate complex codebases Whether you’re building features, debugging complex issues, or orchestrating repo-wide changes, picking the right model helps you get the best out of GitHub Copilot. References and Further Reading To explore each model further, visit the GitHub Copilot model comparison documentation or try switching models in Copilot Chat to see how they impact your workflow. AI model comparison - GitHub Docs Requests in GitHub Copilot - GitHub Docs About Copilot auto model selection - GitHub DocsBuilding a Multi-Agent On-Call Copilot with Microsoft Agent Framework
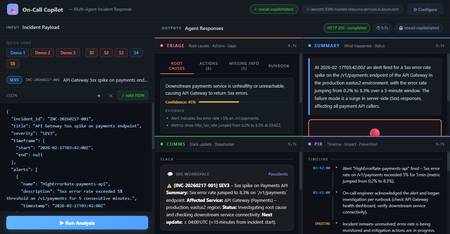
Four AI agents, one incident payload, structured triage in under 60 seconds powered by Microsoft Agent Framework and Foundry Hosted Agents. Multi-Agent Microsoft Agent Framework Foundry Hosted Agents Python SRE / Incident Response When an incident fires at 3 AM, every second the on-call engineer spends piecing together alerts, logs, and metrics is a second not spent fixing the problem. What if an AI system could ingest the raw incident signals and hand you a structured triage, a Slack update, a stakeholder brief, and a draft post-incident report, all in under 10 seconds? That’s exactly what On-Call Copilot does. In this post, we’ll walk through how we built it using the Microsoft Agent Framework, deployed it as a Foundry Hosted Agent, and discuss the key design decisions that make multi-agent orchestration practical for production workloads. The full source code is open-source on GitHub. You can deploy your own instance with a single azd up . Why Multi-Agent? The Problem with Single-Prompt Triage Early AI incident assistants used a single large prompt: “Here is the incident. Give me root causes, actions, a Slack message, and a post-incident report.” This approach has two fundamental problems: Context overload. A real incident may have 800 lines of logs, 10 alert lines, and dense metrics. Asking one model to process everything and produce four distinct output formats in a single turn pushes token limits and degrades quality. Conflicting concerns. Triage reasoning and communication drafting are cognitively different tasks. A model optimised for structured JSON analysis often produces stilted Slack messages—and vice versa. The fix is specialisation: decompose the task into focused agents, give each agent a narrow instruction set, and run them in parallel. This is the core pattern that the Microsoft Agent Framework makes easy. Architecture: Four Agents Running Concurrently On-Call Copilot is deployed as a Foundry Hosted Agent—a containerised Python service running on Microsoft Foundry’s managed infrastructure. The core orchestrator uses ConcurrentBuilder from the Microsoft Agent Framework SDK to run four specialist agents in parallel via asyncio.gather() . All four panels populated simultaneously: Triage (red), Summary (blue), Comms (green), PIR (purple). Architecture: The orchestrator runs four specialist agents concurrently via asyncio.gather(), then merges their JSON fragments into a single response. All four agents The solution share a single Azure OpenAI Model Router deployment. Rather than hardcoding gpt-4o or gpt-4o-mini , Model Router analyses request complexity and routes automatically. A simple triage prompt costs less; a long post-incident synthesis uses a more capable model. One deployment name, zero model-selection code. Meet the Four Agents 🔍 Triage Agent Root cause analysis, immediate actions, missing data identification, and runbook alignment. suspected_root_causes · immediate_actions · missing_information · runbook_alignment 📋 Summary Agent Concise incident narrative: what happened and current status (ONGOING / MITIGATED / RESOLVED). summary.what_happened · summary.current_status 📢 Comms Agent Audience-appropriate communications: Slack channel update with emoji conventions, plus a non-technical stakeholder brief. comms.slack_update · comms.stakeholder_update 📝 PIR Agent Post-incident report: chronological timeline, quantified customer impact, and specific prevention actions. post_incident_report.timeline · .customer_impact · .prevention_actions The Code: Building the Orchestrator The entry point is remarkably concise. ConcurrentBuilder handles all the async wiring—you just declare the agents and let the framework handle parallelism, error propagation, and response merging. main.py — Orchestrator from agent_framework import ConcurrentBuilder from agent_framework.azure import AzureOpenAIChatClient from azure.ai.agentserver.agentframework import from_agent_framework from azure.identity import DefaultAzureCredential, get_bearer_token_provider from app.agents.triage import TRIAGE_INSTRUCTIONS from app.agents.comms import COMMS_INSTRUCTIONS from app.agents.pir import PIR_INSTRUCTIONS from app.agents.summary import SUMMARY_INSTRUCTIONS _credential = DefaultAzureCredential() _token_provider = get_bearer_token_provider( _credential, "https://cognitiveservices.azure.com/.default" ) def create_workflow_builder(): """Create 4 specialist agents and wire them into a ConcurrentBuilder.""" triage = AzureOpenAIChatClient(ad_token_provider=_token_provider).create_agent( instructions=TRIAGE_INSTRUCTIONS, name="triage-agent", ) summary = AzureOpenAIChatClient(ad_token_provider=_token_provider).create_agent( instructions=SUMMARY_INSTRUCTIONS, name="summary-agent", ) comms = AzureOpenAIChatClient(ad_token_provider=_token_provider).create_agent( instructions=COMMS_INSTRUCTIONS, name="comms-agent", ) pir = AzureOpenAIChatClient(ad_token_provider=_token_provider).create_agent( instructions=PIR_INSTRUCTIONS, name="pir-agent", ) return ConcurrentBuilder().participants([triage, summary, comms, pir]) def main(): builder = create_workflow_builder() from_agent_framework(builder.build).run() # starts on port 8088 if __name__ == "__main__": main() Key insight: DefaultAzureCredential means there are no API keys anywhere in the codebase. The container uses managed identity in production; local development uses your az login session. The same code runs in both environments without modification. Agent Instructions: Prompts as Configuration Each agent receives a tightly scoped system prompt that defines its output schema and guardrails. Here’s the Triage Agent—the most complex of the four: app/agents/triage.py TRIAGE_INSTRUCTIONS = """\ You are the **Triage Agent**, an expert Site Reliability Engineer specialising in root cause analysis and incident response. ## Task Analyse the incident data and return a single JSON object with ONLY these keys: { "suspected_root_causes": [ { "hypothesis": "string – concise root cause hypothesis", "evidence": ["string – supporting evidence from the input"], "confidence": 0.0 // 0-1, how confident you are } ], "immediate_actions": [ { "step": "string – concrete action with runnable command if applicable", "owner_role": "oncall-eng | dba | infra-eng | platform-eng", "priority": "P0 | P1 | P2 | P3" } ], "missing_information": [ { "question": "string – what data is missing", "why_it_matters": "string – why this data would help" } ], "runbook_alignment": { "matched_steps": ["string – runbook steps that match the situation"], "gaps": ["string – gaps or missing runbook coverage"] } } ## Guardrails 1. **No secrets** – redact any credential-like material as [REDACTED]. 2. **No hallucination** – if data is insufficient, set confidence to 0 and add entries to missing_information. 3. **Diagnostic suggestions** – when data is sparse, include diagnostic steps in immediate_actions. 4. **Structured output only** – return ONLY valid JSON, no prose. """ The Comms Agent follows the same pattern but targets a different audience: app/agents/comms.py COMMS_INSTRUCTIONS = """\ You are the **Comms Agent**, an expert incident communications writer. ## Task Return a single JSON object with ONLY this key: { "comms": { "slack_update": "Slack-formatted message with emoji, severity, status, impact, next steps, and ETA", "stakeholder_update": "Non-technical summary for executives. Focus on business impact and resolution." } } ## Guidelines - Slack: Use :rotating_light: for active SEV1/2, :warning: for degraded, :white_check_mark: for resolved. - Stakeholder: No jargon. Translate to business impact. - Tone: Calm, factual, action-oriented. Never blame individuals. - Structured output only – return ONLY valid JSON, no prose. """ Instructions as config, not code. Agent behaviour is defined entirely by instruction text strings. A non-developer can refine agent behaviour by editing the prompt and redeploying no Python changes needed. The Incident Envelope: What Goes In The agent accepts a single JSON envelope. It can come from a monitoring alert webhook, a PagerDuty payload, or a manual CLI invocation: Incident Input (JSON) { "incident_id": "INC-20260217-002", "title": "DB connection pool exhausted — checkout-api degraded", "severity": "SEV1", "timeframe": { "start": "2026-02-17T14:02:00Z", "end": null }, "alerts": [ { "name": "DatabaseConnectionPoolNearLimit", "description": "Connection pool at 99.7% on orders-db-primary", "timestamp": "2026-02-17T14:03:00Z" } ], "logs": [ { "source": "order-worker", "lines": [ "ERROR: connection timeout after 30s (attempt 3/3)", "WARN: pool exhausted, queueing request (queue_depth=847)" ] } ], "metrics": [ { "name": "db_connection_pool_utilization_pct", "window": "5m", "values_summary": "Jumped from 22% to 99.7% at 14:03Z" } ], "runbook_excerpt": "Step 1: Check DB connection dashboard...", "constraints": { "max_time_minutes": 15, "environment": "production", "region": "swedencentral" } } Declaring the Hosted Agent The agent is registered with Microsoft Foundry via a declarative agent.yaml file. This tells Foundry how to discover and route requests to the container: agent.yaml kind: hosted name: oncall-copilot description: | Multi-agent hosted agent that ingests incident signals and runs 4 specialist agents concurrently via Microsoft Agent Framework ConcurrentBuilder. metadata: tags: - Azure AI AgentServer - Microsoft Agent Framework - Multi-Agent - Model Router protocols: - protocol: responses environment_variables: - name: AZURE_OPENAI_ENDPOINT value: ${AZURE_OPENAI_ENDPOINT} - name: AZURE_OPENAI_CHAT_DEPLOYMENT_NAME value: model-router The protocols: [responses] declaration exposes the agent via the Foundry Responses API on port 8088. Clients can invoke it with a standard HTTP POST no custom API needed. Invoking the Agent Once deployed, you can invoke the agent with the project’s built-in scripts or directly via curl : CLI / curl # Using the included invoke script python scripts/invoke.py --demo 2 # multi-signal SEV1 demo python scripts/invoke.py --scenario 1 # Redis cluster outage # Or with curl directly TOKEN=$(az account get-access-token \ --resource https://ai.azure.com --query accessToken -o tsv) curl -X POST \ "$AZURE_AI_PROJECT_ENDPOINT/openai/responses?api-version=2025-05-15-preview" \ -H "Authorization: Bearer $TOKEN" \ -H "Content-Type: application/json" \ -d '{ "input": [ {"role": "user", "content": "<incident JSON here>"} ], "agent": { "type": "agent_reference", "name": "oncall-copilot" } }' The Browser UI The project includes a zero-dependency browser UI built with plain HTML, CSS, and vanilla JavaScript—no React, no bundler. A Python http.server backend proxies requests to the Foundry endpoint. The empty state. Quick-load buttons pre-populate the JSON editor with demo incidents or scenario files. Demo 1 loaded: API Gateway 5xx spike, SEV3. The JSON is fully editable before submitting. Agent Output Panels Triage: Root causes ranked by confidence. Evidence is collapsed under each hypothesis. Triage: Immediate actions with P0/P1/P2 priority badges and owner roles. Comms: Slack card with emoji substitution and a stakeholder executive summary. PIR: Chronological timeline with an ONGOING marker, customer impact in a red-bordered box. Performance: Parallel Execution Matters Incident Type Complexity Parallel Latency Sequential (est.) Single alert, minimal context (SEV4) Low 4–6 s ~16 s Multi-signal, logs + metrics (SEV2) Medium 7–10 s ~28 s Full SEV1 with long log lines High 10–15 s ~40 s Post-incident synthesis (resolved) High 10–14 s ~38 s asyncio.gather() running four independent agents cuts total latency by 3–4× compared to sequential execution. For a SEV1 at 3 AM, that’s the difference between a 10-second AI-powered head start and a 40-second wait. Five Key Design Decisions Parallel over sequential Each agent is independent and processes the full incident payload in isolation. ConcurrentBuilder with asyncio.gather() is the right primitive—no inter-agent dependencies, no shared state. JSON-only agent instructions Every agent returns only valid JSON with a defined schema. The orchestrator merges fragments with merged.update(agent_output) . No parsing, no extraction, no post-processing. No hardcoded model names AZURE_OPENAI_CHAT_DEPLOYMENT_NAME=model-router is the only model reference. Model Router selects the best model at runtime based on prompt complexity. When new models ship, the agent gets better for free. DefaultAzureCredential everywhere No API keys. No token management code. Managed identity in production, az login in development. Same code, both environments. Instructions as configuration Each agent’s system prompt is a plain Python string. Behaviour changes are text edits, not code logic. A non-developer can refine prompts and redeploy. Guardrails: Built into the Prompts The agent instructions include explicit guardrails that don’t require external filtering: No hallucination: When data is insufficient, the agent sets confidence: 0 and populates missing_information rather than inventing facts. Secret redaction: Each agent is instructed to redact credential-like patterns as [REDACTED] in its output. Mark unknowns: Undeterminable fields use the literal string "UNKNOWN" rather than plausible-sounding guesses. Diagnostic suggestions: When signal is sparse, immediate_actions includes diagnostic steps that gather missing information before prescribing a fix. Model Router: Automatic Model Selection One of the most powerful aspects of this architecture is Model Router. Instead of choosing between gpt-4o , gpt-4o-mini , or o3-mini per agent, you deploy a single model-router endpoint. Model Router analyses each request’s complexity and routes it to the most cost-effective model that can handle it. Model Router insights: models selected per request with associated costs. Model Router telemetry from Microsoft Foundry: request distribution and cost analysis. This means you get optimal cost-performance without writing any model-selection logic. A simple Summary Agent prompt may route to gpt-4o-mini , while a complex Triage Agent prompt with 800 lines of logs routes to gpt-4o all automatically. Deployment: One Command The repo includes both azure.yaml and agent.yaml , so deployment is a single command: Deploy to Foundry # Deploy everything: infra + container + Model Router + Hosted Agent azd up This provisions the Foundry project resources, builds the Docker image, pushes to Azure Container Registry, deploys a Model Router instance, and creates the Hosted Agent. For more control, you can use the SDK deploy script: Manual Docker + SDK deploy # Build and push (must be linux/amd64) docker build --platform linux/amd64 -t oncall-copilot:v1 . docker tag oncall-copilot:v1 $ACR_IMAGE docker push $ACR_IMAGE # Create the hosted agent python scripts/deploy_sdk.py Getting Started Quickstart # Clone git clone https://github.com/microsoft-foundry/oncall-copilot cd oncall-copilot # Install python -m venv .venv source .venv/bin/activate # .venv\Scripts\activate on Windows pip install -r requirements.txt # Set environment variables export AZURE_OPENAI_ENDPOINT="https://<account>.openai.azure.com/" export AZURE_OPENAI_CHAT_DEPLOYMENT_NAME="model-router" export AZURE_AI_PROJECT_ENDPOINT="https://<account>.services.ai.azure.com/api/projects/<project>" # Validate schemas locally (no Azure needed) MOCK_MODE=true python scripts/validate.py # Deploy to Foundry azd up # Invoke the deployed agent python scripts/invoke.py --demo 1 # Start the browser UI python ui/server.py # → http://localhost:7860 Extending: Add Your Own Agent Adding a fifth agent is straightforward. Follow this pattern: Create app/agents/<name>.py with a *_INSTRUCTIONS constant following the existing pattern. Add the agent’s output keys to app/schemas.py . Register it in main.py : main.py — Adding a 5th agent from app.agents.my_new_agent import NEW_INSTRUCTIONS new_agent = AzureOpenAIChatClient( ad_token_provider=_token_provider ).create_agent( instructions=NEW_INSTRUCTIONS, name="new-agent", ) workflow = ConcurrentBuilder().participants( [triage, summary, comms, pir, new_agent] ) Ideas for extensions: a ticket auto-creation agent that creates Jira or Azure DevOps items from the PIR output, a webhook adapter agent that normalises PagerDuty or Datadog payloads, or a human-in-the-loop agent that surfaces missing_information as an interactive form. Key Takeaways for AI Engineers The multi-agent pattern isn’t just for chatbots. Any task that can be decomposed into independent subtasks with distinct output schemas is a candidate. Incident response, document processing, code review, data pipeline validation—the pattern transfers. Microsoft Agent Framework gives you ConcurrentBuilder for parallel execution and AzureOpenAIChatClient for Azure-native auth—you write the prompts, the framework handles the plumbing. Foundry Hosted Agents let you deploy containerised agents with managed infrastructure, automatic scaling, and built-in telemetry. No Kubernetes, no custom API gateway. Model Router eliminates the model selection problem. One deployment name handles all scenarios with optimal cost-performance tradeoffs. Prompt-as-config means your agents are iterable by anyone who can edit text. The feedback loop from “this output could be better” to “deployed improvement” is minutes, not sprints. Resources Microsoft Agent Framework SDK powering the multi-agent orchestration Model Router Automatic model selection based on prompt complexity Foundry Hosted Agents Deploy containerised agents on managed infrastructure ConcurrentBuilder Samples Official agents-in-workflow sample this project follows DefaultAzureCredential Zero-config auth chain used throughout Hosted Agents Concepts Architecture overview of Foundry Hosted Agents The On-Call Copilot sample is open source under the MIT licence. Contributions, scenario files, and agent instruction improvements are welcome via pull request.Demystifying GitHub Copilot Security Controls: easing concerns for organizational adoption
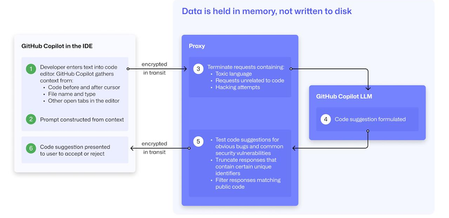
At a recent developer conference, I delivered a session on Legacy Code Rescue using GitHub Copilot App Modernization. Throughout the day, conversations with developers revealed a clear divide: some have fully embraced Agentic AI in their daily coding, while others remain cautious. Often, this hesitation isn't due to reluctance but stems from organizational concerns around security and regulatory compliance. Having witnessed similar patterns during past technology shifts, I understand how these barriers can slow adoption. In this blog, I'll demystify the most common security concerns about GitHub Copilot and explain how its built-in features address them, empowering organizations to confidently modernize their development workflows. GitHub Copilot Model Training A common question I received at the conference was whether GitHub uses your code as training data for GitHub Copilot. I always direct customers to the GitHub Copilot Trust Center for clarity, but the answer is straightforward: “No. GitHub uses neither Copilot Business nor Enterprise data to train the GitHub model.” Notice this restriction also applies to third-party models as well (e.g. Anthropic, Google). GitHub Copilot Intellectual Property indemnification policy A frequent concern I hear is, since GitHub Copilot’s underlying models are trained on sources that include public code, it might simply “copy and paste” code from those sources. Let’s clarify how this actually works: Does GitHub Copilot “copy/paste”? “The AI models that create Copilot’s suggestions may be trained on public code, but do not contain any code. When they generate a suggestion, they are not “copying and pasting” from any codebase.” To provide an additional layer of protection, GitHub Copilot includes a “duplicate detection filter”. This feature helps prevent suggestions that closely match public code from being surfaced. (Note: This duplicate detection currently does not apply to the Copilot coding agent.) More importantly, customers are protected by an Intellectual Property indemnification policy. This means that if you receive an unmodified suggestion from GitHub Copilot and face a copyright claim as a result, Microsoft will defend you in court. GitHub Copilot Data Retention Another frequent question I hear concerns GitHub Copilot’s data retention policies. For organizations on GitHub Copilot Business and Enterprise plans, retention practices depend on how and where the service is accessed from: Access through IDE for Chat and Code Completions: Prompts and Suggestions: Not retained. User Engagement Data: Kept for two years. Feedback Data: Stored for as long as needed for its intended purpose. Other GitHub Copilot access and use: Prompts and Suggestions: Retained for 28 days. User Engagement Data: Kept for two years. Feedback Data: Stored for as long as needed for its intended purpose. For Copilot Coding Agent, session logs are retained for the life of the account in order to provide the service. Excluding content from GitHub Copilot To prevent GitHub Copilot from indexing sensitive files, you can configure content exclusions at the repository or organization level. In VS Code, use the .copilotignore file to exclude files client-side. Note that files listed in .gitignore are not indexed by default but may still be referenced if open or explicitly referenced (unless they’re excluded through .copilotignore or content exclusions). The life cycle of a GitHub Copilot code suggestion Here are the key protections at each stage of the life cycle of a GitHub Copilot code suggestion: In the IDE: Content exclusions prevent files, folders, or patterns from being included. GitHub proxy (pre-model safety): Prompts go through a GitHub proxy hosted in Microsoft Azure for pre-inference checks: screening for toxic or inappropriate language, relevance, and hacking attempts/jailbreak-style prompts before reaching the model. Model response: With the public code filter enabled, some suggestions are suppressed. The vulnerability protection feature blocks insecure coding patterns like hardcoded credentials or SQL injections in real time. Disable access to GitHub Copilot Free Due to the varying policies associated with GitHub Copilot Free, it is crucial for organizations to ensure it is disabled both in the IDE and on GitHub.com. Since not all IDEs currently offer a built-in option to disable Copilot Free, the most reliable method to prevent both accidental and intentional access is to implement firewall rule changes, as outlined in the official documentation. Agent Mode Allow List Accidental file system deletion by Agentic AI assistants can happen. With GitHub Copilot agent mode, the "Terminal auto approve” setting in VS Code can be used to prevent this. This setting can be managed centrally using a VS Code policy. MCP registry Organizations often want to restrict access to allow only trusted MCP servers. GitHub now offers an MCP registry feature for this purpose. This feature isn’t available in all IDEs and clients yet, but it's being developed. Compliance Certifications The GitHub Copilot Trust Center page lists GitHub Copilot's broad compliance credentials, surpassing many competitors in financial, security, privacy, cloud, and industry coverage. SOC 1 Type 2: Assurance over internal controls for financial reporting. SOC 2 Type 2: In-depth report covering Security, Availability, Processing Integrity, Confidentiality, and Privacy over time. SOC 3: General-use version of SOC 2 with broad executive-level assurance. ISO/IEC 27001:2013: Certification for a formal Information Security Management System (ISMS), based on risk management controls. CSA STAR Level 2: Includes a third-party attestation combining ISO 27001 or SOC 2 with additional cloud control matrix (CCM) requirements. TISAX: Trusted Information Security Assessment Exchange, covering automotive-sector security standards. In summary, while the adoption of AI tools like GitHub Copilot in software development can raise important questions around security, privacy, and compliance, it’s clear that existing safeguards in place help address these concerns. By understanding the safeguards, configurable controls, and robust compliance certifications offered, organizations and developers alike can feel more confident in embracing GitHub Copilot to accelerate innovation while maintaining trust and peace of mind.
The Future of Agentic AI: Inside Microsoft Agent Framework 1.0
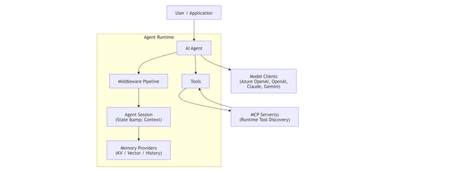
Agentic AI is rapidly moving beyond demos and chatbots toward long‑running, autonomous systems that reason, call tools, collaborate with other agents, and operate reliably in production. On April 3, 2026, Microsoft marked a major milestone with the General Availability (GA) release of Microsoft Agent Framework 1.0, a production‑ready, open‑source framework for building agents and multi‑agent workflows in.NET and Python. [techcommun...rosoft.com] In this post, we’ll deep‑dive into: What Microsoft Agent Framework actually is Its core architecture and design principles What’s new in version 1.0 How it differs from other agent frameworks When and how to use it—with real code examples What Is Microsoft Agent Framework? According to the official announcement, Microsoft Agent Framework is an open‑source SDK and runtime for building AI agents and multi‑agent workflows with strong enterprise foundations. Agent Framework provides two primary capability categories: 1. Agents Agents are long‑lived runtime components that: Use LLMs to interpret inputs Call tools and MCP servers Maintain session state Generate responses They are not just prompt wrappers, but stateful execution units. 2. Workflows Workflows are graph‑based orchestration engines that: Connect agents and functions Enforce execution order Support checkpointing and human‑in‑the‑loop scenarios This leads to a clean separation of responsibilities: Concern Handled By Reasoning & interpretation Agent Execution policy & control flow Workflow This separation is a foundational design decision. High‑Level Architecture From the official overview, Agent Framework is composed of several core building blocks: Model clients (chat completions & responses) Agent sessions (state & conversation management) Context providers (memory and retrieval) Middleware pipeline (interception, filtering, telemetry) MCP clients (tool discovery and invocation) Workflow engine (graph‑based orchestration) Conceptual Flow 🌟 What’s New in Version 1.0 Version 1.0 marks the transition from "Release Candidate" to "General Availability" (GA). Production-Ready Stability: Unlike the earlier experimental packages, 1.0 offers stable APIs, versioned releases, and a commitment to long-term support (LTS). A2A Protocol (Agent-to-Agent): A new structured messaging protocol that allows agents to communicate across different runtimes. For example, an agent built in Python can seamlessly coordinate with an agent running in a .NET environment. MCP (Model Context Protocol) Support: Full integration with the Model Context Protocol, enabling agents to dynamically discover and invoke external tools and data sources without manual integration code. Multi-Agent Orchestration Patterns: Stable implementations of complex patterns, including: Sequential: Linear handoffs between specialized agents. Group Chat: Collaborative reasoning where agents discuss and solve problems. Magentic-One: A sophisticated pattern for task-oriented reasoning and planning. Middleware Pipeline: The new middleware architecture lets you inject logic into the agent's execution loop without modifying the core prompts. This is essential for Responsible AI (RAI), allowing you to add content safety filters, logging, and compliance checks globally. DevUI Debugger: A browser-based local debugger that provides a real-time visual representation of agent message flows, tool calls, and state changes. Code Examples Creating a Simple Agent (C#) From Microsoft Learn : using Azure.AI.Projects; using Azure.Identity; using Microsoft.Agents.AI; AIAgent agent = new AIProjectClient( new Uri("https://your-foundry-service.services.ai.azure.com/api/projects/your-project"), new AzureCliCredential()) .AsAIAgent( model: "gpt-5.4-mini", instructions: "You are a friendly assistant. Keep your answers brief."); Console.WriteLine(await agent.RunAsync("What is the largest city in France?")); This shows: Provider‑agnostic model access Session‑aware agent execution Minimal setup for production agents Creating a Simple Agent (Python) from agent_framework.foundry import FoundryChatClient from azure.identity import AzureCliCredential client = FoundryChatClient( project_endpoint="https://your-foundry-service.services.ai.azure.com/api/projects/your-project", model="gpt-5.4-mini", credential=AzureCliCredential(), ) agent = client.as_agent( name="HelloAgent", instructions="You are a friendly assistant. Keep your answers brief.", ) result = await agent.run("What is the largest city in France?") print(result) The same agent abstraction applies across languages. When to Use Agents vs Workflows Microsoft provides clear guidance: Use an Agent when… Use a Workflow when… Task is open‑ended Steps are well‑defined Autonomous tool use is needed Execution order matters Single decision point Multiple agents/functions collaborate Key principle: If you can solve the task with deterministic code, do that instead of using an AI agent. 🔄 How It Differs from Other Frameworks Microsoft Agent Framework 1.0 distinguishes itself by focusing on "Enterprise Readiness" and "Interoperability." Feature Microsoft Agent Framework 1.0 Semantic Kernel / AutoGen LangChain / CrewAI Philosophy Unified, production-ready SDK. Research-focused or tool-specific. High-level, developer-friendly abstractions. Integration Deeply integrated with Microsoft Foundry and Azure. Varied; often requires more glue code. Generally cloud-agnostic. Interoperability Native A2A and MCP for cross-framework tasks. Limited to internal ecosystem. Uses proprietary connectors. Runtime Identical API parity for .NET and Python. Primarily Python-first (SK has C#). Primarily Python. Control Graph-based deterministic workflows. More non-deterministic/experimental. Mixture of role-based and agentic. 🛠️ Key Technical Components Agent Harness: The execution layer that provides agents with controlled access to the shell, file system, and messaging loops. Agent Skills: A portable, file-based or code-defined format for packaging domain expertise. Implementation Tip: If you are coming from Semantic Kernel, Microsoft provides migration assistants that analyze your existing code and generate step-by-step plans to upgrade to the new Agent Framework 1.0 standards. Microsoft Agent Framework Version 1.0 | Microsoft Agent Framework Agent Framework documentation 🎯 Summary Microsoft Agent Framework 1.0 is the "grown-up" version of AI orchestration. By standardizing the way agents talk to each other (A2A), discover tools (MCP), and process information (Middleware), Microsoft has provided a clear path for taking AI experiments into production. For more detailed guides, check out the official Microsoft Agent Framework DocumentationMicrosoft Agent Framework - .NET AI Community StandupBuilding Agents with GitHub Copilot SDK: A Practical Guide to Automated Tech Update Tracking
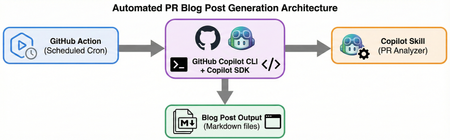
Introduction In the rapidly evolving tech landscape, staying on top of key project updates is crucial. This article explores how to leverage GitHub's newly released Copilot SDK to build intelligent agent systems, featuring a practical case study on automating daily update tracking and analysis for Microsoft's Agent Framework. GitHub Copilot SDK: Embedding AI Capabilities into Any Application SDK Overview On January 22, 2026, GitHub officially launched the GitHub Copilot SDK technical preview, marking a new era in AI agent development. The SDK provides these core capabilities: Production-grade execution loop: The same battle-tested agentic engine powering GitHub Copilot CLI Multi-language support: Node.js, Python, Go, and .NET Multi-model routing: Flexible model selection for different tasks MCP server integration: Native Model Context Protocol support Real-time streaming: Support for streaming responses and live interactions Tool orchestration: Automated tool invocation and command execution Core Advantages Building agentic workflows from scratch presents numerous challenges: Context management across conversation turns Orchestrating tools and commands Routing between models Handling permissions, safety boundaries, and failure modes The Copilot SDK encapsulates all this complexity. As Mario Rodriguez, GitHub's Chief Product Officer, explains: "The SDK takes the agentic power of Copilot CLI and makes it available in your favorite programming language... GitHub handles authentication, model management, MCP servers, custom agents, and chat sessions plus streaming. That means you are in control of what gets built on top of those building blocks." Quick Start Examples Here's a simple TypeScript example using the Copilot SDK: import { CopilotClient } from "@github/copilot-sdk"; const client = new CopilotClient(); await client.start(); const session = await client.createSession({ model: "gpt-5", }); await session.send({ prompt: "Hello, world!" }); And in Python, it's equally straightforward: from copilot import CopilotClient client = CopilotClient() await client.start() session = await client.create_session({ "model": "claude-sonnet-4.5", "streaming": True, "skill_directories": ["./.copilot_skills/pr-analyzer/SKILL.md"] }) await session.send_and_wait({ "prompt": "Analyze PRs from microsoft/agent-framework merged yesterday" }) Real-World Case Study: Automated Agent Framework Daily Updates Project Background agent-framework-update-everyday is an automated system built with GitHub Copilot SDK and CLI that tracks daily code changes in Microsoft's Agent Framework and generates high-quality technical blog posts. System Architecture The project leverages the following technology stack: GitHub Copilot CLI (@github/copilot): Command-line AI capabilities GitHub Copilot SDK (github-copilot-sdk): Programmatic AI interactions Copilot Skills: Custom PR analysis behaviors GitHub Actions: CI/CD automation pipeline Core Workflow The system runs fully automated via GitHub Actions, executing Monday through Friday at UTC 00:00 with these steps: Step Action Description 1 Checkout repository Clone the repo using actions/checkout@v4 2 Setup Node.js Configure Node.js 22 environment for Copilot CLI 3 Install Copilot CLI Install via npm i -g github/copilot 4 Setup Python Configure Python 3.11 environment 5 Install Python dependencies Install github-copilot-sdk package 6 Run PR Analysis Execute pr_trigger_v2.py with Copilot authentication 7 Commit and push Auto-commit generated blog posts to repository Technical Implementation Details 1. Copilot Skill Definition The project uses a custom Copilot Skill (.copilot_skills/pr-analyzer/SKILL.md) to define: PR analysis behavior patterns Blog post structure requirements Breaking changes priority strategy Code snippet extraction rules This skill-based approach enables the AI agent to focus on domain-specific tasks and produce higher-quality outputs. 2. Python SDK Integration The core script pr_trigger_v2.py demonstrates Python SDK usage: from copilot import CopilotClient # Initialize client client = CopilotClient() await client.start() # Create session with model and skill specification session = await client.create_session({ "model": "claude-sonnet-4.5", "streaming": True, "skill_directories": ["./.copilot_skills/pr-analyzer/SKILL.md"] }) # Send analysis request await session.send_and_wait({ "prompt": "Analyze PRs from microsoft/agent-framework merged yesterday" }) 3. CI/CD Integration The GitHub Actions workflow (.github/workflows/daily-pr-analysis.yml) ensures automated execution: name: Daily PR Analysis on: schedule: - cron: '0 0 * * 1-5' # Monday-Friday at UTC 00:00 workflow_dispatch: # Support manual triggers jobs: analyze: runs-on: ubuntu-latest steps: - name: Setup and Run Analysis env: COPILOT_GITHUB_TOKEN: ${{ secrets.COPILOT_GITHUB_TOKEN }} run: | npm i -g github/copilot pip install github-copilot-sdk --break-system-packages python pr_trigger_v2.py Output Results The system automatically generates structured blog posts saved in the blog/ directory with naming convention: blog/agent-framework-pr-summary-{YYYY-MM-DD}.md Each post includes: Breaking Changes (highlighted first) Major Updates (with code examples) Minor Updates and Bug Fixes Summary and impact assessment Latest Advancements in GitHub Copilot CLI Released alongside the SDK, Copilot CLI has also received major updates, making it an even more powerful development tool: Enhanced Core Capabilities Persistent Memory: Cross-session context retention and intelligent compaction Multi-Model Collaboration: Choose different models for explore, plan, and review workflows Autonomous Execution: Custom agent support Agent skill system Full MCP support Async task delegation Real-World Applications Development teams have already built innovative applications using the SDK: YouTube chapter generators Custom GUI interfaces for agents Speech-to-command workflows for desktop apps Games where you compete with AI Content summarization tools These examples showcase the flexibility and power of the Copilot SDK. SDK vs CLI: Complementary, Not Competing Understanding the relationship between SDK and CLI is important: CLI: An interactive tool for end users, providing a complete development experience SDK: A programmable layer for developers to build customized applications The SDK essentially provides programmatic access to the CLI's core capabilities, enabling developers to: Integrate Copilot agent capabilities into any environment Build graphical user interfaces Create personal productivity tools Run custom internal agents in enterprise workflows GitHub handles the underlying authentication, model management, MCP servers, and session management, while developers focus on building value on top of these building blocks. Best Practices and Recommendations Based on experience from the agent-framework-update-everyday project, here are practical recommendations: 1. Leverage Copilot Skills Effectively Define clear skill files that specify: Input and output formats for tasks Rules for handling edge cases Quality standards and priorities 2. Choose Models Wisely Use different models for different tasks: Exploratory tasks: Use more powerful models (e.g., GPT-5) Execution tasks: Use faster models (e.g., Claude Sonnet) Cost-sensitive tasks: Balance performance and budget 3. Implement Robust Error Handling AI calls in CI/CD environments need to consider: Network timeout and retry strategies API rate limit handling Output validation and fallback mechanisms 4. Secure Authentication Management Use fine-grained Personal Access Tokens (PAT): Create dedicated Copilot access tokens Set minimum permission scope (Copilot Requests: Read) Store securely using GitHub Secrets 5. Version Control and Traceability Automated systems should: Log metadata for each execution Preserve historical outputs for comparison Implement auditable change tracking Future Outlook The release of GitHub Copilot SDK marks the democratization of AI agent development. Developers can now: Lower Development Barriers: No need to deeply understand complex AI infrastructure Accelerate Innovation: Focus on business logic rather than underlying implementation Flexible Integration: Embed AI capabilities into any application scenario Production-Ready: Leverage proven execution loops and security mechanisms As the SDK moves from technical preview to general availability, we can expect: Official support for more languages Richer tool ecosystem More powerful MCP integration capabilities Community-driven best practice libraries Conclusion This article demonstrates how to build practical automation systems using GitHub Copilot SDK through the agent-framework-update-everyday project. This case study not only validates the SDK's technical capabilities but, more importantly, showcases a new development paradigm: Using AI agents as programmable building blocks, integrated into daily development workflows, to liberate developer creativity. Whether you want to build personal productivity tools, enterprise internal agents, or innovative AI applications, the Copilot SDK provides a solid technical foundation. Visit github/copilot-sdk to start your AI agent journey today! Reference Resources GitHub Copilot SDK Official Repository Agent Framework Update Everyday Project GitHub Copilot CLI Documentation Microsoft Agent Framework Build an agent into any app with the GitHub Copilot SDK12KViews3likes0CommentsMicrosoft Foundry Toolkit for VS Code is Now Generally Available
We are thrilled to announce that the Microsoft Foundry Toolkit for VS Code, formerly AI Toolkit, is now Generally Available (GA)! From first model prompt to production‑grade AI agents, Foundry Toolkit lets you build, debug, and ship AI end to end without ever leaving VS Code. Same Product. New Name. You may know this extension as AI Toolkit — and we thank you for using it in the past year and for the continuous feedback that has shaped the product. With this GA release, we’re rebranding AI Toolkit to Microsoft Foundry Toolkit. The new name reflects where we’re headed: a single, unified developer experience for building AI apps and agents on the Microsoft AI platform. Rest assured, this is a name change only — there are no plans to remove or deprecate any existing features. Empower AI Development from Idea to Production with Foundry Toolkit The GA release brings together the most requested features into a high-performance workflow: 🧪 Curated Model Playground: Don’t waste time with setup. Browse and chat with over 100+ state-of-the-art models from Microsoft Foundry, GitHub, OpenAI, Anthropic, Ollama, and more. Compare performance side-by-side and export production-ready code in seconds. 🤖 Agent Builder (No-Code/low code): Experiment with agent ideas or build sophisticated agents without writing boilerplate code. Define instructions, link tools from the Foundry catalog, or connect local MCP (Model Context Protocol) servers to have a functional agent running in minutes. ✨GitHub Copilot powered agent development: With Foundry tools and skills built into the Toolkit, GitHub Copilot is equipped with deep context to jumpstart agent creation using the Microsoft Agent Framework - often from a single prompt. 🛠️ Deep-Cycle Debugging: Move beyond black-box AI. The Agent Inspector provides real-time workflow visualization, breakpoints, and full local tracing across tool calls and agent chains. ⚡ Edge-Optimized Performance: Specialized support for the Phi model family. Fine-tune Phi Silica on your data, quantize for NPU/GPU targets, and profile on-device performance to ensure your models run lean and fast. 🚀 Seamless Scale: Transition from local to cloud with one click. Deploy directly to the Microsoft Foundry Agent Service and run continuous evaluations using familiar pytest syntax within the VS Code Test Explorer. Get Started Today Install: Microsoft Foundry Toolkit on VS Code Marketplace. Quick Start: Follow our 3-Minute Getting Started Tutorial to build your first AI agent. Deep Dive: Check out documentations, Samples, and workshop. Join the Community Join us on Model Monday event on 4/20 where we will talk through Building Foundry Agents using VS Code and GitHub Copilot. We can’t wait to see what you build. Share your projects, file issues, or suggest features on our GitHub repository. Welcome to the next chapter of AI development!Engineering a Local-First Agentic Podcast Studio: A Deep Dive into Multi-Agent Orchestration
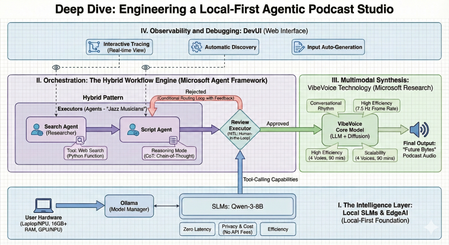
The transition from standalone Large Language Models (LLMs) to Agentic Orchestration marks the next frontier in AI development. We are moving away from simple "prompt-and-response" cycles toward a paradigm where specialized, autonomous units—AI Agents—collaborate to solve complex, multi-step problems. As a Technology Evangelist, my focus is on building these production-grade systems entirely on the edge, ensuring privacy, speed, and cost-efficiency. This technical guide explores the architecture and implementation of The AI Podcast Studio. This project demonstrates the seamless integration of the Microsoft Agent Framework, Local Small Language Models (SLMs), and VibeVoice to automate a complete tech podcast pipeline. I. The Strategic Intelligence Layer: Why Local-First? At the core of our studio is a Local-First philosophy. While cloud-based LLMs are powerful, they introduce friction in high-frequency, creative pipelines. By using Ollama as a model manager, we run SLMs like Qwen-3-8B directly on user hardware. 1. Architectural Comparison: Local vs. Cloud Choosing the deployment environment is a fundamental architectural decision. For an agentic podcasting workflow, the edge offers distinct advantages: Dimension Local Models (e.g., Qwen-3-8B) Cloud Models (e.g., GPT-5.2) Latency Zero/Ultra-low: Instant token generation without network "jitter". Variable: Dependent on network stability and API traffic. Privacy Total Sovereignty: Creative data and drafts never leave the local device. Shared Risk: Data is processed on third-party servers. Cost Zero API Fees: One-time hardware investment; free to run infinite tokens. Pay-as-you-go: Costs scale with token count and frequency of calls. Availability Offline: The studio remains functional without an internet connection. Online Only: Requires a stable, high-speed connection. 2. Reasoning and Tool-Calling on the Edge To move beyond simple chat, we implement Reasoning Mode, utilizing Chain-of-Thought (CoT) prompting. This allows our local agents to "think" through the podcast structure before writing. Furthermore, we grant them "superpowers" through Tool-Calling, allowing them to execute Python functions for real-time web searches to gather the latest news. II. The Orchestration Engine: Microsoft Agent Framework The true complexity of this project lies in Agent Orchestration—the coordination of specialized agents to work as a cohesive team. We distinguish between Agents, who act as "Jazz Musicians" making flexible decisions, and Workflows, which act as the "Orchestra" following a predefined score. 1. Advanced Orchestration Patterns Drawing from the WorkshopForAgentic architecture, the studio utilizes several sophisticated patterns: Sequential: A strict pipeline where the output of the Researcher flows into the Scriptwriter. Concurrent (Parallel): Multiple agents search different news sources simultaneously to speed up data gathering. Handoff: An agent dynamically "transfers" control to another specialist based on the context of the task. Magentic-One: A high-level "Manager" agent decides which specialist should handle the next task in real-time. III. Implementation: Code Analysis (Workshop Patterns) To maintain a production-grade codebase, we follow the modular structure found in the WorkshopForAgentic/code directory. This ensures that agents, clients, and workflows are decoupled and maintainable. 1. Configuration: Connecting to Local SLMs The first step is initializing the local model client using the framework's Ollama integration. # Based on WorkshopForAgentic/code/config.py from agent_framework.ollama import OllamaChatClient # Initialize the local client for Qwen-3-8B # Standard Ollama endpoint on localhost chat_client = OllamaChatClient( model_id="qwen3:8b", endpoint="http://localhost:11434" ) 2. Agent Definition: Specialized Roles Each agent is a ChatAgent instance defined by its persona and instructions. # Based on WorkshopForAgentic/code/agents.py from agent_framework import ChatAgent # The Researcher Agent: Responsible for web discovery researcher_agent = client.create_agent( name="SearchAgent", instructions="You are my assistant. Answer the questions based on the search engine.", tools=[web_search], ) # The Scriptwriter Agent: Responsible for conversational narrative generate_script_agent = client.create_agent( name="GenerateScriptAgent", instructions=""" You are my podcast script generation assistant. Please generate a 10-minute Chinese podcast script based on the provided content. The podcast script should be co-hosted by Lucy (the host) and Ken (the expert). The script content should be generated based on the input, and the final output format should be as follows: Speaker 1: …… Speaker 2: …… Speaker 1: …… Speaker 2: …… Speaker 1: …… Speaker 2: …… """ ) 3. Workflow Setup: The Sequential Pipeline For a deterministic production line, we use the WorkflowBuilder to connect our agents. # Based on WorkshopForAgentic/code/workflow_setup.py from agent_framework import WorkflowBuilder # Building the podcast pipeline search_executor = AgentExecutor(agent=search_agent, id="search_executor") gen_script_executor = AgentExecutor(agent=gen_script_agent, id="gen_script_executor") review_executor = ReviewExecutor(id="review_executor", genscript_agent_id="gen_script_executor") # Build workflow with approval loop # search_executor -> gen_script_executor -> review_executor # If not approved, review_executor -> gen_script_executor (loop back) workflow = ( WorkflowBuilder() .set_start_executor(search_executor) .add_edge(search_executor, gen_script_executor) .add_edge(gen_script_executor, review_executor) .add_edge(review_executor, gen_script_executor) # Loop back for regeneration .build() ) IV. Multimodal Synthesis: VibeVoice Technology The "Future Bytes" podcast is brought to life using VibeVoice, a specialized technology from Microsoft Research designed for natural conversational synthesis. Conversational Rhythm: It automatically handles natural turn-taking and speech cadences. High Efficiency: By operating at an ultra-low 7.5 Hz frame rate, it significantly reduces the compute power required for high-fidelity audio. Scalability: The system supports up to 4 distinct voices and can generate up to 90 minutes of continuous audio. V. Observability and Debugging: DevUI Building multi-agent systems requires deep visibility into the agentic "thinking" process. We leverage DevUI, a specialized web interface for testing and tracing: Interactive Tracing: Developers can watch the message flow and tool-calling in real-time. Automatic Discovery: DevUI auto-discovers agents defined within the project structure. Input Auto-Generation: The UI generates input fields based on workflow requirements, allowing for rapid iteration. VI. Technical Requirements for Edge Deployment Deploying this studio locally requires specific hardware and software configurations to handle simultaneous LLM and TTS inference: Software: Python 3.10+, Ollama, and the Microsoft Agent Framework. Hardware: 16GB+ RAM is the minimum requirement; 32GB is recommended for running multiple agents and VibeVoice concurrently. Compute: A modern GPU/NPU (e.g., NVIDIA RTX or Snapdragon X Elite) is essential for smooth inference. Final Perspective: From Coding to Directing The AI Podcast Studio represents a significant shift toward Agentic Content Creation. By mastering these orchestration patterns and leveraging local EdgeAI, developers move from simply writing code to directing entire ecosystems of intelligent agents. This "local-first" model ensures that the future of creativity is private, efficient, and infinitely scalable. Download sample Here Resource EdgeAI for Beginners - https://github.com/microsoft/edgeai-for-beginners Microsoft Agent Framework - https://github.com/microsoft/agent-framework Microsoft Agent Framework Samples - https://github.com/microsoft/agent-framework-samples9.3KViews3likes0CommentsFrom Concept to Code: Building Production-Ready Multi-Agent Systems with Microsoft Foundry
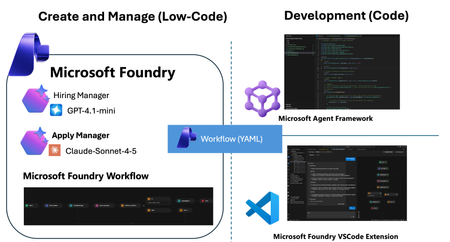
We have reached a critical inflection point in AI development. Within the Microsoft Foundry ecosystem, the core value proposition of "Agents" is shifting decisively—moving from passive content generation to active task execution and process automation. These are no longer just conversational interfaces. They are intelligent entities capable of connecting models, data, and tools to actively execute complex business logic. To support this evolution, Microsoft has introduced a powerful suite of capabilities: the Microsoft Agent Framework for sophisticated orchestration, the Agent V2 SDK, and integrated Microsoft Foundry VSCode Extensions. These innovations provide the tooling necessary to bridge the gap between theoretical research and secure, scalable enterprise landing. But how do you turn these separate components into a cohesive business solution? That is the challenge we address today. This post dives into the practical application of these tools, demonstrating how to connect the dots and transform complex multi-agent concepts into deployed reality. The Scenario: Recruitment through an "Agentic Lens" Let’s ground this theoretical discussion with a real-world scenario that perfectly models a multi-agent environment: The Recruitment Process. By examining recruitment through an agentic lens, we can identify distinct entities with specific mandates: The Recruiter Agent: Tasked with setting boundary conditions (job requirements) and preparing data retrieval mechanisms (interview questions). The Applicant Agent: Objective is to process incoming queries and synthesize the best possible output to meet the recruiter's acceptance criteria. Phase 1: Design Achieving Orchestration via Microsoft Foundry Workflows To bridge the gap between our scenario and technical reality, we start with Foundry Workflows. Workflows serves as the visual integration environment within Foundry. It allows you to build declarative pipelines that seamlessly combine deterministic business logic with the probabilistic nature of autonomous AI agents. By adopting this visual, low-code paradigm, you eliminate the need to write complex orchestration logic from scratch. Workflows empowers you to coordinate specialized agents intuitively, creating adaptive systems that solve complex business problems collaboratively. Visually Orchestrating the Cycle Microsoft Foundry provides an intuitive, web-based drag-and-drop interface. This canvas allows you to integrate specialized AI agents alongside standard procedural logic blocks, transforming abstract ideas into executable processes without writing extensive glue code. To translate our recruitment scenario into a functional workflow, we follow a structured approach: Agent Prerequisites: We pre-configure our specialized agents within Foundry. We create a Recruiter Agent (prompted to generate evaluation criteria) and an Applicant Agent (prompted to synthesize responses). Orchestrating the Interaction: We drag these nodes onto the board and define the data flow. The process begins with the Recruiter generating questions, piping that output directly as input for the Applicant agent. Adding Business Logic: A true workflow requires decision-making. We introduce control flow logic, such as IF/ELSE conditional blocks, to evaluate the recruiter's questions based on predefined criteria. This allows the workflow to branch dynamically—if satisfied, the candidate answers the questions; if not, the questions are regenerated. Alternative: YAML Configuration For developers who prefer a code-first approach or wish to rapidly replicate this logic across environments, Foundry allows you to export the underlying YAML. kind: workflow trigger: kind: OnConversationStart id: trigger_wf actions: - kind: SetVariable id: action-1763742724000 variable: Local.LatestMessage value: =UserMessage(System.LastMessageText) - kind: InvokeAzureAgent id: action-1763736666888 agent: name: HiringManager input: messages: =System.LastMessage output: autoSend: true messages: Local.LatestMessage - kind: Question variable: Local.Input id: action-1763737142539 entity: StringPrebuiltEntity skipQuestionMode: SkipOnFirstExecutionIfVariableHasValue prompt: Boss, can you confirm this ? - kind: ConditionGroup conditions: - condition: =Local.Input="Yes" actions: - kind: InvokeAzureAgent id: action-1763744279421 agent: name: ApplyAgent input: messages: =Local.LatestMessage output: autoSend: true messages: Local.LatestMessage - kind: EndConversation id: action-1763740066007 id: if-action-1763736954795-0 id: action-1763736954795 elseActions: - kind: GotoAction actionId: action-1763736666888 id: action-1763737425562 id: "" name: HRDemo description: "" Simulating the End-to-End Process Once constructed, Foundry provides a robust, built-in testing environment. You can trigger the workflow with sample input data to simulate the end-to-end cycle. This allows you to debug hand-offs and interactions in real-time before writing a single line of application code. Phase 2: Develop From Cloud Canvas to Local Code with VSCode Foundry Workflows excels at rapid prototyping. However, a visual UI is rarely sufficient for enterprise-grade production. The critical question becomes: How do we integrate these visual definitions into a rigorous Software Development Lifecycle (SDLC)? While the cloud portal is ideal for design, enterprise application delivery happens in the local IDE. The Microsoft Foundry VSCode Extension bridges this gap. This extension allows developers to: Sync: Pull down workflow definitions from the cloud to your local machine. Inspect: Review the underlying logic in your preferred environment. Scaffold: Rapidly generate the underlying code structures needed to run the flow. This accelerates the shift from "understanding" the flow to "implementing" it. Phase 3: Deploy Productionizing Intelligence with the Microsoft Agent Framework Once the multi-agent orchestration has been validated locally, the final step is transforming it into a shipping application. This is where the Microsoft Agent Framework shines as a runtime engine. It natively ingests the declarative Workflow definitions (YAML) exported from Foundry. This allows artifacts from the prototyping phase to be directly promoted to application deployment. By simply referencing the workflow configuration libraries, you can "hydrate" the entire multi-agent system with minimal boilerplate. Here is the code required to initialize and run the workflow within your application. Note - Check the source code https://github.com/microsoft/Agent-Framework-Samples/tree/main/09.Cases/MicrosoftFoundryWithAITKAndMAF Summary: The Journey from Conversation to Action Microsoft Foundry is more than just a toolbox; it is a comprehensive solution designed to bridge the chasm between theoretical AI research and secure, scalable enterprise applications. In this post, we walked through the three critical stages of modern AI development: Design (Low-Code): Leveraging Foundry Workflows to visually orchestrate specialized agents (Recruiter vs. Applicant) mixed with deterministic business rules. Develop (Local SDLC): Utilizing the VSCode Extension to break down the barriers between the cloud canvas and the local IDE, enabling seamless synchronization and debugging. Deploy (Native Runtime): Using the Microsoft Agent Framework to ingest declarative YAML, realizing the promise of "Configuration as Code" and eliminating tedious logic rewriting. By following this path, developers can move beyond simple content generation and build adaptive, multi-agent systems that drive real business value. Learning Resoures What's Microsoft Foundry (https://learn.microsoft.com/azure/ai-foundry/what-is-azure-ai-foundry?view=foundry) Work with Declarative (Low-code) Agent workflows in Visual Studio Code (preview) (https://learn.microsoft.com/azure/ai-foundry/agents/how-to/vs-code-agents-workflow-low-code?view=foundry) Microsoft Agent Framework(https://github.com/microsoft/agent-framework) Microsoft Foundry VSCode Extension(https://marketplace.visualstudio.com/items?itemName=TeamsDevApp.vscode-ai-foundry)8.6KViews1like0CommentsToken Economics: The New FinOps for Agentic AI
In AI applications, tokens are now cost — and token economics deserves architectural attention For a long time, AI application design started with model capability: Can the model write code? Can it reason? Can it use tools? Can it handle long context? Those questions still matter, but in the age of agentic applications, they are no longer sufficient. The more important production question is this: How many tokens does the architecture burn to complete one useful task? A classic chat application often maps one user turn to one model call. An agentic system is different. One user goal can trigger planning, retrieval, tool selection, tool execution, result interpretation, reflection, repair, and summarization. The user sees one instruction; the system may execute dozens of model calls behind the scenes. Tokens are no longer just a measure of text length. They become a measure of system design, runtime behavior, developer workflow, and business cost. GitHub Copilot’s 2026 move to usage-based billing through GitHub AI Credits captures the industry shift clearly. Usage is now aligned with token consumption, including input, output, and cached tokens. That matters because Copilot has evolved from an in-editor assistant into an agentic platform that can handle long, multi-step coding sessions across repositories. In that world, a tiny prompt and a multi-hour autonomous coding workflow should not be treated as the same economic unit. Token economics is therefore not about telling developers to “write shorter prompts.” It is about designing systems where: useful context is preserved, while noise is removed; repeated context is cached or deduplicated; simple tasks do not pay for frontier models; short-term state is managed structurally instead of copied repeatedly; every model call is metered, comparable, and governed. In short: token economics is the practice of making agentic AI economically sustainable. Scenario thinking: GitHub Copilot billing, Copilot SDK, GPT-5.5, Anthropic, and MAI-Code Model The new GitHub Copilot billing model provides a useful framing for developers. Copilot is no longer only autocomplete. It is becoming a programmable agentic platform. It can use models, call tools, work across files, stream responses, and participate in long-running coding workflows. With the GitHub Copilot SDK, developers can embed that agentic runtime into their own applications, services, and developer tools. That is powerful, but it also changes the cost model. Once an agent loop becomes programmable, token cost also needs to become programmable. If a system can plan, call tools, edit files, retry, repair, and summarize, it also needs to meter, route, cache, compress, and evaluate. EvalAgentic gives this idea a concrete playground. The project groups models into cost and capability tiers: Tier Example models Example price / 1K tokens Typical use LARGE claude-opus-4.8, gpt-5.5 $0.030 Agents, code generation, multi-step reasoning MID gpt-5.4-mini $0.012 Dialogue, summarization, extraction TINY gpt-5-mini $0.001 Classification, keyword matching, rule-like tasks This tiering lets us reason about real scenarios: GPT-5.5-class models are valuable for hard reasoning and engineering workflows, but they should not be the default for every step. Using a frontier model for simple classification is like hiring a principal architect to label folders. Anthropic high-capability models can be excellent for complex reasoning and coding, but they benefit from routing discipline. Requirements analysis, test interpretation, deployment explanation, and code generation may not need the same model tier. MAI-Code Model-style coding models should be treated as specialized capability layers. Their value is not just “better code generation”; it is deciding when code-specialized intelligence should be invoked in a larger agent pipeline. The real question is not “Which model is the best?” It is: Which model is the most economical and reliable for this step of this workflow? Four engineering techniques for saving tokens Context Compression: turn long text into executable structure Implementation principle Context Compression converts long natural-language context into the structured information an agent actually needs. Business documents are often verbose: resumes, contracts, product manuals, requirements, and support logs contain narrative text, boilerplate, repeated explanations, and low-value context. The next agent step may only need a few fields. EvalAgentic demonstrates this with a long resume-like input that is compressed into a compact JSON object. Instead of injecting the full original text into every prompt, the system extracts key fields and dynamically injects only the data required by the current task. A practical compression pipeline includes: Redundancy detection — identify long-tail text, repeated descriptions, stale history, and low-value context. Structured extraction — use Copilot or a mid-tier model to transform prose into JSON, tables, or typed schemas. Dynamic injection — inject only the fields needed for the next step. Recoverable references — preserve source pointers so compressed context remains auditable. How to evaluate Prompt token reduction before and after compression. Answer quality and task success rate. Schema fidelity and missing-field rate. Latency improvement. Cost per successful task. Compression is not summarization. Summaries are designed for humans. Structured compression is designed for agents. Prompt Deduplication / Cache: stop paying twice for the same context Implementation principle Many agent systems waste tokens because they repeatedly send the same context. The same resume, contract, repository README, user profile, API documentation, or business rule can be copied across turns and agents. Prompt Deduplication / Cache applies a simple principle: if context has already been processed, do not pay to process it again unless it has changed. A concrete design includes: compute a hash or semantic key for source context; reuse extracted structured results when content is identical or equivalent; apply a TTL for repeated entities, such as the 24-hour cache pattern shown in EvalAgentic; organize stable prompt prefixes to benefit from provider-level prompt caching where available; store shared context in an artifact store or memory layer so multiple agents do not copy the same blob. How to evaluate Cache hit rate. Cached token ratio. Duplicate prompt rate. Cost delta before and after caching. Correctness under cache, especially stale-cache failures. Caching is not “save everything forever.” Good caching knows when to reuse and when to invalidate. On-Demand Model Routing: let task complexity decide model tier Implementation principle On-Demand Model Routing routes each request to the cheapest model that can complete the task reliably. The entry point can use a rule tree, a lightweight classifier, or a hybrid complexity score. EvalAgentic’s routing tree is intentionally easy to explain: INCOMING REQUEST └─ Prompt < 500 tokens? ── YES ─→ TINY: classify / extract └─ NO ──→ multi-step reasoning? ├─ NO ─→ MID: dialogue / summary └─ YES ─→ LARGE: agent / code The engineering logic is straightforward: simple classification and keyword matching go to TINY; summarization and structured conversion go to MID; multi-step reasoning, coding, cross-file changes, and orchestration go to LARGE; code-specialized models such as MAI-Code Model can be placed in the coding phase rather than used across the whole pipeline. How to evaluate Routing accuracy. Cost per route. Quality regression by tier. Escalation rate from small models to larger models. End-to-end success rate. Routing does not mean “always use the smallest model.” It means frontier intelligence is reserved for the steps where it actually changes the outcome. Short-term Memory: preserve state instead of replaying history Implementation principle Short-term Memory controls context growth across multi-turn and multi-agent workflows. Without it, agents often replay the full conversation history, full tool outputs, and full intermediate reasoning on every turn. The context grows; quality may not improve; the bill definitely does. A better design stores state structurally: user goal; current plan; tool outputs and references; failure reasons; next actions; handoff artifacts between agents. In a multi-agent coding pipeline, the Requirements Agent should hand off a structured spec. The Coding Agent should read that spec, not the entire prior conversation. The Testing Agent should consume testable artifacts, not every word produced by the Coding Agent. How to evaluate Context growth curve across turns. Memory retrieval precision. Rework rate caused by missing state. Recovery quality after failed steps. Average input tokens per turn. Short-term memory is not about remembering everything. It is about remembering the next useful thing. EvalAgentic as a concrete evaluation example EvalAgentic is effective as an evangelism project because it turns token economics into an observable before/after system. The architecture has five layers: Frontend — frontend/index.html provides Tabs A / B / C, live SSE logs, and before/after charts. API — backend/server.py exposes FastAPI routes and Server-Sent Events streaming. Orchestration — eval.py handles A/B evaluation; coding_agents.py handles the multi-agent coding scenario. Core — compressor.py, router.py, gh_models.py, and token_meter.py implement compression, routing, Copilot SDK calls, and token metering. Providers — GitHub Copilot SDK and Microsoft Agent Framework provide model access and agent orchestration. Tab A: Compression comparison Tab A compares long-form context before and after structured compression. The key message is that token saving does not come from writing a clever sentence. It comes from converting verbose context into a structured artifact that downstream agents can consume efficiently. Tab B: On-demand model routing Tab B demonstrates that cost is not only about raw token count. If a system routes simple tasks to cheaper tiers and reserves expensive models for complex reasoning, total cost can fall even if some token counts increase. This is a subtle but important point: token economics is not token starvation; it is model portfolio optimization. Tab C: Coding scenario — multi-agent with Agent Framework Tab C is the most persuasive demo. The same deliverable — a Taobao-like goods-list site with HTML + JavaScript frontend, Flask backend, and Docker deployment — is produced twice by a four-agent pipeline: Requirements Agent; Coding Agent; Testing Agent; Deployment Agent. The before pipeline uses no compression and sends every agent to GPT-5.5 / LARGE. The after pipeline injects a compressed JSON spec and uses on-demand routing: requirements can use MID, coding can use LARGE, testing can use MID, and deployment can use TINY. This mirrors real enterprise development. Architecture and complex code generation may deserve frontier models. Test interpretation, deployment packaging, and simple validation often do not. Summary and refinement based on the project diagrams The EvalAgentic README describes three important visuals: the architecture flow, the routing tree, and the token-meter design. Together, they form a governance loop: User Scenario ↓ Context Compression ↓ Prompt Deduplication / Cache ↓ On-Demand Model Routing ↓ Short-term Memory ↓ Token Metering & Budget Actions ↓ Before / After Evaluation Optimize the path, not only the prompt Many teams start token optimization by editing prompt wording. That helps, but the largest waste usually lives in the execution path: how many calls are made, how much context is repeated, how often tools retry, and whether every step uses the same expensive model. EvalAgentic makes the path visible through A/B comparisons. Token Meter is the control plane of cost governance EvalAgentic’s token_meter.py uses a non-invasive interceptor pattern: INTERCEPTOR (@token_meter) ↓ COUNTER CORE: accounting / budget threshold / trigger ↓ ACTION HUB: throttle (>80% budget) / rollback (>budget) This is the right architectural instinct. Production systems need thresholds, throttling, rollback, and traceability. Without those controls, one retry loop can quietly turn a small user request into a budget incident. Cost metrics must be evaluated with quality metrics A system that cuts cost by 80% but drops success rate by 50% is not optimized. It is broken more cheaply. The evaluation matrix should combine cost, quality, latency, and reliability: Dimension Metric Why it matters Cost Cost per successful task Measures the real unit economics Token Input / output / cached tokens Identifies compression and cache opportunities Quality Pass rate / regression rate Ensures cheaper tiers do not break outcomes Efficiency Latency / retry count Prevents cheap models from causing expensive retries Governance Budget breach / rollback count Validates runtime control Narrative A simple three-line narrative works well for demos: Token is no longer a technical detail. It is the bill of your architecture. EvalAgentic shows the same scenario before and after cost-aware design. The goal is not to make models cheaper; the goal is to make agent systems economically governable. For a developer audience, the sharper version is: A good agent does not use the biggest model everywhere. It uses the right intelligence at the right step, with the right context, under the right budget. Practical recommendations for real projects Establish a token baseline first. Measure input, output, retries, tool calls, and cost per scenario before optimizing. Make compression a component, not a prompt habit. Define schemas, cache policies, and fallback behavior. Introduce a model routing matrix. Route by task type, complexity, risk, latency, and cost. Define handoff contracts between agents. Pass structured artifacts, not endless conversation history. Evaluate every optimization with A/B tests. Compare cost, quality, latency, and stability. Add budget actions. Throttle at a threshold, rollback on breach, and add circuit breakers for failed retries. Closing: token economics is the second curve of agent engineering The first phase of AI application development was about calling models. The second phase was about putting models into products. The next phase of agentic AI is about running those systems reliably, affordably, and governably. EvalAgentic matters because it turns Context Compression, Prompt Deduplication / Cache, On-Demand Model Routing, and Short-term Memory into something developers can run, compare, and explain. It moves token economics from opinion to instrumentation. Future AI applications will not only ask: How smart is this agent? They will ask: How many tokens does it spend per completed task? Which model did it use? Did it hit cache? Did retries run away? Did the system reserve frontier intelligence for the steps that deserved it? References kinfey/EvalAgentic GitHub Copilot is moving to usage-based billing Updates to GitHub Copilot billing and plans Copilot SDK - GitHub Docs8.3KViews4likes0Comments
Using Jev with Agents in Microsoft Foundry for Model Evaluation
What is Jev? Jev is a new AI model from TypeSafe AI, first released in early access on 15 September 2026. TypeSafe describes Jev as its first “System One” model, designed specifically to make fast, structured decisions rather than generate free-form text. You provide Jev with some state or context and define the judgement you want it to make. It then returns a typed, probabilistic decision, such as: Choice: select from a defined set of options Score: evaluate something against an ordered scale Yes/No probability: determine the probability of a condition being true Unlike a conventional LLM, Jev gives up string generation in favour of type-safe structured values. Their description is essentially unstructured state in, typed probabilistic decisions out Why use Jev? Jev is particularly useful when an application needs to make a judgement rather than generate an answer. For example: Consistent evaluation against explicitly defined criteria Structured outputs that applications can consume directly Classification, assessment, routing and decision-support Agent workflows, where a judgement is required before taking an action Guardrails, such as assessing whether an agent should make a tool call Model routing, where a judgement determines which model or process should handle a request Every decision can also include a confidence or probability, allowing an application to use thresholds to decide when to proceed automatically or when further review is required. Jev and explainability Jev can provide a different approach to explainability for Model-as-a-Service (MaaS) and hosted LLM solutions. Traditional explainability techniques such as SHAP provide feature-attribution explanations for model predictions. Applying these techniques can be more difficult when the model is consumed solely through a hosted API and its internals are not available. Jev does not replace SHAP or provide the same type of feature-attribution explanation. Instead, it can be used as a separate judgement layer, evaluating an LLM's inputs, outputs or proposed actions against explicit criteria and returning structured decisions with confidence scores. For example: LLM generates an answer → Jev evaluates the answer → application decides what to do next This can provide a useful, measurable evaluation layer around otherwise opaque MaaS models. Could you do this with another LLM? Yes you could ask a conventional LLM to classify, score or evaluate an input and request structured JSON output. However, Jev has been purpose-built for this type of workload rather than general-purpose text generation. TypeSafe reports that Jev produces outputs in parallel rather than generating tokens sequentially, and its hosted service currently advertises typical decision latency of approximately 70–500 ms. Pricing As of September 2026, TypeSafe's documentation lists Jev 1.13 (jev-1.13.0) at $0.042 per million input tokens, with output tokens free. It lists rate limits of 250,000 tokens per second and 1,200 requests per minute, although TypeSafe states that these limits can change. As Jev produces decisions rather than generated text, you are effectively paying for the context it evaluates rather than for generated output. Pricing is subject to change and these figures are accurate only as of the date of this article Using Jev with Microsoft Foundry A useful pattern with Microsoft Foundry is to treat Jev as a specialised judgement/evaluation component alongside your generative models: User/Application → Foundry model or agent → Jev judgement → deterministic logic → action/response For example, a Foundry-hosted model could generate a proposed answer and Jev could evaluate that answer against predefined criteria before your application allows the workflow to continue. Here's how to set it up: First, you will need to apply for the preview for Jev from TypeSafe. Once you have an account you will need to create an API key Go to API keys in the menu and create a new key (copy the key for use in Foundry) You may also have received some free credit, which should be more than sufficient for experimenting with Jev given its low per-token cost. Next we go to Foundry and create a new agent for Jev In your agent, add a Tool and select OpenAPI tool as below Fill out the dialogue as follows You will have to create a new connection - The key should be in this format "Bearer apikey_<the rest of your key>" For the schema add this { "openapi": "3.0.3", "info": { "title": "TypeSafe Jev System One", "version": "1.1.0", "description": "Evaluate content using TypeSafe Jev System One." }, "servers": [ { "url": "https://api.typesafe.ai" } ], "paths": { "/v1/systemone": { "post": { "operationId": "evaluate_with_jev", "summary": "Evaluate content using Jev", "description": "Evaluate state against typed questions using TypeSafe Jev.", "security": [ { "bearerAuth": [] } ], "requestBody": { "required": true, "content": { "application/json": { "schema": { "type": "object", "additionalProperties": false, "required": [ "state", "model", "questions" ], "properties": { "state": { "type": "string", "description": "The original text or content for Jev to evaluate." }, "model": { "type": "string", "enum": [ "jev-latest" ], "default": "jev-latest", "description": "The TypeSafe Jev model. Use jev-latest." }, "questions": { "type": "object", "description": "A map of named questions for Jev to answer. Each question must be a Noul, Choice, or Score question.", "additionalProperties": { "oneOf": [ { "$ref": "#/components/schemas/NoulQuestion" }, { "$ref": "#/components/schemas/ChoiceQuestion" }, { "$ref": "#/components/schemas/ScoreQuestion" } ] } } } } } } }, "responses": { "200": { "description": "Successful Jev evaluation", "content": { "application/json": { "schema": { "type": "object", "additionalProperties": true } } } }, "400": { "description": "Invalid request" }, "401": { "description": "Authentication failed" }, "422": { "description": "Request validation failed" } } } } }, "components": { "schemas": { "NoulQuestion": { "type": "object", "additionalProperties": false, "required": [ "type", "instructions" ], "properties": { "type": { "type": "string", "enum": [ "noul" ] }, "instructions": { "type": "string", "description": "The yes/no question for Jev to evaluate." }, "criteria": { "type": "object", "additionalProperties": false, "properties": { "true": { "type": "string", "description": "Description of what a yes or value near 1 means." }, "false": { "type": "string", "description": "Description of what a no or value near 0 means." } } } } }, "ChoiceQuestion": { "type": "object", "additionalProperties": false, "required": [ "type", "instructions", "criteria" ], "properties": { "type": { "type": "string", "enum": [ "choice" ] }, "instructions": { "type": "string", "description": "The question for Jev to decide between the supplied choices." }, "criteria": { "type": "object", "description": "A map where each property name is a possible choice and its value describes that choice.", "minProperties": 2, "additionalProperties": { "type": "string" } } } }, "ScoreQuestion": { "type": "object", "additionalProperties": false, "required": [ "type", "instructions", "criteria" ], "properties": { "type": { "type": "string", "enum": [ "score" ] }, "instructions": { "type": "string", "description": "The attribute or question Jev should score." }, "criteria": { "type": "array", "description": "Ordered scoring levels from lowest to highest.", "minItems": 2, "items": { "type": "string" } } } } }, "securitySchemes": { "bearerAuth": { "type": "apiKey", "name": "Authorization", "in": "header" } } }, "security": [ { "bearerAuth": [] } ] } We are going to use Jev to assess complaints so our instructions for the Agent will be You are a customer-support triage agent. For every customer-support message you MUST call the evaluate_with_jev tool. IMPORTANT: When calling evaluate_with_jev, construct Jev questions using ONLY the following property names: For a Noul question: { "type": "noul", "instructions": "...", "criteria": { "true": "...", "false": "..." } } For a Choice question: { "type": "choice", "instructions": "...", "criteria": { "option1": "...", "option2": "..." } } For a Score question: { "type": "score", "instructions": "...", "criteria": [ "lowest level", "middle level", "highest level" ] } NEVER use these properties: - question - prompt - options - ordered_criteria Always use: - instructions - criteria For customer support tickets, ask Jev these three questions: billing: type = noul instructions = "Does this ticket concern billing, payments, charges, invoices or refunds?" criteria.true = "The issue concerns billing or a financial transaction." criteria.false = "The issue does not concern billing or a financial transaction." tone: type = choice instructions = "What is the customer's tone?" criteria: calm = "Neutral, polite or informational." frustrated = "Dissatisfied, impatient or inconvenienced." angry = "Strongly confrontational or extremely dissatisfied." urgency: type = score instructions = "How urgently does this ticket require attention?" criteria in this exact order: 1. "Can wait" 2. "Handle this week" 3. "Handle today" Always set model to "jev-latest". Pass the customer's original message as state. Do not classify the ticket yourself. Use the values returned by Jev. Always show the Jev output at the end of the response Now we can give a complaint and see what Jev says The room had no water in and one of the towels was dirty Response I’m sorry about the issues you experienced—no running water and a dirty towel are unacceptable. I’ll get this addressed right away. Immediate help I can arrange now: Send maintenance to restore water. Have housekeeping deliver fresh towels and re-service the bathroom. Provide bottled water immediately. If water can’t be restored quickly, arrange a room move. Please share: Your reservation name and room number Best contact number Whether there’s no water at all or only hot/cold is affected Whether you prefer immediate service or a room change If you’ve already left, let me know the date/time this happened so we can investigate and follow up. Jev output: { "model": "jev-1.13.0", "answers": { "billing": { "type": "noul", "noul": 0.02 }, "tone": { "type": "choice", "choice": "frustrated", "confidence": 0.6, "probabilities": { "frustrated": 0.74, "calm": 0.26, "angry": 0.0 } }, "urgency": { "type": "score", "score": 1.81, "confidence": 0.72, "legend": { "0": "Can wait", "1": "Handle this week", "2": "Handle today" }, "probabilities": { "0": 0.03, "1": 0.12, "2": 0.85 } } }, "usage": { "input_tokens": 466, "output_tokens": 75 } } We can now see both Jev's decision and the probabilities behind it. In this example, Jev determines that the complaint is very unlikely to be billing-related, identifies the customer's tone as frustrated, and gives a high probability that the issue should be handled today. This is where Jev becomes particularly useful in an agent workflow. Rather than relying on generated text to drive the next step, our application can use these structured probabilities to make deterministic decisions, such as routing the complaint, escalating it, or requiring human review when confidence falls below a defined threshold.