First published on TECHNET on Jul 10, 2013
Hi, everyone. I’m Jane Yan, a PM on the Work Folders team. I presented a session on Work Folders with Adam Skewgar, and demoed how it works both on the client and server ( A Deep Dive into the New Windows Server Data Sync Solution ). This blog post will show you step by step on how to build the demo environment shown in the sessions.
Work Folders is a new feature introduced in Windows Server 2012 R2 that enables users to access their work related files, no matter whether the devices are joined to a domain or not, and whether the devices are connected directly to the corpnet or over the internet.
The simplest setup for lab test of Work Folders requires the following computers or VMs:
In the lab testing, VMs are more convenient, I’ll provide the end to end setup using VMs . This test environment does not require you to publish any URLs for Work Folders.
This section provides you a checklist on how to setup the lab environment, detailed procedures are covered in the later sections.
This section assumes you have knowledge on setting up VMs, domain controller, and a virtual network. By end of this section, you will have a domain setup with the server and one client machine joining to the domain.
In the Hyper-V Manager console, create a Virtual Switch marked as Private .
Configure the VMs to use the Private network.

Work Folders can be configured to domain users, you need to create a few test users in the AD. For testing purposes, let’s create 10 domain users (U1 to U10).
We recommend controlling access to Work Folders through security groups. Let’s create [n1] one group named “ Sales” , with scope “ Global” and type “ Security ”, and add the 10 domain users (U1 to U10) in the Sales security group.
Now the fun starts. For all the operations performed on the server, I’ll show the UI through Server Manager, and followed by the equivalent Windows PowerShell cmdlet.

PS C:\> Add-WindowsFeature FS-SyncShareService
A sync share is the unit of management on the sync servers. A sync share maps to a local path where all the user folders will be hosted under, and a group of users who can access the sync share.
PS C:\>New-SyncShare SalesShare –path C:\SalesShare –User Contoso\Sales -RequireEncryption $true –RequirePasswordAutoLock $true
If you want to enable the sync share for SMB access, you can open the Windows Explorer, and navigate to the “This PC” location. Right click on the “SalesShare” folder, and select “Share with” -> “Specific people”. Add Contoso\Sales and change the permission level to “Read/Write”, as shown below:
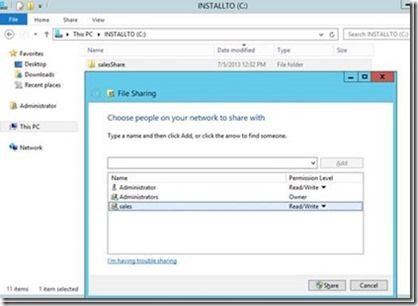
Complete the UI by clicking on “Share” button.
Now user can also access the dataset through UNC path.
Once the server is enabled for SMB access, server will check for data changes every 5 minutes by default. You can change the enumeration time by running the following cmdlet on the server:
PS C:\> Set-SyncServerSetting -MinimumChangeDetectionMins <NumberInMinutes>
It increases the server load each time the server enumerates files to detect changes, on the other hand, the changes done locally on the server or through SMB can only be detected at each enumeration time. It is a balance act to tolerate change detection delay and the load server can handle. Enumeration gets more expensive as the number of files increases under the user folder. If you want to decrease the setting, make sure you test it on the server in your environment first. We are currently evaluating the enumeration performance, and will post guidance in the area later. If you don’t want users to change files directly on the server or through SMB or NFS, you should consider disable running ChangeDetection on the server.
Since we prepared 2 VMs as the client machines, you will need to repeat the following setup on both client machines.
Client Connection (HTTPS or HTTP)
By default, the Work Folders clients connect to the server using HTTPS, which requires the server to have an SSL certificate installed and configured. To configure an SSL certificate see Work Folders Certificate Management .
In lab testing, you can configure the client to use HTTP by running the following command on the client:
Reg add HKLM\SOFTWARE\Microsoft\Windows\CurrentVersion\WorkFolders /v AllowUnsecureConnection /t REG_DWORD /d 1
Caution: The AllowUnsecureConnection registry setting should only be used for lab testing and should not be used in a production environment.
Configure the Work Folders client to use the Work Folders Server Url
When a user enters their email address, such as Jane@contoso.com , the client will construct the Url as https://workfolders.contoso.com , and use that Url to communicate with the server. In production environment, you will need to publish the Url for the client to communicate to the server through reverse proxy. In testing, we’ll bypass the Url publication by configuring the following regkey:
If using HTTP (lab only): Reg add HKCU\Software\Microsoft\Windows\CurrentVersion\WorkFolders /v ServerUrl /t REG_SZ /d http://syncsvr.contoso.com
If using HTTPS: Reg add HKCU\Software\Microsoft\Windows\CurrentVersion\WorkFolders /v ServerUrl /t REG_SZ /d https://syncsvr.contoso.com
With this key set, the client will use the Url in the regkey to establish the sync partnership.
Once you have configured both client machines, user can access the documents under the Work Folders location from any devices, and the documents will be kept in sync by Work Folders.
To test Work Folders, create a document (using Notepad or any other app) on one of the client machines and save the document under the Work Folders location, also, create a document on the other client machine, save it under the Work Folders. In a few moments, you should see the document get synced on both client machines.

The client will sync with the server if there is any changes locally under the Work Folder, and when the client connects to the server, the server will also notify the client for any changes on the server. If client doesn’t have anything changed locally on the client, it will connect to the server every 10 minutes asking for any changes on the server. You can trigger a sync action by creating or modifying a file on the device under the Work Folders.
Since the sync location was also enabled with SMB access, user can also view the data on computers without Work Folders by typing the UNC path in the explorer:

I hope this blog post helps you get started with Work Folders in your test labs. If you have questions not covered here, please raise it in the comments so that I can address it with upcoming postings. Also, there are some resources on this topic you will find helpful:
Powershell cmdlets references: http://technet.microsoft.com/en-us/library/dn296644(v=wps.630).aspx
- Jane
Hi, everyone. I’m Jane Yan, a PM on the Work Folders team. I presented a session on Work Folders with Adam Skewgar, and demoed how it works both on the client and server ( A Deep Dive into the New Windows Server Data Sync Solution ). This blog post will show you step by step on how to build the demo environment shown in the sessions.
Overview
Work Folders is a new feature introduced in Windows Server 2012 R2 that enables users to access their work related files, no matter whether the devices are joined to a domain or not, and whether the devices are connected directly to the corpnet or over the internet.
Topology
The simplest setup for lab test of Work Folders requires the following computers or VMs:
- Active Directory Domain Services domain controller (DC)
- File server running Windows Server 2012 R2 or later
- 2 client PCs running Windows 7 or later (to observe documents sync between 2 devices)
In the lab testing, VMs are more convenient, I’ll provide the end to end setup using VMs . This test environment does not require you to publish any URLs for Work Folders.
Express lane
This section provides you a checklist on how to setup the lab environment, detailed procedures are covered in the later sections.
- Setting up VMs with a domain controller, a server and 2 clients: VM setup
- Create domain users and a security group: User and Security group creation
- Setup the sync server and create sync share: Sync Server configuration
- Setup Work Folders on client: Client setup
- See how it works: Sync in action
VM setup
This section assumes you have knowledge on setting up VMs, domain controller, and a virtual network. By end of this section, you will have a domain setup with the server and one client machine joining to the domain.
Configure Network
In the Hyper-V Manager console, create a Virtual Switch marked as Private .
Configure the VMs to use the Private network.
DC setup
- Create a VM using Windows Server 2012 R2
- Rename the VM to DC .
- Configure the IP of the server as 10.10.1.10
- After the VM setup, open Server Manager, and then add the following roles:
- Active Directory Domain Services
- DHCP Server (Note: this role is optional. You can also configure static IP for each VM without enabling DHCP)
- DNS Server
- Complete the wizard, then click on promote DC link “ Promote this server to a domain controller”
- Use the wizard to create a new forest as “Contoso.com”, and configure the DC appropriately.
- Add a new scope in DHCP, such that other machines on the network can get IP address automatically. Make sure all the machines are on the same subnet, and pointing to 10.10.1.10 as the DNS server. Note: this is optional, you can also manually configure other machines with static IP.
Server setup
- Create a VM using Windows Server 2012 R2.
- Rename the VM to SyncSvr .
- Join the SyncSvr machine to the domain Contoso.com
- Optionally, if you use static Ip, configure the Ip on this server as 10.10.1.12
Client setup
- Create 2 VMs using Windows 8.1
- Rename VM1 to OfficePC
- Optionally, if you use static Ip, configure the Ip on this client as 10.10.1.15
- Rename VM2 to HomePC
- Optionally, if you use static Ip, configure the Ip on this client as 10.10.1.16
- Join OfficePC to the contoso.com domain.
User and Security group creation
Work Folders can be configured to domain users, you need to create a few test users in the AD. For testing purposes, let’s create 10 domain users (U1 to U10).
We recommend controlling access to Work Folders through security groups. Let’s create [n1] one group named “ Sales” , with scope “ Global” and type “ Security ”, and add the 10 domain users (U1 to U10) in the Sales security group.
Sync Server configuration
Now the fun starts. For all the operations performed on the server, I’ll show the UI through Server Manager, and followed by the equivalent Windows PowerShell cmdlet.
Enabling the Work Folders role
Using Server Manager UI
- Launch the Server Manager on SyncSvr.
- On the dashboard, click “ Add roles and features ”.
- Follow the wizard, on the Server Role selection page, choose Work Folders under File and Storage Services:
- Complete the wizard.
Using PowerShell cmdlet
PS C:\> Add-WindowsFeature FS-SyncShareService
Create Sync Share
Using Server Manager UI
A sync share is the unit of management on the sync servers. A sync share maps to a local path where all the user folders will be hosted under, and a group of users who can access the sync share.
| Steps | Screenshots | Description | ||||||||||
| Launch New Sync Share Wizard from Server Manager |

|
|||||||||||
| Provide the local path where user folders will be created under, type C:\SalesShare, and then click Next . |

|
There are 2 options to specify the local path:
If you have a local path that is configured to be an SMB share, such as a folder redirection share, you can simply select the first option “Select by file share”. For example, as the screenshot shown above, I had one SMB share created on this server, which points to the C:\finshare location. I can simply enable the path “c:\finshare” for sync by select the first radio button. If you are creating sync share first, ((without the SMB share configuration), you can provide the local path directly in the second option, which I’m using in the demo. |
||||||||||
| Select the user folder format, choose the default user alias, and click Next . |

|
There are 2 options you can select from the UI:
Using user alias . This is selected by default, and it is compatible with other technologies such as folder redirection or home folders  Using
alias@domain
. This option ensures the uniqueness of the folder name for users across domains.
Using
alias@domain
. This option ensures the uniqueness of the folder name for users across domains.

|
||||||||||
Admin can choose a subfolder “Document” as the folder to be synced to devices, and leaving other folders still functioning with Folder redirection. To do so, check “Sync only the following subfolder”

|
Sync only the following subfolder:
By default, all the folders/files under the user folder will be synced to the devices. This checkbox allows the admin to specify a single subfolder to be synced to the devices. For example, the user folder might contain the following folders as part of a Folder Redirection deployment:

|
|||||||||||
| Provide the sync share name and description (optional), and click Next |

|
|||||||||||
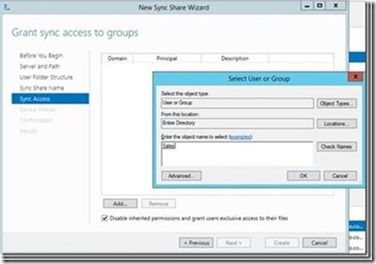
| Assign security groups for sync share access by clicking the Add button and entering the Sales security group (created in section User and Security group creation). Then click Next |
|
By default, the admin will not be able to access the user data on the server. If you want to have admin access to user data, uncheck the “
Disable inherited permissions and grant users exclusive access to their files
” checkbox.
As part of this assignment, the share creation will modify the NTFS folder permission on the sync root, to ensure users in the security group can create their folders, and access documents to only their own folder. The table below shows the permissions which will be configured as part of the sync share creation:
|
||||||||||
| Define device policies, and then click Next . |

|
Encryption policies requires the documents in Work Folders on the client devices to be encrypted with the Enterprise ID. Data encrypted with the Enterprise ID will have a different key from the EFS key which is used to encrypt personal documents on the same device. The separation allows the admin to wipe only the Work Folders data, while preserve the personal data on the device.
The password policy enforces the following configuration on user PCs and devices:
If the device doesn’t meet the policy, user will not be able to configure the Work Folders. The policy enforcement on the client devices is not in the Preview release. It will be in the RTM release. |
||||||||||
| Check the sync share settings, and click Create. |

|
Using PowerShell cmdlet
PS C:\>New-SyncShare SalesShare –path C:\SalesShare –User Contoso\Sales -RequireEncryption $true –RequirePasswordAutoLock $true
Enable SMB access
If you want to enable the sync share for SMB access, you can open the Windows Explorer, and navigate to the “This PC” location. Right click on the “SalesShare” folder, and select “Share with” -> “Specific people”. Add Contoso\Sales and change the permission level to “Read/Write”, as shown below:
Complete the UI by clicking on “Share” button.
Now user can also access the dataset through UNC path.
Once the server is enabled for SMB access, server will check for data changes every 5 minutes by default. You can change the enumeration time by running the following cmdlet on the server:
PS C:\> Set-SyncServerSetting -MinimumChangeDetectionMins <NumberInMinutes>
It increases the server load each time the server enumerates files to detect changes, on the other hand, the changes done locally on the server or through SMB can only be detected at each enumeration time. It is a balance act to tolerate change detection delay and the load server can handle. Enumeration gets more expensive as the number of files increases under the user folder. If you want to decrease the setting, make sure you test it on the server in your environment first. We are currently evaluating the enumeration performance, and will post guidance in the area later. If you don’t want users to change files directly on the server or through SMB or NFS, you should consider disable running ChangeDetection on the server.
Client setup
Since we prepared 2 VMs as the client machines, you will need to repeat the following setup on both client machines.
Lab testing specific settings
Client Connection (HTTPS or HTTP)
By default, the Work Folders clients connect to the server using HTTPS, which requires the server to have an SSL certificate installed and configured. To configure an SSL certificate see Work Folders Certificate Management .
In lab testing, you can configure the client to use HTTP by running the following command on the client:
Reg add HKLM\SOFTWARE\Microsoft\Windows\CurrentVersion\WorkFolders /v AllowUnsecureConnection /t REG_DWORD /d 1
Caution: The AllowUnsecureConnection registry setting should only be used for lab testing and should not be used in a production environment.
Configure the Work Folders client to use the Work Folders Server Url
When a user enters their email address, such as Jane@contoso.com , the client will construct the Url as https://workfolders.contoso.com , and use that Url to communicate with the server. In production environment, you will need to publish the Url for the client to communicate to the server through reverse proxy. In testing, we’ll bypass the Url publication by configuring the following regkey:
If using HTTP (lab only): Reg add HKCU\Software\Microsoft\Windows\CurrentVersion\WorkFolders /v ServerUrl /t REG_SZ /d http://syncsvr.contoso.com
If using HTTPS: Reg add HKCU\Software\Microsoft\Windows\CurrentVersion\WorkFolders /v ServerUrl /t REG_SZ /d https://syncsvr.contoso.com
With this key set, the client will use the Url in the regkey to establish the sync partnership.
WorkFolders setup
| Steps | Screenshots | Description |
|
User can find the setup link in
Control Panel->System and Security->Work Folders
|

|
|
| Provide the user email address or Work Folders Server URL, and then click Next . |

|
If the client machine is domain joined, user will not be prompted for credentials. |
| Specify where to store Work Folders on the device |

|
|
| Consent to the device policy, and then click Setup Work Folders . |

|
|
|
Work Folders is now configured on the device. You can open File Explorer to see Work Folders.
|

|
Once you have configured both client machines, user can access the documents under the Work Folders location from any devices, and the documents will be kept in sync by Work Folders.
Sync in action
To test Work Folders, create a document (using Notepad or any other app) on one of the client machines and save the document under the Work Folders location, also, create a document on the other client machine, save it under the Work Folders. In a few moments, you should see the document get synced on both client machines.
The client will sync with the server if there is any changes locally under the Work Folder, and when the client connects to the server, the server will also notify the client for any changes on the server. If client doesn’t have anything changed locally on the client, it will connect to the server every 10 minutes asking for any changes on the server. You can trigger a sync action by creating or modifying a file on the device under the Work Folders.
Since the sync location was also enabled with SMB access, user can also view the data on computers without Work Folders by typing the UNC path in the explorer:
Conclusion
I hope this blog post helps you get started with Work Folders in your test labs. If you have questions not covered here, please raise it in the comments so that I can address it with upcoming postings. Also, there are some resources on this topic you will find helpful:
Powershell cmdlets references: http://technet.microsoft.com/en-us/library/dn296644(v=wps.630).aspx
- Jane
Updated Apr 10, 2019
Version 2.0Jian (Jane) Yan Microsoft
MicrosoftJoined May 24, 2017
Storage at Microsoft
Follow this blog board to get notified when there's new activity