First published on TECHNET on Nov 06, 2013
In the previous blog post , I provided a step by step guide to set up Work Folders in a lab environment using the Preview release of Windows Server 2012 R2. With the GA release, Work Folders leverages Windows Failover clustering to increase availability. For general details about failover clusters, see Failover Clustering .
In this blog post, I’ll show you how to configure the Work Folders on failover clusters using the latest Windows Server 2012 R2 release.
Work Folders is a new technology in the File and Storage Services role. Work Folders enables users to sync their work data across their devices using a backend file server so that their data is available to them wherever they are. In the Windows Server 2012 R2 release, Work Folders is supported on traditional failover file server clusters.
In this blog post, I’ll provide you with the step by step guide to set up Work Folders in a highly available failover configuration, and discuss the differences in managing a clustered Work Folders server vs. a standalone Work Folders server. This post assumes that you have a good understanding of Work Folders, and know how to configure Work Folders on a standalone server. If not, refer to the Work Folders Overview as well as Designing a Work Folders Implementation and Deploying Work Folders .
To follow this step by step guide, you will need to have the following computers ready:
The computers can be physical or VMs. This blog post will not cover the steps to build the two node clusters; to set up a failover cluster, see Create a Failover Cluster .
This section provides you a checklist on how to setup sync shares on clusters, detailed procedures are covered in the later sections.
The Work Folders role service needs to be enabled on all the cluster nodes. In this blog posts, as I have a two node cluster, I will enable roles on both nodes, by running the following Windows PowerShell cmdlets on each node:
PS C:\> Add-WindowsFeature FS-SyncShareService
To check if the computer has Work Folders enabled, run
PS C:\> Get-WindowsFeature FS-SyncShareService
Note: If Work Folders is installed, FS-SyncShareService will be marked with X.
Highly available services are created by using the High Availability Wizard in Failover Cluster Manager. Since Work Folders is part of the File and Storage Services Server role and you have already enabled Work Folders on each node, you can simply create the file server in the cluster, and configure sync shares on the highly available file server. The clustered file server will also be referred as a clustered file server instance, which is often called a cluster name account, virtual computer object, or (VCO).
Note: Work Folders isn’t supported on Scale-Out File Servers.
To create a clustered file server:
1. Open Failover Cluster Manager
2. Right click Roles, and then click Configure Roles…

3. Click File Server.
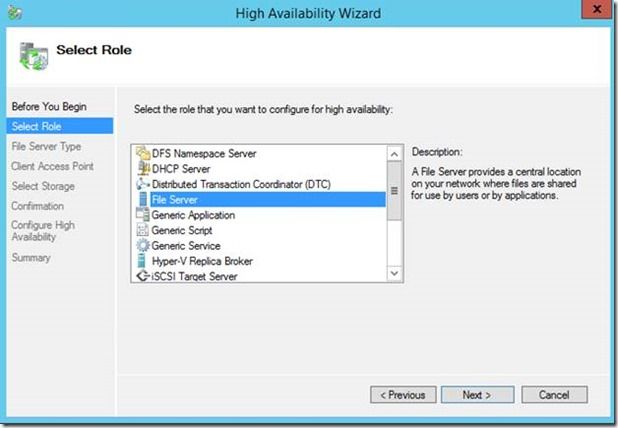
4. Choose the “File Server for general use” option:

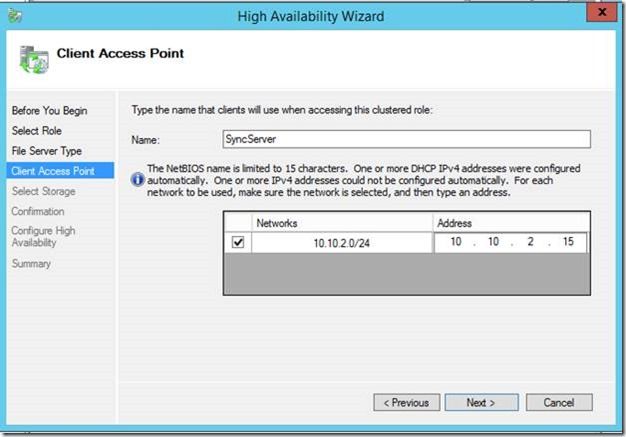
5. Enter a name for the clustered file server instance (VCO). This will be the sync server name used by Work Folders client computers and devices during sync.
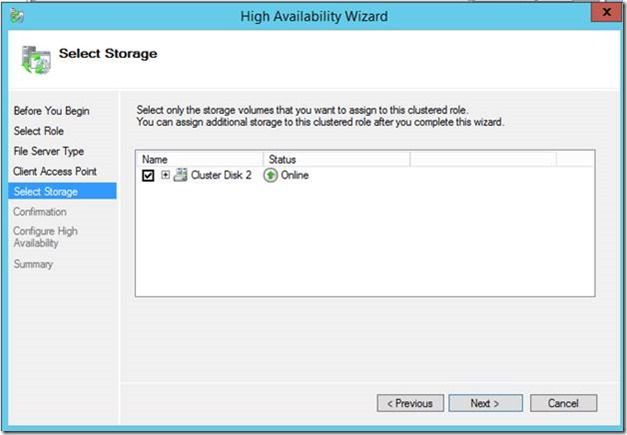
6. Select the disk on which users’ data will be stored.
7. Click on the confirmation to proceed on the role creation.

8. After you’re finished, the sync server appears in Failover Cluster Manager.

When the File Server role is moved to another node, you may notice ESENT errors logged in the Windows application event log on the passive node. These errors are logged due to operations running on the passive node that are unable to access the Work Folders metadata and can be ignored. However, you can prevent these events from being logged by adding the Work Folders services as generic services in the cluster.
Note : Generic Services can only be added to one File Server Role. If you plan to have more than one Work Folders Sync Share in the cluster, these steps should not be performed.
To add the Work Folders services as generic services, perform the steps below:
1. Right-click on the SyncServer role and add a “Generic Service.”

2. Select the “Windows Sync Share” service, click Next and then click Finish.

3. Repeat steps #1 and #2 for the Sync Share Token Translation Service.

4. Confirm the Windows Sync Share and Sync Share Token Translation services have been added as generic services.

5. Now we need to configure service dependencies. Right-click on the “Windows Sync Share” service, go to Properties and then click on the “Dependencies” tab.

6. Insert the following dependencies from the resource drop-down and click OK.

7. Repeat steps #5 and #6 for the "Sync Share Token Translation Service."
Note : These dependencies may vary based on your environment. It’s important that all File\Disk cluster resources are Online before the Work Folders services are started.
For general certificate management, see this post. This section will focus on certificate configurations in a cluster using self-signed certificate. Note: the certificate must be configured on each of the nodes.
1. Create a self-signed certificate on one of the cluster nodes by using Windows PowerShell:
PS C:\> New-SelfSignedCertificate –DnsName “SyncServer.Contoso.org”,”WorkFolders.Contoso.org” –CertStoreLocation cert:\Localmachine\My
Note: the DNS name should be the name you used for the clustered file server instance (VCO) for the sync server. For multiple VCOs, the certificate must include all of the VCO names.
2. Export the certificate to a file
To export the certificate with password, you can either use certmgr.msc, or Windows PowerShell. I’ll show you the cmdlet version referenced in this page :
$cert = Get-ChildItem –Path Cert:\LocalMachine\My\<thumbprint>
$type = [System.Security.Cryptography.X509Certificates.X509ContentType]::pfx
$pass = read-host "Password:" -assecurestring
$bytes = $cert.export($type, $pass)
[System.IO.File]::WriteAllBytes("ServerCert.pfx", $bytes)
3. Copy, then import the certificate on the other node
$pass = read-host “Password:” -AsSecureString
Import-pfxCertificate –FilePath servercert.pfx –CertStoreLocation cert:\LocalMachine\My –Password $pass
4. Configure SSL binding on both cluster nodes
netsh http add sslcert ipport=0.0.0.0:443 certhash=<Cert thumbprint> appid={CE66697B-3AA0-49D1-BDBD-A25C8359FD5D} certstorename=MY
Note: you can get the certificate thumbprint by running:
PS C:\>Get-ChildItem –Path cert:\LocalMachine\My
5. Copy, then import the certificate on the client computer. Note: this step is only necessary for self-signed certificate, where client computers don’t trust the certificate by default. Skip this step if you are using trusted certificate.
$pass = read-host “Password:” -AsSecureString
Import-pfxCertificate –FilePath servercert.pfx –CertStoreLocation cert:\LocalMachine\Root –Password $pass
In a cluster, the sync share is created on the node that owns the disk resource. In other words
1. You cannot create sync shares on disks that are not shared across all the nodes.
2. You cannot create sync shares on the non-owner node of the clustered file server instance (VCO).
For example, I want to setup a sync share on disk E, which is owned by SyncNode1, I will run the following cmdlet on SyncNode1:
New-SyncShare HAShare -path E:\hashare -user Contoso\fin
Note: For more information about creating sync shares, see Deploying Work Folders .
Most of the management experiences are the same between standalone and clustered sync servers. In this section, I’d like to list out a few differences:
Work Folders supports failover clustering configuration in Windows Server 2012 R2. Most of the management experience is similar to the standalone servers, and the management should be scoped to the clustered sync server (VCO). Certificate management however is per-node.
I hope this blog post helps you to understand how to set up a highly available Work Folders server and provides you with insight into the differences in management between a standalone and highly available configuration. If you have questions not covered here, please raise it in the comments so that I can address it with upcoming postings.
In the previous blog post , I provided a step by step guide to set up Work Folders in a lab environment using the Preview release of Windows Server 2012 R2. With the GA release, Work Folders leverages Windows Failover clustering to increase availability. For general details about failover clusters, see Failover Clustering .
In this blog post, I’ll show you how to configure the Work Folders on failover clusters using the latest Windows Server 2012 R2 release.
Overview
Work Folders is a new technology in the File and Storage Services role. Work Folders enables users to sync their work data across their devices using a backend file server so that their data is available to them wherever they are. In the Windows Server 2012 R2 release, Work Folders is supported on traditional failover file server clusters.
Pre-requisite
In this blog post, I’ll provide you with the step by step guide to set up Work Folders in a highly available failover configuration, and discuss the differences in managing a clustered Work Folders server vs. a standalone Work Folders server. This post assumes that you have a good understanding of Work Folders, and know how to configure Work Folders on a standalone server. If not, refer to the Work Folders Overview as well as Designing a Work Folders Implementation and Deploying Work Folders .
To follow this step by step guide, you will need to have the following computers ready:
- Domain controller: a server with the Active directory Domain Services role enabled, and configured with a domain (for example: Contoso.org )
- A two node server cluster, joined to the domain ( Contoso.org) . Each node runs Windows Server 2012 R2 build. (for example: HAWorkFolders )
- One client computer running Windows 8.1 or Windows RT 8.1
The computers can be physical or VMs. This blog post will not cover the steps to build the two node clusters; to set up a failover cluster, see Create a Failover Cluster .
Express lane
This section provides you a checklist on how to setup sync shares on clusters, detailed procedures are covered in the later sections.
- Enable the Work Folders role on both cluster nodes
- Create a file server role in the cluster
- Configure certificates
- Create sync share
- Client setup
Enable Work Folders role service
The Work Folders role service needs to be enabled on all the cluster nodes. In this blog posts, as I have a two node cluster, I will enable roles on both nodes, by running the following Windows PowerShell cmdlets on each node:
PS C:\> Add-WindowsFeature FS-SyncShareService
To check if the computer has Work Folders enabled, run
PS C:\> Get-WindowsFeature FS-SyncShareService
Note: If Work Folders is installed, FS-SyncShareService will be marked with X.
Creating a clustered file server
Highly available services are created by using the High Availability Wizard in Failover Cluster Manager. Since Work Folders is part of the File and Storage Services Server role and you have already enabled Work Folders on each node, you can simply create the file server in the cluster, and configure sync shares on the highly available file server. The clustered file server will also be referred as a clustered file server instance, which is often called a cluster name account, virtual computer object, or (VCO).
Note: Work Folders isn’t supported on Scale-Out File Servers.
To create a clustered file server:
1. Open Failover Cluster Manager
2. Right click Roles, and then click Configure Roles…
3. Click File Server.
4. Choose the “File Server for general use” option:
5. Enter a name for the clustered file server instance (VCO). This will be the sync server name used by Work Folders client computers and devices during sync.
6. Select the disk on which users’ data will be stored.
7. Click on the confirmation to proceed on the role creation.
8. After you’re finished, the sync server appears in Failover Cluster Manager.
Optional: Add Work Folders services in the cluster
When the File Server role is moved to another node, you may notice ESENT errors logged in the Windows application event log on the passive node. These errors are logged due to operations running on the passive node that are unable to access the Work Folders metadata and can be ignored. However, you can prevent these events from being logged by adding the Work Folders services as generic services in the cluster.
Note : Generic Services can only be added to one File Server Role. If you plan to have more than one Work Folders Sync Share in the cluster, these steps should not be performed.
To add the Work Folders services as generic services, perform the steps below:
1. Right-click on the SyncServer role and add a “Generic Service.”
2. Select the “Windows Sync Share” service, click Next and then click Finish.
3. Repeat steps #1 and #2 for the Sync Share Token Translation Service.
4. Confirm the Windows Sync Share and Sync Share Token Translation services have been added as generic services.
5. Now we need to configure service dependencies. Right-click on the “Windows Sync Share” service, go to Properties and then click on the “Dependencies” tab.
6. Insert the following dependencies from the resource drop-down and click OK.
- File Server Role
- Storage\Cluster Disk
- Server\Network Name
7. Repeat steps #5 and #6 for the "Sync Share Token Translation Service."
Note : These dependencies may vary based on your environment. It’s important that all File\Disk cluster resources are Online before the Work Folders services are started.
Configure certificates
For general certificate management, see this post. This section will focus on certificate configurations in a cluster using self-signed certificate. Note: the certificate must be configured on each of the nodes.
1. Create a self-signed certificate on one of the cluster nodes by using Windows PowerShell:
PS C:\> New-SelfSignedCertificate –DnsName “SyncServer.Contoso.org”,”WorkFolders.Contoso.org” –CertStoreLocation cert:\Localmachine\My
Note: the DNS name should be the name you used for the clustered file server instance (VCO) for the sync server. For multiple VCOs, the certificate must include all of the VCO names.
2. Export the certificate to a file
To export the certificate with password, you can either use certmgr.msc, or Windows PowerShell. I’ll show you the cmdlet version referenced in this page :
$cert = Get-ChildItem –Path Cert:\LocalMachine\My\<thumbprint>
$type = [System.Security.Cryptography.X509Certificates.X509ContentType]::pfx
$pass = read-host "Password:" -assecurestring
$bytes = $cert.export($type, $pass)
[System.IO.File]::WriteAllBytes("ServerCert.pfx", $bytes)
3. Copy, then import the certificate on the other node
$pass = read-host “Password:” -AsSecureString
Import-pfxCertificate –FilePath servercert.pfx –CertStoreLocation cert:\LocalMachine\My –Password $pass
4. Configure SSL binding on both cluster nodes
netsh http add sslcert ipport=0.0.0.0:443 certhash=<Cert thumbprint> appid={CE66697B-3AA0-49D1-BDBD-A25C8359FD5D} certstorename=MY
Note: you can get the certificate thumbprint by running:
PS C:\>Get-ChildItem –Path cert:\LocalMachine\My
5. Copy, then import the certificate on the client computer. Note: this step is only necessary for self-signed certificate, where client computers don’t trust the certificate by default. Skip this step if you are using trusted certificate.
$pass = read-host “Password:” -AsSecureString
Import-pfxCertificate –FilePath servercert.pfx –CertStoreLocation cert:\LocalMachine\Root –Password $pass
Create a sync share
In a cluster, the sync share is created on the node that owns the disk resource. In other words
1. You cannot create sync shares on disks that are not shared across all the nodes.
2. You cannot create sync shares on the non-owner node of the clustered file server instance (VCO).
For example, I want to setup a sync share on disk E, which is owned by SyncNode1, I will run the following cmdlet on SyncNode1:
New-SyncShare HAShare -path E:\hashare -user Contoso\fin
Note: For more information about creating sync shares, see Deploying Work Folders .
Client setup
- Make sure that the client can trust the certificate used on the server. If you are using the self-signed certificate, you need to import it on the client. (see step 5 in Configure certificate s)
- When the client connects to the sync servers, it connects to the clustered file server instance (e.g. https://SyncServer.Contoso.org). The client should not connect directly to any physical nodes.
- The Work Folders setup experience for users is the same as if Work Folders was hosted on a single server, as long as the administrator has set up Work Folders properly with a publicly accessible URL pointing to the VCO name.
- Sync happens in the background, and there is no difference between standalone or clustered Work Folder servers for ongoing sync, although users can’t sync while the server is in the process of failing over - sync continues after the failover has completed.
Managing clustered sync servers
Most of the management experiences are the same between standalone and clustered sync servers. In this section, I’d like to list out a few differences:
- All the nodes in the cluster need to have “Work Folders” enabled.
- When there are more than one clustered sync servers hosted by a single cluster, you can manage sync shares with the “scope” parameter in the cmdlet. For example, Get-SyncShare –Scope <sync server VCO> will limit the sync shares configured on a specific clustered sync server (VCO). You need to run the cmdlet on the cluster node which is hosting the VCO.
- Using Set-SyncServerSetting on a standalone server applies the settings on a single sync server; using the cmdlet on a clustered sync server applies the settings to all the clustered sync server (VCO) in the cluster.
- When managing sync shares (such as new, set, remove), you must run the cmdlet or wizard on the node that owns the disk resources that are hosting the sync share data.
- The SSL certificate is managed on each node in the cluster. The certificate must be installed and configured with SSL binding on each node; certificate renewal is also per node.
- The certificate CN must contain the sync server (VCO) name, not the cluster node names.
- When the client connects to the server, it connects using the sync server (VCO) name.
Conclusion
Work Folders supports failover clustering configuration in Windows Server 2012 R2. Most of the management experience is similar to the standalone servers, and the management should be scoped to the clustered sync server (VCO). Certificate management however is per-node.
I hope this blog post helps you to understand how to set up a highly available Work Folders server and provides you with insight into the differences in management between a standalone and highly available configuration. If you have questions not covered here, please raise it in the comments so that I can address it with upcoming postings.
Updated Apr 10, 2019
Version 2.0Jian (Jane) Yan Microsoft
MicrosoftJoined May 24, 2017
Storage at Microsoft
Follow this blog board to get notified when there's new activity