Hello, my name is Christo Lolov h ttp://twitter.com/Christo_lolov

I am a second-year Computing student in Imperial College London. I am a member of a couple of student societies, take part in several online courses, follow a few newsletters, and send and receive a lot of university related emails. As such, I often find it difficult to order the incoming data to my Outlook.
I frequently find myself looking for an attachment that has been sent to me. I open my Outlook and quickly enter a few criteria. However, even with Outlook’s powerful search engine I must go through the results of the query to find the needed attachment.
Would it not be a lot easier if all attachments were extracted and stored elsewhere?
With this question in mind, I started looking for a solution. My search led me to Microsoft Flow. Microsoft Flow simplifies the communication between different applications which otherwise would not have a way of exchanging data easily. It provides templates with interactions (workflows) that are common, but also allows users to alter them or create their own.
I browsed through the available templates and found one that would solve my problem. Upon the arrival of a new email it extracted all attachments and saved them in the user’s OneDrive.
In the following mini-tutorials the red squares indicate areas of interest.
I have used a template for saving email attachments to OneDrive for Business, but there is a similar functionality to use a plain OneDrive account as well.

1. To start using Microsoft Flow visit https://flow.microsoft.com/ . Create an account or log in and click on the Templates tab.

2. Select the template for saving email attachments to OneDrive.

3. Confirm that you would like to use the template. You will be prompted to log in to your respective accounts and allow data to be shared via Microsoft Flow.

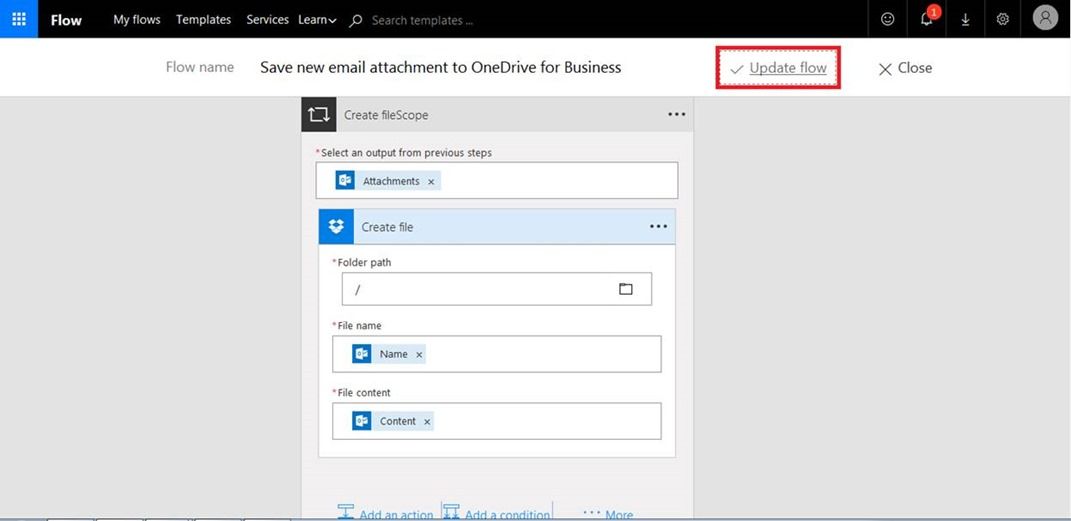
4. Create the workflow. From now on, all emails received in your Inbox that contain an attachment will have their attachment extracted and saved in the root folder of your OneDrive.
I was impressed at how easily the process was completed, but I was not quite satisfied with the result. While all the attachments were indeed easier to find, I did not retain any information of who sent them or their context.
Would it not be better if the attachments were sorted by their sender?
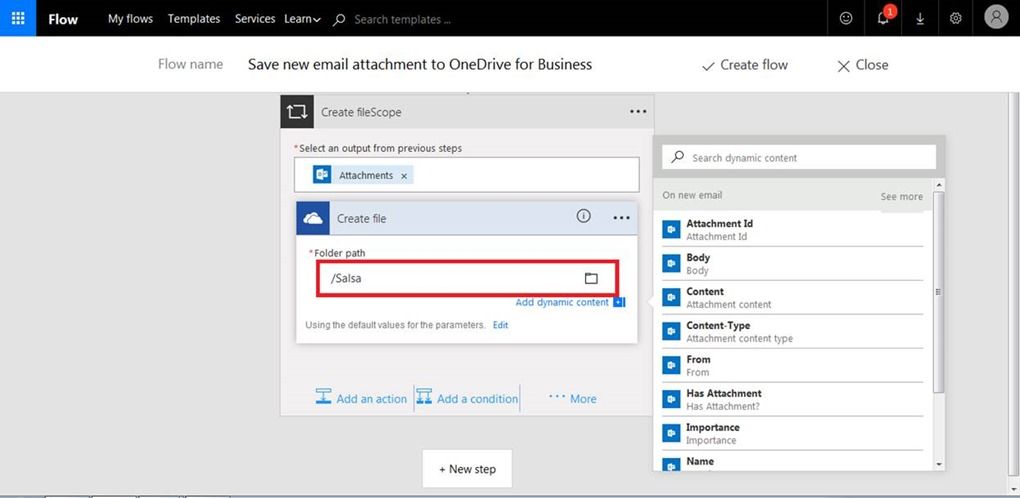
Quickly, I set up another rule. Every person that sent me an email would get their own folder and attachments would be stored by their sender.

1. Click on Edit and expand the additional options.

2. Enter a specific email address.

3. Name the folder in which you would like to receive the attachments and save your flow. From now on, all attachments coming from the specified email address will be redirected to the respective folder.
I then considered that I get emails from different people, but they are usually centered around a topic. For example, all members of my Salsa society would send me emails concerning our dance classes. I was already using Outlook’s rules to separate incoming emails into different folders. Could I use that to further improve the sorting of attachments?
Would it not be better if all incoming attachments that ended up in a folder were redirected to a respective folder in OneDrive?
Altering a couple of options allowed me to achieve that as well.

1. Expand the additional options and change the folder you would like to be monitored.
2. Enter the folder you would like the attachments to be redirected to and save your flow. From now on, all attachments that are received in the selected folder in your Outlook would be stored in the respective folder in your OneDrive.
Looking at the speed with which my OneDrive was filling up, I got worried. Was all my struggle in vain?
Would it not be better if I could send all my important attachments to OneDrive and all leisure ones to Dropbox?
A quick alteration and the result was at hand.

1. Delete the OneDrive action and click on Add an action .

2. Search for Dropbox and select Create file . You will be prompted to log into your Dropbox account and allow it to share information via Microsoft Flow.
3. Fill in the required details to save the attachments into the root folder of your Dropbox and save your workflow. From now on, all attachments that fit the specified search criteria are going to be stored in your Dropbox.
Microsoft Flow integrated with non-Microsoft applications as well!
In the end, I had achieved what I wanted. I started with a chaotic attachment retrieval method and by using Microsoft Flow I introduced a system which sorted my attachments into folders by sender or topic that I could access from anywhere.
Additional Resources
|
|
Search by service in Create from scratch
|
||||
|
Flow Ask Microsoft Anything
|

 Microsoft