Guest blog by Shu Ishida Microsoft Student Partner at Oxford University

About me
My name is Shu Ishida, and I am a third year engineering student at the University of Oxford. I am into web development and design, and my ambition is to help break down educational, cultural and social barriers by technological innovation. My current interest is in applications of Artificial Intelligence to e-Learning. I also have passion towards outreach and teaching, and have mentoring experiences in summer schools as an Oxford engineering student ambassador.
LinkedIn: https://www.linkedin.com/in/shu-ishida
Introduction
I would like to give an overview on how to build a user interactive bot with Microsoft Bot Framework. For those of you who are not familiar with bots, bots are applications that can assist your daily needs like a virtual robot. They can perform semi-automated tasks, such as setting an alarm, searching online, making an order, and posting on social media. The beauty of modern bots is that it can understand and operate on instructions that are given through text and voice dialog.
Today we are going to make a bot that is both usable and user friendly. We’ll use Microsoft Bot Framework – a comprehensive framework that can be used by anyone from beginners to developers. We’ll first discuss how to build a bot, and later on, talk more about why user experience is important and how we can design conversation flow.
Registering to Microsoft Azure
To get started, let’s create an Azure account – registration and trial is free.
If you are new to Azure, Azure is a comprehensive set of cloud services to build, deploy and manage applications. Today we are going to focus on Bot Service, but there are other fantastic features such as Azure Machine Learning where you can train your online machine learning model which require minimal amount of programming.
Creating your first bot
Once you are registered, go to your dashboard at https://portal.azure.com/ and click ‘New’ with the green plus icon. From the options, select ‘Data + Analytics’ > ‘Bot Service’.

Alternatively, you can go to https://dev.botframework.com/ and click ‘Create a bot’ button on the ‘My bots’ page. This site also has useful documentation for Bot Framework.
Fill in the app name and the location, and press ‘Create’. Here I named my bot ‘superbott’.

There are five templates available to get your development going. You can choose your template according to what sort of bot you are going to make. For now, let’s try building a bot which can understand dialogs using the Cognitive Services LUIS (Language Understanding Intelligent Service) API. [Read Documentation]
A screen appears, prompting you to get an App ID and password. After pressing ‘Create Bot’, a window will open to ask you to connect Azure Bot Service to LUIS:

How to use LUIS
A LUIS app takes a user utterance and extracts intents and entities that correspond to activities in the client application’s logic. In a nutshell, this means that LUIS can identify the type of action that the user is requesting, such as flight booking, reminder, food order, etc. together with the information of quantity, specific location or name of the item of interest. LUIS gives a response in JSON format, denoting the confidence in its recognition. We can pass this response to the bot which can then take appropriate action based on the user intentions. [Read Documentation]
Let me explain more about the three concepts – utterance, intents and entitles. Utterance is the user’s input, usually by text or voice. Intents are actions that the bot is requested to take (the intention of the user), usually corresponding to the verb within the uttered sentence. Entitles are information associated to the action, such as location, date and noun in the utterance (name of an app, item, etc.). The task of LUIS is to identify the intents and entitles within an utterance. Intent options are defined by the developer (you), so in order to get the bot working, we have to first decide on what kind of tasks we are expecting our bot to do.
Here are some good tutorials on how to use LUIS to create a bot.
https://channel9.msdn.com/Blogs/MVP-Azure/build-a-chatbot-with-azure-bot-service
Make the bot respond to you
Let’s start by creating a very simple bot. The default page should look like this. You can either edit the code on an online editor, or download the code and work from a local IDE / editor. The ‘Channels’ tab shows you apps that you can connect with. From ‘Settings’ you can change your bot icon. By clicking the blue ‘Test’ button, a bot emulator appears.
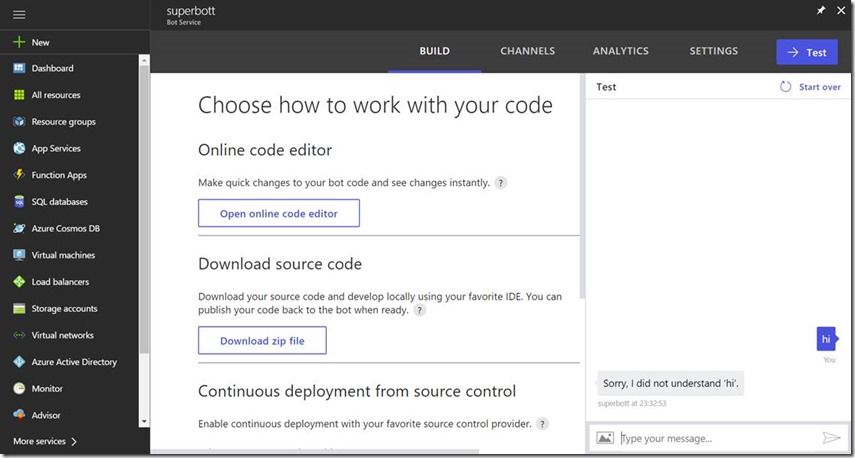
At the moment the bot is being highly unsociable. That is because we haven’t programmed anything yet so the bot doesn’t know what to do. We can manually programme the bot so that it can recognise utterances starting with ‘hey’ as an intent. You can make the bot respond with “Hello. How can I help you?” or maybe you can be more creative…

Ooops, we’ve made the bot angry! In this example, I’ve just added this extra line of code so that it can detect ‘hey’ at the start of the utterance.

^ denotes the start of a sentence, and ‘i' indicates that the search should be case-insensitive. These are called regular expressions , often used in text search and text replacement. The bot replies to you using session.message.text which contains your utterance.
We can continue manually coding conditions for the bot, but that makes the code convoluted. This is where LUIS becomes useful. Go to https://www.luis.ai/applications and click on the app connected to your bot. You should be able to ‘Create an intent’. Let’s call it ‘Greeting’.

We can add many examples of utterances to train the bot. Once you have finished training the bot, go to ‘Publish App’ at the bottom left navigation. Going back to the code, replace /^hey/i with ‘Greeting’ as shown below. Now your bot should be able to pick up different greetings.

Making your first Twitter bot
Now your bot will start responding to various user inputs. However, it is not exactly useful yet. To make it do something useful, let’s change it into a twitter bot. I am going to walk you through how to set it up, but if you need further details, here is a good article on how to set up your twitter and connect it to your bot.
https://medium.freecodecamp.org/how-to-build-and-deploy-a-multifunctional-twitter-bot-49e941bb3092
Alternatively, this is a good YouTube tutorial that walks you through how to create a twitter bot.
First, we want to register our bot to our twitter account so that the bot can have access using the access token and key. I strongly recommend you get a new Twitter account for development, so that if anything goes wrong, you won’t lose your Twitter account or your followers. Once you’ve logged into your new account, go to https://apps.twitter.com/app/new and fill in the details of your bot. A website URL is not essential for this.

Once you register your application, you can get details for the Consumer Key (API Key), Consumer Secret (API Secret), Access Token and Access Token Secret. Now we will return to the code on Azure and create an .env file with these details as shown below.
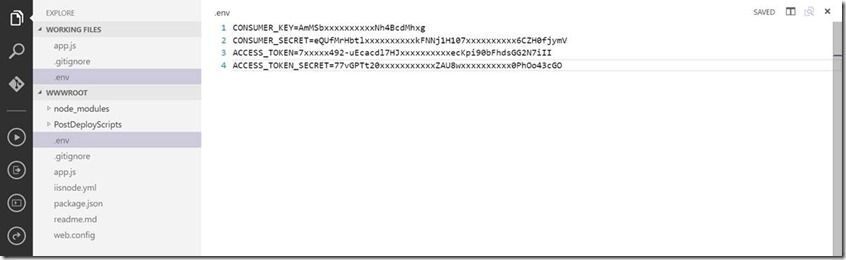
Separating out your API key information from the main code and storing it in .env is good practice. Otherwise, your account will be at risk if you are working on a collaborative project or sharing your code on GitHub. NEVER share your key online, even in a tutorial video or screenshot. There are crawler bots out there that tries to steal your account / API keys and if you are unlucky you can be charged for incredibly expensive bills. In case you want to upload your code to GitHub in the future, add .env to .gitignore file so that it wouldn’t be uploaded.
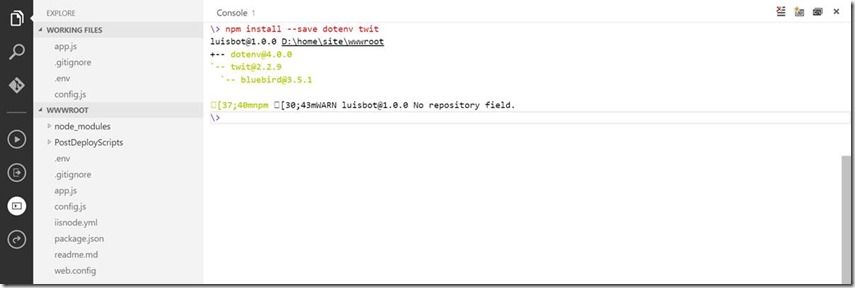
We have two more steps – first to read in the key information from .env into Node.js, and then connect to twitter using that account information. We can do these by installing node modules called dotenv and twit. Open the console and type

Now that we have dotenv, we can import the key information from .env to config.js.


Finally, in the app.js file, set up twitbot (a Twit object that carries out the tweeting operations) configuring with the key information. Make sure you don’t call this just ‘bot’ – it will overlap with the ‘bot’ variable defined already.

Below is the part where twitbot posts a tweet. We can determine the content in ‘status’, which I set to ‘hello world!’.

Let’s append this to the response to ‘Greeting’ for the time being as shown below.

Now everything is set up. Go to your online bot emulator and type in some greeting. After the bot responds, check your twitter account and, lo and behold! You have your first tweet!

Making the bot tweet what you want
Cool stuff! So now we can add some flexibility to the bot and make it tweet whatever we want. To get started, let’s add another intent ‘Tweet’ to LUIS so that it can distinguish between greetings and tweet tasks. Create an intent and add utterances. Remember to re-publish your changes once you’ve finished.

Now you can go ahead and handle the case where the intent matches ‘Tweet’.

The major changes I have made in the code is this bit where I have added a dialog that is called by beginDialog(‘/tweet’). This sort of dialog structure is called waterfalls implementation [Read Documentation] . In the dialog, the bot asks what the user wants to tweet and directly goes ahead posting it. This looks straight forward, but might raise an issue if we want to quit midway - we should handle this case in the next section.


Finally our bot is up and running, and can change what it tweets according to the user’s order. Notice that the initial conversation starter has been altered to indicate what the bot is about.

Go on to your twitter account and make sure it’s working! If you are having problems with your tweet, maybe it is because you are posting the same sentence over and over again. Twitter doesn’t seem to allow multiple identical tweets.

The problem with quitting
So far so good. But what if we change our mind half-way through the action? Consider this situation below:
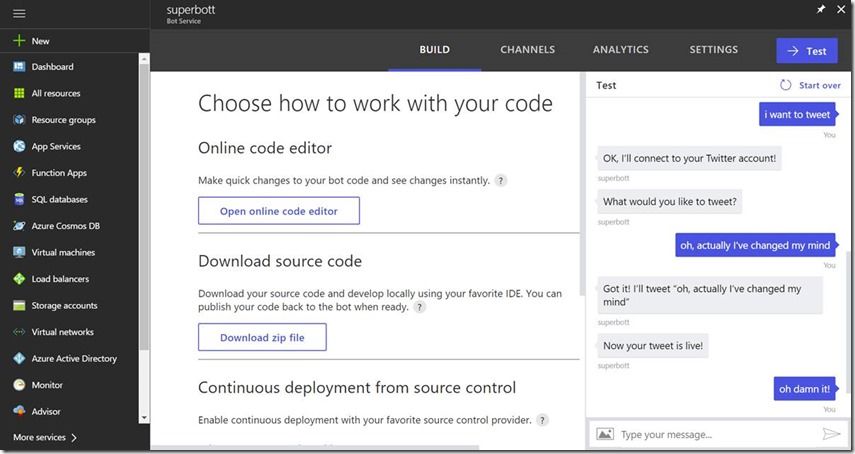
In this case we want the bot to be clever enough to detect that the user has changed their mind and wants to quit. Although we can try creating an additional intent for cancellation, there is a straightforward way of handling user action, and moreover, call out a predefined function to cancel an action. Here we are going to use cancelAction, but other actions such as triggerAction and reload Action could be also handy. [Read Documentation]


As it could be seen, this interface provides the opportunity for users to quit, and moreover, cancel the quit operation and go back to where the bot was interrupted. Determining every possible flow of conversation that can occur, and handling cases that doesn’t follow the designed conversation pattern is crucial in bot building, since it doesn’t have a navigation system of back and forward unlike web browsers. This documentation can give you further insight into this topic.
Tweet from Facebook
Finally, let’s learn about how to use channels. By going to the ‘Channels’ tab, you can see many options where you can use your bot. Slack is quite a common place to use bots, but today let’s have our bot working on Facebook messenger. To get started with, click the Facebook messenger icon. The documentation walks you through step by step. [Read Documentation]

Since the bot is associated to a Facebook page rather than a user account and is intended to be used as an autoreply bot for an organisation, we’ll first have to create a new Facebook page and connect the bot to it.
1. Create a new Facebook page from https://www.facebook.com/bookmarks/pages .
2. Create a new Facebook App from https://developers.facebook.com/quickstarts .
3. Select Messenger as your product and generate a Page Access Token.
4. Copy and paste your credentials from all the above into the Bot Framework Portal.
5. Click ‘Set up Webhooks’ on the Messenger setup page.
6. Copy and paste the webhook callback URL and verify token from the portal into the webhook form.
7. Save details.

Now let’s go back to the Facebook page we have created and send a message, and lo and behold! The Facebook page gives automated replies!

For obvious reasons, you don’t want all the Facebook users in the world to be able to tweet on your Twitter account, so make sure you delete the newly created Facebook App once you’re done with it. Although a Twitter bot was probably not the best example of bots that can be embedded on Facebook messenger, it demonstrates how bots can be implemented and be useful when you are dealing with a ton of customers. Now, you can start to visualise these bots actually interacting with humans, and more importantly, perceived as human operators across the screen. Therefore it is highly important that the bots can provide essential services with a well-designed communication flow and without the intervention of humans.
Build your own bot with Microsoft Bot Framework
Now is time for you to create your own bot. If you are not making it public, it could be a personal planner and secretary. If you are developing for your enterprise or an online service, it could be easily made into a receptionist, companion, gaming opponent, media source, image processing service or more. Interface matters because it is automated, but once you get over that barrier, there are many opportunities out there since it could be built in to commonly used services such as Facebook messenger and Skype, so that it would be easy to subscribe.
And with that, we have come to the end of this article. Thank you very much for reading through all the way.
Resources and further information
Microsoft Bot Framework Documentation https://docs.microsoft.com/en-us/bot-framework/
Video tutorial of building a LUIS chat bot
Example of playing hangman on a Microsoft Bot http://www.codeshare.co.uk/blog/how-to-create-a-hangman-chat-bot-game-in-nodejs-using-microsoft-bot-framework/
Example of building a Twitter bot https://medium.freecodecamp.org/how-to-build-and-deploy-a-multifunctional-twitter-bot-49e941bb3092
YouTube tutorial on how to create a Twitter bot https://www.youtube.com/watch?v=GQC2lJIAyzM&list=PLRqwX-V7Uu6atTSxoRiVnSuOn6JHnq2yV&index=3
 Microsoft