First published on MSDN on Oct 09, 2017
Guest blog by MVP David Renton on developing and publishing a Unity game to a hosted Web site on Azure.
Exercise 1 – Setting up and configuring Azure
You can use Microsoft Azure to host your game online as a WebGL app, since as a student you qualify for free access to many of the features of Azure, including the Web Apps feature of Azure App Service. The easiest way to verify yourself as a student is to use a code which you can get from Microsoft Imagine Premium.
1. Go to your colleges MS Imagine Premium webstore and checkout a free Microsoft Azure for Students. If you haven’t accessed it before, go into your college email and you should have an email inviting you to register for Imagine Premium.

2. This will give you a verification code like the one below, which I suggest you copy and paste into a text file. Follow the instructions on the next page to verify as a student and activate your Azure for Students subscription.

3. Click on the “ Instructions – Azure for Students ” link under the code, to take you to the Microsoft Imagine website ( https://imagine.microsoft.com/en-US/Catalog/Product/99 ).

4. Click on Sign in to Access to login using a valid Microsoft account. If you do not yet have a Microsoft account, click Create One to create one first. Do not use an office365 account, such as your college O365/email account, as they do not work for this. Accounts such as Hotmail, Live, outlook.com etc should work. You can even register a non-MS email address as a Microsoft account, such as a Gmail or whatever.

5. You may at this point be asked to accept terms and conditions and to update information. Do so if required.

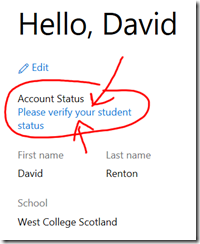
6. Click on Please verify your student status .
7. Choose Microsoft Imagine Verification Code as the method of verification.

8. Enter the 25-digit verification code that you received from Microsoft Imagine Premium and click on Submit . Finally, click Continue once it says you are verified.

9. Next click on Activate Azure .

10. Click on Register now and sign in using the same Microsoft account that you just used on Microsoft Imagine verifying your student status. If it goes in with your college O365 account, sign out and try clicking the Activate Azure link again.
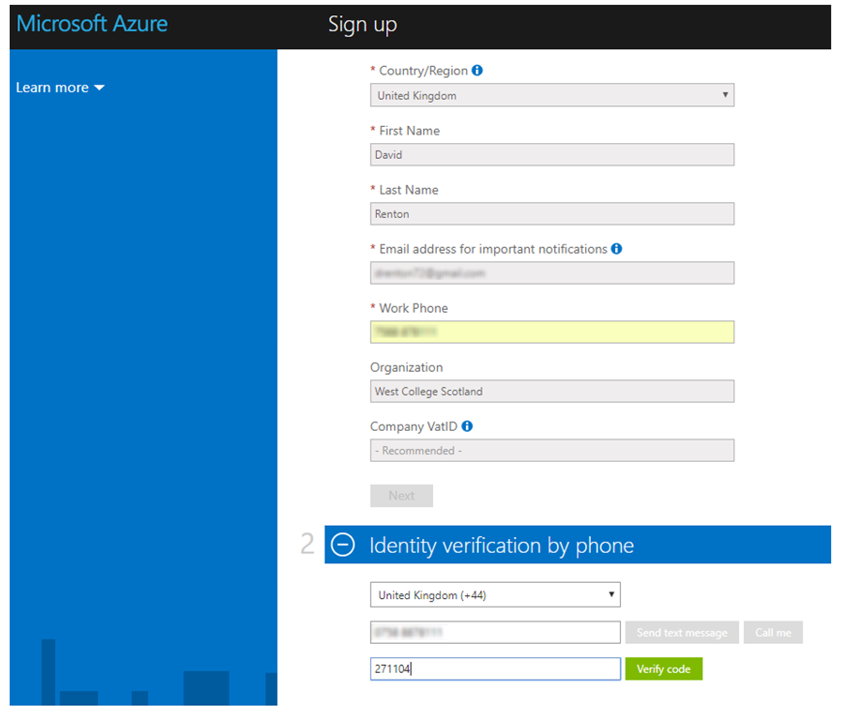
11. Fill in the form as shown below and use your mobile phone for identity verification.

12. Agree to the terms and conditions and give it a minute to set things up. Click on Get started with your Azure subscription , once the message below appears.

13. You should be taken straight into the Azure Portal, however if it doesn’t go to https://portal.azure.com and sign in using the Microsoft account you verified.

14. Now click on “ Create resources ” or if that button doesn’t show, click on “ All resources ” and then click on Add .

15. Select Web App.

16. Fill in the form as shown opposite (choose a unique App name that isn’t already taken) and then click on Create.

17. Wait until it creates your web app for you and then click on Deployment credentials .
18. Create a username and password and then click on Save .

19. Click back onto Overview and you should now have everything you need to upload your game to it (as in the example below).

Exercise 2 – Creating a Unity WebGL game and uploaded it
1. Go into your game in Unity and go into FILE and then BUILD SETTINGS .
2. Click on WEBGL and then BUILD . Next select or make a folder to store the WebGL version of your game (click on SELECT FOLDER once you have done that). Do not build it inside your existing Unity Project folder . After about 3 to 5 minutes it should complete and you should have a folder with the WebGL version of your game.
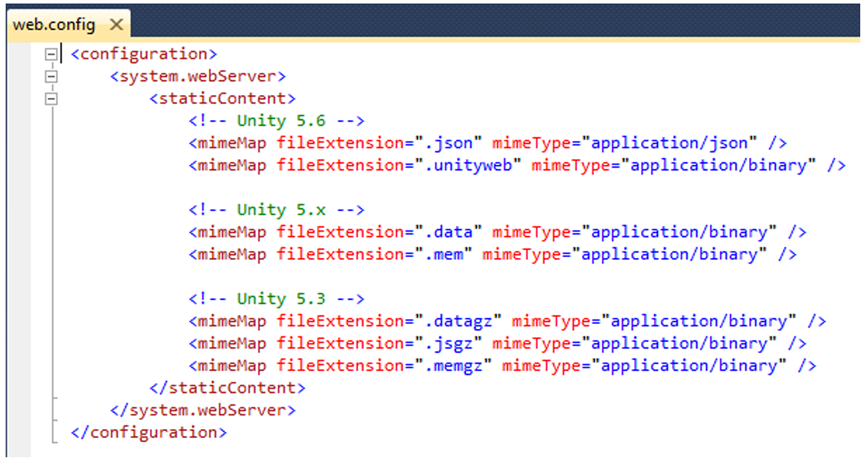
3. Add the web.config file below to your WebGL folder. It is just a text file which you can create (as shown below) you can download this here.

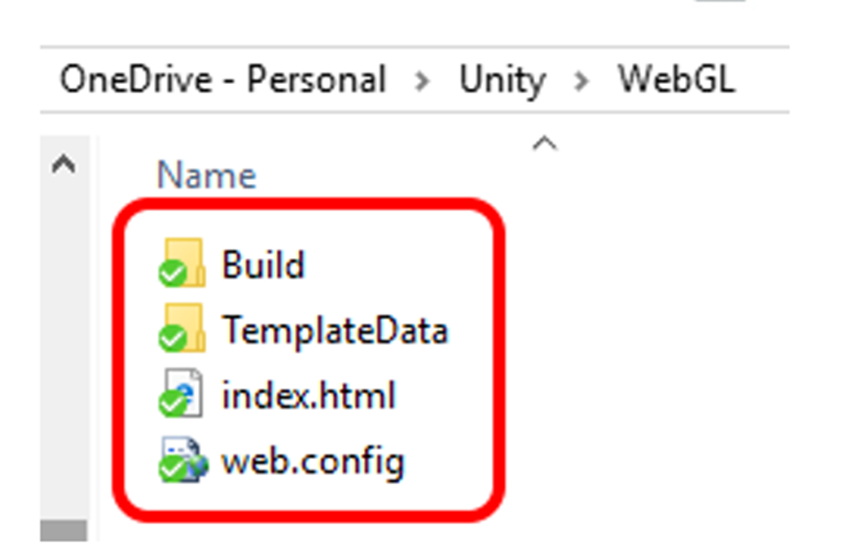
4. You should now have a folder with sub-directories and files as shown opposite.

5. You can connect directly to Azure using Visual Studio 2017. Go to the FILE menu, select NEW and then Web Site .

6. If you haven’t already installed it click on “Open Visual Studio Installer” and install the “ASP.NET and web development” and “Azure development” workloads.


7. Select “ ASP.NET Empty Web Site ” as your project type and choose the folder where your Unity WebGL version of your game is located. Finally click on OK .

8. As your web site already exists, it should prompt you to ask you how you wish to proceed. Choose “ Open the existing Web site ” and click on OK .

9. Click on the BUILD menu and select “ Publish Web App ”.

10. Select “ Microsoft Azure App Service ” as the publish target.
11. Click on Next .

12. On the next screen make your you are logged into the Microsoft account that is linked to your Azure account. If you are not click on your account details in the top right-hand corner and choose to add an account. Log in with the account that you linked to your Azure account.

13. All web apps that you are hosting should appear in the box, choose the one you want to publish your game to and click on OK .
14. The Publish screen should be automatically filled in for you. If it is all you should need to do is click on “ Validate Connection ” to make sure you can connect. A green tick will appear if you have successfully connected.

15. Click on Next .

16. On the Publish Settings window, just click on Next .
17. On the Publish Preview window, just click on Publish .

18. Your game should now be uploaded to your Azure Web App. If it is successful it should open a web browser automatically with the URL of your game to allow you to test it.

19. If everything works, close the Visual Studio project and save any changes if prompted.
20. If you have problems with this you can use a standard FTP client app to upload it. You would enter your credentials as shown below. Delete any existing files in the wwwroot folder, such as hostingstart.html . Make sure to upload everything inside the folder containing the WebGL version of your game to the wwwroot folder of your web app.

21. Alternatively, you can connect to your web app FTP server using an FTP website. To do this go to one of the sites below and enter your credentials.
http://www.net2ftp.com/index.php or another site is https://www.onlineftp.ch/

22. Go into site and then into wwwroot .

23. Delete the hostingstart.html file.
24. Upload the files created inside the folder into the wwwroot folder of your Azure app. Net2FTP allows you to upload a zip file, so if you are using that site zip up the files and folders into a single zip file (as opposite). Then you can upload it in one go, using the Archive upload option shown below.

25. If you have done everything right you can now go onto a web-browser, enter the URL for your web app and it should run within the browser. You can also just click on the URL in the Azure portal for your web app to go to it.

26. Test that the game works the same when running online.
Guest blog by MVP David Renton on developing and publishing a Unity game to a hosted Web site on Azure.
Exercise 1 – Setting up and configuring Azure
You can use Microsoft Azure to host your game online as a WebGL app, since as a student you qualify for free access to many of the features of Azure, including the Web Apps feature of Azure App Service. The easiest way to verify yourself as a student is to use a code which you can get from Microsoft Imagine Premium.
1. Go to your colleges MS Imagine Premium webstore and checkout a free Microsoft Azure for Students. If you haven’t accessed it before, go into your college email and you should have an email inviting you to register for Imagine Premium.

2. This will give you a verification code like the one below, which I suggest you copy and paste into a text file. Follow the instructions on the next page to verify as a student and activate your Azure for Students subscription.

3. Click on the “ Instructions – Azure for Students ” link under the code, to take you to the Microsoft Imagine website ( https://imagine.microsoft.com/en-US/Catalog/Product/99 ).

4. Click on Sign in to Access to login using a valid Microsoft account. If you do not yet have a Microsoft account, click Create One to create one first. Do not use an office365 account, such as your college O365/email account, as they do not work for this. Accounts such as Hotmail, Live, outlook.com etc should work. You can even register a non-MS email address as a Microsoft account, such as a Gmail or whatever.

5. You may at this point be asked to accept terms and conditions and to update information. Do so if required.

6. Click on Please verify your student status .
7. Choose Microsoft Imagine Verification Code as the method of verification.

8. Enter the 25-digit verification code that you received from Microsoft Imagine Premium and click on Submit . Finally, click Continue once it says you are verified.

9. Next click on Activate Azure .

10. Click on Register now and sign in using the same Microsoft account that you just used on Microsoft Imagine verifying your student status. If it goes in with your college O365 account, sign out and try clicking the Activate Azure link again.
11. Fill in the form as shown below and use your mobile phone for identity verification.

12. Agree to the terms and conditions and give it a minute to set things up. Click on Get started with your Azure subscription , once the message below appears.

13. You should be taken straight into the Azure Portal, however if it doesn’t go to https://portal.azure.com and sign in using the Microsoft account you verified.

14. Now click on “ Create resources ” or if that button doesn’t show, click on “ All resources ” and then click on Add .

15. Select Web App.

16. Fill in the form as shown opposite (choose a unique App name that isn’t already taken) and then click on Create.

17. Wait until it creates your web app for you and then click on Deployment credentials .
18. Create a username and password and then click on Save .

19. Click back onto Overview and you should now have everything you need to upload your game to it (as in the example below).

Exercise 2 – Creating a Unity WebGL game and uploaded it
1. Go into your game in Unity and go into FILE and then BUILD SETTINGS .
2. Click on WEBGL and then BUILD . Next select or make a folder to store the WebGL version of your game (click on SELECT FOLDER once you have done that). Do not build it inside your existing Unity Project folder . After about 3 to 5 minutes it should complete and you should have a folder with the WebGL version of your game.

3. Add the web.config file below to your WebGL folder. It is just a text file which you can create (as shown below) you can download this here.

4. You should now have a folder with sub-directories and files as shown opposite.

5. You can connect directly to Azure using Visual Studio 2017. Go to the FILE menu, select NEW and then Web Site .

6. If you haven’t already installed it click on “Open Visual Studio Installer” and install the “ASP.NET and web development” and “Azure development” workloads.


7. Select “ ASP.NET Empty Web Site ” as your project type and choose the folder where your Unity WebGL version of your game is located. Finally click on OK .

8. As your web site already exists, it should prompt you to ask you how you wish to proceed. Choose “ Open the existing Web site ” and click on OK .

9. Click on the BUILD menu and select “ Publish Web App ”.

10. Select “ Microsoft Azure App Service ” as the publish target.
11. Click on Next .

12. On the next screen make your you are logged into the Microsoft account that is linked to your Azure account. If you are not click on your account details in the top right-hand corner and choose to add an account. Log in with the account that you linked to your Azure account.

13. All web apps that you are hosting should appear in the box, choose the one you want to publish your game to and click on OK .
14. The Publish screen should be automatically filled in for you. If it is all you should need to do is click on “ Validate Connection ” to make sure you can connect. A green tick will appear if you have successfully connected.

15. Click on Next .

16. On the Publish Settings window, just click on Next .
17. On the Publish Preview window, just click on Publish .

18. Your game should now be uploaded to your Azure Web App. If it is successful it should open a web browser automatically with the URL of your game to allow you to test it.

19. If everything works, close the Visual Studio project and save any changes if prompted.
20. If you have problems with this you can use a standard FTP client app to upload it. You would enter your credentials as shown below. Delete any existing files in the wwwroot folder, such as hostingstart.html . Make sure to upload everything inside the folder containing the WebGL version of your game to the wwwroot folder of your web app.

21. Alternatively, you can connect to your web app FTP server using an FTP website. To do this go to one of the sites below and enter your credentials.
http://www.net2ftp.com/index.php or another site is https://www.onlineftp.ch/

22. Go into site and then into wwwroot .

23. Delete the hostingstart.html file.
24. Upload the files created inside the folder into the wwwroot folder of your Azure app. Net2FTP allows you to upload a zip file, so if you are using that site zip up the files and folders into a single zip file (as opposite). Then you can upload it in one go, using the Archive upload option shown below.

25. If you have done everything right you can now go onto a web-browser, enter the URL for your web app and it should run within the browser. You can also just click on the URL in the Azure portal for your web app to go to it.

26. Test that the game works the same when running online.
Updated Mar 21, 2019
Version 2.0Lee_Stott Microsoft
 Microsoft
Joined September 25, 2018
Educator Developer Blog
Follow this blog board to get notified when there's new activity