First published on MSDN on Jan 04, 2017
In the previous articles from the Always Encrypted blog series , we demonstrated how to configure Always Encrypted using SQL Server Management Studio. In this article, we will show you how to configure Always Encrypted from the command line, using PowerShell.
To try the examples in this article, you need:
In this step, we will create a column master key and a metadata object describing the column master key in the database.
In this step, we will create a column encryption key and a metadata object describing the column encryption key in the database.
After we have provisioned Always Encrypted keys, it is time to encrypt some columns.
Now, let's verify the data in the
In this blog post, we have demonstrated how to configure Always Encrypted using PowerShell, including:
Note that steps 1-3 are equivalent to running the Always Encrypted Wizard, which we demonstrated in SSMS Encryption Wizard – Enabling Always Encrypted in a Few Easy Steps .
For more information about using PowerShell for setting up Always Encrypted, please see Configure Always Encrypted using PowerShell .
In the previous articles from the Always Encrypted blog series , we demonstrated how to configure Always Encrypted using SQL Server Management Studio. In this article, we will show you how to configure Always Encrypted from the command line, using PowerShell.
Prerequisites
To try the examples in this article, you need:
-
A database, named
Clinic
, hosted in SQL Server 2016 or in Azure SQL Database. The database should contain the
Patientstable with the following schema. To make things more interesting, make sure the table contains some data.
     CREATE TABLE [dbo].[Patients](


     [PatientId] [int] IDENTITY(1,1),


     [SSN] [char](11) NOT NULL,


     [FirstName] [nvarchar](50) NULL,


     [LastName] [nvarchar](50) NULL,


     [MiddleName] [nvarchar](50) NULL,


     [StreetAddress] [nvarchar](50) NULL,


     [City] [nvarchar](50) NULL,


     [ZipCode] [char](5) NULL,


     [State] [char](2) NULL,


     [BirthDate] [date] NOT NULL


     PRIMARY KEY CLUSTERED ([PatientId] ASC) ON [PRIMARY] )


     GO
- The SqlServer PowerShell module, which you can find on the PowerShell Gallery site. See the download instructions for more details.
Step 1: Configure a Column Master Key
In this step, we will create a column master key and a metadata object describing the column master key in the database.
-
Open a PowerShell window.
Note : In a production environment, you should always run tools (such as PowerShell or SSMS) provisioning and using Always Encrypted keys on a machine that is different than the machine hosting your database. The primary purpose of Always Encrypted is to protect your data, in case the environment hosting your database gets compromised. If your keys are revealed to the machine hosting the database, an attacker can get them and the benefit of Always Encrypted will be defeated. -
Create a column master key. Always Encrypted supports storing column master keys in different types of key stores. In the below example, we will use a certificate, stored in the Current User certificate store location, as a column master key.
$cert = New-SelfSignedCertificate -Subject "AlwaysEncryptedCert" -CertStoreLocation Cert:CurrentUser\My -KeyExportPolicy Exportable -Type DocumentEncryptionCert -KeyUsage DataEncipherment -KeySpec KeyExchange
-
Import the SqlServer PowerShell module.
Import-Module "SqlServer"
-
Connect to your database. There are multiple ways to connect to the database using the SqlServer module. Here, we will use the most universal method, using SMO, which works for both SQL Server and Azure SQL Database.
     $serverName = "myserver"


     $databaseName = "Clinic"


     $connStr = "Server = " + $serverName + "; Database = " + $databaseName + "; Integrated Security = True"


     $connection = New-Object Microsoft.SqlServer.Management.Common.ServerConnection


     $connection.ConnectionString = $connStr


     $connection.Connect()


     $server = New-Object Microsoft.SqlServer.Management.Smo.Server($connection)


     $database = $server.Databases[$databaseName]
-
Create a
SqlColumnMasterKeySettingsobject that contains information about the location of your column master key.SqlColumnMasterKeySettingsis an object that exists in memory (in PowerShell).
$cmkSettings = New-SqlCertificateStoreColumnMasterKeySettings -CertificateStoreLocation "CurrentUser" -Thumbprint $cert.Thumbprint
-
Create a column master key metadata object, describing your column master key in the database. Notice that we are passing the name of the column master key object, the database object and the SqlColumnMasterKeySettings object created above to the New-SqlColumnMasterKey cmdlet.
     $cmkName = "CMK1"


     $cmk = New-SqlColumnMasterKey -Name $cmkName -InputObject $database -ColumnMasterKeySettings $cmkSettings
Note that under the covers, the above cmdlet simply calls theCREATE COLUMN MASTER KEYTransact-SQL statement against the target database. -
Verify the properties of the column master key metadata object, you created.
$cmk | Select-Object -Property *
The output from the above command should look like this:
Note that the column master key metadata object, you created in the database, does not contain the actual certificate (the column master key) - it only identifies the type of the key store, holding the column master key (Windows Certificate Store), and the location of the key within the store (the key path). An Always Encrypted-enabled client driver, such as .NET Framework Data Provider for SQL Server, uses this metadata at runtime, when querying encrypted columns, to locate the column master key.

Step 2: Configure a Column Encryption Key
In this step, we will create a column encryption key and a metadata object describing the column encryption key in the database.
-
Create a column encryption key and its metadata in the database.
     $cekName = "CEK1"


     New-SqlColumnEncryptionKey -Name $cekName  -InputObject $database -ColumnMasterKey $cmkName
The above executes a fairly complex workflow:
- Generates a column encryption key (in memory of PowerShell), which is a 256-bit random number.
-
Retrieves the metadata, describing the specified column master key (
$cmkName), from the database. - Encrypts the generated column encryption key with the column master key (which is a certificate, generated in Step 1 and stored on the machine, where PowerShell is running).
-
Creates a metadata object, describing the column encryption key in the database. To achieve that, the cmdlet executes the
CREATE COLUMN ENCRYPTION KEYTransact-SQL statement against the target database.
One thing to call out about the above process is that the plaintext column encryption key is never persisted. It is immediately encrypted and stored in the encrypted form in the database metadata. -
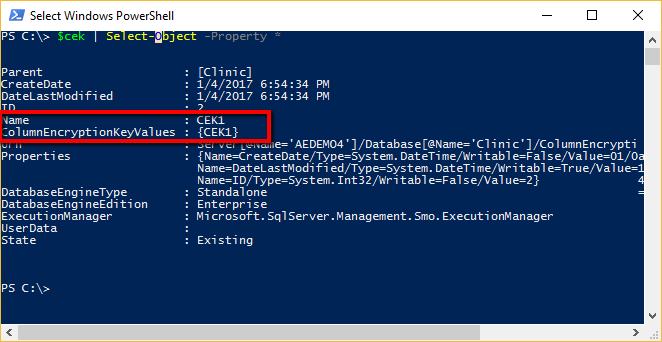
Verify the properties of the column encryption key metadata object, you created in the database.
$cek | Select-Object -Property *
The output from the above command should look like this.
Note that the CEK metadata object has theColumnEncryptionKeyValuesproperty, which is an array of objects. Let's print the content of that array:
$cek.ColumnEncryptionKeyValues | Select-Object -Property *
TheColumnEncryptionKeyValuesarray contains encrypted values of the given column encryption key, along with the information on how each value was produced (the name of column master key used to encrypted the column encryption key and the name of the encryption algorithm). Normally (and this is the case above), a column encryption key has just one encrypted value. However, during a column master key rotation, it can have up to two values.
When an Always Encrypted-enabled client driver queries encrypted columns, it retrieves the encrypted values and other metadata for the column encryption keys protecting the columns, which allows the driver to decrypt the encrypted key values and get the plaintext of the column encryption keys and, subsequently, to encrypt or decrypt data stored in encrypted columns.

Step 3: Encrypt Selected Columns
After we have provisioned Always Encrypted keys, it is time to encrypt some columns.
-
Create an array of
SqlColumnEncryptionSettingsobjects, each of which describes target encryption settings for one column in the target database. In our example, we want to encrypt two columns in thePatientstable:SSNandBirthDate. Hence, we create an array with two elements. EachSqlColumnEncryptionSettingsobject specifies the type of encryption (RandomizedorDeterministic) for the target column, and the name of the metadata object describing the column encryption key to be used to encrypt the column.
     $ces = @()


     $ces += New-SqlColumnEncryptionSettings -ColumnName "dbo.Patients.SSN" -EncryptionType "Deterministic" -EncryptionKey "CEK1"


     $ces += New-SqlColumnEncryptionSettings -ColumnName "dbo.Patients.BirthDate" -EncryptionType "Randomized" -EncryptionKey "CEK1"
-
Encrypt the columns.
Set-SqlColumnEncryption -InputObject $database -ColumnEncryptionSettings $ces -LogFileDirectory .
To apply the specified target encryption settings for the database, theSet-SqlColumnEncryptioncmdlet transparently:
-
Creates a new temporary (initially empty) table, which has the same schema as the
Patientstable, but the two specified columns (SSNandBirthDate) are configured as encrypted. -
Downloads all data from the
Patientstable. - Uploads the data back to the temporary table. On upload, the underlying SQL client driver (.NET Framework Data Provider for SQL Server) transparently encrypts the data targeting the encrypted columns in the temporary table.
- Replaces the original tables with the temporary table.
The above workflow can take a long time, depending on the size of the data. By default,Set-SqlColumnEncryptionlocks the target table making it unavailable to write transactions throughout the duration of the entire operation. In SSMS 17.0 and later versions,Set-SqlColumnEncryptionalso supports the online mode, which minimizes the duration of downtime. We will discuss the online mode in a later blog post. -
Creates a new temporary (initially empty) table, which has the same schema as the
-
Review the log file, that was generated in the specified log file directory (
.). Please note, that log file generation is only supported in SSMS 17.0 and later versions.
     12/12/2016 5:34:59 PM INFO MainThread Logger initialized.


     12/12/2016 5:34:59 PM INFO MainThread Acquiring database model and preparing data migration.


     12/12/2016 5:35:10 PM INFO [dbo].[Patients] Data migration for table '[dbo].[Patients]' started.


     12/12/2016 5:35:10 PM INFO [dbo].[Patients] Processing Table '[dbo].[Patients]'. 100.00 % done.


     12/12/2016 5:35:10 PM INFO MainThread Finalizing data migration.


     12/12/2016 5:35:11 PM INFO MainThread Deploying the specified encryption settings completed in 0d:0h:0m:11s.
Step 4: Verify Encryption
Now, let's verify the data in the
SSN
and
BirthDate
columns are indeed encrypted.
-
Query the table containing encrypted columns.
Invoke-Sqlcmd -Query "SELECT TOP(1) * FROM Patients" -ConnectionString $connStr
Note that the values of theSSNandBirthDatecolumns appear as byte arrays, as the columns are encrypted.
-
Let's query the table again, but this time let's decrypt the values stored in the encrypted columns. We can achieve this by adding
Column Encryption Setting = Enabledto the connection string. This instructs the client driver to decrypt the data retrieved from the encrypted columns.
     $connStr = $connStr + "; Column Encryption Setting = Enabled"


     Invoke-Sqlcmd -Query "SELECT TOP(1) * FROM Patients" -ConnectionString $connStr
Note that the values of theSSNandBirthDatecolumns now appear in plaintext. TheInvoke-Sqlcmdcmdlet can successfully decrypt the data, as it runs on the machine containing the column master key.


Summary
In this blog post, we have demonstrated how to configure Always Encrypted using PowerShell, including:
- Configuring certificates as column master keys.
- Configuring column encryption keys.
- Encrypting columns.
- Querying encrypted columns.
Note that steps 1-3 are equivalent to running the Always Encrypted Wizard, which we demonstrated in SSMS Encryption Wizard – Enabling Always Encrypted in a Few Easy Steps .
For more information about using PowerShell for setting up Always Encrypted, please see Configure Always Encrypted using PowerShell .
Updated Nov 09, 2020
Version 5.0Jakub Szymaszek Microsoft
MicrosoftJoined September 13, 2016
Azure SQL Blog
Follow this blog board to get notified when there's new activity