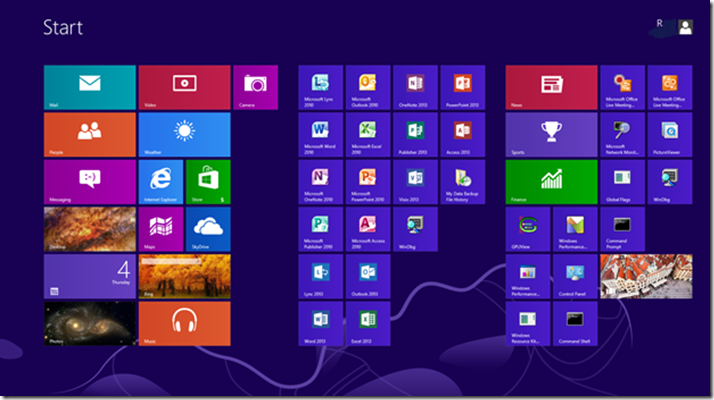
Welcome to day 2 of our Launch Series. This is part one of a two part series regarding the new Start Screen and User Interface in Windows 8. Today, we will look into tiles and groups.
The Start screen replaces the Start menu from previous versions of Windows. Instead of using static icons to represent applications like its predecessors, the new Start screen makes use of active tiles that can dynamically show notifications and updates at a glance. You can organize the Start screen to suit your preference.
When you log into Windows 8, you will be greeted with a screen similar to the one below.
Figure 1: Sample Start Screen

You can switch to the familiar desktop by selecting the Desktop tile, but you’ll notice the removal of the Start button which has been around since Windows 95 .
Figure 2: Start button removal

The Start screen was designed from the ground up to be “Touch First”, meaning the best method to interact with the interface is with a multi-touch display. However, you may still use a keyboard and mouse. Desktop mode allows you to use applications which were not designed for touch.
Tiles
In Windows 8 you launch applications using tiles, instead of icons. You can have Windows Store apps tiles, which allow for richer content to be displayed dynamically, such as the current weather for a weather app. This allows you to glance at the tile for information without having to open it.
Figure 3: Weather Tile

For applications that are not Windows Store apps, the tiles may also be displayed on the Start screen, but they are static and only display the applications icon and the title. The screenshot below is an example of what some of the Office 2010 apps look like on the Start screen.
Figure 4: Desktop Apps Tiles

Tile Size
Tile size may be small or large, meaning a small tile is a single square, whereas a large tile is rectangle (two square tiles long).
Figure 5: Small Tiles

Figure 6: Large Tile

Interacting with Tiles
- Single tap or single click – Launches application
- Tap and hold or right-click – Brings up the properties of the tile. Depending on the type of tile, different options are displayed. For Windows Store apps, you may see some of the options below.
Figure 7: Windows 8 Windows Store app options

With Windows Store apps tiles, you can turn off live tile notifications or make the tile smaller or larger depending on what app you select.
Desktop apps will have different options, including the ability to “Run as administrator”.
Figure 8: Desktop app options

Arranging Tiles
The Start screen is arranged into columns and groups. Each column is two small tiles or one large tile wide. When more tiles that can fit vertically have been added to the column, the tile overflows to a new column next to it.
Figure 9: Weather tile overflows to new column on the right side

You can also arrange tiles into groups. Groups allow for a logical separation of tiles and have a large space dividing them. When moving a tile between groups, you will see a bar appear, signifying you are moving it into a different group.
Figure 10: Bar appearing between groups when moving Weather app to a new group

Once tiles have been arranged to your liking, the Start screen allows for group names which can be helpful in associating similar tiles. To name groups, you must zoom out of the Start screen by doing one of the following:
- On a touch display, zoom out by using pinch-to-zoom
- With mouse and keyboard, use the CTRL button and the scroll wheel
- With the keyboard, use CTRL and minus key (plus key to zoom back in)
- With the mouse, select the small minus on the bottom right corner of the Start screen
Figure 11: Minus at the bottom right corner of Start screen

Once zoomed out, you may select the group and name it accordingly.
Figure 12: Naming groups

Figure 13: Start screen after naming groups

As you can see, you are able to personalize the Start screen to fit your needs and make it your own.
This concludes part one of the new Start screen. Tomorrow we will be going over other aspects of the new Start screen, such as switching between apps, the new Snap feature, and charms.
-AskPerf blog Team
 Microsoft