
As we can see, there are no roles installed. To install the Printing Role, we use the following command: ocsetup Printing-ServerCore-Role . Once the installation of the role is completed, we are prompted to reboot the server. There are server roles that are dependent on the Print Server role, such as the LPD Print Server Role (as shown above). However, when the Print Server Role is installed, the LPD Print Server role is not installed automatically. Once the server is rebooted, I need to make sure that the firewall on the server has the appropriate ports open to enable File and Printer Sharing. To open the File & Printer Sharing ports, we use the netsh command: netsh firewall set service fileandprint enable . So now that the basic prep work is completed, it's time to create and configure the printers.
There are two ways to manage a Server Core installation configured as a Print Server. At the console itself, you can use a combination of commands and scripts. All of the scripts are located in the Windows\System32\Printing_Admin_Scripts\en-US folder. The following commands can be used locally:
-
Net Print: Displays information about a printer queue or print job. It can also be used to control a specified print job
-
Print: Sends a text file to a printer
-
Prncnfg.vbs: Configures or displays configuration information about a printer
-
Prndrvr.vbs: Adds, deletes, and lists printer drivers
-
Prnjobs.vbs: Pauses, resumes, cancels and lists print jobs
-
Prnmngr.vbs: Adds, deletes and lists printers or printer connections. Also sets and displays the default printer
-
Prnport.vbs: Creates, deletes and lists TCP/IP Printer ports. Also displays and changes port configuration
-
Prnqctl.vbs: Prints a test pages, pauses or resumes a printer, and clears a printer queue
- Pubprn.vbs: Publishes a printer to the Active Directory
To get help about the syntax for any of these commands or scripts, use the /? switch.
The second (and for most people, easier) method to manage the Print Server on a Server Core machine is through the Print Management Console (PMC). I added my Server Core machine to the PMC on my Windows Server 2008 Enterprise Test machine as shown below:

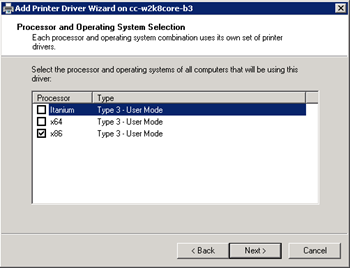
The first thing we are going to do is install a driver on the server in preparation for creating a printer. Right-click on the Drivers option and select Add Driver to launch the Driver Installation Wizard. As you can see, even though my Server Core machine is running a 32-bit (x86) Operating System, I have the option to install x64 drivers. If you select the option to install x64 drivers on an x86 server, you need to ensure that you have either the OS installation media for the x64 system (for inbox drivers) or the x64 driver installation package (for OEM drivers). In this instance, I am only going to install x86 drivers initially.
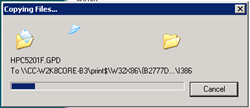
After selecting the HP Color LaserJet 4550 driver from the list of inbox drivers, the printer driver files are copied to the correct folder and the driver is installed:

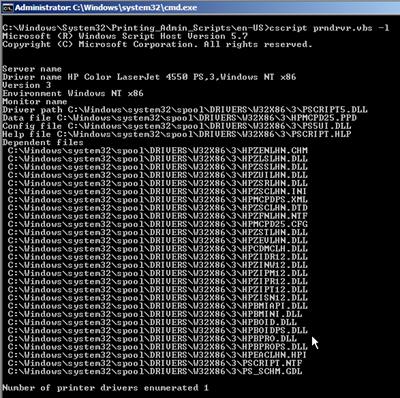
I can confirm the driver installation on the Server Core machine using the prndrvr.vbs script with the -l option:
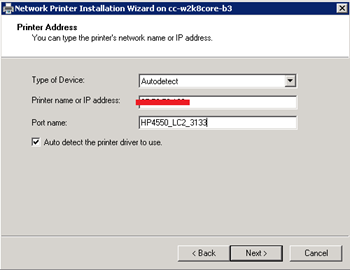
Now I have to create the printer queue on the server. This particular printer is already on the network, so I just need to add a TCP/IP port for it.

I modified the Port Name so that I can easily tell exactly where this printer is located by looking at the port itself.
Since I know I already have the correct driver installed, I am going to select the HP Color Laserjet 4550 PS driver.

Time to name and share the printer, and ...

... that's it! The printer has been successfully installed. If I check the shared printers on the server from a different machine, the printer is correctly shared out and accessible.

However, if you recall, I only installed the x86 drivers. Now I want to go back and add drivers for the Windows XP x64 clients that need to use this printer. So, I can repeat the same process of adding a driver - I just need to ensure that I provide the installation media for the OS or the driver package. Once the driver itself is installed, it updates the printer automatically as shown below:

And that covers the basics of getting a Server Core machine up and running as a Print Server from scratch. In a future post, we will walk through a printer migration from Windows Server 2003 to Windows Server 2008 Server Core using the Print Management Console. Until next time ...
Additional Resources:
-
Technet: Print Command Reference
- Print Management Console Step-by-Step Guide (Windows Server 2003 R2)
 Microsoft