Hello AskPerf! My name is Jeffrey Worline and I am a Support Escalation Engineer on the Performance team in Texas. We’ve done a number of posts in the past about WMI, and different WMI tools, and today we’re going to take a look at a powerful tool that you can use. If you would like a little help with leveraging the power of WMI but do not know how to write a script or are scripting challenged as I am, then what is needed is a tool that will write one for you. There is such a tool and it is called Scriptomatic 2.0, which is an HTA (HTML Application) that can write rudimentary WMI scripts. The tool is remarkably easy to use and flexible with different scripting languages and output format options. Let’s get started …
Scriptomatic 2.0 allows you to work with all WMI Namespaces, and not just Root\Cimv2. This is especially useful when working with custom applications, providers and namespaces. In addition, you can create scripts to run against multiple computers by entering the system names in a delimited list format or by loading the names from an input text file. Scriptomatic also provides some flexibility with respect to the scripting language you need your script generated in. You have the choice of having the script created in VBScript, Perl, JScript or Python. In addition to the different scripting languages that you can use, you also have the option to generate output in different formats including HTML, Excel and XML.
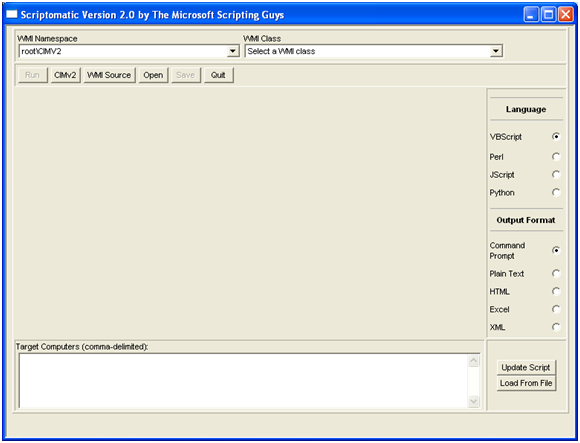
OK – enough about what the tool can do, let’s see it in action. Once you’ve downloaded Scriptomatic from the Microsoft website , double-click the ScriptomaticV2.HTA file. In the steps below, you’ll notice that I’m running Scriptomatic on a Windows XP system. If you’re using Windows Vista or Windows Server 2008 and UAC is enabled, check out the note at the end of this post about running Scriptomatic on those operating systems. Getting back to our demo, once Scriptomatic is lanched, you should see the following screen:
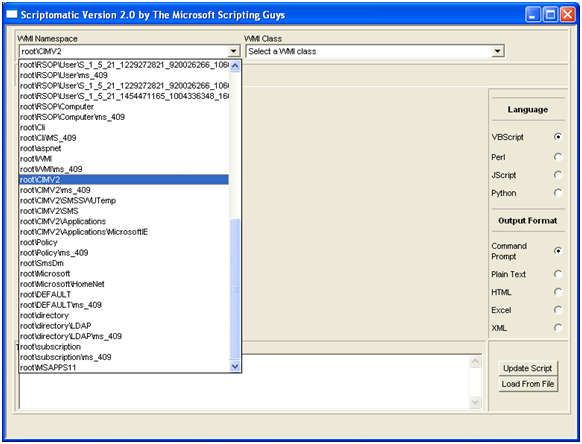
By default, all of the classes under root\CIMv2 are loaded. To choose a different namespace, click on the WMI Namespace drop down box and you can select from the namespaces available on the local machine.
If you want to get the WMI Namespaces from a remote computer to use instead of the local computer’s namespaces, just click on the “WMI Source” button. Once the window opens, put in the name of the remote computer. Remember that you will need to have permissions to access WMI on the remote system.
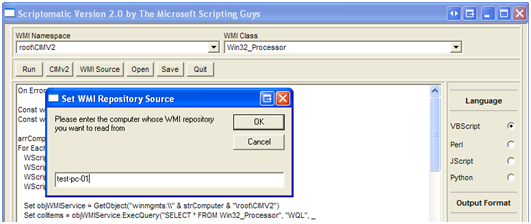
Select the namespace, and the classes found in that namespace are populated into the WMI Class dropdown box. Select a class from the WMI Class dropdown and Scriptomatic 2.0 auto-generates a script that returns the information for all the properties of that class. For example, I chose Win32_Processor:

Click on the Run button and unless you have chosen a different output format, you should get a command window with the output of the script file:

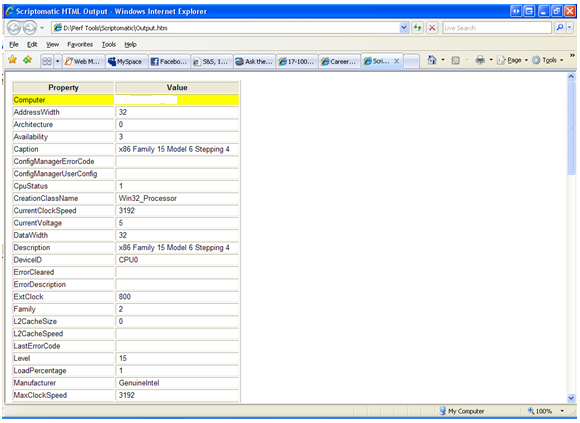
Let’s take a look at the output of this script in HTML format:
If you want to save your script, ensure that you do it prior to generating a new script. Scriptomatic re-uses its temp files to store the script, so if you execute a new script it overwrites the data from the old script in the temp files. To save the script, click the “Save” button and provide the full path to the location to save the script. Remember to add the appropriate extension for your script, .vbs for VBScript, .pl for Perl, .py for Python and .js for JScript.
Now, let’s take a quick look at running a script against multiple target machines. There are several different ways to specify that you want to run your script against a group of computers. You can enter the computer names in the “Target Computers” box – as a comma-separated list (or by putting each computer on a separate line) or from an input file.

To load the computer names from a file, click the “Load from File” button and navigate to the text file that has the list of computers. Once you have the names loaded, whether via the input file or by typing them in, click on the “Update Script” button to get the computer names added to the script. Again, you'll need to ensure that you have appropriate permissions to run WMI queries against the remote systems.
Once you’ve finished working with Scriptomatic, you can either click on the “Quit” button or just close the console window. If you click on the “Quit” button, the Scriptomatic temp files are deleted as part of the application exit process. If you close the console window, the temp files are not deleted.
OK – now, let’s talk about running Scriptomatic 2.0 on Windows Vista and Windows Server 2008 systems. If you try to launch the Scriptomaticv2.HTA file by double-clicking on it, you will most likely encounter an Error 80041003 message. ScriptomaticV2.HTA requires Administrative credentials to run. If you recall from our Basics of UAC post a couple of years ago, when UAC is enabled, all users (except the built-in Administrator account) run as Standard Users. Thus, you have to run ScriptomaticV2.HTA in an elevated context. To do this, launch an elevated command prompt and run the following command: MSHTA.EXE C:\<path to Scriptomatic>\ScriptomaticV2.HTA,

With that, we’ve come to the end of this post. If you’ve never used Scriptomatic before, I hope you find it as useful as I have. A quick word on support - there is no official support for Scriptomatic 2.0. However, as indicated in the Scriptomatic 2.0 Readme , if you do run into issues with the tool, send an email to scripter@microsoft.com .
Additional Resources:
- Download Scriptomatic 2.0
- Scriptomatic 2.0: Readme
- “Hey, Scripting Guy!” downloadable Archive (August 2004 – September 2007)
- Jeffrey Worline
| Share this post : |
|
|
|

|

|

|

|

|
 Microsoft