Hello all,
My name is Pankaj Pande and I would like to clarify a bit about using certificates, specifically with WebSSO.
RemoteApp (or TS RemoteApp ) is a special mode of Remote Desktop Services, available only in Remote Desktop Connection 6.1 and above (with Windows Server 2008 being the RemoteApp server), where a remote session connects to a specific application, rather than the entire Windows desktop.
Often, while opening a RemoteApp, you may see a yellow bar along the top of the dialog box, like so:
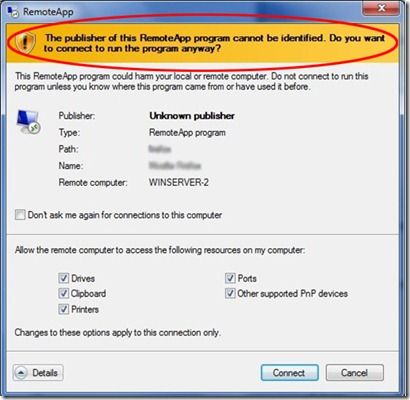
This type of dialog box will generally occur when the remote app source or application is not coming from a verified source. So, in order for this to work, we need to get them verified, which means certificates.
First, we should understand the use and value of these certificates. Certificates are nothing more than a file with a digital signature which provides verification of an application or machine. For security reasons, certificates are critical in today’s world. Here is an example:
Suppose we have a Remote Session Host server (terminal server), where we have published an application. While connecting to this from our client machine, we get redirected to a different terminal server, or even a malicious location. This malicious server could serve us malware, viruses or collect info from us. However, if we are verifying locations using certificates, you would get a clear indication that something was wrong due to getting the dialog above.
Now, where do we get these certificates? There are three ways to get a certificate for our machine or application:
- Self-signed certificates – these are not recommended for a production environment. You should use a certificate from a trusted certificate provider. Which bring us to:
- Third-party certificates – These are cheap (a few dollars a year) and are available from any number of online sites.
- Certificate Authority certificates/Enterprise PKI – We can generate a certificate using our own Certificate Authority.
In this guide, we will not cover how to buy or create these certificates; that is a discussion for another time. So, now we know that we can use three different types of certificates. Here are the prerequisites we should follow while purchasing or creating a certificate:
- The certificate must be trusted explicitly or from a trusted root certificate.
- The certificate name or the Subject Alternative Name must match the fully qualified domain name of the server.
- The certificate must support Server Authentication or Remote Desktop Authentication Extended Key Usage.
Let’s tackle each of these one at a time:
The certificate must be trusted explicitly or from a trusted root certificate
So, if we are purchasing the certificate from a third party vendor, we don’t need to check this step, as its name would automatically be there in our Trusted Root Certification Authorities (in most of the cases). We just need to import the certificate to our “PERSONAL STORE” in the certificate MMC, but if we are creating the certificate via our Own CA, then we need to ensure that we have added the certificate to our “Personal store” as well as the name of our CA should be added in our Trusted Root Certification Authorities of the client machine or where we are trying to run the remote application.
How we do that? Simple. Wherever you create the certificate or where we have the Certificate Authority under Trusted Root Certification Authorities, just click on the name of the certificate under Trusted Root Certification Authorities/Certificates, and click on ALL TASKS, and hit EXPORT, take that certificate to the machine where you want to add the certificate to the Trusted Root Certification Authorities, and right click on the certificates and hit the IMPORT button and mention the location of the certificate. Here is how to do this:
In the Run dialog box, type MMC.exe and click OK. Click File, then Add/Remove Snap-in…

Select Certificates, then click Add:

Select Computer Account, then Local Account. Then browse down to Trusted Root Certificates\Certificates, right-click, All Tasks, then import:

Point to the location of the certificate (which we previously exported from the CA) and you are done. Now the machine will trust the Certificate Authority, which means we will be able to verify the digital signature or the Remote App.
One important thing I would like to discuss is the difference between Issued By and Issued To, when double-clicking the certificate in the MMC.

ISSUED BY is the name of the Authority, from where the certificate has been purchased or issued. It can be from your own CA or from a third-party vendor. I mentioned that we are importing the certificate to the Trusted Root Certificate Authority, which means we are adding the name of the ISSUER to the Trusted Root Certificate Authority, not the ISSUED TO.
ISSUED TO refers to the server name which is hosting our remote apps. We tell our CA or the third-party vendor this name while creating the certificate and this generates the certificate by adding the name of the server to the ISSUED TO column.
The Certificate Name or the Subject Alternative Name must match the fully-qualified domain name of the server
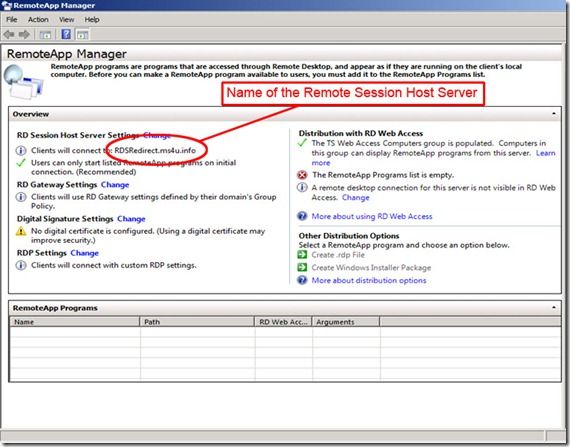
This is a very important step that is often forgotten. This means that the ISSUED TO name should be the same as the name of the Remote Session Host server, or where we have our remote app’s manager.
The certificate must support Server Authentication or Remote Desktop Authentication Extended Key Usage
This is just a verification step, but it is sometimes the reason a remote app will fail with a certificate error. When we double-click our certificate in the MMC and choose the Details tab, we should see a window similar to this:

Here, you just have to verify that the certificate is ‘Server Authenticated’.
So, all of this means that you should be asking the following questions before moving on to the WebSSO piece:
1) Do we have any certificate with us? Third Party or CA?
2) Is the certificate Server Authenticated?
3) Does the certificate asked for a Public key, while importing to Personal Store?
4) Is the name on the certificate same as the name of the Server?
5) Finally, from where did we get this certificate? If the answer is:
a) 3rd party Certificate – That is Fine
b) Root CA/Enterprise PKI -- check if we have the CA under Trusted Root CA.
WebSSO
What is WebSSO? Web Single Sign-On (WebSSO) consists of an agent installed on the web servers and a central infrastructure that includes a directory and servers (or logic) to manage authentication and access control. When users attempt to access a WebSSO enabled web server or application, the agent redirects the user’s web browser to an authentication server, where the user signs in. The web browser is then redirected back to the requesting web application and the user can access the application or web content.
So, what real use is WebSSO? When a user who is already authenticated accesses another WebSSO enables app or web page, the agent retrieves the already validated credentials, eliminating the need for the user to sign on again.

In order for WebSSO to work, we must install the certificates at two places on the Remote Session Host server and one place on the Connection Broker (if you are using one).
1. First in the “Remote App Manager”. Open the Remote app manager console from the start menu, and click on “CHANGE” in front of “digital certificate” (we are assuming that we have installed the certificates correctly by following this guide). See the image below for more clarification.

As soon as we hit the change button, we will get the option of installed certificate, just select it and hit the OK button.
2. Second, in “Session host Configuration”. Open Session Host Configuration from the Start menu, and then double click on the RDP-TCP setting and locate to GENERAL tab:

Click on the “SELECT” key and select the certificate which is installed in the Personal Store:

After this, we are all green and good to go.
Now, on to Connection Broker
When we open the Connection Manager on the Connection Broker machine, we should see something similar to this:

Click the Specify button and specify the certificate, which we have installed in the Personal Store of this Connection Broker machine. That’s it, and at this point you should have fully functional WebSSO.
Thanks for your time and I hope you have found this information helpful.
Pankaj Pande
| Share this post : |
|
|
|

|

|

|

|

|
<br/>
 Microsoft