With Windows Server 2012, Server manager includes simple and easy to use, user interface that enables management of Windows Storage Spaces and other Storage Subsystems such as http://blogs.technet.com/b/filecab/archive/2012/07/16/using-the-emc-smi-s-provider-with-windows-server-2012-and-scvmm.aspx and http://up2v.nl/2012/12/01/dell-equallogic-adds-support-for-windows-server-2012-hyper-v-storage-integration/ (but not limited to these) storage arrays with supporting http://blogs.technet.com/b/filecab/archive/2012/06/25/introduction-to-smi-s.aspx and http://msdn.microsoft.com/en-us/library/windows/desktop/hh830613(v=vs.85).aspx based Storage provider respectively. By using Server Manager’s File and Storage Services Role user interfaces, you can create and manage storage objects such as storage pools and virtual disks.
In the following post, we will cover common storage spaces administrative tasks by using the “File and Storage Services” pages on Server Manager. For more information on the Windows Storage Spaces technology please read:
- http://technet.microsoft.com/library/hh831739.aspx
- http://technet.microsoft.com/library/jj822938.aspx
- http://blogs.msdn.com/b/b8/archive/2012/01/05/virtualizing-storage-for-scale-resiliency-and-efficiency.aspx
Storage Pools page in Server Manager:
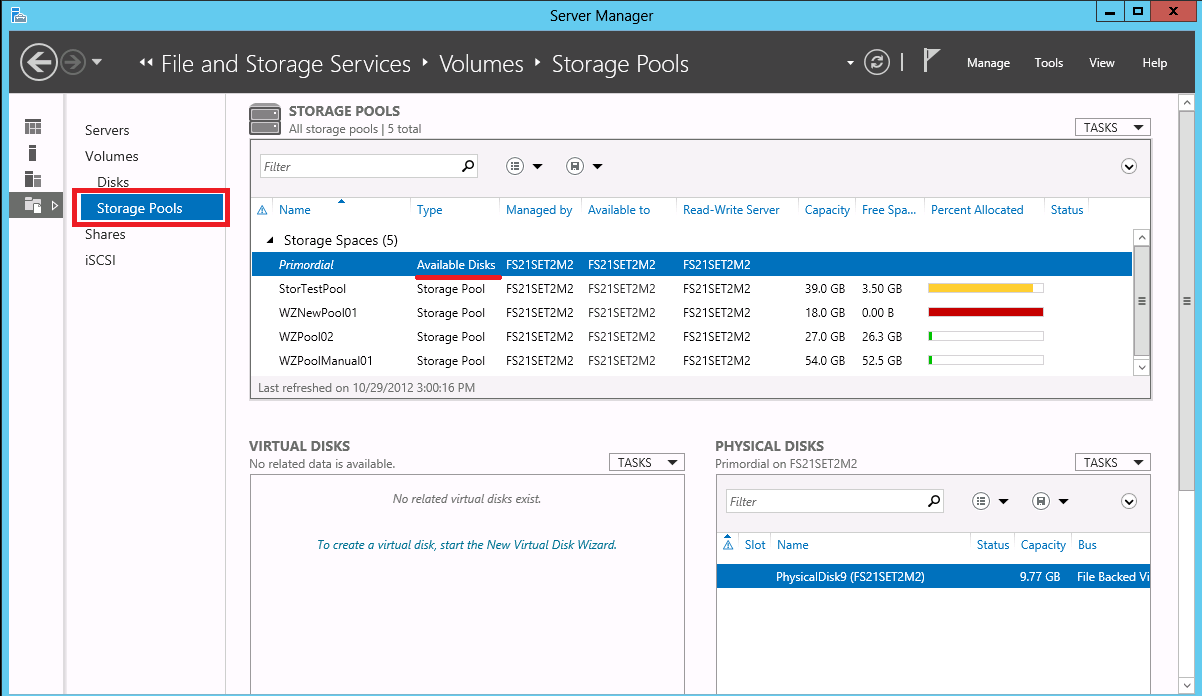
- The Storage Pools page as seen in the image (1.2) below, displays the “Available Disks” pool and the concrete pools.
- The “Available Disks” pool is a subset of the physical disks from the primordial pool that you can use to create a new concrete pool or add to the existing concrete pool. In simple terms, physical disks showing in the Storage Pools page for the "Available Disks" are the physical disks with a “CanPool” property value as true.
- Different storage subsystems mark the physical disk “CanPool” property as true or false based on the storage vendor criteria. For Windows Storage Spaces subsystem,the “Can Pool” property will only be set to true if the disk has at least 4GB of contiguous unallocated space**.
- To get more details and property values for each physical disk, open up an elevated PowerShell console and run the following command “Get-PhysicalDisk | fl *”.
- To specifically see physical disks which are not showing with the "Available Disks" pool, open up an elevated PowerShell console and run the command “Get-physicaldisk –CanPool $false”.
(**Some other disks configurations such as using dynamic disks or disk associated to a windows server cluster storage will also mark the physical disk as not appropriate to be added to a storage pool.)
- Once you select a specific storage pool in the primary tile, the associated virtual disks, physical disks of the selected storage pool will show up in the Physical Disks, and Virtual Disks related tiles.
- You must refresh the Storage Pools page to see the updates to the subsystem that occurred outside of the Server Manager UI. ( Refer to section 1.3 below for refresh button )
- Management of physical disks through Server Manager relies on the uniqueness of the UniqueID property of each physical disk. While most disks and storage controller manufacturers comply with this requirement, some storage controllers are setting the http://social.technet.microsoft.com/Forums/en-US/winserver8gen/thread/578a4c17-ed61-4d1a-837b-bdde46f2e7fe . In the case where there are more than one physical disks having same value for the UniqueID property, only one physical disk out of the set will be shown. In order to identify if the storage controller is setting unique values for physical disk IDs, you can open up an elevated PowerShell console and run the following command Get-PhysicalDisk | ft FriendlyName, UniqueId and verify whether the physical disks IDs are unique or duplicated.
1. Navigating to the Storage Pools page in Server Manager
1.1. Launch Server Manager and navigate to the “File and Storage Services” page.

1.2. Navigate to the Storage Pools page.

1.3. Refresh the UI by clicking on the Refresh button.

Operations
The following sections describe the common storage management actions of creating a storage pool and a virtual disk on it using Server Manager.
1. Create storage pool
1.1 Logon as a user with admin privileges to your server, launch Server Manager, and then navigate to the “Storage Pools” page within the File and Storage Services Role.
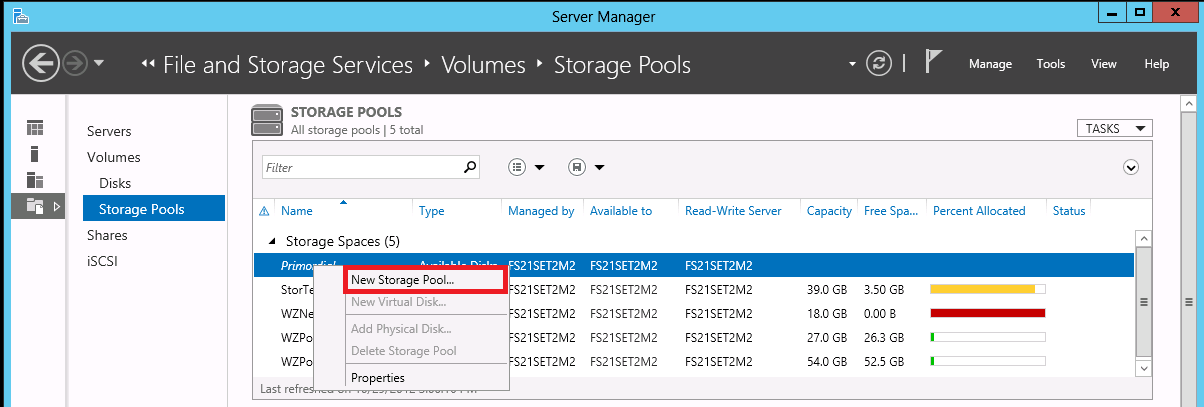
1.1.1 Right-click the “Available Disks” pool for the Storage Spaces subsystem and launch the New Storage Pool Wizard.

OR
Launch the New Storage Pool Wizard from the TASKS list.

1.1.2 In the New Storage Pool Wizard, enter desired pool name and optional description. Make sure that you have selected the Primordial pool for the Storage Spaces subsystem.

1.1.3 Select the number of disks needed for pool creation. If you want to designate a physical disk as a hot spare, then select the “Hot Spare” allocation type.

1.1.4 Confirm the selected settings and initiate pool creation by selecting “Create” on the “Confirm selections” page.

2. Create virtual disk (storage space)
2.1. Right-click the concrete pool that you just created (the pool where type value is Storage Pool), and then launch the New Virtual Disk Wizard.

2.1.1. In the New Virtual Disk Wizard, make sure that you have selected the appropriate pool. Enter the desired virtual disk name and optional description.

2.1.2. Select the desired storage layout and provisioning scheme as per your storage requirements.
2.1.3. On the “Specify the size of the virtual disk” page, enter the desired size for the new virtual disk or pick the “Maximum size” option.
- If you pick the “Maximum size” option, the system will try to create the largest size possible for the virtual disk.
- If you select the check box for “Create the largest virtual disk possible, up to the specified size” while specifying the size then the system will try to create the largest size possible for the virtual disk up to the requested size.
- It is also important to note that the value showing up as the storage pool free space (in our example 43.8GB) shows the actual free allocation the pool has overall. For cases with a fixed provisioning of a non-simple storage layout such as Mirror or Parity, when defining the size of the virtual disk, you have to take into account the overhead of storage needed to create the extra copies of the virtual disks extents for resiliency. As a basic example, with the 43.8GB free space in the pool, creating a 30GB mirrored virtual disk is not possible since it will take at least 60GB of free space in the pool to create a mirrored virtual disk to hold the two copies of the mirrored data.

2.1.4. Confirm the settings and initiate virtual disk creation by selecting “Create” on the “Confirm selections” page.

Some Additional Storage Management Related References and Information:
1) Storage Space creation using PowerShell cmdlet :
Below are a couple of PowerShell cmdlet examples that demonstrate the same provisioning action as described above using Server Manager.
- Create a storage pool using all the available physical disks. More information on pool creation using PowerShell cmdlet is http://technet.microsoft.com/en-us/library/hh848689.aspx .
$PhysicalDisks = Get-StorageSubSystem -FriendlyName "Storage Spaces*" | Get-PhysicalDisk -CanPool $True;
New-StoragePool -FriendlyName CompanyData -StorageSubsystemFriendlyName "Storage Spaces*" -PhysicalDisks $PhysicalDisks;
- Create a thinly provisioned, mirrored virtual disk (storage space) on the pool created above. More information on virtual disk creation using PowerShell cmdlet is http://technet.microsoft.com/en-us/library/hh848643.aspx .
New-VirtualDisk -StoragePoolFriendlyName CompanyData -FriendlyName DataWarehouse –ResiliencySettingName Mirror -Size 100GB -ProvisioningType Thin;
We hope that you found the information above on how to use Server Manager to provision storage useful. For even more resources and further reading, please have a look at the list of links below.
1) http://social.technet.microsoft.com/wiki/contents/articles/11382.storage-spaces-frequently-asked-questions-faq.aspx
2) http://technet.microsoft.com/library/hh848705.aspx
3) http://blogs.msdn.com/b/clustering/archive/2012/06/02/10314262.aspx
4) http://technet.microsoft.com/library/jj822937.aspx