Updated Jul 11, 2024
Version 1.0
Siddhartha_Ray_Barua Microsoft
MicrosoftMicrosoft
Hello,
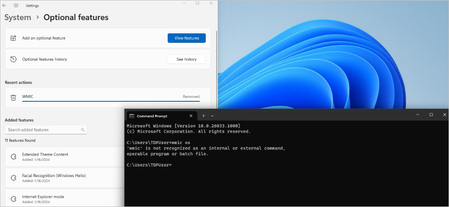
this workaround is not working anymore since there is no WMIC in fresh installs of 24H2 or 25H2. Microsoft has completely removed this feature. Do you have a solution for this?

Hi crash0r You can try,
How to Install and Restore WMIC on Windows 11 24H2 & 25H2
Starting with Windows 11 versions 24H2 and 25H2, Microsoft has completely eliminated the Windows Management Instrumentation Command-line (WMIC) utility. It is no longer preinstalled, and the option to add it natively through the Windows Settings GUI has been removed.
If you are running legacy software, installers, or third-party IDEs (like older versions of MuleSoft Anypoint Studio) that strictly require wmic.exe, you will face system crashes or execution blocks.
Below are the only working installation methods to force-restore the utility onto newer Windows 11 builds.
Method 1: The Online DISM Force-Injection (Recommended)
While the graphical interface no longer displays WMIC, Microsoft's deployment servers still host the feature package payload for backwards compatibility. You can bypass the GUI and use the Deployment Image Servicing and Management (DISM) tool to pull the package down directly.
Step-by-Step Instructions:
1. Press the Windows Key, type cmd or Terminal.
2. Right-click the application and select Run as Administrator.
3. Copy and paste the following command, then press Enter:cmd
DISM /Online /Add-Capability /CapabilityName:WMIC~~~~
Use code with caution.
4. Allow the progress bar to reach 100%.
5. Close your terminal, open a fresh command prompt, and type wmic to verify it is active.
Method 2: Offline Local Source Installation (Air-Gapped Systems)
If your machine is offline, behind a strict corporate proxy, or returning installation error code 0x800f0954, DISM cannot reach Windows Update to fetch the files. You must install it using a local asset.
Step-by-Step Instructions:
1. Obtain the official Windows 11 24H2/25H2 Features on Demand (FoD) ISO package from the Microsoft Volume Licensing Service Center (VLSC) or Visual Studio Subscriptions.
2. Double-click the ISO to mount it to your system (let's assume it mounts as drive E:).
3. Open Command Prompt (Admin) and execute the command targeting the local drive path:cmd
DISM /Online /Add-Capability /CapabilityName:WMIC~~~~ /Source:"E:\LanguagesAndOptionalFeatures" /LimitAccess
Use code with caution.
4. Once completed, the binary files will be successfully registered in your local System32 directory.
Method 3: Manual Binary Injection (Last Resort for Third-Party Apps)
If your operating system build rejects the DISM capability package entirely, you can manually clone the binary architecture from a working device running an older version of Windows (such as Windows 11 23H2 or Windows 10).
File Requirements:
To restore functionality, you need to copy exactly two files from an older machine:
• The Executable: C:\Windows\System32\wmic.exe
• The Language File: C:\Windows\System32\en-US\wmic.exe.mui (Note: Replace en-US with your system's native language folder if using a different locale).
Deployment Steps:
1. Move wmic.exe directly into the C:\Windows\System32\ folder of the target 24H2/25H2 machine.
2. Move wmic.exe.mui into the C:\Windows\System32\en-US\ folder of the target machine.
3. Open a command prompt and test the utility.
Warning: Because this method bypasses the official Windows component store, future major Windows cumulative updates may flag these manually injected files and delete them automatically.
Long-Term Advice
While these installation methods will temporarily rescue breaking software dependencies, Microsoft intends to phase out the backend payload files completely. You should prioritize updating your underlying software stack or rewriting internal scripts to use modern PowerShell CIM Cmdlets (such as Get-CimInstance).
Are you setting this up for a single developer workstation, or do you need a way to deploy this package silently across multiple enterprise computers using a tool like SCCM or Intune? Let me know, and I can provide the automated deployment parameters.