Update 4/16/2009: We have corrected an incorrect permissions entry in this blog post.
Heard of the term calendar concierge? Look up http://msexchangeteam.com/archive/2006/07/24/428390.aspx. In this post I'm going to talk about what happened to the Auto Accept Agent in Exchange Server 2007 and how you can define, schedule and manage resources easily and reliably.
Booking resources (e.g. a conference room) in conjunction with a meeting frequently leads to multiple meeting updates, general confusion and lost productivity for both organizers and attendees. The system should enable organizers to reliably find and book an available resource in one attempt and later confirm the reservation while minimizing attendee confusion. This is accomplished in Exchange Server 2007.
- Exchange Server 2007 helps the Information Worker quickly find a room at the right time and schedule it.
- It helps minimize the effort that resource managers must undertake to manage a resource schedule.
- Help resource administrators control who can schedule resources.
Resource booking in Exchange 2003
In Exchange 2003 there are two ways for customers to automate resource booking using Outlook and Exchange:
- Exchange 2003 Auto Accept Agent and
- Outlook direct booking
The Auto Accept Agent (AAA) is a server-side store event sink available in the Exchange 2003 SP1 timeframe. It provides automatic server-side processing of meeting requests sent to resource mailboxes that have been registered with the agent. The agent handles both requests and cancellations and sends responses to the meeting organizer. AAA uses EXOLEDB and CDOEX for notification of incoming messages and calendar item processing, respectively.
Direct booking is an Outlook-specific feature that uses the organizer's Outlook client (Outlook 2000 or later) to book an appointment directly into a resource mailbox schedule. The Outlook client of the person organizing the meeting performs all the necessary tasks, such as conflict checking and placing the reservation on the resource calendar. The resource mailbox must be manually configured with Outlook to support direct booking. It can be set up to allow automatically accept non-conflicting meeting requests and to allow/deny recurring bookings.
What's new in resource booking in Exchange 2007?
Exchange 2007 provides a reliable resource management solution that maps to information worker goals and increases organizational productivity. Exchange Server 2007 introduces changes to the resource booking architecture that address many of the concerns.
Resource management improvements have been made in the following areas.
- Booking and search services
- Up-to-date Free/busy
- Integration with Office Outlook 2007 meeting request process
- Schedule management services
- Ability to delegate management of resource policy to users using Outlook Web Access
- Policies and rules to control who can schedule and when they can schedule
- Support for both manual and automatic approval
- Enterprise-wide resource management services
- Ability to create and manage resource schema
Resource Booking Attendant
Exchange 2007 identifies meeting resources as either a room or equipment and includes special attributes for each of these types of resources. For example, a room resource includes a capacity attribute. Custom attributes, such as audio-visual capabilities can also be defined. The Resource Booking attendant provides the following features:
- Enforces maximum meeting duration
- Schedules meetings only during working hours
- Forwards out-of-policy requests to delegates for approval
- Provides conflict information for declined meetings
Feature Comparison
The following table shows a comparison of the features available for direct booking in Outlook, using the Auto Accept Agent, and resource scheduling in Exchange Server 2007.
| Feature | Outlook Direct Booking | Auto Accept Agent | Resource Scheduling |
| Booking Process | |||
| Directly books without sending mail | x | ||
| Resource can be designated as any type of attendee | x | x | |
| Does not require permissions to calendar folder of resource | x | x | |
| Resource schema | |||
| Distinguish between user and resource mailboxes in GAL/OAB | x | ||
| Find resources based on resource criteria (location, custom property) | x | ||
| Add additional, custom resource properties | x | ||
| Resource administration | |||
| Integration with Exchange Management Console and Shell | x | ||
| Scheduling Logic | |||
| Return information on conflicts in recurring meetings |
x |
x |
|
| Prevent double booking |
x |
x |
x |
| Partially book recurring meeting |
x |
x |
|
| Strips sensitive information from request, calendar item |
x |
x | |
| Scheduling Policy | |||
|
Define list of users who can book directly |
x |
x |
|
|
Control how far requests are booked in the future |
x |
x |
|
|
Define list of users who can book with approval, book outside policy |
x | ||
|
Set available hours, max duration |
x |
||
|
Custom meeting response text* |
x |
x |
*Its per server in AAA and per mailbox in Exchange Server 2007
Steps to set up Resource booking in Exchange 2007
Before going further I want to explain a few points one should be aware while working with a resource mailbox in Exchange Server 2007.
A resource mailbox has the same structure as a user mailbox - it is composed of an Active Directory mailbox-enabled user object and an Exchange mailbox.
The major difference between a user and resource mailbox is that the resource mailbox:
- Always has special resource-specific properties set on the Active Directory user object.
- Typically has a disabled user account and grants logon privileges to one or more "resource managers"
- May have a scheduling policy automatically enforced by the Resource Booking mailbox assistant.
I will talk more above Exchange Server 2007/Exchange server 2003 environments and how legacy resource mailboxes can be converted to Exchange Server 2007 resources without interrupting the ability of legacy clients to send meeting requests to them later on. In this post I'm going to concentrate on a pure Exchange Server 2007 environment.
Resource mailbox scheduling and administration in Exchange Server 2007 is primarily handled by the Resource Booking Attendant. The calendar and Resource Assistant interact with each other. The Resource Assistant provides a call that determines if a mailbox is a resource or not.
1. Create a new mailbox.
This can be done either from the Shell (Powershell/Exchange Management Shell) or by using the EMC.
-
Create a new mailbox using the EMC:
Expand Recipient Configuration > select Mailbox, and then click New Mailbox in the Mailbox section of the Actions task pane.
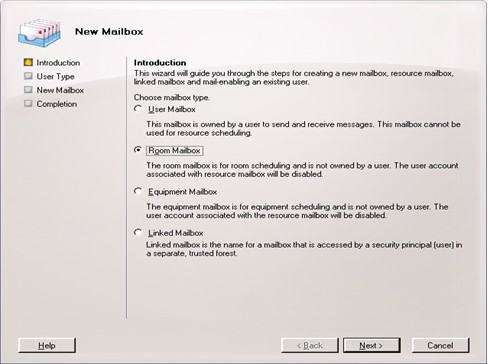
Figure 1: Click New Mailbox to start the New Mailbox WizardNote: In Exchange 2007, only disabled accounts can be used as resource mailboxes. When you create a new resource mailbox, the user account is disabled by default. If you click Existing User and then Browse, only disabled accounts are presented. Enabling the user account for a resource mailbox is NOT a supported configuration.
-
Use the Shell to create a new mailbox:
New-Mailbox -Name:"Resource1" -Alias:Resource1 -OrganizationalUnit:Users -Database:"Database Name" -UserPrincipalName:"Resource1@domain.com" -DisplayName:"Resource Mailbox" -Room
If you use the EMC, the end result is the same. In the final page of the wizard, the EMC actually shows you the Shell command that it uses.
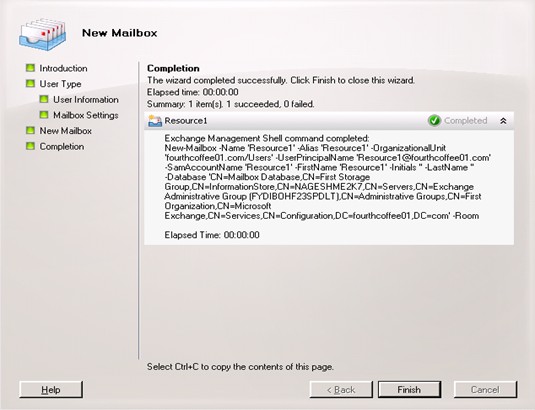
Figure 2: The final page of the New Mailbox Wizard shows the Shell command used
This will create a new resource mailbox mailbox. At the command prompt type
Get-Mailbox Resource1 | fl *resource*
The output:
IsResource : True
ResourceType : Room
Notice the ResourceType is Room.
At this point, the resource mailbox is not completely configured. If you attempt to book the resource it will not automatically accept the meeting. After creating a resource mailbox, you'll need to configure it to auto-accept meetings to which the resource mailbox has been invited. Otherwise, the resource mailbox does not automatically accept meetings sent to it and meetings sent to it will sit in the calendar of the resource in a "tentative state".
Note: To learn more about the Format-List cmdlet (the short form or alias fl is used here), please see this. Additionally, piping the output to fl *resource* will display all the attributes (of that mailbox) where the attribute name contains the string resource.
Let's check calendar settings for the mailbox:
Get-MailboxCalendarSettings Resource1 | fl
The output shows that AutomateProcessing is set to AutoUpdate by default:
AutomateProcessing : AutoUpdate
If AutomateProcessing is set to AutoUpdate (the property that controls the automatic acceptance of meeting requests), then the meeting organizer receives no response from the resource. In order to accept a meeting, one would have to log into the resource mailbox (using an account that has permissions to access the resource mailbox) and accept it.
2. Enable Auto-Accept for a resource and configuring resource mailbox settings
Using OWA or the Shell, you can configure a mailbox to automatically process meeting requests and cancellations.
Using the Shell:
Set-MailboxCalendarSettings Resource1 -AutomateProcessing:Autoaccept
Get-MailboxCalendarSettings Resource1 | fl
The output:
AutomateProcessing: AutoAccept
Using Outlook Web Access
You can log on to the resource mailbox using OWA and configure the resource account to automatically process meeting requests and cancellations from the Options page. What account do you use to log into OWA? Because the account for a resource mailbox is disabled, you can use either of the following methods to log into the resource mailbox using OWA:
-
Explicit OWA logon to the resource mailbox with credentials for an account that has FullAccess permissions to the mailbox.
Use this command to grant FullAccess permissions to User1 for the Conference Room1 resource mailbox.
Add-MailboxPermission -Identity:Resource1 -AccessRights:fullaccess -User:user1
After User1 has been given FullAccess rights, in your browser, enter the explicit URL for the resource mailbox: http://servername/owa/Resource1@domain.com. When prompted for credentials, enter the username and password for an account that has FullAccess permission to the resource mailbox - in this case User1.
-
Log into OWA using an account that has has FullAccess permissions to the resource mailbox and select Open Other Mailbox.
-
Enter the normal URL for OWA: http://servername/owa
-
When prompted for credentials, enter the username and password for an account that has FullAccess permissions to the resource mailbox.
-
In the upper right corner of the OWA page, click the dropdown next to the logged on username, select Open Other Mailbox and then enter the name of the resource mailbox.
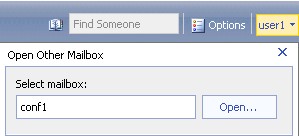
Figure 3: Select Open Other Mailbox to open another mailbox in OWA
-
When you log into a resource mailbox, click on Options and notice Resource Settings on the left pane as an available option just for resource mailboxes. You can set the following options on this page. Every single option via the shell is available on this page.
- Resource Scheduling
- Options
- Resource Scheduling Permissions
- Resource Privacy Options and
- Response Message
Scheduling a Room Resource
Exchange 2007 creates an All Rooms address list as seen in the following screenshot:
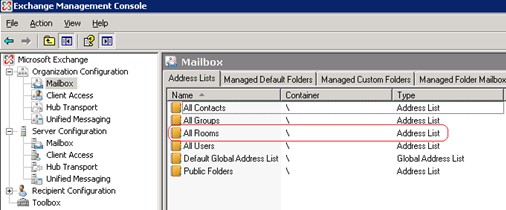
Figure 4: Exchange 2007 creates an All Rooms address list by default
In Outlook 2007, the All Rooms search feature transpires itself as shown below. Instead of clicking the To" button, which is everything in the GAL, you can now click on Rooms and we come up with the All Rooms address list. If you select a room, it automatically adds it in the Resources well. This should work if the resource is added to the "Required" field.
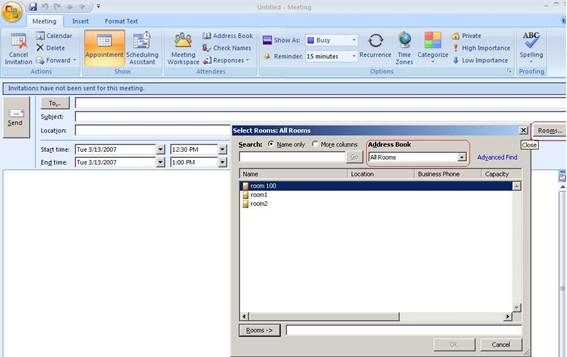
Figure 5: Selecting Rooms when scheduling a meeting, Outlook 2007 displays all rooms from the Rooms address list
Managing Resource Scheduling
If you want to lock down the resource booking options, you have the option to do so. Let's take a look at a few of the options available to lock down resource mailboxes.
Open up the shell prompt and type:
Get-MailboxCalendarSettings Resource1 | fl
Take a look at the different parameters that can be set for a resource mailbox. Most of the parameters are self-explanatory. Let's focus instead on some of the policy-based settings, such as RequestInPolicy, BookInPolicy, RequestOutOfPolicy, AllBookInPolicy, AllRequestOutOfPolicy, etc
- BookInPolicy: List of users/groups that can submit an in-policy request for automatic approval - Value is a String: SMTP address; series of SMTP addresses
- RequestInPolicy: List of users/groups that can submit an in-policy request that is subject to approval by a resource mailbox delegate. - Value is a String: SMTP address
- RequestOutOfPolicy: List of users/groups that can submit an in-policy request for automatic approval; Out-of-policy requests are subject to approval by a resource mailbox delegate. The RequestOutOfPolicy setting is good for situation where certain users (CEO for example) that should never receive an automatic meeting decline. - Value is a String: SMTP address
The default options allow all users to book resources if they are within the set policies (i.e. up to 180 days in the future, up to 1440 minutes in duration, etc.), and will reject all other meetings. In the context of resource mailboxes, InPolicy and OutOfPolicy simply mean whether or not the meeting invitation matches any restrictions enabled on the resource mailbox. For example MaximumDurationInMinutes value for the resource mailbox is 30 minutes, any meeting invitation longer than 30 minutes would be considered OutOfPolicy. Using the RequestOutOfPolicy parameter, you can manually add users that are allowed to request meetings that are not within the policy, and if you really want to lock things down, you can set the AllBookInPolicy value to False, and then manually add users to the BookInPolicy field, or more restrictive, to the RequestInPolicy field.
By default, the BookInPolicy parameter is configured for Everyone. If you leave BookInPolicy with the default setting and you configure the RequestInPolicy parameter with one or more SMTP addresses, the BookInPolicy setting overrides RequestInPolicy. The meeting is automatically accepted if it is within policy.
Compared to the options that were available with Auto Accept Agent, these settings allow you a lot of control to lock down and customize resource booking permissions.
You can't use the EMC to set resource booking policies. To run the Set-MailboxCalendarSettings cmdlet, the account you use must be delegated Exchange Organization Administrator role.
How to Set Resource Booking Policies
To control who can schedule a resource, use the following parameters in conjunction with the Set-MailboxCalendarSettings command:
AllBookInPolicy, AllRequestInPolicy, AllRequestOutOfPolicy, BookInPolicy, RequestInPolicy, RequestOutOfPolicy, ForwardRequestsToDelegates, TentativePendingApproval, ResourceDelegates
To control when a resource can be scheduled, use the following parameters in conjunction with the Set-MailboxCalendarSettings command:
AllowConflicts, BookingWindowInDays, EnforceSchedulingHorizon, MaximumDurationInMinutes, AllowRecurringMeetings, ScheduleOnlyDuringWorkingHours, ConflictPercentageAllowed, MaximumConflictInstances
To control what meeting information will be visible on the resource's calendar, use the following parameters in conjunction with the Set-MailboxCalendarSettings command:
DeleteAttachments, DeleteComments, RemovePrivateProperty, DeleteSubject, DisableReminders, AddOrganizerToSubject, DeleteNonCalendarItems, OrganizerInfo
To customize the response message that meeting organizers will receive, you can use the following parameters in the Set-MailboxCalendarSettings command:
AddAdditionalResponse, AdditionalResponse
Here's how "Restricting who can book" will look like:
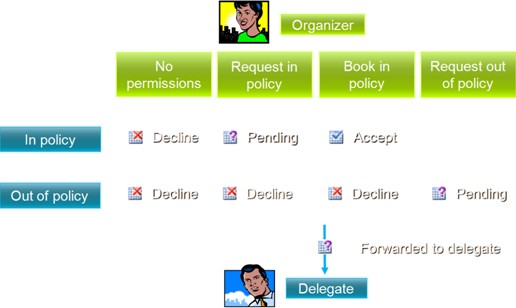
More information regarding booking policies can be found in Set-MailboxCalendarSettings cmdlet help.
How to Customize the Response Message for Resource Scheduling
To use the Exchange Management Shell to customize the response message for resource scheduling, run the following command
Set-MailboxCalendarSettings -Id ResourceMailbox01 -AddAdditionalResponse:$true -AdditionalResponse:<text>
As an example:
Set-MailboxCalendarSettings -Identity "ResourceMailbox01" -AddAdditionalResponse "Add your response text here"
You can also set a custom response through OWA as mentioned previously.
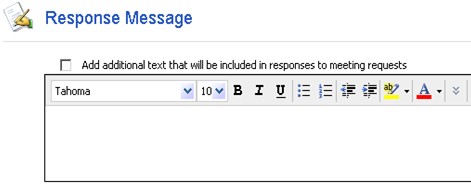
Figure 6: Creating a custom response message using Outlook Web Access
How to Set a Delegate on a Resource Mailbox
In the context of resource mailboxes, the term delegate is used very loosely. You do not use the Delegates tab in the Outlook Tools > Options dialog box to configure the delegate even though the user(s) managing the resource mailbox might appear on the Delegates tab. These users appear on the Delegates tab because they have Send-on-behalf permissions to the resource mailbox. In scenarios where you are using the AllRequestOutOfPolicy, RequestOutOfPolicy, AllRequestInPolicy, or RequestInPolicy parameters, you need to use a delegate to respond to meetings that are not automatically accepted or declined by the resource mailbox.
Note: If you don't want to forward requests to a delegate (ForwardRequestsToDelegates = false), you can get away with granting FullAccess permissions for the resource mailbox to a regular user. This user can respond to meeting invites from the Inbox of the resource mailbox.
Because resource mailboxes use disabled accounts in Exchange 2007, the steps to create a delegate for a resource mailbox are a little different than in earlier versions of Exchange. To configure a delegate for an Exchange 2007 resource mailbox, use the following steps.
Run a command similar to the following to specify the delegate for the resource mailbox.
Set-MailboxCalendarSettings Resource1 -ResourceDelegates Delegate1
Note: Because of a bug in ResourceDelegates, the complete permissions for the delegate are not added to the resource mailbox. This is fixed in Exchange 2007 SP1. Therefore, you must also perform one the following methods to provide the necessary permissions to the delegate.
Use either of the following methods to provide adequate permissions on the resource mailbox to the delegate:
-
Method 1: Provide Full Access permissions to the delegate
Assign FullAccess mailbox permission for the resource mailbox to a delegate:
Add-MailboxPermission Resource1 -AccessRights FullAccess -User Delegate1
-
Method 2: Modify the Free/Busy Permissions for the resource mailbox
To modify just the free/busy permissions on the Resource mailbox, use the following steps:
-
Assign FullAccess mailbox permission for the resource mailbox to an administrator:
Add-MailboxPermission Resource1 -AccessRights FullAccess -User Admin1
- Create an Outlook 2007 profile for the resource mailbox.
- Start Outlook with this new profile and provide the credentials of the Admin1 user when prompted.
Note: Granting an administrator user Full Access permission instead of the delegate is a technique you can use for central administration of resource mailboxes. This allows the administrator to gain access to the resource mailbox while also allowing the delegate to process meetings for the resource.
- Right-click the Calendar folder and click Properties
- On the Permissions page, make sure the delegate (a user other than the administrator Admin1) has at least Editor permissions to the Calendar folder. Click OK.
- Exit Outlook.
Now check the delegates on the resource mailbox using this command:
Get-MailboxCalendarSettings Resource1 |fl
It should now show:
ResourceDelegates : {Delegate1}
-
The default setting for the ForwardRequestsToDelegates parameter is true. Therefore, meetings are forwarded to the delegates (listed under ResourceDelegates). If this is set to false, the delegate will not receive the forwarded invite.
Happy resource booking in Exchange Server 2007.