Guest blog by Enyi Shang from Imperial College London.

Hi, I am Enyi. I am a Microsoft Student Partner studying Computing in Imperial College London and am going to start my second year this fall. Besides math, technology, and programming, I am also into languages, art, and sports in general.
Introduction
If you haven’t had much programming experience before, building a conversational bot and connecting it to various channels may sound like a difficult task. However, with the Azure Bot Service, Microsoft Language Understanding Intelligent Service (LUIS) and Microsoft Bot Framework, you can finish all the work within a few hours. In this blog post I am going to walk through how to:
· Register a bot in Azure Bot Service
· Train your custom language intelligence application using LUIS
· Design the bot directly in Azure editor
· Connect the Bot to different channels in Microsoft Bot Framework
Setting up the bot in Microsoft Azure:
Microsoft Azure is a cloud computing service that allows you to build, test and publish applications using the Azure portal. The first thing you need to do is to sign in/create a new account in https://azure.microsoft.com/en-us/?v=17.14 .
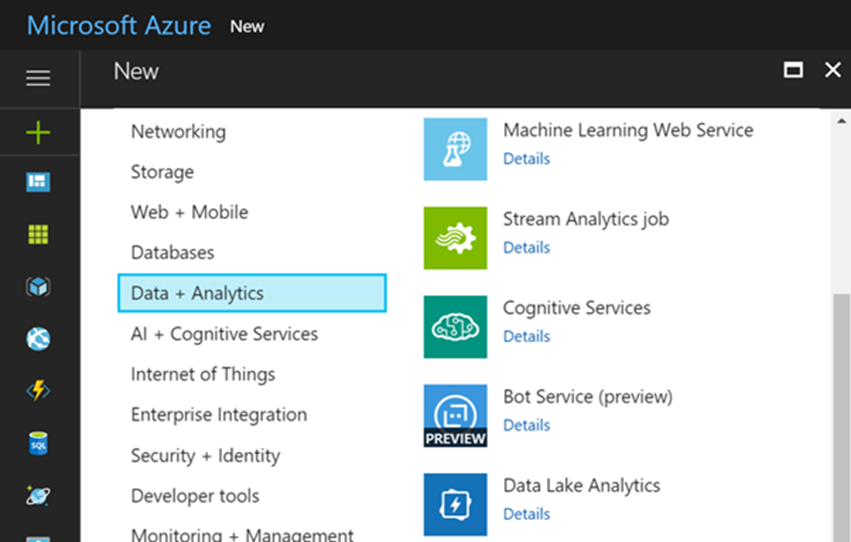
To start building the chat bot, press the green plus button on the top-left corner and choose ‘Bot Service’ under ‘Data + Analysis’:

Once you fill in the app name and the location, press Create. It might take a while to deploy the bot. Here I named the demo bot ‘mspdemobot’ and chose South-Central US as the location.

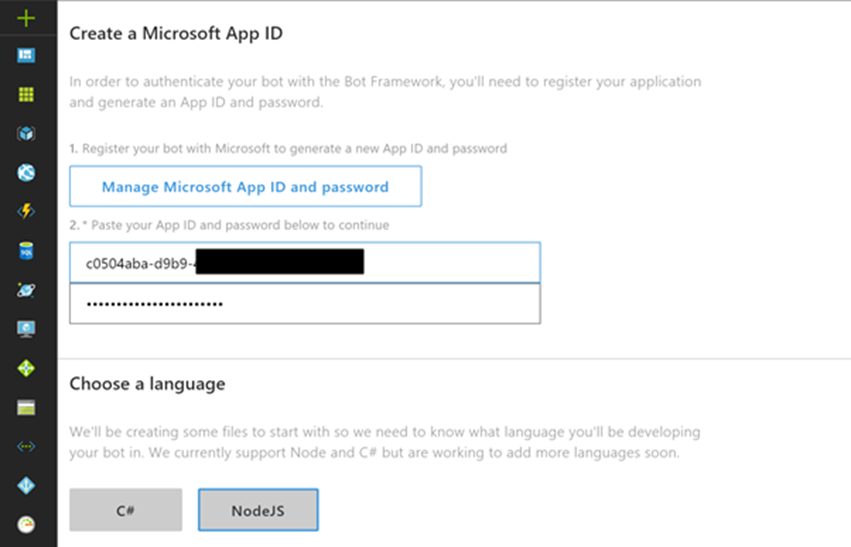
A notification will be sent when deployment succeeds, and you will be greeted with the following screen. To get the App ID and password, simply click on the blue button to register your bot. Here, we choose Nodejs as the language and Language Understanding as the template for the demo bot. After pressing ‘Create Bot’, a window will open to ask you to connect Azure Bot Service to LUIS:

After everything is set up, you can edit your bot directly in Azure editor. Azure also allows you to integrate with BitBuckey, GitHub and Visual Studio Team Service. You can find tutorials on continuous deployment here: https://docs.microsoft.com/en-us/azure/app-service-web/app-service-continuous-deployment :

Go to https://www.luis.ai/welcome and sign in using the same account you used previously for Azure Bot Service. You can see that under My Apps section, there is a new application called ‘mspdemobot’:

Training Your Bot with LUIS:
To build a conversational bot, we want our bot to understand the intentions of the sentences and extract important information. This is where Microsoft Language Understanding Intelligent Service comes in. It reduces the difficulty of building an intelligent bot by allowing us to customize our own language-understanding model in an intuitive way.
To create a new application, click ‘New App’ and fill in the name and culture (from 16 different languages to choose from) of your application. We are going to mainly work on the Intents and Entities in LUIS. Once you click on ‘Intent’, you can create different categories for your custom language understanding model. For example, we can start with the most basic category ‘Greeting’:

After the intent is created, you will be directed to a page where you can add in a new utterance. In this case, possible new utterances could be ‘Hey’, ‘How are you doing?’, or ‘Hello’ etc.
Sometimes, we need to work on a specific token to continue the conversation, or to complete a certain task. To achieve this, we need to go to the Entities page. There are several prebuilt entities available, such as age, URL, and email address. You can also choose a package of intent and entities for different situations by adding prebuilt domain entities. You can also add in your own custom entities to suit your need. To help your application understand which part of the utterance belongs to which entities, you only need to go back to the utterance page and click on the words you need. In the following screenshot, ‘London’ is selected as location entity in the ‘AskWeather’ intent:

Now let’s move to the testing part. In Train & Test page you can test specific utterances with your newest model. The right-hand side shows the result produced by current version, which consists of the intent name and the corresponding score. The score is the possibility of the intent that your test utterance belongs to. Using this, you could test some edge case and optimize your model based on the outcome.

The more utterances you enter, the more accurate the results will be. After you finish testing, publish your LUIS app and you are good to go.
Coding Your Bot:
Once you open the Azure portal and go to the bot service page of your bot, you can code and test your bot directly in Azure editor. In here, we use the ‘intent.matches’ function to let the bot do different things based on users’ intentions. A very simple example is the intent ‘Greeting’, we simply detect user’s intent and reply with a sentence:

Based on this, we can start coding more complicated things. We are going to code a bot with the ability to understand user’s intentions and start a hangman game when the intent ‘StartGame’, is detected.
To build a hangman bot, you can refer to the blog post by Paul Seal, which explains the process using Nodejs with sample code: http://www.codeshare.co.uk/blog/how-to-create-a-hangman-chat-bot-game-in-nodejs-using-microsoft-bot-framework/ .
After the bot is finished you can test it directly in the Azure portal. In my demo bot, I added in more match functions to show that the bot can understand different intentions by connecting to the LUIS API. Here are the screenshots of when different intentions are detected; the bot successfully detects the intentions and classifies ‘London’ as a ‘location’ entity. The developer could design more complicated features by extracting the entities from the argument.

You could find out how to extract an entity as well as other functions in the reference library: https://docs.botframework.com/en-us/node/builder/chat-reference/modules/_botbuilder_d_.html .
Connecting Your Bot to Different Channel:
You can easily connect your bot to Skype, Messenger, Bing etc. by simply adding them as the channel of your bot. Go to Microsoft Bot Framework and your bot should be connected to Web Chat and Skype by default:

There are many different channels you can connect your bot to. Once you click on a channel, there will be step by step guide to help you to configure the channel. Simply follow the instructions and most of them should be as easy as copy and paste. The second icon is Cortana, which is an intelligent agent for Windows 10. If you want to provide Cortana with new capabilities using the bot you built, you could refer to this blog post: https://www.robinosborne.co.uk/2017/05/14/building-your-first-botframework-based-cortana-skill/ .
References and Other Resources
· Build a Chat Bot with Azure Bot Service: https://channel9.msdn.com/Blogs/MVP-Azure/build-a-chatbot-with-azure-bot-service
· Create a bot with the Bot Builder SDK for Node.js: https://docs.microsoft.com/en-us/bot-framework/nodejs/bot-builder-nodejs-quickstart
· How to create a Hangman Chat Bot game in Node.js using Microsoft Bot Framework: http://www.codeshare.co.uk/blog/how-to-create-a-hangman-chat-bot-game-in-nodejs-using-microsoft-bot-framework/
· Building your first Botframework based Cortana Skill: https://www.robinosborne.co.uk/2017/05/14/building-your-first-botframework-based-cortana-skill/
- Cortana skills development: Get started: https://channel9.msdn.com/events/Build/2017/B8030?term=dorrene%20brown
 Microsoft