First published on MSDN on Apr 19, 2018
My name is Andrei Margeloiu and I am studying Computer Science at University College London and also a Microsoft Student Partner at the University.

I’ve participated in the World Finals of Google HashCode, the largest algorithmic competition organised by Google, and before that, I won three Gold Medals in the Computing Olympiad in Romania. Having this experience, I’ve published the online course “Introduction to Algorithms and Data Structures in C++” that has been helping over 8000 students from 135 countries with their first steps in the field.
Hence, in this article, I want to share how you can get started with Xamarin and build an application that you can publish straight away in Google Play! You can reach me here .
Following this tutorial, you will create your own very first Android application. There is no prerequisite to building a great app and you will create a nice looking sliding puzzle following an easy-to-follow approach. I will explain at every stage what we are trying to achieve and how to code each element used. if your really interested in mobile development and Xamarin check out the docs at https://docs.microsoft.com/en-us/xamarin/
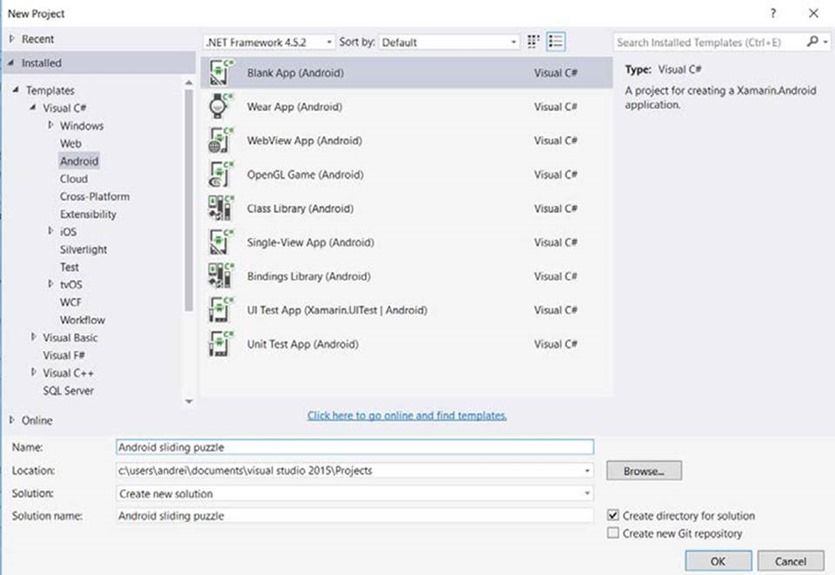
1. Let’s create a new Android project. Click on File -> New -> Project . Them in the left menu go to Templates
-> Visual C# -> Android and select Black App (Android). Give it the name “Android sliding puzzle” and we are good to go.
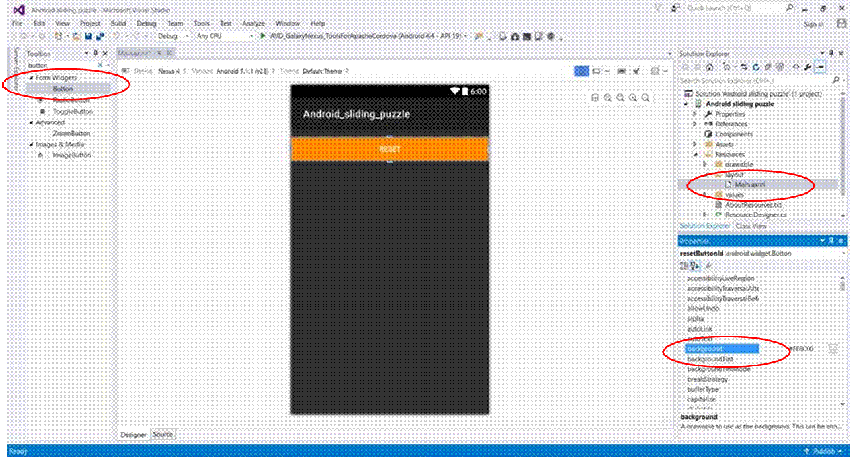
2. Now we want to create our first button, one that will shuffle the puzzle. In the Solution explorer (right) go to Android sliding puzzle -> Resources -> layout -> Main.axml . This file is resposable for the appearance of our application, so here we need to add all the buttons. If you don’t see the Android screen, be sure that you have made all the updates to Xamarin and you are in the Designer tab (bottom-left corner).

3. In order to add layout buttons, be sure that you have the toolbox activated. Go to View -> Toolbox and check it . Now, a menu will all kind of buttons should have appeared. Now look for a ‘Grid layout’ object and drag and drop one on the screen.

4. Now look for a ‘Button’ and also drag and drop it on the screen. We need to change the ID’s of the two elements we have just created, in order to easily access them in the future. Double click on the grid and in the Properties menu (right side) change the property ‘id’ to be ‘@+id/gameGridLayoutId’ .
The same thing, click on the button and change it’s ‘id’ property to be ‘@+id/resetButtonId’ . Now change the text property to be ‘Reset’. Change the background property to be #FF8C00. Save the file and now your app should look like:
5. Let’s start coding! Go in the MainActivity.cs file and be sure that you have the following code written.
6. We need to get the Grid and button back in the main program, in order to make changes to them. So let’s do that by making the following changes in the MainActivity.cs
7. Our app should work on multiple Android devices, independent on their screen size. So our grid should change the size according to the screen size. Make the following changes in your code.

8. Let’s move on to creating the tiles of the grid! As you saw on the first page, the grid is 4 x 4, meaning that it has 16 tiles in total. Let’s firstly try to make the top-left tile and then we’ll do the others!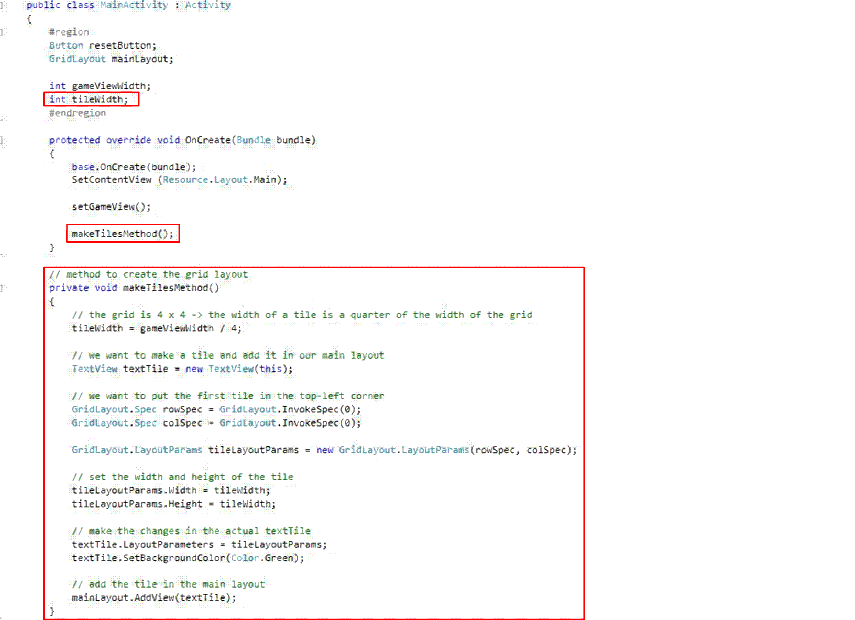
9. We now need to extend the grid to be 4 x 4, not just one tile. So we need to iterate on each row and column and create a tile and put it there. So we’ll use two ‘for loops’ which will do exactly that (will go on every row and every column) and put a tile there.Because we want our app to look great and be downloaded by many people, we’ll also leave some space between the tiles so they now intercalate. Now make the following changes in the code.
10. Now let’s put some text on each tile, such as the number of tile which is from 1 to 16. To do that, we need to take a counter and increase it after every tile is made, so the on the new tile it will be increased to the next value.
Firstly, add ‘using Android.Views;’ on top of your file.
Secondly, let’s write the counter number of every tile. Whenever you get lost in the code, take a look in the left side on the rows number and be sure that you are looking at the same rows J

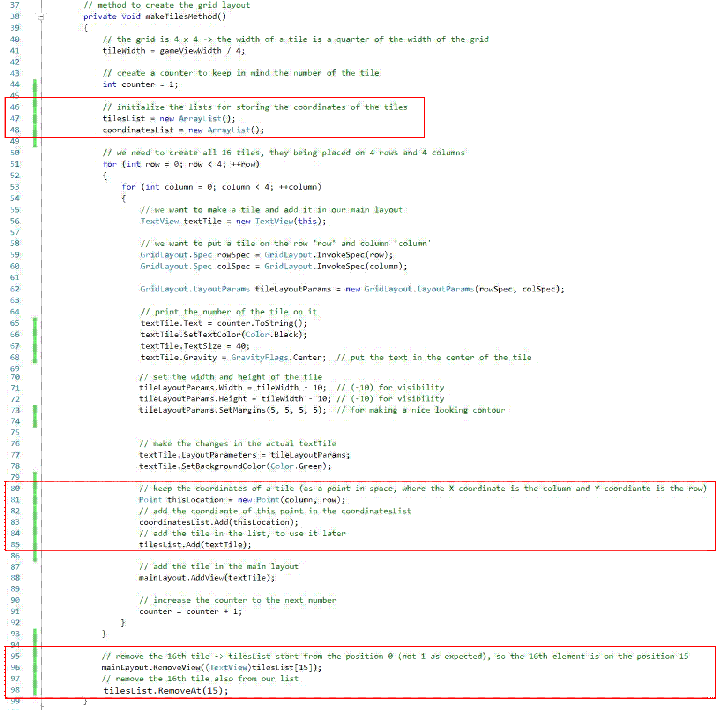
11. We want to randomize the tiles now, so that each new game is unique. For each tile, we need to randomly choose a position where to put that tile. We’ll store the positions of the tiles in a list (also called ArrayList), think of it like a list where for each tile number you also write the final position. Then we’ll remove the tile 16 th , because we need one free space for tiles to move J
Firstly, add this line on top of the code:
Create the lists for storing information about the tile and their coordiantes. (pay attention to the lines of the code)
12. We now want to shuffle the tiles when the games start, so that each new game will be different and challanging! We’ll create a method randomizeMethod() for doing that. All the necessary comments are inside the code.
Add this line at the beginning of the code: Next write the code for randomising the puzzle.
13. Now let’s suffle the game everytime the Reset button is pressed. We need to create a method before the setGameView methon and set the button to call it at every press.
14. Our goal now remains to make the tiles move when we touch them. More specifically, if a tile is situated near the empty tile, it should swap its position with the empty tile.
In order to do that, we need to know where each tile is situated, right? So that when we click on it to change its position to the empty tiles’s one. Add the new code under the setGameView() method.
15. We now transformed the tile TextView into MyTextView, so we need to make additional changes in the code: where we wrote TextView, we need to change to MyTextView.
1 st change in makeTilesMethod()
2 nd change also in makeTilesMethod()

3 rd change in the randomizeMethod()
16. Now, we need to make a small change. We told that when we touch on a tile, it should move, right? Yes, but we didn’t implement it yet, so let’s do that! Add the following code in the two for-loops from the makeTilesMethod().
And also in the foreach from the randomizeMethod(), let’s remember the location of the tiles.
17. Now let’s create the function that moves the tile when it’s touched. We’ll create it before the class MyTextView.
18. We need to remember where is the empty tile, right? So let’s firstly declare a varible to keep this information.
19. This is the last step until having a fully functional application! We just need to move the tiles when they are pressed. So, if a tile is touched and it is near the empty space, we’ll move it there.
How do we check this condition? We just have to compute the distance between the touched tile and the empty place, similar with what you’ve learned at school. The code speaks from itself J
How do we check this condition? We just have to compute the distance between the touched tile and the empty place, similar with what you’ve learned at school. The code speaks from itself J
Now go and show it to your parents and friends, they would not believe you made it. But you know it wasn’t that hard, right?
Take a look at the Xamarin docs and tutorials https://docs.microsoft.com/en-us/xamarin/
My name is Andrei Margeloiu and I am studying Computer Science at University College London and also a Microsoft Student Partner at the University.

I’ve participated in the World Finals of Google HashCode, the largest algorithmic competition organised by Google, and before that, I won three Gold Medals in the Computing Olympiad in Romania. Having this experience, I’ve published the online course “Introduction to Algorithms and Data Structures in C++” that has been helping over 8000 students from 135 countries with their first steps in the field.
Hence, in this article, I want to share how you can get started with Xamarin and build an application that you can publish straight away in Google Play! You can reach me here .
Android sliding puzzle in Xamarin
Following this tutorial, you will create your own very first Android application. There is no prerequisite to building a great app and you will create a nice looking sliding puzzle following an easy-to-follow approach. I will explain at every stage what we are trying to achieve and how to code each element used. if your really interested in mobile development and Xamarin check out the docs at https://docs.microsoft.com/en-us/xamarin/
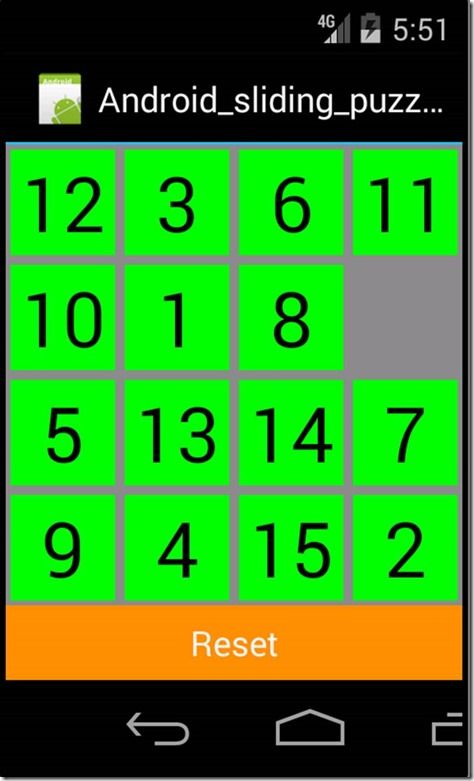
Take a look, this is what you’ll create!

1. Let’s create a new Android project. Click on File -> New -> Project . Them in the left menu go to Templates
-> Visual C# -> Android and select Black App (Android). Give it the name “Android sliding puzzle” and we are good to go.

2. Now we want to create our first button, one that will shuffle the puzzle. In the Solution explorer (right) go to Android sliding puzzle -> Resources -> layout -> Main.axml . This file is resposable for the appearance of our application, so here we need to add all the buttons. If you don’t see the Android screen, be sure that you have made all the updates to Xamarin and you are in the Designer tab (bottom-left corner).

3. In order to add layout buttons, be sure that you have the toolbox activated. Go to View -> Toolbox and check it . Now, a menu will all kind of buttons should have appeared. Now look for a ‘Grid layout’ object and drag and drop one on the screen.

4. Now look for a ‘Button’ and also drag and drop it on the screen. We need to change the ID’s of the two elements we have just created, in order to easily access them in the future. Double click on the grid and in the Properties menu (right side) change the property ‘id’ to be ‘@+id/gameGridLayoutId’ .
The same thing, click on the button and change it’s ‘id’ property to be ‘@+id/resetButtonId’ . Now change the text property to be ‘Reset’. Change the background property to be #FF8C00. Save the file and now your app should look like:
5. Let’s start coding! Go in the MainActivity.cs file and be sure that you have the following code written.

|
6. We need to get the Grid and button back in the main program, in order to make changes to them. So let’s do that by making the following changes in the MainActivity.cs

7. Our app should work on multiple Android devices, independent on their screen size. So our grid should change the size according to the screen size. Make the following changes in your code.

|
TIP: If you want to check in real time how your app look like, run it on the virtual device.

8. Let’s move on to creating the tiles of the grid! As you saw on the first page, the grid is 4 x 4, meaning that it has 16 tiles in total. Let’s firstly try to make the top-left tile and then we’ll do the others!


|
Run your app the virtual device to be sure it’s working.
9. We now need to extend the grid to be 4 x 4, not just one tile. So we need to iterate on each row and column and create a tile and put it there. So we’ll use two ‘for loops’ which will do exactly that (will go on every row and every column) and put a tile there.Because we want our app to look great and be downloaded by many people, we’ll also leave some space between the tiles so they now intercalate. Now make the following changes in the code.

|
10. Now let’s put some text on each tile, such as the number of tile which is from 1 to 16. To do that, we need to take a counter and increase it after every tile is made, so the on the new tile it will be increased to the next value.
Firstly, add ‘using Android.Views;’ on top of your file.

|
Secondly, let’s write the counter number of every tile. Whenever you get lost in the code, take a look in the left side on the rows number and be sure that you are looking at the same rows J

|
This how out app should look like until now

11. We want to randomize the tiles now, so that each new game is unique. For each tile, we need to randomly choose a position where to put that tile. We’ll store the positions of the tiles in a list (also called ArrayList), think of it like a list where for each tile number you also write the final position. Then we’ll remove the tile 16 th , because we need one free space for tiles to move J
Firstly, add this line on top of the code:

Create the lists for storing information about the tile and their coordiantes. (pay attention to the lines of the code)
|
12. We now want to shuffle the tiles when the games start, so that each new game will be different and challanging! We’ll create a method randomizeMethod() for doing that. All the necessary comments are inside the code.
Add this line at the beginning of the code:
 Next write the code for randomising the puzzle.

|
13. Now let’s suffle the game everytime the Reset button is pressed. We need to create a method before the setGameView methon and set the button to call it at every press.

|
And now everytime we press the Reset button, the puzzle shuffles. Yuhuuu!

|

|

|
|||
14. Our goal now remains to make the tiles move when we touch them. More specifically, if a tile is situated near the empty tile, it should swap its position with the empty tile.
In order to do that, we need to know where each tile is situated, right? So that when we click on it to change its position to the empty tiles’s one. Add the new code under the setGameView() method.

|
15. We now transformed the tile TextView into MyTextView, so we need to make additional changes in the code: where we wrote TextView, we need to change to MyTextView.
1 st change in makeTilesMethod()

|
2 nd change also in makeTilesMethod()

3 rd change in the randomizeMethod()

|
16. Now, we need to make a small change. We told that when we touch on a tile, it should move, right? Yes, but we didn’t implement it yet, so let’s do that! Add the following code in the two for-loops from the makeTilesMethod().

|
And also in the foreach from the randomizeMethod(), let’s remember the location of the tiles.

|
17. Now let’s create the function that moves the tile when it’s touched. We’ll create it before the class MyTextView.

|
18. We need to remember where is the empty tile, right? So let’s firstly declare a varible to keep this information.

Then, after the foreach from the randomizeMethod() finishes, we’ll memorize where the empty tile is. |

|
19. This is the last step until having a fully functional application! We just need to move the tiles when they are pressed. So, if a tile is touched and it is near the empty space, we’ll move it there.
How do we check this condition? We just have to compute the distance between the touched tile and the empty place, similar with what you’ve learned at school. The code speaks from itself J

|
How do we check this condition? We just have to compute the distance between the touched tile and the empty place, similar with what you’ve learned at school. The code speaks from itself J
Congratulations! You have built your first Android application!
Now go and show it to your parents and friends, they would not believe you made it. But you know it wasn’t that hard, right?
Want to expand your project?
Take a look at the Xamarin docs and tutorials https://docs.microsoft.com/en-us/xamarin/
Updated Mar 21, 2019
Version 2.0Lee_Stott Microsoft
 Microsoft
Joined September 25, 2018
Educator Developer Blog
Follow this blog board to get notified when there's new activity