well-architected
63 Topics
ExpressRoute Gateway Microsoft initiated migration
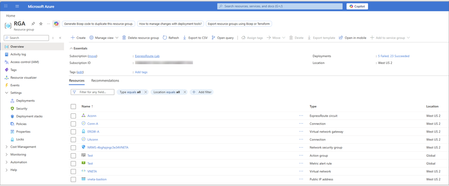
Objective The backend migration process is an automated upgrade performed by Microsoft to ensure your ExpressRoute gateways use the Standard IP SKU. This migration enhances gateway reliability and availability while maintaining service continuity. You receive notifications about scheduled maintenance windows and have options to control the migration timeline. For guidance on upgrading Basic SKU public IP addresses for other networking services, see Upgrading Basic to Standard SKU. Important: As of September 30, 2025, Basic SKU public IPs are retired. For more information, see the official announcement. You can initiate the ExpressRoute gateway migration yourself at a time that best suits your business needs, before the Microsoft team performs the migration on your behalf. This gives you control over the migration timing. Please use the ExpressRoute Gateway Migration Tool to migrate your gateway Public IP to Standard SKU. This tool provides a guided workflow in the Azure portal and PowerShell, enabling a smooth migration with minimal service disruption. Backend migration overview The backend migration is scheduled during your preferred maintenance window. During this time, the Microsoft team performs the migration with minimal disruption. You don’t need to take any actions. The process includes the following steps: Deploy new gateway: Azure provisions a second virtual network gateway in the same GatewaySubnet alongside your existing gateway. Microsoft automatically assigns a new Standard SKU public IP address to this gateway. Transfer configuration: The process copies all existing configurations (connections, settings, routes) from the old gateway. Both gateways run in parallel during the transition to minimize downtime. You may experience brief connectivity interruptions may occur. Clean up resources: After migration completes successfully and passes validation, Azure removes the old gateway and its associated connections. The new gateway includes a tag CreatedBy: GatewayMigrationByService to indicate it was created through the automated backend migration Important: To ensure a smooth backend migration, avoid making non-critical changes to your gateway resources or connected circuits during the migration process. If modifications are absolutely required, you can choose (after the Migrate stage complete) to either commit or abort the migration and make your changes. Backend process details This section provides an overview of the Azure portal experience during backend migration for an existing ExpressRoute gateway. It explains what to expect at each stage and what you see in the Azure portal as the migration progresses. To reduce risk and ensure service continuity, the process performs validation checks before and after every phase. The backend migration follows four key stages: Validate: Checks that your gateway and connected resources meet all migration requirements for the Basic to Standard public IP migration. Prepare: Deploys the new gateway with Standard IP SKU alongside your existing gateway. Migrate: Cuts over traffic from the old gateway to the new gateway with a Standard public IP. Commit or abort: Finalizes the public IP SKU migration by removing the old gateway or reverts to the old gateway if needed. These stages mirror the Gateway migration tool process, ensuring consistency across both migration approaches. The Azure resource group RGA serves as a logical container that displays all associated resources as the process updates, creates, or removes them. Before the migration begins, RGA contains the following resources: This image uses an example ExpressRoute gateway named ERGW-A with two connections (Conn-A and LAconn) in the resource group RGA. Portal walkthrough Before the backend migration starts, a banner appears in the Overview blade of the ExpressRoute gateway. It notifies you that the gateway uses the deprecated Basic IP SKU and will undergo backend migration between March 7, 2026, and April 30, 2026: Validate stage Once you start the migration, the banner in your gateway’s Overview page updates to indicate that migration is currently in progress. In this initial stage, all resources are checked to ensure they are in a Passed state. If any prerequisites aren't met, validation fails and the Azure team doesn't proceed with the migration to avoid traffic disruptions. No resources are created or modified in this stage. After the validation phase completes successfully, a notification appears indicating that validation passed and the migration can proceed to the Prepare stage. Prepare stage In this stage, the backend process provisions a new virtual network gateway in the same region and SKU type as the existing gateway. Azure automatically assigns a new public IP address and re-establishes all connections. This preparation step typically takes up to 45 minutes. To indicate that the new gateway is created by migration, the backend mechanism appends _migrate to the original gateway name. During this phase, the existing gateway is locked to prevent configuration changes, but you retain the option to abort the migration, which deletes the newly created gateway and its connections. After the Prepare stage starts, a notification appears showing that new resources are being deployed to the resource group: Deployment status In the resource group RGA, under Settings → Deployments, you can view the status of all newly deployed resources as part of the backend migration process. In the resource group RGA under the Activity Log blade, you can see events related to the Prepare stage. These events are initiated by GatewayRP, which indicates they are part of the backend process: Deployment verification After the Prepare stage completes, you can verify the deployment details in the resource group RGA under Settings > Deployments. This section lists all components created as part of the backend migration workflow. The new gateway ERGW-A_migrate is deployed successfully along with its corresponding connections: Conn-A_migrate and LAconn_migrate. Gateway tag The newly created gateway ERGW-A_migrate includes the tag CreatedBy: GatewayMigrationByService, which indicates it was provisioned by the backend migration process. Migrate stage After the Prepare stage finishes, the backend process starts the Migrate stage. During this stage, the process switches traffic from the existing gateway ERGW-A to the new gateway ERGW-A_migrate. Gateway ERGW-A_migrate: Old gateway (ERGW-A) handles traffic: After the backend team initiates the traffic migration, the process switches traffic from the old gateway to the new gateway. This step can take up to 15 minutes and might cause brief connectivity interruptions. New gateway (ERGW-A_migrate) handles traffic: Commit stage After migration, the Azure team monitors connectivity for 15 days to ensure everything is functioning as expected. The banner automatically updates to indicate completion of migration: During this validation period, you can’t modify resources associated with both the old and new gateways. To resume normal CRUD operations without waiting 15 days, you have two options: Commit: Finalize the migration and unlock resources. Abort: Revert to the old gateway, which deletes the new gateway and its connections. To initiate Commit before the 15-day window ends, type yes and select Commit in the portal. When the commit is initiated from the backend, you will see “Committing migration. The operation may take some time to complete.” The old gateway and its connections are deleted. The event shows as initiated by GatewayRP in the activity logs. After old connections are deleted, the old gateway gets deleted. Finally, the resource group RGA contains only resources only related to the migrated gateway ERGW-A_migrate: The ExpressRoute Gateway migration from Basic to Standard Public IP SKU is now complete. Frequently asked questions How long will Microsoft team wait before committing to the new gateway? The Microsoft team waits around 15 days after migration to allow you time to validate connectivity and ensure all requirements are met. You can commit at any time during this 15-day period. What is the traffic impact during migration? Is there packet loss or routing disruption? Traffic is rerouted seamlessly during migration. Under normal conditions, no packet loss or routing disruption is expected. Brief connectivity interruptions (typically less than 1 minute) might occur during the traffic cutover phase. Can we make any changes to ExpressRoute Gateway deployment during the migration? Avoid making non-critical changes to the deployment (gateway resources, connected circuits, etc.). If modifications are absolutely required, you have the option (after the Migrate stage) to either commit or abort the migration.3.5KViews1like3CommentsSimpler, private connectivity between Azure and AWS with Azure Multicloud Interconnect
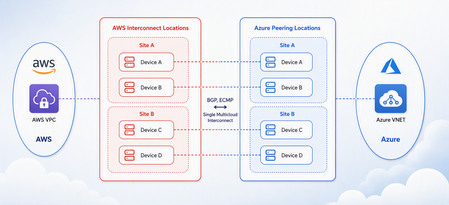
Multicloud is no longer the exception — it is how most enterprises operate. Teams run analytics in one cloud and applications in another, place workloads to meet data-residency requirements, and increasingly move large volumes of data between clouds to train and serve AI models. Yet the network that connects these environments has remained one of the hardest parts of a multicloud strategy to get right. Connecting Azure and AWS privately has traditionally meant stitching together Azure ExpressRoute, AWS Direct Connect, a connectivity provider or colocation footprint, customer-managed routers, BGP sessions, and link-layer encryption — then owning the resiliency design and day-to-day operations across all of it. The result is often slow to deliver, difficult to troubleshoot, and inconsistent in performance. Today, Microsoft and AWS are together introducing Azure Multicloud Interconnect, a jointly engineered, fully managed service that delivers private, high-throughput connectivity between Azure and AWS through a single logical resource. Both clouds coordinate provisioning, resiliency, encryption, and lifecycle operations, so the connection between your environments simply works — end to end. The challenge with connecting clouds today For most organizations, cross-cloud connectivity has been a build-it-yourself exercise. Establishing a private link between Azure and AWS typically requires provisioning an ExpressRoute circuit on one side and a Direct Connect circuit on the other, engaging a connectivity provider or securing space in a colocation facility to bridge them, and then configuring and maintaining the routers, BGP peering, and encryption that tie the two clouds together. Each of those pieces is owned by a different team or vendor, which makes the end-to-end path only as reliable as its least-managed component. When something breaks, isolating the root cause means coordinating across Microsoft, AWS, a network provider, and your own operations team — and mean time to resolution suffers as a result. Capacity planning is equally difficult: bandwidth is often provisioned for peak demand and left underused, while scaling up to meet a new AI or data initiative can take weeks. The outcome is a connectivity layer that is slow to stand up, expensive to operate, and hard to reason about — exactly the opposite of what a multicloud strategy is meant to deliver. Azure Multicloud Interconnect removes that complexity by turning cross-cloud connectivity into a managed service. What is Azure Multicloud Interconnect? Azure Multicloud Interconnect is a provider-managed, private intercloud connectivity service built on the proven foundations of Azure ExpressRoute and AWS Direct Connect. Instead of assembling and operating the underlying components yourself, you establish one interconnect resource and consume a private, dedicated path between your Azure and AWS environments. Under the covers, Microsoft and AWS coordinate the circuits, routing, and encryption on your behalf. You get the outcome you want — a reliable private connection between clouds — without becoming the systems integrator for it. Because the service builds on ExpressRoute and Direct Connect, it fits naturally into the connectivity models, tooling, and operational practices your teams already use in each cloud. One managed resource replaces a stack of circuits, routers, BGP sessions, and encryption you would otherwise build and operate yourself. Figure 1. Azure Multicloud Interconnect provides a single, managed private path between Azure and AWS, built on ExpressRoute and Direct Connect with a quad-redundant, 400G-class design and MACsec encryption. How it works Azure Multicloud Interconnect is engineered for the performance and availability that production and AI-scale workloads demand: A single logical connection. You provision and manage one interconnect resource. There are no customer-owned routers to rack, configure, or patch between the clouds. Quad-redundant, multi-site design. The data path is built across redundant devices and diverse sites — four Azure Microsoft Enterprise Edge (MSEE) routers and four AWS routers — so there is no single point of failure. High bandwidth backbone. A high-capacity LAG-based design provides the headroom needed for large-scale data movement and distributed AI traffic. Elastic bandwidth. Scale capacity up or down as demand changes, rather than provisioning for peak and paying for it year-round. Encryption by default. MACsec link-layer encryption is enabled automatically, so traffic between clouds is protected without extra configuration. Enterprise-ready networking. The service is IPv6-ready, supports APIPA addressing, and targets a 99.99% availability SLA. Routing and provisioning are coordinated by the platform, which removes the most common sources of cross-cloud connectivity errors — mismatched BGP configuration, inconsistent encryption settings, and asymmetric or fragile failover paths. A foundation you can trust Azure Multicloud Interconnect is not a new, unproven path — it extends two connectivity services that enterprises already rely on: Azure ExpressRoute and AWS Direct Connect. Both are private connectivity backbones trusted for mission-critical hybrid and cloud workloads, and the interconnect inherits their carrier-grade capacity, global edge presence, and operational maturity from day one. It also means your teams do not have to learn a separate model. The interconnect appears as a first-class resource governed by the identity, access, and monitoring controls each cloud already provides, and it can be automated with the tooling you use today. Extending trusted services, rather than introducing a parallel one, is what allows Microsoft and AWS to offer intercloud connectivity as a managed experience with confidence. Why this matters for your team Azure Multicloud Interconnect is designed to change the economics and the experience of running across clouds. Taken together, these benefits shift cross-cloud networking from a specialized, high-effort project to a repeatable, on-demand capability. Instead of dedicating senior engineers to build and babysit intercloud links, your team can direct that expertise toward the applications and data platforms that differentiate your business — while trusting that the connective tissue between clouds is reliable, secure, and ready to scale. Faster time to value. Turn up private Azure–AWS connectivity through a guided, managed workflow instead of a multi-week integration project spanning several vendors. Lower operational burden. Microsoft manages the infrastructure, resiliency, and lifecycle, so your networking team is freed from patching routers and diagnosing cross-cloud faults. Predictable, high performance. A dedicated, private path with high capacity that delivers the consistent throughput and low latency that public-internet or VPN paths cannot guarantee. Security you don’t have to assemble. Private connectivity plus default MACsec encryption keeps intercloud traffic off the public internet and protected in transit. A consistent experience in both clouds. Provision, monitor, and manage the interconnect using the native constructs and tooling your teams already rely on in Azure and AWS alike. Built for the way enterprises use multicloud “I've heard a very consistent message across many years of customer engagements - we are multi-cloud enterprise by design. With this announcement we are taking a burden on connecting clouds away from the customers." Igor Sakhnov, CVP Azure Networking Customers have told us where dedicated, managed intercloud connectivity makes the biggest difference. Azure Multicloud Interconnect is designed for scenarios such as: Distributed AI workloads. Move training data and model outputs between clouds at high throughput to feed pipelines wherever the compute lives. Large-scale data movement. Replicate datasets, back up across clouds, and support analytics that span Azure and AWS. Cross-cloud disaster recovery. Use a second cloud as a resilient recovery target over a private, reliable link. Hybrid and best-of-breed architectures. Run each application on the cloud that suits it best while keeping the connection between them private and performant. Regulated and sovereign workloads. Keep intercloud traffic on a private path to help meet data-residency and compliance requirements. Workload migration. Rehost or rebalance workloads between clouds without re-engineering connectivity for each move. Availability and what’s next Azure Multicloud Interconnect is launching first for Azure and AWS connectivity, the pairing customers ask about most often. Microsoft and AWS are starting with a preview so that you can validate the experience against your own architectures, with general availability to follow. This is the beginning of a broader journey. Building on existing multicloud connectivity capabilities, we plan to extend the managed interconnect model to additional clouds — including Google Cloud (coming soon)— so that a consistent, provider-managed experience can span your entire multicloud estate. As always, the roadmap will be guided by customer demand and real-world use. Our shared goal is simple: make the network the easiest part of your multicloud strategy, not the hardest. By delivering intercloud connectivity as a managed service, Microsoft and AWS want every organization — from a team moving its first dataset between clouds to an enterprise operating at AI scale — to connect Azure and AWS privately, securely, and with confidence, and to do it in minutes rather than months. Get started Learn more about Azure Multicloud Interconnect, Azure ExpressRoute, and AWS Direct Connect from Microsoft and AWS documentation, talk with your Microsoft or AWS account team about joining the preview, and tell us which cloud pairings and scenarios matter most for your organization. We are building this with your feedback. Azure Multicloud Interconnect is jointly delivered by Microsoft and AWS, built on Azure ExpressRoute and AWS Direct Connect. Feature availability, performance targets, and timelines may evolve as the service moves from preview to general availability.6.5KViews3likes0CommentsAzure Virtual Network routing appliance is now generally available
Modern cloud networks are evolving faster than ever. Organizations are building larger AI platforms, connecting more services through private connectivity, adopting IPv6, and expanding applications across regions and business units. As these environments grow, the network becomes a critical foundation for delivering performance, resiliency, and operational simplicity. Today, we're excited to announce the general availability of Azure Virtual Network routing appliance, a managed, platform-native routing service designed to provide high-performance connectivity across Azure virtual networks at cloud scale. Virtual Network routing appliance brings together Azure-native operations, specialized networking infrastructure, built-in resiliency, and high-bandwidth forwarding to help organizations build the next generation of cloud network architectures. Built for the era of AI infrastructure AI is changing the scale at which networks operate. Training clusters, inference services, analytics platforms, data processing pipelines, and distributed application environments generate unprecedented volumes of east-west traffic. These workloads require high-performance connectivity between services, networks, and regions while maintaining operational simplicity. Virtual Network routing appliance provides a managed routing foundation for these environments, enabling organizations to scale network connectivity alongside their AI investments. Instead of building and operating custom routing infrastructure, teams can focus on accelerating innovation, deploying new services, and delivering business outcomes. Scale hub-and-spoke architectures Hub-and-spoke remains one of the most widely adopted network architectures in Azure because it provides centralized governance, simplified operations, and efficient connectivity. As organizations expand, however, these architectures often grow from a handful of virtual networks into hundreds or even thousands of connected environments. Virtual Network routing appliance enables customers to scale these architectures while maintaining a consistent operational model. By providing a dedicated routing layer within the hub, Virtual Network routing appliance simplifies connectivity between applications, shared services, and business units while supporting the scale required by modern enterprise environments. The result is a network architecture that remains manageable even as organizational growth accelerates. Unlock large-scale private connectivity Private connectivity has become the default connectivity model for modern cloud deployments. Applications, databases, platforms, shared services, and partner solutions increasingly depend on private communication patterns across Azure environments. Virtual Network routing appliance provides a centralized routing foundation that helps customers build and scale these architectures while maintaining a consistent private networking experience across their environments. Virtual Network routing appliance can also help scale Private Endpoint connectivity beyond the current 20,000-endpoint HSPE boundary. Looking ahead, it establishes a foundation for further accelerating private connectivity to on-premises environments, without introducing additional architectural specifics. As organizations continue consolidating services onto private connectivity models, Virtual Network routing appliance provides the performance and scale needed to support long-term growth. Accelerate your IPv6 journey IPv6 adoption continues to grow across enterprise, telecommunications, and cloud environments. Organizations increasingly need network architectures capable of supporting IPv4, IPv6, and dual-stack deployments while maintaining operational consistency. Virtual Network routing appliance supports IPv4, IPv6, and dual-stack virtual networks, enabling customers to modernize network architectures and expand address space without introducing new operational complexity. Whether organizations are beginning their IPv6 transition or building IPv6-first architectures, Virtual Network routing appliance provides a consistent routing foundation across both address families. Simplify multi-region architectures Modern applications rarely live within a single region. Organizations increasingly deploy workloads globally to improve performance, resiliency, business continuity, and regulatory compliance. These architectures require a networking foundation capable of supporting connectivity across regions while remaining simple to operate and govern. Virtual Network routing appliance helps customers build scalable multi-region network architectures by providing a centralized, high-performance routing layer that integrates naturally into Azure networking designs. This allows teams to focus on application architecture and customer experience rather than operational management of routing infrastructure. Built for enterprise scale As organizations continue to grow, networking teams face a common challenge: supporting increasing scale without increasing operational complexity. Virtual Network routing appliance was designed to meet this challenge by combining: High-performance routing using specialized Azure networking infrastructure Built-in resiliency and availability zone support Native Azure management and governance integration Support for IPv4, IPv6, and dual-stack deployments Integrated monitoring and observability through Azure Monitor metrics available Configurable bandwidth tiers for production workloads Future support for scaling Private Endpoints beyond 20,000 These capabilities allow customers to build large-scale networking architectures while maintaining a familiar Azure-native operational experience. Learn more Azure Virtual Network routing appliance is more than a new networking resource. It is a foundational building block for the next generation of Azure networking. Organizations are continuing to build larger AI platforms, expand private connectivity, increase multi-region deployments, and modernize network architectures. These transformations require a routing foundation that can scale alongside them. Virtual Network routing appliance provides that foundation, delivering the performance, scale, resiliency, and operational simplicity required for modern cloud networks. Whether you're building an AI platform, expanding a hub-and-spoke architecture, scaling private connectivity, enabling IPv6, or designing a global application footprint, Azure Virtual Network routing appliance helps simplify networking so you can focus on what matters most: delivering innovation faster. Overview of Routing Appliances - Azure Virtual Network | Microsoft Learn4.7KViews1like0CommentsSimplify Virtual WAN Spoke Connectivity at Scale with Azure Virtual Network Manager
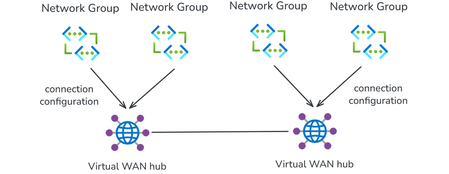
With Azure Virtual Network Manager (AVNM) integration, organizations using Virtual WAN for transitive connectivity can simplify spoke connectivity and policy management across large-scale hub-and-spoke deployments. By using a Virtual WAN hub as the hub in an AVNM hub-and-spoke topology, organizations can define connectivity and routing intent once at the network group level and apply it consistently across large numbers of spoke VNets. This reduces repetitive per-spoke connection and routing configuration, helps maintain operational consistency as deployments expand, and makes it easier to manage hub-and-spoke environments at scale. Together, AVNM’s centralized, group-based orchestration and Virtual WAN’s managed routing, security integration, and hybrid connectivity provide a more streamlined way to simplify operations and scale with confidence. What is Azure Virtual Network Manager? Azure Virtual Network Manager is a management service that lets you group, configure, and deploy network connectivity and security policies across virtual networks at scale. Instead of configuring VNet peering and access rules on each virtual network individually, you define network groups — logical collections of virtual networks based on static selection or dynamic Azure Policy conditions — and apply connectivity configurations and security admin rules to those groups. Key capabilities include: Hub-and-spoke and mesh topologies — Define how virtual networks in a network group connect to a central hub or to each other. Network groups — Group VNets statically or dynamically (using tags, subscriptions, resource group names, or other Azure Policy conditions). Security admin rules — Author and enforce access control lists across all VNets in a network group, providing a centralized layer of defense that complements NSGs and firewalls. Region-scoped deployment — Deploy configurations to specific Azure regions, enabling incremental rollout and controlled blast radius. AVNM operates as an overlay management layer — it orchestrates VNet peering, connectivity, and security rules without replacing the underlying networking primitives. What is Azure Virtual WAN? Azure Virtual WAN as a service brings together routing, security, VPN, ExpressRoute, and transitive connectivity in a hub-and-spoke architecture. A Virtual WAN hub is a managed regional resource that acts as a central transit point for branch connectivity, remote users, private enterprise connectivity, spoke virtual networks, and private traffic routing through security services. Site-to-site VPN connectivity (branch offices, SD-WAN devices) Point-to-site VPN connectivity (remote users) ExpressRoute private connectivity (on-premises datacenters) VNet-to-VNet transitive connectivity (spoke virtual networks) Routing, firewall, and encryption for private traffic All hubs in a Standard Virtual WAN are connected in a full mesh over the Microsoft backbone, enabling any-to-any connectivity between spokes, branches, and remote users across regions. Virtual WAN removes the need to manually manage complex route tables and transit VNets — routing is handled by the hub's built-in router. What this integration enables When you select a Virtual WAN hub as the hub in an AVNM connectivity configuration, AVNM handles the spoke-to-hub wiring for you. For each virtual network in your selected network groups: If the VNet is not yet connected to the Virtual WAN hub, AVNM creates the Virtual Network connection to Virtual WAN hub and applies a consistent routing configuration with Virtual WAN connection policy. If the VNet is already connected, AVNM updates the existing Virtual Network connection to utilize the routing properties in the Virtual WAN connection policy. A connection policy is a hub-level Virtual WAN resource that defines shared routing behavior for the virtual network connections it governs, including route table association and propagation, route maps, internet security settings, and propagated labels. Because the policy applies these settings consistently across governed connections, it helps standardize routing and overrides conflicting settings configured directly on individual connections. How it works The setup follows AVNM's standard workflow: Create a network group. Add virtual networks as members — either statically (by selecting specific VNets) or dynamically (using Azure Policy conditions such as tags or resource group names). Create a connectivity configuration. Choose hub-and-spoke topology, select your Virtual WAN hub as the hub, and select or create a connection policy. Deploy. Commit the configuration to your target regions. AVNM connects all VNets in the network groups to the Virtual WAN hub and applies the connection policy in parallel. You can also enable direct connectivity within a spoke network group. When enabled, VNet-to-VNet traffic within that group routes directly between virtual networks instead of transiting the Virtual WAN hub — useful for latency-sensitive or high-throughput east-west workloads. By default, direct connectivity is regional; enable global mesh to extend it across Azure regions. Key use cases Bulk spoke onboarding Connect many virtual networks to a Virtual WAN hub in one operation. All connections are orchestrated in parallel by AVNM, and the pre-defined routing configuration is automatically applied. Policy-based dynamic onboarding Use Azure Policy to define network group membership conditions. When a new virtual network matches those conditions—for example, a VNet tagged env:prod—it is automatically added to the network group. On the next deployment, AVNM connects it to the Virtual WAN hub with the correct routing configuration, reducing manual onboarding effort. Batch routing configuration updates Push routing changes to all virtual networks in a network group as a single, fully parallelized operation. This significantly reduces maintenance window duration for network-wide changes and makes rollback straightforward. Incremental deployment Segment your network into precise update domains by creating separate network groups — for example, by environment (staging, dev, production) or by region. Deploy connection policies to each group or region independently. This lets you test changes on a smaller subset before applying them broadly, minimizing blast radius. Mesh for selective inspection bypass If you use routing intent to send all private traffic through a firewall in the Virtual WAN hub, certain high-throughput or latency-sensitive flows (such as database replication) may benefit from bypassing that inspection. Enable direct connectivity in AVNM to create a mesh between selected spokes, allowing VNet-to-VNet traffic to route directly while all other traffic continues through the hub firewall. Security admin rules at scale Define network groups for your Virtual WAN spokes, then use AVNM security admin rules to author and deploy access control lists across those spokes. This provides an additional layer of defense alongside next-generation firewalls in the Virtual WAN hub. Getting started Prerequisites: An existing Azure Virtual Network Manager instance An existing Azure Virtual WAN and Virtual WAN hub One or more virtual networks to use as spoke members To configure: Go to your Network Manager instance in the Azure portal. Create a network group and add your spoke VNets. Create a connectivity configuration → select hub-and-spoke → select your Virtual WAN hub → select or create a connection policy → add spoke network groups. Deploy the configuration to your target regions. In your Virtual WAN resource, verify that the expected spoke VNet connections are in a connected state. Review effective routes in the virtual hub to confirm routing behavior matches the selected connection policy. For detailed step-by-step instructions, see Configure Azure Virtual WAN hub for Azure Virtual Network Manager. For more on connection policy, see Connection policy in Azure Virtual WAN. Learn more Azure Virtual Network Manager documentation Virtual WAN and Virtual Network Manager integration overview Azure Virtual WAN documentation911Views1like1CommentAzure Front Door edge actions: programmable compute for a secure, resilient, AI-ready edge
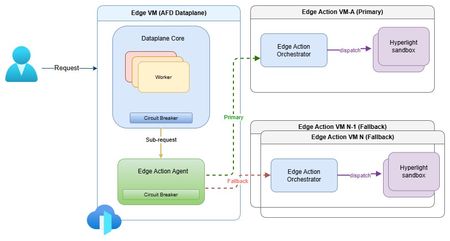
The need for secure edge programmability As modern web applications increasingly move decision-making closer to users, programmable compute at the edge is becoming a foundational capability for delivering low-latency, personalized, and intelligent experiences. Azure Front Door edge actions introduces lightweight customer-defined logic that executes close to users at Microsoft's global edge (https://aka.ms/edgeactionsblog). The engineering challenge extends well beyond moving code closer to the request path. It is about enabling edge programmability while preserving the core guarantees customers expect from a global edge platform: hyperscale performance and acceleration, strong security and tenant isolation, resiliency, and fast, controlled recovery. That sets up a much higher engineering bar than simply bringing a serverless runtime to the edge. Programmability introduces customer code, new execution paths, runtime dependencies, and additional failure modes directly into the critical request path. Architecture therefore must make flexibility a first-class capability without compromising the operational characteristics of a hyperscale edge platform. Preserving performance at hyperscale The first architectural challenge was preserving the performance characteristics of Azure Front Door while introducing programmable execution into the request path. Every additional execution step has the potential to increase latency, amplify failures, or reduce throughput at global scale. Edge actions was therefore designed to add programmability without changing the fundamental performance profile customers already expect from Azure Front Door. At request time, Azure Front Door evaluates the request, determines whether an edge action should be executed based on the associated rule, invokes the edge actions runtime, and applies the result inline. Because the runtime sits directly in the request path, every design decision was guided by a common principle: keep execution local whenever possible, bound latency when dependencies degrade, and ensure optional compute never becomes a platform-wide latency amplifier. Performance design principles Node-local execution keeps request processing on the same machine whenever possible, minimizing cross-node communications and preserving low latency. Minimized inter-node hops keep the common path compact while still enabling cluster-level fallback when local dependencies deteriorate. Connection reuse through Edge Action Agent reduces gRPC invocation overhead and improves hot path efficiency. Lightweight Hyperlight isolation provides strong tenant isolation with an execution model suitable for latency-sensitive edge workloads. Fast-fail and circuit-breaker protects latency by bounding waits on degraded dependencies and preventing cascading pressure. Together, these architectural choices introduce programmable compute without turning the Azure Front Door data plane into a distributed orchestration layer. The hot path remains local, predictable, and bounded, with fallback used only when necessary to preserve performance across the global edge. Security and tenant isolation by design Running customer-defined code on a shared global edge fundamentally changes the security model. Unlike traditional request processing, programmable execution introduces untrusted customer code directly into the request path, making strong isolation a foundational architectural requirement rather than an operational safeguard. For Azure Front Door edge actions, every execution is designed to run within a dedicated Hyperlight micro-VM, providing hardware-enforced isolation between customer workloads, the Azure Front Door data plane, and the underlying host environment. Security design principles Hypervisor-backed isolation ensures customer code executes within dedicated Hyperlight micro-VM boundaries rather than shared execution environments. Data plane separation isolates edge actions execution from Azure Front Door's core traffic-processing path. Minimal host surface area reduces the attack surface and limits privileged interactions. Restricted execution context exposes only the request information required to process a request. Reduced operational blast radius helps contain compromised or misbehaving workloads. These architectural boundaries extend beyond workload isolation. Azure Front Door's data plane remains physically separated from the edge actions orchestration service, while each execution receives only the minimum context required to perform its task. This defense-in-depth approach reduces both security risk and operational blast radius without compromising performance. Hyperlight: Security without sacrificing performance A key differentiator of Azure Front Door edge actions is its use of Hyperlight micro-VMs to provide hardware-backed isolation without introducing the traditional performance penalties associated with virtual machines. Hyperlight was designed to make VM-level protection practical for high-throughput function execution, enabling strong tenant isolation while remaining suitable for latency-sensitive edge workloads. Edge actions builds this foundation through the edge action orchestrator, which maintains a pool of warm Hyperlight sandboxes ready to serve requests. By reusing pre-initialized sandboxes instead of creating a new execution environment for every request, edge actions minimizes initialization overhead, reduces request latency, and sustains higher throughput under load. The result is a security model based on VM isolation that remains compatible with the performance expectations of a hyperscale edge platform. Critically, performance optimizations do not weaken isolation guarantees. After each execution, sandbox state is cleaned before reuse, ensuring that subsequent invocations cannot access data from prior executions while preserving the efficiency benefits of warm sandboxing. In internal benchmarking, lightweight edge actions executed in less than 2 ms inside Hyperlight, with approximately 1.27 ms of total sandbox overhead, demonstrating that strong isolation and high-performance edge execution can coexist. Security enables resiliency Security and resiliency are closely related architectural goals. Isolation helps contain malformed inputs, unexpected behavior, and execution failures, preventing individual workloads from affecting the broader platform. In a multitenant edge service, isolation is not only a security requirement; it is also a key resiliency mechanism. Resiliency built into the platform Strong isolation is not only a security property, but also a foundational resiliency mechanism. By containing malformed inputs, unexpected behavior, and execution failures within dedicated execution boundaries, the platform prevents individual workloads from affecting neighboring tenants or the broader service. At hyperscale, robust isolation is essential for maintaining customer trust and predictable platform reliability. Building on that foundation, Azure Front Door edge actions was designed around a simple operating principle: failures are inevitable, but their impact must be predictable, bounded, and recoverable. Because programmable compute introduces additional execution paths and runtime dependencies into the request path, resiliency must be built into the control points that determine when to execute, stop waiting, or fall back. The platform incorporates lessons learned from operating Azure services at a global scale, with a focus on minimizing blast radius, maintaining service continuity, and enabling controlled recovery when dependencies fail, overload, or time out. Resiliency principles Bound failure impact through isolation and containment. Recover predictably using health-aware routing and fallback paths. Protect customer availability first through graceful degradation. Fail fast rather than fail slowly to avoid latency amplification. Continuously validate assumptions through Game Days and fault injections. These principles translate into request-time behavior through deadlines, circuit breakers, fail-open behavior, and health-based fallback. Together, they ensure that optional programmable execution enhances application capabilities without compromising the stability of Azure Front Door's core request-processing pipeline. Continuous validation of resiliency assumptions Resilient architecture is credible only when validation becomes part of the operating model. For edge actions, Game Days and Fault Injections provide recurring opportunities to verify that architectural assumptions continue to hold under production-like stress. Validation includes chaos and failure injections, timeout and dependency-loss exercises, overload and queue-growth scenarios, mixed-workload testing, and interface fuzzing. These exercises answer practical production questions: Does fail-open behavior protect the request path? Do circuit breakers engage early enough? Does fallback routing preserve service continuity? Do malformed inputs remain contained? Repeated validation also strengthens operations. Detection improves, mitigation becomes more predictable, and recovery evolves from architectural intent into demonstrated operational capability. Built for future intelligent & modern workloads Edge actions is designed for lightweight programmable execution today, but the underlying architecture is intended to support increasingly intelligent decision-making over time. The engineering requirement remains unchanged: future intelligence workloads must operate within the same architectural constraints that govern today's request processing - bounded execution, strong isolation, predictable fallback, and protection of the common request path. Architectural implications for intelligence workloads Real-time AI inferencing for request classification and policy evaluation. Intelligent bot, abuse, and fraud detection closer to users. AI-assisted origin selection and traffic-routing decisions. Application-specific SLM-powered decision making at the edge. In that model, the objective is not simply to introduce more intelligence at the edge, but to ensure that intelligence inherits the same platform guarantees as every other component of the request path. Closing thoughts Programmable edge execution is becoming a foundational capability for modern distributed applications. The engineering challenge, however, extends far beyond running customer code closer to users. It is about preserving the system properties that customers already depend on while introducing a new execution surface into the critical request path. Edge actions demonstrates that edge programmability, performance, security, tenant isolation, and resiliency are not independent design goals - they are a single architectural problem that must be solved together. By keeping the common path protected, failures bounded, tenants strongly isolated, and recovery predictable, Azure Front Door edge actions extends the platform's capabilities without compromising the engineering principles that underpin a global hyperscale edge service. Learn more Introducing Hyperlight Edge actions samples: JavaScript request context690Views1like0CommentsAzure Front Door: Resiliency Series – Part 2: Faster recovery (RTO)
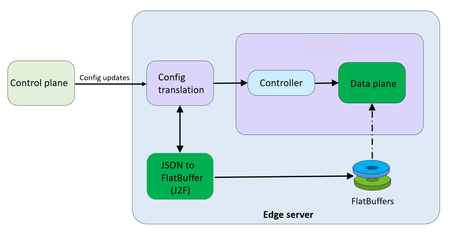
Abhishek Tiwari, Vice President of Engineering, Azure Networking Amit Srivastava, Partner Director of PM, Azure Networking Varun Chawla, Partner Director of Engineering, Azure Networking Karthik Uthaman, Principal Engineer, Azure Networking In Part 1 of this blog series, we outlined our four‑pillar strategy for resiliency in Azure Front Door: configuration resiliency, data plane resiliency, tenant isolation, and accelerated Recovery Time Objective (RTO). Together, these pillars help Azure Front Door remain continuously available and resilient at global scale. Part 1 focused on the first two pillars: configuration and data plane resiliency. Our goal is to make configuration propagation safer, so incompatible changes never escape pre‑production environments. We discussed how incompatible configurations are blocked early, and how data plane resiliency ensures the system continues serving traffic from a last‑known‑good (LKG) configuration even if a bad change manages to propagate. We also introduced ‘Food Taster’, a dedicated sacrificial process running in each edge server’s data plane, that pretests every configuration change in isolation, before it ever reaches the live data plane. In this post, we turn to the recovery pillar. We describe how we have made key enhancements to the Azure Front Door recovery path so the system can return to full operation in a predictable and bounded timeframe. For a global service like Azure Front Door, serving hundreds of thousands of tenants across 210+ edge sites worldwide, we set an explicit target: to be able to recover any edge site – or all edge sites – within approximately 10 minutes, even in worst‑case scenarios. In typical data plane crash scenarios, we expect recovery in under a second. Repair status The first blog post in this series mentioned the two Azure Front Door incidents from October 2025 – learn more by watching our Azure Incident Retrospective session recordings for the October 9 th incident and/or the October 29 th incident. Before diving into our platform investments for improving our Recovery Time Objectives (RTO), we wanted to provide a quick update on the overall repair items from these incidents. We are pleased to report that the work on configuration propagation and data plane resiliency is now complete and fully deployed across the platform (in the table below, “Completed” means broadly deployed in production). With this, we have reduced configuration propagation latency from ~45 minutes to ~20 minutes. We anticipate reducing this even further – to ~15 minutes by the end of April 2026, while ensuring that platform stability remains our top priority. Learning category Goal Repairs Status Safe customer configuration deployment Incompatible configuration never propagates beyond ‘EUAP or canary regions’ Control plane and data plane defect fixes Forced synchronous configuration processing Additional stages with extended bake time Early detection of crash state Completed Data plane resiliency Configuration processing cannot impact data plane availability Manage data-plane lifecycle to prevent outages caused by configuration-processing defects. Completed Isolated work-process in every data plane server to process and load the configuration. Completed 100% Azure Front Door resiliency posture for Microsoft internal services Microsoft operates an isolated, independent Active/Active fleet with automatic failover for critical Azure services Phase 1: Onboarded critical services batch impacted on Oct 29 th outage running on a day old configuration Completed Phase 2: Automation & hardening of operations, auto-failover and self-management of Azure Front Door onboarding for additional services March 2026 Recovery improvements Data plane crash recovery in under 10 minutes Data plane boot-up time optimized via local cache (~1 hour) Completed Accelerate recovery time < 10 minutes April 2026 Tenant isolation No configuration or traffic regression can impact other tenants Micro cellular Azure Front Door with ingress layered shards June 2026 Why recovery at edge scale is deceptively hard To understand why recovery took as long as it did, it helps to first understand how the Azure Front Door data plane processes configuration. Azure Front Door operates in 210+ edge sites with multiple servers per site. The data plane of each edge server hosts multiple processes. A master process orchestrates the lifecycle of multiple worker processes, that serve customer traffic. A separate configuration translator process runs alongside the data plane processes, and is responsible for converting customer configuration bundles from the control plane into optimized binary FlatBuffer files. This translation step, covering hundreds of thousands of tenants, represents hours of cumulative computation. A per edge server cache is kept locally at each server level – to enable a fast recovery of the data plane, if needed. Once the configuration translator process produces these FlatBuffer files, each worker processes them independently and memory-maps them for zero-copy access. Configuration updates flow through a two-phase commit: new FlatBuffers are first loaded into a staging area and validated, then atomically swapped into production maps. In-flight requests continue using the old configuration, until the last request referencing them completes. The data process recovery is designed to be resilient to different failure modes. A failure or crash at the worker process level has a typical recovery time of less than one second. Since each server has multiple such worker processes which serve customer traffic, this type of crash has no impact on the data plane. In the case of a master process crash, the system automatically tries to recover using the local cache. When the local cache is reused, the system is able to recover quickly – in approximately 60 minutes – since most of the configurations in the cache were already loaded into the data plane before the crash. However, in certain cases if the cache becomes unavailable or must be invalidated because of corruption, the recovery time increases significantly. During the October 29 th incident, a data plane crash triggered a complete recovery sequence that took approximately 4.5 hours. This was not because restarting a process is slow, it is because a defect in the recovery process invalidated the local cache, which meant that “restart” meant rebuilding everything from scratch. The configuration translator process then had to re-fetch and re-translate every one of the hundreds of thousands of customer configurations, before workers could memory-map them and begin serving traffic. This experience has crystallized three fundamental learnings related to our recovery path: Expensive rework: A subset of crashes discarded all previously translated FlatBuffer artifacts, forcing the configuration translator process to repeat hours of conversion work that had already been validated and stored. High restart costs: Every worker on every node had to wait for the configuration translator process to complete the full translation, before it could memory-map any configuration and begin serving requests. Unbounded recovery time: Recovery time grew linearly with total tenant footprint rather than with active traffic, creating a ‘scale penalty’ as more tenants onboarded to the system. Separately and together, the insight was clear: recovery must stop being proportional to the total configuration size. Persisting ‘validated configurations’ across restarts One of the key recovery improvements was strengthening how validated customer configurations are cached and reused across failures, rather than rebuilding configuration states from scratch during recovery. Azure Front Door already cached customer configurations on host‑mounted storage prior to the October incident. The platform enhancements post outage focused on making the local configuration cache resilient to crashes, partial failures, and bad tenant inputs. Our goal was to ensure that recovery behavior is dominated by serving traffic safely, not by reconstructing configuration state. This led us to two explicit design goals… Design goals No category of crash should invalidate the configuration cache: Configuration cache invalidation must never be the default response to failures. Whether the failure is a worker crash, master crash, data plane restart, or coordinated recovery action, previously validated customer configurations should remain usable—unless there is a proven reason to discard it. Bad tenant configuration must not poison the entire cache: A single faulty or incompatible tenant configuration should result in targeted eviction of that tenant’s configuration only—not wholesale cache invalidation across all tenants. Platform enhancements Previously, customer configurations persisted to host‑mounted storage, but certain failure paths treated the cache as unsafe and invalidated it entirely. In those cases, recovery implicitly meant reloading and reprocessing configuration for hundreds of thousands of tenants before traffic could resume, even though the vast majority of cached data was still valid. We changed the recovery model to avoid invalidating customer configurations, with strict scoping around when and how cached entries are discarded: Cached configurations are no longer invalidated based on crash type. Failures are assumed to be orthogonal to configuration correctness unless explicitly proven otherwise. Cache eviction is granular and tenant‑scoped. If a cached configuration fails validation or load checks, only that tenant’s configuration is discarded and reloaded. All other tenant configurations remain available. This ensures that recovery does not regress into a fleet‑wide rebuild due to localized or unrelated faults. Safety and correctness Durability is paired with strong correctness controls, to prevent unsafe configurations from being served: Per‑tenant validation on load: Each cached tenant configuration is validated during the ‘load and verification’ phase, before being promoted for traffic serving. Therefore, failures are contained to that tenant. Targeted re‑translation: When validation fails, only the affected tenant’s configuration is reloaded or reprocessed. Therefore, the cache for other tenants is left untouched. Operational escape hatch: Operators retain the ability to explicitly instruct a clean rebuild of the configuration cache (with proper authorization), preserving control without compromising the default fast‑recovery path. Resulting behavior With these changes, recovery behavior now aligns with real‑world traffic patterns - configuration defects impact tenants locally and predictably, rather than globally. The system now prefers isolated tenant impact, and continued service using last-known-good over aggressive invalidation, both of which are critical for predictable recovery at the scale of Azure Front Door. Making recovery scale with active traffic, not total tenants Reusing configuration cache solves the problem of rebuilding configuration in its entirety, but even with a warm cache, the original startup path had a second bottleneck: eagerly loading a large volume of tenant configurations into memory before serving any traffic. At our scale, memory-mapping, parsing hundreds of thousands of FlatBuffers, constructing internal lookup maps, adding Transport Layer Security (TLS) certificates and configuration blocks for each tenant, collectively added almost an hour to startup time. This was the case even when a majority of those tenants had no active traffic at that moment. We addressed this by fundamentally changing when configuration is loaded into workers. Rather than eagerly loading most of the tenants at startup across all edge locations, Azure Front Door now uses an Machine Learning (ML)-optimized lazy loading model. In the new architecture, instead of loading a large number of tenant configurations, we only load a small subset of tenants that are known to be historically active in a given site, we call this the “warm tenants” list. The warm tenants list per edge site is created through a sophisticated traffic analysis pipeline that leverages ML. However, loading the warm tenants is not good enough, because when a request arrives and we don’t have the configuration in memory, we need to know two things. Firstly, is this a request from a real Azure Front Door tenant – and, if it is, where can I find the configuration? To answer these questions, each worker maintains a hostmap that tracks the state of each tenant’s configuration. This hostmap is constructed during startup, as we process each tenant configuration – if the tenant is in the warm list, we will process and load their configuration fully; if not, then we will just add an entry into the hostmap where all their domain names are mapped to the configuration path location. When a request arrives for one of these tenants, the worker loads and validates that tenant’s configuration on demand, and immediately begins serving traffic. This allows a node to start serving its busiest tenants within a few minutes of startup, while additional tenants are loaded incrementally only when traffic actually arrives—allowing the system to progressively absorb cold tenants as demand increases. The effect on recovery is transformative. Instead of recovery time scaling with the total number of tenants configured on a server, it scales with the number of tenants actively receiving traffic. In practice, even at our busiest edge sites, the active tenant set is a small fraction of the total. Just as importantly, this modified form of lazy loading provides a natural failure isolation boundary. Most Edge sites won’t ever load a faulty configuration of an inactive tenant. When a request for an inactive tenant with an incompatible configuration arrives, impact is contained to a single worker. The configuration load architecture now prefers serving as many customers as quickly as possible, rather than waiting until everything is ready before serving anyone. The above changes are slated to complete in April 2026 and will bring our RTO from the current ~1 hour to under 10 minutes – for complete recovery from a worst case scenario. Continuous validation through Game Days A critical element of our recovery confidence comes from GameDay fault-injection testing. We don’t simply design recovery mechanisms and assume they work—we break the system deliberately and observe how it responds. Since late 2025, we have conducted recurring GameDay drills that simulate the exact failure scenarios we are defending against: Food Taster crash scenarios: Injecting deliberately faulty tenant configurations, to verify that they are caught and isolated with zero impact on live traffic. In our January 2026 GameDay, the Food Taster process crashed as expected, the system halted the update within approximately 5 seconds, and no customer traffic was affected. Master process crash scenarios: Triggering master process crashes across test environments to verify that workers continue serving traffic, that the Local Config Shield engages within 10 seconds, and that the coordinated recovery tool restores full operation within the expected timeframe. Multi-region failure drills: Simulating simultaneous failures across multiple regions to validate that global Config Shield mechanisms engage correctly, and that recovery procedures scale without requiring manual per-region intervention. Fallback test drills for critical Azure services running behind Azure Front Door: In our February 2026 GameDay, we simulated the complete unavailability of Azure Front Door, and successfully validated failover for critical Azure services with no impact to traffic. These drills have both surfaced corner cases and built operational confidence. They have transformed recovery from a theoretical plan into tested, repeatable muscle memory. As we noted in an internal communication to our team: “Game day testing is a deliberate shift from assuming resilience to actively proving it—turning reliability into an observed and repeatable outcome.” Closing Part 1 of this series emphasized preventing unsafe configurations from reaching the data plane, and data plane resiliency in case an incompatible configuration reaches production. This post has shown that prevention alone is not enough—when failures do occur, recovery must be fast, predictable, and bounded. By ensuring that the FlatBuffer cache is never invalidated, by loading only active tenants, and by building safe coordinated recovery tooling, we have transformed failure handling from a fleet-wide crisis into a controlled operation. These recovery investments work in concert with the prevention mechanisms described in Part 1. Together, they ensure that the path from incident detection to full service restoration is measured in minutes, with customer traffic protected at every step. In the next post of this series, we will cover the third pillar of our resiliency strategy: tenant isolation—how micro-cellular architecture and ingress-layered sharding can reduce the blast radius of any failure to a small subset, ensuring that one customer’s configuration or traffic anomaly never becomes everyone’s problem. We deeply value our customers’ trust in Azure Front Door. We are committed to transparently sharing our progress on these resiliency investments, and to exceed expectations for safety, reliability, and operational readiness.3KViews5likes0Comments
We never really knew if our Azure followed CAF or Well-Architected — so we built something
For years we ran Azure environments professionally and CAF and WAF reviews were always the same story. A consultant every 12-18 months, a thick PDF, good intentions — and then nothing until the next one. The problem wasn't that we didn't care. It was that there was no lightweight way to track it continuously. Defender had some parts of CIS. WAF had the assessment tool. CAF had... a whitepaper and a spreadsheet we kept meaning to update. We couldn't answer basic questions like: are we getting better or worse? Which subscriptions are drifting? What would an auditor actually see if they looked at our CAF posture today? Eventually we got frustrated enough to build Anubion — it connects agentlessly to your Azure tenant and runs continuous checks across CIS, CAF, and WAF in one place, with findings prioritised and evidence stored over time. Happy to share more if anyone's interested. But also genuinely curious — how are other teams handling CAF and WAF tracking between formal assessments? If anyone is curious about their scores, you can sign up for at 14 day free trial. The setup is short and you only need a read-only service principal. Check out https://anubion.io/#request-access
Azure VNet Data Gateway for Secure Power BI & Power Platform Access in Enterprises
What Is a VNet data gateway? The VNet data gateway is a Microsoft‑managed gateway service that runs inside a delegated subnet of an Azure Virtual Network. It allows supported Microsoft cloud services—such as Power BI, Power Platform dataflows, and Microsoft Fabric workloads—to securely connect to data sources that are protected using private networking. Key characteristics: No customer‑managed VM or container No OS, patching, or gateway software upgrades Gateway lifecycle fully managed by Microsoft Traffic stays on the Azure backbone network Works seamlessly with Private Endpoints This makes it ideal for enterprise and regulated environments where security and operational efficiency are equally important. Why Enterprises need VNet data gateway Eliminates gateway infrastructure management Traditional gateways require: Virtual machines High availability setup OS patching and scaling Monitoring and troubleshooting With the VNet data gateway: Microsoft manages compute lifecycle No VM or gateway software to maintain No HA or load balancer design needed ✅ Result: Significant reduction in operational and maintenance overhead for platform and infrastructure teams. Secure access to private Azure resources Most enterprise Azure environments use: Private Endpoints NSGs and route tables Firewalls blocking public access The VNet data gateway: Is injected into a delegated subnet in your VNet Uses private IP addressing Enforces NSG and UDR rules Communicates with Microsoft services over a Microsoft‑managed internal tunnel ✅ Result: Data sources remain fully private—no public endpoints or inbound ports required. Designed for Power Platform & Power BI at Scale The gateway supports secure access for: Power BI semantic models Power BI paginated reports Microsoft Fabric Dataflow Gen2 Fabric pipelines and copy jobs Because it’s cloud‑native and centrally managed, the VNet data gateway scales well in large enterprises standardizing on Power Platform and Fabric. High‑level architecture overview At runtime, the VNet data gateway works as follows: A query is initiated from Power BI / Power Platform Query details and credentials are sent to the Microsoft Power Platform VNet service A containerized gateway instance is injected into the delegated subnet The gateway connects to the private data source using private networking Results are sent back to Power BI or Power Platform via a Microsoft‑managed internal tunnel Key security highlights: No inbound connectivity No public IP exposure Traffic remains on Azure backbone Full enforcement of NSGs and routing rules Key Enterprise benefits Least management overhead – no gateway servers Zero Trust aligned – private-only connectivity Fully managed by Microsoft Enterprise-grade security & governance Works with Azure Private Endpoint architectures When to Use VNet Data Gateway Scenario Recommendation Azure private PaaS services ✅ VNet data gateway Private Endpoint–only access ✅ VNet data gateway Zero Trust network model ✅ VNet data gateway Minimal ops & maintenance ✅ VNet data gateway On‑prem only, no Azure ❌ Traditional gateway Step‑by‑step configuration: VNet data gateway (Enterprise setup) High‑level flow (What you will configure) Register required Azure resource provider Prepare Azure Virtual Network and subnet Configure private connectivity to data source Create the VNet data gateway Create and bind data source connections Validate with Power BI / Power Platform workloads Step 1: Register Microsoft.PowerPlatform resource provider Why this step is required The VNet data gateway is a Microsoft‑managed service that is injected into your Azure VNet. Azure must explicitly allow Power Platform to deploy managed infrastructure into your subscription. Configuration steps Sign in to Azure portal Navigate to Subscriptions Select the subscription that hosts the target VNet Go to Resource providers Search for Microsoft.PowerPlatform Click Register ✅ Status must show Registered This step enables subnet delegation to Power Platform services. Step 2: Prepare the Azure Virtual Network Why this step is required The gateway runs inside your VNet. It must be placed in a dedicated, delegated subnet to maintain isolation and security boundaries. Requirements VNet can be in any Azure region Subnet must be exclusive to VNet data gateway Subnet must have outbound connectivity to the data source Configuration steps Go to Azure portal → virtual networks Select your existing VNet (or create one) Navigate to Subnets → + Subnet Configure: Subnet name: snet-vnet-datagateway Address range: /27 or larger (recommended) Subnet delegation: Microsoft.PowerPlatform/vnetaccesslinks Save the subnet ⚠️ Do not place any VMs, app gateway, or other workloads in this subnet. Step 3: Configure private connectivity to the data source Why this step is required Enterprises typically block public access to PaaS services. The VNet data gateway is designed to work natively with private endpoints. Example: Azure SQL / SQL Managed Instance Create Private Endpoint for the data service Attach it to the same VNet (can be different subnet) Create or link a Private DNS Zone, for example: privatelink.database.windows.net Link the Private DNS Zone to the VNet Ensure DNS resolution from the delegated subnet resolves to private IP ✅ This ensures all traffic remains private and internal. Step 4: Create the VNet data gateway Why this step is required This is where the actual Microsoft‑managed gateway is logically created and associated with your VNet. Configuration steps You can do this from either Power BI Service or Power Platform Admin Center. Using Power Platform Admin Center Go to https://admin.powerplatform.microsoft.com Select Data → Gateways Click + New → Virtual network data gateway Provide: Gateway name Azure subscription Resource group Virtual network Delegated subnet Click Create 📌 Notes: Gateway metadata is stored in Power BI tenant home region Gateway runtime executes in the VNet region No VM or scale settings are required Step 5: Create and configure data source connections Why this step is required The gateway exists, but Power BI / Power Platform must know which data sources can be accessed via it. Configuration steps (Power BI example) Go to Power BI Service Navigate to Settings → Manage connections and gateways Select the newly created VNet data gateway Click + New connection Provide: Data source type (Azure SQL, Storage, Databricks, etc.) Server / endpoint name (private DNS name) Authentication (SQL / Entra ID) Save the connection Assign users or security groups ✅ This step enables governance and access control. Step 6: Use the gateway in Power BI / Power Platform Power BI Open dataset or semantic model settings Under Gateway connection, select: Use a data gateway Choose the VNet data gateway Apply changes Refresh or run queries Power Platform / Fabric Select the same connection when configuring: Dataflows Gen2 Fabric pipelines Copy jobs Step 7: Validate and test Validation Checklist ✅ DNS resolves to private IP ✅ No public endpoint access enabled ✅ NSGs allow outbound traffic to data source ✅ Dataset refresh succeeds ✅ No gateway VM exists in subscription Optional: Enable logging and auditing from Power BI / Fabric Monitor gateway health in Admin Center Key Enterprise design guidance (Best practices) Use one gateway per environment tier (Prod / Non‑Prod) Use dedicated VNets for data access where possible Use Private Endpoint only (avoid service endpoints) Control access via AAD groups, not individuals Avoid mixing gateway subnet with other workloads Conclusion: For enterprises looking to consume Power Platform, Power BI, and Microsoft Fabric securely while keeping operational overhead close to zero, the VNet data gateway is the recommended approach. It removes gateway infrastructure complexity, strengthens security posture, and aligns perfectly with modern Azure landing zone and Zero Trust architectures.1.8KViews0likes0CommentsEnabling fallback to internet for Azure Private DNS Zones in hybrid architectures
Introduction Azure Private Endpoint enables secure connectivity to Azure PaaS services such as: Azure SQL Managed Instance Azure Container Registry Azure Key Vault Azure Storage Account through private IP addresses within a virtual network. When Private Endpoint is enabled for a service, Azure DNS automatically changes the name resolution path using CNAME Redirection Example: myserver.database.windows.net ↓ myserver.privatelink.database.windows.net ↓ Private IP Azure Private DNS Zones are then used to resolve this Private Endpoint FQDN within the VNet. However, this introduces a critical DNS limitation in: Hybrid cloud architectures (AWS → Azure SQL MI) Multiregion deployments (DR region access) Crosstenant / Crosssubscription access MultiVNet isolated networks If the Private DNS zone does not contain a corresponding record, Azure DNS returns: NXDOMAIN (NonExistent Domain) When a DNS resolver receives a negative response (NXDOMAIN), it sends no DNS response to the DNS client and the query fails. This results in: ❌ Application connectivity failure ❌ Database connection timeout ❌ AKS pod DNS resolution errors ❌ DR failover application outage Problem statement In traditional Private Endpoint DNS resolution: DNS query is sent from the application. Azure DNS checks linked Private DNS Zone. If no matching record exists: NXDOMAIN returned DNS queries for Azure Private Link and network isolation scenarios across different tenants and resource groups have unique name resolution paths which can affect the ability to reach Private Linkenabled resources outside a tenant's control. Azure does not retry resolution using public DNS by default. Therefore: Public Endpoint resolution never occurs DNS query fails permanently Application cannot connect Microsoft native solution Fallback to internet (NxDomainRedirect) Azure introduced a DNS resolution policy: resolutionPolicy = NxDomainRedirect This property enables public recursion via Azure’s recursive resolver fleet when an authoritative NXDOMAIN response is received for a Private Link zone. When enabled: ✅ Azure DNS retries the query ✅ Public endpoint resolution occurs ✅ Application connectivity continues ✅ No custom DNS forwarder required Fallback policy is configured at: Private DNS Zone → virtualnetwork link Resolution policy is enabled at the virtual network link level with the NxDomainRedirect setting. In the Azure portal this appears as: Enable fallback to internet How it works Without fallback: Application → Azure DNS → Private DNS Zone → Record missing → NXDOMAIN returned → Connection failure With fallback enabled: Application → Azure DNS → Private DNS Zone → Record missing → NXDOMAIN returned → Azure recursive resolver → Public DNS resolution → Public endpoint IP returned → Connection successful Azure recursive resolver retries the query using the public endpoint QNAME each time NXDOMAIN is received from the private zone scope Real world use case AWS Application Connecting to Azure SQL Managed Instance You are running: SQL MI in Azure Private Endpoint enabled Private DNS Zone: privatelink.database.windows.net AWS application tries to connect: my-mi.database.windows.net If DR region DNS record is not available: Without fallback: DNS query → NXDOMAIN → App failure With fallback enabled: DNS query → Retry public DNS → Connection success Step-by-step configuration Method 1 – Azure portal Go to: Private DNS Zones Select your Private Link DNS Zone: Example: privatelink.database.windows.net Select: Virtual network links Open your linked VNet Enable: ✅ Enable fallback to internet Click: Save Method 2 – Azure CLI You can configure fallback policy using: az network private-dns link vnet update \ --resource-group RG-Network \ --zone-name privatelink.database.windows.net \ --name VNET-Link \ --resolution-policy NxDomainRedirect Validation steps Run from Azure VM: nslookup my-mi.database.windows.net Expected: ✔ Private IP (if available) ✔ Public IP (if fallback triggered) Security considerations Fallback to internet: ✅ Does NOT expose data ✅ Only impacts DNS resolution ✅ Network traffic still governed by: NSG Azure Firewall UDR Service Endpoint Policies DNS resolution fallback only triggers on NXDOMAIN and does not change networklevel firewall controls. When should you enable this? Recommended in: Hybrid AWS → Azure connectivity Multiregion DR deployments AKS accessing Private Endpoint services CrossTenant connectivity Private Link + VPN / ExpressRoute scenarios Conclusion Fallback to Internet using NxDomainRedirect provides: Seamless hybrid connectivity Reduced DNS complexity No custom forwarders Improved application resilience and simplifies DNS resolution for modern Private Endpointenabled architectures.1.1KViews0likes0Comments
Announcing Azure DNS security policy with Threat Intelligence feed general availability
Azure DNS security policy with Threat Intelligence feed allows early detection and prevention of security incidents on customer Virtual Networks where known malicious domains sourced by Microsoft’s Security Response Center (MSRC) can be blocked from name resolution. Azure DNS security policy with Threat Intelligence feed is being announced to all customers and will have regional availability in all public regions.3.2KViews3likes0Comments