vmss
5 TopicsHow to use Instance Mix with Azure Virtual Machine Scale Sets
When a Virtual Machine Scale Set needs to scale out, it normally uses a single VM size (also known as SKU). Whilst that is simple, it can also become a constraint. For example the scale out might be limited if that specific size has limited regional capacity, quota pressure, or a price profile that is not ideal for every scale-out event. Instance Mix for Azure Virtual Machine Scale Sets allows you to configure your scale out with more options by define multiple compatible VM sizes in a single scale set. When scaling out, Azure can choose from your list during provisioning based on the allocation strategy you select. What is Instance Mix? Instance Mix is a Virtual Machine Scale Sets capability that lets you specify up to five VM sizes for a single scale set that uses Flexible orchestration mode. Instead of setting the scale set to a single size such as Standard_D2s_v5 , you set the scale set SKU name to Mix and define the real VM sizes in the skuProfile . At provisioning time, Azure uses the skuProfile.vmSizes list and the selected allocation strategy to decide which VM size to deploy. The high-level model looks like this: { "sku": { "name": "Mix", "capacity": 2 }, "properties": { "skuProfile": { "vmSizes": [ { "name": "Standard_D2s_v5" }, { "name": "Standard_D2as_v5" }, { "name": "Standard_D2s_v4" } ], "allocationStrategy": "CapacityOptimized" } } } You can use this if your workload can run on more than one VM size and you want to improve provisioning success, optimize for cost, or align allocation with reservations or savings plans. When should you use Instance Mix? Instance Mix is a good fit when: Your application can run correctly on several similar VM sizes. You want scale-out to have more than one capacity option in a region. You run Spot VMs and want Azure to prefer lower-priced capacity when available. You have reservations for specific sizes, or want to favor VM sizes with better savings-plan economics, and need predictable priority. You want one scale set instead of several separate scale sets for equivalent worker capacity. It is usually best for stateless or horizontally scalable workloads, such as web front ends, API tiers, queue workers, batch workers, and other scale-out services where each instance performs the same role. Avoid using Instance Mix as a way to combine very different machines in one pool. For example, mixing a small general-purpose VM with a much larger memory-optimized VM can make capacity planning, load distribution, and performance troubleshooting harder. Best practice is to use sizes with similar vCPU and memory for balanced load distribution and similar VM types for consistent performance. Key requirements and limits Before you deploy, check these requirements: Requirement Detail Orchestration mode Instance Mix is available only for Virtual Machine Scale Sets using Flexible orchestration mode. Number of VM sizes You can specify up to five VM sizes. VM family support The Instance Mix skuProfile supports A, B, D, E, and F VM families. Architecture Do not mix CPU architectures. For example, do not mix Arm64 and x64 sizes in the same Instance Mix. Storage interface Do not mix incompatible storage interfaces such as SCSI and NVMe. Premium storage capability Do not mix VM SKUs that use premium storage with SKUs that do not. Security profile The selected sizes must use a compatible security profile. Local disk configuration The selected sizes must have a consistent local disk configuration. Quota You must already have quota for the VM sizes you include. Instance Mix does not request quota for you. Unsupported scenarios Instance Mix currently does not support Standby Pools, Azure Dedicated Host, Proximity Placement Groups, on-demand capacity reservations, or diffDiskSettings on the OS disk. Microsoft Learn currently states that all public Azure regions support Instance Mix. VM size availability and quota still vary by region and subscription, so you should check the exact sizes you plan to use before deploying. Choose an allocation strategy Instance Mix supports three allocation strategies. Strategy Best for Behavior LowestPrice Cost-sensitive and fault-tolerant workloads, especially Spot Azure prefers the lowest-priced VM sizes in the list while considering available capacity. It deploys as many of the lowest-priced VMs as capacity allows before moving to higher-priced sizes, so higher-cost sizes may be selected to secure capacity. This is the default strategy if you do not specify one. CapacityOptimized Production workloads where provisioning success is more important than the lowest possible price Azure prioritizes VM sizes that have the highest likelihood of available capacity in the target region. Cost is not considered, and higher-cost sizes may be selected to secure capacity. Prioritized Predictable ordering, reservations, or savings plan alignment Azure follows user-defined rank values on VM sizes when provided, subject to quota and regional capacity. Lower rank values have higher priority. This strategy is currently documented as preview. Rank note: Use rank only with Prioritized . Ranks are optional with Prioritized ; when specified, lower numbers have higher priority, and rank values can be duplicated or non-sequential. Omit ranks for LowestPrice and CapacityOptimized . For many operations teams, CapacityOptimized is a practical starting point for production scale sets because it is designed to improve the chance of successful provisioning. For Spot-heavy or highly cost-sensitive workloads, LowestPrice may be a better first choice. If you have reservations for specific sizes, or want to favor VM sizes with better savings-plan economics, use Prioritized and rank those reservation-backed or preferred sizes first. Walkthru Prereqs The commands below are Bash-specific. Use Azure Cloud Shell in Bash mode or another Bash environment with Azure CLI installed. You need: An Azure subscription. Permission to create resource groups, networking, and Virtual Machine Scale Sets. Azure CLI version 2.66.0 or later. An SSH-capable client if you plan to connect to the Linux instances. Check your Azure CLI version: az version --query '"azure-cli"' --output tsv Sign in and select the subscription you want to use: az login az account set --subscription "<subscription-id-or-name>" Set variables for the example: RG="rg-vmss-instancemix-demo" LOCATION="australiaeast" VMSS="vmss-instancemix-demo" ADMIN_USER="azureuser" You can change LOCATION to another public Azure region if you don't feel like sharing a datacenter rack with drop bears and the occasional kangaroo. Keep the VM sizes in the examples compatible if you change regions or families. Step 1: Check VM size availability in the region Before creating the scale set, check that the candidate VM sizes are available in your target region and subscription. az vm list-skus \ --location "$LOCATION" \ --resource-type virtualMachines \ --size Standard_D \ --all \ --output table For this walkthrough, we will use these D-series sizes: Standard_D2s_v5 Standard_D2as_v5 Standard_D2s_v4 In the az vm list-skus output, check the Restrictions column. If a size is restricted in your region or subscription, choose another compatible size or deploy in a different region. Step 2: Check quota Instance Mix does not automatically request quota. If one size in the mix lacks quota, Azure can try another size from the list that has quota. If none of the eligible sizes has enough quota, deployment or scale-out can fail. Check current regional VM quota and usage: az vm list-usage \ --location "$LOCATION" \ --output table Look for: Total Regional vCPUs The family quota rows that match your selected VM sizes, such as DSv5, DASv5, or DSv4 family vCPUs If quota is too low, either request a quota increase or choose sizes that have available quota in the target region. Step 3: Create a resource group Create a resource group for the demo: az group create \ --name "$RG" \ --location "$LOCATION" Step 4: Create a VM Scale Set with Instance Mix The key settings are: --orchestration-mode Flexible --vm-sku Mix --skuprofile-vmsizes --skuprofile-allocation-strategy Create the scale set: az vmss create \ --resource-group "$RG" \ --name "$VMSS" \ --location "$LOCATION" \ --orchestration-mode Flexible \ --image Ubuntu2204 \ --vm-sku Mix \ --skuprofile-vmsizes Standard_D2s_v5 Standard_D2as_v5 Standard_D2s_v4 \ --skuprofile-allocation-strategy CapacityOptimized \ --instance-count 2 \ --admin-username "$ADMIN_USER" \ --generate-ssh-keys This creates a Flexible orchestration scale set with two instances. Because the scale set uses Instance Mix, the scale set SKU name is Mix , and the allowed VM sizes are stored in skuProfile.vmSizes . Do not expect every VM size in the list to appear immediately. Azure may deploy all initial instances using the same VM size if that satisfies the selected allocation strategy and capacity is available. The point of Instance Mix is to give Azure more eligible choices during provisioning and scaling. Step 5: Verify the Instance Mix configuration View the complete skuProfile : az vmss show \ --resource-group "$RG" \ --name "$VMSS" \ --query "skuProfile" \ --output jsonc Example output: { "allocationStrategy": "CapacityOptimized", "vmSizes": [ { "name": "Standard_D2s_v5" }, { "name": "Standard_D2as_v5" }, { "name": "Standard_D2s_v4" } ] } View only the configured VM sizes: az vmss show \ --resource-group "$RG" \ --name "$VMSS" \ --query "skuProfile.vmSizes[].name" \ --output tsv View only the allocation strategy: az vmss show \ --resource-group "$RG" \ --name "$VMSS" \ --query "skuProfile.allocationStrategy" \ --output tsv List the current instances and their VM sizes. Because Flexible orchestration instances are standard Azure VMs, use az vm list for full instance details and filter by the scale set resource ID: VMSS_ID=$(az vmss show \ --resource-group "$RG" \ --name "$VMSS" \ --query id \ --output tsv) az vm list \ --resource-group "$RG" \ --query "[?virtualMachineScaleSet.id=='$VMSS_ID'].{Name:name, VMSize:hardwareProfile.vmSize, ProvisioningState:provisioningState}" \ --output table Step 6: Scale out and observe allocation Scale the set from two instances to five: az vmss scale \ --resource-group "$RG" \ --name "$VMSS" \ --new-capacity 5 List the instances again: VMSS_ID=$(az vmss show \ --resource-group "$RG" \ --name "$VMSS" \ --query id \ --output tsv) az vm list \ --resource-group "$RG" \ --query "[?virtualMachineScaleSet.id=='$VMSS_ID'].{Name:name, VMSize:hardwareProfile.vmSize, ProvisioningState:provisioningState}" \ --output table You may see one VM size or several VM sizes. The result depends on allocation strategy, quota, regional capacity, and the sizes in your skuProfile . Step 7: Add autoscale Instance Mix does not require autoscale, but it becomes especially useful when a workload scales out under demand. Autoscale asks the scale set to add instances; Instance Mix gives Azure multiple eligible VM sizes to use for those new instances. Create an autoscale profile: az monitor autoscale create \ --resource-group "$RG" \ --resource "$VMSS" \ --resource-type Microsoft.Compute/virtualMachineScaleSets \ --name "vmss-autoscale" \ --min-count 2 \ --max-count 10 \ --count 2 Create a scale-out rule that adds two instances when average CPU is greater than 70 percent for five minutes: az monitor autoscale rule create \ --resource-group "$RG" \ --autoscale-name "vmss-autoscale" \ --condition "Percentage CPU > 70 avg 5m" \ --scale out 2 Create a scale-in rule that removes one instance when average CPU is less than 30 percent for five minutes: az monitor autoscale rule create \ --resource-group "$RG" \ --autoscale-name "vmss-autoscale" \ --condition "Percentage CPU < 30 avg 5m" \ --scale in 1 Tune these thresholds for your workload. Scale out aggressively enough to protect availability, and scale in conservatively enough to avoid unnecessary churn. Step 8: Update the VM sizes in the mix You can change the VM sizes in an existing Instance Mix configuration. The important detail is that updating --skuprofile-vmsizes replaces the full list. It does not add or remove a single size incrementally. For example, this command replaces the mix with four sizes: az vmss update \ --resource-group "$RG" \ --name "$VMSS" \ --skuprofile-vmsizes Standard_D2s_v5 Standard_D2as_v5 Standard_D2s_v4 Standard_D2as_v4 If you want to remove a size, specify the full list of sizes you want to keep. If you want to add a size, specify the full existing list plus the new size. Verify the new list: az vmss show \ --resource-group "$RG" \ --name "$VMSS" \ --query "skuProfile.vmSizes[].name" \ --output tsv Step 9: Change the allocation strategy You can also update the allocation strategy. For example, this changes the walkthrough scale set from its original CapacityOptimized strategy to LowestPrice . Use this as a real update example, not as a blanket production recommendation: az vmss update \ --resource-group "$RG" \ --name "$VMSS" \ --set skuProfile.allocationStrategy=LowestPrice When you change the allocation strategy, existing VMs are not immediately reshaped. The new strategy takes effect after the scale set scales in or out. If you change from Prioritized to another allocation strategy, Microsoft Learn notes that you must first nullify the priority ranks associated with the VM sizes. Step 10: Enable Instance Mix on an existing scale set You can enable Instance Mix on a separate existing scale set if it uses Flexible orchestration mode, does not already use Instance Mix, and the selected VM sizes are compatible. Do not run this procedure against the $VMSS scale set created earlier, because that scale set is already Instance Mix-enabled. The required settings are: Set sku.name to Mix . Set sku.tier explicitly to null unless you have confirmed it is already null or absent. Provide at least one VM size in skuProfile.vmSizes . Provide an allocation strategy, or let Azure use the default lowest-price strategy. Set a separate variable for the existing scale set you want to convert: EXISTING_VMSS="my-existing-flex-vmss" Example: az vmss update \ --resource-group "$RG" \ --name "$EXISTING_VMSS" \ --set sku.name=Mix sku.tier=null \ --skuprofile-vmsizes Standard_D2as_v4 Standard_D2s_v5 Standard_D2as_v5 \ --set skuProfile.allocationStrategy=CapacityOptimized As with other Instance Mix updates, existing VM instances are not necessarily changed immediately. The configuration is used for subsequent scale actions. Portal procedure If you prefer the Azure portal: Go to Virtual machine scale sets. Select Create. On the Basics tab, choose the subscription, resource group, scale set name, region, image, and administrator settings. Set Orchestration mode to Flexible. In the Size section, choose Select up to 5 sizes. Select up to five compatible VM sizes. Choose the Allocation strategy. If you choose Prioritized (preview), a Rank size section appears below Allocation strategy. Select Rank priority to open the prioritization blade and order the VM sizes based on your preferred priority. Complete the remaining tabs for networking, management, health, scaling, and advanced settings. Select Review + create, then create the scale set. After deployment, open the scale set and check the Overview blade. In the Properties section, check Size for the configured VM sizes and Management for the allocation strategy. Operational tips Use similar sizes for predictable application behavior For web, API, and worker tiers, choose sizes with similar vCPU and memory. This makes autoscale behavior easier to reason about and helps load distribution remain balanced. Do not rely on Instance Mix as a quota workaround Instance Mix can use another listed size if one size lacks quota, but it does not request quota for you. Check quota before production deployment, especially if your autoscale maximum is high. Align reservations and savings plans with Prioritized Reserved instance pricing and savings-plan discounts can apply with Instance Mix. If you want to consume reservation-backed sizes first, or favor sizes with better savings-plan economics, use the Prioritized strategy and rank those sizes first. Use Spot Priority Mix for Spot plus Standard Instance Mix can be used with both Spot and Standard VMs. The Instance Mix FAQ says to use Spot Priority Mix when you need a defined split between Spot and Standard capacity. Caveat: Instance Mix supports B-family sizes for regular capacity, but Azure Spot VMs do not support B-series or promo versions of any size. If your scale set will use Spot capacity, choose Spot-supported sizes for the mix. Be careful with unsupported properties If a deployment template includes unsupported properties such as Azure Dedicated Host, on-demand capacity reservation, Standby Pools, Proximity Placement Groups, or OS disk diffDiskSettings , remove those settings before using Instance Mix. Troubleshooting common deployment errors Error code Meaning Fix SkuProfileAllocationStrategyInvalid The allocation strategy is not valid. Use CapacityOptimized , Prioritized , or LowestPrice for the allocation strategy. SkuProfileVMSizesCannotBeNullOrEmpty No VM sizes were provided. Add at least one VM size to skuProfile.vmSizes . SkuProfileHasTooManyVMSizesInRequest More than five VM sizes were specified. Reduce the list to no more than five VM sizes. SkuProfileVMSizesCannotHaveDuplicates The same VM size appears more than once. Remove duplicate VM sizes. SkuNameMustBeMixIfSkuProfileIsSpecified A skuProfile was provided, but sku.name is not Mix . Set sku.name to Mix . SkuTierMustNotBeSetIfSkuProfileIsSpecified sku.tier is set when using Instance Mix. Set sku.tier to null or omit it. SkuProfileScenarioNotSupported The template includes a property not supported with Instance Mix. Remove unsupported properties such as host groups, capacity reservations, or standby pool settings. Instance Mix gives your operations team a practical way to make scale sets more flexible. By defining several compatible VM sizes and selecting the right allocation strategy, you can improve scale-out success, give Azure more capacity choices, and better align VM allocation with cost or reservation goals. For most production workloads, start with similar VM sizes, verify regional availability and quota, use Flexible orchestration mode, and test scale-out behavior before relying on the configuration in a critical environment. Further reading on Microsoft Learn: Use multiple Virtual Machine sizes with instance mix Create a scale set using instance mix Orchestration modes for Virtual Machine Scale Sets Update instance mix settings on an existing scale set Instance Mix FAQ and troubleshooting318Views0likes0CommentsStep-by-step: Integrate Ollama Web UI to use Azure Open AI API with LiteLLM Proxy
Introductions Ollama WebUI is a streamlined interface for deploying and interacting with open-source large language models (LLMs) like Llama 3 and Mistral, enabling users to manage models, test them via a ChatGPT-like chat environment, and integrate them into applications through Ollama’s local API. While it excels for self-hosted models on platforms like Azure VMs, it does not natively support Azure OpenAI API endpoints—OpenAI’s proprietary models (e.g., GPT-4) remain accessible only through OpenAI’s managed API. However, tools like LiteLLM bridge this gap, allowing developers to combine Ollama-hosted models with OpenAI’s API in hybrid workflows, while maintaining compliance and cost-efficiency. This setup empowers users to leverage both self-managed open-source models and cloud-based AI services. Problem Statement As of February 2025, Ollama WebUI, still do not support Azure Open AI API. The Ollama Web UI only support self-hosted Ollama API and managed OpenAI API service (PaaS). This will be an issue if users want to use Open AI models they already deployed on Azure AI Foundry. Objective To integrate Azure OpenAI API via LiteLLM proxy into with Ollama Web UI. LiteLLM translates Azure AI API requests into OpenAI-style requests on Ollama Web UI allowing users to use OpenAI models deployed on Azure AI Foundry. If you haven’t hosted Ollama WebUI already, follow my other step-by-step guide to host Ollama WebUI on Azure. Proceed to the next step if you have Ollama WebUI deployed already. Step 1: Deploy OpenAI models on Azure Foundry. If you haven’t created an Azure AI Hub already, search for Azure AI Foundry on Azure, and click on the “+ Create” button > Hub. Fill out all the empty fields with the appropriate configuration and click on “Create”. After the Azure AI Hub is successfully deployed, click on the deployed resources and launch the Azure AI Foundry service. To deploy new models on Azure AI Foundry, find the “Models + Endpoints” section on the left hand side and click on “+ Deploy Model” button > “Deploy base model” A popup will appear, and you can choose which models to deploy on Azure AI Foundry. Please note that the o-series models are only available to select customers at the moment. You can request access to the o-series models by completing this request access form, and wait until Microsoft approves the access request. Click on “Confirm” and another popup will emerge. Now name the deployment and click on “Deploy” to deploy the model. Wait a few moments for the model to deploy. Once it successfully deployed, please save the “Target URI” and the API Key. Step 2: Deploy LiteLLM Proxy via Docker Container Before pulling the LiteLLM Image into the host environment, create a file named “litellm_config.yaml” and list down the models you deployed on Azure AI Foundry, along with the API endpoints and keys. Replace "API_Endpoint" and "API_Key" with “Target URI” and “Key” found from Azure AI Foundry respectively. Template for the “litellm_config.yaml” file. model_list: - model_name: [model_name] litellm_params: model: azure/[model_name_on_azure] api_base: "[API_ENDPOINT/Target_URI]" api_key: "[API_Key]" api_version: "[API_Version]" Tips: You can find the API version info at the end of the Target URI of the model's endpoint: Sample Endpoint - https://example.openai.azure.com/openai/deployments/o1-mini/chat/completions?api-version=2024-08-01-preview Run the docker command below to start LiteLLM Proxy with the correct settings: docker run -d \ -v $(pwd)/litellm_config.yaml:/app/config.yaml \ -p 4000:4000 \ --name litellm-proxy-v1 \ --restart always \ ghcr.io/berriai/litellm:main-latest \ --config /app/config.yaml --detailed_debug Make sure to run the docker command inside the directory where you created the “litellm_config.yaml” file just now. The port used to listen for LiteLLM Proxy traffic is port 4000. Now that LiteLLM proxy had been deployed on port 4000, lets change the OpenAI API settings on Ollama WebUI. Navigate to Ollama WebUI’s Admin Panel settings > Settings > Connections > Under the OpenAI API section, write http://127.0.0.1:4000 as the API endpoint and set any key (You must write anything to make it work!). Click on “Save” button to reflect the changes. Refresh the browser and you should be able to see the AI models deployed on the Azure AI Foundry listed in the Ollama WebUI. Now let’s test the chat completion + Web Search capability using the "o1-mini" model on Ollama WebUI. Conclusion Hosting Ollama WebUI on an Azure VM and integrating it with OpenAI’s API via LiteLLM offers a powerful, flexible approach to AI deployment, combining the cost-efficiency of open-source models with the advanced capabilities of managed cloud services. While Ollama itself doesn’t support Azure OpenAI endpoints, the hybrid architecture empowers IT teams to balance data privacy (via self-hosted models on Azure AI Foundry) and cutting-edge performance (using Azure OpenAI API), all within Azure’s scalable ecosystem. This guide covers every step required to deploy your OpenAI models on Azure AI Foundry, set up the required resources, deploy LiteLLM Proxy on your host machine and configure Ollama WebUI to support Azure AI endpoints. You can test and improve your AI model even more with the Ollama WebUI interface with Web Search, Text-to-Image Generation, etc. all in one place.12KViews1like4Comments
Automatic scaling with Azure Virtual Machine Scale Sets flexible orchestration mode
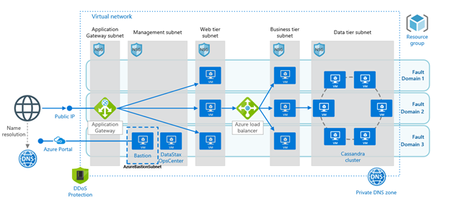
At Ignite March 2021, we announced the Public Preview of Azure Virtual Machine Scale Sets with flexible orchestration mode, an evolution of Azure Virtual Machine Scale sets that makes it easier to run a variety of virtual machine workloads at high scale with high availability. We are excited to announce we are adding additional functionality to the VMSS Flexible Orchestration preview: Automatic scaling Flexible orchestration mode now allows you to scale your virtual machine application out or in manually, automatically based on metrics, or according to a schedule. Like the traditional VMSS in Uniform Orchestration Mode, you specify a virtual machine profile or template for virtual machine instances: VM size, networking configuration, data disks, etc, and the number of instances you would like. Once the profile is defined, the scale set will automatically create the number of instances you request or remove instances and associated NICs and disks. VMSS provides many options to help you scale out based on your application needs: Scale up to 1000 instances in the scale set Specify instances should be placed in a particular zone Spread across multiple fault domains Automatically scale based on metrics such as aggregate CPU load, disk throughput, memory usage, etc Use Spot or on demand priority Automatically remove NICs and Disks when deleting the VM instances When application demand goes down or you need fewer instances for your application, you can save cost by scaling and reducing the number of instances in your scale set. Faster, more reliable deployments VMSS Flexible Orchestration mode is built on our next generation datacenter deployment technologies, enabling more reliable deployment success, more consistent deployment times, and faster, more reliable scale out and scale in operations. Maintain application health with Application Monitoring and Automatic Instance Repair You can install the Application Health Extension on each instance to allow your application to report application specific health metrics to Azure. Azure can automatically remove and replace instances with unhealthy application state. Safely remove instances with Terminate Notification Your application can receive an instance termination notice and set a predefined delay to the terminate operation, allowing your application to perform any clean up activities or end of life workflow before the instance is deleted. Application aware In Guest Security Patching Orchestration Automatic VM guest patching for virtual machines helps ease update management by safely and automatically patching virtual machines to maintain security compliance. With automatic VM guest patching enabled, the VM is assessed periodically to determine the applicable patches for that VM. Updates classified as 'Critical' or 'Security' are automatically downloaded and applied on the VM during off-peak hours. Patch orchestration is managed by Azure and patches are applied following availability-first principles. Improve network security with explicit outbound connectivity Historically, Azure VMs are assigned a default outbound IP address, enabling outbound connectivity from the VM to the internet (default outbound access). There are several disadvantages of this default outbound access IP including inability to lock down access via network security groups, and SNAT port exhaustion. In order to support modern best practices based on the secure by default approach in zero trust network security, VM instances created with VMSS Flexible Orchestration will not have the default outbound access IP associated with it. VMSS Flexible Orchestration will require that you specify an explicit outbound connectivity method, for example: Associate a NAT Gateway to the subnet where the instances reside Associate a Standard Load balancer with Outbound Rules configured Associate a Public IP with the VM Network Interface Only VMs created implicitly by the VMSS scaling engine will be secure by default with no implicit IP. VMs associated with an Availability Set or VMSS Uniform Orchestration mode, or standalone VMs that are later added to a VMSS Flex will still have the default outbound access and implicit IP address enabled. If you are building new workloads for VMSS Flexible Orchestration, or migrating existing workloads to VMSS Flexible orchestration, you may need to review network configuration to ensure connectivity to external services, including: Windows Activation Key Management Service Establish Private Link to required Azure services like Storage accounts, Azure Key Vault, etc. Custom scripts that require access to external URIs, Azure Active Directory Domain jon, etc Windows Update service For more information, refer to Default Outbound Access Support for Azure Backup and Azure Site Recovery We have extended support for VM management service like Azure Backup and Azure Site Recovery to VMSS Flexible Orchestraton mode. Example: N-Tier Application with VMSS Flexible Orchestration Let’s look at a how you can use VMSS Flexible Orchestration mode to simplify a traditional N-Tier Application virtual machine architecture. Adapted from Azure Architecture Center: N-Tier application with Apache Cassandra Traditionally this application architecture requires that you managed each of the 14 VMs individually; you are responsible for monitoring each instance, performing all security patching and ensuring application update. Furthermore, if demand for your application grows or shrinks, you would have to manually create additional instances at the web and/or business tier to handle additional traffic. You can simplify deployment and management of this architecture by using a VMSS with Flexible Orchestration at each application tier, and rely on VMSS platform features to assist with monitoring and management tasks. Data-tier – As this database workload tends to be stateful and requiring that instances are spread across multiple racks or partitions, you can specify a VMSS Flexible Orchestration to spread virtual machines across fault domains Business-tier – Middle tier of the application is often stateless, so you may be able to specify VMSS Flexible with maximum spreading (allow Azure to manage spreading…no particular quorum requirement). You could take advantage of Automatic Instance Repair to monitor if application instances are reporting healthy, and automatically replacing unhealthy instances with new, healthy instances. Web tier – This also tends to be a stateless tier, and is most susceptible to dynamic changes in traffic. You can specify autoscaling rules to automatically increase or decrease the number of instances based on a schedule, or metrics based rules. You can help optimize costs by mixing demand types; adding 2-3 instance at full, on-demand pricing, and specifying auto scale rules to scale out with less-expensive Spot instances. Sample templates: vm-scale-sets/vmss-flex-n-tier-demo at master · Azure/vm-scale-sets (github.com) Looking toward General Availability and beyond We are excited to share this first step in our journey to combine Azure Virtual Machines, Availability Sets, and VMSS into a single, integrated offering in VMSS Flexible Orchestration. On the way to general availability, we expect to continue to improve the parity between VMSS Uniform and VMSS Flexible Orchestration. One feature we plan to add next is the ability to specify multi-zone deployments, so you can automatically spread instances across multiple availability zones. We also look forward to bring more API parity between VMSS Uniform and Flex for batch instance operations, support for all VM sizes, as well as VMSS orchestrations like Scale in Policy, and Instance Protection. We look forward to hearing your feedback and stories, so we can continue to help you build the applications and services for your organization. Resources to get you started Virtual Machine Scale Sets Learn how to deploy and manage VMSS Flex9KViews2likes0CommentsA little PS script for getting VM and VMSS member status
I wrote this simple PS script to see the status of our VMs and VMSS members, as I wished to monitor infrastructure with an eye to costs. The VMSS bit took me a while, probably because I'm not very bright, but I thought the construction might help others who need to do tasks on each member of a scale set. YMMV # Login-AzureRMAccount # Uncomment above to log in # add a Object to collect output $outObj = New-Object PSObject # What is your TenantID $tenantId = "your tenant ID in here" # First get a list of subscriptions in this tenant $subList = Get-AzureRmSubscription -TenantId $tenantId # Then write it to the screen in yellow Write-Host -ForegroundColor Yellow $subList.name foreach ($subName in $subList.name) { # Write each sub as we work on it below the yellow name in Green Write-Host -NoNewline -ForegroundColor Green $subName "" # Below is an odd construction # I find that if you use Select-AzureRmSubscription with a string subName # it does not always work, mostly but not always # the method below always has worked for me YMMV $subObj = Get-AzureRmSubscription -SubscriptionName $subName $subTmp = Select-AzureRmSubscription -SubscriptionId $subObj # Get list of Resource Groups $rgList = Get-AzureRmResourceGroup foreach ($rgName in $rgList.ResourceGroupName) # In each RG first get the VMSSs then the VMs { # The below logic will be useful for any thing you need to do on each member of a scale set $vmssList = Get-AzureRmVmss -ResourceGroupName $rgName foreach ($vmssName in $vmssList.Name) { $vmssObj = Get-AzureRmVMssVM -InstanceView -Name $vmssName -ResourceGroupName $rgName foreach ($instCount in $vmssObj.InstanceID) # if you want to use this logic for another task on each member of a scale set # then replace what is between {} with your tasks {$vmssTmp = Get-AzureRmVmssVM -InstanceView -InstanceId $instCount -ResourceGroupName $rgName -VMScaleSetName $vmssName $outTmp = $vmssName + "_" + $instCount + "." + $rgName + "." + $subName $outObj | Add-Member $outTmp $vmssTmp.Statuses[1].DisplayStatus } } $vmList = Get-AzureRmVM -ResourceGroupName $rgName foreach ($vmName in $vmList.Name) { $vmObj = Get-AzureRmVM -Name $vmName -ResourceGroupName $rgName -Status $outTmp = $vmObj.Name + "." + $rgName + "." + $subName $outObj | Add-Member $outTmp $vmObj.Statuses[1].DisplayStatus } } } Write-Host # Write-Host for the New line $outObj # Output the list1.4KViews0likes0Comments