static web apps
61 TopicsInside the architecture: How connectors work with Azure Functions
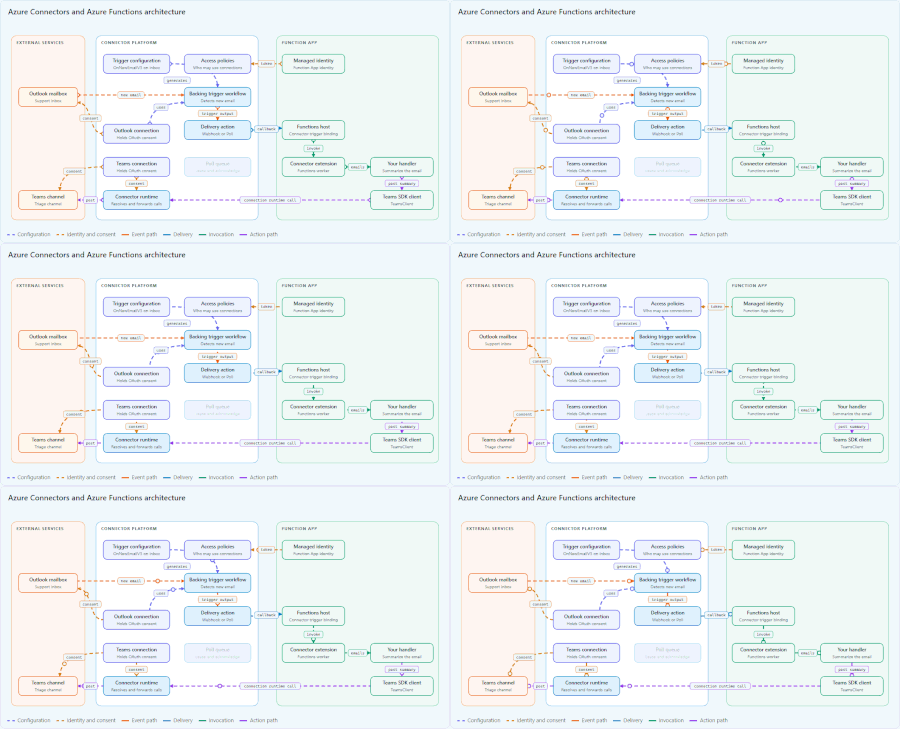
Say you run a shared support inbox. Each time a customer writes in, you want a function to read the email, pick out the important parts, and post a summary in your team's Teams channel. The business logic might be twenty lines. The rest is authorization, change detection, event delivery, and a second set of permissions to post in Teams, and you rebuild most of it for every service you touch. Azure Connectors and the Connector SDKs take that work on. The platform manages connections and authorization. The same app can react to events in one service and call operations in another. Webhook and poll delivery give you push or pull, so you can pick what fits your app. One SDK per language covers the Connector catalog with typed operations and payloads, VS Code tooling handles setup, and SDKs are available for .NET, Python, and Node.js from day one. Underneath those promises are a handful of pieces we built and a few decisions about where each one stops. The support inbox runs through all of them. Follow that one email from Outlook to Teams, and you'll know exactly how to wire up the next hundred integrations yourself. Starting from what Azure already has Azure already runs more than 1,600+ managed Connectors to services like Salesforce, SAP, SQL Server etc. They power Azure Logic Apps and Power Automate, and API Hub hosts their connections, OAuth consent, and runtime. Logic Apps already knows how to run Connector triggers, whether the source sends notifications, accepts a webhook subscription, or has to be polled. So we didn't write a second integration for each service. We built a new front door to the existing Connector runtime, one that application code can use directly, and added the glue Azure Functions needs on top. Most of the new work falls into four areas: A control plane, the Connector Namespace, that exposes connections, access policies, and trigger configurations as Azure resources. A runtime layer that proxies SDK calls into API Hub and turns trigger configurations into system-managed workflows with a delivery step at the end. A Functions Connector extension, with host and worker pieces, that receives events by webhook or by polling and feeds the Functions scale controller. One code generator that emits typed SDKs for .NET, Python, and Node.js from live Connector metadata, plus tooling that sets everything up. The control plane: Connector Namespace A Connector Namespace is an Azure Resource Manager resource of type Microsoft.Web/connectorGateways. Under it sit three child resource types: connections, connection access policies, and trigger configurations. Because they're ARM resources, you can create them with Bicep, the CLI, or the VS Code tooling, and they get the usual Azure role-based access control and lifecycle. A connection is the application-facing name for a backing API Hub connection, the same kind Logic Apps uses. The consent you grant for Outlook lives there. An access policy lists the Microsoft Entra identities, such as a Function App's managed identity, that may use a connection. That split means the identity that calls the connection and the account that consented to the mailbox are separate, and you can change one without touching the other. Authorize the connections: the Function App's managed identity presents a token to the access policies, and the Outlook and Teams connections hold OAuth consent for their accounts A trigger configuration describes an event source. Its properties include the connection, the Connector operation (for the support inbox, OnNewEmail), the operation's parameters, optional trigger conditions and settings, and a delivery mode. For webhook delivery it carries the callback details; for poll delivery the service fills in the polling endpoints. Each namespace also gets a stable host name, and a background job repairs its DNS record if it drifts. The action path: a proxy into API Hub When your handler posts the summary to Teams, the generated SDK client sends an HTTPS request to the connection's runtime URL. On the platform side that URL maps to `api/connectorGateways/{gateway}/connections/{connection}/runtime`, followed by the operation's own path. Behind that route, the runtime processor handles each request in four steps: It resolves the application-facing connection to its backing API Hub connection and environment, in the namespace's scale unit. It builds the API Hub runtime URL and checks that the requested path stays inside that connection, so a caller can't reach a different connection by rewriting the path. It strips identity headers supplied by the caller and attaches a platform service token, plus headers that pass the caller's managed identity through. It forwards the method, path, query, and body to API Hub, which runs the Connector operation against Teams. The caller authenticates with a Microsoft Entra token for the API Hub audience. In the Node.js SDK the default scope is `https://apihub.azure.com/.default`, and the token comes from any Azure Identity TokenCredential, typically the Function App's managed identity. The SDK side is thin on purpose. Generated clients extend a shared base class that holds the runtime URL and credential. A shared HTTP pipeline built on Azure Core adds the token, a user agent, tracing, and retries. Retries apply by default only to safe methods such as `GET` and `HEAD`, because retrying a `POST` that sends a message could send it twice. Paged operations follow `nextLink` values. When a continuation link points at a different host, as some Connector back ends return, the SDK reroutes its path and query through the connection's runtime URL, so paging stays behind the proxy. Failures surface as a ConnectorExceptions that carries the Connector name, the operation, the status code, and the response body. The trigger path: system-managed workflows When you create a trigger configuration, the trigger API validates the request, generates a Logic Apps workflow definition, creates the workflow directly in a platform-owned subscription under a generated name, and stores the workflow details alongside the trigger configuration. Updates rewrite the workflow, and deleting the trigger configuration removes the workflow, its poll queue, and its message history. The workflow generator picks the right trigger shape for the operation's metadata: a notification subscription, a webhook subscription, or a recurring poll. It adds `splitOn` for operations that return batches, so each item becomes its own run unless the configuration opts out, and it applies any trigger conditions you set. The workflow ends with a Connector delivery action. We generate a workflow per trigger configuration because Logic Apps already has years of hardening around subscription renewal, polling state, and trigger history, and every Connector trigger already runs on it. The workflow stays an implementation detail: customers work with the trigger configuration resource and never see or edit the workflow. Two ways to deliver an event How the platform notices a new email and how the event reaches your function are separate problems. The backing workflow handles the first. The delivery action at the end of the workflow handles the second, and it supports two transports. Webhook delivery For webhook delivery, which is the default, the delivery action makes an HTTPS call to the callback in the trigger configuration, using the workflow engine's HTTP retry policy. On the Function App side, the callback is the host's `/runtime/webhooks/connector` route, protected by a system key named `connector_extension`. A `functionName` query parameter selects the function. The host returns `202` when the invocation succeeds, `400` for a missing or invalid name, `404` for an unknown function, and `500` when the invocation fails. Poll delivery For poll delivery, the delivery action writes the event to an Azure Storage queue owned by that trigger configuration and records it in a message history table. Storage queue messages are limited to 64 KB, so when an event is larger the action queues a reference to the workflow run's output instead of the output itself. The poll runtime API sits in front of the queue and has four operations: `receive`, `acknowledge`, `hasMessages`, and `approximateQueueDepth`. `receive` hands out events under a temporary lease with an opaque lock token. `acknowledge` deletes an event only when the message ID and a still-valid lock token match. If the lease expires first, the event becomes visible again. The reported depth is approximate and excludes leased messages. Deliver the event by Poll: the delivery action enqueues the event, and the Functions host receives and acknowledges it from the Poll queue Poll delivery means the Function App never exposes an inbound endpoint, and work can build up safely when the app is busy, scaled to zero, or running on a developer's laptop. Inside Azure Functions: the connector extension The Functions side has two layers. A host extension, written as a WebJobs extension, owns transport and scaling. A worker extension for each language turns payloads into typed objects for your handler. The host extension The host extension registers a connectorTrigger binding. Each function picks webhook or poll delivery, and the binding starts the matching listener. Backoff: an empty queue backs off with jitter, up to a configurable maximum interval; receive failures get their own capped backoff. Auth: the listener authenticates to the polling endpoint with the connection's credential, usually the Function App's managed identity. Concurrency: a function that takes one event at a time can run several invocations in parallel, up to `MaxConcurrentCalls`. A batched function processes one batch at a time per listener. Acknowledgment: an event is acknowledged only after its invocation succeeds; a failed invocation leaves it unacknowledged so it comes back when the lease expires. Large outputs: when an event holds a link to a large output, the listener downloads it, with a 100 MB default cap. Poll delivery also plugs into Azure Functions target-based scaling: The Connector trigger reports how much work is waiting by reading the queue's approximate depth through the same poll runtime API. Azure Functions does the scaling, aiming for `ceil(depth / target)` instances. The target is the function's pending-event threshold, or the per-instance concurrency that the platform supplies when it has one. Batch size and concurrency don't change that calculation. Batching therefore happens in several places. The source trigger can return a collection, `splitOn` can split it into separate runs, and the poll listener can deliver several events to one invocation. The batch settings have the same meaning in every language: Setting .NET isolated Python Node.js Receive several events per invocation IsBatched = true cardinality=func.Cardinality.MANY cardinality: Cardinality.Many Maximum events per invocation MaxBatchSize max_batch_size maxBatchSize Concurrent single-event calls MaxConcurrentCalls max_concurrent_calls maxConcurrentCalls Pending events per instance, for scaling TargetPendingEventThreshold target_pending_event_threshold targetPendingEventThreshold The batch size can be 1 through 32 and defaults to 1. The worker extensions Because the host extension does the transport work, each language worker only has to bind payloads. The .NET isolated worker extension deserializes the payload into the type your function declares, such as a generated Office365OnNewEmailTriggerPayload, or into `ConnectorEvent<T>[]` when you also want each poll message ID. Python functions use the connector_trigger decorator from the azure-functions library. Other workers reach the same host extension through the Functions extension bundle and the connectorTrigger binding type. The Node.js extension shows how thin this layer is. One generic wrapper registers the trigger and flattens every payload shape (a single item, a collection in `body.value`, or an array of poll envelopes) into one list of items, keeping the original in `rawPayload`. Each Connector's helper is then a few lines that add a friendly alias and borrow the item type from the generated SDK. This is the whole OneDrive for Business file: import { BlobMetadata } from "@azure/connectors/generated/OneDriveForBusinessExtensions"; import { OneDriveFileTriggerContext } from "../../types"; import { createConnectorTrigger } from "./createConnectorTrigger"; const registerFileTrigger = createConnectorTrigger<BlobMetadata, OneDriveFileTriggerContext>( (context) => ({ ...context, files: context.items }), ); export const onNewFiles = registerFileTrigger; export const onUpdatedFiles = registerFileTrigger; `BlobMetadata` comes from the same generated module that the OneDrive client uses for actions, so a trigger payload and an action response share one type, defined once from the connector's metadata. Calling out from the handler After reading the email, the handler posts a summary to Teams. That call leaves the Function App through the same Connector platform, going the other way. The handler calls a generated Teams client with typed input. The client holds the Teams connection's runtime URL and an Azure Identity credential, gets a Microsoft Entra token, usually for the Function App's managed identity, and sends the request. The Function App never holds a Teams token or secret. The connection's access policies decide whether that identity may use the Teams connection, and the connection holds the OAuth consent for the account that posts. The Connector runtime resolves the connection, replaces the caller's identity headers with a platform token, and runs the operation against Teams. This path doesn't depend on how the email arrived, so it works the same with webhook or poll delivery and with any Connector in the catalog. Idempotency is the handler's job. The SDK won't retry a failed post, but a redelivered event runs the whole invocation again, so the handler should check before posting the same summary twice. One generator, three SDKs The SDKs are generated. A shared generator, `CodefulSdkGenerator`, reads live Connector Swagger definitions through Azure Resource Manager, cleans them up, and emits clients for C#, Python, and TypeScript. Each SDK repository records what produced it in a generation manifest: the generator commits, the metadata API version, and a hash of every Connector's Swagger input. That makes each regeneration traceable to a specific generator revision and a specific set of Connector definitions. Besides action methods, the generator emits models for request and response bodies, typed trigger payloads and trigger operation constants, catalog constants that list the available Connectors, and support for paging and dynamic schemas. Each language then has a small handwritten runtime (the base client, the HTTP pipeline, errors, and paging) that the generated code builds on. Naming rules are kept consistent across languages, so the same Connector and operation have recognizable names whether you write C#, Python, or TypeScript. For setup, the VS Code connection manager and the connection-setup skill create the namespace and connection through the ARM preview API, open the OAuth consent page and check that the connection reports `Connected`, add access policies for your developer identity or the Function App's managed identity, and write the runtime URLs into local or deployed app settings. Recap When a customer writes in, the backing workflow detects the email through API Hub's existing Connector trigger. The delivery action then either calls the Function App's webhook or writes to a per-trigger storage queue that the host extension polls and scales on. The language worker binds the payload to a type that came from the same generator as the SDK, and the handler uses a generated Teams client whose calls go through the namespace's runtime proxy into API Hub. Each piece reuses what was already there: the Logic Apps workflow engine for triggers, API Hub for connections and Connector runtime, the Functions extension model and scale controller for hosting, and Azure Identity for credentials. The new parts are the namespace resources that tie them together, the delivery step, the Functions extension, and the generator that keeps every language's types in step with the Connectors themselves. References Connectors SDKs Language Repository .NET Azure/Connectors-NET-SDK Python Azure/Connectors-Python-SDK Node.js Azure/Connectors-NodeJS-SDK Azure Functions connector extensions Component Repository Host extension and .NET isolated worker extension Azure/azure-functions-connector-extension Python worker extension azurefunctions-extensions-connectors Node.js worker extension azure-functions-nodejs-extensions-connectors Samples Sample Repository .NET email triage into Teams Azure-Samples/functions-connectors-net-e2e-email-users-teams .NET connector samples Azure/Connectors-NET-samples Python connector samples Azure-Samples/functions-connectors-python TypeScript connector samples Azure-Samples/functions-connectors-typescript Note: The connector platform internals described in the post (the resource model, runtime proxy, trigger workflows, delivery action, and Poll runtime API) aren't in a public repository, so they have no links here.104Views1like0CommentsAuditing and Telemetry for the Agent Governance Toolkit - Getting Started with .NET Core
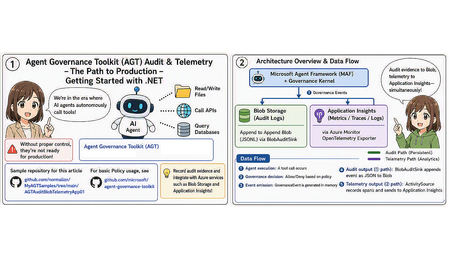
We've entered an era where AI agents autonomously invoke tools — reading and writing files, calling APIs, querying databases. Convenient as this is, without a mechanism to control who can call what, and under what conditions, you can't put it into production. The Agent Governance Toolkit (AGT), open-sourced by Microsoft, is exactly the toolkit for embedding that "gatekeeper" into AI agents. This article walks through getting started with AGT in .NET (C#), based on the following GitHub repository sample.810Views5likes0CommentsExplaining what GitHub Copilot Modernization can (and cannot do)
In the last post, we looked at the workflow: assess, plan, execute. You get reports you can review and the agent makes changes you can inspect. If you don’t know, GitHub Copilot Modernization is the new agentic tool that supports you to in modernizing older applications. Could it support you with that old 4.8 Framework app, even that forgotten VB.NET script? You're probably not modernizing one small app. It is probably a handful of projects, each with its own stack of blockers. Different frameworks, different databases, different dependencies frozen in time because nobody wants to touch them. GitHub Copilot modernization handles two big categories: upgrading .NET projects to newer versions and migrating .NET apps to Azure. But what does that look like? Upgrading .NET Projects Let’s say, you've got an ASP.NET app running on .NET Framework 4.8 or it's a web API stuck on .NET Core 3.1. Unfortunately, getting it to .NET 9 or 10 isn't just updating a target framework property. Here's what the upgrade workflow handles in Visual Studio: Assessment first. - The agent examines your project structure, dependencies, and code patterns. It generates an Assessment Report, which shows both the app information, to create the plan, and shows what it needs to do and update. Then planning. - Once you approve the assessment, it moves to planning. Here you get upgrade strategies, refactoring approaches, dependency upgrade paths, and risk mitigations documented in a plan.md file at .appmod/.migration, you can check and edit that Markdown before moving forward or ask in the Copilot Chat window to change it. # .NET 10.0 Upgrade Plan ## Execution Steps Execute steps below sequentially one by one in the order they are listed. 1. Validate that a .NET 10.0 SDK required for this upgrade is installed on the machine and if not, help to get it installed. 2. Ensure that the SDK version specified in global.json files is compatible with the .NET 10.0 upgrade. 3. Upgrade src\eShopLite.StoreFx\eShopLite.StoreFx.csproj ## Settings This section contains settings and data used by execution steps. ### Excluded projects No projects are excluded from this upgrade. ### Aggregate NuGet packages modifications across all projects NuGet packages used across all selected projects or their dependencies that need version update in projects that reference them Then execution. - After you approve the plan, and the agent breaks it into discrete tasks in a tasks.md file. Each task gets validation criteria. As it works, it updates the file with checkboxes and completion percentages so you can track progress. It makes code changes, verifies builds, runs tests. If it hits a problem, it tries to identify the cause and apply a fix. Go to the GitHub Copilot Chat window and type: The plan and progress tracker look good to me. Go ahead with the migration. It usually creates Git commits for each portion so you can review what changed or roll back if you need to. In case you don’t have a need for the Git commits for the change, you can ask the agent at the start to not commit anything. The agent primarily focuses on ASP.NET, ASP.NET Core, Blazor, Razor Pages, MVC, and Web API. It can also handle Azure Functions, WPF, Windows Forms, console apps, class libraries, and test projects. What It Handles Well (and What It Doesn't) The agent is good at code-level transformations: updating TargetFramework in .csproj files, upgrading NuGet packages, replacing deprecated APIs with their modern equivalents, fixing breaking changes like removed BinaryFormatter methods, running builds, and validating test suites. It can handle repetitive work across multiple projects in a solution without you needing to track every dependency manually. It's also solid at applying predefined Azure migration patterns, swapping plaintext credentials for managed identity, replacing file I/O with Azure Blob Storage calls, moving authentication from on-prem Active Directory to Microsoft Entra ID. These are structured transformations with clear before-and-after code patterns. But here's where you may need to pay closer attention: Language and framework coverage: It works with C# projects mainly. If your codebase includes complex Entity Framework migrations that rely on hand-tuned database scripts, the agent won't rewrite those for you. It also won't handle third-party UI framework patterns that don't map cleanly to ASP.NET Core conventions that have breaking changes between .NET Framework and later .NET versions. Web Forms migration is underway. Configuration and infrastructure: The agent doesn't migrate IIS-specific web.config settings that don't have direct equivalents in Kestrel or ASP.NET Core. It won't automatically set up a CI/CD pipeline or any modernization features; for that, you need to implement it with Copilot’s help. If you've got frontend frameworks bundled with ASP.NET (like an older Angular app served through MVC), you'll need to separate and upgrade that layer yourself. Learning and memory: The agent uses your code as context during the session, and if you correct a fix or update the plan, it tries to apply that learning within the same session. But those corrections don't persist across future upgrades. You can encode internal standards using custom skills, but that requires deliberate setup. Offline and deployment: There's no offline mode. The agent needs connectivity to run. And while it can help prepare your app for Azure deployment, it doesn't manage the actual infrastructure provisioning or ongoing operations, that's still on you. Guarantees: The suggestions aren't guaranteed to follow best practices. The agent won't always pick the best migration path. It won't catch every edge case. You're reviewing the work; pay attention to the results before putting it into production. What it does handle: the tedious parts. Reading dependency graphs. Finding all the places a deprecated API is used. Updating project files. Writing boilerplate for managed identity. Fixing compilation errors that follow a predictable pattern. Where to Start If you've been staring at a modernization backlog, pick one project. See what it comes up with! You don't have to commit to upgrading your entire portfolio. Try it on one project and see if it saves you time. Modernization at scale still happens application by application, repo by repo, and decision by decision. GitHub Copilot modernization just makes each one a little less painful. Experiment with it!1.6KViews0likes0CommentsMCP Apps on Azure Functions: Quick Start with TypeScript
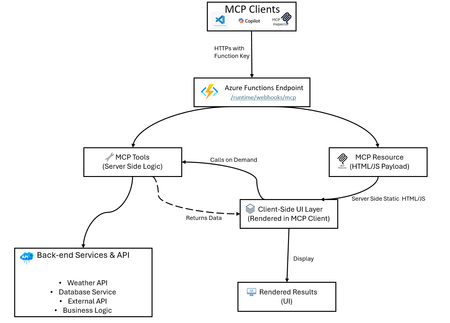
Azure Functions makes hosting MCP apps simple: build locally, create a secure endpoint, and deploy fast with Azure Developer CLI (azd). This guide shows you how using a weather app example. What Are MCP Apps? MCP Apps let MCP servers return interactive HTML interfaces such as data visualizations, forms, dashboards that render directly inside MCP-compatible hosts (Visual Studio Code Copilot, Claude, ChatGPT, etc.). Learn more about MCP Apps in the official documentation. Having an interactive UI removes many restrictions that plain texts have, such as if your scenario has: Interactive Data: Replacing lists with clickable maps or charts for deep exploration. Complex Setup: Use one-page forms instead of long, back-and-forth questioning. Rich Media: Embed native viewers to pan, zoom, or rotate 3D models and documents. Live Updates: Maintain real-time dashboards that refresh without new prompts. Workflow Management: Handle multi-step tasks like approvals with navigation buttons and persistent state. MCP App Hosting as a Feature Azure Functions provides an easy abstraction to help you build MCP servers without having to learn the nitty-gritty of the MCP protocol. When hosting your MCP App on Functions, you get: MCP tools (server logic): Handle client requests, call backend services, return structured data - Azure Functions manages the MCP protocol details for you MCP resources (UI payloads such as app widgets): Serve interactive HTML, JSON documents, or formatted content - just focus on your UI logic Secure HTTPS access: Built-in authentication using Azure Functions keys, plus built-in MCP authentication with OAuth support for enterprise-grade security Easy deployment with Bicep and azd: Infrastructure as Code for reliable deployments Local development: Test and debug locally before deploying Auto-scaling: Azure Functions handles scaling, retries, and monitoring automatically The weather app in this repo is an example of this feature, not the only use case. Architecture Overview Example: The classic Weather App The sample implementation includes: A GetWeather MCP tool that fetches weather by location (calls Open-Meteo geocoding and forecast APIs) A Weather Widget MCP resource that serves interactive HTML/JS code (runs in the client; fetches data via GetWeather tool) A TypeScript service layer that abstracts API calls and data transformation (runs on the server) Bidirectional communication: client-side UI calls server-side tools, receives data, renders locally Local and remote testing flow for MCP clients (via MCP Inspector, VS Code, or custom clients) How UI Rendering Works in MCP Apps In the Weather App example: Azure Functions serves getWeatherWidget as a resource → returns weather-app.ts compiled to HTML/JS Client renders the Weather Widget UI User interacts with the widget or requests are made internally The widget calls the getWeather tool → server processes and returns weather data The widget renders the weather data on the client side This architecture keeps the UI responsive locally while using server-side logic and data on demand. Quick Start Checkout repository: https://github.com/Azure-Samples/remote-mcp-functions-typescript Run locally: npm install npm run build func start Local endpoint: http://0.0.0.0:7071/runtime/webhooks/mcp Deploy to Azure: azd provision azd deploy Remote endpoint: https://.azurewebsites.net/runtime/webhooks/mcp TypeScript MCP Tools Snippet (Get Weather service) In Azure Functions, you define MCP tools using app.mcpTool(). The toolName and description tell clients what this tool does, toolProperties defines the input arguments (like location as a string), and handler points to your function that processes the request. app.mcpTool("getWeather", { toolName: "GetWeather", description: "Returns current weather for a location via Open-Meteo.", toolProperties: { location: arg.string().describe("City name to check weather for") }, handler: getWeather, }); Resource Trigger Snippet (Weather App Hook) MCP resources are defined using app.mcpResource(). The uri is how clients reference this resource, resourceName and description provide metadata, mimeType tells clients what type of content to expect, and handler is your function that returns the actual content (like HTML for a widget). app.mcpResource("getWeatherWidget", { uri: "ui://weather/index.html", resourceName: "Weather Widget", description: "Interactive weather display for MCP Apps", mimeType: "text/html;profile=mcp-app", handler: getWeatherWidget, }); Sample repos and references Complete sample repository with TypeScript implementation: https://github.com/Azure-Samples/remote-mcp-functions-typescript Official MCP extension documentation: https://learn.microsoft.com/azure/azure-functions/functions-bindings-mcp?pivots=programming-language-typescript Java sample: https://github.com/Azure-Samples/remote-mcp-functions-java .NET sample: https://github.com/Azure-Samples/remote-mcp-functions-dotnet Python sample: https://github.com/Azure-Samples/remote-mcp-functions-python MCP Inspector: https://github.com/modelcontextprotocol/inspector Final Takeaway MCP Apps are just MCP servers but they represent a paradigm shift by transforming the AI from a text-based chatbot into a functional interface. Instead of forcing users to navigate complex tasks through back-and-forth conversations, these apps embed interactive UIs and tools directly into the chat, significantly improving the user experience and the usefulness of MCP servers. Azure Functions allows developers to quickly build and host an MCP app by providing an easy abstraction and deployment experience. The platform also provides built-in features to secure and scale your MCP apps, plus a serverless pricing model so you can just focus on the business logic.527Views1like0CommentsA Practical Path Forward for Heroku Customers with Azure
On February 6, 2026, Heroku announced it is moving to a sustaining engineering model focused on stability, security, reliability, and ongoing support. Many customers are now reassessing how their application platforms will support today’s workloads and future innovation. Microsoft is committed to helping customers migrate and modernize applications from platforms like Heroku to Azure.394Views0likes0CommentsAnnouncing Database connections for Azure Static Web Apps with Data API builder
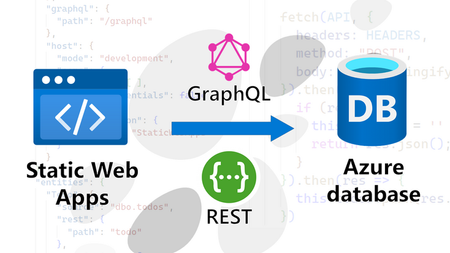
With database connections for Azure Static Web Apps, you can access your Azure database contents directly from your static site, without having to write any backend code. Build your applications faster, while ensuring security and serverless scalability. Free during public preview.8.7KViews3likes1CommentIntroducing the Azure Static Web Apps Skill for GitHub Copilot
From "Built" to "Deployed" in Minutes You've just finished building something great: A marketing landing page for your startup A portfolio site showcasing your work A documentation site for your open-source project An e-commerce storefront built with Next.js An internal dashboard for your team A blog with your latest content Now you want to share it with the world. Azure Static Web Apps offers free hosting, global CDN, custom domains, and built-in auth—but figuring out the deployment workflow can slow you down. The learning curve: "What's the CLI command again? Is it swa-cli or @azure/static-web-apps-cli? Where does staticwebapp.config.json go?" The golden path: "Hey Copilot, deploy my Vite app to Azure Static Web Apps" The skill provides a streamlined, tested workflow—the golden path—so you can focus on your app, not the deployment process. What Are Agent Skills? Agent Skills are self-contained knowledge bundles that enhance GitHub Copilot's capabilities for specialized tasks. They provide a curated, golden path for common workflows: Feature Benefit Curated Commands Exact CLI syntax that works today Guardrails Knows what NOT to do (e.g., never manually create swa-cli.config.json) Troubleshooting Built-in solutions for common errors Framework Awareness Knows Vite uses port 5173, React uses 3000 The Traditional Approach: Learning as You Go Deploying to Azure Static Web Apps is straightforward once you know the workflow, but the learning curve can add time to your first deployment: Typical First-Time Challenges Finding the right tools: Azure has multiple CLI options—the Azure CLI extension (az staticwebapp) for managing resources, and the SWA CLI (@azure/static-web-apps-cli) for local development and deployment. Knowing which to use when takes research. Configuration decisions: Where does staticwebapp.config.json go? Should you use swa init or create configs manually? What's the right build output path for your framework? Framework-specific setup: Different frameworks have different port numbers, build commands, and output directories. Vite uses port 5173, Create React App uses 3000, Next.js has its own conventions. SPA routing: Client-side routing needs navigationFallback configuration—something you might not discover until you see 404 errors in production. Typical First Deployment: 25-45 minutes This time includes reading documentation, trying commands, and troubleshooting configuration. Not wrong—just a learning process that the skill can accelerate. The Golden Path: With the Azure Static Web Apps Skill The skill provides a streamlined workflow that guides you through each step—whether you're deploying a portfolio, marketing site, or enterprise application: Step 1: Install and Initialize (30 seconds) You: "Set up my Vite React app for Azure Static Web Apps" Copilot (with skill): "I'll help you set up SWA for your Vite app: 1. Install the CLI: npm install -D @azure/static-web-apps-cli 2. Initialize (auto-detects Vite framework): npx swa init --yes" Correct package, correct command, framework auto-detected! Step 2: Local Development (15 seconds) You: "Run it locally" Copilot (with skill): "Start the local emulator: npx swa start Open http://localhost:4280 to test." Dev server proxy automatically configured! Step 3: Deploy (30 seconds) You: "Deploy to Azure" Copilot (with skill): "Deploy to production: npx swa login npx swa deploy --env production" Correct commands AND proactive troubleshooting advice! Total Time: Under 3 minutes The skill provides the golden path—tested commands, framework awareness, and proactive guidance. Side-by-Side Comparison Task Learning Curve Golden Path (with Skill) Find correct CLI Research docs Instant guidance Create config Trial and error swa init --yes Local dev setup Framework research Auto-detected Deployment Documentation reading Guided workflow Total Time 25-45 minutes < 3 minutes Confidence Level Learning Guided Understanding Azure Static Web Apps Tooling Azure provides multiple tools for working with Static Web Apps. The skill helps you navigate these options by providing the golden path for each scenario: Two Complementary Tools Tool Purpose Install Command Azure CLI extension (az staticwebapp) Manage Azure resources Built into Azure CLI SWA CLI (swa) Local development, deploying apps npm install -D azure/static-web-apps-cli Both tools serve important purposes, and the skill guides you to the right one for your task. The Skill Provides the Golden Path The skill guides you through: The right tool for your task The recommended workflow: swa init → swa start → swa deploy Framework detection (Vite, React, Vue, Next.js, and more) Best practices like using swa init for configuration What the Skill Knows Best Practices Built In Best Practice Why It Matters Use swa init for configuration Auto-detects framework settings Framework-specific ports Vite uses 5173, React uses 3000, etc. navigationFallback for SPAs Prevents 404s on client-side routes platform.apiRuntime for APIs Required for Azure Functions integration Built-in Troubleshooting Common Issue Skill's Solution 404 on client routes Add navigationFallback API returns 404 Check apiRuntime and function exports Build output not found Verify output_location matches build CORS errors APIs under /api/* are same-origin Installing the Skill There are two ways to install the skill: using GitHub Copilot CLI (recommended) or manually adding the skill file. Option 1: GitHub Copilot CLI (Recommended) The fastest way to get started is using the Copilot CLI plugin system: # Add the repo as a plugin marketplace /plugin marketplace add microsoft/github-copilot-for-azure # Install the Azure plugin (includes Static Web Apps skill) /plugin install azure@github-copilot-for-azure # Update the plugin when changes are made /plugin update azure@github-copilot-for-azure Option 2: Manual Installation If you prefer to install the skill manually: 1. Create the Skill Folder your-project/ └── skills/ └── azure-static-web-apps/ └── SKILL.md 2. Copy the Skill Content The skill file contains: Overview of Azure Static Web Apps capabilities Installation commands with verification Configuration guidance for both config files Command reference for all SWA CLI commands Scenarios for common workflows Troubleshooting for common issues Get the skill: github.com/github/awesome-copilot Try It Yourself Prompt What Copilot Does "Deploy my React app to SWA" Full workflow: install → init → build → deploy "Add authentication to my routes" Configures staticwebapp.config.json with auth rules "Set up GitHub Actions for SWA" Generates complete CI/CD workflow "Why am I getting 404 on /dashboard" Identifies missing navigationFallback "Add an API backend" Creates Azure Functions with correct runtime config Key Takeaways Time Savings: What takes 30-45 minutes now takes under 3 minutes with guided, accurate commands Best Practices: The skill encodes best practices—guiding you through the recommended workflow Curated Guidance: Skills contain curated, tested commands for the golden path deployment Context-Aware: Framework-specific knowledge means less configuration guessing Learn More Agent Skills Specification: agentskills.io/specification Azure Static Web Apps Docs: learn.microsoft.com/azure/static-web-apps SWA CLI Reference: azure.github.io/static-web-apps-cli More Skills: github.com/github/awesome-copilot Have you tried Agent Skills? Share your experience deploying to Azure Static Web Apps in the comments!1.3KViews0likes0Comments
Building a TOTP Authenticator App on Azure Functions and Azure Key Vault
Two-factor authentication (2FA) has become a cornerstone of modern digital security, serving as a crucial defense against unauthorized access and account compromises. While many organizations rely on popular authenticator apps like Microsoft Authenticator, there's significant value in understanding how to build and customize your own TOTP (Time-based One-Time Password) solution. This becomes particularly relevant for those requiring specific customizations, enhanced security controls, or seamless integration with existing systems. In this blog, I'll walk through building a TOTP authenticator application using Azure's modern cloud services. Our solution demonstrates using Azure Functions for server-side operations with Azure Key Vault for secrets management. A bonus section covers integrating with Azure Static Web Apps for the frontend. The solution supports the standard TOTP protocol (RFC 6238), ensuring compatibility with services like GitHub and Microsoft's own authentication systems. While this implementation serves as a proof of concept rather than a production-ready system, it provides a solid foundation for understanding how authenticator apps work under the hood. By walking through the core components - from secret management to token generation - it will share valuable insights into both authentication systems and cloud architecture. This knowledge proves especially valuable for teams considering building custom authentication solutions or those looking to better understand the security principles behind 2FA. Understanding TOTP Time-based One-Time Password (TOTP) is an algorithm that generates temporary passwords based on a shared secret key and the current time. The foundation of TOTP lies in its use of a shared secret key. When a user first enables 2FA with a service like GitHub, a unique secret key is generated. This key is then encoded into a QR code that the user scans with their authenticator app. This initial exchange of the secret is the only time it's transmitted between the service and the authenticator. For example, a service will provide a QR code that looks like this: On decoding that, we see that the text encoded within this QR code is: otpauth://totp/Test%20Token?secret=2FASTEST&issuer=2FAS When we break down this URI: otpauth:// specifies this is an OTP authentication totp/ indicates this is time-based (as opposed to counter-based HOTP) Test%20Token is the account name (URL encoded) secret=2FASTEST is the shared secret key issuer=2FAS identifies the service providing the 2FA. Once the user scans this, the secret is shared with the app and both the service and authenticator app use it in combination with the current time to generate codes. The process divides time into 30-second intervals. For each interval, the current Unix timestamp is combined with the secret key using a cryptographic hash function (HMAC-SHA1), which produces a consistent 6-digit code that both sides can generate independently. Security in TOTP comes from several key design principles. The short 30-second validity window means that even if an attacker intercepts a code, they have very limited time to use it. The one-way nature of the hash function means that even with a valid code, an attacker cannot work backwards to discover the secret key. Additionally, since the system relies on UTC time, it works seamlessly across different time zones. Most services implement a small amount of time drift tolerance. Since device clocks may not be perfectly synchronized, services typically accept codes from adjacent 30 second time windows. This provides a balance between security and usability, ensuring that slight time differences don't prevent legitimate authentication attempts while maintaining the security benefits of time-based codes. TOTP has become the de facto standard for two-factor authentication across the internet. Its implementation in RFC 6238 ensures compatibility between different services and authenticator apps. This means that whether you're using Google Authenticator, Microsoft Authenticator, or building your own solution like we are, the underlying mechanics remain the same, providing a consistent and secure experience for users. Architecture Our TOTP authenticator is built with security and scalability in mind, leveraging Azure's managed services to handle sensitive authentication data. The system consists of two main components: the web frontend, the backend API, and the secret storage. Backend API: Implemented as Azure Functions, our backend provides endpoints for managing TOTP secrets and generating tokens. We use Azure Functions because they provide excellent security features through managed identities, automatic HTTPS enforcement, and built-in scaling capabilities. The API will contain endpoints for adding new 2FA accounts and retrieving tokens. Secret storage: Azure Key Vault serves as our secure storage for TOTP secrets. This choice provides several crucial benefits: hardware-level encryption for secrets, detailed access auditing, and automatic key rotation capabilities. Azure Key Vault's managed identity integration with Azure Functions ensures secure, certificate-free access to secrets, while its global redundancy guarantees high availability. Prerequisites To follow along this blog, you'll need the following: Azure subscription: You will need an active subscription to host the services we will use. Make sure you have appropriate permissions to create and manage resources. If you don't have one, you can sign up here: https://azure.microsoft.com/en-us/pricing/purchase-options/azure-account Visual Studio Code: For the development environment, install Visual Studio Code. Other IDEs are available, though we will be benefiting from the extensions within this IDE. Download VS Code here: https://code.visualstudio.com/ VS Code Azure extensions (optional): There are many different ways to deploy to Azure Static Web Apps and Azure Functions, but having one-click deploy functionality inside our IDE is extremely useful. To install on VS Code, head to Extensions > Search Azure Static Web Apps > Click Install and do the same for the Azure Functions extension. Building the app Deploying the resources We will need to create at least an Azure Key Vault resource, and if you want to test the Function in the cloud (not just locally) then an Azure Function App too. I've attached the Azure CLI commands to deploy these resources, though it can be done through the portal if that's more comfortable. Firstly, create an Azure Key Vault resource: az keyvault create \ --name <your-kv-name> \ --resource-group <your-rg> \ --location <region></region></your-rg></your-kv-name> Enable RBAC for your Azure Key Vault: az keyvault update \ --name <your-kv-name> \ --enable-rbac-authorization true</your-kv-name> Create new Azure Function App: az functionapp create \ --name <app-name> \ --storage-account <storage-name> \ --consumption-plan-location <region> \ --runtime node \ --runtime-version 18 \ --functions-version 4</region></storage-name></app-name> Set Azure Key Vault name environment variable in Azure Function App: az functionapp config appsettings set \ --name <app-name> \ --resource-group <your-rg> \ --settings "KEY_VAULT_NAME=<your-kv-name>"</your-kv-name></your-rg></app-name> Grant your Azure Function App's managed identity access to Azure Key Vault: az role assignment create \ --assignee-object-id <function-app-managed-identity> \ --role "Key Vault Secrets Officer" \ --scope /subscriptions/<subscription-id>/resourceGroups/<rg-name>/providers/Microsoft.KeyVault/vaults/<your-kv-name></your-kv-name></rg-name></subscription-id></function-app-managed-identity> Building the API The backend of our authenticator app serves as the secure foundation for managing 2FA secrets and generating TOTP tokens. While it might be tempting to handle TOTP generation entirely in the frontend (as some authenticator apps do), our cloud-based approach offers several advantages. By keeping secrets server-side, we can provide secure backup and recovery options, implement additional security controls, and protect against client-side vulnerabilities. The backend API will have two key responsibilities which the frontend will trigger: Securely store new account secrets Generating valid TOTP tokens on demand First, we need to create an Azure Functions project in VS Code. The creation wizard will ask you to create a trigger, so let's start with (1) and create a trigger for processing new accounts: Go to Azure tab > Click the Azure Functions icon > Click Create New Project > Choose a folder > Choose JavaScript > Choose Model V4 > Choose HTTP trigger > Provide a name ('accounts') > Click Open in new window. Let's make a few modifications to this base Function: Ensure that the only allowed HTTP method is POST, as there is no need to support both and we will make use of the request body allowed in POST requests. Clear everything inside that function to make way for our upcoming code. Now, let's work forward from this adjusted base: const { app } = require("@azure/functions"); app.http("accounts", { methods: ["POST"], authLevel: "anonymous", handler: async (request, context) => { } }); This accounts endpoint will be responsible for securely storing new TOTP secrets when users add accounts to their authenticator. Here's what we need this endpoint to do: Receive the new account details: the TOTP secret, account name and issuer (extracted from the QR code on the frontend) Validate the request, ensuring proper formatting of all fields and that the user is authenticated Store the secret in Azure Key Vault with appropriate metadata Return success/failure status to allow the frontend to update accordingly. First, let's validate the incoming request data. When setting up two-factor authentication, services provide a QR code containing a URI in the otpauth:// format. This standardized format includes all the information we need to set up TOTP authentication. Assuming the frontend has decoded the QR code and sent us the resulting data, let's add some code to parse and validate this URI format. We'll use JavaScript's built-in URL class to handle the parsing, which will also take care of URL encoding/decoding for us. Add the following code to the function: // First, ensure we have a JSON payload let requestBody; try { requestBody = await request.json(); } catch (error) { context.log('Error parsing request body:', error); return { status: 400, jsonBody: { error: 'Invalid request format', details: 'Request body must be valid JSON containing a TOTP URI' } }; } // Check for the URI in the request const { uri } = requestBody; if (!uri || typeof uri !== 'string') { return { status: 400, jsonBody: { error: 'Missing or invalid TOTP URI', details: 'Request must include a "uri" field containing the TOTP setup URI' } }; } This first section of code handles the basic validation of our incoming request data. We start by attempting to parse the request body as JSON using request.json(), wrapping it in a try-catch block to handle any parsing failures gracefully. If the parsing fails, we return a 400 Bad Request status with a clear error message. After successfully parsing the JSON, we check for the presence of a uri field in the request body and ensure it's a string value. This validation ensures we have the minimum required data before we attempt to parse the actual TOTP URI in the next step. Let's now move on to parsing and validating the TOTP URI itself. This URI should contain all the important information: the type of OTP (TOTP in our case), the account name, the secret key, and optionally the issuer. Here's an example of a valid URI which would be provided by services: otpauth://totp/Test%20Token?secret=2FASTEST&issuer=2FAS To parse this, add the following code after our initial validation: // Parse and validate the TOTP URI try { const totpUrl = new URL(uri); // Validate it's a TOTP URI if (totpUrl.protocol !== "otpauth:") { throw new Error("URI must use otpauth:// protocol"); } if (totpUrl.host !== "totp") { throw new Error("URI must be for TOTP authentication"); } // Extract the components const accountName = decodeURIComponent(totpUrl.pathname.split("/")[1]); const secret = totpUrl.searchParams.get("secret"); const issuer = totpUrl.searchParams.get("issuer"); // Validate required components if (!secret) { throw new Error("Missing secret in URI"); } // Store the parsed data for the next step const validatedData = { accountName, secret, issuer: issuer || accountName, // Fall back to account name if issuer not specified }; ... } catch (error) { context.log("Error validating TOTP URI:", error); return { status: 400, jsonBody: { error: "Invalid TOTP URI", details: error.message, }, }; } We use JavaScript's built-in URL class to do the heavy lifting of parsing the URI components. We first verify this is actually a TOTP URI by checking the protocol and path. Then we extract the three key pieces of information: the account name (from the path), the secret key, and the issuer (both from the query parameters). We validate that the essential secret is present and store all this information in a validatedData object. Now that we have our TOTP data properly validated and parsed, let's move on to setting up our Azure Key Vault integration. Firstly, we must install the required Azure SDK packages: npm install azure/identity azure/keyvault-secrets Now we can add the Azure Key Vault integration to our function. Add these imports at the top of your file: const { DefaultAzureCredential } = require('@azure/identity'); const { SecretClient } = require('@azure/keyvault-secrets'); const { randomUUID } = require('crypto'); // Initialize Key Vault client const credential = new DefaultAzureCredential(); const vaultName = process.env.KEY_VAULT_NAME; const vaultUrl = `https://${vaultName}.vault.azure.net`; const secretClient = new SecretClient(vaultUrl, credential); This code sets up our connection to Azure Key Vault using Azure's managed identity authentication. The DefaultAzureCredential will automatically handle authentication when deployed to Azure, and our vault name comes from an environment variable to keep it configurable. Be sure to go and set the KEY_VAULT_NAME variable inside of your local.settings.json file. Now let's add the code to store our TOTP secret in Azure Key Vault. Add this after our URI validation: // Create a unique name for this secret const secretName = `totp-${Date.now()}`; // Store the secret in Key Vault with metadata try { await secretClient.setSecret(secretName, validatedData.secret, { contentType: 'application/json', tags: { accountName: validatedData.accountName, issuer: validatedData.issuer, type: 'totp-secret' } }); context.log(`Stored new TOTP secret for account ${validatedData.accountName}`); return { status: 201, jsonBody: { message: 'TOTP secret stored successfully', secretName: secretName, accountName: validatedData.accountName, issuer: validatedData.issuer } }; } catch (error) { context.error('Error storing secret in Key Vault:', error); return { status: 500, jsonBody: { error: 'Failed to store TOTP secret' } }; } When storing the secret, we use setSecret with three important parameters: A unique name generated using a UUID (totp-${randomUUID()}). This ensures each secret has a globally unique identifier with no possibility of collisions, even across distributed systems. The resulting name looks like totp-123e4567-e89b-12d3-a456-426614174000. The actual TOTP secret we extracted from the URI. Metadata about the secret, including: contentType marking this as JSON data tags containing the account name and issuer, which helps us identify the purpose of each secret without needing to retrieve its actual value A type tag marking this specifically as a TOTP secret. If the storage succeeds, we return a 201 Created status with details about the stored secret (but never the secret itself). The returned secretName is particularly important as it will be used later when we need to retrieve this secret to generate TOTP codes. Now that we can securely store TOTP secrets, let's create our second endpoint that generates the 6-digit codes. This endpoint will: Retrieve a secret from Azure Key Vault using its unique ID Generate a valid TOTP code based on the current time Return the code along with its remaining validity time Follow the same setup steps as earlier, and ensure you have an empty function. I've named it tokens and set it as a GET request: app.http('tokens', { methods: ['GET'], authLevel: 'anonymous', handler: async (request, context) => { } }); Let's add the code to validate the query parameter and retrieve the secret from Azure Key Vault. A valid request will look like this: /api/tokens?id=totp-123e4567-e89b-12d3-a456-426614174000 We want to ensure the ID parameter exists and has the correct format: // Get the secret ID from query parameters const secretId = request.query.get('id'); // Validate the secret ID format if (!secretId || !secretId.startsWith('totp-')) { return { status: 400, jsonBody: { error: 'Invalid or missing secret ID. Must be in format: totp-{uuid}' } }; } This code first checks if we have a properly formatted secret ID in our query parameters. The ID should start with totp- and be followed by a UUID, matching the format we used when storing secrets in our first endpoint. If the ID is missing or invalid, we return a 400 Bad Request with a helpful error message. Now if the ID is valid, we should attempt to retrieve the secret from Azure Key Vault: try { // Retrieve the secret from Key Vault const secret = await secretClient.getSecret(secretId); ... } catch (error) { context.error('Error retrieving secret:', error); return { status: 500, jsonBody: { error: 'Failed to retrieve secret' } }; } If anything goes wrong during this process (like the secret doesn't exist or we have connection issues), we log the error and return a 500 Internal Server Error. Now that we have the secret from Azure Key Vault, let's add the code to generate the 6-digit TOTP code. First, install otp package: npm install otp Then add this import at the top of your file: const OTP = require('otp'); Now let's generate a 6-digit TOTP using this library from the data retrieved from Azure Key Vault: const totp = new OTP({ secret: secret.value }); // Generate the current token const token = totp.totp(); // Calculate remaining seconds in this 30-second window const timeRemaining = 30 - (Math.floor(Date.now() / 1000) % 30); return { status: 200, jsonBody: { token, timeRemaining } }; Let's break down exactly how this code generates our 6-digit TOTP code. When we generate a TOTP code, we're using our stored secret key to create a unique 6-digit number that changes every 30 seconds. The OTP library handles this through several steps behind the scenes. First, when we create a new OTP instance with new OTP({ secret: secret.value }), we're setting up a TOTP generator with our base32-encoded secret (like 'JBSWY3DPEHPK3PXP') that we retrieved from Azure Key Vault. When we call totp(), the library takes our secret and combines it with the current time to generate a code. It takes the current Unix timestamp, divides it by 30 to get the current time window, then uses this value and our secret in an HMAC-SHA1 operation. The resulting hash is then dynamically truncated to give us exactly 6 digits. This is why anyone with the same secret will generate the same code within the same 30-second window. To help users know when the current code will expire, we calculate timeRemaining by finding out how far we are into the current 30-second window and subtracting that from 30. This gives users a countdown until the next code will be generated. With both our endpoints complete, we now have a functional backend for our TOTP authenticator. The first endpoint securely stores TOTP secrets in Azure Key Vault, generating a unique ID for each one. The second endpoint uses these IDs to retrieve secrets and generate valid 6-digit TOTP codes on demand. This server-side approach offers several advantages over traditional authenticator apps: our secrets are securely stored in Azure Key Vault rather than on user devices, we can easily back up and restore access if needed, and we can add additional security controls around code generation. Testing First, we'll need to run the functions locally using the Azure Functions Core Tools. Open your terminal in the project directory and run: func start I'm using a website designed to check if your 2FA app is working correctly. It creates a valid QR code, and also calculates the TOTP on their end so you can compare results. I highly recommend using this alongside me to test our solution: https://2fas.com/check-token/ It will present you with a QR code. You can scan it in your frontend, though you can copy/paste the below which is the exact same value: otpauth://totp/Test%20Token?secret=2FASTEST&issuer=2FAS Now let's test our endpoints sequentially using curl (or Postman if you prefer). My functions started on port 7071, be sure to check yours before you send the request. Let's start with adding the above secret to Azure Key Vault: curl -X POST http://localhost:7071/api/accounts \ -H "Content-Type: application/json" \ -d '{ "uri": "otpauth://totp/Test%20Token?secret=2FASTEST&issuer=2FAS" }' This should return a response containing the generated secret ID (your UUID will be different): { "message": "TOTP secret stored successfully", "secretName": "totp-f724efb9-a0a7-441f-86c3-2cd36647bfcf", "accountName": "Test Token", "issuer": "2FAS" } Sidenote: If you head to Azure Key Vault in the Azure portal, you can see the saved secret: Now we can use this secretName to generate TOTP codes: curl http://localhost:7071/api/tokens?id=totp-550e8400-e29b-41d4-a716-446655440000 The response will include a 6-digit code and the remaining time until it expires: { "token": "530868", "timeRemaining": 26 } To prove that this is accurate, quickly look again at the website, and you should see the exact same code and a very similar time remaining: This confirms that your code is valid! You can keep generating new codes and checking them - remember that the code changes every 30 seconds, so be quick when testing and validating. Bonus: Frontend UI While not the focus of this blog, as bonus content I've put together a React component which provides a functional interface for our TOTP authenticator. This component allows users to upload QR codes provided by other services, processes them to extract the TOTP URI, sends it to our backend for storage, and then displays the generated 6-digit code with a countdown timer. Here's how it looks: As you can see, I've followed a similar style to other known and modern authenticator apps. I recommend writing your own code for the user interface, as it's highly subjective. However, the following is the full React component in case you can benefit from it: import React, { useState, useEffect, useCallback } from "react"; import { Shield, UserCircle, Plus, Image as ImageIcon } from "lucide-react"; import jsQR from "jsqr"; const TOTPAuthenticator = () => { const [secretId, setSecretId] = useState(null); const [token, setToken] = useState(null); const [timeRemaining, setTimeRemaining] = useState(null); const [localTimer, setLocalTimer] = useState(null); const [error, setError] = useState(null); const [isPasting, setIsPasting] = useState(false); useEffect(() => { let timerInterval; if (timeRemaining !== null) { setLocalTimer(timeRemaining); timerInterval = setInterval(() => { setLocalTimer((prev) => { if (prev <= 0) return timeRemaining; return prev - 1; }); }, 1000); } return () => clearInterval(timerInterval); }, [timeRemaining]); const processImage = async (imageData) => { try { const img = new Image(); img.src = imageData; await new Promise((resolve, reject) => { img.onload = resolve; img.onerror = reject; }); const canvas = document.createElement("canvas"); const context = canvas.getContext("2d"); canvas.width = img.width; canvas.height = img.height; context.drawImage(img, 0, 0); const imgData = context.getImageData(0, 0, canvas.width, canvas.height); const code = jsQR(imgData.data, canvas.width, canvas.height); if (!code) { throw new Error("No QR code found in image"); } const response = await fetch( "http://localhost:7071/api/accounts", { method: "POST", headers: { "Content-Type": "application/json" }, body: JSON.stringify({ uri: code.data }), } ); const data = await response.json(); if (!response.ok) throw new Error(data.error); setSecretId(data.secretName); setToken({ issuer: data.issuer, accountName: data.accountName, code: "--", }); setError(null); } catch (err) { setError(err.message); } finally { setIsPasting(false); } }; const handlePaste = useCallback(async (e) => { e.preventDefault(); setIsPasting(true); setError(null); try { const items = e.clipboardData.items; const imageItem = Array.from(items).find((item) => item.type.startsWith("image/") ); if (!imageItem) { throw new Error("No image found in clipboard"); } const blob = imageItem.getAsFile(); const reader = new FileReader(); reader.onload = async (event) => { await processImage(event.target.result); }; reader.onerror = () => { setError("Failed to read image"); setIsPasting(false); }; reader.readAsDataURL(blob); } catch (err) { setError(err.message); setIsPasting(false); } }, []); const handleDrop = useCallback(async (e) => { e.preventDefault(); setIsPasting(true); setError(null); try { const file = e.dataTransfer.files[0]; if (!file || !file.type.startsWith("image/")) { throw new Error("Please drop an image file"); } const reader = new FileReader(); reader.onload = async (event) => { await processImage(event.target.result); }; reader.onerror = () => { setError("Failed to read image"); setIsPasting(false); }; reader.readAsDataURL(file); } catch (err) { setError(err.message); setIsPasting(false); } }, []); const handleDragOver = (e) => { e.preventDefault(); }; useEffect(() => { let interval; const fetchToken = async () => { try { const response = await fetch( `http://localhost:7071/api/tokens?id=${secretId}` ); const data = await response.json(); if (!response.ok) throw new Error(data.error); setToken((prevToken) => ({ ...prevToken, code: data.token, })); setTimeRemaining(data.timeRemaining); const nextFetchDelay = data.timeRemaining * 1000 || 30000; interval = setTimeout(fetchToken, nextFetchDelay); } catch (err) { setError(err.message); interval = setTimeout(fetchToken, 30000); } }; if (secretId) { fetchToken(); } return () => clearTimeout(interval); }, [secretId]); if (!secretId) { return ( <div classname="w-[416px] max-w-full mx-auto bg-white rounded-xl shadow-md overflow-hidden"> <div classname="bg-[#0078D4] p-4 text-white flex items-center gap-2"> <shield classname="mt-px" size="{24}"> <h2 classname="text-xl font-semibold m-0">My Authenticator</h2> </shield></div> <div classname="p-6"> <div classname="{`w-full" p-10="" border-2="" border-dashed="" border-gray-300="" rounded-lg="" text-center="" cursor-pointer="" transition-all="" duration-200="" ${="" ispasting="" ?="" "bg-gray-100"="" :="" "bg-white"="" }`}="" onpaste="{handlePaste}" ondrop="{handleDrop}" ondragover="{handleDragOver}" tabindex="{0}"> <imageicon size="{32}" classname="text-gray-600 mx-auto"> <p classname="text-gray-600 mt-3 text-sm"> {isPasting ? "Processing..." : "Paste or drop QR code here"} </p> </imageicon></div> {error && <div classname="text-red-600 text-sm mt-2">{error}</div>} </div> </div> ); } return ( <div classname="w-[416px] max-w-full mx-auto bg-white rounded-xl shadow-md overflow-hidden"> <div classname="bg-[#0078D4] p-4 text-white flex items-center gap-2"> <shield classname="mt-px" size="{24}"> <h2 classname="text-xl font-semibold m-0">My Authenticator</h2> </shield></div> <div classname="flex items-center p-4 border-b"> <div classname="bg-gray-100 rounded-full w-10 h-10 flex items-center justify-center mr-4"> <usercircle size="{24}" classname="text-gray-600"> </usercircle></div> <div classname="flex-1"> <h3 classname="text-base font-medium text-gray-800 m-0"> {token?.issuer || "--"} </h3> <p classname="text-sm text-gray-600 mt-1 m-0"> {token?.accountName || "--"} </p> </div> <div classname="text-right"> <p classname="text-2xl font-medium text-gray-800 m-0 mb-0.5"> {token?.code || "--"} </p> <p classname="text-xs text-gray-600 m-0"> {localTimer || "--"} seconds </p> </div> </div> <div classname="p-6"> <div classname="{`w-full" p-10="" border-2="" border-dashed="" border-gray-300="" rounded-lg="" text-center="" cursor-pointer="" transition-all="" duration-200="" ${="" ispasting="" ?="" "bg-gray-100"="" :="" "bg-white"="" }`}="" onpaste="{handlePaste}" ondrop="{handleDrop}" ondragover="{handleDragOver}" tabindex="{0}"> <imageicon size="{32}" classname="text-gray-600 mx-auto"> <p classname="text-gray-600 mt-3 text-sm"> {isPasting ? "Processing..." : "Paste or drop QR code here"} </p> </imageicon></div> </div> {error && <div classname="text-red-600 text-sm mt-2">{error}</div>} </div> ); }; export default TOTPAuthenticator; For deployment, I recommend Azure Static Web Apps because it offers built-in authentication, global CDN distribution, and seamless integration with our Azure Functions backend. Summary In this blog, we've built a TOTP authenticator that demonstrates both the inner workings of two-factor authentication and modern cloud architecture. We've demystified how TOTP actually works - from the initial QR code scanning and secret sharing, to the time-based algorithm that generates synchronized 6-digit codes. By implementing this ourselves using Azure services like Azure Key Vault and Azure Functions, we've gained deep insights into both the security protocol and cloud-native development. While this implementation focuses on the core TOTP functionality, it serves as a foundation that you can build upon with features like authenticated multi-user support, backup codes, or audit logging. Whether you're interested in authentication protocols, cloud architecture, or both, this project provides hands-on experience with real-world security implementations. The complete source code for this project is available on my GitHub repository: https://github.com/stephendotgg/azure-totp-authenticator Thanks for reading! Hopefully this has helped you understand TOTP and Azure services better.1.8KViews0likes0CommentsAI Transcription & Text Analytics for Health
Industry Challenge Healthcare organizations depend on qualitative research, patient interviews, and clinical documentation to improve care delivery. Traditional transcription services often create bottlenecks: Manual Processes: Require manual uploads and lack automation. Delayed Turnaround: Transcripts can take days, slowing research and decision-making. Limited Integration: Minimal interoperability with EMR systems or analytics platforms. Cost Inefficiencies: Pricing models that scale poorly for large volumes. The need for real-time, HIPAA-compliant transcription and integrated analytics has never been greater. Azure AI Solution Overview Azure provides a comprehensive, cloud-native transcription and analytics pipeline that addresses these challenges head-on. By leveraging Azure AI Services, organizations can: Transcribe audio/video recordings in real time. Process PDFs and text documents for structured data extraction. Apply Text Analytics for Health to identify medical entities and structure data into FHIR format. Generate summaries and insights using cutting edge LLMs including Azure OpenAI. This approach accelerates workflows, improves compliance, and reduces costs compared to traditional transcription vendors. Azure Speech Service Options Azure Speech Service offers multiple transcription modes to fit different scenarios: Real-Time Transcription: Converts live audio streams into text instantly for telehealth sessions and interviews. Batch Transcription: Processes large volumes of pre-recorded audio asynchronously for research studies. Fast Transcription: Optimized for quick turnaround on short recordings for rapid documentation needs. Azure Text Analytics for Health One of the most powerful components of this solution is Azure AI Language – Text Analytics for Health, which transforms raw text into structured clinical insights. Key capabilities include: Named Entity Recognition (NER): Automatically identifies clinical entities such as symptoms, diagnoses, medications, procedures, and anatomy from transcripts and documents. Relation Extraction: Detects relationships between entities (e.g., linking a medication to its dosage or a condition to its treatment), enabling richer context for clinical decision-making. Entity Linking to UMLS Codes: Maps recognized entities to Unified Medical Language System (UMLS) concepts, ensuring interoperability and standardization across healthcare systems. Assertion Detection: Determines the status of an entity (e.g., present, absent, conditional, or hypothetical), which is critical for accurate interpretation of patient data. These features allow healthcare organizations to move beyond simple transcription and unlock structured, actionable insights that can feed downstream analytics and reporting. Other Azure Resources Azure AI Document Intelligence – Extracts structured data from PDFs and scanned documents. Azure OpenAI Service – Summarizes transcripts and generates clinical insights. Azure Storage & Functions – Securely stores raw and processed data; orchestrates workflows for transcription and analytics. Integration with Microsoft Fabric OneLake Once FHIR JSON output is generated from Text Analytics for Health, it can be stored in Microsoft Fabric OneLake. This unlocks powerful downstream capabilities: Unified Data Lake: Centralized storage for structured healthcare data. Analytics & Reporting: Use Fabric’s Lakehouse and Power BI to build dashboards for clinical research trends, patient outcomes, and operational metrics. AI-Driven Insights: Combine transcription data with other datasets for predictive modeling and advanced analytics. This integration ensures that transcription and clinical insights are not siloed—they become part of a broader data ecosystem for research and decision-making. Why Azure Stands Out Compared to other transcription solutions in the market, Azure offers: Real-Time Processing: Immediate access to transcripts versus multi-day turnaround. Integrated Analytics: Built-in medical entity recognition and AI summarization. Compliance & Security: HIPAA-ready architecture with enterprise-grade governance. Cost Efficiency: Pay-as-you-go pricing with elastic scaling for large datasets. End-to-End Data Flow: From transcription to Fabric OneLake for analytics. Step-by-Step Deployment Guide As part of the Azure Field team working in the Healthcare and Life Sciences industry, this challenge has emerged as a common theme among organizations seeking to modernize transcription and analytics workflows. To assist organizations exploring Azure AI solutions to address these challenges, the following demo application was developed by Solution Engineer Samuel Tauil and Cloud & AI Platform Specialist Hannah Abbott. This application is intended to allow organizations to quickly stand up and test these Azure services for their needs and is not intended as a production-ready solution. This Azure-powered web application demonstrates how organizations can modernize transcription and clinical insights using cloud-native AI services. Users can upload audio files in multiple formats, which are stored in Azure Storage and trigger an Azure Function to perform speech-to-text transcription with speaker diarization. The transcript is then enriched through Azure Text Analytics for Health, applying advanced capabilities like named entity recognition, relation extraction, UMLS-based entity linking, and assertion detection to deliver structured clinical insights. Finally, Azure OpenAI generates a concise summary and a downloadable clinical report, while FHIR-compliant JSON output seamlessly integrates with Microsoft Fabric OneLake for downstream analytics and reporting—unlocking a complete, scalable, and secure solution for healthcare data workflows. The following video clip uses AI-generated dialog for a fictitious scenario to demonstrate the capabilities of the sample application. Sample application developed by Samuel Tauil Microsoft Solution Engineer (25) Samuel Tauil | LinkedIn Prerequisites Azure Subscription GitHub account Azure CLI installed locally (optional, for manual deployment) 1. Fork the Repository GitHub - samueltauil/transcription-services-demo: Azure Healthcare Transcription Services Demo - Speech-to-text with Text Analytics for Health for HIPAA-compliant medical transcription 2. Create Azure Service Principal for GitHub Actions Copy the JSON output. 3. Add GitHub Secrets (Settings → Secrets and variables → Actions): AZURE_CREDENTIALS: Paste the service principal JSON from step 2 4. Run the deployment workflow: Go to Actions tab → "0. Deploy All (Complete)" Click "Run workflow" Enter your resource group name and Azure region Click "Run workflow" 5. After infrastructure deploys, add these additional secrets: AZURE_FUNCTIONAPP_NAME: The function app name (shown in workflow output) AZURE_STATIC_WEB_APPS_API_TOKEN: Get from Azure Portal → Static Web App → Manage deployment token Benefits Accelerated Research: Reduce transcription time from days to minutes. Enhanced Accuracy: AI-driven entity recognition for clinical terms. Scalable & Secure: Built on Azure’s compliance-ready infrastructure. Analytics-Ready: Seamless integration with Fabric for reporting and insights. Reference Links: Transcription Service: Speech to text overview - Speech service - Foundry Tools | Microsoft Learn Batch transcription overview - Speech service - Foundry Tools | Microsoft Learn Speech to text quickstart - Foundry Tools | Microsoft Learn Real-time diarization quickstart - Speech service - Foundry Tools | Microsoft Learn Text Analytics: Watch this: Embedded Video | Microsoft Learn What is the Text Analytics for health in Azure Language in Foundry Tools? - Foundry Tools | Microso… Fast Healthcare Interoperability Resources (FHIR) structuring in Text Analytics for health - Foundr… azure-ai-docs/articles/ai-services/language-service/text-analytics-for-health/quickstart.md at main… AI Foundry: Model catalog - Azure AI Foundry985Views0likes0CommentsBuild full-stack Next.js apps with Azure Static Web Apps
Next.js is the most popular hybrid rendering frontend framework, and is the most popular React framework as well. With Azure Static Web Apps’ recently announced improved support for Next.js, we can easily deploy and host our Next.js applications on Azure, while leveraging Next.js’ recent features such as React Server Components and Server Actions. In this article, we’ll build and deploy a Next.js application to Azure Static Web Apps (and you can follow along with the free plan!).9.9KViews3likes2Comments