spring cloud
26 Topics
A Simple Network Connection Test Tool for Azure Spring Cloud
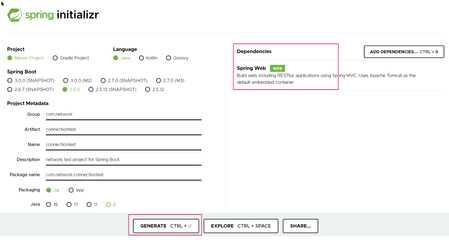
Applications running inside Azure Spring Cloud may need to make outbound calls to targets outside the Azure Spring Cloud. Sometimes the application may encounter network connection issue for different reasons. If we can run DNS resolve and TCP ping test from inside the Azure Spring Cloud to the outside target, it should be helpful for us to quickly narrow down network connection related issues. This blog shows how to build a very simple App for DNS resolve and TCP ping tests. After we deploy this App inside the existing Azure Spring Cloud service. We can run quick test to verify the availability of network connection to a specific target. Note: Azure Spring Apps published a new Connect Feature that allows you access the shell environment inside your application instances to do advanced troubleshooting. For more details, please refer to: Investigate Azure Spring Apps Networking Issue with the new Connect feature Step 1: Create a simple Spring Web application with DNS resolve and TCP ping feature Step 2: Deploy it to your Azure Spring Cloud Step 3: Run DNS/Tcpping tests inside your Azure Spring Cloud instance Step 1: Create a simple Spring Web application with DNS resolve and TCP ping feature My test tool source code and compiled jar file can be found in: https://github.com/renhanli/AzureSpringCloud_connectiontest/tree/main/src/main/java/com/network/connectiontest https://github.com/renhanli/AzureSpringCloud_connectiontest/blob/main/target/connectiontest-0.0.1-SNAPSHOT.jar You can use the following steps to build your own test application: 1. Go to Spring initializr to create a Spring Web template. Select Generate when all the dependencies are set. 2. Download and unpack the package, then create a network test controller for a simple web application by adding the file \src\main\java\com\network\connectiontest\NetworkTestController.java with the following contents: package com.network.connectiontest; import org.springframework.web.bind.annotation.GetMapping; import org.springframework.web.bind.annotation.RequestParam; import org.springframework.web.bind.annotation.RestController; import java.net.Socket; import java.io.PrintWriter; import java.io.StringWriter; import java.net.InetAddress; import java.net.InetSocketAddress; import java.util.List; import org.xbill.DNS.ResolverConfig; @RestController public class NetworkTestController { @GetMapping("/") public String index() { return "Run DNS resovle and Tcpping tests!"; } @GetMapping("/dns") public String dns(@RequestParam String hostname) { String result = "Resolve name for "+ hostname + ". </br>"; try { List<InetSocketAddress> dnsServers = ResolverConfig.getCurrentConfig().servers(); for (InetSocketAddress nameServer : dnsServers) { result += "Using system selected DNS server:"+ "</br>"; result += nameServer.getAddress() + "</br>"; } InetAddress addr = InetAddress.getByName(hostname); result += addr + "</br>"; } catch (Exception e) { result += "DNS resolve Failed! </br>"; StringWriter writer = new StringWriter(); PrintWriter printWriter = new PrintWriter( writer ); e.printStackTrace( printWriter ); printWriter.flush(); result += writer.toString().replaceAll("(\r\n|\n)", "<br />"); } return result; } @GetMapping("/tcpping") public String tcpping(@RequestParam String target, @RequestParam int port) { String result = "Tcpping "+ target + ":"+ port + ".</br>"; Socket socket = null; try { socket = new Socket(target, port); socket.setSoTimeout(2*1000); result += "Successfully Connected. </br>"; socket.close(); result += "Disconnected. </br>"; } catch(Exception e) { result += "Connection Failed! </br>"; StringWriter writer = new StringWriter(); PrintWriter printWriter = new PrintWriter( writer ); e.printStackTrace( printWriter ); printWriter.flush(); result += writer.toString().replaceAll("(\r\n|\n)", "<br />"); } return result; } } 3. Build the project using Maven mvn clean package 4. Run local test java -jar target\connectiontest-0.0.1-SNAPSHOT.jar After you bring up the application in your local machine, you should be able to access http://localhost:8080 We can run DNS resolve test by providing the hostname http://localhost:8080/dns?hostname=google.com We can run tcpping test by providing the target IP/domain and port number http://localhost:8080/tcpping?target=google.com&port=443 http://localhost:8080/tcpping?target=142.250.76.174&port=443 Step 2: Deploy it to your Azure Spring Cloud Assume you already have your Azure Spring Cloud service created. If you do not have any Azure Spring Cloud instance created, please create one according to https://docs.microsoft.com/en-us/azure/spring-cloud/quickstart?tabs=Azure-CLI&pivots=programming-language-java#provision-an-instance-of-azure-spring-cloud Use Azure CLI to create the network test App and deploy the .jar file to it. 1. Install the Azure CLI version 2.0.67 or higher and the Azure Spring Cloud extension with the command: az extension add --name spring-cloud 2. Login your account az login az account set --subscription <Name or ID of a subscription> 3. Create the test app with endpoint enabled az spring-cloud app create -n networktest -s <spring cloud instance name> -g <resource group name> --assign-endpoint true 4. Deploy the jar file to the app az spring-cloud app deploy -n networktest -s <spring cloud instance name> -g <resource group name> --artifact-path <jar file path>/connectiontest-0.0.1-SNAPSHOT.jar Step 3: Run DNS/Tcpping tests inside your Azure Spring Cloud instance Go to the networktest app we just created, use the URL provided in Overview Portal to run the test For succeed dns resolve test, we can see the following output. For failed dns resolve, we can see detailed error message and call stacks. For succeed tcpping, we can see the following output. For failed tcpping, we can see detailed error message and call stacks. To help you get started, we have monthly FREE grants on all tiers – 50 vCPU Hours and 100 memory GB Hours per tier. These are the number of FREE hours per month BEFORE any usage is billed.6.3KViews3likes1CommentTroubleshooting guide for Application Configuration Service on Azure Spring Apps
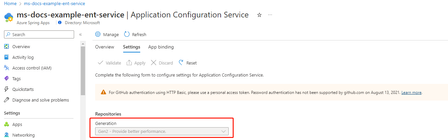
Application Configuration Service overview Application Configuration Service for VMware Tanzu (ACS) is one of the commercial VMware Tanzu components. It enables the management of Kubernetes-native ConfigMap resources that are populated from properties defined in one or more Git repositories. Application Configuration Service is offered in two versions: Gen1 and Gen2. The Gen1 version mainly serves existing customers for backward compatibility purposes and is supported only until April 30, 2024. New service instances should use Gen2. The Gen2 version uses flux as the backend to communicate with Git repositories and provides better performance compared to Gen1. You can check the generation information via Azure Portal The below article will introduce the troubleshooting guide for both generations. Case 1: Application fails to start due to configuration not available 1. Make sure your Application Configuration Service setting is correct. There are several checkpoints in the Application Configuration Service settings. The Git URI and label are correct. E.g. we have met several cases that use `master` branch but the default branch in GitHub has been changed to `main`. The credentials are correct. If you are using a private Git repo, it is recommended to use `SSH` auth for security considerations. `HTTP basic` auth also works but be cautioned that the token usually has an expiration date. Please remember to update the token before it expires. Please check Authentication section in our docs. To verify the above things, you may take a look at Application Configuration Service's logs through Azure Log analysis. The log will hint reason if it is not able to access to your Git repository. // Both works for Application Configuration Service Gen1 and Gen2 AppPlatformSystemLogs | where LogType == "ApplicationConfigurationService" | project TimeGenerated , ServiceName , Log , _ResourceId | limit 100 If you are using Application Configuration Service Gen2, it is also worth a while to take a look at `Flux` logs. // Only available in Application Configuration Service Gen2 AppPlatformSystemLogs | where LogType == "Flux" | project TimeGenerated , ServiceName , Log , _ResourceId | limit 100 2. Make sure the app is bonded to ACS. To explicitly use Application Configuration Service feature in an app, you have to bind the app through Azure Portal or Azure command line. It is unbound by default. # Azure Command line to bind app az spring application-configuration-service bind --app <app-name> 3. Make sure the deployment is configured with the corrected pattern. A pattern is a combination of {application}/{profile}. To explicitly tell Azure Spring Apps which pattern your deployment wants to use, you can do that through Azure Portal or Azure command line. // Bind config file pattern to your deployment az spring app deploy \ --name <app-name> \ --artifact-path <path-to-your-JAR-file> \ --config-file-pattern <config-file-pattern> 4. Restart the app You have to restart the application after the bind operation. Note that restart is not mandatory if you do an app deploy instead. Case 2: Configuration not refreshed in application The refresh strategies provides some code examples about the end to end workflow to refresh your Java Spring Boot application configuration after you update the configuration file in the Git repository. The refresh frequency is 60 seconds in Azure Spring Apps but please allow another 60 seconds to reflect the change to the configmap. If you still hit any issue, you can also follow the below troubleshooting guide. 1. Make sure the Application Configuration Service setting still uses the correct credentials. Credentials may be expired and not been updated in Application Configuration Service settings. You can verify it through the same step in Case 1 via logs in Azure Log analysis. 2. Restart the app Another possible reason that the refresh doesn't work in your app is that the Spring context is not refreshed. It could be a code issue in the app. You may restart the app to check the result. Hope the troubleshooting guide is helpful to you! To help you get started, we have monthly FREE grants on all tiers – 50 vCPU Hours and 100 memory GB Hours per tier. Additional Resources Learn using an MS Learn module or self-paced workshop on GitHub Deploy your first Spring app to Azure! Deploy the demo Fitness Store Spring Boot app to Azure Deploy the demo Animal Rescue Spring Boot app to Azure Learn more about implementing solutions on Azure Spring Apps Deploy Spring Boot apps by leveraging enterprise best practices –Azure Spring Apps Reference Architecture Migrate your Spring Boot, Spring Cloud, and Tomcat applications to Azure Spring Apps Wire Spring applications to interact with Azure services For feedback and questions, please raise your issues on our GitHub. To learn more about Spring Cloud Azure, we invite you to visit the following links: Reach out to us on StackOverflow or GitHub. Reference Documentation Conceptual Documentation Code Samples Spring Version Mapping2.2KViews2likes0CommentsMaximizing Value: Streamlined Cloud Solutions with Prime Cost Savings for Spring Apps – upto 47% off
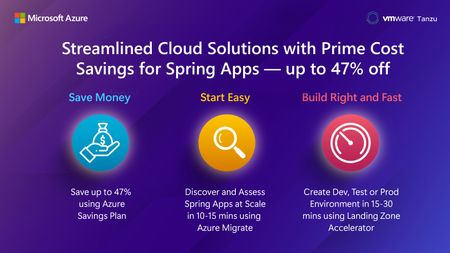
Cost is not just a number — it is key to making big decisions, especially when moving to the cloud. Knowing how important this is, we offer solutions that make your cloud experience better and save you a lot of money, up to a huge 47% discount. This is not just about being affordable; it is about getting great value every step of the way.9.6KViews0likes0CommentsBuild Right and Fast: Landing Zone Accelerator for Spring Apps - Now Generally Available!
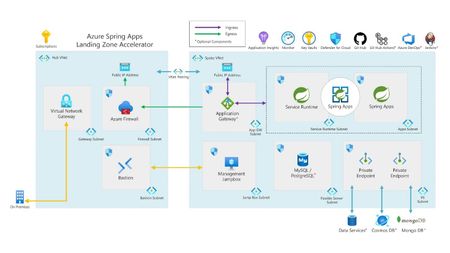
Are you looking for deploying spring applications at enterprise scale with industry-proven practices? Leverage Azure Spring Apps landing zone accelerator, now generally available that helps you build a secure scalable compliant development, test or production environments within 15-30 minutes. Landing zone accelerator provides a packaged architecture guidance with design recommendations and considerations on key critical design areas, reference architecture and reference implementation.3.4KViews0likes0Comments
Azure Spring Apps feature updates in Q1 2023
The following updates are now available in both basic/standard and enterprise plan: Source code assessment for migration: Assess your existing on-premise Spring applications for their readiness to migrate to Azure Spring Apps with Cloud Suitability Analyzer. The tool will provide you information on what types of changes will be needed for migration, and how much effort will be involved. Learn more. The following updates are now available in the enterprise plan More Options For build pools and allow queue build jobs: Build service now supports big size build agent pool and allows at most one pool-sized build task to build and twice the pool-sized build tasks to queue. Learn more. 99.95% SLA support: Higher SLA for mission-critical workloads. High vCPU and Memory app support: Support to deploy large CPU and memory applications to support CPU-intensive or memory-intensive workloads. Learn more. SCG APM & certificate verification support: Allow to configure APM and TLS certificate verification between Spring Cloud Gateway and applications. Learn more. Tanzu Components on demand: allow to enable or disable Tanzu components after service provisioning, you can learn how to do that per Tanzu component doc. Learn more. To help you get started, we have monthly FREE grants on all tiers – 50 vCPU Hours and 100 memory GB Hours per tier. Additional Resources Learn using an MS Learn module or self-paced workshop on GitHub Deploy your first Spring app to Azure! Deploy the demo Fitness Store Spring Boot app to Azure Deploy the demo Animal Rescue Spring Boot app to Azure Learn more about implementing solutions on Azure Spring Apps Deploy Spring Boot apps by leveraging enterprise best practices – Azure Spring Apps Reference Architecture Migrate your Spring Boot, Spring Cloud, and Tomcat applications to Azure Spring Apps Wire Spring applications to interact with Azure services For feedback and questions, please e-mail us.1.8KViews0likes0CommentsUnleash Spring apps in a flex environment with Azure Spring Apps Consumption and Dedicated plans
Today, we are thrilled to announce the public preview of the Standard Dedicated plan! The Standard Dedicated plan provides a fully managed, dedicated environment for running Spring applications on Azure. This plan offers you customizable compute options (including memory-optimized), single tenancy, and high availability to help you achieve price predictability, cost savings, and performance for running Spring applications at scale.12KViews1like0CommentsYour ultimate guide to Azure app innovation at Microsoft Build 2023
This has been an incredible year for app innovation, with new solutions, new plans, and new capabilities from Azure to help you rapidly build, deploy, and secure apps at scale. It is a lot to keep up with, we know! This is why we’re excited to bring you this curated list of Azure app innovation sessions, labs, and demos at Microsoft Build 2023!9.5KViews1like0CommentsConfiguring Custom DNS for Azure Spring App in a Private Network
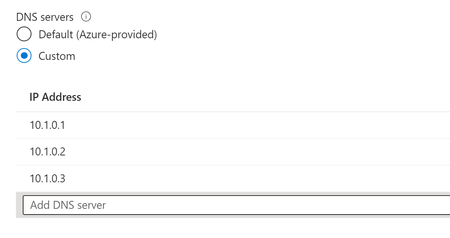
Azure Spring App is a cloud-based platform for building and deploying enterprise-grade Java applications. By default, Azure Spring App uses Azure DNS for name resolution. However, in some cases, you may want to use custom DNS servers for name resolution. This article explains how to configure custom DNS for Azure Spring App in a private network. Suggestions for Using Custom DNS. Set up less than 3 custom DNS servers. This is because Azure Kubernetes Service (AKS) uses the CoreDNS project for cluster DNS management and resolution. It only takes the first three custom DNS server settings. If you specify more than three custom DNS servers, AKS will only use the first three. Make sure that all custom DNS servers have some records that all of them could resolve your private URLs. With multiple DNS servers, the resolver library queries them in the order that's listed. (The strategy used is to try a name server first. If the query times out, try the next name server, and continue until the list of name servers is exhausted. Then, the query continues to try to connect to the name servers until the maximum number of retries are made.) If two custom DNS servers are specified, and the third DNS server is specified as Azure DNS (168.63.129.16), the node will send requests to the first custom DNS server if it's running and reachable. In this setup, the node can resolve the custom domain. However, some of the DNS requests from the pod might be directed to Azure DNS. This is because CoreDNS can select the upstream server at random. In this scenario, the custom domain can’t be resolved. Therefore, the DNS request fails. We recommend that you don't combine Azure DNS with custom DNS servers in the virtual network settings. If you want to use the custom DNS servers, add only the custom DNS servers in the virtual network settings. Then, configure Azure DNS in the forwarder settings of your custom DNS servers. Setting up DNS Forwarding on a Custom DNS Server As discussed earlier, we need to set up Azure DNS in the DNS forwarding on your custom DNS server, you can add the IP address (168.63.129.16) of the Azure DNS server to the DNS forwarder settings. This will allow your custom DNS server to forward DNS requests to the Azure DNS server for resolution. Keep in mind that the specific steps for configuring DNS forwarding on your Windows or Linux DNS server may vary depending on the distribution and version of Linux you're using. Windows Server Open the DNS Manager on the custom DNS server. Right-click on the server name and select "Properties". Click on the "Forwarders" tab. Click "Edit" and enter the IP address of the DNS server you want to forward requests to. Click "OK" to save your changes. Reference link: https://www.readandexecute.com/how-to/server-2016/dns/configure-dns-forwarders-windows-server-2016/. Linux Open the DNS configuration file on the custom DNS server. The location of the file may vary depending on your Linux distribution. Add the following line to the configuration file, replacing "IP_ADDRESS" with the IP address of the DNS server you want to forward requests to: forwarders { IP_ADDRESS; }; Save the configuration file. Restart the DNS service to apply the changes. Reference link: How To Configure Bind as a Caching or Forwarding DNS Server on Ubuntu 16.04 | DigitalOcean. How to Verify if your Custom DNS can Resolve Private URLs? I would suggest using the 'Console' feature of the Azure Spring Apps portal to connect to your app instance for troubleshooting, as described in this link: Connect to an app instance for troubleshooting. Once connected, you can run the 'nslookup' command to check the resolution result of your private URLs. How to Verify if DNS Forwarding to Azure DNS is Set Up Correctly? In Azure Spring Apps, you can use the DNS health check feature to verify if your app can resolve internal DNS names. You can access this feature through the 'Diagnose and solve problems' blade in the Azure portal. The DNS health check feature checks if your app can resolve the '*.svc.private.azuremicroservices.io' domain name. If you're seeing an error message that says 'cannot resolve private DNS zone', it may indicate that DNS forwarding is not properly configured. This error can occur when your custom DNS server is unable to forward DNS requests to the Azure DNS server for resolution.4KViews2likes0Comments