serverless
320 TopicsRun an Ollaya decision model on Azure Container Apps
Many AI calls are not really conversations. A support message needs an intent. A workflow needs a route. A policy check needs a yes or no. An agent needs to select its next action from a known list. These are bounded decisions, but they are often sent to a general-purpose LLM. The LLM reads the request, generates an answer token by token, and then the application validates and parses the response. That is useful when the task needs reasoning or language generation. It is more machinery than necessary when the only valid answer is one of 60 labels. On September 15, 2026, TypeSafe released Jev, its first public System One Model, in early access. Jev has helped bring attention to models built specifically for decisions: structured state goes in, and typed choices with probabilities come out. Ollaya approaches the same problem from a self-hosted direction. It is a model runtime that can serve open decision models, including the winnow:e4b model used here. Jev and Ollaya are not connected products. Jev is a hosted model from TypeSafe; Ollaya provides a way to run decision models in infrastructure you control. They are related by the kind of work they target. What decision models are good at A decision model scores predefined options rather than generating open-ended text: Decision model Traditional LLM Selects from allowed choices Generates text Returns a probability for each decision Usually returns one generated answer Has a bounded, typed output Needs schema constraints and validation Supports confidence thresholds Often needs a separate confidence strategy Fits classification, routing, scoring, policy, and prioritization Fits generation, summarization, coding, and open-ended reasoning That narrower interface creates several practical benefits: Predictable outputs: the application receives an allowed value rather than text that must be repaired or parsed. Lower decision latency: there is no autoregressive output sequence to generate. Token savings: a decision can be returned without generating output tokens. Useful uncertainty: calibrated probabilities let the application act, reject, or escalate. Smaller infrastructure: a specialized model can fit on hardware that would be modest for a general LLM. Decision models are not replacements for every LLM call. They make sense when the possible outcomes are known before the request arrives. An LLM remains the better tool when the output itself is language, code, or open-ended reasoning. Why Azure Container Apps serverless GPU Azure Container Apps serverless GPUs make self-hosted inference feel much closer to consuming a managed API. You bring the container and model; Azure manages the underlying GPU infrastructure. The Consumption GPU profile provides: NVIDIA T4 or A100 GPUs without managing GPU nodes or a Kubernetes cluster. Automatic scaling with the option to scale to zero. Per-second GPU billing while replicas are running. Container Apps networking, identity, ingress, logging, and revision management. A private inference path where the model and request data stay inside your Azure environment. That last point matters for data-sensitive decisions. In the Ollaya-only configuration, text is sent to an internal Ollaya endpoint rather than an external model API. The model, API, persistent cache, and operational controls remain in the application's Azure environment. Serverless does not remove the need to think about cold starts. A model still needs to be loaded into VRAM. For low or sporadic traffic, scaling to zero can avoid idle GPU cost. For latency-sensitive traffic, a warm minimum replica avoids making a user wait for the model to load. Azure Files can retain the model layers across revisions so a new deployment does not download the full model again. The T4 is also an important part of this experiment. It is not the largest GPU available, but the goal is not to run the largest model. The goal is to match the hardware to a model designed for the task. A focused decision model on a T4 can compete with a hosted API when the workload is a bounded classification rather than text generation. The experiment I deployed winnow:e4b through Ollaya on an Azure Container Apps Consumption-GPU-NC8as-T4 workload profile. An authenticated API exposed the classifier while Ollaya remained on internal-only ingress. A second path sent the same requests to GPT-5.4 Nano through Azure OpenAI using managed identity. The evaluation used the complete 2,974-record test partition from Amazon MASSIVE 1.1. It contains 18 scenarios and 60 intents. Both providers received the same records, labels, and descriptions. The benchmark measured latency at concurrency 1 and throughput at concurrency 8. Providers and modes ran sequentially so one measurement did not load the service used by another. This was not a direct benchmark of Jev; it tested the same decision-model pattern with an open model that could run inside the Azure environment. What the results showed The benchmark ran on September 30, 2026. Provider Successful Intent accuracy Macro-F1 p50 p95 Winnow on T4 2,974 / 2,974 75.59% 76.40% 946 ms 960 ms GPT-5.4 Nano 2,974 / 2,974 79.12% 78.07% 1,369 ms 2,489 ms Nano led intent accuracy by 3.53 percentage points. Winnow was 30.9% faster at p50 and 61.4% faster at p95. This is the useful T4 result: a smaller GPU running the right specialized model matched and beat the hosted endpoint on response latency, though not on accuracy. At concurrency 8, Nano delivered 1.367 requests per second compared with Winnow's 1.120. Nano also had 25 requests fail after eight retries because the deployment exceeded its token-rate limit. Winnow completed all 2,974 requests, but its single loaded runner serialized work and increased queue time. The token comparison shows what the decision-only path removes: Provider, both benchmark passes Input tokens Cached input tokens Output tokens Winnow on T4 9,252,872 0 0 GPT-5.4 Nano 8,501,200 7,564,800 122,759 Winnow returned every decision without generating output tokens. Nano generated 122,759 output tokens across the latency and throughput passes. The rows do not represent equivalent billing models: Winnow consumes self-hosted GPU time, while Nano is metered by hosted token usage. The comparison isolates the generated tokens that a bounded decision did not need. Winnow also returned calibrated probabilities. At a 0.90 threshold, it accepted 53.73% of the records and was correct on 94.43% of those accepted decisions. An application could handle that high-confidence group locally and send only the uncertain remainder to an LLM or human reviewer. In brief A decision model is useful when software needs a bounded answer rather than generated language. In this experiment, Winnow on a serverless T4 traded some accuracy for lower latency, zero generated output tokens, private inference, and an explicit confidence signal. The practical design is often a combination: use the decision model for fast, high-confidence choices and reserve LLM calls for uncertain or open-ended work. Try it with the template The Azure Developer CLI template packages the Container Apps environment, T4 workload profile, authenticated API, internal Ollaya service, persistent model cache, GPU readiness checks, and benchmark. It supports two deployment modes: Mode What it deploys ollaya-only Private Winnow inference on a serverless T4 plus the authenticated API full The Ollaya deployment, GPT-5.4 Nano, and the comparison benchmark Read the deployment guide Inspect every benchmark prediction and retry Review the shared MASSIVE taxonomy119Views0likes0CommentsMeet the Hosted Skills Canvas: Build, Run, and Debug in GitHub Copilot
Build, run, and debug event-driven AI apps right inside GitHub Copilot. The new Azure Functions Hosted Skills canvas brings instructions, triggers, and live results into one workspace—so you can spend less time switching tools and more time building. 307Views1like0Comments
Sending Email from an AKS Pod Without a Single Secret
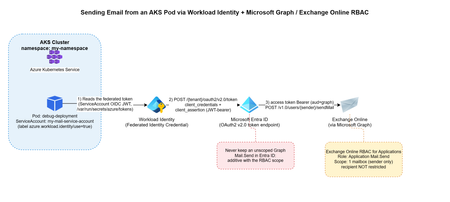
The problem You have a workload running in AKS that occasionally needs to send an email — a notification, an alert, a report. The obvious options all come with baggage: An SMTP relay means yet another credential to store, rotate, and eventually leak. A shared "app password" mailbox account means an identity nobody really owns, that can authenticate as itself forever. Granting Mail.Send as a Microsoft Graph application permission is tempting — until you realize it lets your app send email as any mailbox in the entire tenant, not just the one you intended. This post walks through a pattern that avoids all three: Azure Workload Identity for the pod, Microsoft Graph for sending, and Exchange Online RBAC for Applications to scope the identity down to exactly one authorized mailbox. No secrets stored anywhere in the cluster, and no tenant-wide send permission. Architecture Pod (AKS) -- federated OIDC token --> Workload Identity Workload Identity -- client_credentials + client_assertion--> Microsoft Entra ID Entra ID -- access token (aud=Graph) --> Pod Pod -- POST /v1.0/users/{sender}/sendMail (Bearer token)--> Microsoft Graph --> Exchange Online The pod never handles a password or a client secret. It reads a federated identity token that Azure Workload Identity's webhook mounts automatically, exchanges it with Entra ID for a Graph access token, and calls sendMail directly. The only thing that determines which mailbox it's allowed to send as is a role assignment on the Exchange Online side — not anything configured in Kubernetes. Step 1 — Get a Workload Identity bound to your namespace This is a platform-team request, not something you self-service from inside the cluster: you need a Managed Identity (or App Registration) with a Federated Identity Credential issued for your specific Kubernetes namespace and ServiceAccount subject. Give your platform/identity team: The target namespace (e.g. my-namespace) The target ServiceAccount name (e.g. my-mail-service-account) The intended use case (application email via Microsoft Graph) They hand you back a Client ID — that's all your manifest needs. One important thing to not ask for: don't request the Graph Mail.Send application permission on this identity. That permission, if granted directly in Entra ID, is unscoped — it lets the identity send as anyone. The actual sending restriction is going to live in Exchange, not in Entra ID (see Step 2). Step 2 — Restrict sending to one mailbox with Exchange Online RBAC for Applications Microsoft's currently recommended way to scope application email-sending rights is RBAC for Applications in Exchange Online — the modern replacement for the deprecated Application Access Policies. The short version: The Managed Identity gets no unscoped Graph Mail.Send grant in Entra ID. (Entra ID and Exchange RBAC authorizations are additive — if you leave an unscoped grant in place, it defeats the whole point.) Exchange Online registers a pointer to the Managed Identity's service principal (New-ServicePrincipal), then assigns it the Application Mail.Send role, scoped to a Management Scope that resolves to exactly one mailbox (or one security group of mailboxes). The identity can now call /users/{authorized-mailbox}/sendMail and get a 202. Any other mailbox returns 403. This part is usually owned by whoever administers your Exchange Online tenant, not by the application team — it's a five-minute PowerShell runbook for them (New-ManagementScope, New-ServicePrincipal, New-ManagementRoleAssignment), fully documented in Microsoft's RBAC for Applications docs. For reference, here's the actual runbook: # 0. Make sure no unscoped Graph Mail.Send grant exists on the identity first $mi = Get-EntraServicePrincipal -ServicePrincipalId $MiObjectId $graphSp = Get-EntraServicePrincipal -Filter "appId eq '00000003-0000-0000-c000-000000000000'" $mailSendRole = $graphSp.AppRoles | Where-Object { $_.Value -eq "Mail.Send" -and $_.AllowedMemberTypes -contains "Application" } Get-EntraServicePrincipalAppRoleAssignment -ServicePrincipalId $mi.Id | Where-Object { $_.ResourceId -eq $graphSp.Id -and $_.AppRoleId -eq $mailSendRole.Id } | ForEach-Object { Remove-EntraServicePrincipalAppRoleAssignment -ServicePrincipalId $mi.Id -AppRoleAssignmentId $_.Id } # 1. Connect to Exchange Online Connect-ExchangeOnline # 2. Scope to exactly one mailbox (filter on ExternalDirectoryObjectId, not SMTP address) $mbx = Get-EXORecipient -Identity $AllowedMailbox -Properties ExternalDirectoryObjectId New-ManagementScope -Name $ScopeName ` -RecipientRestrictionFilter "ExternalDirectoryObjectId -eq '$($mbx.ExternalDirectoryObjectId)'" # 3. Register the service principal pointer (this is NOT a new identity, just a reference) $exoSp = New-ServicePrincipal -AppId $MiAppId -ObjectId $MiObjectId -DisplayName $MiDisplayName # 4. Assign exclusively Application Mail.Send, scoped New-ManagementRoleAssignment -Name $AssignmentName ` -App $exoSp.ObjectId -Role "Application Mail.Send" -CustomResourceScope $ScopeName # 5. Validate both directions Test-ServicePrincipalAuthorization -Identity $exoSp.ObjectId -Resource $AllowedMailbox # expect InScope = True Test-ServicePrincipalAuthorization -Identity $exoSp.ObjectId -Resource $BlockedMailbox # expect InScope = False Two things that trip people up here: -App in step 3/4 expects the Object ID of the Enterprise application / service principal, not the App Registration object — and never fall back to Application Mail Full Access or an exclusive management scope, since Microsoft explicitly notes exclusive scopes don't restrict application access. Worth calling out explicitly: this RBAC scope restricts the sender only. It has no concept of a recipient allowlist. Once your identity is authorized to send as a mailbox, it can send to anyone, inside or outside your tenant. If you need recipient-side restrictions, that has to be application logic — Exchange RBAC won't do it for you. Step 3 — The Kubernetes manifest Three resources: a ServiceAccount annotated with the Client ID from Step 1, a ConfigMap holding the send script, and a Deployment that mounts it. Here's the complete manifest: --- apiVersion: v1 kind: ServiceAccount metadata: annotations: azure.workload.identity/client-id: <CLIENT-ID-FROM-YOUR-IDENTITY-TEAM> name: my-mail-service-account namespace: my-namespace --- apiVersion: v1 kind: ConfigMap metadata: name: send-email namespace: my-namespace data: send-email.sh: | #!/bin/bash set -euo pipefail if [ $# -lt 2 ]; then echo "Usage: $0 <sender-email> <recipient-email> [recipient-email...]" exit 1 fi SENDER_EMAIL="$1" shift RECIPIENTS=("$@") TENANT_ID="${AZURE_TENANT_ID:-}" CLIENT_ID="${AZURE_CLIENT_ID:-}" FEDERATED_TOKEN_FILE="${AZURE_FEDERATED_TOKEN_FILE:-}" if [ -z "$TENANT_ID" ] || [ -z "$CLIENT_ID" ] || [ -z "$FEDERATED_TOKEN_FILE" ]; then echo "ERROR: Workload Identity variables not set" exit 1 fi FEDERATED_TOKEN=$(cat "$FEDERATED_TOKEN_FILE") TOKEN_RESPONSE=$(curl -s -X POST \ "https://login.microsoftonline.com/${TENANT_ID}/oauth2/v2.0/token" \ -H "Content-Type: application/x-www-form-urlencoded" \ -d "client_id=${CLIENT_ID}" \ -d "scope=https://graph.microsoft.com/.default" \ -d "client_assertion_type=urn:ietf:params:oauth:client-assertion-type:jwt-bearer" \ -d "client_assertion=${FEDERATED_TOKEN}" \ -d "grant_type=client_credentials") ACCESS_TOKEN=$(echo "$TOKEN_RESPONSE" | grep -o '"access_token":"[^"]*' | cut -d'"' -f4) if [ -z "$ACCESS_TOKEN" ]; then echo "ERROR: Failed to get token" echo "$TOKEN_RESPONSE" exit 1 fi RECIPIENTS_JSON="" for r in "${RECIPIENTS[@]}"; do if [ -n "$RECIPIENTS_JSON" ]; then RECIPIENTS_JSON="${RECIPIENTS_JSON}," fi RECIPIENTS_JSON="${RECIPIENTS_JSON}{\"emailAddress\":{\"address\":\"${r}\"}}" done cat > /tmp/email.json <<EOF { "message": { "subject": "Test from AKS", "body": { "contentType": "Text", "content": "Test email from Workload Identity" }, "toRecipients": [${RECIPIENTS_JSON}] }, "saveToSentItems": "true" } EOF HTTP_CODE=$(curl -s -w "%{http_code}" -o /tmp/response.json \ -X POST "https://graph.microsoft.com/v1.0/users/${SENDER_EMAIL}/sendMail" \ -H "Authorization: Bearer ${ACCESS_TOKEN}" \ -H "Content-Type: application/json" \ -d @/tmp/email.json) if [ "$HTTP_CODE" -eq 202 ]; then echo "Email sent successfully" else echo "ERROR: HTTP ${HTTP_CODE}" cat /tmp/response.json exit 1 fi --- apiVersion: apps/v1 kind: Deployment metadata: name: debug-deployment namespace: my-namespace labels: app: debug azure.workload.identity/use: "true" # Required. Only pods with this label can use workload identity. spec: replicas: 1 selector: matchLabels: app: debug template: metadata: labels: app: debug azure.workload.identity/use: "true" # Required. Only pods with this label can use workload identity. spec: serviceAccount: my-mail-service-account serviceAccountName: my-mail-service-account containers: - name: debug image: <your-registry>/az-init:0.1 command: ["sleep", "3600"] readinessProbe: exec: command: ["ls"] livenessProbe: exec: command: ["ls"] resources: requests: memory: "256Mi" cpu: "250m" limits: memory: "512Mi" cpu: "500m" volumeMounts: - name: script mountPath: "/script" volumes: - name: script configMap: name: send-email defaultMode: 0555 Two details that will bite you if you skip them: /me/sendMail doesn't work here. In a client_credentials flow (app-only, no signed-in user), /me returns 400 BadRequest: /me request is only valid with delegated authentication flow. You must call /users/{sender}/sendMail and name the sender explicitly. configMap.defaultMode matters. 0500 only grants execute to the file's owner (root); if your container runs as non-root, you'll get a Permission denied on exec. Use 0555. Step 4 — Test it kubectl apply -f email-pod.yaml kubectl exec -n my-namespace -it deploy/debug-deployment -- \ /script/send-email.sh authorized-sender@yourcompany.com \ recipient1@yourcompany.com recipient2@yourcompany.com A 202 and Email sent successfully means it worked. Try it again with a sender mailbox that isn't in your RBAC scope — you should get a clean 403. If you don't, go back and check that no unscoped Graph Mail.Send grant is still sitting on the identity in Entra ID; that's the most common way this containment silently fails. Conclusion This solution addresses an application email-sending need without introducing static credentials into the cluster or broadening permissions beyond what is strictly necessary. Full cloud, with no on-premises dependency or manually managed secret: No password, API key, or certificate is stored in Kubernetes (Secret, ConfigMap, or anywhere else). Authentication relies entirely on OIDC federation between the Kubernetes ServiceAccount and Microsoft Entra ID (Workload Identity) — the federated token is issued and mounted automatically by the webhook, never manually generated or distributed. The entire authentication and sending chain (Entra ID, Microsoft Graph, Exchange Online) goes through Microsoft-managed HTTPS endpoints; no on-premises component is involved in the application path (section A.3 covers a pitfall related to Exchange hybrid setups on the target mailbox side, not the authentication path itself). Provisioning the sender mailbox and the RBAC configuration are themselves managed natively within Microsoft 365 / Exchange Online, with no extra script or infrastructure to maintain on the client side. Secure by design (least privilege): The OIDC federated token is short-lived (limited lifetime, automatically renewed by the webhook) and scoped to the my-mail-service-account ServiceAccount in the my-namespace namespace — it cannot be reused outside this specific context. No tenant-wide Microsoft Graph Mail.Send permission is granted to the identity: without this precaution, the identity could send as any mailbox in the tenant. Exchange Online RBAC for Applications carries the real authorization, strictly scoped to the mailboxes that are members of the dedicated Exchange group. The containment is verified both positively and negatively before going to production — not only tested on the case that must succeed. Known and documented limitation: this RBAC model restricts only the sender, never the recipient — application-side control is still required if recipient restriction is ever needed. See You in the Cloud JamesdldBulletproof agents with the durable task extension for Microsoft Agent Framework
Today, we're thrilled to announce the public preview of the durable task extension for Microsoft Agent Framework. This extension transforms how you build production-ready, resilient and scalable AI agents by bringing the proven durable execution (survives crashes and restarts) and distributed execution (runs across multiple instances) capabilities of Azure Durable Functions directly into the Microsoft Agent Framework. Now you can deploy stateful, resilient AI agents to Azure that automatically handle session management, failure recovery, and scaling, freeing you to focus entirely on your agent logic. Whether you're building customer service agents that maintain context across multi-day conversations, content pipelines with human-in-the-loop approval workflows, or fully automated multi-agent systems coordinating specialized AI models, the durable task extension gives you production-grade reliability, scalability and coordination with serverless simplicity. Key features of the durable task extension include: Serverless Hosting: Deploy agents on Azure Functions with auto-scaling from thousands of instances to zero, while retaining full control in a serverless architecture. Automatic Session Management: Agents maintain persistent sessions with full conversation context that survives process crashes, restarts, and distributed execution across instances Deterministic Multi-Agent Orchestrations: Coordinate specialized durable agents with predictable, repeatable, code-driven execution patterns Human-in-the-Loop with Serverless Cost Savings: Pause for human input without consuming compute resources or incurring costs Built-in Observability with Durable Task Scheduler: Deep visibility into agent operations and orchestrations through the Durable Task Scheduler UI dashboard Click here to create and run a durable agent # Python endpoint = os.getenv("AZURE_OPENAI_ENDPOINT") deployment_name = os.getenv("AZURE_OPENAI_DEPLOYMENT_NAME", "gpt-4o-mini") # Create an AI agent following the standard Microsoft Agent Framework pattern agent = AzureOpenAIChatClient( endpoint=endpoint, deployment_name=deployment_name, credential=AzureCliCredential() ).create_agent( instructions="""You are a professional content writer who creates engaging, well-structured documents for any given topic. When given a topic, you will: 1. Research the topic using the web search tool 2. Generate an outline for the document 3. Write a compelling document with proper formatting 4. Include relevant examples and citations""", name="DocumentPublisher", tools=[ AIFunctionFactory.Create(search_web), AIFunctionFactory.Create(generate_outline) ] ) # Configure the function app to host the agent with durable session management app = AgentFunctionApp(agents=[agent]) app.run() // C# var endpoint = Environment.GetEnvironmentVariable("AZURE_OPENAI_ENDPOINT"); var deploymentName = Environment.GetEnvironmentVariable("AZURE_OPENAI_DEPLOYMENT") ?? "gpt-4o-mini"; // Create an AI agent following the standard Microsoft Agent Framework pattern AIAgent agent = new AzureOpenAIClient(new Uri(endpoint), new DefaultAzureCredential()) .GetChatClient(deploymentName) .CreateAIAgent( instructions: """You are a professional content writer who creates engaging, well-structured documents for any given topic. When given a topic, you will: 1. Research the topic using the web search tool 2. Generate an outline for the document 3. Write a compelling document with proper formatting 4. Include relevant examples and citations""", name: "DocumentPublisher", tools: [ AIFunctionFactory.Create(SearchWeb), AIFunctionFactory.Create(GenerateOutline) ]); // Configure the function app to host the agent with durable thread management // This automatically creates HTTP endpoints and manages state persistence using IHost app = FunctionsApplication .CreateBuilder(args) .ConfigureFunctionsWebApplication() .ConfigureDurableAgents(options => options.AddAIAgent(agent) ) .Build(); app.Run(); Why the durable task extension? As AI agents evolve from simple chatbots to sophisticated systems handling complex, long-running tasks, new challenges emerge: Conversations span multiple days and weeks, requiring persistent state across process restarts, crashes, and disruptions. Tool calls might take longer than typical timeouts allow, needing automatic checkpointing and recovery. High-volume workloads require elastic scaling across distributed instances to handle thousands of concurrent agent conversations. Multiple specialized agents need coordination with predictable, repeatable execution for reliable business processes. Agents sometimes must wait for human approval before proceeding, ideally without consuming resources. The Durable Extension addresses these challenges by extending Microsoft Agent Framework with capabilities from Azure Durable Functions, enabling you to build AI agents that survive failures, scale elastically, and execute predictably through durable and distributed execution. The extension is built on four foundational value pillars, which we refer to as the 4D’s: Durability Every agent state change (messages, tool calls, decisions) is durably checkpointed automatically. Agents survive and automatically resume from infrastructure updates, crashes, and can be unloaded from memory during long waiting periods without losing context. This is essential for agents that orchestrate long-running operations or wait for external events. Distributed Agent execution is accessible across all instances, enabling elastic scaling and automatic failover. Healthy nodes seamlessly take over work from failed instances, ensuring continuous operation. This distributed execution model allows thousands of stateful agents to scale up and run in parallel. Deterministic Agent orchestrations execute predictably using imperative logic written as ordinary code. Define the execution path, enabling automated testing, verifiable guardrails, and business-critical workflows that stakeholders can trust. This complements agent-directed workflows by providing explicit control flow when needed. Debuggability Use familiar development tools (IDEs, debuggers, breakpoints, stack traces, and unit tests) and programming languages to develop and debug. Your agent and agent orchestrations are expressed as code, making them easily testable, debuggable, and maintainable. Features in action Serverless hosting Deploy agents to Azure Functions (with expansion to other Azure computes soon) with automatic scaling to thousands of instances or down to zero when not in use. Pay only for the compute resources you consume. This code-first deployment approach gives you full control over the compute environment while maintaining the benefits of a serverless architecture. # Python endpoint = os.getenv("AZURE_OPENAI_ENDPOINT") deployment_name = os.getenv("AZURE_OPENAI_DEPLOYMENT_NAME", "gpt-4o-mini") # Create an AI agent following the standard Microsoft Agent Framework pattern agent = AzureOpenAIChatClient( endpoint=endpoint, deployment_name=deployment_name, credential=AzureCliCredential() ).create_agent( instructions="""You are a professional content writer who creates engaging, well-structured documents for any given topic. When given a topic, you will: 1. Research the topic using the web search tool 2. Generate an outline for the document 3. Write a compelling document with proper formatting 4. Include relevant examples and citations""", name="DocumentPublisher", tools=[ AIFunctionFactory.Create(search_web), AIFunctionFactory.Create(generate_outline) ] ) # Configure the function app to host the agent with durable session management app = AgentFunctionApp(agents=[agent]) app.run() Automatic session management Agent sessions are automatically checkpointed in durable storage that you configure in your function app, enabling durable and distributed execution across multiple instances. Any instance can resume an agent's execution after interruptions or process failures, ensuring continuous operation. Under the hood, agents are implemented as durable entities. These are stateful objects that maintain their state across executions. This architecture enables each agent session to function as a reliable, long-lived entity with preserved conversation history and context. Example scenario: A customer service agent handling a complex support case over multiple days and weeks. The conversation history, context, and progress are preserved even if the agent is redeployed or moves to a different instance. # First interaction - start a new thread to create a document curl -X POST https://your-function-app.azurewebsites.net/api/agents/DocumentPublisher/threads \ -H "Content-Type: application/json" \ -d '{"message": "Create a document about the benefits of Azure Functions"}' # Response includes thread ID and initial document outline/draft # {"threadId": "doc789", "response": "I'll create a comprehensive document about Azure Functions benefits. Let me search for the latest information... [Document Draft] # Benefits of Azure Functions\n\n## Introduction\nAzure Functions is a serverless compute service that enables you to run event-driven code without managing infrastructure...\n\n## Cost Efficiency\n- Pay only for execution time\n- No charges for idle resources\n- Automatic scaling reduces over-provisioning...\n\n## Developer Productivity\n- Multiple language support (C#, Python, JavaScript, Java)\n- Integrated development tools and CI/CD...\n\n## Scalability\n- Automatic scaling based on demand\n- Handle millions of requests seamlessly...\n\nReferences: [Azure documentation, serverless computing studies]"} # Second interaction - continue the same thread to refine the document curl -X POST https://your-function-app.azurewebsites.net/api/agents/DocumentPublisher/threads/doc789 \ -H "Content-Type: application/json" \ -d '{"message": "Can you add a section about integration with other Azure services?"}' # Agent remembers the Azure Functions document context and adds the requested section # {"threadId": "doc789", "response": "I've added a comprehensive integration section to your Azure Functions document:\n\n## Integration with Azure Services\n\n### Azure Storage\nSeamless triggers and bindings for Blob Storage, Queue Storage, and Table Storage enable event-driven architectures...\n\n### Azure Event Grid & Event Hubs\nProcess real-time event streams and implement publish-subscribe patterns at scale...\n\n### Azure Cosmos DB\nBuilt-in bindings for document database operations with automatic change feed processing...\n\n### Azure Service Bus\nReliable message processing with enterprise messaging features...\n\n### Azure AI Services\nEasily integrate OpenAI, Cognitive Services, and AI Search for intelligent applications...\n\nThe document now includes this section after the Scalability section. Would you like me to add use cases or deployment best practices?"} Deterministic multi-agent orchestrations Coordinate multiple specialized durable agents using imperative code where you define the control flow. This differs from agent-directed workflows where the agent decides the next steps. Deterministic Orchestrations provide predictable, repeatable execution patterns with automatic checkpointing and recovery. Example scenario: An email processing system that uses a spam detection agent, then conditionally routes to different specialized agents based on the classification. The orchestration automatically recovers if any step fails and completed agent calls are not re-executed. # Python app.orchestration_trigger(context_name="context") def document_publishing_orchestration(context: DurableOrchestrationContext): """Deterministic orchestration coordinating multiple specialized agents.""" doc_request = context.get_input() # Get specialized agents from the orchestration context research_agent = context.get_agent("ResearchAgent") writer_agent = context.get_agent("DocumentPublisherAgent") # Step 1: Research the topic using web search research_result = yield research_agent.run( messages=f"Research the following topic and gather key information: {doc_request.topic}", response_schema=ResearchResult ) # Step 2: Generate outline based on research findings outline = yield context.call_activity("generate_outline", { "topic": doc_request.topic, "research_data": research_result.findings }) # Step 3: Write the document with the research and outline document = yield writer_agent.run( messages=f"""Create a comprehensive document about {doc_request.topic}. Research findings: {research_result.findings} Outline: {outline} Write a well-structured, engaging document with proper formatting and citations.""", response_schema=DocumentResponse ) # Step 4: Save and publish the generated document return yield context.call_activity("publish_document", { "title": doc_request.topic, "content": document.text, "citations": document.citations }) Human-in-the-loop Orchestrations and agents can pause for human input, approval, or review without consuming compute resources. Durable execution enables orchestrations to wait for days or even weeks while waiting for human responses, even if the app crashes or restarts. When combined with serverless hosting, all compute resources are spun down during the wait period, eliminating compute costs until the human provides their input. Example scenario: A content publishing agent that generates drafts, sends them to human reviewers, and waits days for approval without running (or paying for) compute resources during the review period. When the human response arrives, the orchestration automatically resumes with full conversation context and execution state intact. # Python app.orchestration_trigger(context_name="context") def content_approval_workflow(context: DurableOrchestrationContext): """Human-in-the-loop workflow with zero-cost waiting.""" topic = context.get_input() # Step 1: Generate content using an agent content_agent = context.get_agent("ContentGenerationAgent") draft_content = yield content_agent.run(f"Write an article about {topic}") # Step 2: Send for human review yield context.call_activity("notify_reviewer", draft_content) # Step 3: Wait for approval - no compute resources consumed while waiting approval_event = context.wait_for_external_event("ApprovalDecision") timeout_task = context.create_timer(context.current_utc_datetime + timedelta(hours=24)) winner = yield context.task_any([approval_event, timeout_task]) if winner == approval_event: timeout_task.cancel() approved = approval_event.result if approved: result = yield context.call_activity("publish_content", draft_content) return result else: return "Content rejected" else: # Timeout - escalate for review result = yield context.call_activity("escalate_for_review", draft_content) return result Built-in agent observability Configure your Function App with the Durable Task Scheduler as the durable backend (what persists agents and orchestration state). The Durable Task Scheduler is the recommended durable backend for your durable agents, offering the best throughput performance, fully managed infrastructure, and built-in observability through a UI dashboard. The Durable Task Scheduler dashboard provides deep visibility into your agent operations: Conversation history: View complete conversation threads for each agent session, including all messages, tool calls, and conversation context at any point in time Multi-agent visualization: See the execution flow when calling multiple specialized agents with visual representation of agent handoffs, parallel executions, and conditional branching Performance metrics: Monitor agent response times, token usage, and orchestration duration Execution history: Access detailed execution logs with full replay capability for debugging Demo Video Language support The Durable Extension supports: C# (.NET 8.0+) with Azure Functions Python (3.10+) with Azure Functions Support for additional computes coming soon. Get started today Click here to create and run a durable agent Learn more Overview documentation C# Samples Python Samples8.8KViews3likes8CommentsConnect Azure Functions to more services with managed connectors
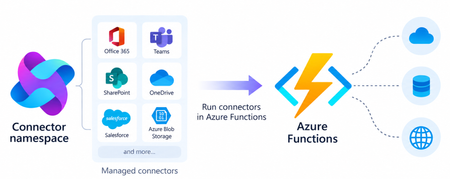
Azure Functions can already connect to many Azure services through triggers and bindings. With managed connectors, your functions can access about 1,700 connectors across services such as Microsoft 365, Microsoft Teams, Dataverse, SharePoint, OneDrive, and third-party systems. Connector triggers deliver events from these services to your function, while typed connector clients let your code take actions against them. You get this broader integration surface without writing the webhook registration code or managing the OAuth tokens required to connect to each service. Focus on your function's business logic and let Azure Connector Namespace handles the connection. Azure Functions integration with Connector Namespace is currently in public preview. It supports .NET isolated, Python, and Node.js. Review the managed connectors overview for current language, hosting plan, and regional availability. To demonstrate how connector triggers and actions work together, this article follows a .NET sample that automates RFP intake across SharePoint, Azure Content Understanding, and Teams. From an uploaded RFP to Teams notification Consider an organization that receives requests for proposals (RFPs) in a shared SharePoint document library. Someone must read each document, identify the requested capabilities, determine which subject-matter experts should respond, and notify the right team. The automated RFP intake sample turns that process into an event-driven workflow: A customer uploads an RFP to a SharePoint document library. A SharePoint connector trigger invokes an Azure Function when the file is created. The function uses a typed SharePoint connector client to retrieve the file contents. Azure Content Understanding extracts the document’s text and layout. The function applies deterministic rules to identify the customer, required capabilities, and recommended subject-matter experts. The function uses a typed Teams connector client to post the results as an Adaptive Card in a channel. Connector Namespace manages the SharePoint and Teams connections. The function controls file processing, document analysis, routing rules, error handling, and notification content How the sample works The .NET sample demonstrates both parts of the connector programming model: a connector trigger receives an event from SharePoint, and typed connector clients provided by the Connector SDKs to perform actions against SharePoint and Teams. The function starts when the SharePoint When a file is created trigger detects a new RFP. It declares the trigger using the ConnectorTrigger attribute and receives a typed payload containing the file’s properties: [Function("OnNewFile")] public async Task OnNewFile( [ConnectorTrigger] SharePointOnlineOnNewFileItemsTriggerPayload payload, CancellationToken cancellationToken) { // Process the newly uploaded file. } Because the trigger provides file properties rather than its contents, the function uses a typed SharePoint client to retrieve the document: byte[] response = await _sharePoint.GetFileContentAsync( Uri.EscapeDataString(siteAddress), fileIdentifier, cancellationToken: cancellationToken); byte[] document = SharePointFileContent.Decode(response); The SharePoint and Teams clients are registered through dependency injection. Each client uses the runtime URL of its Connector Namespace connection and authenticates with DefaultAzureCredential: services.AddSingleton( new SharePointOnlineClient( new Uri(sharePointRuntimeUrl), credential)); services.AddSingleton( new TeamsClient( new Uri(teamsRuntimeUrl), credential)); The function sends the document to Content Understanding’s prebuilt-layout analyzer, which extracts its text and structure. It then applies deterministic C# rules to identify the customer and required capabilities and map those capabilities to predefined subject-matter expert roles. Finally, the function creates an Adaptive Card containing the results and posts it to the configured Teams channel with the typed Teams client: await _teams.PostCardToConversationAsync( postAs, postIn, request, cancellationToken); Connector Namespace handles the SharePoint and Teams connections, while the function controls the document analysis, routing logic, error handling, and notification content. Try the sample The RFP intake sample includes the function code, Bicep infrastructure, Azure Developer CLI configuration, and supporting scripts. Its README explains how to test the workflow locally and deploy it to Azure. Common connector patterns Managed connectors are useful when a function must react to events or perform operations in external systems. Common patterns include: Event to action: React to an event in one service and take an action in another. Event to enrich to action: Retrieve additional information related to an event before acting. Event to document analysis to action: Extract text and structure from a document, apply application rules, and send the result through another connector. Event to AI to action: Analyze event data with an AI service and write the result back through a connector. Extend an existing function app: Add connector-based integrations alongside HTTP, timer, queue, Service Bus, Event Grid, or Durable Functions workloads. The RFP sample combines several of these patterns. A SharePoint event starts the workflow, a SharePoint action retrieves the document, Content Understanding extracts its contents, application code enriches the result, and a Teams action sends the notification. Closing thoughts Managed connectors extend the external systems that can trigger your functions and the services your function code can act on. This brings services such as SharePoint, Teams, Microsoft 365, and many third-party systems into the Azure Functions programming model without requiring you to build the underlying webhook and OAuth infrastructure. Choose Azure Functions with managed connectors when you want this broader integration surface in a code-first application and need custom branching, application libraries and SDKs, other Functions bindings, document or AI processing, or application-specific logic between the trigger and action. If the workload primarily orchestrates connector operations, involves little custom code, and would benefit from a visual designer, Azure Logic Apps is usually the simpler choice. Resources Documentations Overview of managed connectors in Azure Functions Azure Functions connector samples Azure Connector Namespace overview Content Understanding prebuilt-layout analyzer Connector SDK GitHub repos .NET SDK Python SDK Node.js SDK285Views0likes0CommentsAzure Container Apps Sandboxes, Now Generally Available
Agents Act. You Set the Limits. Your platform needs to run untrusted code. Agents choose actions at runtime, from installing packages to calling APIs. In a multi-tenant service, you have to support both without letting one customer's code reach another customer's data. That requires an execution environment you control for each tenant, session, or task. Azure Container Apps Sandboxes is that execution environment, as a service. Each sandbox is a hardware-isolated microVM with its own Linux kernel. It starts in under a second, and you decide per sandbox what it can reach, how large it is, and how long it lives. For each user, controlling which credentials their agent can use and what it can reach is key. Untrusted code must stay isolated from other workloads and the host kernel. Preserving a session state without giving up scale to zero or instant startup is important, as is visibility into what each agent did. Let's unpack these one at a time. Control What Your Agents Can Reach The first question about an agent is not what it can do, but what it can reach. Per-sandbox egress policies answer that: an external proxy evaluates every outbound request against rules you set - by host, domain pattern, or CIDR. You can start with a default 'Deny' action and allow only the endpoints the task needs, so a prompt injection or a compromised dependency has nowhere to go. Network Audit shows you what was allowed and what was denied. Approved endpoints usually need credentials, and handing an API key to an agent means the key can be logged, echoed into a response, or carried off somewhere you did not intend. Transform rules can inject authentication headers outside the sandbox. The agent sends a request with no secret in it, the proxy adds the credential outside the sandbox, and the call goes through. The agent gets access to the service without ever getting the API key. When a static allowlist cannot express the rule you need, an egress webhook hands each request to your own service before it leaves. You can build a service that reviews all outbound calls, approves some and rejects others. Good results depend on the agent reaching the right data, and the data that matters usually sits on your private network. Outbound, VNet integration places the sandbox group on a dedicated subnet, so agents can reach internal APIs, databases, and services behind private endpoints. Egress rules are still enforced: routing is chosen per rule, so a call to an internal database is filtered, transformed, and recorded in Network Audit exactly like a call to the open internet. Inbound, a Private Endpoint brings the sandbox service into your VNet, so your own applications reach into your sandboxes without crossing the public internet. Run Untrusted Code Without Sharing a Kernel Each sandbox runs in a hardware-isolated microVM with its own Linux kernel and virtual hardware, with memory separation enforced through CPU virtualization. In contrast, typical container runtimes isolate processes while sharing the host kernel. In a sandbox, code calls into its own guest kernel, so the blast radius of a kernel exploit is one sandbox. You get that boundary with ACA Sandboxes. Inside that boundary, the filesystem is yours to choose. The quickest way to start is by creating a sandbox based on a platform-provided disk image: Public image Ready for ubuntu General-purpose Linux execution and development tools nginx Running a web server copilot, claude GitHub Copilot CLI or Claude Code workflows azure-dev Azure development with CLI tools and multiple language runtimes python-3.12-code-interpreter Isolated Python execution through REST and MCP python-3.11 to python-3.14 Python workloads node-22, node-24 Node.js workloads dotnet-8 to dotnet-10 .NET workloads php-8.3, php-8.4 PHP-FPM workloads Availability and versions change over time, please check the portal's catalog for the current list. Images are provided as is. For a custom environment with your own code and dependencies, you can bring a container image from a public or private registry. The platform converts it into an optimized, bootable disk image containing your application, agent harness, runtimes, and toolchain. For a private registry, you authenticate with registry credentials or a managed identity for Azure Container Registry. You can also start from a sandbox you already have running. A disk snapshot captures the filesystem as a new disk image, while a memory snapshot captures disk and memory together, so a sandbox created from it resumes where the original left off. Installed dependencies, or a cloned repo, are set up once, and every sandbox created from the snapshot starts with them. Give Every Task Its Own Sandbox A sandbox starts in under a second, and that is why it is practical to give every task its own machine. When a machine takes minutes to come up, everything ends up sharing that same space. When it starts instantly, each task, user, or tool call runs in isolation, and gets deleted when the work is done. Thousands at a time. Sandboxes are sized when created by selecting a resource tier. These range from 0.25 vCPU with 0.5 GB of memory and a 5 GB disk, enough for a short script or a quick evaluation, to 4 vCPU with 8 GB of memory and an 80 GB disk for compilation and heavier analysis, with multiple steps in between. Programmatically you can go up to 16 vCPU with 32 GB of memory and a 320 GB disk for the most demanding work. Sandboxes do not have to be discarded by hand. Lifecycle policies stop a sandbox once it goes idle, capturing the disk and optionally the memory. It can resume on a start command or automatically on arriving network traffic. A policy can also auto-delete a sandbox that has been stopped long enough, so abandoned work does not linger. Keep State and Bring Your Data Most agent tasks are short - run a script, or return a result. That is not the limit. A long-running agent needs state that outlives single runs, and volumes attach persistent storage to a sandbox at a path you choose. Code reads and writes to it through ordinary filesystem calls, and the data stays after the sandbox is deleted. There are three kinds: A Data Disk mounts to one sandbox at a time and gives it a fast, fully POSIX-compatible filesystem on local disk, which suits a working database, a build cache, or an agent's accumulated memory. An Azure Blob volume mounts to many sandboxes at once, for sharing a large read-heavy dataset rather than supporting concurrent writers. Azure Blob BYO volume (bring your own) does the same for blob storage you already own, referenced by resource ID. See What Your Sandboxes Are Doing Observability is how you know what a fleet of short-lived sandboxes did. Telemetry is opt-in and configured per sandbox when you create it, and it streams out while the sandbox runs, so you can go back to a run that finished hours ago. A sandbox emits four categories of data, and you choose which of them to collect: Category What it carries Console logs The stdout and stderr streams from each sandbox Sandbox metrics (platform) Platform-managed CPU usage, memory consumption, and network I/O per sandbox, sampled on an interval you set OpenTelemetry Signals emitted by your own application; the sandbox injects the OTLP endpoint, so an SDK you already use exports with no extra configuration Network egress decisions One record per outbound request, with the allow or deny decision the egress policy made Each category is then pointed at a destination: any OTLP-compatible collector, Log Analytics through the Logs Ingestion API, or Application Insights. They mix freely, so console logs can go to your collector while egress decisions go to Log Analytics. The credential that writes to the destination never enters the sandbox. OTLP resolves their from a sandbox-group secret, Log Analytics authenticates with a managed identity on the group. Separate from what a sandbox exports, the platform publishes cores and memory to Azure Monitor on the sandbox group, and that is what the portal shows for a Sandbox group. Sandbox group totals come by default, and you can opt-in for per sandbox details if you need that level of granularity. Use It From Code, a Shell, or a Browser Every one of these operations is available from code, a shell, a template, or a browser, so the choice comes down to what you are doing at the time. When the sandbox is part of your application, use an SDK. Today available for Python and TypeScript, with .NET on the way. An app or service you build creates sandboxes, writes and reads files, runs commands, mounts volumes, and captures snapshots as native objects in the language you use. When the work is scripted, the ACA CLI covers the same surface from Bash or PowerShell: aca sandbox create --disk ubuntu or aca sandbox snapshot. Commands accept label selectors, so automation and CI act on -l name=build-agent instead of tracking generated IDs. When the group itself is managed in source control, define it as infrastructure as code. Microsoft.App/sandboxGroups is a first-class ARM resource, so a Bicep template attaches a managed identity, links a delegated VNet subnet, and assigns data-plane roles. An ACA Terraform provider (Preview) covers the same group-level controls for teams standardized on Terraform. Sandboxes portal Designing a new resource type from scratch let us rethink the portal experience along with it. The creation flow asks the minimal set of questions - a disk image and resource tier - and you have a running sandbox. The Advanced section allows you to go deeper to ports, volumes, lifecycle policies, egress policies, logging and more. All there when you need it. What you see afterward is tailored the same way. A sandbox group gives you the overview of all sandboxes in that group: how many exist and how many are running, cores and memory in use over time. The most recent sandboxes with their state and size, and the disk images and snapshots the group can build from. A single sandbox gives you the machine: a terminal, live CPU, memory, storage, and network, a log stream, running processes, the files on disk, mounted volumes, and the egress traffic it generated with each request marked allowed or denied. You get that same experience wherever you start. Reach sandboxes from the Azure portal, alongside the rest of your resources and under the same subscriptions, RBAC, and policies, or go straight to the standalone ACA Sandboxes portal. It is the same experience either way, so there is nothing to relearn and nothing you can only do in one of them. How Much Does It Cost? Three types of charges: vCPU, per core-second while the sandbox runs. Memory, per GiB-second while the sandbox runs. Storage, per GB stored, for as long as you keep it. The resource tier of the sandbox determines the amount of vCPU and GiB of memory. These rates are on the Container Apps pricing page. Storage is charged (coming soon) at Premium Azure Blob ZRS rates and covers: Custom Disk Images, including Disk Snapshots. The platform converts your OCI container image into a bootable disk image. You pay to store one copy of that image for as long as you keep it, regardless of how many sandboxes boot from it. The OS disk each of those sandboxes runs on is not billed. Snapshots are the combined memory and disk snapshots of your sandboxes, including those taken automatically when a sandbox stops. Optional Data Disk Volumes and Azure Blob Volumes that can be attached to sandboxes. Thank You and What Comes Next General availability is not the destination, it is where many more of you get to start. During public preview that we announced in June 2026, the usage surpassed quickly a million sandboxes created every day. Our team worked closely with early customers that provided valuable feedback that shaped the product as it's today. From teams running real workloads on sandboxes ranging from cloud-native SaaS companies like Templafy to global organizations like KPMG and Cognite. KPMG built their Cowork AI Agent for their global workforce on ACA Sandboxes. Cognite uses ACA Sandboxes in their industrial Atlas AI system. Lastly, the Department for Education, South Australia - uses ACA sandboxes to power their EdChat - A safe place for every learner. We run the EdChat so students can learn by writing code and exploring data alongside AI, across 60,000 students and more than 40,000 staff. That model only works if every student gets an environment of their own, with clear guardrails, and can come back later to find their work exactly as they left it. Building that in house meant owning the machinery behind it. We estimate that moving to Azure Container Apps Sandboxes lets us retire close to 50,000 lines of code written to manage custom code interpreter and state ourselves. It is the per-user execution model that scales for our school system, and a lower maintenance burden for us. Cody Little, AI Technical Lead, Department for Education, South Australia In addition, many internal customers at Microsoft adopted ACA Sandboxes to build and enhance their products for their customers. Among those Microsoft Foundry built hosted agents, Copilot Studio hosts agents you create - both on ACA Sandboxes and – our very own Azure Container Apps Express built a modern and fast serverless container platform on sandboxes. Their feedback and your feedback set the next priorities, and we are grateful to you for it. Three focus areas of work that follow: Sandbox groups get more control and visibility, so a platform team can observe sandboxes, audit and enforce policies at the sandbox group level. Broad extensibility with more SDKs and tighter integration with VS Code. Lastly, extensive interoperability with Connectors and Triggers (now in preview) that will provide even larger customizability and on-behalf-of authentication (OBO), so agents securely reach the systems needed to do their job. Next Steps Open the ACA Sandboxes portal and create a group with a sandbox. Clone the samples repo and start with the working code. Read the documentation for the quick starts and the reference behind everything above. We appreciate your feedback, please submit it in the ACA Sandboxes portal, or open an issue in the Azure Container Apps repo Issues · microsoft/azure-container-apps.1.7KViews2likes0CommentsEnable Dynamic Workflows in Azure Functions hosted skills
Azure Functions already gives you a familiar way to build event-driven apps. A queue message, HTTP request, timer, or event triggers the code that handles the work. Azure Functions hosted skills (formerly Serverless Agents) add AI reasoning to that model. A hosted skill can read a request, use the regular tools you give it to inspect context, and choose the next step, while your triggers, tools, and business logic stay in place. When the work needs to keep going Consider an insurance policy servicing request. A hosted skill can use its regular tools to understand the requested change, look up the policy, and inspect the submitted documents. If the information is ready and the request can finish now, the normal tool loop, where the model calls a tool, reads the result, and decides the next step, is a good fit. That changes when the work must continue after the initial request. An insurance policy servicing request may need to inspect several documents in parallel, wait for a configured delay before checking again for missing information, and build a review packet after the checks it depends on complete. In a normal tool loop, each result returns to the model before the skill can decide what happens next. The application must keep the job alive, save its progress, and deliver the final result. At that point, the work needs to keep running independently of the original interaction instead of relying on the model and application to coordinate every step. For a queue or other non-HTTP trigger, the final result also needs to be written or sent somewhere useful because there is no response channel. Introducing Dynamic Workflows Dynamic Workflows brings a programmatic tool-calling pattern to Azure Functions hosted skills. Instead of sending every tool result back to the model so it can decide the next call, the model creates a structured, validated workflow plan once. Durable Functions then executes the allowed workflow-safe tool calls, waits, and subagent tasks, passing intermediate results through the workflow instead of the model context. This can reduce model turns and token use for multi-step work while making the work durable. That separation addresses the limits of the normal tool loop: the workflow store keeps state and intermediate results out of the model's context, independent checks can run in parallel, and durable timers resume waits without holding a worker open. Because a Durable Functions orchestration handles execution, the work can continue after the original request or a Functions worker restart. To test the difference, we ran the same structured multi-step task with the regular tool loop and with Dynamic Workflows, using a Foundry gpt-5.4-mini deployment. We ran it with inputs for one service and then ten services. In the Dynamic Workflows version, the model made the plan once, while the runtime kept intermediate tool results in the workflow store instead of sending them back to the model after every tool call. Dynamic Workflows used 56% fewer total model tokens for the one-service run and 93% fewer for the ten-service run, while producing the same final reports. Results will vary by workload and model, and small jobs can have planning overhead. The savings are largest when intermediate tool results would otherwise return to the model after every tool call. How it works Enable workflows in the hosted skill's Markdown front matter. The runtime then adds the management tools: start_workflow, get_workflow_status, list_workflows, cancel_workflow, and terminate_workflow. You do not implement those tools. You choose the workflow-safe tools and subagents that a plan can use. At run time, the AI model uses the hosted skill's instructions to generate a structured plan, limited to the workflow-safe tools and subagents you explicitly allow. The hosted skill calls start_workflow with that plan; the runtime validates it, starts a Durable Functions orchestration, and returns a workflow ID right away. --- name: Add Driver Review description: Prepares an add-driver document review for an insurance representative. workflows: enabled: true trigger: type: queue_trigger args: queue_name: policy-service-requests connection: AzureWebJobsStorage --- Put workflow-safe handlers under tools/ and decorate them for use in a workflow. Each handler must run synchronously, accept one dict argument, return JSON-serializable data, and be idempotent. A worker failure can cause a handler to run more than once, which is why that last point matters. Ordinary tools retain their existing behavior unless you explicitly make them available to a workflow. workflow_tool( description=( "Inspect one document from an add-driver request. Args: " "{document: <document>, position: int}. Returns the document and evidence state." ) ) def inspect_driver_document(args: dict[str, Any]) -> dict[str, Any]: document = args["document"] evidence_state = { "received": "present", "missing": "missing", "expired": "needs_current_copy", }[document["status"]] return { "position": args["position"], "document_id": document["document_id"], "type": document["type"], "file_name": document["file_name"], "evidence_state": evidence_state, } Dynamic Workflows runs on Durable Functions. You can configure Durable Task Scheduler in host.json and use its dashboard to see per-instance task state, retry history, and controls for work that is still running. Durable timers let a workflow wait without keeping a worker busy, then resume the steps that are ready. The workflow stays visible and durable instead of depending on an open request or a best-effort background task. Get started Build your first Azure Functions hosted skill dynamic workflow with the quickstart, then use the overview and sample to go deeper: Follow the Dynamic Workflows quickstart. Read the Dynamic Workflows overview. Browse the insurance policy review sample for an end-to-end implementation.342Views0likes0CommentsVirtual nodes on Azure Container Instances: a new compute layer for AKS
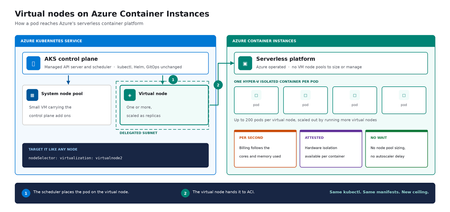
Meet virtual nodes on ACI Azure Kubernetes Service (AKS) gives you managed Kubernetes: the full Kubernetes API without operating the control plane yourself. Virtual nodes on Azure Container Instances go a step further, letting your pods run directly on Azure's serverless container platform, with the elasticity and with no capacity planning and no waiting for machines. Whether you already run AKS or want a managed Kubernetes that bursts without node management, this is for you. In short: virtual nodes on ACI attach Azure's serverless container platform to your cluster as Kubernetes nodes. Pods run as Hyper-V isolated containers, sized per pod rather than packed onto a fixed VM, up to 200 pods per virtual node. Run multiple virtual nodes, scaled as replicas, for more. They behave like any other pod: same kubectl, Helm, and GitOps. Kubernetes has always assumed a fixed set of machines underneath it. That assumption shapes everything above it: you size a node pool for a specific VM type in a specific region, you plan for peak rather than for average, and every workload on a node shares the same kernel and the same security boundary. Virtual nodes on ACI relaxs that assumption, which is what makes both elastic capacity and per container isolation possible without a different Kubernetes. If you've used the original AKS virtual nodes add-on (Virtual Kubelet based), this is not a rebrand. It is a new implementation that integrates far more deeply with Kubernetes, lifts most prior limitations (init containers, persistent volumes, managed identity, richer networking), and adds confidential containers as a first-class capability. The migration guide can be found here. Two capabilities carry the rest of this post: effortless burst capacity, and confidential containers. How virtual nodes on ACI work ACI runs every container as a Hyper-V isolated container, which means each one gets its own lightweight virtual machine boundary rather than sharing a kernel with its neighbors. Azure operates that platform. A virtual node connects it to your cluster. The cluster's control plane, the component that decides where each container runs, sees two kinds of destination: a small pool of virtual machines carrying cluster services, and one or more virtual nodes. From the application manifest's perspective, nothing changes. The pod lands on a virtual node; the virtual node hands it off to ACI. See Microsoft Learn: virtual nodes on ACI for the official capability and current limits. Virtual nodes on ACI in practice The rest of this post is hands on. You do not need to be a Kubernetes expert to follow it. kubectl is the command line tool for talking to a cluster, Helm installs packaged software into one, and a manifest is a text file describing what you want to run. If you have a cluster, everything below runs against it as written. The manifests behind the examples live in a companion demo repo. Setup is documented officially, and you can reproduce this end to end from the ACI virtual nodes documentation and the microsoft/virtualnodesOnAzureContainerInstances Helm repo. One requirement before you start: deploy into a delegated ACI subnet, meaning a subnet in your virtual network set aside for the ACI platform to place containers in. Size it for peak pod count plus headroom, since every pod consumes an address from it for its lifetime. Demo manifest files can be found in this repo, a personal sample repo provided as is and not a supported Microsoft artifact. Enable virtual nodes on ACI The virtual node is deployed via Helm. The Microsoft GitHub repo is itself a Helm repository, so a single helm install is all you strictly need. Cloning first, shown here, just makes it easier to customize values. Running kubectl get nodes afterward confirms the node registered. git clone https://github.com/microsoft/virtualnodesOnAzureContainerInstances.git helm install <yourReleaseName> ./virtualnodesOnAzureContainerInstances/Helm/virtualnode kubectl get nodes The virtual node appears alongside any existing capacity, ready to accept work. A virtual node is a Kubernetes node You target it the same way you would target any node. These few lines in a manifest say "run this on the virtual node": nodeSelector: virtualization: virtualnode2 kubernetes.io/os: linux tolerations: - key: virtual-kubelet.io/provider operator: Exists effect: NoSchedule That is the entire integration surface. No new API to learn, no separate deployment pipeline, no application changes. kubectl describe, kubectl logs, and kubectl exec, the standard commands for inspecting and troubleshooting, all work as they would anywhere else, including opening a shell inside a container running in a Hyper-V isolated boundary. Scaling stays trivial. kubectl scale deployment demo-deployment --replicas=10 lands every replica on the same virtual node, with no VMSS scale event, no provisioning latency, no climbing node-count chart. The same flow scales just as cleanly to hundreds. Cost follows the same shape. Each pod is billed per second against the cores and memory it requests, at ACI rates, and billing stops when the pod stops. Logs and metrics flow through the same path you already use, so existing dashboards and alerts keep working. One annotation makes a pod confidential Turning a regular container into a confidential one takes a single addition to its manifest: a policy that pins exactly which images, commands, environment variables, mounts, and capabilities are permitted inside the Trusted Execution Environment. The format is a base64 encoded Rego document, called a CCE (Container Confidential Enforcement) policy. You do not write that policy by hand. A tool generates it from the manifest you already have: az extension add -n confcom az confcom acipolicygen --virtual-node-yaml ./hello-world-deployment.yaml The tool pulls each image, hashes its layers, builds the allow-list, and injects the annotation back into the manifest. kubectl apply, and you're done. (acipolicygen has prerequisites of its own, including a working Docker installation; see the confcom documentation.) Here is why this is a genuinely new isolation primitive rather than a stronger version of an existing one. Most container security policy is enforced by software in the cluster, which means an attacker who compromises the host can potentially bypass it. This policy is enforced by the guest operating system inside the TEE instead. The underlying hardware, AMD SEV-SNP, also produces an attestation report, retrievable from inside the container, which is a cryptographic proof that the workload running is the workload you specified and nothing tampered with it. That is the guarantee regulated industries have been asking for, and increasingly the one AI workloads running untrusted code need too. The same per pod boundary is also what makes multi-tenancy on a single cluster realistic, though multi-tenancy in production still depends on your network and identity boundaries, which sit outside what the isolation layer itself provides. Background: Microsoft Learn: confidential containers on ACI. Wrapping up Virtual nodes on ACI give containers on Azure two things that were previously hard to deliver cleanly on Kubernetes: Effortless burst capacity on Azure's serverless container platform, billed per second for the cores and memory used, with no capacity planning and no waiting for machines. Confidential containers with hardware attested, per container isolation inside a Trusted Execution Environment. Virtual nodes are additive, not a replacement. Traditional node pools remain the right home for steady state, DaemonSet, and persistent volume workloads, and AKS features such as Node Auto Provisioning and Virtual Machine Node Pools already make that baseline more flexible. Virtual nodes on ACI absorb the spikes, the short-lived jobs, and the specialized isolation work on top. Where to start New to containers on Azure? Start with a small AKS cluster and add a virtual node from day one. You get a managed Kubernetes environment without having to guess your peak capacity in advance, and the elastic layer is there the first time you need it. Already running AKS? Add a virtual node to an existing cluster and move one bursty or short lived workload to it. Nothing else changes, and the comparison is immediate. Evaluating platforms? The capability that is hard to find elsewhere is the confidential containers path: hardware attested isolation per container, reachable through a standard Kubernetes manifest. The result: virtual nodes on ACI expand what AKS can run, with more capacity and stronger isolation, without changing the Kubernetes operating model you already use. Same kubectl, same manifests, same GitOps. New ceiling. For the high-level overview, official documentation, and Helm details, the Microsoft Learn is the source of truth. The companion repo holds the demo manifests used in this post. Acknowledgements I'd like to thank Gurpreet Virdi, Partner Group Engineering Manager, whose guidance shaped this post from the first outline through to publication. Her product leadership ensured this post reflects both the technical depth and the customer value of virtual nodes on ACI. Thanks to Gabriel Fuhrman, Senior Software Engineer, for his detailed technical review. His feedback refined the technical content and significantly improved the accuracy and depth of this post. Christopher Little, Principal CSA, shaped the enterprise adoption perspective, and Adam Sharif, CSA, reviewed the post from the earliest draft. Thanks also to Kirthi Maguluri, Senior Product Manager, and Varun Shandilya, Principal Product Manager, for their review of the blog.588Views1like0Comments
Azure function require private git package
At the moment we are deploying our python application to a server-less azure function app. For this we use the kudu config-zip deployment. az functionapp deployment source config-zip -g "xxxx" -n "xxxx" --src "xxxx.zip" --build-remote We also want a remote build, because this will install the correct version of the packages. Because some packages have different versions voor different python versions (e.g. 3.8 vs 3.10) and different environment (windows vs linux). The remote build will make sure the correct packages are installed, cause the build (azure's default oryx) will run in the same environment. Recently we moved some of our code to another package. This package is shared by multiple other applications. To install it, we add it to our requirements.txt: git+ssh://Email address removed/xxxxx/xxxxx.git@f4e2bf2e3dxxxxxxxxx This works perfect on our local machines. But not once we deploy to azure. Unfortunately there are no logs. Well the logs shows "oryx build...." and that's it. There is no way to access the build logs. Anyway, we know the cause of the issue: the build doesn't have access to the repository. We do have a ssh key, which can be used to access the git repo. But we have no clue how to pass it to the orxy builder. We tried to make a work around with the "PRE_BUILD_COMMAND" environment variable, but since there are no logs, we cannot determine what is failing during the build. So we cannot install private python packages with azure serverless functions. We see two ways to solve this issue, but for neither we have a clue how to do it: Make the orxy builder use the ssh key Do a local build and push it to the azure function Did some tried this before or can give someone some pointers how to get started on this?1.6KViews1like1Comment