openclaw
3 TopicsAdding a Fallback Model to Hermes with Microsoft Foundry
So the plan was simple. Leave the Bedrock configuration untouched, then wire Microsoft Foundry in behind it as a fallback, so Hermes always has somewhere else to go when the primary provider is not responding. A few other reasons pushed me towards Foundry in particular: Redundancy that does not need me. If Bedrock is throttled or out of quota, I want Hermes to fail over on its own rather than waiting for me to notice. A catalogue I already pay for. Foundry puts the latest GPT models next to open-weight and partner models in one place, so I can pick a model that suits the task instead of settling for whatever a single provider happens to offer. Enterprise controls out of the box. Region pinning, private networking, content filters and per-deployment quota all sit in the same portal, which makes the setup far easier to defend to a security reviewer. Learning the mechanics before I need them. Working out how Hermes handles a provider chain is much nicer on a quiet Tuesday than during a live outage. Here is the short version, if you are deciding whether to read on. Time: about thirty minutes if nothing goes wrong. Cost: pay-as-you-go tokens only, and none at all while the fallback sits idle. Result: an assistant that keeps answering when your primary provider stops. Before you start, you will need three things: a machine with Hermes already installed and a working primary provider configured, an Azure subscription with access to Microsoft Foundry in a region you can actually deploy into, and enough quota in that region to create a deployment. One thing that made this easy to justify: Foundry deployments bill per token on the standard pay-as-you-go tier. A fallback provider that never gets invoked costs nothing beyond the requests it actually serves, so the insurance is close to free until the day you need it. Chat surface (CLI, messaging) → Hermes Gateway → Primary Amazon Bedrock → Fallback Microsoft Foundry Figure 1: Where the fallback sits. Every request goes through the Hermes gateway to the primary provider; only when that provider is unavailable does the chain continue to Microsoft Foundry. Part 1: Deploying a Model on Microsoft Foundry The first half of this job happens entirely inside the Microsoft Foundry portal and has nothing to do with Hermes yet. All you are really doing here is making sure your Azure subscription can serve a model, and that you hold an endpoint and key Hermes can authenticate with later. 1. Deploy model in Foundry → 2. Copy endpoint + key → 3. hermes fallback add → 4. Authenticate → 5. Select models, test Figure 2: The whole setup in five moves. The first two happen in the Microsoft Foundry portal (orange); the rest happen on the Hermes machine (blue). Go to Microsoft Foundry > Build > Models > Deploy > Deploy a base model. You can deploy a fine-tuned model instead if you already have one, which works just as well with Hermes. Check the region shown at the top of the portal before you commit, because both model availability and deployment quota differ from one region to the next. Then deploy the model you have selected: In this case I deployed gpt-5.6-sol, which is the model Hermes will fall back to. The choice was deliberate rather than exciting. My primary model on Bedrock is a general-purpose chat model, and a fallback is only useful if the answers it gives feel like a continuation of the same conversation rather than a different assistant wearing the same name. The gpt-5.6-sol deployment matches that behaviour closely, it was available in the region I wanted to pin, and the quota I was granted comfortably covers a day of normal use. If a fallback surprises you the first time it fires, it is the wrong fallback. Once the deployment finishes, open it and take note of two values: the target endpoint URI and the API key. Copy both somewhere safe now, because you will be pasting them into Hermes in the next part. If your organisation rotates keys on a schedule, use a key with the longest life you are allowed, since a fallback secured with a credential that expires quietly stops being a fallback. What to copy Where it lives in the portal Where Hermes asks for it Target endpoint URI Deployment > Endpoint > Target URI "Endpoint" prompt in hermes fallback add API key Deployment > Endpoint > Key "API key" prompt, or choose Entra ID instead Deployment name Deployment > Details > Name Shown in the model list Hermes returns Region Top of the portal, next to the resource Must match the region you deployed into Figure 3: Everything Hermes will ask for, and where to find each value before you leave the portal. Part 2: Adding Foundry to Hermes as a Fallback With the Foundry side sorted, everything from here happens in the Hermes CLI. One thing worth knowing before you start: this is the fallback command, not the primary model command, so your existing Bedrock configuration is left completely alone. Nothing in this section can break what is already working, which makes it a good one to try on a live setup. Run the Hermes fallback command: When Hermes asks which provider to add, choose Azure Foundry. The picker still carries the old name; it is the same service that the portal now calls Microsoft Foundry. Paste the target endpoint URI from your deployment, then authenticate with the API key you copied earlier. Hermes also offers Microsoft Entra ID at this prompt, which is the better option if your organisation would rather not have a static key sitting on the machine. If authentication fails here, check the endpoint before you start suspecting the key. In my experience the endpoint is wrong far more often than the credential is, usually because the deployment name at the end of the URI does not match the deployment you actually created. Once authentication succeeds, Hermes lists the deployments your Foundry resource exposes and asks which ones you want to use. You can select more than one, and the order is not cosmetic: Hermes walks down the chain from top to bottom whenever the provider above is unavailable. Treat that list as a priority order, not a shopping basket. What happens to the primary What Hermes does What you see in the chat Responds normally Routes every request to the primary and never touches the chain Nothing. The fallback stays idle Throttled or out of quota Retries the next provider down the chain on the same request A reply, served by the fallback model Endpoint unreachable Keeps failing over on each new request until the primary recovers Slightly different tone and latency, but a working assistant Every provider fails Returns the error rather than hanging An error worth chasing with hermes status Figure 4: The chain in practice. The fallback only earns its keep in the middle two rows, which is exactly why it is easy to forget you configured it. Part 3: Promoting Foundry to the Primary Model At this stage Foundry is sitting in the back seat as a backup. I wanted to reverse the arrangement and make Foundry the primary while Bedrock slides down into the fallback slot, partly because I preferred keeping day-to-day traffic inside my Azure subscription, and partly because I wanted proof the chain works in both directions. Before promotion After promotion Primary: Amazon Bedrock → Primary: Microsoft Foundry Fallback: Microsoft Foundry → Fallback: Amazon Bedrock Figure 5: The promotion, in effect. Nothing is added or removed; the two providers simply trade places in the chain. There is no dedicated "promote" command in Hermes, so the manual route is a short sequence of steps rather than a single instruction: Select the fallback provider/model as the new primary: hermes model Remove the now-duplicate model from the fallback chain: hermes fallback remove Optionally add the old primary model as a fallback: hermes fallback add Restart the messaging gateway: hermes gateway restart Verify the result: hermes status / hermes fallback list That sequence works, and it is good to know what is happening underneath. But since I already had a working provider configured, I would rather just ask Hermes to rearrange itself. This is the part I genuinely enjoy about the tool: the configuration is something you can talk to, not only something you type commands at. Prompt: Okay now please make the model I configured on Microsoft Foundry into the main model, and make the Bedrock one the fallback model! Hermes rewrites the provider chain on its own and confirms the swap once it is done, which is a great deal less error-prone than running the five commands by hand. Part 4: Testing the Switch Configuration you have not tested is just an assumption with extra steps, so the next thing is to confirm Hermes really is talking to Foundry. Type /model when running Hermes to bring up the model picker. You will be prompted to select a provider first. Pick the Microsoft Foundry entry, then choose the specific deployment from the list underneath it. The active model should switch straight away. Send it a plain "Hello" to check that the deployment actually responds, rather than just looking correct in the menu. Appearing in a dropdown and serving a request are two very different things. A second test is worth the thirty seconds it costs: run hermes status to confirm which provider is live, then hermes fallback list to confirm the chain is ordered the way you intended. The picker tells you what you selected; those two commands tell you what Hermes will actually do at three in the morning. Part 5: The Obstacle, and What It Actually Taught Me Every walkthrough has the part the author quietly leaves out. Here is mine: the wrinkle was not the model, it was capacity. My first attempt deployed into the region closest to me out of habit, and the portal turned it down because there was no capacity left for that model at the tier I asked for. The model was clearly listed in the catalogue; being listed and being deployable in your region, on your subscription, at your quota, are three separate questions. Redeploying in a different region fixed it in a couple of minutes, but it meant the endpoint URI changed, which in turn meant the value I had already pasted into Hermes was stale. Re-running hermes fallback add against the new endpoint sorted it out. The lesson is cheap enough to hand over for free: check quota and regional capacity for your specific subscription before you design a walkthrough, a demo or a production fallback around one deployment. In the Foundry portal, Management then Quota shows exactly what you have been granted per region and per model family, which is the only list that matters. Symptom Likely cause Fix Deployment rejected in the portal No capacity for that model at the tier you asked for, in that region Deploy in another region, or drop to a smaller tier Hermes rejects the credential Endpoint URI does not match the deployment you created Re-copy the target URI from the deployment, not the resource Provider authenticates but lists nothing Key belongs to a different Foundry resource Check you are in the right resource, then re-run hermes fallback add Fallback never fires Chain ordered the wrong way round hermes fallback list, then reorder Figure 6: The four things that went wrong, or nearly did, and what fixed each one. There is a silver lining worth stating plainly. Because the fallback chain was already in place, a deployment that refused to come up did not take the assistant down with it. That is precisely the scenario this whole exercise was meant to cover, and it turned up on day one without me having to simulate it. Command Cheat Sheet Everything used in this walkthrough, collected in one place: hermes fallback add: attach a provider to the fallback chain hermes fallback remove: drop a provider from the chain hermes fallback list: show the chain in priority order hermes model: set the primary model hermes gateway restart: restart the messaging gateway after a change hermes status: confirm which provider is currently live /model: switch models from inside a running session Conclusion Adding Microsoft Foundry as a fallback behind my existing Bedrock setup took an afternoon, and most of that was spent recovering from a regional capacity limit I should have checked first. The work itself is small: deploy a model, copy the endpoint and key, run hermes fallback add, authenticate, pick your deployments. The payoff is that Hermes no longer depends on one provider staying healthy. Three things are worth carrying away from this: Check quota, not just the catalogue. The Foundry catalogue shows what Microsoft offers. It does not show what your subscription and region can actually deploy today. Confirm that first, before you build anything on top of a specific deployment. Order your fallback chain deliberately. Hermes works down the list from top to bottom, so the sequence you choose during setup is the failover policy you are going to live with. Put the model you actually trust at the top. Treat the endpoint as part of the credential. Redeploying in a new region changes the endpoint URI, and a fallback pointed at an endpoint that no longer exists is not a fallback. Re-run the setup whenever the deployment moves. The switch from Bedrock primary to Foundry primary also proved the chain runs in both directions, which is the real point. Provider redundancy is only useful if you have watched it work. Next on my list is deliberately breaking the primary provider to confirm the failover triggers on its own, without me typing a single command. If you run this against a different model, region or provider pairing, I would genuinely like to know how it went, particularly if your quota experience was better than mine. Drop it in the comments.467Views0likes0CommentsSigning in to Microsoft Foundry from OpenClaw using Azure AD: a smoother way to bring your models in
This post is a quick update to walk through the new flow. If you read the previous one, think of this as the easier path I wish I had the first time round. If you have not seen the original, you can find it here: Integrating Microsoft Foundry with OpenClaw: Step by Step Model Configuration | Microsoft Community Hub Pre-requisite: You will need the Azure CLI (azure-cli) installed on your machine. The official install guide for Linux is here: https://learn.microsoft.com/en-us/cli/azure/install-azure-cli-linux?view=azure-cli-latest I am on Linux so I went the Homebrew route, which keeps things simple. The formula is here: https://formulae.brew.sh/formula/azure-cli Microsoft also has official docs covering the Homebrew/Linuxbrew install: https://learn.microsoft.com/en-us/cli/azure/install-azure-cli-macos?view=azure-cli-latest#install-with-homebrew Once Homebrew is ready, run this in your terminal: brew install azure-cli Why this matters: Before this update, every Foundry model you wanted to use in OpenClaw needed its own API key and endpoint pasted into the config. It worked, but it was tedious, and keys are easy to leak if you are copying them around. The Azure AD path solves both problems. You authenticate as yourself (or a service principal), OpenClaw asks Azure for the list of Foundry resources you have access to, and it brings the models in automatically. Signing in to Microsoft Foundry from OpenClaw via Azure AD A device-code OAuth handshake replaces the old static-API-key flow. OpenClaw delegates auth to the local Azure CLI; the CLI handles the browser-side sign-in, holds the resulting tokens, and refreshes them silently. OpenClaw then walks the Azure resource graph, subscriptions → Foundry resources → model deployments and registers each model into its own config. No API keys move through OpenClaw at any point. Sequence diagram of the OAuth 2.0 device-authorization flow as orchestrated by OpenClaw. Phases 1–3 establish identity (the developer authenticates once, in a real browser, against Azure AD). Phases 4–5 perform service discovery (OpenClaw walks the ARM resource hierarchy, subscriptions → Foundry accounts → model deployments and persists the result to a local provider config). After registration, every model call OpenClaw makes against Foundry reuses the same Azure-CLI-managed token cache: tokens refresh transparently, and access is gated by the Foundry resource's RBAC assignments rather than a static API key. Dashed lines denote return values; the teal line in step 7 marks the single token-issuance event the rest of the system pivots on. Walking through the new flow: Start with the command to onboard openclaw as if you were setting up OpenClaw for the first time: openclaw onboard Kick things off with the OpenClaw onboard command, the same one you would use when setting up OpenClaw for the first time. When it prompts you, choose update values. Next, you will be asked to configure your models. Scroll down a little and you will see Microsoft Foundry listed as a supported provider. Pick it. From here, you have two options. You can sign in with an API key, which is what I covered in the previous blog post, or you can sign in through Azure AD. The Azure AD path is easier and more secure, so that is the one we will use. OpenClaw will give you a URL and a device code. Copy the URL into your browser and use the code to complete the sign in. (This is where the az CLI from the pre-requisite section earns its keep.) If everything worked, you should see a success prompt similar to this: Once you are signed in, OpenClaw will ask you to pick the Azure subscription that your Microsoft Foundry resource lives in. Pick the subscription, then pick the Foundry resource where your models are deployed. And that is pretty much it. All the models you have deployed to that Foundry resource get pulled into OpenClaw automatically. Compared to the old way of pasting API keys and endpoints one by one, this is a huge time saver, and you do not have to babysit any keys. From here you can start using your Foundry-deployed models inside OpenClaw straight away: Wrapping up The Azure AD sign-in option in OpenClaw is one of those small updates that quietly removes a real pain point. If you have ever juggled multiple Foundry endpoints and rotated keys across them, you already know why. With this flow, you sign in once, your models show up, and you can get back to actually building. If you have not tried OpenClaw with Microsoft Foundry yet, this is a good time to give it a go. And if you were holding off because of the key management overhead, that excuse is gone now. References Previous post on integrating Microsoft Foundry with OpenClaw using API keys: Integrating Microsoft Foundry with OpenClaw: Step by Step Model Configuration | Microsoft Community Hub Install the Azure CLI on Linux: https://learn.microsoft.com/en-us/cli/azure/install-azure-cli-linux?view=azure-cli-latest Install the Azure CLI on macOS: https://learn.microsoft.com/en-us/cli/azure/install-azure-cli-macos?view=azure-cli-latest#install-with-homebrew Homebrew formula for azure-cli: https://formulae.brew.sh/formula/azure-cli489Views0likes0CommentsHardening OpenClaw on AKS: Mitigating Container Escapes with Kata microVM Isolation
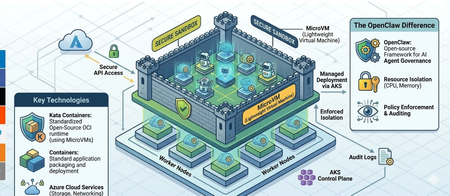
What is OpenClaw, and what security challenges does it pose with container escapes? OpenClaw is an open-source autonomous AI agent designed for power users and developers to automate tasks, such as managing emails, files, and scheduling via chat apps like WhatsApp or Telegram. While OpenClaw functions as a powerful autonomous assistant, its runtime model creates a massive security paradox: to be truly useful, the agent requires broad permissions to your filesystem and APIs, yet this "God Mode" access often lacks the rigorous containerized isolation typical of enterprise workloads. Because many users run the framework natively rather than within a hardened sandbox, the primary security challenge is that a single malicious "Skill" or an indirect prompt injection can escalate into full system compromise. This structural vulnerability, exemplified by high-profile exploits like CVE-2026-25253, transforms the agent from a helpful tool into a high-risk entry point for lateral movement and data exfiltration within a private network. Why container escapes matter in OpenClaw-style deployments: because containers share the host kernel, a successful container escape turns a single compromised container into a host compromise (or at least a compromise of other co-located workloads). This is especially important when OpenClaw runs code from many tenants, many teams, or varying trust levels on the same worker nodes. That soft isolation is often permeable due to the following structural and configuration-based weaknesses: Shared-kernel attack surface: the container boundary is not a hypervisor boundary. Kernel vulnerabilities (e.g., privilege escalation bugs) can allow a process in a container to gain host-level privileges. Excessive privileges / misconfiguration: running with --privileged, broad Linux capabilities, hostPath mounts, access to the Docker socket, or device passthrough (e.g., /dev/kvm, /dev/fuse) can provide direct paths to host control. Filesystem and namespace boundary breaks: mount namespace confusion, writable host mounts, or mistakes in chroot/pivot_root handling can expose host files and credentials. Supply-chain and image risk: a malicious image or dependency can execute within the container and then attempt escalation/escape. Blast radius: once the host is compromised, attackers can access node-level secrets (service account tokens, registry creds), tamper with the runtime, sniff traffic, or pivot to other containers and the broader cluster. In short, OpenClaw’s security challenge is not that containers are inherently insecure, but that the isolation boundary is thinner than a VM boundary. When the threat model includes adversarial code execution, a “container-only” isolation strategy often requires additional hardening or a stronger sandbox. What are MicroVMs and Kata Containers, and how do they help mitigate OpenClaw container-escape risks? MicroVMs are lightweight virtual machines optimized for running short-lived or container-like workloads with much lower overhead than traditional VMs. They use hardware virtualization (via a hypervisor such as KVM) but keep the device model and boot path minimal, reducing startup time and the overall attack surface compared to a full general-purpose VM. Kata Containers is an “OCI-compatible containers in a VM” approach: it runs each container (or pod sandbox) inside a dedicated microVM by default (implementation varies by runtime/config). To the orchestration layer (e.g., Kubernetes), it still looks like a container runtime, but isolation is provided by a hypervisor boundary rather than only namespaces/cgroups. Stronger isolation boundary: a container escape that relies on Linux kernel exploitation is far less likely to directly compromise the host, because the workload’s “host” kernel is typically the guest kernel inside the microVM. Reduced blast radius: compromise is contained to the microVM/pod sandbox; lateral movement to other workloads on the same node becomes significantly harder. Smaller and more controllable attack surface: minimal device models, tighter default privileges, and fewer host mounts/devices exposed to the workload. Defense-in-depth with container controls: you still can (and should) apply seccomp, capabilities dropping, read-only root filesystems, and LSMs inside the guest, but the hypervisor boundary becomes an additional layer. Better fit for hostile multi-tenant workloads: when OpenClaw executes third-party jobs/plugins, Kata-style sandboxing aligns better with an adversarial threat model. Solution overview Figure 1 illustrates a Kubernetes-based sandboxing architecture for running OpenClaw workloads with stronger isolation. The design keeps the developer experience and packaging model of containers (OCI images, Kubernetes scheduling) while ensuring that untrusted agent code executes inside a microVM boundary using Kata Containers. This reduces the likelihood that a container escape can compromise the underlying node or other co-located workloads. Key components: (1) Application gateway for HTTPS traffic to the backend, (2) Kubernetes as the orchestration, scheduling and policy enforcement plane, (3) a container runtime (e.g., containerd) configured with a Kata Containers runtime class, (4) KVM-backed microVMs that provide the isolation boundary for each untrusted workload and (5) Azure files for persistent storage which allows scaling of OpenClaw. Figure 1: Solution architecture diagram End-to-end flow: Traffic Entry via Application Gateway: Incoming user requests (e.g., from WhatsApp or Discord) first hit the Azure Application Gateway. Orchestration in AKS: The traffic is routed into an Azure Kubernetes Service (AKS) cluster, which manages the lifecycle of the OpenClaw agent and its associated "Skills." Hardened Execution via Kata Containers: Instead of running in standard shared-kernel containers, the OpenClaw agent runs inside Kata Containers. This provides a dedicated lightweight VM for the agent, creating a hardware-level isolation boundary that prevents "container escapes" from compromising the host. Stateful Storage in Azure Files: The agent interacts with Azure Files to read and write persistent data, such as conversation history, configuration files, and downloaded assets, ensuring data remains available even if the container is restarted. Security posture: by shifting isolation from “shared-kernel containers” to “containers inside microVMs,” the architecture limits the blast radius of kernel-level exploits and common escape paths. Even if an attacker achieves code execution within an OpenClaw container, they must additionally break the microVM/hypervisor boundary to affect the node or neighboring workloads, providing a strong defense-in-depth improvement over standard container alone. Implement the solution This section describes how to deploy the solution architecture. In this post, you’ll perform the following tasks: Create a Kata VM-isolated AKS node pool Mount a NFS persistent storage Create the application ConfigMap Deploy the OpenClaw gateway Expose the gateway internally Set up TLS termination Route external traffic through the Azure application gateway for containers. Ensure that you have the following prerequisites deployed before moving to the next section: An AKS cluster provisioned in Azure An Azure NFS File Share with private link enabled. An Application gateway for containers managed by ALB controller Kubectl configured and pointing to the cluster Az CLI authenticated with the correct subscription Initialise environment variables In your Linux terminal, export these variables with your own values. They will be used in later commands. export cluster_name=<CLUSTER_NAME> export resource_group=<RESOURCE_GROUP> Create the AKS Node Pool with Kata VM Isolation The OpenClaw gateway pods require Kata VM isolation (runtimeClassName: kata-vm-isolation). You must create a dedicated AKS node pool that supports this runtime before deploying any workloads. Use the Azure CLI to add a node pool with the Kata VM isolation workload runtime to your existing AKS cluster: az aks nodepool add \ --resource-group $resource_group \ --cluster-name $cluster_name \ --name katanp \ --node-count 2 \ --node-vm-size Standard_D4s_v3 \ --os-sku AzureLinux \ --workload-runtime KataMshvVmIsolation \ --labels agentpool=katanp **Important:** The `--workload-runtime KataMshvVmIsolation` flag enables the `kata-vm-isolation` runtime class on the node pool. The VM size must support nested virtualization (D-series v3/v5, E-series v3/v5, etc.). Create NFS Persistent Volume The deployment uses an Azure Files NFS share for persistent workspace storage. The PersistentVolume must exist before the PVC can bind to it. Replace volumeHandle and volumeAttributes with your own Azure Files values. cat <<EOF | kubectl apply -f - apiVersion: v1 kind: PersistentVolume metadata: name: openclaw-nfs-pv spec: capacity: storage: 100Gi accessModes: - ReadWriteMany persistentVolumeReclaimPolicy: Retain mountOptions: - sec=sys - noresvport - actimeo=30 csi: driver: file.csi.azure.com volumeHandle: <resource-group>#<storage-account>#<share-name> volumeAttributes: resourceGroup: <resource-group> shareName: <share-name> protocol: nfs server: <storage-account>.privatelink.file.core.windows.net EOF Verify that the persistent volume is created. kubectl get pv openclaw-nfs-pv Figure 2: Persistent volume Create the NFS PersistentVolumeClaim The PVC binds to the PV created. The deployment references this PVC by name (`pvc-openclaw-nfs`). cat <<EOF | kubectl apply -f - apiVersion: v1 kind: PersistentVolumeClaim metadata: # The name of the PVC name: pvc-openclaw-nfs spec: accessModes: - ReadWriteMany resources: requests: # The real storage capacity in the claim storage: 50Gi # This field must be the same as the storage class name in StorageClass storageClassName: "" volumeName: openclaw-nfs-pv EOF Verify that the persistent volume claim is created successfully. The status should show bound. Figure 3: Persistent Volume Claim Create the ConfigMap The ConfigMap provides the openclaw.json configuration file to the gateway pods. It configures allowed CORS origins for the control UI and the gateway token. Replace the allowed origins with your own ALB frontend URL. The ConfigMap also stores the gateway auth token, so DO NOT hardcode your token here. Always keep it as a variable rather than storing it in plain text so that, if attackers gain access to this file, they cannot see the OpenClaw gateway auth token. cat <<EOF | kubectl apply -f - apiVersion: v1 kind: ConfigMap metadata: name: openclaw-config data: openclaw.json: | { "gateway": { "auth": { "token": "${AUTH_TOKEN}" }, "controlUi": { "allowedOrigins": [ "https://<YOUR ALB FRONTEND URL>.alb.azure.com" ] } } } EOF Create the Auth Token Secret The OpenClaw gateway requires an authentication token to secure access. The deployment references a Kubernetes Secret named openclaw-auth-token and injects it into the container as the AUTH_TOKEN environment variable via secretKeyRef. Generate a random token (or use an existing one) and create the kubernetes secret. # Generate a random 32-byte hex token AUTH_TOKEN=$(openssl rand -hex 32) echo "$AUTH_TOKEN" # save this — you'll need it to authenticate with the gateway kubectl create secret generic openclaw-auth-token \ --from-literal=token="$AUTH_TOKEN" If the secret does not exist when the deployment is applied, pods will fail with `CreateContainerConfigError`. Deploy the OpenClaw Gateway This is the main application deployment. It depends on all previous steps: - Kata node pool (pods require runtimeClassName: kata-vm-isolation and nodeSelector: agentpool=katanp) - PVC (pvc-openclaw-nfs for persistent workspace data) - ConfigMap (openclaw-config for openclaw.json) Key details: - Runs 2 replicas with a rolling update strategy - Uses an init container to copy the config file to a writable volume - Exposes port 18789 - Includes liveness and readiness probes on /health - Resource requests: 500m CPU, 512Mi memory - Resource limits: 2 CPU, 2Gi memory cat <<EOF | kubectl apply -f - apiVersion: apps/v1 kind: Deployment metadata: name: openclaw-gateway spec: replicas: 2 selector: matchLabels: app: openclaw-gateway strategy: type: RollingUpdate rollingUpdate: maxUnavailable: 1 maxSurge: 1 template: metadata: labels: app: openclaw-gateway spec: runtimeClassName: kata-vm-isolation nodeSelector: agentpool: katanp securityContext: fsGroup: 1000 initContainers: - name: copy-openclaw-config image: alpine/openclaw:latest env: - name: HOME value: /writable command: - sh - -c - | cp /config/openclaw.json /writable/openclaw.json \ && chown 1000:1000 /writable/openclaw.json \ && echo "--- Config file contents ---" \ && cat /writable/openclaw.json volumeMounts: - name: openclaw-config-volume mountPath: /config - name: openclaw-writable mountPath: /writable containers: - name: gateway image: alpine/openclaw:latest ports: - containerPort: 18789 env: - name: NODE_OPTIONS value: "--max-old-space-size=4096" - name: AUTH_TOKEN valueFrom: secretKeyRef: name: openclaw-auth-token key: token # Start gateway the way the tutorial indicates command: ["openclaw", "gateway"] args: ["run", "--allow-unconfigured", "--bind", "lan"] volumeMounts: - name: openclaw-writable mountPath: /home/node/.openclaw - name: openclaw-data mountPath: /home/node/workspace subPath: workspace resources: requests: cpu: "500m" memory: "2Gi" limits: cpu: "1000m" memory: "4Gi" livenessProbe: httpGet: path: /health port: 18789 initialDelaySeconds: 60 periodSeconds: 15 failureThreshold: 3 readinessProbe: httpGet: path: /health port: 18789 initialDelaySeconds: 10 periodSeconds: 5 volumes: - name: openclaw-data persistentVolumeClaim: claimName: pvc-openclaw-nfs - name: openclaw-config-volume configMap: name: openclaw-config items: - key: openclaw.json path: openclaw.json - name: openclaw-writable emptyDir: {} --- apiVersion: v1 kind: Service metadata: name: openclaw-gateway-service spec: type: ClusterIP selector: app: openclaw-gateway ports: - protocol: TCP port: 18789 targetPort: 18789 EOF Verify that the deployment succeeds. Wait until all pods show `Running` and `READY 2/2`. kubectl get deployment openclaw-gateway kubectl get pods -l app=openclaw-gateway Figure 4: OpenClaw deployment Create the TLS secret (for HTTPS) The Application Gateway for Containers references a TLS secret (gateway-tls-secret) for HTTPS termination. This blog post uses a self-signed certificate; in a production environment, use a certificate signed by a certificate authority. Replace `<path-to-tls-cert>` and `<path-to-tls-key>` with paths to your TLS certificate and private key files. kubectl create secret tls gateway-tls-secret \ --cert=<path-to-tls-cert> \ --key=<path-to-tls-key> Create the Gateway The Gateway resource defines the HTTPS listener on the Azure Application Load Balancer (ALB). Update the `alb.network.azure.com/application-gateway-id` annotation to match your ALB traffic controller resource ID. You will also need to reference the gateway-tls-secret to enable HTTPS. cat <<EOF | kubectl apply -f - apiVersion: gateway.networking.k8s.io/v1 kind: Gateway metadata: name: https annotations: alb.network.azure.com/application-gateway-id: /subscriptions/<subscription id>/resourceGroups/mc_openclaw_openclaw-cluster_centralus/providers/Microsoft.ServiceNetworking/trafficControllers/<alb id> alb.networking.azure.io/alb-namespace: default alb.networking.azure.io/alb-name: alb-openclaw spec: gatewayClassName: azure-alb-external listeners: - name: https protocol: HTTPS port: 443 allowedRoutes: namespaces: from: All tls: mode: Terminate certificateRefs: - kind: Secret group: "" name: gateway-tls-secret EOF kubectl get gateway https Wait until the Gateway shows a `Programmed=True` condition. Create the HTTPRoute The HTTPRoute connects the Gateway to the backend Service. It routes all traffic (`/` prefix) from the HTTPS Gateway to `openclaw-gateway-service` on port 18789. cat <<EOF | kubectl apply -f - kind: HTTPRoute apiVersion: gateway.networking.k8s.io/v1 metadata: name: http-route spec: parentRefs: - name: https rules: - matches: - path: type: PathPrefix value: / backendRefs: - name: openclaw-gateway-service kind: Service namespace: default port: 18789 EOF Test OpenClaw application Get the external endpoint. kubectl get gateway https -o jsonpath='{.status.addresses[0].value}' Paste the endpoint into your browser to reach the OpenClaw application. If you are using a self-signed certificate, you will see a “Not secure” warning; click Advanced to proceed. In a production environment with a certificate signed by a certificate authority, you should not see that warning. Figure 5: OpenClaw Authentication Paste in your Gateway Token (the auth token created earlier). You will notice that even though the token is valid, it throws back a “pairing required” error. Pairing is required in OpenClaw whenever a new device, browser profile, or CLI client attempts to connect to the gateway for the first time, ensuring only authorized clients can control the AI agent. POD=$(kubectl get pod -l app=openclaw-gateway -o jsonpath='{.items[0].metadata.name}') POD2=$(kubectl get pod -l app=openclaw-gateway -o jsonpath='{.items[1].metadata.name}') TOKEN=$(kubectl get secret openclaw-auth-token -o jsonpath='{.data.token}' | base64 -d) kubectl exec "$POD" -c gateway -- openclaw devices approve --latest --token "$TOKEN" kubectl exec "$POD2" -c gateway -- openclaw devices approve --latest --token "$TOKEN" You should see a message like the one in the image below. You can now open the OpenClaw application and start using it. Figure 6: OpenClaw pairing success message Figure 7: OpenClaw Application You have successfully deployed OpenClaw within a microVM hosted on Azure Kubernetes Service. Test microVM kernel isolation From within the OpenClaw pod, try to read the host’s root filesystem via /proc/1/root. You should see an error like: ls: cannot access '/proc/1/root/etc/kubernetes': No such file or directory. kubectl exec -it "$POD" -c gateway -- ls /proc/1/root/etc/kubernetes 2>&1 In a standard container deployment, PID 1 inside the container is still running on the host kernel, so traversing /proc/1/root/ exposes the host's root filesystem — including sensitive paths like /etc/kubernetes (which holds kubelet credentials). With Kata VM isolation, the picture is completely different. When we run ls /proc/1/root/etc/kubernetes from inside the OpenClaw pod, it returns "No such file or directory". This is because PID 1 is no longer a process on the host — it's running inside a dedicated guest VM with its own kernel. The /proc/1/root/ path leads to the microVM's root filesystem, not the host's, and that microVM has no knowledge of the node's Kubernetes configuration or machine identity. The host is simply invisible. This is the core security guarantee of Kata Containers: even if an attacker achieves a full container escape, there is nothing to escape to — they land inside a lightweight VM boundary, not on the shared host, making lateral movement to other pods or the node itself impossible. Conclusion This post discussed why running OpenClaw workloads in standard containers can be risky when the workload includes untrusted or semi-trusted code: containers share the host Linux kernel, so a single container escape or privileged misconfiguration can expand into node-level compromise and a much larger blast radius. To address this, we introduced microVM-based sandboxing with Kata Containers on Azure Kubernetes Service (AKS) and walked through an implementation approach (a node pool with Kata VM isolation, storage, gateway deployment, and ingress). Finally, we validated the isolation properties by demonstrating that common host-visibility techniques (for example, probing /proc/1/root) no longer reveal host paths when the workload runs inside a microVM. Separate kernel boundary: Kata runs the container inside a microVM, so the workload executes against a guest kernel rather than the shared host kernel—kernel exploits and escape attempts don’t directly translate into host control. Host filesystem is no longer “in scope”: paths that often leak host context in standard containers (for example, traversals via /proc) resolve inside the microVM’s filesystem, not the node’s root filesystem. Reduced blast radius per workload: each sandbox has its own VM boundary, making it much harder to pivot from one compromised workload to other pods/containers on the same node. Stronger default device and privilege separation: the hypervisor boundary and minimal virtual device model limit exposure to host devices and privileged interfaces that commonly enable breakouts. Defense-in-depth still applies: you can keep container hardening (seccomp, capability dropping, read-only filesystems, restricted mounts) while gaining an additional isolation layer that is independent of Linux namespaces/cgroups. Overall, this post helps you deploy OpenClaw on AKS with Kata microVM isolation so you can run agent workloads with a significantly reduced risk of host-kernel compromise from container escape techniques.