microsoft copilot harness
1 TopicNew Microsoft Copilot Harness | More power, token efficiency & control for agents in Foundry
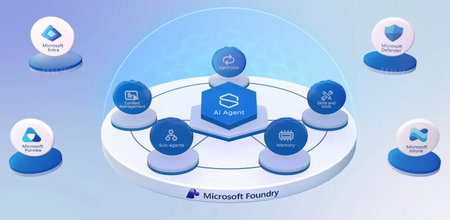
Start with a fully managed prompt agent and move it onto the Microsoft Copilot harness so it plans, loops, calls subagents, and delivers finished reports. You can also bring your own harness, such as the Claude Agent SDK, and run it as a hosted agent with isolated VM sandboxes, autoscaling, and zero idle cost. Give every agent its own Entra Agent ID, restrict its egress to approved endpoints, and trace every action it takes. Curate tools once in a governed, MCP-compatible toolbox, cut token use with tool search, and tune agents against your own benchmark with Agent Optimizer. Jeff Hollan, Microsoft Foundry VP, shares how to balance agent autonomy with enterprise control from first build through production. Same agent. New harness. The Microsoft Copilot harness turns a one-pass prompt agent in Foundry into a planner that loops, fetches data, and ships an executive report. Check it out. Your code. Your loop. Enterprise controls. Hosted agents in Microsoft Foundry run any harness with the same Entra Agent ID, telemetry, and guardrails, plus your own VNet and container registry. Check it out. Every tool — only the ones you need. Tool search in Microsoft Foundry pulls just the right tools for each request from a single governed toolbox, keeping your agent’s context lean. Watch here. 👥 Who it’s for: Developers and AI engineers building production agents, solution architects designing agent platforms, and IT and security teams responsible for governing agent identity, access, and network egress. ⏱️ Chapters: 00:00 Why the harness decides agent trust 00:59 What an agent harness does 01:22 Five components built into every harness 02:15 Microsoft Copilot harness meets Foundry controls 03:28 Where a prompt agent falls short 04:57 Same agent on the Microsoft Copilot harness 06:10 Guardrails block unauthorized agent actions 07:29 Entra Agent ID and egress rules 08:05 Bring your own harness as a hosted agent 09:06 Private networking, regions, and your own registry 10:13 Curate tools once with Foundry toolboxes 11:13 Tool search keeps agent context lean 11:54 Benchmark agents against your real tasks 12:54 Auto-tune agents with Agent Optimizer 13:53 Start building in Microsoft Foundry What is an agent harness? The harness is the environment you wrap around your model and agents. It runs the agent loop, manages context as it grows, provides skills and tools such as MCP servers, delegates work to subagents in parallel, and maintains memory across turns and sessions. The Microsoft Copilot harness is model-agnostic, optimized for enterprise task completion, and runs behind Microsoft services like GitHub and Microsoft 365. Inside Microsoft Foundry, it respects your existing permissions and data protection controls and runs each agent instance in its own isolated sandbox. Hosted agents in Microsoft Foundry Agent Service also support Hermes, OpenClaw, and fully custom harnesses, along with your own virtual network, container images from your own registry, and expanded regions so agents run where your data is. 🔗 Related links: ► Head to Microsoft Foundry to build your first project at https://ai.azure.com ►For hosted agent templates and the SDKs to start coding, check out https://github.com/foundry-samples Unfamiliar with Microsoft Mechanics? Microsoft’s Official Video Series for IT — Subscribe https://www.youtube.com/c/MicrosoftMechanicsSeries — Microsoft Tech Community: https://techcommunity.microsoft.com/t5/microsoft-mechanics-blog/bg-p/MicrosoftMechanicsBlog — Podcast: https://microsoftmechanics.libsyn.com/podcast Join us on social: — https://twitter.com/MSFTMechanics — https://www.linkedin.com/company/microsoft-mechanics/ — https://www.instagram.com/msftmechanics/ — https://www.tiktok.com/@msftmechanics Video Transcript: -Conditional Access is Microsoft’s Zero Trust policy engine. What it protects has expanded, and now we’re evolving the management experience to match. Today, it continuously assesses real-time signals across users, AI agents, applications, endpoints, networks, and resources to enforce Zero Trust. Based on an identity and its context, it makes adaptive access decisions, determining whether to require additional controls in order to allow or restrict access, or block the request to specified resources altogether. And to help you manage those access controls more effectively at scale, we are introducing Conditional Access policy plans. I’ll show you what these are, how they expand what you can do, and how they work with your existing Conditional Access policies. -So, what are policy plans, and how do they help? Well, until now, you’ve probably been managing who gets access to what across your organization as one flat list of policies. What started off as a small list of controls, including multifactor authentication, device compliance requirements, along with the scoping and exclusions within policies to make everything work, has now expanded to fine-grained, risk-based policies, identity-driven network controls through Global Secure Access, dedicated conditions for agent identities, and much more. -Over time, it’s become harder to understand how policies relate to one another, who owns them, and how changes might affect access decisions. There’s no grouping and no structure in that list, so the only way to keep track of what covers what might be creative naming prefixes or other solutions. This is where Conditional Access policy plans come in. It’s a new policy framework for Conditional Access, where you organize access controls around an objective, instead of managing them one policy at a time. A policy plan objective might be based on a specific persona, like employees, external guests, or administrators, or a security goal, like securing agent activity or requiring compliant devices. -At the plan level, you can define the common attributes for that objective once. This includes identities, resources including applications, user actions, and authentication context, as well as shared conditions like risk levels, devices, network locations, and client app types. Each plan then holds one or more rules, and every rule inherits those shared attributes automatically. A rule adds the specifics needed to meet the objective, its own conditions, and its own grant or session controls. So, a variation of your objective becomes a rule, instead of another standalone policy to manage. It’s a new framework where each policy plan has its own name, description, owner, and tags. -So, it’s clear what each plan is for, who owns it, and what will change if you edit it later. That’s what keeps policy sprawl down as you scale. Importantly, your existing Conditional Access policies will continue to work, and won’t be affected as you roll out policy plans. Let me show you this in action, starting with a new policy plan, in this case, with the objective of securing access for people working from our company headquarters. In the Microsoft Entra admin center, under Conditional Access, there’s a new “Policy plans” view sitting alongside the list of policies you have today. I’ll create a new plan to manage headquarters users. -First, I’ll give it a name, type in a description that will be useful for anyone to know what this plan is about, then I’ll add a tag, “HQ,” for easier filtering, and you can see that my name is auto-filled as the owner of this plan. Below that is where, based on the policy plan security objective, you can select the appropriate shared identities, resources, or conditions. Because this plan’s objective is to specify requirements for people in the headquarters location, I’ll only need to use shared identities here. I’ll go into users and groups for my inclusions, and by filtering to HQ, I’ll see the matching groups. I’ll select the “HQ All Users” group. I also want to add an exclusion here to avoid unexpected lockouts. -So, following the same steps, I’ll pick a group to exclude and choose “Break Glass HQ.” That means these groups will be inherited as assignments by any rule within this policy plan. When you create a new plan, the process guides you through creation of its first rule. If you’ve ever written a Conditional Access policy, this will look familiar. I’ll create a rule to require phishing-resistant authentication for headquarters users. I just need to give my rule a name and optionally add a description that can be referred to later. -For the rule’s state, I’ll leave this as report-only for now, but I could toggle it to on from here. Notice that I don’t need to define the assignments and conditions again for the included and excluded groups. However, I do need to assign resources. So, I’ll do that here, in this case, by selecting “All resources,” and then confirm. Now, for under these conditions, I’ll leave “All client app types,” and I can go straight into Grant and session controls in this case. I’ll choose to grant, but require authentication strength, and choose “Phishing-resistant MFA,” and confirm that control. That way, all headquarters users are required to meet this authentication strength for all resources they are trying to access. -Now, I just need to review and create my policy plan and initial rule. And from there, I can add more rules to this plan. So, I’ll create a rule to require compliant devices from our HQ users. Previously, each rule would have meant creating a separate policy and reconfiguring the same shared identities and exclusions. Again, this would apply to shared resources and conditions based on your plan and its security objective. -Now, I just need to enter a name. I’ll call this “Require Compliant Device,” and then in the description, I’ll write what this rule does. Again, under Accessing these resources, I want to assign all resources to this rule. So, I’ll change the resource assignment like last time, from “None” to “All resources,” and confirm. From under these conditions, I’ll leave all client apps. For this rule, I’ll add a control to grant again, and in this case, require device to be marked as compliant. I can do the same to add risk-based rules or others to my plan. -Now, I just need to save it, and that’s it. So, instead of managing multiple policies with the same scope, shared assignments are defined once, and individual access requirements are implemented as rules. From here, I can keep going to create other plans for specific objectives, and I’ve already created a few. And you can see we have some for different identities, specific resources like important ERP apps, or conditions like the policy plans listed based on risk. I just showed you how to create a plan based on a user group in our specific HQ location. -So, now let’s look at one based on a security objective, securing agent access, where it’s now a lot simpler to apply Conditional Access to agentic activity. You can see that this plan is using shared conditions for all client app types, and where agent risk is determined to be high. And below that, there are individual rules defined to block high-risk agent users and block high-risk autonomous agents. This will help ensure that access protections cover agents acting with their own agent-specific permissions. Without a policy plan, each of these scenarios would require its own standalone policy, repeating many of the same conditions. I’ll open this rule for the high-risk autonomous agents, and you’ll see that it includes the inherited conditions of the plan, and adds an assignment for all agent identities. And under controls, it’s set to block when those conditions are met. -So, now, instead of spreading agent access controls across multiple policies, they’re organized in a single plan, making them easier to understand, manage, and update as requirements evolve. The good news is that you don’t need to build these policy plans from scratch. In fact, the agent policy plan I just showed you was created by using a template. -Next, let’s move on to your existing Conditional Access policies, and I’ll show you how to quickly migrate what you already have in place into policy plans. The first plan we created for users at the company headquarters runs in parallel with existing policies for our various branch offices. Each have dedicated Global Secure Access security profiles. -As you can see, this environment has dozens of Conditional Access policies already running, and I filtered my list down to branch office policies, because the only thing connecting these policies together was the naming prefix. I’ll use the “Migrate to Conditional Access Policy plans” option and get started. That will keep my filtered list of policies and allow me to select the ones I want to migrate. In this case, I’ll use the top “Select all” control to save a few clicks, then choose “Merge 5 policies into a plan.” And now I can see a preview of my plan before I create it. I’ll give this policy plan a name, “Branch Office Access.” -Under the covers, the process looks for anything that my selected policies have in common, and defines those as shared conditions, as you can see with the two resources here. Below that, each of my previous policies are translated into rules, where you can see identities, resources, locations, grant, and session configurations for each. Then, to confirm, I just need to click “Create policy plan.” And just like that, my five policies have been migrated into one plan, with a set of shared conditions and unique rules. My original policies are still there and untouched. Each are also still enforced based on their policy state. -Once you’re ready, you’re in control of managing the cutover to the new plan by enforcing it. From there, you turn off or delete the previous policies. And as you add new branch locations, those just become new rules in your plan. So, that’s how we’re evolving the framework for managing Conditional Access, moving from individual policies to security objectives that can be defined once and enforced consistently across your environment. -Check out aka.ms/conditionalaccesspolicyplans to learn more. Keep watching Microsoft Mechanics for the latest tech updates, and thanks for watching.39Views0likes0Comments