intune
9 Topics
Locking down PAWs internet access when GSA drops
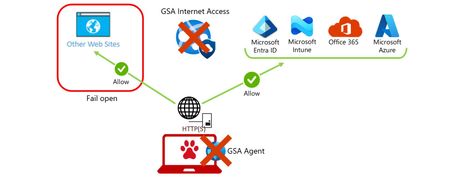
By: Christian Friedel-Jain - Sr. Security Consultant | James Noyce - Sr. Security Solution Engineer Introduction Privileged Access Workstations (PAWs) are among the most sensitive endpoints in any organization. A PAW, in most of our Microsoft consulting projects, exists to do one job safely: administer cloud services from a hardened device that is only ever allowed to reach a small, tightly controlled set of internet destinations. But an endpoint’s security posture is ultimately defined by its behavior under failure conditions. When we moved the internet access restriction for our PAW devices from a locally enforced restriction (more about that later) to a solution based on Microsoft Global Secure Access (GSA), we immediately identified a gap under failure conditions – but first a quick grounding on the moving parts. Global Secure Access (What is Global Secure Access?) is Microsoft’s umbrella term for Microsoft Entra Internet Access and Microsoft Entra Private Access — the components of Microsoft’s Security Service Edge solution. For a PAW device we are leveraging Microsoft Entra Internet Access as an identity centric secure web gateway solution to control exactly which internet destinations the workstation can reach, by applying a fine-grained set of rules and policies enforced through Conditional Access in Microsoft Entra. This configuration provides us better filtering capabilities, like web content filtering (Global Secure Access web content filtering) with TLS inspection (TLSi) (Global Secure Access transport layer security inspection) and additional features like Threat Intelligence (Global Secure Access threat intelligence), but it comes also with a downside. Currently by default, if the GSA client encounters an issue or cannot connect to its required GSA edge services, the GSA client will fall back to a fail-open state, rather than to a fail-close state. Difference between those two modes: Fail-Open: When a security or control mechanism fails, access is still allowed. Fail-Close: When the security or control mechanism fails, access is blocked. This blog post covers above problem and showcases a solution we built, as part of our projects, to achieve a “Fail-Close” state rather than having the current “Fail-Open” behavior. The enforcement of the “Fail-Close” solution we developed works at two independent layers, both are deployable through Microsoft Intune: A network layer: Windows Defender Firewall network profiles, a rule set with Windows Firewall Dynamic Keywords, and event-driven automation — restricts the device internet access in the moment GSA’s tunnels or services drop. An identity layer: an Intune custom compliance check paired with Conditional Access — denies the device access whenever the GSA client is missing or its services are not running. Together, they help to make sure a failure that slips past one layer is still caught by the other. From URL Lock Proxy to Global Secure Access Historically, we restricted internet access on PAW devices with the Windows Defender Firewall (for more details see here Microsoft Defender Firewall) and a “URL Lock Proxy” approach (and here URL lock proxy): an allow-list of permitted URLs that blocked every outbound HTTP(S) connection except the ones required for: Approved management portals, Authentication to Microsoft Entra ID, Management by Microsoft Intune, and Monitoring by Microsoft Defender for Endpoint. It worked, but it carried real limitations: No auditing of what was allowed or blocked, It did not scale and required a lot of wildcards to be used, A limited ruleset size — the size cap on the underlying registry key meant the solution simply could not grow, and It was not enterprise class. Microsoft Global Secure Access with its component Entra Internet Access replaces the URL Lock Proxy configuration entirely. We are using dedicated firewall rules for the GSA client, to allow the client to reach the Entra Internet Access edge service. Through Entra Condition Access, a GSA Internet Access traffic profile (security profile) is applied which blocks all internet access except the specific FQDNs needed for approved management portals/platforms, Entra ID authentication, Intune, and Defender for Endpoint. HTTP and HTTPS traffic is evaluated and filtered within the GSA Edge service itself, and a request to a destination that is not on the allow-list is blocked with a simple “You can’t access this destination” message. Additional features like filtering on URL level instead of FQDN, due to the use of TLSi, helped to remove most of the wildcards we had to use with the previous URL lock proxy approach. The result is: Access and the access results are auditable, More granular and centrally managed rule set, And genuinely enterprise class. The catch: Global Secure Access fails open GSA as the internet access restriction method is powerful, but it builds on the assumption that the GSA client is installed, running, and connected. When that assumption breaks, the client’s current behavior is to fail open. As a result, the device ends up with unrestricted internet access whenever: The GSA client is installed but cannot establish its tunnels with the GSA edge services (according to the Entra ID SLA this doesn’t happen that often – see Service Level Agreement performance for Microsoft Entra ID), The GSA client on the PAW is installed but suspended, or Its services are disabled, or The GSA client component is not installed at all on the PAW device. On a regular end user device, the fail-open mode is a convenience. On a PAW it is exactly the wrong default: the very moment the protection drops away, the device becomes its most exposed. Therefore, we had to develop a solution to have a fail-close behavior. The Fail-Close approach The core idea is deliberately simple, and it uses capability that already exists on most of the Windows devices: the Windows Defender Firewall network profiles (more details here Windows Firewall Network Profiles). Two of the available firewall profiles are repurposed to act as separate operating modes: Private profile: “unrestricted” HTTP(S). Internet access filtering is delegated to GSA Internet Access, so the firewall itself does not constrain destinations. Public profile: “restricted” HTTP(S). Outbound web traffic is limited to a mandatory set of FQDNs via Defender Dynamic Keywords and selected system processes — just enough for the device to stay managed and healthy. When the GSA client has successfully established its Internet access tunnel, the device is assigned the Private network profile. If GSA fails, the Windows Firewall profile is automatically switched to the Public network profile, restricting Internet access to essential destinations only. This profile transition implements the required fail-close behavior. Normal state — Private profile As soon as the GSA client is running, connected to the GSA edge services and has established the Internet Access tunnel (step 1), the client writes a success event to the GSA event log (step 2) (Internet Access tunnel connected — Event ID 142) When that event occurs, a scheduled task (step 3) runs a PowerShell script (step 4) that: Switches the device to the Private firewall network profile, Validates the state of all local GSA services, and Initiates an Intune custom compliance check (to perform additional validations). In case all validates were successfully passed, the PowerShell script enforces the Private firewall profile (step 5) and GSA Internet Access is being used to filter the internet access (step 6). Failure state — Public profile The moment GSA stops protecting (step 1) the device, one of several failure events is written to the GSA event log (step 2) and triggers a different scheduled task (step 3) which runs a PowerShell script (step 4) that switches the device to the Public firewall network profile (step 5) and initiates an Intune custom compliance check, too. The failure signals we watch for are: Entra or Internet Access tunnel disconnected — Event ID 141 (logged roughly every 10 seconds while the tunnel is down), GSA services stopped — Event IDs 106, 206, 406, and 705, No internet connectivity — Event ID 638, and Services start initiated — Event ID 701. On the Public profile, the HTTP(S) outbound rule has Reusable Settings (Defender Dynamic Keywords - Windows Firewall Dynamic Keywords) (step 6) assigned, which restricts the reachable FQDNs down to a mandatory set of endpoints. Additionally, mandatory applications and services are explicitly exempt from that restriction, so the device can still be managed, patched, and monitored even while it is locked down. Closing the gap when GSA is absent: custom compliance The firewall profile switch is event-driven — it reacts to the signals the GSA client writes to the event log. That works well for a device where the GSA client is present, but it leaves one blind spot: if the GSA client is not installed at all, or its services never start, there may be no events to react to. Those are exactly the scenarios where a device would otherwise fall back to unrestricted access, the solution uses a custom device compliance policy/check that does not depend on any event firing. It directly: Validates that the GSA client is installed on the device, and Checks the local GSA service state — confirming that the services are running, not just present. If either of those checks fails — GSA client is not installed, or its services are not running — Intune reports the device as non-compliant. Because a PAW’s access to cloud resources is gated by Conditional Access requiring a compliant device, a non-compliant PAW is denied access to the very cloud services it exists to manage. So even in the one case the event-driven firewall switch cannot see, access still fails closed — this time at the identity layer rather than the network layer. In addition, as soon as the local evaluation detected a non-compliant scenario, the custom compliance check flips the firewall profile to the Public profile, too. The profile-switching PowerShell scripts also initiate this compliance evaluation as they run in both the normal and failure states, so the device re-reports its posture promptly instead of waiting for the next routine Intune check-in. The result is defense in depth — two independent layers, neither relying on the other: Enforcement layer Mechanism What it catches Network Defender Firewall profile switch, driven by GSA event IDs (141, 106, 206, 406, 705, 638, 701) Tunnel drops and service stops while the GSA client is present and reporting Identity Intune custom compliance check + Conditional Access (require compliant device) GSA not installed, or its services not running — no event required to trigger it A failure that slips past one layer is caught by the other: If GSA stops mid-session, the firewall restricts access near real-time; If GSA is missing or disabled entirely, Conditional Access refuses the device to access Entra ID integrated resources. Under the hood: the building blocks The full solution is a set of several components, which all can be delivered and governed through Microsoft Intune: Component What it does Firewall profile Base firewall settings — default block all inbound and outbound connectivity across all profiles (public, private, and domain). Firewall rules Allow mandatory programs and services (~35 rules); restrict HTTP(S) in the Public profile using Dynamic Keywords; allow “unrestricted” HTTP(S) in the Private profile. Defender Dynamic Keywords (Reusable Settings) The set of FQDNs required for Entra ID, Defender for Endpoint, Intune, Windows Update, and Global Secure Access. Platform scripts Switch the firewall network profile to Private (unrestricted HTTP(S)); update the Defender anti-malware engine so it supports the Dynamic Keywords feature. Win32 app package Required app that deploys the scheduled tasks and the underlying PowerShell scripts. Custom device compliance check Validates that GSA is installed and checks the local GSA service state. The firewall rules that make it work The heart of the enforcement is a pair of “World Wide Web Services” outbound rules — one per firewall profile: Rule Profile Action Ports Remote destinations World Wide Web Services (HTTP & HTTPS Out) Private Allow 80, 443 Any address World Wide Web Services (HTTP & HTTPS Out) Public Allow 80, 443 Dynamic Keywords only The Private HTTP/HTTPS rule is deliberately open, because GSA is the gatekeeper. The Public HTTP/HTTPS rule scopes outbound web traffic down to the endpoint categories expressed as Dynamic Keywords: GSA Edge Endpoints, Microsoft 365 Common and Office Online, Microsoft 365 encryption chains, Windows 11, Intune & Autopilot, and Defender for Endpoint. Because these are Defender Dynamic Keywords with AutoResolve (AutoResolve dynamic keyword addresses) deployed via Microsoft Intune reusable settings (Use reusable groups of settings policies in Microsoft Intune), rather than hard-coded IP ranges, the allow-list includes endpoints centrally instead of being frozen into a brittle registry key — directly addressing the scale and maintainability limits of the old URL Lock Proxy. Besides the mentioned outbound HTTP/HTTPS firewall rule for the public and private network profile, additional rules are required for our scenario. With those additional firewall rules we cover: Basic Windows operating system network communication, Communication for Global Secure Access, and Critical Windows processes and services. Disclaimer: We are sharing the lists of firewall rules with you AS IS without warranty. Keep in mind that the config might require modifications to match to your scenario or environment. Firewall rules for basic network communication Name Action Network Types Direction Service / File / App Id Protocols Local Ports Local Address Ranges Remote Ports Remote Address Ranges Delivery Optimization (TCP-In) Allow All Inbound Service name: DoSvc File path: C:\windows\system32\svchost.exe TCP 7680 Any address Any remote port Any address Delivery Optimization (UDP-In) Allow All Inbound Service name: DoSvc File path: C:\windows\system32\svchost.exe UDP 7680 Any address Any remote port Any address Core Networking - DHCP (DHCP-Out) Allow All Outbound Service name: Dhcp File path: C:\windows\system32\svchost.exe UDP 68 Any address 67 Any address Core Networking - DHCP for IPv6 (DHCPV6-Out) Allow All Outbound Service name: Dhcp File path: C:\windows\system32\svchost.exe UDP 546 Any address 547 Any address Core Networking - DNS (TCP-Out) Allow All Outbound Service name: Dnscache File path: C:\windows\system32\svchost.exe TCP Any Any address 53 DNS 6.6.0.0-6.6.255.255 Core Networking - DNS (UDP-Out) Allow All Outbound Service name: Dnscache File path: C:\windows\system32\svchost.exe UDP Any Any address 53 DNS 6.6.0.0-6.6.255.255 Windows Time (UDP-Out) Allow All Outbound Service name: W32Time File path: C:\windows\system32\svchost.exe UDP Any Any address 123 Any address NCSI Probe (HTTP-Out) Allow All Outbound Service name: NlaSvc File path: C:\windows\system32\svchost.exe TCP Any Any address 80 Any address Firewall rules for Global Secure Access Name Action Network Types Direction Service / File / App Id Protocols Local Ports Local Address Ranges Remote Ports Remote Address Ranges GSA Client - Tray App (TCP-Out) Allow All Outbound File path: %ProgramFiles%\Global Secure Access Client\TrayApp\GlobalSecureAccessClient.exe TCP Any Any address 80, 443, 6543 Any address GSA Client - Mgmt Service (TCP-Out) Allow All Outbound File path: %ProgramFiles%\Global Secure Access Client\GlobalSecureAccessClientManagerService.exe TCP Any Any address 80, 443 Any address GSA Client - Tunneling Service (TCP-Out) Allow All Outbound File path: %ProgramFiles%\global secure access client\globalsecureaccesstunnelingservice.exe TCP Any Any address 80, 443 Any address GSA Client - Advanced Diagnostics (TCP-Out) Allow All Outbound File path: %ProgramFiles%\global secure access client\advanceddiagnostics\globalsecureaccessclientadvanceddiagnostics.exe TCP Any Any address Any Any address GSA Client - Forwarding Profile Service (TCP-Out) Allow All Outbound File path: %ProgramFiles%\Global Secure Access Client\GlobalSecureAccessForwardingProfileService.exe TCP Any Any address 80, 443 Any address GSA Client - Engine Service (TCP-Out) Allow All Outbound File path: %ProgramFiles%\Global Secure Access Client\GlobalSecureAccessEngineService.exe TCP Any Any address 80, 443 Any address Firewall rules for critical Windows processes and services Name Action Network Types Direction Service / File / App Id Protocols Local Ports Local Address Ranges Remote Ports Remote Address Ranges Microsoft Defender Antivirus Network Inspection Service (TCP-Out) Allow All Outbound Service: WdNisSvc TCP Any Any 80, 443 Any Microsoft Defender Core Service (TCP-Out) Allow All Outbound Service: MDCoreSvc TCP Any Any 443 Any Windows Defender Advanced Threat Protection Service (TCP-Out) Allow All Outbound Service: Sense TCP Any Any 80, 443 Any Microsoft Defender Antivirus Service (TCP-Out) Allow All Outbound Service: WinDefend TCP Any Any 443 Any Microsoft Intune Management Extension (TCP-Out) Allow All Outbound File path: C:\Program Files (x86)\Microsoft Intune Management Extension\Microsoft.Management.Services.IntuneWindowsAgent.exe TCP Any Any 80, 443 Any Runtimebroker (TCP-Out) Allow All Outbound File path: C:\windows\system32\runtimebroker.exe TCP Any Any 443 Any Windows Push Notifications System Service (TCP-Out) Allow All Outbound Service: WpnService File path: C:\windows\system32\svchost.exe TCP Any Any 443 Any Host Process for OMA-DM Client (TCP-Out) Allow All Outbound File path: C:\Windows\System32\omadmclient.exe TCP Any Any 80, 443 Any Microsoft Edge Update (TCP-Out) Allow All Outbound File path: C:\Program Files (x86)\Microsoft\EdgeUpdate\MicrosoftEdgeUpdate.exe TCP Any Any 443 Any Network List Service (TCP-Out) Allow All Outbound Service: netprofm File path: C:\WINDOWS\System32\svchost.exe TCP Any Any 80 Any Microsoft Health Attestation Client Agent (TCP-Out) Allow All Outbound File path: C:\Windows\System32\HealthAttestationClient\HealthAttestationClientAgent.exe TCP Any Any 80, 443 Any Windows Defender Advanced Threat Protection IMDSCollector module (TCP-Out) Allow All Outbound File path: C:\Program Files\Windows Defender Advanced Threat Protection\SenseImdsCollector.exe TCP Any Any 80, 443 Any API for MDM Enrollment (TCP-Out) Allow All Outbound File path: C:\Windows\System32\DeviceEnroller.exe TCP Any Any 443 Any Windows Defender SmartScreen (TCP-Out) Allow All Outbound File path: C:\Windows\System32\smartscreen.exe TCP Any Any 443 Any Windows Update (TCP-Out) Allow All Outbound Service: wuauserv File path: C:\WINDOWS\System32\svchost.exe TCP Any Any 80, 443 Any Device Management Enrollment Service (TCP-Out) Allow All Outbound Service: DmEnrollmentSvc File path: C:\WINDOWS\System32\svchost.exe TCP Any Any 443 Any Delivery Optimization (TCP-Out) Allow All Outbound Service: DoSvc File path: C:\WINDOWS\System32\svchost.exe TCP Any Any 80, 443 Any Company Portal (TCP-Out) Allow All Outbound App Id: Microsoft.CompanyPortal_8wekyb3d8bbwe TCP Any Any 80, 443 Any LSASS.exe (TCP-Out) Allow All Outbound File path: C:\Windows\system32\lsass.exe TCP Any Any 443 Any Windows License Manager Service Allow All Outbound Service: LicenseManager File path: C:\WINDOWS\System32\svchost.exe TCP Any Any 443 Any Background Intelligent Transfer Service (TCP-Out) Allow All Outbound Service: BITS File path: C:\WINDOWS\System32\svchost.exe TCP Any Any 80 Any Microsoft Intune ClientHealthEval (TCP-Out) Allow All Outbound File path: c:\program files (x86)\microsoft intune management extension\clienthealtheval.exe TCP Any Any 443 Any Microsoft Intune AgentExecutor (TCP-Out) Allow All Outbound File path: c:\program files (x86)\microsoft intune management extension\agentexecutor.exe TCP Any Any 80, 443 Any BitLocker Drive Encryption Service (TCP-Out) Allow All Outbound Service: BDESVC File path: C:\WINDOWS\System32\svchost.exe TCP Any Any 443 Any Microsoft Intune ClientCertCheck (TCP-Out) Allow All Outbound File path: c:\program files (x86)\microsoft intune management extension\clientcertcheck.exe TCP Any Any 443 Any Cryptographic Services (TCP-Out) Allow All Outbound Service: CryptSvc File path: C:\WINDOWS\System32\svchost.exe TCP Any Any 80, 443 Any Microsoft Malware Protection Command Line Utility (TCP-Out) Allow All Outbound File path: c:\program files\windows defender\mpcmdrun.exe TCP Any Any 443 Any Microsoft EPM Agent Service (TCP-Out) Allow All Outbound File path: C:\Program Files\Microsoft EPM Agent\EPMService\EpmService.exe TCP Any Any 443 Any Microsoft Store Install Service (TCP-Out) Allow All Outbound Service: InstallService File path: C:\WINDOWS\System32\svchost.exe TCP Any Any 80, 443 Any Update Orchestrator Service (TCP-Out) Allow All Outbound Service: UsoSvc File path: C:\WINDOWS\System32\svchost.exe TCP Any Any 80, 443 Any Note: List of mandatory programs & services is not a 100% complete list. We are still discovering additional exclusions. Microsoft Intune Reusable Settings As mentioned in the section before, several endpoint categories are being used as part of the Public "World Wide Web Services (HTTP & HTTPS Out)" Firewall rule. As part of this blog post, we cannot publish a one-size fits all list of FQDNs, since the actual list of FQDNs highly depends on the actual configuration, scenario or environment and are subject to change (as usual when it comes to endpoints). In our scenario it was important that PAW devices, when not connected to GSA, are able to: Perform authentication against Microsoft Entra ID, Remains fully managed by the MDM, in our case Microsoft Intune, Receive updates for the operating system (Windows 11 Enterprise) and the XDR solution (Defender for Endpoint), and Are able to connect to Microsoft Global Secure Access edge services. Based on the requirements we leveraged several publicly available endpoint lists, which include the following, to create our Reusable Settings configuration: GSA Edge Endpoints - FQDN and IP addresses where the Global Secure Access service receives traffic Microsoft 365 - Microsoft 365 URLs and IP address ranges Windows 11 - Connection endpoints for Windows 11 Enterprise Intune & Autopilot - Network endpoints for Microsoft Intune Defender for Endpoint - Microsoft Defender for Endpoint streamlined connectivity URLs Create Reusable Settings objects Attached to this blog post you will find several CSV files (GlobalSecureAccessEdgeEndpoints.csv, DefenderforEndpoint.csv, IntuneAutopilot.csv, Microsoft365Common.csv, Microsoft365encryptionchains.csv, Windows11.csv) which include the lists of FQDNs we are using as part of our deployments. Disclaimer: We are sharing those Reusable Settings lists with you AS IS without warranty. Keep in mind that the config might require modifications to match to your scenario or environment. The following code example can be used to create the Reusable Settings Object in Intune via Graph API. The code example doesn't include any error handling, since it should give you an idea how to perform the import, based on a CV file. Code example for Reusable Settings import via CSV: $csvFile = Get-Item 'C:\temp\GlobalSecureAccessEdgeEndpoints.csv' $definitionId = 'vendor_msft_firewall_mdmstore_dynamickeywords_addresses_{id}' $values = Import-Csv -LiteralPath $csvFile.FullName | ForEach-Object { $row = $_ $autoResolve = [bool]::Parse($row.AutoResolve) $autoResolveValue = $autoResolve.ToString().ToLowerInvariant() $choiceChildren = if (-not $autoResolve) { @{ '@odata.type' = '#microsoft.graph.deviceManagementConfigurationSimpleSettingCollectionInstance' settingDefinitionId = "${definitionId}_addresses" settingInstanceTemplateReference = $null simpleSettingCollectionValue = @( $row.Addresses -split ';' | Where-Object { -not [string]::IsNullOrWhiteSpace($_) } | ForEach-Object { @{ '@odata.type' = '#microsoft.graph.deviceManagementConfigurationStringSettingValue' settingValueTemplateReference = $null value = $_.Trim() } } ) } } @{ '@odata.type' = '#microsoft.graph.deviceManagementConfigurationGroupSettingValue' settingValueTemplateReference = $null children = @( @{ '@odata.type' = '#microsoft.graph.deviceManagementConfigurationSimpleSettingInstance' settingDefinitionId = "${definitionId}_id" settingInstanceTemplateReference = $null simpleSettingValue = @{ '@odata.type' = '#microsoft.graph.deviceManagementConfigurationStringSettingValue' settingValueTemplateReference = $null value = "{$([guid]::NewGuid())}" } } @{ '@odata.type' = '#microsoft.graph.deviceManagementConfigurationChoiceSettingInstance' settingDefinitionId = "${definitionId}_autoresolve" settingInstanceTemplateReference = $null choiceSettingValue = @{ '@odata.type' = '#microsoft.graph.deviceManagementConfigurationChoiceSettingValue' settingValueTemplateReference = $null value = "${definitionId}_autoresolve_$autoResolveValue" children = @($choiceChildren) } } @{ '@odata.type' = '#microsoft.graph.deviceManagementConfigurationSimpleSettingInstance' settingDefinitionId = "${definitionId}_keyword" settingInstanceTemplateReference = $null simpleSettingValue = @{ '@odata.type' = '#microsoft.graph.deviceManagementConfigurationStringSettingValue' settingValueTemplateReference = $null value = $row.Keyword } } ) } } $body = @{ '@odata.type' = '#microsoft.graph.deviceManagementReusablePolicySetting' displayName = $csvFile.BaseName description = '' settingDefinitionId = $definitionId settingInstance = @{ '@odata.type' = '#microsoft.graph.deviceManagementConfigurationGroupSettingCollectionInstance' settingDefinitionId = $definitionId settingInstanceTemplateReference = $null groupSettingCollectionValue = @($values) } } Connect-MgGraph -Scopes 'DeviceManagementConfiguration.ReadWrite.All' Invoke-MgGraphRequest ` -Method POST ` -Uri 'https://graph.microsoft.com/beta/deviceManagement/reusablePolicySettings' ` -Body ($body | ConvertTo-Json -Depth 20) ` -ContentType 'application/json' Important: A maximum of 100 properties can be stored in a single reusable settings group object. Therefore, it might be required to split a endpoint category into multiple Reusable Settings Group objects. Intune Win32 app package Besides the deployment of the actual Global Secure Access client, a dedicated application package will be used to deploy the local components (Scheduled Tasks and PowerShell scripts) for the fail-close approach. To react on the two different states (normal and failure), two Scheduled Tasks need to be deployed to the PAW device. The Scheduled Task creation can be simplified by using exported XML files, which can also include the event trigger itself (examples listed in the sections Normal State and Failure State). Please note, the creation of Scheduled Tasks with event log based triggers require that the actual event log already exists on the device. So it might be worth creating a dependency between the different application packages. Example code to register exported Scheduled Tasks via PowerShell: Register-ScheduledTask -Xml (Get-Content "$PSScriptRoot\GSA-Connected.xml" | Out-String) -TaskName 'GSA-Connected' Register-ScheduledTask -Xml (Get-Content "$PSScriptRoot\GSA-Disconnected.xml" | Out-String) -TaskName 'GSA-Disconnected' XML Sample Scheduled Task export GSA-Connected: <?xml version="1.0" encoding="UTF-16"?> <Task version="1.4" xmlns="http://schemas.microsoft.com/windows/2004/02/mit/task"> <RegistrationInfo> <Date>2026-09-10T17:46:11.8914414</Date> <Author>ChristianFriedel-Jain</Author> <URI>\GSA-Connected</URI> </RegistrationInfo> <Triggers> <EventTrigger> <Enabled>true</Enabled> <Subscription><QueryList><Query Id="0" Path="Microsoft-Windows-Global Secure Access Client-Operational"><Select Path="Microsoft-Windows-Global Secure Access Client-Operational"> *[System[(EventID=142)]] and *[EventData[Data[@Name='Channel Name'] and (Data='Internet')]] </Select></Query></QueryList></Subscription> </EventTrigger> </Triggers> <Principals> <Principal id="Author"> <UserId>S-1-5-18</UserId> <RunLevel>HighestAvailable</RunLevel> </Principal> </Principals> <Settings> <MultipleInstancesPolicy>IgnoreNew</MultipleInstancesPolicy> <DisallowStartIfOnBatteries>false</DisallowStartIfOnBatteries> <StopIfGoingOnBatteries>false</StopIfGoingOnBatteries> <AllowHardTerminate>true</AllowHardTerminate> <StartWhenAvailable>false</StartWhenAvailable> <RunOnlyIfNetworkAvailable>false</RunOnlyIfNetworkAvailable> <IdleSettings> <StopOnIdleEnd>true</StopOnIdleEnd> <RestartOnIdle>false</RestartOnIdle> </IdleSettings> <AllowStartOnDemand>true</AllowStartOnDemand> <Enabled>true</Enabled> <Hidden>false</Hidden> <RunOnlyIfIdle>false</RunOnlyIfIdle> <DisallowStartOnRemoteAppSession>false</DisallowStartOnRemoteAppSession> <UseUnifiedSchedulingEngine>true</UseUnifiedSchedulingEngine> <WakeToRun>false</WakeToRun> <ExecutionTimeLimit>PT1H</ExecutionTimeLimit> <Priority>7</Priority> </Settings> <Actions Context="Author"> <Exec> <Command>"C:\Windows\System32\WindowsPowerShell\v1.0\powershell.exe"</Command> <Arguments>-NoProfile -ExecutionPolicy Bypass -File "C:\Progra~1\GSA-NetDetection\Set-NetworkPrivate.ps1"</Arguments> </Exec> </Actions> </Task> Sample XML Scheduled Task export GSA-Disconnected: <?xml version="1.0" encoding="UTF-16"?> <Task version="1.4" xmlns="http://schemas.microsoft.com/windows/2004/02/mit/task"> <RegistrationInfo> <Date>2026-09-10T17:46:11.8914414</Date> <Author>ChristianFriedel-Jain</Author> <URI>\GSA-Disconnected</URI> </RegistrationInfo> <Triggers> <EventTrigger> <Enabled>true</Enabled> <Subscription><QueryList><Query Id="0" Path="Microsoft-Windows-Global Secure Access Client-Operational"><Select Path="Microsoft-Windows-Global Secure Access Client-Operational"> *[System[(EventID=141)]] and *[EventData[Data[@Name='Channel Name'] and (Data='Entra')]] </Select></Query></QueryList></Subscription> </EventTrigger> <EventTrigger> <Enabled>true</Enabled> <Subscription><QueryList><Query Id="0" Path="Microsoft-Windows-Global Secure Access Client-Operational"><Select Path="Microsoft-Windows-Global Secure Access Client-Operational"> *[System[(EventID=141)]] and *[EventData[Data[@Name='Channel Name'] and (Data='Internet')]] </Select></Query></QueryList></Subscription> </EventTrigger> <EventTrigger> <Enabled>true</Enabled> <Subscription><QueryList><Query Id="0" Path="Microsoft-Windows-Global Secure Access Client-Operational"><Select Path="Microsoft-Windows-Global Secure Access Client-Operational">*[System[Provider[@Name='Microsoft-Windows-Global Secure Access Client'] and EventID=106]]</Select></Query></QueryList></Subscription> </EventTrigger> <EventTrigger> <Enabled>true</Enabled> <Subscription><QueryList><Query Id="0" Path="Microsoft-Windows-Global Secure Access Client-Operational"><Select Path="Microsoft-Windows-Global Secure Access Client-Operational">*[System[Provider[@Name='Microsoft-Windows-Global Secure Access Client'] and EventID=206]]</Select></Query></QueryList></Subscription> </EventTrigger> <EventTrigger> <Enabled>true</Enabled> <Subscription><QueryList><Query Id="0" Path="Microsoft-Windows-Global Secure Access Client-Operational"><Select Path="Microsoft-Windows-Global Secure Access Client-Operational">*[System[Provider[@Name='Microsoft-Windows-Global Secure Access Client'] and EventID=406]]</Select></Query></QueryList></Subscription> </EventTrigger> <EventTrigger> <Enabled>true</Enabled> <Subscription><QueryList><Query Id="0" Path="Microsoft-Windows-Global Secure Access Client-Operational"><Select Path="Microsoft-Windows-Global Secure Access Client-Operational">*[System[Provider[@Name='Microsoft-Windows-Global Secure Access Client'] and EventID=705]]</Select></Query></QueryList></Subscription> </EventTrigger> <EventTrigger> <Enabled>true</Enabled> <Subscription><QueryList><Query Id="0" Path="Microsoft-Windows-Global Secure Access Client-Operational"><Select Path="Microsoft-Windows-Global Secure Access Client-Operational">*[System[Provider[@Name='Microsoft-Windows-Global Secure Access Client'] and EventID=638]]</Select></Query></QueryList></Subscription> </EventTrigger> <EventTrigger> <Enabled>true</Enabled> <Subscription><QueryList><Query Id="0" Path="Microsoft-Windows-Global Secure Access Client-Operational"><Select Path="Microsoft-Windows-Global Secure Access Client-Operational">*[System[Provider[@Name='Microsoft-Windows-Global Secure Access Client'] and EventID=701]]</Select></Query></QueryList></Subscription> </EventTrigger> </Triggers> <Principals> <Principal id="Author"> <UserId>S-1-5-18</UserId> <RunLevel>HighestAvailable</RunLevel> </Principal> </Principals> <Settings> <MultipleInstancesPolicy>IgnoreNew</MultipleInstancesPolicy> <DisallowStartIfOnBatteries>false</DisallowStartIfOnBatteries> <StopIfGoingOnBatteries>false</StopIfGoingOnBatteries> <AllowHardTerminate>true</AllowHardTerminate> <StartWhenAvailable>false</StartWhenAvailable> <RunOnlyIfNetworkAvailable>false</RunOnlyIfNetworkAvailable> <IdleSettings> <StopOnIdleEnd>true</StopOnIdleEnd> <RestartOnIdle>false</RestartOnIdle> </IdleSettings> <AllowStartOnDemand>true</AllowStartOnDemand> <Enabled>true</Enabled> <Hidden>false</Hidden> <RunOnlyIfIdle>false</RunOnlyIfIdle> <DisallowStartOnRemoteAppSession>false</DisallowStartOnRemoteAppSession> <UseUnifiedSchedulingEngine>true</UseUnifiedSchedulingEngine> <WakeToRun>false</WakeToRun> <ExecutionTimeLimit>PT1H</ExecutionTimeLimit> <Priority>7</Priority> </Settings> <Actions Context="Author"> <Exec> <Command>"C:\Windows\System32\WindowsPowerShell\v1.0\powershell.exe"</Command> <Arguments>-NoProfile -ExecutionPolicy Bypass -File "C:\Progra~1\GSA-NetDetection\Set-NetworkPublic.ps1"</Arguments> </Exec> </Actions> </Task> As soon as one of the Scheduled Tasks has been triggered, the corresponding PowerShell script (Set-NetworkPrivate.ps1 or Set-NetworkPublic.ps1) will be executed. Example content of Set-NetworkPrivate.ps1 $NetworkName = (Get-NetConnectionProfile).Name Set-NetConnectionProfile -Name $NetworkName -NetworkCategory Private Example content of Set-NetworkPublic.ps1 $NetworkName = (Get-NetConnectionProfile).Name Set-NetConnectionProfile -Name $NetworkName -NetworkCategory Public Platform scripts Install Microsoft Defender Antivirus updates during the device enrollment To leverage the AutoResolve dynamic keyword feature, Microsoft Defender Antivirus must be turned on and running with platform version 4.18.2209.7 or later (see reference here FQDN Feature requirements). Since the required version is not natively included in Windows yet, a Platform script is being used to install the required Defender updates (Use the command line to manage Microsoft Defender Antivirus) Example command to trigger Defender update: $MpCmdRun = "C:\Program Files\Windows Defender\MpCmdRun.exe" & $MpCmdRun -SignatureUpdate -MMPC Switch Defender Firewall profile to private during enrollment phase To avoid issues during the device enrollment phase, the Defender Firewall profile is being switched from the default Public profile to the unrestricted Private profile by using another Platform Script. Example code to switched the Firewall profile: $NetworkName = (Get-NetConnectionProfile).Name Set-NetConnectionProfile -Name $NetworkName -NetworkCategory Private Custom device compliance check A custom device compliance check is being used to validate if GSA is installed and if the services are running on the device. A custom device compliance check requires an underlying script to gather the required information. Example custom compliance script: # GSA services to check $Services = @( "GlobalSecureAccessClientManagerService" "GlobalSecureAccessEngineService" "GlobalSecureAccessForwardingProfileService" "GlobalSecureAccessTunnelingService" ) $GSAInstalled = $false $RunningGSAServices = 0 # Validate that all Services are present (GSA installed) if ((Get-Service $Services[0] -ErrorAction SilentlyContinue) -and (Get-Service $Services[1] -ErrorAction SilentlyContinue) -and (Get-Service $Services[2] -ErrorAction SilentlyContinue) -and (Get-Service $Services[3] -ErrorAction SilentlyContinue)) { $GSAInstalled = $true } else { $GSAInstalled = $false } # Validate Service State foreach ($Service in $Services) { if ((Get-Service -Name $Service -ErrorAction SilentlyContinue).Status -eq 'Running' ) { # Service running - increase number of running services by 1 $RunningGSAServices += 1 } else { # Service not running - will not increase number of running services $RunningGSAServices += 0 } } if (($RunningGSAServices -ne 4) -or ($GSAInstalled -eq $false)) { Set-NetConnectionProfile -NetworkCategory Public } # Create a hashtable with the collected data $hash = @{ "GSAinstalled" = $GSAInstalled "GSArunning" = $RunningGSAServices } return $hash | ConvertTo-Json -Compress The result of the custom compliance script will be evaluated against the custom compliance policy, which requires the custom compliance settings in a JSON format. Example custom compliance settings JSON: { "Rules": [ { "SettingName": "GSAinstalled", "Operator": "IsEquals", "DataType": "Boolean", "Operand": "true", "MoreInfoUrl": "https://learn.microsoft.com/en-us/entra/global-secure-access/overview-what-is-global-secure-access", "RemediationStrings": [ { "Language": "en_US", "Title": "Global Secure Access not detected", "Description": "Global Secure Access service not found on the device." } ] }, { "SettingName": "GSArunning", "Operator": "IsEquals", "DataType": "Int64", "Operand": "4", "MoreInfoUrl": "https://learn.microsoft.com/en-us/entra/global-secure-access/overview-what-is-global-secure-access", "RemediationStrings": [ { "Language": "en_US", "Title": "Global Secure Access services not running", "Description": "One or more Global Secure Access service is not running on the device." } ] } ] } Validating and monitoring How did we work out which rules and events mattered — and how do we confirm the solution keeps working? Two sources did the heavy lifting: The local security event log on the device, which is essential during enrollment and reset scenarios when the profile-switching lifecycle is first established; and Microsoft Defender advanced hunting, to surface blocked connection attempts while the device is in its restricted, fail-close state. For example, this advanced hunting query surfaces outbound connections from the PAW that were blocked while it was failing closed: DeviceNetworkEvents | where DeviceName == "paw" | where LocalIPType == "Private" and RemoteIPType == "Public" | where ActionType == "ConnectionFailed" | sort by Timestamp desc Reviewing these "ConnectionFailed" events tells you whether the restricted rule set is too tight (legitimate management traffic being blocked and needing an exemption) or working exactly as intended (unexpected destinations being denied while the device is locked down). Key takeaways Global Secure Access is the right tool for controlling PAW internet access — but its currently default fail-open behavior is unacceptable for a privileged workstation. You don’t need a new GSA client to fix it. Windows Defender Firewall network profiles, driven by GSA’s own event log, give you a reliable fail-close backstop. Defender Dynamic Keywords keep the locked-down state both minimal and maintainable, replacing brittle, unscalable allow-lists. Enforcement runs at two independent layers — network (Defender Firewall profiles) and identity (Intune custom compliance plus Conditional Access) — so a failure that evades one is still caught by the other. The compliance check specifically covers the case the firewall cannot see: GSA not installed or its services not running. The whole solution deploys through Intune — Win32 app, firewall profile and rules, and a custom compliance check — and is observable through the event log and Defender advanced hunting. The Fail-Close solution turns a gap into a safe default: the instant Global Secure Access stops protecting the workstation, the privileged access workstation stops trusting the internet. We hope this article gives you a practical pattern to harden your own privileged endpoints — and if you’d like to hear more about how we design and implement our Secure Privileged Access (SPA) strategy (for instance leveraging Global Secure Access to secure on-Premises management, secure access and management of Azure private resources, what Entra ID identity controls we are using to protect privileged access, or how we leverage Identity Governance to simplify governance for privileged users), feel free to reach out to us and stay tuned for more articles. I'd like to thank DagmarHeidecker for her review and help in getting my first blog post created. As well as, JamesNoyce who came up with the initial base concept which I built upon. Disclaimer The sample scripts are not supported under any Microsoft standard support program or service. The sample scripts are provided AS IS without warranty of any kind. Microsoft further disclaims all implied warranties including, without limitation, any implied warranties of merchantability or of fitness for a particular purpose. The entire risk arising out of the use or performance of the sample scripts and documentation remains with you. In no event shall Microsoft, its authors, or anyone else involved in the creation, production, or delivery of the scripts be liable for any damages whatsoever (including, without limitation, damages for loss of business profits, business interruption, loss of business information, or other pecuniary loss) arising out of the use of or inability to use the sample scripts or documentation, even if Microsoft has been advised of the possibility of such damages.Implementing Intune RBAC and Scope Tags for Zero Trust and Least Privilege
If you’re rolling out Microsoft Intune at scale, the hardest part usually isn’t creating policies—it’s making sure the right people can manage the right things, without turning every admin account into a “keys to the kingdom” risk. In this guide, you’ll learn how to use Intune RBAC and Scope Tags to enforce least privilege, build clear management boundaries by region/agency/environment, and pair device compliance with Entra Conditional Access to strengthen a Zero Trust posture—plus a practical RACI approach so ownership stays clear as your environment grows. TL;DR Use Intune RBAC to align admin permissions to job responsibilities, reducing standing privilege and limiting who can change policies, apps, and security settings. Use Scope Tags to create visibility/management boundaries (region, agency, environment) so admins only see and manage what they own. Pair Intune compliance + Entra Conditional Access to enforce “access only from compliant devices / protected apps,” which supports a Zero Trust posture. Establish a RACI model so ownership is explicit across Endpoint, Identity, Security, Apps, AD, Help Desk, and Compliance teams. Track outcomes (compliance rates, blocked risky sign-ins, RBAC audit events, scope boundary effectiveness, GPO migration progress) and review on a regular cadence. Zero Trust and Least Privilege in Modern Endpoint Management Zero Trust is an approach to security that treats every access attempt as untrusted until it is proven otherwise. Rather than relying on “inside the network = safe,” organizations evaluate each request using signals such as user identity, device health, location, and risk, and they re-check those signals over time. In an endpoint program, Microsoft Intune supports this model by establishing device compliance, applying app protection where appropriate, and working with Conditional Access so that access decisions can depend on verified user and device posture. A practical way to describe Zero Trust is through three recurring themes: (1) make access decisions using explicit verification (strong authentication plus context and risk signals), (2) minimize privilege by granting only the access needed and reducing standing admin rights where possible, and (3) design for compromise by limiting lateral movement and reducing the impact of any single breach. These concepts align with Microsoft’s published Zero Trust guidance. Role-Based Access Control (RBAC) in Intune allows organizations to delegate administrative permissions based on roles, responsibilities, and scope. For modern endpoint environments, RBAC ensures that only authorized personnel can manage devices, deploy configurations, or access sensitive data, which is a foundational control in a Zero Trust model where access is granted based on least privilege and verified identity. By combining Intune's RBAC capabilities with Scope Tags, organizations can create visibility boundaries that align with their organizational structure, whether by region, department, business unit, or function. This prevents over-allowing permissions by assigning only the rights needed for each role, supports Zero Trust by enforcing least privilege and role-based access, and improves operational security by limiting who can manage devices and policies. Understanding Intune RBAC Roles and Permissions Microsoft Intune provides nine built-in RBAC roles designed to address common administrative scenarios. Each role has predefined permissions that determine what actions users can perform within the Intune environment, helping organizations delegate administrative tasks while maintaining control over access to sensitive information. The built-in roles include Intune Administrator with full access to all Intune features and settings (This role should not be used for every day management tasks and should be limited to only a few individuals who would be responsible for performing more elevated tasks in the Intune Portal), Policy and Profile Manager who manages device configuration profiles and compliance policies, Application Manager who manages mobile and managed applications, Endpoint Security Manager who manages security and compliance features, Help Desk Operator who performs remote tasks on users and devices, Read-Only Operator with view-only access, School Administrator for Windows 10 devices in Intune for Education, Intune Role Administrator who manages custom roles and assignments, and Cloud PC roles for managing Cloud PC features and Windows Autopatch roles for managing updates. Built-in Role Primary Permissions Use Case Application Manager Manages mobile and managed applications, app configuration policies, and app protection policies Teams responsible for deploying and managing organizational apps across devices Policy and Profile Manager Manages device configuration profiles, compliance policies, and conditional access policies IT administrators configuring device settings and ensuring compliance across the organization Endpoint Security Manager Manages security baselines, endpoint detection and response, and BitLocker policies Security teams focused on device protection and threat mitigation Help Desk Operator Performs remote tasks including device restart, password reset, and remote lock First-line support staff assisting end users with device issues Read-Only Operator View-only access to all Intune data and reports without modification rights Auditors and stakeholders needing visibility without administrative capabilities Beyond built-in roles, Intune supports custom roles that allow administrators to define specific permissions for users or groups based on their responsibilities. Custom roles enable fine-grained access control by selecting granular permissions for each role, ensuring users have access only to the features and data they require. For example, a custom role could grant only the 'Rotate local administrator password' permission to a specific Helpdesk Managers group, demonstrating the principle of least privilege in action. Create Custom Roles Login to the Intune Admin Portal with the Intune Administrator Role and navigate to Tenant Administration> Roles > All Roles > Create then select the type of role you want to create. I will select “Intune Role” Give your Custom Role a Name and a brief description. Scroll through the list of permissions as they will all be set to no by default and select the permissions relevant to the responsibility of the custom role. If you have already created your Scope Tag add it here, then review and select create Once the role is created you can select the new role and create an assignment. Give it a name and description, then select the admin group to be assigned to the role. Add the groups that the role will be managing. Add your relevant Scope Tags then select create. To take things one step further I would recommend leveraging Privileged Identity Management (PIM) for groups so that you can leverage Just-in-Time Assignments for the Intune roles. One last note on custom roles if you do not want to start from scratch with the permission sets, you can also duplicate a built-in role and modify the permissions as needed. Just select the 3 dots to the right of the role and select Duplicate Implementing Scope Tags for Distributed IT Management Scope Tags are labels that help control what different admins can see and manage in Microsoft Intune. By adding scope tags to Intune items like configuration profiles, apps, policies, or device groups and assigning the same labels to admins, organizations create clear boundaries, so each admin only sees the devices and settings they are responsible for. This capability is essential for distributed IT environments where different teams manage different locations, departments, or business units. Every Intune tenant includes a default scope tag that is automatically applied to all objects and admins, ensuring everything continues working smoothly even without custom tags configured. The key benefits of using scope tags include enabling distributed IT management by allowing regional or departmental admins to manage their specific resources, controlling access by limiting admin visibility to specific resources, enhancing security by preventing unauthorized access, improving organization by grouping resources by scope, and providing flexibility to support multiple administrative models. Scope tags work together with RBAC role assignments through three components: the role defining what actions admins can perform, scope tags determining which objects admins can see, and scope groups limiting which users and devices they can affect. Common use cases for scope tags include managed service providers limiting access to specific customer resources, regional IT administrators ensuring teams only manage and see objects relevant to their region, separating testing versus production environments when a dedicated test tenant is not available, and separating Azure Virtual Desktop resources for AVD administrators. Creating Scope Tags While still under Tenant Administration> Roles select Scope Tags Then Create. Give it a name and description. Assign the proper groups then select create. If this is all implemented properly, the admin will only be able to see items and devices that have the Scope tag that has been assigned to their role. Here are views of the apps in my tenant when signed in as a Intune Administrator (which Scope tags do not apply t And here are the same views when logged in with an admin with the iOS admin role that we created. Establishing a RACI Model for Intune Management While establishing a RACI model is not something done in the Intune portal, it is crucial in my opinion for enterprise customers since Intune covers such a vast number of capabilities that should not all be done by one team if we are practicing least privilege and zero trust. A RACI matrix is a powerful tool for defining organizational roles and responsibilities, identifying who is Responsible, Accountable, Consulted, and Informed for each activity. In Microsoft Intune management, implementing a RACI model eliminates ambiguity about which teams handle security policies, application management, patch compliance, Conditional Access, and GPO migration. The RACI framework defines four key roles: Responsible individuals execute the task or deliverable, Accountable is the single person ultimately answerable for correct completion and decision-making authority, Consulted are experts or stakeholders whose feedback is sought during the task, and Informed are those kept up to date on progress or decisions without actively contributing. For Intune environments, a well-designed RACI matrix promotes organizational alignment by mapping all key stakeholders across central IT and individual agencies or departments, clarifies decision rights by defining who approves, who executes, and who provides input for each Intune activity, ensures accountability by assigning a single accountable party for each deliverable to prevent diffusion of responsibility, and improves communication by identifying upfront who needs to be consulted and kept informed. Based on internal implementation experience and with Microsoft Federal customers, organizations should list deliverables not just activities, define roles not individual names to ensure the matrix remains relevant as people change positions, enforce exactly one Accountable person per task, assign Responsible, Consulted, and Informed roles thoughtfully, validate in a short review session, publish where work happens, and evolve the matrix as the project evolves. RACI Matrix for Security Policies and Compliance The following are just generic examples of some of the workloads and how they could be managed with a RACI matrix. Security policies and compliance management in Intune require clear ownership across multiple teams. Organizations must define who creates compliance policies requiring device encryption and minimum OS versions, who deploy security baselines like the Microsoft Defender for Endpoint Security Baseline, who manages Conditional Access policies that require device compliance, and who responds to non-compliant devices. A typical RACI model for security policies assigns the Cloud Security Team as Accountable for overall security policy strategy and compliance requirements, the Endpoint Team as Responsible for creating and deploying compliance policies and security baselines in Intune, the Application Team as Consulted for application-specific security requirements, the Help Desk as Informed about policy changes that may affect device compliance status, and the Compliance Team as Consulted to ensure policies meet regulatory requirements and as Informed about compliance status reports. For patch management and application compliance, the RACI model shifts slightly with the Endpoint Team becoming Accountable for patch deployment strategy and timing, the Application Team becoming Responsible for testing application compatibility with updates, the Help Desk becoming Responsible for addressing user-reported issues after patches, and the Cloud Security Team becoming Consulted for security update prioritization. Organizations implementing Windows Autopatch benefit from Microsoft managing problematic quality and feature update deployment cancellations using telemetry, automatically splitting devices into rings based on percentage of total devices, and managing patching behavior for Windows, Microsoft 365 Apps, Edge, Teams, and Drivers. This shifts some Accountable and Responsible designations to Microsoft while keeping internal teams Informed and Consulted. Intune Activity Accountable Responsible Consulted Informed Security Policy Creation Cloud Security Team Endpoint Team Application Team, Compliance Team Help Desk Compliance Policy Deployment Cloud Security Team Endpoint Team Compliance Team Help Desk, Application Team Security Baseline Management Cloud Security Team Endpoint Team Application Team Help Desk, Compliance Team Patch Management Strategy Endpoint Team Application Team Cloud Security Team Help Desk, Compliance Team Non-Compliance Response Cloud Security Team Endpoint Team, Help Desk Compliance Team Application Team Application and Conditional Access Management Responsibilities Application management and Conditional Access in Intune span multiple organizational functions requiring coordinated responsibility. For application lifecycle management, the Application Team is both Accountable and Responsible for deployment strategy, app protection policies, creating and testing app packages and configurations. The Endpoint Team is Consulted for deployment targeting and device compatibility, while the Help Desk is Informed about new applications and support procedures. For Conditional Access policy management, multiple teams coordinate their expertise. The Cloud Security Team is Accountable for overall Conditional Access strategy and Zero Trust implementation. The Endpoint Team is Responsible for ensuring device compliance status feeds correctly into Conditional Access decisions. The Identity Team is Responsible for configuring Conditional Access policies in Microsoft Entra ID. The Application Team is Consulted about application-specific access requirements, and the Help Desk is both Informed about access restrictions and Responsible for assisting users blocked by Conditional Access policies. Conditional Access integration with Intune creates a powerful Zero Trust security model where Intune evaluates device compliance based on compliance policies, compliance status is reported to Microsoft Entra ID, Conditional Access policies check device compliance status, and access is granted or blocked based on compliance status. For mobile application management, the Application Team is both Accountable and Responsible for app protection policies including data protection settings, access requirements like PIN and biometric authentication, and integration with Conditional Access. The Cloud Security Team is Consulted for security requirements, and the Endpoint Team is Informed about app-level controls that complement device-level policies. GPO Migration to Intune: Roles and Responsibilities Migrating Group Policy Objects from on-premises Active Directory to Microsoft Intune represents a critical transformation requiring clear ownership and phased execution. The migration process uses Group Policy Analytics, a built-in tool in Intune that analyzes on-premises GPOs by importing them as XML exports and translating them against the Settings Catalog to determine which policies are supported, deprecated, or unsupported in Intune. Organizations export GPOs from the Group Policy Management Console by right clicking the GPO, selecting Save Report, and saving as XML format. After importing to Intune via Devices > Group Policy Analytics, the tool generates a percentage-based report showing exactly how many settings have a direct 1:1 mapping to modern Intune settings. The Group Policy Analytics tool categorizes settings into three distinct types: Supported settings that have a direct counterpart in Intune and can be migrated via Settings Catalog policies, Deprecated settings no longer applicable to modern Windows versions, and Not Supported settings that do not currently have a CSP mapping and often require alternative management methods like PowerShell scripts or Proactive Remediations. Approximately 45% of GPOs can be successfully migrated to Settings Catalog, 30% require alternative approaches via PowerShell remediations, and 25% can be deprecated and retired based on typical migration outcomes. RACI Model for GPO Migration For the RACI model, the Endpoint Team is Accountable for the overall GPO migration strategy and timeline, the Active Directory Team is Responsible for exporting GPOs and documenting current policy structures, the Application Team is Consulted to validate that application-specific GPOs migrate correctly and that applications continue functioning, the Cloud Security Team is Consulted to ensure migrated policies maintain security posture, and the Help Desk is Informed about changes to device configurations and becomes Responsible for user communication about policy transitions. Integrating Conditional Access with Device Compliance Conditional Access integration with Intune device compliance creates an additional layer of security by enforcing access controls based on device compliance status and app protection policies. This integration ensures that only compliant devices and protected apps can access organizational resources, forming a cornerstone of Zero Trust architecture. Device-Based Conditional Access Implementation Device-based Conditional Access uses device compliance status from Intune to control access to organizational resources through a four-step process: Intune evaluates device compliance based on compliance policies Compliance status is reported to Microsoft Entra ID Conditional Access policies check device compliance status Access is granted or blocked based on compliance status To implement device compliance Conditional Access, organizations first create and assign device compliance policies in Intune requiring elements like BitLocker encryption, Microsoft Defender antivirus enabled, Windows Firewall enabled, and minimum OS version requirements. Then in the Microsoft Entra Admin Center under Security > Conditional Access, administrators create policies specifying: Users as target groups like Corporate Users Cloud apps as All cloud apps or selected Microsoft 365 apps Device platform as Windows or other platforms Access control requiring device to be marked as compliant Measuring Success and Continuous Improvement Organizations implementing Intune RBAC and Scope Tags should establish metrics to measure success and identify areas for continuous improvement. Key performance indicators include percentage of devices compliant with security policies, time to resolve non-compliance issues, number of unauthorized access attempts blocked by Conditional Access, percentage of GPOs successfully migrated to Intune Settings Catalog, and administrative efficiency measured by reduction in time spent on routine management tasks. Compliance reporting in Intune provides visibility into device compliance status across the organization, with reports showing compliant versus non-compliant devices, specific compliance policy violations, and trends over time. Organizations typically see compliance rates improve from a 65% baseline to 95% or higher within 12 months of implementing proper RBAC roles and Scope Tags. This improvement results from clearer ownership, faster policy deployment, and more focused administrative oversight. Conditional Access sign-in logs in Microsoft Entra ID reveal which access attempts are granted or blocked, the reasons for access decisions, and patterns of risky sign-ins that may indicate compromised credentials or devices. For RBAC effectiveness, organizations should monitor audit logs to track which administrators are performing which actions, identify any privilege escalation attempts or suspicious administrative activity, and ensure separation of duties is maintained. Scope tag effectiveness can be measured by confirming that administrators only see resources within their designated scope, tracking incidents where admins requested access outside their scope, and validating that regional or departmental segregation is working as intended. Organizations should establish a regular review cadence with monthly compliance and security posture reviews, quarterly RBAC and Scope Tag access reviews, bi-annual GPO migration progress assessments, and annual Zero Trust maturity assessments. Disclaimer All screenshots are from a non-production lab environment and can/will vary per environment. All processes and directions are of my own opinion and not of Microsoft and are from my years of experience with the Intune product in multiple customer environments References Role-based access control (RBAC) with Microsoft Intune - Microsoft Intune | Microsoft Learn Use role-based access control (RBAC) and scope tags for distributed IT - Microsoft Intune | Microsoft Learn Aligning responsibilities across teams - Cloud Adoption Framework | Microsoft Learn How to Require Device Compliance with Conditional Access - Microsoft Entra ID | Microsoft Learn Configuring Microsoft Intune just-in-time admin access with Azure AD PIM for Groups | Microsoft Community HubUpdate Entra ID Device Extension Attributes via PowerShell & Create Dynamic Security Groups.
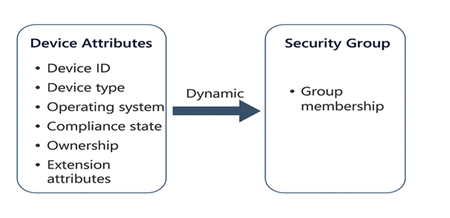
2) Overview of Extension Attributes and Updating via PowerShell What Are Extension Attributes? Extension attributes (1–15) are predefined string fields available on Entra ID device objects. They are exposed to Microsoft Graph as the extensionAttributes property. These attributes can store custom values like department, environment tags (e.g., Prod, Dev), or ownership details. Why Use Them? Dynamic Group Membership: Use extension attributes in membership rules for security or Microsoft 365 groups. Policy Targeting: Apply Defender for Endpoint (MDE) policies, Conditional Access or Intune policies to devices based on custom tags. For details on configuration of the policies refer below documentation links. https://learn.microsoft.com/en-us/defender-endpoint/manage-security-policies https://learn.microsoft.com/en-us/intune/intune-service/ https://learn.microsoft.com/en-us/entra/identity/conditional-access/ Updating Extension Attributes via PowerShell and Graph API Use Microsoft Graph PowerShell to authenticate and update device properties. Required permission: “Device.ReadWrite.All”. 3) Using PowerShell to Update Extension Attributes create app registration in Entra ID with permissions Device.ReadWriteall and Grant admin Consent. Register an app How to register an app in Microsoft Entra ID - Microsoft identity platform | Microsoft Learn Graph API permissions Reference. For updating Entra ID device properties you need “Device.ReadWrite.all” permission and Intune administrator role to run the script. Microsoft Graph permissions reference - Microsoft Graph | Microsoft Learn Below is the script Important things to note and update the script with your custom values. a) update the path of the excel file in the script. column header is 'DeviceName' Note: You may want to use CSV instead of excel file if Excel is not available on the admin workstation running this process. b) update the credential details - tenantId,clientId & clientSecret in the script. Client id and client secret are created as a part of app registration. c) update the Externsionattribute and value in the script. This is the value of the extension attribute you want to use in dynamic membership rule creation. ___________________________________________________________________________ #Acquire token $tenantId = "xxxxxxxxxxxxxxxxxxxxx" $clientId = "xxxxxxxxxxxxxxxx" $clientSecret = "xxxxxxxxxxxxxxxxxxxx" $excelFilePath = "C:\Temp\devices.xlsx" # Update with actual path $tokenResponse = Invoke-RestMethod -Uri "https://login.microsoftonline.com/ $tenantId/oauth2/v2.0/token" -Method POST -Body $tokenBody $accessToken = $tokenResponse.access_token # Import Excel module and read device names Import-Module ImportExcel $deviceList = Import-Excel -Path $excelFilePath foreach ($device in $deviceList) { $deviceName = $device.DeviceName # Assumes column header is 'DeviceName' Get device ID by name $headers = @{ "Authorization" = "Bearer $accessToken"} $deviceLookupUri = "https://graph.microsoft.com/beta/devices?`$filter=displayName eq '$deviceName'" try { $deviceResponse = Invoke-RestMethod -Uri $deviceLookupUri -Headers $headers -Method GET } catch { Write-Host "Error querying device: $deviceName - $_" continue } if ($null -eq $deviceResponse.value -or $deviceResponse.value.Count -eq 0) { Write-Host "Device not found: $deviceName" continue } $deviceId = $deviceResponse.value[0].id # Prepare PATCH request $uri = "https://graph.microsoft.com/beta/devices/$deviceId" $headers["Content-Type"] = "application/json" $body = @{ extensionAttributes = @{ extensionAttribute6 = "MDE" } } | ConvertTo-Json -Depth 3 try { $response = Invoke-RestMethod -Uri $uri -Method Patch -Headers $headers -Body $body Write-Host "Updated device: $deviceName"} catch { Write-Host "Failed to update device: $deviceName - $_" } } Write-Host "Script execution completed." ________________________________________________________________________________________________________________________ Here’s a simple summary of what the script does: Gets an access token from Microsoft Entra ID using the app’s tenant ID, client ID, and client secret (OAuth 2.0 client credentials flow). Reads an Excel file (update the path in $excelFilePath, and ensure the column header is DeviceName) to get a list of device names. Loops through each device name from the Excel file: Calls Microsoft Graph API to find the device ID by its display name. If the device is found, sends a PATCH request to Microsoft Graph to update extensionAttribute6 with the value "MDE". Logs the result for each device (success or failure) and prints messages to the console. 4) Using Extension Attributes in Dynamic Device Groups Once extension attributes are set, you can create a dynamic security group in Entra ID: Go to Microsoft Entra admin center → Groups → New group. Select Security as the group type and choose Dynamic Device membership. Add a membership rule, for example: (device.extensionAttributes.extensionAttribute6 -eq "MDE") 4. Save the group. Devices with extensionAttribute6 = MDE will automatically join. 5) Summary Extension attributes in Entra ID allow custom tagging of devices for automation and policy targeting. You can update these attributes using Microsoft Graph PowerShell. These attributes can be used in dynamic device group rules, enabling granular MDE policies, Conditional Access and Intune deployments. Disclaimer This script is provided "as-is" without any warranties or guarantees. It is intended for educational and informational purposes only. Microsoft and the author assume no responsibility for any issues that may arise from the use or misuse of this script. Before deploying in a production environment, thoroughly test the script in a controlled setting and review it for compliance with your organization's security and operational policies.Gpresult Like Tool For Intune
Hi, Jonas here! Or as we say in the north of Germany: "Moin Moin!" I had to troubleshoot a lot of Intune policies lately and I used a variety of tools for that. At the end, I built my own script to have a result which looks similar to what “GPresult /h” creates for on-premises group polices. The script is inspired by the following article: https://doitpshway.com/get-a-better-intune-policy-report-part-2 by Ondrej Sebela. It follows a similar approach, but without any module dependencies and fewer output options, as my script only generates an HTML page. What started as a script is now a module which might have more functions in the future. Feel free to read any of my other articles here: https://aka.ms/JonasOhmsenBlogs How to get the module The PowerShell module is called: "IntuneDebug" and can be installed or downloaded from the PowerShell Gallery. Install the module by running the following command: Install-Module -Name IntuneDebug The module repository can be found here https://aka.ms/IntuneDebug in case you want to download the module manually or want to contribute to it. The command to get the report is called: “Get-MDMPolicyReport” How to use Get-MDMPolicyReport The function can run without administrative permissions and without any parameters on a windows machine. But you can also start the function with administrative permissions to get more data about Intune Win32Apps and their install status. Use parameter “-MDMDiagReportPath” to load MDM report data captured on a remote machine. But more on that in section “How to use parameter -MDMDiagReportPath“ So, in summary, the function can run locally to output information specific to that device, or it can parse already captured data via the “-MDMDiagReportPath” parameter. It cannot gather data remotely, though. The function output As mentioned earlier, the only output of the function is an HTML file which will automatically open in Edge. The output is grouped into sections to make the report easier to read. The page looks like this when all sections are collapsed: Section: "DeviceInfo <Devicename>" DeviceInfo shows general information about the device and the Intune sync status: Section: "PolicyScope: Device" This section shows all the settings applied to the device grouped by area/product. Note: If you’re coming from ConfigMgr you might expect a policy ID in the report. While an Intune policy has an ID, the ID is not stored on the device. That’s by-design and that’s the reason why we just see the settings that apply to a device in this report. The following example shows some basic Defender and Delivery Optimization settings grouped together. You can also see the system's default value if there is one and the winning settings provider. This should typically be the MDM provider like Intune, but it could also be a different provider for some settings depending on the setup. Section: "PolicyScope: <SID> <UPN>" This section shows all the policies applied to a user. The user’s SID and UPN (UPN only when run locally) are visible in the policy-scope header. If there are multiple users working on a machine, each user will have their own section in the report. Section: "PolicyScope: EnterpriseDesktopAppManagement" This section shows all MSI installation policies from Intune. NOTE: Win32 and store apps are visible in the “Win32Apps” section. The application name is not available, instead I show the MSI filename to give an indication of what type of app that is. Section: "PolicyScope: Resources" Under resources we will see policies which typically contain some sort of payload. Like a certificate or Defender firewall rule. I tried to make each section as readable as possible. So, the output varies by type. Certificates for example, are shown in a different format as Defender firewall rules. NOTE: If the function runs without the parameter “-MDMDiagReportPath” it will try to enrich the policy info with as much data as possible. This is not possible when working with captured MDM-reports from a remote machine. The output might be limited in that case. Section: "PolicyScope: Local Admin Password Solution (LAPS)" This section shows all the settings applied to the device coming from a LAPS policy as well as some local settings. Section: "PolicyScope: Win32Apps" This section shows all available Win32App policies. Those apps can be installed already or just assigned as available. If you need more information about the installation status, you need to run the function with administrative permission. This only works locally and cannot be used with parameter “-MDMDiagReportPath” since the extra data is coming from the local registry. If a script is used for the detection or requirement, the script will be parsed and shown as it is. Use the copy button to copy the script and test it locally if needed. When the script is run as administrator locally, it will try to get more information about the actual installation status of an application: Section: "PolicyScope: Intune Scripts" Intune Scripts will show script policies and their current state. The example below shows a remediation script with the detection output string "Found". It does not have an remediation action and therefore no data for the related properties. Unfortunately, the script name is not part of the policy and cannot be shown here. But you can use Graph Explorer https://aka.ms/ge and use the following endpoint to get the script name by entering the script ID of your script: "https://graph.microsoft.com/beta/deviceManagement/deviceHealthScripts/<ScriptID>?$select=id,displayName" Where the data comes from The function will use the following command to generate an MDM report: MdmDiagnosticsTool.exe -out “C:\Users\PUBLIC\Documents\MDMDiagnostics\<DateTime>” NOTE: The tool MdmDiagnosticsTool.exe is part of the Windows operating system. More about it can be found HERE The tool will export the data to C:\Users\PUBLIC\Documents\MDMDiagnostics to a folder in the following format: "yyyy-MM-dd_HH-mm-ss" The function will then parse the following two files to extract the required data without administrative privileges: MDMDiagReport.html MDMDiagReport.xml Some data is directly read from the registry to enrich the output and in some cases administrator permissions are required. The Win32Apps and Intune script policy data is coming from the Intune Management Extension logfiles: C:\ProgramData\Microsoft\IntuneManagementExtension\Logs\AppWorkload*.log C:\ProgramData\Microsoft\IntuneManagementExtension\Logs\HealthScripts*.log NOTE: The folders under “C:\Users\PUBLIC\Documents\MDMDiagnostics” will be deleted when the creation time is older than one day. This can be changed with parameter “-CleanUpDays” set to a higher value than one day. How to use parameter “-MDMDiagReportPath” Simply generate MDM report data, either with the MdmDiagnosticsTool.exe, via the settings app or via Intune. Then copy the files to a system with the IntuneDebug module on it and unpack the report data. You can now run the function with the parameter “-MDMDiagReportPath” and point it to the unpacked report data. NOTE: The report header will contain the following when the parameter was used: “Generated from captured MDM Diagnostics Report” MdmDiagnosticsTool.exe example: mdmdiagnosticstool.exe -area "DeviceEnrollment;DeviceProvisioning;Autopilot" -zip C:\temp\MDMDiagnosticsData.zip Settings app example: Intune Example: I hope you find this tool helpful. In case of any issues or suggestions, head over to GitHub via https://aka.ms/IntuneDebug and create an issue or pull request. Stay safe! Jonas Ohmsen Code disclaimer This sample script is not supported under any Microsoft standard support program or service. This sample script is provided AS IS without warranty of any kind. Microsoft further disclaims all implied warranties including, without limitation, any implied warranties of merchantability or of fitness for a particular purpose. The entire risk arising out of the use or performance of this sample script and documentation remains with you. In no event shall Microsoft, its authors, or anyone else involved in the creation, production, or delivery of this script be liable for any damages whatsoever (including, without limitation, damages for loss of business profits, business interruption, loss of business information, or other pecuniary loss) arising out of the use of or inability to use this sample script or documentation, even if Microsoft has been advised of the possibility of such damages.
Creating Custom Intune Reports with Microsoft Graph API
Systems administrators often need to be able to report on data that is not available in the native reports in the Intune console. In many cases this data is available to them through Microsoft Graph. However, in some instances administrators may need to pull data from other sources or store it for tracking trends over time. For example, generating a custom dashboard to track Windows 365 license costs requires pulling data from Microsoft Graph and combining it with licensing details that are not available in Graph, but may be stored in another location (an IT Asset Management Tool for example). The Windows 365 Cost Dashboard is an example of how you can combine Intune data from Microsoft Graph with information pulled from another source. This guide provides step-by-step instructions to pull data from Microsoft Graph API, ingest it to Azure Log Analytics, and connect to your workspace with Power Bi. This solution demonstrates how to gather and store Graph API data externally for richer reporting and integrate it with data from an additional data source to produce a dashboard tailored to your unique needs. By using this dashboard as an example, administrators can unlock deeper insights while leveraging Intune's powerful foundation. The solution: This dashboard and the accompanying PowerShell script are meant to demonstrate an end-to-end example of gathering data from Microsoft Graph and ultimately being able to visualize it in a Power Bi dashboard. While it does create the Azure Infrastructure needed to complete the scenario in the demonstration, it can be extended to gather and report additional information. What does this do? This example consists of two separate pieces – the Power Bi dashboard and a PowerShell script that creates all the Azure resources needed to gather data from Microsoft Graph and ingest it into a Log Analytics workbook. This post will discuss all of the infrastructure elements that are created and the steps to get your data from Log Analytics into the Power Bi dashboard, but I want to strip away all of the “extra” elements and talk about the most important part of the process first. Prerequisites The scripts shared in this blog post assume that you already have an Azure subscription and a resource group configured. You need to have an account with the role of “Owner” on the resource group (or equivalent permissions) to create resources and assign roles. The account will also need to have the “Application Developer” role in Entra Active Directory to create an App Registration. To run the resource creation script, you will need to have several modules available in PowerShell. To see the full list please review the script on GitHub. From Microsoft Graph API to Log Analytics: How we get there Microsoft Graph API can give us a picture of what our environment looks like right now. Reporting on data over time requires gathering data from Graph and storing it in another repository. This example uses a PowerShell script running in Azure Automation, but there are several different ways to accomplish this task. Let’s explore the underlying process first, and then we can review the overall scope of the script used in the example. The Azure Automation runbook [CloudPCDataCollection] calls Graph API to return details about each Windows 365 Cloud PC. It does this by making GET requests to the following endpoints: https://graph.microsoft.com/beta/deviceManagement/virtualEndpoint/cloudPCs https://graph.microsoft.com/v1.0/users/<userPrincipalName> As a best practice, we should only return the properties from an API endpoint that we need. To do that, we can append a select query to the end of the URI. Queries allow us to customize requests that are made to Microsoft Graph. You can learn more about Select (and other query operators) here. The example dashboard allows you to report on Windows 365 cost over time based on properties of the device (the provisioning policy, for example), or the primary user (department). We will request the Cloud PCs id, display name, primary user’s UPN, the service plan name and id (needed to cross reference our pricing table in Power Bi), the Provisioning Policy name, and the type (Enterprise, Frontline dedicated, or Frontline Shared). The complete URI to return a list of Cloud PCs is: https://graph.microsoft.com/beta/deviceManagement/virtualEndpoint/cloudPCs?$select=id,displayName,userPrincipalName,servicePlanName,servicePlanId,ProvisioningPolicyName,ProvisioningType Once we have a list of Cloud PCs, we need to find the primary user for each device. We can return a specific user by replacing the <userPrincipalName> value in the users URI above with the primary user UPN for a specific Cloud PC. Since we only need the department, we will minimize the results by only selecting the userPrincipalName (for troubleshooting), and department. The complete URI is: https://graph.microsoft.com/v1.0/users/<userPrincipalName>?$select=userPrincipalName,department Data sent to a data collection endpoint needs to be formatted correctly. Requests that don’t match the required format will fail. In this case, we need to create a JSON payload. The properties in the payload need to match the order of the properties in the data collection rule (explained later) and the property names are case sensitive. The automation script handles the creation of the JSON object, including matching the case and order requirements as shown here: # Get Cloud PCs from Graph try { $payload = @() $cloudPCs = Invoke-RestMethod -Uri 'https://graph.microsoft.com/beta/deviceManagement/virtualEndpoint/cloudPCs?$select=id,displayName,userPrincipalName,servicePlanName,servicePlanId,ProvisioningPolicyName,ProvisioningType' -Headers @{Authorization="Bearer $($graphBearerToken.access_token)"} $CloudPCArray= @() $CloudPCs.value | ForEach-Object { $CloudPCArray += [PSCustomObject]@{ Id = $_.id DisplayName = $_.displayName UserPrincipalName = $_.userPrincipalName ServicePlanName = $_.servicePlanName ServicePlanId = $_.servicePlanId ProvisioningPolicyName = $_.ProvisioningPolicyName ProvisioningType = $_.ProvisioningType } } # Prepare payload foreach ($CloudPC in $CloudPCArray) { If($null -ne $CloudPC.UserPrincipalName){ try { $UPN = $CloudPc.userPrincipalName $URI = "https://graph.microsoft.com/v1.0/users/$UPN" + '?$select=userPrincipalName,department' $userObj = Invoke-RestMethod -Method GET -Uri $URI -Headers @{Authorization="Bearer $($graphBearerToken.access_token)"} $userDepartment = $UserObj.Department } catch { $userDepartment = "[User department not found]" } } else { $userDepartment = "[Shared - Not Applicable]" } $CloudPC | Add-Member -MemberType NoteProperty -Name Department -Value $userDepartment $CloudPC | Add-Member -MemberType NoteProperty -Name TimeGenerated -Value (Get-Date).ToUniversalTime().ToString("o") $payload += $CloudPC } } catch { throw "Error retrieving Cloud PCs or user department: $_" } After the payload has been generated, the script sends it to a data collection endpoint using a URI that is generated by the setup script. # Send data to Log Analytics try { $ingestionUri = "$logIngestionUrl/dataCollectionRules/$dcrImmutableId/streams/$streamDeclarationName`?api-version=2023-01-01" $ingestionToken = (Get-AzAccessToken -ResourceUrl 'https://monitor.azure.com//.default').Token Invoke-RestMethod -Uri $ingestionUri -Method Post -Headers @{Authorization="Bearer $ingestionToken"} -Body ($payload | ConvertTo-Json -Depth 10) -ContentType 'application/json' Write-Output "Data sent to Log Analytics." } catch { throw "Error sending data to Log Analytics: $_" } Getting access tokens with a managed identity Security should be top of mind for any Systems Administrator. When making API calls to Microsoft Graph, Azure, and other resources you may need to provide an access token in the request. Access to resources controlled with an App Registration in Entra. In the past, this required using either a certificate or client secret. Both options create management overhead, and client secrets that are hard coded in scripts present a considerable security risk. Managed identities are managed entirely by Entra. There is no requirement for an administrator to manage certificates or client secrets, and credentials are never exposed. Entra recently introduced the ability to assign a User-assigned managed identity as a federated credential on an App Registration. This means that a managed identity can now be used to generate an access token for Microsoft Graph and other azure resources. You can read more about adding the managed identity as a federated credential here. Requesting an access token via federated credentials happens in two steps. First, the script uses the managed identity to request a special token scoped for the endpoint ‘api://AzureADTokenExchange'. #region Step 2 - Authenticate as the user assigned identity #This is designed to run in Azure Automation; $env:IDENTITY_header and $env:IDENTITY_ENDPOINT are set by the Azure Automation service. try { $accessToken = Invoke-RestMethod $env:IDENTITY_ENDPOINT -Method 'POST' -Headers @{ 'Metadata' = 'true' 'X-IDENTITY-HEADER' = $env:IDENTITY_HEADER } -ContentType 'application/x-www-form-urlencoded' -Body @{ 'resource' = 'api://AzureADTokenExchange' 'client_id' = $UAIClientId } if(-not $accessToken.access_token) { throw "Failed to acquire access token" } else { Write-Output "Successfully acquired access token for user assigned identity" } } catch { throw "Error acquiring access token: $_" } #endregion That token is then exchanged in a second request to the authentication endpoint in the Entra tenant for a token that is scoped to access 'https://graph.microsoft.com/.default' in the context of the App Registration. #region Step 3 - Exchange the access token from step 2 for a token in the target tenant using the app registration try { $graphBearerToken = Invoke-RestMethod "https://login.microsoftonline.com/$TenantId/oauth2/v2.0/token" -Method 'POST' -Body @{ client_id = $appClientId scope = 'https://graph.microsoft.com/.default' grant_type = "client_credentials" client_assertion_type = "urn:ietf:params:oauth:client-assertion-type:jwt-bearer" client_assertion = $accessToken.access_token } if(-not $graphBearerToken.access_token) { throw "Failed to acquire Bearer token for Microsoft Graph API" } else { Write-Output "Successfully acquired Bearer token for Microsoft Graph API" } } catch { throw "Error acquiring Microsoft Graph API token: $_" } #endregion Azure Resource Creation Script The PowerShell script included in this example will complete the following tasks: Creates a Log Analytics Workspace Define a custom table in the newly created workspace to store Cloud PC data Configure a data collection endpoint and data collection rule to ingest data into the custom table Create an Azure Automation account and runbook to retrieve data from Microsoft Graph and send it to the data collection endpoint Establish a User Assigned Managed Identity to run the data collection script from Azure Automation Register an App and assign a service principal with required Microsoft Graph permissions Add the Managed Identity as a federated credential within the App Registration Assign workbook operator and Monitoring Metrics Publisher roles to the Managed Identity Steps to Implement: 1. Download the script and Power BI Dashboard: Download the Power Bi dashboard and PowerShell script from GitHub: Windows 365 Custom Report Dashboard 2. Update Variables: Modify the PowerShell script to include your Tenant ID, Resource Group Name, and location Adjust other variables to fit your specific use case while adhering to Azure naming conventions 3. Run the PowerShell Script: Execute the script to create the necessary Azure resources and configurations. 4. Verify Resource Creation: Log into the Azure Portal. Navigate to Log Analytics and confirm the creation of the W365CustomReporting workspace. Click on Settings > Tables and confirm the W365_CloudPCs_CL table was created Search for Automation Accounts and locate AzAut-CustomReporting. 5. Run the Runbook and Pull Data into Log Analytics: Open the CloudPCDataCollection runbook, select Edit > Edit in portal and the click on Test Pane. Click start to test the CloudPCDataCollection runbook and ensure data ingestion into Log Analytics. The runbook may take several minutes to run. You should see a “Completed” status message and the output should include, “Data sent to Log Analytics.” Return to the Log Analytics workspace and select “Logs.” Click on the table icon in the upper left corner of the query window. Select Custom Logs > W365_CloudPCs_CL and click on “Run.” (Please note: initial data ingestion may take several minutes to complete. If the table is not available, please check later.) The table Logs should populate with data from the last 24 hours by default. Click on Share > Export to Power BI (as an M query)Export the data to Power BI using an M query. The file should download. Open the file to view the completed query. Select the contents of the file and copy it to the clipboard. 6. Import Data into Power BI Dashboard: Open the Power BI template. In the table view on the right side of the screen, right click on the CloudPCs table and select “Edit Query.” Click on “Advanced Editor” on the ribbon to edit the query. Paste the contents of the downloaded M Query file in the editor and click “Done.” A preview of your data should appear. We need to make sure the columns match the data in the template. Right click on the “Time Generated” column and select Transform > Date Only. Right click on the same column and select “Rename.” Rename the column to “Date” Click “Close and Apply” to apply your changes and update the dashboard. 7. Update the Pricing and Service Plan Details table (Optional) The Pricing and Service Plan Details table was created via manual data entry, which allows for it to be updated directly within Power BI. To update the dashboard with your pricing information, right click on PricingAndServicePlanDetails table and select edit query Click on the gear icon to the right of “Source” Find the SKU Id that matches the Windows 365 Enterprise or Frontline licenses in your tenant; update the price column to match your pricing 8. (Optional) Update the timespan on the imported M query to view data over a longer period When we initially viewed the logs in Log Analytics, we left the time period set with the default value, “Last 24 Hours.” That means that the query that was created will only show data from the last day, even if the runbook has been configured to run on a schedule. We can edit that behavior by updating the table query. Edit the Cloud PCs table as you did before. In the advanced editor find the “Timespan” property. The Timespan value uses ISO 8601 durations to select data over a specific period. For example, “P1D” will show data from the previous 1 day. The past year would be represented by “P1Y” or “P365D”. Learn more about ISO 8601 duration format here: ISO 8601 - Wikipedia Please note that this query can only return data that is stored in Log Analytics. If you set it to “P1Y,” but only have collected information from the past month, you will still only see 1 month worth of data. Parting thoughts This example demonstrates how a systems administrator can leverage Microsoft Graph, Azure Log Analytics, and Power Bi to create custom reports. The script provided creates all the required resources to create your own custom reports. You can leverage the concepts used in this example to add additional data sources and expand your Log Analytics workbooks (by adding additional columns or tables) to store other data pulled from Microsoft Graph. By following this example, Systems Administrators can build custom Intune reports that integrate data from Microsoft Graph and external sources. This solution provides comprehensive, historical reporting, helping organizations gain valuable insights into their IT environments. Additional Credit: The script to create resources was adapted from the process described by Harjit Singh here: Ingest Custom Data into Azure Log Analytics via API Using PowerShell. Please visit that post for additional information on creating the underlying resources. Limitations: This example is not intended to be ready for production use. While the script creates the underlying infrastructure, it does not automatically schedule the Azure Automation runbook, nor does it change the default retention period in Log Analytics beyond 30 days. The use of Log Analytics and Azure Automation can incur charges. You should follow your organization’s guidelines when scheduling runbooks or updating retention policies. The pricing details table was created based on the Windows 365 SKUs listed on the Product names and service plan identifiers for licensing and the corresponding retail prices for Windows 365 Enterprise and Frontline as of February 26, 2025. You may need to update the pricing details to match your license costs or connect to an outside data source where your license details are stored to accurately reflect your cost details. Disclaimer The sample scripts are not supported under any Microsoft standard support program or service. The sample scripts are provided AS IS without warranty of any kind. Microsoft further disclaims all implied warranties including, without limitation, any implied warranties of merchantability or of fitness for a particular purpose. The entire risk arising out of the use or performance of the sample scripts and documentation remains with you. In no event shall Microsoft, its authors, or anyone else involved in the creation, production, or delivery of the scripts be liable for any damages whatsoever (including, without limitation, damages for loss of business profits, business interruption, loss of business information, or other pecuniary loss) arising out of the use of or inability to use the sample scripts or documentation, even if Microsoft has been advised of the possibility of such damages.Migrating BitLocker Recovery Key Management from ConfigMgr to Intune: A Practical Guide
Hi, I'm Herbert Fuchs, a Cloud Solution Architect. In this blog, I’ll guide you through migrating existing BitLocker recovery keys from Configuration Manager to Intune—especially for scenarios involving already encrypted devices. While many posts cover Intune setup basics for greenfield deployments, this guide dives deeper into real-world considerations for Hybrid-Joined, co-managed environments. Current Setup: ConfigMgr BitLocker Management In many organizations, BitLocker encryption and key management is handled via MBAM Standalone or the Configuration Manager BitLocker feature. In both cases, the MBAM Agent Service is responsible for encrypting devices and configuring key protectors based on policy — either via GPO or Configuration Manager profiles. You configure a BitLocker policy and assign it to devices. For Configuration Manager, the Configuration tab will show a BitLocker configuration profile once the client receives the policy. Once the encryption process starts, the BitLocker API events show: Key protector creation TPM sealing Encryption initiation You can check encryption status via PowerShell or using manage-bde.exe. You can also compare the recovery password with what's available in the MBAM Helpdesk Portal. PowerShell: Manage-bde: Compare Key: Note: When Configuration Manager escrows the BitLocker key, the information is written to the registry in UNIX DateTime format. Here's how to convert it: $LastEscrowTime = Get-ItemPropertyValue HKLM:\SOFTWARE\Microsoft\CCM\BLM -Name 'LastEscrowTime' $oUNIXDate=[System.DateTimeOffset]::FromUnixTimeSeconds($LastEscrowTime) $oUNIXDate If your environment is running MECM 2203 and higher than you can test the Escrow through the local API, also the Key-Rotation: Function Invoke-CCMBitlockerEscrowKey { [CmdletBinding()] Param ( [Parameter(Mandatory = $false)] [switch]$rotate ) $ErrorActionPreference = 'stop' #ensure client agent is at least CB 2203 if (([wmi]"ROOT\ccm:SMS_Client=@").ClientVersion.Split('.')[2] -lt 9078){ Write-Host "Required client version is at least CB 2203! Aborting..." -ForegroundColor Yellow break } if ($rotate) { # remove escrowed reference to force key rotation Write-Verbose "Removing HKLM\SOFTWARE\Microsoft\CCM\BLM\Escrowed key (if exists), to force key rotation" Remove-Item HKLM:\SOFTWARE\Microsoft\CCM\BLM\Escrowed -Recurse -ErrorAction SilentlyContinue } # Execute Package/Program Try { $ReturnObj = New-Object System.Collections.ArrayList Write-Verbose "Connect CCM_BLM_KeyEscrow Class" $CCMBLMSDK = ([WMIClass]'root\ccm\clientsdk:CCM_BLM_KeyEscrow') Write-Verbose "Retrieving drive letter(s) of encrypted volumes" $EncryptedDrives = (([wmiclass]"ROOT\cimv2\Security\MicrosoftVolumeEncryption:Win32_EncryptableVolume").GetInstances() | Where-Object ProtectionStatus -EQ 1).DriveLetter # loop through all encrypted drives & escrow the recovery key foreach ($ed in $EncryptedDrives) { Write-Verbose "Execute EscrowKey-Method for drive $ed" $Escrow = $CCMBLMSDK.EscrowKey($ed) Write-Verbose "Fill up HashTable-Object with Information" $Input = @{ 'ReturnValue'= $Escrow.ReturnValue 'Escrowkey' = $Escrow.KeyID 'DriveLetter' = $ed } $InfoTable = New-Object PSObject -Property $Input [Void]$ReturnObj.Add($InfoTable) } Return $ReturnObj } Catch { Write-Host "Exception Type: $($_.Exception.GetType().FullName)" -ForegroundColor Red Write-Host "Exception Message: $($_.Exception.Message)" -ForegroundColor Red Write-Host "Exception Stack: $($_.ScriptStackTrace)" -ForegroundColor Red } } Invoke-CCMBitlockerEscrowKey -rotate -Verbose Step 1: Identify Co-Managed Devices In this migration scenario, we're working with Entra-Hybrid-Joined devices that are co-managed. First, set Endpoint Protection workload authority to Intune. Assign your devices to a staging collection. This will not immediately change BitLocker policies on the device — but prepares the system to receive policy from Intune. In this Registry-Area you can see the Windows Encryption Settings which are enforced: You'll also find the MBAM-Agent configurations here: You can verify workload authority using the CoManagementFlag via this PowerShell Function. The CoManagement Flag you get from the Configmgr-Control-Panel or the Registry: HKEY_LOCAL_MACHINE\SOFTWARE\Microsoft\CCM\CoManagementFlags. You can also find this state in the SQL-View vClientCoManagementState. Function Get-CoMgmtClientFlag { [CmdletBinding()] Param ( [Parameter(Mandatory=$True)] [Int]$CoMgmtFlag ) $CoMgmtFlagsTable = @{ 'CompliancePolicy' = 2 'ConfigurationSettings' = 8 'Default' = 8193 'DiskEncryption' = 4096 'EpSplit' = 8192 'Inventory' = 1 'ModernApps' = 64 'None' = 0 'Office365' = 128 'ResourceAccess' = 4 'Security' = 32 'WUfB' = 16 } $FlagsObject = [ordered]@{} foreach ($FlagType in $CoMgmtFlagsTable.Keys) { if (($CoMgmtFlag -band $CoMgmtFlagsTable[$FlagType]) -ne 0) { $FlagsObject.Add($FlagType, $True) } } return $FlagsObject } Get-CoMgmtClientFlag -CoMgmtFlag 12527 Once the workload is set to Intune, Configuration Manager is no longer responsible for BitLocker. The original configuration item remains visible, but BitLockerManagementHandler will defer to Intune. Key Insight: Even if you decrypt the disk and reevaluate the BitLocker CI, ConfigMgr will report it as compliant—but it is no longer enforcing the settings. In the next step we will discuss the BitLocker Policy in Intune. In a Migration-Workflow, ensure you setup the same Encryption Policies as you did in your Configuration Manager Policies – with one exception Startup Pin. Intune does not require the MBAM-Agent to manage and control Disk-Encryption – the downside out of the Box you cannot configure a Silent/Unattended Encryption with a Startup PIN because no UI for a Standard User is provided. For Registry-Policies, you might want to deploy the Custom CSP MDMWinOverGPO. However, if you for instance, define a different Cipher-Strength you will always get a Non-Compliant-State. The Reason for such an activity it would be necessary to decrypt and encrypt the System again. Step 2: Create and Assign BitLocker Policy in Intune You can create BitLocker policies in Intune via: Endpoint Security > Disk Encryption Device Configuration Templates Settings Catalog Each has slightly different UI/UX and wording, so take care during setup. Recommendation: Use Endpoint Security > Disk Encryption—it maps directly to the Settings Catalog, and the UI enforces proper dependencies and validations. Example: Silent Encryption Configuration by Endpoint Security Disk Encryption Configure OS drive encryption settings, cipher strength, and recovery options. Assign the policy to a test group in Entra or your staged collection by Collection/Group Sync. Once assigned, the device will receive the policy via the MDM channel. You can verify this via the Windows Settings app or Registry: HKLM\SOFTWARE\Policies\Microsoft\FVE – As we can see now each Configuration Options now added to this space – which is difference to the Configuration Manager Policy item. HKLM\SOFTWARE\Microsoft\PolicyManager\current\device\BitLocker The PolicyManager is in general a good reference for tracking which provider is managing settings. Important: The KeyProtector RecoveryPassword will not automatically back up to Entra unless a new key protector is created and encryption is re-triggered. Step 3: Trigger Backup to Entra or Rotate Key To ensure key escrow to Entra: Option 1: Use Intune to Rotate BitLocker Key From Intune, trigger BitLocker Key Rotation for the device for ad hoc testing. Requires that Windows Recovery Environment (WinRE) is enabled. Windows Recovery Environment (Windows RE) | Microsoft Learn The Client will receive the Notification and execute the Rotation Successful Upload Event to Entra: Successful Upload Event to Active Directory Option 2: Use PowerShell Use the built-in PowerShell cmdlet to back up the recovery key manually. Ideal for scripting or proactive remediation: BackupToAAD-BitLockerKeyProtector BackupToAAD-BitLockerKeyProtector (BitLocker) | Microsoft Learn Here an example for this purpose: <# .Synopsis Backup Bitlocker Recovery Key to Entra .DESCRIPTION The Script will get all Volumes which have Bitlocker Protection On. For each of this Volumes we look for the RecoveryPassword KeyProtector. The ID of this KeyProtector is used to execute the BuiltIn-Cmdlet BackupToAAD-BitlockerRecoveryKey. The activities are added to a Hashtable for a Final Return to be displayed in Endpoint-Analytics. For Troubleshooting Write-Verbose Output can be called. .EXAMPLE BackupBitlockerKeyToEntra.ps1 -Verbose .REQUIREMENT The Script Execution requires Elevated Permissions #> [CmdletBinding()] Param() Try { Write-Verbose "Create empty Array-Object" $BLKeyObject = New-Object System.Collections.ArrayList Write-Verbose "Get all Volumes where Bitlocker Protection is on" $Volumes = Get-BitLockerVolume | where {$_.ProtectionStatus.value__ -eq 1} If ($Volumes -is [System.Object]) { Foreach ($Volume in $Volumes) { Write-Verbose "Get for Drive $($Volume.MountPoint) RecoveryPassword KeyProtector" $KeyProtector = (Get-BitLockerVolume -MountPoint $Volume.Mountpoint).KeyProtector | where {$_.KeyProtectorType -eq 'RecoveryPassword'} If ($KeyProtector) { Write-Verbose "Trigger Backup Bitlocker Recovery Key to Entra for Drive: $($Volume.MountPoint) with ID: $($KeyProtector.KeyProtectorId)" BackupToAAD-BitLockerKeyProtector -MountPoint $Volume.MountPoint -KeyProtectorId $KeyProtector.KeyProtectorId Write-Verbose "Prepare Return HashTable" $Input = @{ Drive = $Volume.MountPoint KeyProtector = $KeyProtector.KeyProtectorId BackupToEntra = $true } $ResultTable = New-Object PSObject -Property $Input [void]$BLKeyObject.Add($ResultTable) } } } Else { Write-Host "WARNING - The System does not have any Bitlocker Encrypted Drive!!!" Exit 1 } Write-Verbose "Backup-Execution successful" Return $BLKeyObject } Catch { Write-Error $_ } Note: In hybrid scenarios, keys may be escrowed to both AD and Entra. If Entra is unavailable during encryption and you've set "Do not enable BitLocker until recovery information is stored to AD DS...", the key will be escrowed to AD only. Recommendation: Use a Proactive Remediation Script to periodically validate and enforce Entra key escrow. You can safely run BackupToAAD-BitLockerKeyProtector multiple times without issues. You can verify backup locations using: manage-bde -protectors -get C -type RecoveryPassword Step 4: Test a Fresh Encryption Cycle To confirm full Intune-based encryption and key escrow: Confirm Policies are applied Decrypt the Volume Remove all key protectors Trigger an Intune policy sync Confirm silent encryption with proper key backup Tip: You can test this with a Generation 2 VM with a virtual TPM. Key Takeaways Ensure BitLocker workload is shifted to Intune before key migration. Match Intune Configuration Profile with existing Configuration Manager Policies – otherwise you get Non-Compliance Messages (Note that Bitlocker-PreProvisioning in a TaskSequences, implies Used Space Encryption) Use key rotation or PowerShell scripts to escrow keys to Entra. Hybrid-joined devices may escrow to both AD and Entra (this is by Design, there is no option to configure only Entra) Confirm encryption compliance locally via Settings app, Registry, and manage-bde.exe – or use the Intune Reports Consider a proactive remediation script to ensure consistent key backup. Intune does not offer RBAC for viewing recovery keys. Show BitLocker-Recovery-Key is an Entra-Permission Device management permissions for Microsoft Entra custom roles - Microsoft Entra ID | Microsoft Learn Thanks for reading! Let me know your feedback or share your own tips and tricks for BitLocker migration from ConfigMgr to Intune! Disclaimer The sample scripts are not supported under any Microsoft standard support program or service. The sample scripts are provided AS IS without warranty of any kind. Microsoft further disclaims all implied warranties including, without limitation, any implied warranties of merchantability or of fitness for a particular purpose. The entire risk arising out of the use or performance of the sample scripts and documentation remains with you. In no event shall Microsoft, its authors, or anyone else involved in the creation, production, or delivery of the scripts be liable for any damages whatsoever (including, without limitation, damages for loss of business profits, business interruption, loss of business information, or other pecuniary loss) arising out of the use of or inability to use the sample scripts or documentation, even if Microsoft has been advised of the possibility of such damages.How to easily apply DISA STIGs with Intune
Introduction In today's digital landscape, ensuring the security and compliance of IT infrastructure is paramount. The Defense Information Systems Agency (DISA) provides Security Technical Implementation Guides (STIGs) to optimize security for various software and systems. Utilizing Microsoft Intune, administrators can create configuration profiles that adhere to these STIGs, thereby enhancing their organization's security posture. This blog will walk you through the process of creating Intune Configuration Profiles for DISA STIGs, complete with screenshots and detailed steps. Prerequisites Before diving into the configuration process, ensure you have the following: Access to the Intune admin center. Appropriate administrative privileges to create and manage configuration profiles. Familiarity with DISA STIGs and their requirements. Step-by-Step Guide Step 1: Access Intune Acquire DISA STIG Files: The first step in this process is to acquire the DISA STIG files from their official website (Group Policy Objects – DoD Cyber Exchange). These files contain the specific security guidelines and requirements you need to implement. Visit the DISA website, locate the relevant STIG files for your systems, and download them to your local machine. Prep files: Unzip the file you just downloaded then inside you should find another zipped file named like “Intune STIG Policy Baselines.” Unzip this file as well. Login to Intune with proper permissions: To begin, navigate to the Intune admin center at https://intune.microsoft.com or https://Intune.microsoft.us for Intune Government GCC-H/DoD (I am using a GCC-H instance of Intune, but these steps should be the same no matter what impact level you are using). Sign in with your administrator credentials: If you are using RBAC and least privilege you will need to have at least the “Policy and Profile Manager” role. Step 2: Create a New Configuration Profile Once logged in, follow these steps to create a new configuration profile: In the left-hand menu, select Devices -> Configuration profiles. Click on the Create profile button at the top, select “import policy” Select “Browse for files” and browse to the location where you unzipped the Intune STIG Policy Baselines, inside that folder go to the Intune Policies folder then Settings Catalog. Select your STIG of choice and provide a meaningful name and description for the profile and select save. Step 3: Configure Profile Settings Next, verify the profile settings align with the DISA STIG requirements: Once the profile has been created select view policy. Navigate through the settings and ensure every setting is meticulously configured to meet the STIG compliance guidelines. This may include settings such as password policies, encryption, and network security configurations. Ensure every setting meets the compliance standards of your organization. For example, Windows Spotlight is a feature that rotates the wallpaper and screensaver randomly if your organization uses custom wallpaper or screensavers you may want to have this completely disabled. Step 4: Assign the Profile and TEST, TEST, and TEST Again!! After configuring the profile settings, assign the profile to the appropriate groups: Next to Assignments select edit. Select the user or device groups that the profile should apply to, this should be a small but diverse group of devices or users that can provide feedback on the user experience of the settings being applied and or issues they cause because STIGS never break anything right!? Once you have assigned your groups click Review & Save then Save. Conclusion Creating Intune Configuration Profiles for DISA STIGs is a crucial step in maintaining robust security and compliance within your organization. By following this step-by-step guide, you can effectively configure and deploy profiles that adhere to stringent security standards, safeguarding your IT infrastructure. Stay vigilant and periodically review your profiles to ensure they remain compliant with evolving STIG requirements. Disclaimer While DISA has made this a fairly easy process with Microsoft Intune there are some caveats. In the folder where we found the Intune policies is a “Support files” folder which hold an excel spreadsheet with valuable information. There are still several STIG settings that are not natively set by Intune for various reasons (Not in Windows CSP, organization specific settings, etc.) They have also provided the Desired State Configuration (DSC) files to set a lot of these settings that will need to be deployed as a Win32_APP. This is outside the scope of this blog but stay tuned! Lastly, the spreadsheet provides STIG settings that will be a false positive when you use the Security Content Automation Protocol (SCAP) tool. This is due to the settings being set now through the Configuration Service Providers (CSP) and the tool is looking at the legacy registry locations. Unfortunately, until that tool gets updated to look in the new locations we will need to provide that to prove the settings have been configured. All screenshots and folder paths are from a non-production lab environment and can/will vary per environment. All processes and directions are of my own opinion and not of Microsoft and are from my years of experience with the Intune product in multiple customer environments Additional Resources Microsoft Intune Documentation: Microsoft Intune documentation | Microsoft Learn DISA STIGs: Security Technical Implementation Guides (STIGs) – DoD Cyber Exchange Intune Admin Center: intune.microsoft.com (Commercial/GCC) or Intune.microsoft.us for government (GCC-High/DoD) Stay tuned for future posts where we delve deeper into advanced configurations and best practices. Happy securing!