gpt-4o
8 TopicsAdding a Fallback Model to Hermes with Microsoft Foundry
So the plan was simple. Leave the Bedrock configuration untouched, then wire Microsoft Foundry in behind it as a fallback, so Hermes always has somewhere else to go when the primary provider is not responding. A few other reasons pushed me towards Foundry in particular: Redundancy that does not need me. If Bedrock is throttled or out of quota, I want Hermes to fail over on its own rather than waiting for me to notice. A catalogue I already pay for. Foundry puts the latest GPT models next to open-weight and partner models in one place, so I can pick a model that suits the task instead of settling for whatever a single provider happens to offer. Enterprise controls out of the box. Region pinning, private networking, content filters and per-deployment quota all sit in the same portal, which makes the setup far easier to defend to a security reviewer. Learning the mechanics before I need them. Working out how Hermes handles a provider chain is much nicer on a quiet Tuesday than during a live outage. Here is the short version, if you are deciding whether to read on. Time: about thirty minutes if nothing goes wrong. Cost: pay-as-you-go tokens only, and none at all while the fallback sits idle. Result: an assistant that keeps answering when your primary provider stops. Before you start, you will need three things: a machine with Hermes already installed and a working primary provider configured, an Azure subscription with access to Microsoft Foundry in a region you can actually deploy into, and enough quota in that region to create a deployment. One thing that made this easy to justify: Foundry deployments bill per token on the standard pay-as-you-go tier. A fallback provider that never gets invoked costs nothing beyond the requests it actually serves, so the insurance is close to free until the day you need it. Chat surface (CLI, messaging) → Hermes Gateway → Primary Amazon Bedrock → Fallback Microsoft Foundry Figure 1: Where the fallback sits. Every request goes through the Hermes gateway to the primary provider; only when that provider is unavailable does the chain continue to Microsoft Foundry. Part 1: Deploying a Model on Microsoft Foundry The first half of this job happens entirely inside the Microsoft Foundry portal and has nothing to do with Hermes yet. All you are really doing here is making sure your Azure subscription can serve a model, and that you hold an endpoint and key Hermes can authenticate with later. 1. Deploy model in Foundry → 2. Copy endpoint + key → 3. hermes fallback add → 4. Authenticate → 5. Select models, test Figure 2: The whole setup in five moves. The first two happen in the Microsoft Foundry portal (orange); the rest happen on the Hermes machine (blue). Go to Microsoft Foundry > Build > Models > Deploy > Deploy a base model. You can deploy a fine-tuned model instead if you already have one, which works just as well with Hermes. Check the region shown at the top of the portal before you commit, because both model availability and deployment quota differ from one region to the next. Then deploy the model you have selected: In this case I deployed gpt-5.6-sol, which is the model Hermes will fall back to. The choice was deliberate rather than exciting. My primary model on Bedrock is a general-purpose chat model, and a fallback is only useful if the answers it gives feel like a continuation of the same conversation rather than a different assistant wearing the same name. The gpt-5.6-sol deployment matches that behaviour closely, it was available in the region I wanted to pin, and the quota I was granted comfortably covers a day of normal use. If a fallback surprises you the first time it fires, it is the wrong fallback. Once the deployment finishes, open it and take note of two values: the target endpoint URI and the API key. Copy both somewhere safe now, because you will be pasting them into Hermes in the next part. If your organisation rotates keys on a schedule, use a key with the longest life you are allowed, since a fallback secured with a credential that expires quietly stops being a fallback. What to copy Where it lives in the portal Where Hermes asks for it Target endpoint URI Deployment > Endpoint > Target URI "Endpoint" prompt in hermes fallback add API key Deployment > Endpoint > Key "API key" prompt, or choose Entra ID instead Deployment name Deployment > Details > Name Shown in the model list Hermes returns Region Top of the portal, next to the resource Must match the region you deployed into Figure 3: Everything Hermes will ask for, and where to find each value before you leave the portal. Part 2: Adding Foundry to Hermes as a Fallback With the Foundry side sorted, everything from here happens in the Hermes CLI. One thing worth knowing before you start: this is the fallback command, not the primary model command, so your existing Bedrock configuration is left completely alone. Nothing in this section can break what is already working, which makes it a good one to try on a live setup. Run the Hermes fallback command: When Hermes asks which provider to add, choose Azure Foundry. The picker still carries the old name; it is the same service that the portal now calls Microsoft Foundry. Paste the target endpoint URI from your deployment, then authenticate with the API key you copied earlier. Hermes also offers Microsoft Entra ID at this prompt, which is the better option if your organisation would rather not have a static key sitting on the machine. If authentication fails here, check the endpoint before you start suspecting the key. In my experience the endpoint is wrong far more often than the credential is, usually because the deployment name at the end of the URI does not match the deployment you actually created. Once authentication succeeds, Hermes lists the deployments your Foundry resource exposes and asks which ones you want to use. You can select more than one, and the order is not cosmetic: Hermes walks down the chain from top to bottom whenever the provider above is unavailable. Treat that list as a priority order, not a shopping basket. What happens to the primary What Hermes does What you see in the chat Responds normally Routes every request to the primary and never touches the chain Nothing. The fallback stays idle Throttled or out of quota Retries the next provider down the chain on the same request A reply, served by the fallback model Endpoint unreachable Keeps failing over on each new request until the primary recovers Slightly different tone and latency, but a working assistant Every provider fails Returns the error rather than hanging An error worth chasing with hermes status Figure 4: The chain in practice. The fallback only earns its keep in the middle two rows, which is exactly why it is easy to forget you configured it. Part 3: Promoting Foundry to the Primary Model At this stage Foundry is sitting in the back seat as a backup. I wanted to reverse the arrangement and make Foundry the primary while Bedrock slides down into the fallback slot, partly because I preferred keeping day-to-day traffic inside my Azure subscription, and partly because I wanted proof the chain works in both directions. Before promotion After promotion Primary: Amazon Bedrock → Primary: Microsoft Foundry Fallback: Microsoft Foundry → Fallback: Amazon Bedrock Figure 5: The promotion, in effect. Nothing is added or removed; the two providers simply trade places in the chain. There is no dedicated "promote" command in Hermes, so the manual route is a short sequence of steps rather than a single instruction: Select the fallback provider/model as the new primary: hermes model Remove the now-duplicate model from the fallback chain: hermes fallback remove Optionally add the old primary model as a fallback: hermes fallback add Restart the messaging gateway: hermes gateway restart Verify the result: hermes status / hermes fallback list That sequence works, and it is good to know what is happening underneath. But since I already had a working provider configured, I would rather just ask Hermes to rearrange itself. This is the part I genuinely enjoy about the tool: the configuration is something you can talk to, not only something you type commands at. Prompt: Okay now please make the model I configured on Microsoft Foundry into the main model, and make the Bedrock one the fallback model! Hermes rewrites the provider chain on its own and confirms the swap once it is done, which is a great deal less error-prone than running the five commands by hand. Part 4: Testing the Switch Configuration you have not tested is just an assumption with extra steps, so the next thing is to confirm Hermes really is talking to Foundry. Type /model when running Hermes to bring up the model picker. You will be prompted to select a provider first. Pick the Microsoft Foundry entry, then choose the specific deployment from the list underneath it. The active model should switch straight away. Send it a plain "Hello" to check that the deployment actually responds, rather than just looking correct in the menu. Appearing in a dropdown and serving a request are two very different things. A second test is worth the thirty seconds it costs: run hermes status to confirm which provider is live, then hermes fallback list to confirm the chain is ordered the way you intended. The picker tells you what you selected; those two commands tell you what Hermes will actually do at three in the morning. Part 5: The Obstacle, and What It Actually Taught Me Every walkthrough has the part the author quietly leaves out. Here is mine: the wrinkle was not the model, it was capacity. My first attempt deployed into the region closest to me out of habit, and the portal turned it down because there was no capacity left for that model at the tier I asked for. The model was clearly listed in the catalogue; being listed and being deployable in your region, on your subscription, at your quota, are three separate questions. Redeploying in a different region fixed it in a couple of minutes, but it meant the endpoint URI changed, which in turn meant the value I had already pasted into Hermes was stale. Re-running hermes fallback add against the new endpoint sorted it out. The lesson is cheap enough to hand over for free: check quota and regional capacity for your specific subscription before you design a walkthrough, a demo or a production fallback around one deployment. In the Foundry portal, Management then Quota shows exactly what you have been granted per region and per model family, which is the only list that matters. Symptom Likely cause Fix Deployment rejected in the portal No capacity for that model at the tier you asked for, in that region Deploy in another region, or drop to a smaller tier Hermes rejects the credential Endpoint URI does not match the deployment you created Re-copy the target URI from the deployment, not the resource Provider authenticates but lists nothing Key belongs to a different Foundry resource Check you are in the right resource, then re-run hermes fallback add Fallback never fires Chain ordered the wrong way round hermes fallback list, then reorder Figure 6: The four things that went wrong, or nearly did, and what fixed each one. There is a silver lining worth stating plainly. Because the fallback chain was already in place, a deployment that refused to come up did not take the assistant down with it. That is precisely the scenario this whole exercise was meant to cover, and it turned up on day one without me having to simulate it. Command Cheat Sheet Everything used in this walkthrough, collected in one place: hermes fallback add: attach a provider to the fallback chain hermes fallback remove: drop a provider from the chain hermes fallback list: show the chain in priority order hermes model: set the primary model hermes gateway restart: restart the messaging gateway after a change hermes status: confirm which provider is currently live /model: switch models from inside a running session Conclusion Adding Microsoft Foundry as a fallback behind my existing Bedrock setup took an afternoon, and most of that was spent recovering from a regional capacity limit I should have checked first. The work itself is small: deploy a model, copy the endpoint and key, run hermes fallback add, authenticate, pick your deployments. The payoff is that Hermes no longer depends on one provider staying healthy. Three things are worth carrying away from this: Check quota, not just the catalogue. The Foundry catalogue shows what Microsoft offers. It does not show what your subscription and region can actually deploy today. Confirm that first, before you build anything on top of a specific deployment. Order your fallback chain deliberately. Hermes works down the list from top to bottom, so the sequence you choose during setup is the failover policy you are going to live with. Put the model you actually trust at the top. Treat the endpoint as part of the credential. Redeploying in a new region changes the endpoint URI, and a fallback pointed at an endpoint that no longer exists is not a fallback. Re-run the setup whenever the deployment moves. The switch from Bedrock primary to Foundry primary also proved the chain runs in both directions, which is the real point. Provider redundancy is only useful if you have watched it work. Next on my list is deliberately breaking the primary provider to confirm the failover triggers on its own, without me typing a single command. If you run this against a different model, region or provider pairing, I would genuinely like to know how it went, particularly if your quota experience was better than mine. Drop it in the comments.317Views0likes0CommentsUnderstanding Azure OpenAI Service Quotas and Limits: A Beginner-Friendly Guide
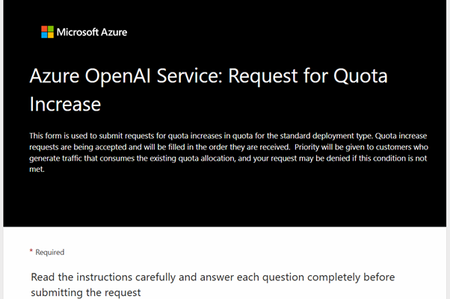
Azure OpenAI Service allows developers, researchers, and students to integrate powerful AI models like GPT-4, GPT-3.5, and DALL·E into their applications. But with great power comes great responsibility and limits. Before you dive into building your next AI-powered solution, it's crucial to understand how quotas and limits work in the Azure OpenAI ecosystem. This guide is designed to help students and beginners easily understand the concept of quotas, limits, and how to manage them effectively. What Are Quotas and Limits? Think of Azure's quotas as your "AI data pack." It defines how much you can use the service. Meanwhile, limits are hard boundaries set by Azure to ensure fair use and system stability. Quota The maximum number of resources (e.g., tokens, requests) allocated to your Azure subscription. Limit The technical cap imposed by Azure on specific resources (e.g., number of files, deployments). Key Metrics: TPM & RPM Tokens Per Minute (TPM) TPM refers to how many tokens you can use per minute across all your requests in each region. A token is a chunk of text. For example, the word "Hello" is 1 token, but "Understanding" might be 2 tokens. Each model has its own default TPM. Example: GPT-4 might allow 240,000 tokens per minute. You can split this quota across multiple deployments. Requests Per Minute (RPM) RPM defines how many API requests you can make every minute. For instance, GPT-3.5-turbo might allow 350 RPM. DALL·E image generation models might allow 6 RPM. Deployment, File, and Training Limits Here are some standard limits imposed on your OpenAI resource: Resource Type Limit Standard model deployments 32 Fine-tuned model deployments 5 Training jobs 100 total per resource (1 active at a time) Fine-tuning files 50 files (total size: 1 GB) Max prompt tokens per request Varies by model (e.g., 4096 tokens for GPT-3.5) How to View and Manage Your Quota Step-by-Step: Go to the Azure Portal. Navigate to your Azure OpenAI resource. Click on "Usage + quotas" in the left-hand menu. You will see TPM, RPM, and current usage status. To Request More Quota: In the same "Usage + quotas" panel, click on "Request quota increase". Fill in the form: Select the region. Choose the model family (e.g., GPT-4, GPT-3.5). Enter the desired TPM and RPM values. Submit and wait for Azure to review and approve. What is Dynamic Quota? Sometimes, Azure gives you extra quota based on demand and availability. “Dynamic quota” is not guaranteed and may increase or decrease. Useful for short-term spikes but should not be relied on for production apps. Example: During weekends, your GPT-3.5 TPM may temporarily increase if there's less traffic in your region. Best Practices for Students Monitor Regularly: Use the Azure Portal to keep an eye on your usage. Batch Requests: Combine multiple tasks in one API call to save tokens. Start Small: Begin with GPT-3.5 before requesting GPT-4 access. Plan Ahead: If you're preparing a demo or a project, request quota in advance. Handle Limits Gracefully: Code should manage 429 Too Many Requests errors. Quick Resources Azure OpenAI Quotas and Limits How to Request Quota in Azure Join the Conversation on Azure AI Foundry Discussions! Have ideas, questions, or insights about AI? Don't keep them to yourself! Share your thoughts, engage with experts, and connect with a community that’s shaping the future of artificial intelligence. 🧠✨ 👉 Click here to join the discussion!3.1KViews0likes0Comments
How to Reliably Gauge LLM Confidence?
a { text-decoration: none; color: #464feb; } tr th, tr td { border: 1px solid #e6e6e6; } tr th { background-color: #f5f5f5; } I’m trying to estimate an LLM’s confidence in its answers in a way that correlates with correctness. Self-reported confidence is often misleading, and raw token probabilities mostly reflect fluency rather than truth. I don’t have grounding options like RAG, human feedback, or online search, so I’m looking for approaches that work in this constraint. What techniques have you found effective—entropy-based signals, calibration (temperature scaling), self-evaluation, or others? Any best practices for making confidence scores actionable?
Understanding Azure OpenAI Service Provisioned Reservations
Hello Team, We are building a Azure OpenAI based finetuned model making use of GPT 4o-mini for long run. Wanted to understand the costing, here we came up with the following question over Azure OpenAI Service Provisioned Reservations plan PTU units. Need to understand how it works: Is there any Token Quota Limit Provisioned finetuned model deployment? How many finetuned model with Provisioned capacity can be deployed under the plan, How will the pricing affect if we deploy multiple finetune model? Model Deployment - GPT 4o-mini finetuned Region - North Central US We are doing it for our enterprise customer, kindly help us to resolve this issue.Solved1.2KViews1like6CommentsHow to build Tool-calling Agents with Azure OpenAI and Lang Graph
Introducing MyTreat Our demo is a fictional website that shows customers their total bill in dollars, but they have the option of getting the total bill in their local currencies. The button sends a request to the Node.js service and a response is simply returned from our Agent given the tool it chooses. Let’s dive in and understand how this works from a broader perspective. Prerequisites An active Azure subscription. You can sign up for a free trial here or get $100 worth of credits on Azure every year if you are a student. A GitHub account (not necessarily) Node.js LTS 18 + VS Code installed (or your favorite IDE) Basic knowledge of HTML, CSS, JS Creating an Azure OpenAI Resource Go over to your browser and key in portal.azure.com to access the Microsoft Azure Portal. Over there navigate to the search bar and type Azure OpenAI. Go ahead and click on + Create. Fill in the input boxes with appropriate, for example, as shown below then press on next until you reach review and submit then finally click on Create. After the deployment is done, go to the deployment and access Azure AI Foundry portal using the button as show below. You can also use the link as demonstrated below. In the Azure AI Foundry portal, we have to create our model instance so we have to go over to Model Catalog on the left panel beneath Get Started. Select a desired model, in this case I used gpt-35-turbo for chat completion (in your case use gpt-4o). Below is a way of doing this. Choose a model (gpt-4o) Click on deploy Give the deployment a new name e.g. myTreatmodel, then click deploy and wait for it to finish On the left panel go over to deployments and you will see the model you have created. Access your Azure OpenAI Resource Key Go back to Azure portal and specifically to the deployment instance that we have and select on the left panel, Resource Management. Click on Keys and Endpoints. Copy any of the keys as shown below and keep it very safe as we will use it in our .env file. Configuring your project Create a new project folder on your local machine and add these variables to the .env file in the root folder. AZURE_OPENAI_API_INSTANCE_NAME= AZURE_OPENAI_API_DEPLOYMENT_NAME= AZURE_OPENAI_API_KEY= AZURE_OPENAI_API_VERSION="2024-08-01-preview" LANGCHAIN_TRACING_V2="false" LANGCHAIN_CALLBACKS_BACKGROUND = "false" PORT=4556 Starting a new project Go over to https://github.com/tiprock-network/mytreat.git and follow the instructions to setup the new project, if you do not have git installed, go over to the Code button and press Download ZIP. This will enable you get the project folder and follow the same procedure for setting up. Creating a custom tool In the utils folder the math tool was created, this code show below uses tool from Langchain to build a tool and the schema of the tool is created using zod.js, a library that helps in validating an object’s property value. The price function takes in an array of prices and the exchange rate, adds the prices up and converts them using the exchange rate as shown below. import { tool } from '@langchain/core/tools' import { z } from 'zod' const priceConv = tool((input) =>{ //get the prices and add them up after turning each into let sum = 0 input.prices.forEach((price) => { let price_check = parseFloat(price) sum += price_check }) //now change the price using exchange rate let final_price = parseFloat(input.exchange_rate) * sum //return return final_price },{ name: 'add_prices_and_convert', description: 'Add prices and convert based on exchange rate.', schema: z.object({ prices: z.number({ required_error: 'Price should not be empty.', invalid_type_error: 'Price must be a number.' }).array().nonempty().describe('Prices of items listed.'), exchange_rate: z.string().describe('Current currency exchange rate.') }) }) export { priceConv } Utilizing the tool In the controller’s folder we then bring the tool in by importing it. After that we pass it in to our array of tools. Notice that we have the Tavily Search Tool, you can learn how to implement in the Additional Reads Section or just remove it. Agent Model and the Call Process This code defines an AI agent using LangGraph and LangChain.js, powered by GPT-4o from Azure OpenAI. It initializes a ToolNode to manage tools like priceConv and binds them to the agent model. The StateGraph handles decision-making, determining whether the agent should call a tool or return a direct response. If a tool is needed, the workflow routes the request accordingly; otherwise, the agent responds to the user. The callModel function invokes the agent, processing messages and ensuring seamless tool integration. The searchAgentController is a GET endpoint that accepts user queries (text_message). It processes input through the compiled LangGraph workflow, invoking the agent to generate a response. If a tool is required, the agent calls it before finalizing the output. The response is then sent back to the user, ensuring dynamic and efficient tool-assisted reasoning. //create tools the agent will use //const agentTools = [new TavilySearchResults({maxResults:5}), priceConv] const agentTools = [ priceConv] const toolNode = new ToolNode(agentTools) const agentModel = new AzureChatOpenAI({ model:'gpt-4o', temperature:0, azureOpenAIApiKey: AZURE_OPENAI_API_KEY, azureOpenAIApiInstanceName:AZURE_OPENAI_API_INSTANCE_NAME, azureOpenAIApiDeploymentName:AZURE_OPENAI_API_DEPLOYMENT_NAME, azureOpenAIApiVersion:AZURE_OPENAI_API_VERSION }).bindTools(agentTools) //make a decision to continue or not const shouldContinue = ( state ) => { const { messages } = state const lastMessage = messages[messages.length -1] //upon tool call we go to tools if("tool_calls" in lastMessage && Array.isArray(lastMessage.tool_calls) && lastMessage.tool_calls?.length) return "tools"; //if no tool call is made we stop and return back to the user return END } const callModel = async (state) => { const response = await agentModel.invoke(state.messages) return { messages: [response] } } //define a new graph const workflow = new StateGraph(MessagesAnnotation) .addNode("agent", callModel) .addNode("tools", toolNode) .addEdge(START, "agent") .addConditionalEdges("agent", shouldContinue, ["tools", END]) .addEdge("tools", "agent") const appAgent = workflow.compile() The above is implemented with the following code: Frontend The frontend is a simple HTML+CSS+JS stack that demonstrated how you can use an API to integrate this AI Agent to your website. It sends a GET request and uses the response to get back the right answer. Below is an illustration of how fetch API has been used. const searchAgentController = async ( req, res ) => { //get human text const { text_message } = req.query if(!text_message) return res.status(400).json({ message:'No text sent.' }) //invoke the agent const agentFinalState = await appAgent.invoke( { messages: [new HumanMessage(text_message)] }, {streamMode: 'values'} ) //const agentFinalState_b = await agentModel.invoke(text_message) /*return res.status(200).json({ answer:agentFinalState.messages[agentFinalState.messages.length - 1].content })*/ //console.log(agentFinalState_b.tool_calls) res.status(200).json({ text: agentFinalState.messages[agentFinalState.messages.length - 1].content }) } There you go! We have created a basic tool-calling agent using Azure and Langchain successfully, go ahead and expand the code base to your liking. If you have questions you can comment below or reach out on my socials. Additional Reads Azure Open AI Service Models Generative AI for Beginners AI Agents for Beginners Course Lang Graph Tutorial Develop Generative AI Apps in Azure AI Foundry Portal5KViews1like2CommentsCreate your own QA RAG Chatbot with LangChain.js + Azure OpenAI Service
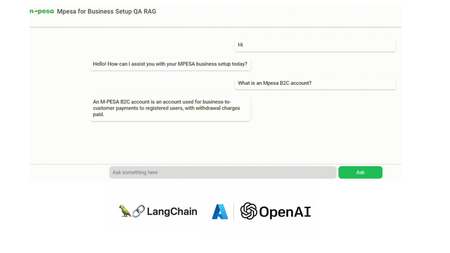
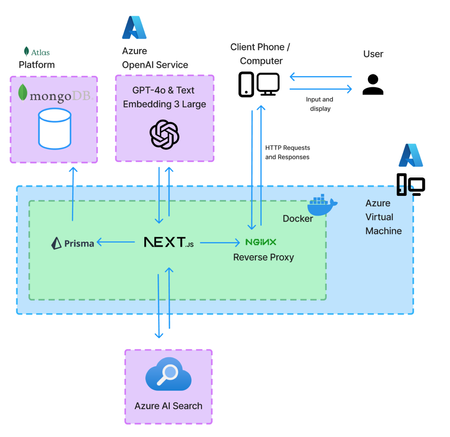
Demo: Mpesa for Business Setup QA RAG Application In this tutorial we are going to build a Question-Answering RAG Chat Web App. We utilize Node.js and HTML, CSS, JS. We also incorporate Langchain.js + Azure OpenAI + MongoDB Vector Store (MongoDB Search Index). Get a quick look below. Note: Documents and illustrations shared here are for demo purposes only and Microsoft or its products are not part of Mpesa. The content demonstrated here should be used for educational purposes only. Additionally, all views shared here are solely mine. What you will need: An active Azure subscription, get Azure for Student for free or get started with Azure for 12 months free. VS Code Basic knowledge in JavaScript (not a must) Access to Azure OpenAI, click here if you don't have access. Create a MongoDB account (You can also use Azure Cosmos DB vector store) Setting Up the Project In order to build this project, you will have to fork this repository and clone it. GitHub Repository link: https://github.com/tiprock-network/azure-qa-rag-mpesa . Follow the steps highlighted in the README.md to setup the project under Setting Up the Node.js Application. Create Resources that you Need In order to do this, you will need to have Azure CLI or Azure Developer CLI installed in your computer. Go ahead and follow the steps indicated in the README.md to create Azure resources under Azure Resources Set Up with Azure CLI. You might want to use Azure CLI to login in differently use a code. Here's how you can do this. Instead of using az login. You can do az login --use-code-device OR you would prefer using Azure Developer CLI and execute this command instead azd auth login --use-device-code Remember to update the .env file with the values you have used to name Azure OpenAI instance, Azure models and even the API Keys you have obtained while creating your resources. Setting Up MongoDB After accessing you MongoDB account get the URI link to your database and add it to the .env file along with your database name and vector store collection name you specified while creating your indexes for a vector search. Running the Project In order to run this Node.js project you will need to start the project using the following command. npm run dev The Vector Store The vector store used in this project is MongoDB store where the word embeddings were stored in MongoDB. From the embeddings model instance we created on Azure AI Foundry we are able to create embeddings that can be stored in a vector store. The following code below shows our embeddings model instance. //create new embedding model instance const azOpenEmbedding = new AzureOpenAIEmbeddings({ azureADTokenProvider, azureOpenAIApiInstanceName: process.env.AZURE_OPENAI_API_INSTANCE_NAME, azureOpenAIApiEmbeddingsDeploymentName: process.env.AZURE_OPENAI_API_DEPLOYMENT_EMBEDDING_NAME, azureOpenAIApiVersion: process.env.AZURE_OPENAI_API_VERSION, azureOpenAIBasePath: "https://eastus2.api.cognitive.microsoft.com/openai/deployments" }); The code in uploadDoc.js offers a simple way to do embeddings and store them to MongoDB. In this approach the text from the documents is loaded using the PDFLoader from Langchain community. The following code demonstrates how the embeddings are stored in the vector store. // Call the function and handle the result with await const storeToCosmosVectorStore = async () => { try { const documents = await returnSplittedContent() //create store instance const store = await MongoDBAtlasVectorSearch.fromDocuments( documents, azOpenEmbedding, { collection: vectorCollection, indexName: "myrag_index", textKey: "text", embeddingKey: "embedding", } ) if(!store){ console.log('Something wrong happened while creating store or getting store!') return false } console.log('Done creating/getting and uploading to store.') return true } catch (e) { console.log(`This error occurred: ${e}`) return false } } In this setup, Question Answering (QA) is achieved by integrating Azure OpenAI’s GPT-4o with MongoDB Vector Search through LangChain.js. The system processes user queries via an LLM (Large Language Model), which retrieves relevant information from a vectorized database, ensuring contextual and accurate responses. Azure OpenAI Embeddings convert text into dense vector representations, enabling semantic search within MongoDB. The LangChain RunnableSequence structures the retrieval and response generation workflow, while the StringOutputParser ensures proper text formatting. The most relevant code snippets to include are: AzureChatOpenAI instantiation, MongoDB connection setup, and the API endpoint handling QA queries using vector search and embeddings. There are some code snippets below to explain major parts of the code. Azure AI Chat Completion Model This is the model used in this implementation of RAG, where we use it as the model for chat completion. Below is a code snippet for it. const llm = new AzureChatOpenAI({ azTokenProvider, azureOpenAIApiInstanceName: process.env.AZURE_OPENAI_API_INSTANCE_NAME, azureOpenAIApiDeploymentName: process.env.AZURE_OPENAI_API_DEPLOYMENT_NAME, azureOpenAIApiVersion: process.env.AZURE_OPENAI_API_VERSION }) Using a Runnable Sequence to give out Chat Output This shows how a runnable sequence can be used to give out a response given the particular output format/ output parser added on to the chain. //Stream response app.post(`${process.env.BASE_URL}/az-openai/runnable-sequence/stream/chat`, async (req,res) => { //check for human message const { chatMsg } = req.body if(!chatMsg) return res.status(201).json({ message:'Hey, you didn\'t send anything.' }) //put the code in an error-handler try{ //create a prompt template format template const prompt = ChatPromptTemplate.fromMessages( [ ["system", `You are a French-to-English translator that detects if a message isn't in French. If it's not, you respond, "This is not French." Otherwise, you translate it to English.`], ["human", `${chatMsg}`] ] ) //runnable chain const chain = RunnableSequence.from([prompt, llm, outPutParser]) //chain result let result_stream = await chain.stream() //set response headers res.setHeader('Content-Type','application/json') res.setHeader('Transfer-Encoding','chunked') //create readable stream const readable = Readable.from(result_stream) res.status(201).write(`{"message": "Successful translation.", "response": "`); readable.on('data', (chunk) => { // Convert chunk to string and write it res.write(`${chunk}`); }); readable.on('end', () => { // Close the JSON response properly res.write('" }'); res.end(); }); readable.on('error', (err) => { console.error("Stream error:", err); res.status(500).json({ message: "Translation failed.", error: err.message }); }); }catch(e){ //deliver a 500 error response return res.status(500).json( { message:'Failed to send request.', error:e } ) } }) To run the front end of the code, go to your BASE_URL with the port given. This enables you to run the chatbot above and achieve similar results. The chatbot is basically HTML+CSS+JS. Where JavaScript is mainly used with fetch API to get a response. Thanks for reading. I hope you play around with the code and learn some new things. Additional Reads Introduction to LangChain.js Create an FAQ Bot on Azure Build a basic chat app in Python using Azure AI Foundry SDK763Views0likes0CommentsEnhancing Applications with AI - RoomRadar.Ai's Chatbot, Search, and Recommendation Systems
Learn how to build AI-powered applications using Microsoft Azure’s AI services. This article discusses RoomRadar.Ai, a hotel search system, as an example to guide developers to help create personalized user experiences with AI technologies. Within, the GPT-4o chatbot, search, and recommendation (similarity search) systems are discussed.1.6KViews1like0Comments