elastic job
4 Topics
Automating Azure SQL DB index and statistics maintenance using Elastic Jobs.
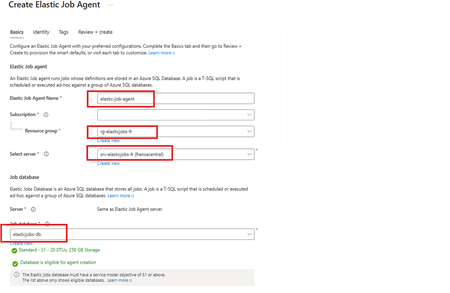
Using as a reference of this article. Automating Azure SQL DB index and statistics maintenance using Azure Automation | Microsoft Community Hub To provide complete solution to maintain you Azure SQL DB statistics and maintenance we provide our maintenance script here What's an elastic job? Create and schedule elastic jobs that periodically run against one or many Azure SQL databases. The jobs run Transact-SQL (T-SQL) queries and perform maintenance tasks. What's required? Create an empty Azure SQL Database with the S1 tier or higher. The Elastic Job Agent will use this database to store job information, job definitions, and other related data. The database must be created on the same Azure SQL Server as the Elastic Job Agent. During the Elastic Job Agent setup, this database is used as the job database. Microsoft Entra authentication with a user-assigned managed identity (UMI) (recommended). The elastic job must be able to log in to each target server or database. Create an elastic job agent. It’s a managed service that lets you run and schedule jobs across Azure SQL databases. Creating the Azure SQL database and UMI should be fairly straightforward, but I’ve included the code below in case you’d like to follow along. # This is sample code, so feel free to replace the names and location with the values that suit your environment. # Resource Group New-AzResourceGroup -Name "rg-elasticjobs-fr" -Location "FranceCentral" # Azure SQL Database - Elastic Jobs New-AzSqlServer -ResourceGroupName "rg-elasticjobs-fr" -ServerName "srv-elasticjobs-fr" -Location "FranceCentral" -ExternalAdminName "XXXXXXXXX@msft.com" -EnableActiveDirectoryOnlyAuthentication New-AzSqlDatabase -ResourceGroupName "rg-elasticjobs-fr" -ServerName "srv-elasticjobs-fr" -DatabaseName "elasticjobs-db" -Edition "Standard" -RequestedServiceObjectiveName "S1" # Azure SQL Database - Target New-AzSqlServer -ResourceGroupName "rg-elasticjobs-fr" -ServerName "srv-target-fr" -Location "FranceCentral" -ExternalAdminName "XXXXXXXXX@msft.com" -EnableActiveDirectoryOnlyAuthentication New-AzSqlDatabase -ResourceGroupName "rg-elasticjobs-fr" -ServerName "srv-target-fr" -DatabaseName "target-db" -Edition "Standard" -RequestedServiceObjectiveName "S0" -SampleName "AdventureWorksLT" # User Managed Identity New-AzUserAssignedIdentity -ResourceGroupName "rg-elasticjobs-fr" -Name "umi_fr_user" -Location "francecentral" In the search box at the top, type Elastic Job Agent, then select it and create a new Elastic Job Agent. On the identity tab, select the UMI and then click on Review + Create Now, let's create a target group (The set of servers, pools, and databases to run a job against.) and add targets for the jobs. Elastic Jobs Agent - Jobs - Target Groups - Create, once created, then click on the name, create again and add a Target Group Member. On each of the target databases, create the required objects for the maintenance script, create a contained user linked to the UMI, and grant the user the permissions needed to run the job scripts. Note: This is sample code. Please adjust the permissions based on your requirements and apply least privilege. Next, let’s schedule a job! For an Elastic Job that runs once every week, the ISO 8601 repeating interval is: P1W Add steps to each elastic job. A target group must be chosen for each job step. If you would like to see the current status of the jobs, head to Jobs, Job Executions. If further information is required, connect to the elasticjobs-db database and run the following query: SELECT TOP (10) * FROM jobs.job_executions WHERE lifecycle <> 'Succeeded' ORDER BY create_time DESC; References: Automation in Azure SQL overview - Azure SQL Database & Azure SQL Managed Instance & Azure Synapse Analytics | Microsoft Learn Elastic Jobs Overview - Azure SQL Database | Microsoft Learn Create, configure, and manage elastic jobs - Azure SQL Database | Microsoft Learn Disclaimer Please note that products and options presented in this article are subject to change. This article reflects for Azure SQL Database in September 2026. I hope this article was helpful for you, please feel free to share your feedback in the comments section.93Views0likes0CommentsHow to automate the deployment of an Elastic Job Agent with a Private Endpoint via Bicep
Environment Overview Recently, I worked on a case where our customer encountered an issue during the deployment of an Elastic Job Agent (EJA) and a Private Endpoint (PEP) using a Bicep deployment script. The process resulted in an endless deployment loop. In this article, I will guide you step by step through creating an EJA with a PEP and demonstrate how to automatically approve the connection using a Bicep deployment script. Technical Issue The main challenge is that the EJA PEP is fully managed by Microsoft, which means you cannot specify a name during the script authorization process—the system assigns one randomly. To address this, we will use deploymentScripts in combination with PowerShell to monitor and authorize the process automatically. For more details, please refer to the following resources: References Use deployment scripts in Bicep https://learn.microsoft.com/en-us/azure/azure-resource-manager/bicep/deployment-script-bicep?tabs=azure-cli Elastic jobs in Azure SQL Database https://learn.microsoft.com/en-us/azure/azure-sql/database/elastic-jobs-overview?view=azuresql Elastic job private endpoints https://learn.microsoft.com/en-us/azure/azure-sql/database/elastic-jobs-overview?view=azuresql#elastic-job-private-endpoints The Idea Since it's not possible to specify the EJA PEP name as a variable for direct approval—unlike standard PEPs—the approach was to intercept the auto-generated PEP by its ID or name and then authorize it automatically. (Remember to always follow the Principle of Least Privilege (PoLP)); in my example, I used Contributor permissions for simplicity. ****************************************************************************************************************************************************************************************************** /*Disclaimer: ****************************************************************************************************************************************************************************************************** This script is not supported under any Microsoft standard support program or service. This script is provided AS IS without warranty of any kind. Microsoft further disclaims all implied warranties including, without limitation, any implied warranties of merchantability or of fitness for a particular purpose. The entire risk arising out of the use or performance of the script and documentation remains with you. In no event shall Microsoft, its authors, or anyone else involved in the creation, production, or delivery of the script be liable for any damages whatsoever (including, without limitation, damages for loss of business profits, business interruption, loss of business information, or other pecuniary loss) arising out of the use of or inability to use the current script or documentation, even if Microsoft has been advised of the possibility of such damages. I’m not a programmer or a Bicep expert. I simply put together what I was able to reason through in order to meet our client’s request. Any suggestions or modifications are welcome. ****************************************************************************************************************************************************************************************************** This article was written in August 2025; code and modules may change over time. ****************************************************************************************************************************************************************************************************** */ param prefix string = 'bicep' param environment string = 'test' param sqlServerName string = 'bicep-test-sqleja-sqlsrv' param location string = 'westeurope' param forceUpdateTag string = utcNow() //let's check that the previously manually created server is present resource sqlServer 'Microsoft.Sql/servers@2021-11-01' existing = { name: sqlServerName } //create the database resource sqlDb 'Microsoft.Sql/servers/databases@2021-11-01' = { parent: sqlServer name: '${prefix}-${environment}-sqleja-sqldb' location: location properties: { requestedBackupStorageRedundancy: 'Local' maxSizeBytes: 5368709120 } sku: { name: 'S3' } } //create the Job Agent resource sqlJob 'Microsoft.Sql/servers/jobAgents@2024-05-01-preview' = { parent: sqlServer location: location name: '${prefix}-${environment}-sqleja-sqljobagent' properties: { databaseId: sqlDb.id } sku: { name: 'JA100' } } //defines a Target Group within a Job Agent resource targetGroup 'Microsoft.Sql/servers/jobAgents/targetGroups@2024-05-01-preview' = { parent: sqlJob name: '${prefix}-${environment}-sqleja-targetgroup' properties: { members: [ { membershipType: 'Include' serverName: sqlServer.name type: 'SqlServer' } ] } } //generate an UMI to auth and deploy the PS script resource scriptIdentity 'Microsoft.ManagedIdentity/userAssignedIdentities@2023-01-31' = { name: '${prefix}-${environment}-deployscript-umi' location: location } //assign the role to the script UMI //https://learn.microsoft.com/en-us/azure/role-based-access-control/built-in-roles resource scriptRoleAssignment 'Microsoft.Authorization/roleAssignments@2022-04-01' = { name: guid(scriptIdentity.id, 'script-role-assignment') properties: { roleDefinitionId: subscriptionResourceId('Microsoft.Authorization/roleDefinitions', 'b24988ac-6180-42a0-ab88-20f7382dd24c') // Contributor principalId: scriptIdentity.properties.principalId } dependsOn: [ delayScript ] } //let's generate a delay to allow Azure AD permissions propagation resource delayScript 'Microsoft.Resources/deploymentScripts@2023-08-01' = { name: 'sleep-60s-bash' location: location kind: 'AzureCLI' identity: { type: 'UserAssigned' userAssignedIdentities: { '${scriptIdentity.id}': {} } } properties: { azCliVersion: '2.76.0' scriptContent: ''' echo "Sleeping for 60 seconds..." sleep 60 echo "Done sleeping." ''' retentionInterval: 'P1D' cleanupPreference: 'Always' timeout: 'PT5M' forceUpdateTag: forceUpdateTag } dependsOn: [ scriptIdentity ] } //create the eja pep resource privateEndpoint 'Microsoft.Sql/servers/jobAgents/privateEndpoints@2024-05-01-preview' = { parent: sqlJob name: '${prefix}-${environment}-sqleja-pep' properties: { targetServerAzureResourceId: sqlServer.id } } //PS script to approve the MS fully managed PEP resource approvePrivateEndpointConnection 'Microsoft.Resources/deploymentScripts@2023-08-01' = { name: 'ps-to-approve-eja-pep-by-script' location: location kind: 'AzurePowerShell' identity: { type: 'UserAssigned' userAssignedIdentities: { '${scriptIdentity.id}': {} } } properties: { azPowerShellVersion: '11.0' scriptContent: ''' Connect-AzAccount -Identity $SqlServerResourceIdForPrivateLink = '/subscriptions/<yourSubID>/resourceGroups/bicep-rg/providers/Microsoft.Sql/servers/bicep-test-sqleja-sqlsrv' $SQLprivateEndpoints = Get-AzPrivateEndpointConnection -PrivateLinkResourceId $SqlServerResourceIdForPrivateLink foreach ($privateEndpoint in $SQLprivateEndpoints) { if ($privateEndpoint.PrivateLinkServiceConnectionState.Status -eq "Pending") { $id = $privateEndpoint.id Write-Output "Approving Private Endpoint Connection: $id" Approve-AzPrivateEndpointConnection -ResourceId "${id}" -Description "Approved by Bicep Deployment Script" } } ''' retentionInterval: 'P1D' cleanupPreference: 'Always' timeout: 'PT30M' forceUpdateTag: forceUpdateTag } dependsOn: [ sqlJob scriptRoleAssignment ] } Deployment Details Below is an overview of the resources created by the automation Conclusion With this article, I’ve wanted to share how to automate the creation of an Elastic Job Agent Private Endpoint without requiring manual approval. Kindly note that the products and options presented in this article are subject to change, this article reflects for Azure SQL Database in September 2025. Please also make sure to review the code carefully. It is provided as-is, with no guarantees, warranties, or support. Any suggestions or improvements are welcome. I hope you find this guide useful and that it inspires you to experiment freely with your deployments. Thank you. Best Regards, Vittorio