defender
5 Topics
Locking down PAWs internet access when GSA drops
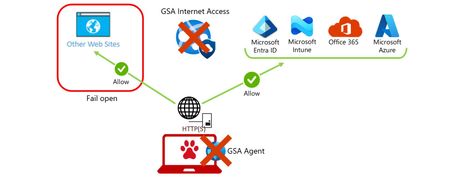
By: Christian Friedel-Jain - Sr. Security Consultant | James Noyce - Sr. Security Solution Engineer Introduction Privileged Access Workstations (PAWs) are among the most sensitive endpoints in any organization. A PAW, in most of our Microsoft consulting projects, exists to do one job safely: administer cloud services from a hardened device that is only ever allowed to reach a small, tightly controlled set of internet destinations. But an endpoint’s security posture is ultimately defined by its behavior under failure conditions. When we moved the internet access restriction for our PAW devices from a locally enforced restriction (more about that later) to a solution based on Microsoft Global Secure Access (GSA), we immediately identified a gap under failure conditions – but first a quick grounding on the moving parts. Global Secure Access (What is Global Secure Access?) is Microsoft’s umbrella term for Microsoft Entra Internet Access and Microsoft Entra Private Access — the components of Microsoft’s Security Service Edge solution. For a PAW device we are leveraging Microsoft Entra Internet Access as an identity centric secure web gateway solution to control exactly which internet destinations the workstation can reach, by applying a fine-grained set of rules and policies enforced through Conditional Access in Microsoft Entra. This configuration provides us better filtering capabilities, like web content filtering (Global Secure Access web content filtering) with TLS inspection (TLSi) (Global Secure Access transport layer security inspection) and additional features like Threat Intelligence (Global Secure Access threat intelligence), but it comes also with a downside. Currently by default, if the GSA client encounters an issue or cannot connect to its required GSA edge services, the GSA client will fall back to a fail-open state, rather than to a fail-close state. Difference between those two modes: Fail-Open: When a security or control mechanism fails, access is still allowed. Fail-Close: When the security or control mechanism fails, access is blocked. This blog post covers above problem and showcases a solution we built, as part of our projects, to achieve a “Fail-Close” state rather than having the current “Fail-Open” behavior. The enforcement of the “Fail-Close” solution we developed works at two independent layers, both are deployable through Microsoft Intune: A network layer: Windows Defender Firewall network profiles, a rule set with Windows Firewall Dynamic Keywords, and event-driven automation — restricts the device internet access in the moment GSA’s tunnels or services drop. An identity layer: an Intune custom compliance check paired with Conditional Access — denies the device access whenever the GSA client is missing or its services are not running. Together, they help to make sure a failure that slips past one layer is still caught by the other. From URL Lock Proxy to Global Secure Access Historically, we restricted internet access on PAW devices with the Windows Defender Firewall (for more details see here Microsoft Defender Firewall) and a “URL Lock Proxy” approach (and here URL lock proxy): an allow-list of permitted URLs that blocked every outbound HTTP(S) connection except the ones required for: Approved management portals, Authentication to Microsoft Entra ID, Management by Microsoft Intune, and Monitoring by Microsoft Defender for Endpoint. It worked, but it carried real limitations: No auditing of what was allowed or blocked, It did not scale and required a lot of wildcards to be used, A limited ruleset size — the size cap on the underlying registry key meant the solution simply could not grow, and It was not enterprise class. Microsoft Global Secure Access with its component Entra Internet Access replaces the URL Lock Proxy configuration entirely. We are using dedicated firewall rules for the GSA client, to allow the client to reach the Entra Internet Access edge service. Through Entra Condition Access, a GSA Internet Access traffic profile (security profile) is applied which blocks all internet access except the specific FQDNs needed for approved management portals/platforms, Entra ID authentication, Intune, and Defender for Endpoint. HTTP and HTTPS traffic is evaluated and filtered within the GSA Edge service itself, and a request to a destination that is not on the allow-list is blocked with a simple “You can’t access this destination” message. Additional features like filtering on URL level instead of FQDN, due to the use of TLSi, helped to remove most of the wildcards we had to use with the previous URL lock proxy approach. The result is: Access and the access results are auditable, More granular and centrally managed rule set, And genuinely enterprise class. The catch: Global Secure Access fails open GSA as the internet access restriction method is powerful, but it builds on the assumption that the GSA client is installed, running, and connected. When that assumption breaks, the client’s current behavior is to fail open. As a result, the device ends up with unrestricted internet access whenever: The GSA client is installed but cannot establish its tunnels with the GSA edge services (according to the Entra ID SLA this doesn’t happen that often – see Service Level Agreement performance for Microsoft Entra ID), The GSA client on the PAW is installed but suspended, or Its services are disabled, or The GSA client component is not installed at all on the PAW device. On a regular end user device, the fail-open mode is a convenience. On a PAW it is exactly the wrong default: the very moment the protection drops away, the device becomes its most exposed. Therefore, we had to develop a solution to have a fail-close behavior. The Fail-Close approach The core idea is deliberately simple, and it uses capability that already exists on most of the Windows devices: the Windows Defender Firewall network profiles (more details here Windows Firewall Network Profiles). Two of the available firewall profiles are repurposed to act as separate operating modes: Private profile: “unrestricted” HTTP(S). Internet access filtering is delegated to GSA Internet Access, so the firewall itself does not constrain destinations. Public profile: “restricted” HTTP(S). Outbound web traffic is limited to a mandatory set of FQDNs via Defender Dynamic Keywords and selected system processes — just enough for the device to stay managed and healthy. When the GSA client has successfully established its Internet access tunnel, the device is assigned the Private network profile. If GSA fails, the Windows Firewall profile is automatically switched to the Public network profile, restricting Internet access to essential destinations only. This profile transition implements the required fail-close behavior. Normal state — Private profile As soon as the GSA client is running, connected to the GSA edge services and has established the Internet Access tunnel (step 1), the client writes a success event to the GSA event log (step 2) (Internet Access tunnel connected — Event ID 142) When that event occurs, a scheduled task (step 3) runs a PowerShell script (step 4) that: Switches the device to the Private firewall network profile, Validates the state of all local GSA services, and Initiates an Intune custom compliance check (to perform additional validations). In case all validates were successfully passed, the PowerShell script enforces the Private firewall profile (step 5) and GSA Internet Access is being used to filter the internet access (step 6). Failure state — Public profile The moment GSA stops protecting (step 1) the device, one of several failure events is written to the GSA event log (step 2) and triggers a different scheduled task (step 3) which runs a PowerShell script (step 4) that switches the device to the Public firewall network profile (step 5) and initiates an Intune custom compliance check, too. The failure signals we watch for are: Entra or Internet Access tunnel disconnected — Event ID 141 (logged roughly every 10 seconds while the tunnel is down), GSA services stopped — Event IDs 106, 206, 406, and 705, No internet connectivity — Event ID 638, and Services start initiated — Event ID 701. On the Public profile, the HTTP(S) outbound rule has Reusable Settings (Defender Dynamic Keywords - Windows Firewall Dynamic Keywords) (step 6) assigned, which restricts the reachable FQDNs down to a mandatory set of endpoints. Additionally, mandatory applications and services are explicitly exempt from that restriction, so the device can still be managed, patched, and monitored even while it is locked down. Closing the gap when GSA is absent: custom compliance The firewall profile switch is event-driven — it reacts to the signals the GSA client writes to the event log. That works well for a device where the GSA client is present, but it leaves one blind spot: if the GSA client is not installed at all, or its services never start, there may be no events to react to. Those are exactly the scenarios where a device would otherwise fall back to unrestricted access, the solution uses a custom device compliance policy/check that does not depend on any event firing. It directly: Validates that the GSA client is installed on the device, and Checks the local GSA service state — confirming that the services are running, not just present. If either of those checks fails — GSA client is not installed, or its services are not running — Intune reports the device as non-compliant. Because a PAW’s access to cloud resources is gated by Conditional Access requiring a compliant device, a non-compliant PAW is denied access to the very cloud services it exists to manage. So even in the one case the event-driven firewall switch cannot see, access still fails closed — this time at the identity layer rather than the network layer. In addition, as soon as the local evaluation detected a non-compliant scenario, the custom compliance check flips the firewall profile to the Public profile, too. The profile-switching PowerShell scripts also initiate this compliance evaluation as they run in both the normal and failure states, so the device re-reports its posture promptly instead of waiting for the next routine Intune check-in. The result is defense in depth — two independent layers, neither relying on the other: Enforcement layer Mechanism What it catches Network Defender Firewall profile switch, driven by GSA event IDs (141, 106, 206, 406, 705, 638, 701) Tunnel drops and service stops while the GSA client is present and reporting Identity Intune custom compliance check + Conditional Access (require compliant device) GSA not installed, or its services not running — no event required to trigger it A failure that slips past one layer is caught by the other: If GSA stops mid-session, the firewall restricts access near real-time; If GSA is missing or disabled entirely, Conditional Access refuses the device to access Entra ID integrated resources. Under the hood: the building blocks The full solution is a set of several components, which all can be delivered and governed through Microsoft Intune: Component What it does Firewall profile Base firewall settings — default block all inbound and outbound connectivity across all profiles (public, private, and domain). Firewall rules Allow mandatory programs and services (~35 rules); restrict HTTP(S) in the Public profile using Dynamic Keywords; allow “unrestricted” HTTP(S) in the Private profile. Defender Dynamic Keywords (Reusable Settings) The set of FQDNs required for Entra ID, Defender for Endpoint, Intune, Windows Update, and Global Secure Access. Platform scripts Switch the firewall network profile to Private (unrestricted HTTP(S)); update the Defender anti-malware engine so it supports the Dynamic Keywords feature. Win32 app package Required app that deploys the scheduled tasks and the underlying PowerShell scripts. Custom device compliance check Validates that GSA is installed and checks the local GSA service state. The firewall rules that make it work The heart of the enforcement is a pair of “World Wide Web Services” outbound rules — one per firewall profile: Rule Profile Action Ports Remote destinations World Wide Web Services (HTTP & HTTPS Out) Private Allow 80, 443 Any address World Wide Web Services (HTTP & HTTPS Out) Public Allow 80, 443 Dynamic Keywords only The Private HTTP/HTTPS rule is deliberately open, because GSA is the gatekeeper. The Public HTTP/HTTPS rule scopes outbound web traffic down to the endpoint categories expressed as Dynamic Keywords: GSA Edge Endpoints, Microsoft 365 Common and Office Online, Microsoft 365 encryption chains, Windows 11, Intune & Autopilot, and Defender for Endpoint. Because these are Defender Dynamic Keywords with AutoResolve (AutoResolve dynamic keyword addresses) deployed via Microsoft Intune reusable settings (Use reusable groups of settings policies in Microsoft Intune), rather than hard-coded IP ranges, the allow-list includes endpoints centrally instead of being frozen into a brittle registry key — directly addressing the scale and maintainability limits of the old URL Lock Proxy. Besides the mentioned outbound HTTP/HTTPS firewall rule for the public and private network profile, additional rules are required for our scenario. With those additional firewall rules we cover: Basic Windows operating system network communication, Communication for Global Secure Access, and Critical Windows processes and services. Disclaimer: We are sharing the lists of firewall rules with you AS IS without warranty. Keep in mind that the config might require modifications to match to your scenario or environment. Firewall rules for basic network communication Name Action Network Types Direction Service / File / App Id Protocols Local Ports Local Address Ranges Remote Ports Remote Address Ranges Delivery Optimization (TCP-In) Allow All Inbound Service name: DoSvc File path: C:\windows\system32\svchost.exe TCP 7680 Any address Any remote port Any address Delivery Optimization (UDP-In) Allow All Inbound Service name: DoSvc File path: C:\windows\system32\svchost.exe UDP 7680 Any address Any remote port Any address Core Networking - DHCP (DHCP-Out) Allow All Outbound Service name: Dhcp File path: C:\windows\system32\svchost.exe UDP 68 Any address 67 Any address Core Networking - DHCP for IPv6 (DHCPV6-Out) Allow All Outbound Service name: Dhcp File path: C:\windows\system32\svchost.exe UDP 546 Any address 547 Any address Core Networking - DNS (TCP-Out) Allow All Outbound Service name: Dnscache File path: C:\windows\system32\svchost.exe TCP Any Any address 53 DNS 6.6.0.0-6.6.255.255 Core Networking - DNS (UDP-Out) Allow All Outbound Service name: Dnscache File path: C:\windows\system32\svchost.exe UDP Any Any address 53 DNS 6.6.0.0-6.6.255.255 Windows Time (UDP-Out) Allow All Outbound Service name: W32Time File path: C:\windows\system32\svchost.exe UDP Any Any address 123 Any address NCSI Probe (HTTP-Out) Allow All Outbound Service name: NlaSvc File path: C:\windows\system32\svchost.exe TCP Any Any address 80 Any address Firewall rules for Global Secure Access Name Action Network Types Direction Service / File / App Id Protocols Local Ports Local Address Ranges Remote Ports Remote Address Ranges GSA Client - Tray App (TCP-Out) Allow All Outbound File path: %ProgramFiles%\Global Secure Access Client\TrayApp\GlobalSecureAccessClient.exe TCP Any Any address 80, 443, 6543 Any address GSA Client - Mgmt Service (TCP-Out) Allow All Outbound File path: %ProgramFiles%\Global Secure Access Client\GlobalSecureAccessClientManagerService.exe TCP Any Any address 80, 443 Any address GSA Client - Tunneling Service (TCP-Out) Allow All Outbound File path: %ProgramFiles%\global secure access client\globalsecureaccesstunnelingservice.exe TCP Any Any address 80, 443 Any address GSA Client - Advanced Diagnostics (TCP-Out) Allow All Outbound File path: %ProgramFiles%\global secure access client\advanceddiagnostics\globalsecureaccessclientadvanceddiagnostics.exe TCP Any Any address Any Any address GSA Client - Forwarding Profile Service (TCP-Out) Allow All Outbound File path: %ProgramFiles%\Global Secure Access Client\GlobalSecureAccessForwardingProfileService.exe TCP Any Any address 80, 443 Any address GSA Client - Engine Service (TCP-Out) Allow All Outbound File path: %ProgramFiles%\Global Secure Access Client\GlobalSecureAccessEngineService.exe TCP Any Any address 80, 443 Any address Firewall rules for critical Windows processes and services Name Action Network Types Direction Service / File / App Id Protocols Local Ports Local Address Ranges Remote Ports Remote Address Ranges Microsoft Defender Antivirus Network Inspection Service (TCP-Out) Allow All Outbound Service: WdNisSvc TCP Any Any 80, 443 Any Microsoft Defender Core Service (TCP-Out) Allow All Outbound Service: MDCoreSvc TCP Any Any 443 Any Windows Defender Advanced Threat Protection Service (TCP-Out) Allow All Outbound Service: Sense TCP Any Any 80, 443 Any Microsoft Defender Antivirus Service (TCP-Out) Allow All Outbound Service: WinDefend TCP Any Any 443 Any Microsoft Intune Management Extension (TCP-Out) Allow All Outbound File path: C:\Program Files (x86)\Microsoft Intune Management Extension\Microsoft.Management.Services.IntuneWindowsAgent.exe TCP Any Any 80, 443 Any Runtimebroker (TCP-Out) Allow All Outbound File path: C:\windows\system32\runtimebroker.exe TCP Any Any 443 Any Windows Push Notifications System Service (TCP-Out) Allow All Outbound Service: WpnService File path: C:\windows\system32\svchost.exe TCP Any Any 443 Any Host Process for OMA-DM Client (TCP-Out) Allow All Outbound File path: C:\Windows\System32\omadmclient.exe TCP Any Any 80, 443 Any Microsoft Edge Update (TCP-Out) Allow All Outbound File path: C:\Program Files (x86)\Microsoft\EdgeUpdate\MicrosoftEdgeUpdate.exe TCP Any Any 443 Any Network List Service (TCP-Out) Allow All Outbound Service: netprofm File path: C:\WINDOWS\System32\svchost.exe TCP Any Any 80 Any Microsoft Health Attestation Client Agent (TCP-Out) Allow All Outbound File path: C:\Windows\System32\HealthAttestationClient\HealthAttestationClientAgent.exe TCP Any Any 80, 443 Any Windows Defender Advanced Threat Protection IMDSCollector module (TCP-Out) Allow All Outbound File path: C:\Program Files\Windows Defender Advanced Threat Protection\SenseImdsCollector.exe TCP Any Any 80, 443 Any API for MDM Enrollment (TCP-Out) Allow All Outbound File path: C:\Windows\System32\DeviceEnroller.exe TCP Any Any 443 Any Windows Defender SmartScreen (TCP-Out) Allow All Outbound File path: C:\Windows\System32\smartscreen.exe TCP Any Any 443 Any Windows Update (TCP-Out) Allow All Outbound Service: wuauserv File path: C:\WINDOWS\System32\svchost.exe TCP Any Any 80, 443 Any Device Management Enrollment Service (TCP-Out) Allow All Outbound Service: DmEnrollmentSvc File path: C:\WINDOWS\System32\svchost.exe TCP Any Any 443 Any Delivery Optimization (TCP-Out) Allow All Outbound Service: DoSvc File path: C:\WINDOWS\System32\svchost.exe TCP Any Any 80, 443 Any Company Portal (TCP-Out) Allow All Outbound App Id: Microsoft.CompanyPortal_8wekyb3d8bbwe TCP Any Any 80, 443 Any LSASS.exe (TCP-Out) Allow All Outbound File path: C:\Windows\system32\lsass.exe TCP Any Any 443 Any Windows License Manager Service Allow All Outbound Service: LicenseManager File path: C:\WINDOWS\System32\svchost.exe TCP Any Any 443 Any Background Intelligent Transfer Service (TCP-Out) Allow All Outbound Service: BITS File path: C:\WINDOWS\System32\svchost.exe TCP Any Any 80 Any Microsoft Intune ClientHealthEval (TCP-Out) Allow All Outbound File path: c:\program files (x86)\microsoft intune management extension\clienthealtheval.exe TCP Any Any 443 Any Microsoft Intune AgentExecutor (TCP-Out) Allow All Outbound File path: c:\program files (x86)\microsoft intune management extension\agentexecutor.exe TCP Any Any 80, 443 Any BitLocker Drive Encryption Service (TCP-Out) Allow All Outbound Service: BDESVC File path: C:\WINDOWS\System32\svchost.exe TCP Any Any 443 Any Microsoft Intune ClientCertCheck (TCP-Out) Allow All Outbound File path: c:\program files (x86)\microsoft intune management extension\clientcertcheck.exe TCP Any Any 443 Any Cryptographic Services (TCP-Out) Allow All Outbound Service: CryptSvc File path: C:\WINDOWS\System32\svchost.exe TCP Any Any 80, 443 Any Microsoft Malware Protection Command Line Utility (TCP-Out) Allow All Outbound File path: c:\program files\windows defender\mpcmdrun.exe TCP Any Any 443 Any Microsoft EPM Agent Service (TCP-Out) Allow All Outbound File path: C:\Program Files\Microsoft EPM Agent\EPMService\EpmService.exe TCP Any Any 443 Any Microsoft Store Install Service (TCP-Out) Allow All Outbound Service: InstallService File path: C:\WINDOWS\System32\svchost.exe TCP Any Any 80, 443 Any Update Orchestrator Service (TCP-Out) Allow All Outbound Service: UsoSvc File path: C:\WINDOWS\System32\svchost.exe TCP Any Any 80, 443 Any Note: List of mandatory programs & services is not a 100% complete list. We are still discovering additional exclusions. Microsoft Intune Reusable Settings As mentioned in the section before, several endpoint categories are being used as part of the Public "World Wide Web Services (HTTP & HTTPS Out)" Firewall rule. As part of this blog post, we cannot publish a one-size fits all list of FQDNs, since the actual list of FQDNs highly depends on the actual configuration, scenario or environment and are subject to change (as usual when it comes to endpoints). In our scenario it was important that PAW devices, when not connected to GSA, are able to: Perform authentication against Microsoft Entra ID, Remains fully managed by the MDM, in our case Microsoft Intune, Receive updates for the operating system (Windows 11 Enterprise) and the XDR solution (Defender for Endpoint), and Are able to connect to Microsoft Global Secure Access edge services. Based on the requirements we leveraged several publicly available endpoint lists, which include the following, to create our Reusable Settings configuration: GSA Edge Endpoints - FQDN and IP addresses where the Global Secure Access service receives traffic Microsoft 365 - Microsoft 365 URLs and IP address ranges Windows 11 - Connection endpoints for Windows 11 Enterprise Intune & Autopilot - Network endpoints for Microsoft Intune Defender for Endpoint - Microsoft Defender for Endpoint streamlined connectivity URLs Create Reusable Settings objects Attached to this blog post you will find several CSV files (GlobalSecureAccessEdgeEndpoints.csv, DefenderforEndpoint.csv, IntuneAutopilot.csv, Microsoft365Common.csv, Microsoft365encryptionchains.csv, Windows11.csv) which include the lists of FQDNs we are using as part of our deployments. Disclaimer: We are sharing those Reusable Settings lists with you AS IS without warranty. Keep in mind that the config might require modifications to match to your scenario or environment. The following code example can be used to create the Reusable Settings Object in Intune via Graph API. The code example doesn't include any error handling, since it should give you an idea how to perform the import, based on a CV file. Code example for Reusable Settings import via CSV: $csvFile = Get-Item 'C:\temp\GlobalSecureAccessEdgeEndpoints.csv' $definitionId = 'vendor_msft_firewall_mdmstore_dynamickeywords_addresses_{id}' $values = Import-Csv -LiteralPath $csvFile.FullName | ForEach-Object { $row = $_ $autoResolve = [bool]::Parse($row.AutoResolve) $autoResolveValue = $autoResolve.ToString().ToLowerInvariant() $choiceChildren = if (-not $autoResolve) { @{ '@odata.type' = '#microsoft.graph.deviceManagementConfigurationSimpleSettingCollectionInstance' settingDefinitionId = "${definitionId}_addresses" settingInstanceTemplateReference = $null simpleSettingCollectionValue = @( $row.Addresses -split ';' | Where-Object { -not [string]::IsNullOrWhiteSpace($_) } | ForEach-Object { @{ '@odata.type' = '#microsoft.graph.deviceManagementConfigurationStringSettingValue' settingValueTemplateReference = $null value = $_.Trim() } } ) } } @{ '@odata.type' = '#microsoft.graph.deviceManagementConfigurationGroupSettingValue' settingValueTemplateReference = $null children = @( @{ '@odata.type' = '#microsoft.graph.deviceManagementConfigurationSimpleSettingInstance' settingDefinitionId = "${definitionId}_id" settingInstanceTemplateReference = $null simpleSettingValue = @{ '@odata.type' = '#microsoft.graph.deviceManagementConfigurationStringSettingValue' settingValueTemplateReference = $null value = "{$([guid]::NewGuid())}" } } @{ '@odata.type' = '#microsoft.graph.deviceManagementConfigurationChoiceSettingInstance' settingDefinitionId = "${definitionId}_autoresolve" settingInstanceTemplateReference = $null choiceSettingValue = @{ '@odata.type' = '#microsoft.graph.deviceManagementConfigurationChoiceSettingValue' settingValueTemplateReference = $null value = "${definitionId}_autoresolve_$autoResolveValue" children = @($choiceChildren) } } @{ '@odata.type' = '#microsoft.graph.deviceManagementConfigurationSimpleSettingInstance' settingDefinitionId = "${definitionId}_keyword" settingInstanceTemplateReference = $null simpleSettingValue = @{ '@odata.type' = '#microsoft.graph.deviceManagementConfigurationStringSettingValue' settingValueTemplateReference = $null value = $row.Keyword } } ) } } $body = @{ '@odata.type' = '#microsoft.graph.deviceManagementReusablePolicySetting' displayName = $csvFile.BaseName description = '' settingDefinitionId = $definitionId settingInstance = @{ '@odata.type' = '#microsoft.graph.deviceManagementConfigurationGroupSettingCollectionInstance' settingDefinitionId = $definitionId settingInstanceTemplateReference = $null groupSettingCollectionValue = @($values) } } Connect-MgGraph -Scopes 'DeviceManagementConfiguration.ReadWrite.All' Invoke-MgGraphRequest ` -Method POST ` -Uri 'https://graph.microsoft.com/beta/deviceManagement/reusablePolicySettings' ` -Body ($body | ConvertTo-Json -Depth 20) ` -ContentType 'application/json' Important: A maximum of 100 properties can be stored in a single reusable settings group object. Therefore, it might be required to split a endpoint category into multiple Reusable Settings Group objects. Intune Win32 app package Besides the deployment of the actual Global Secure Access client, a dedicated application package will be used to deploy the local components (Scheduled Tasks and PowerShell scripts) for the fail-close approach. To react on the two different states (normal and failure), two Scheduled Tasks need to be deployed to the PAW device. The Scheduled Task creation can be simplified by using exported XML files, which can also include the event trigger itself (examples listed in the sections Normal State and Failure State). Please note, the creation of Scheduled Tasks with event log based triggers require that the actual event log already exists on the device. So it might be worth creating a dependency between the different application packages. Example code to register exported Scheduled Tasks via PowerShell: Register-ScheduledTask -Xml (Get-Content "$PSScriptRoot\GSA-Connected.xml" | Out-String) -TaskName 'GSA-Connected' Register-ScheduledTask -Xml (Get-Content "$PSScriptRoot\GSA-Disconnected.xml" | Out-String) -TaskName 'GSA-Disconnected' XML Sample Scheduled Task export GSA-Connected: <?xml version="1.0" encoding="UTF-16"?> <Task version="1.4" xmlns="http://schemas.microsoft.com/windows/2004/02/mit/task"> <RegistrationInfo> <Date>2026-09-10T17:46:11.8914414</Date> <Author>ChristianFriedel-Jain</Author> <URI>\GSA-Connected</URI> </RegistrationInfo> <Triggers> <EventTrigger> <Enabled>true</Enabled> <Subscription><QueryList><Query Id="0" Path="Microsoft-Windows-Global Secure Access Client-Operational"><Select Path="Microsoft-Windows-Global Secure Access Client-Operational"> *[System[(EventID=142)]] and *[EventData[Data[@Name='Channel Name'] and (Data='Internet')]] </Select></Query></QueryList></Subscription> </EventTrigger> </Triggers> <Principals> <Principal id="Author"> <UserId>S-1-5-18</UserId> <RunLevel>HighestAvailable</RunLevel> </Principal> </Principals> <Settings> <MultipleInstancesPolicy>IgnoreNew</MultipleInstancesPolicy> <DisallowStartIfOnBatteries>false</DisallowStartIfOnBatteries> <StopIfGoingOnBatteries>false</StopIfGoingOnBatteries> <AllowHardTerminate>true</AllowHardTerminate> <StartWhenAvailable>false</StartWhenAvailable> <RunOnlyIfNetworkAvailable>false</RunOnlyIfNetworkAvailable> <IdleSettings> <StopOnIdleEnd>true</StopOnIdleEnd> <RestartOnIdle>false</RestartOnIdle> </IdleSettings> <AllowStartOnDemand>true</AllowStartOnDemand> <Enabled>true</Enabled> <Hidden>false</Hidden> <RunOnlyIfIdle>false</RunOnlyIfIdle> <DisallowStartOnRemoteAppSession>false</DisallowStartOnRemoteAppSession> <UseUnifiedSchedulingEngine>true</UseUnifiedSchedulingEngine> <WakeToRun>false</WakeToRun> <ExecutionTimeLimit>PT1H</ExecutionTimeLimit> <Priority>7</Priority> </Settings> <Actions Context="Author"> <Exec> <Command>"C:\Windows\System32\WindowsPowerShell\v1.0\powershell.exe"</Command> <Arguments>-NoProfile -ExecutionPolicy Bypass -File "C:\Progra~1\GSA-NetDetection\Set-NetworkPrivate.ps1"</Arguments> </Exec> </Actions> </Task> Sample XML Scheduled Task export GSA-Disconnected: <?xml version="1.0" encoding="UTF-16"?> <Task version="1.4" xmlns="http://schemas.microsoft.com/windows/2004/02/mit/task"> <RegistrationInfo> <Date>2026-09-10T17:46:11.8914414</Date> <Author>ChristianFriedel-Jain</Author> <URI>\GSA-Disconnected</URI> </RegistrationInfo> <Triggers> <EventTrigger> <Enabled>true</Enabled> <Subscription><QueryList><Query Id="0" Path="Microsoft-Windows-Global Secure Access Client-Operational"><Select Path="Microsoft-Windows-Global Secure Access Client-Operational"> *[System[(EventID=141)]] and *[EventData[Data[@Name='Channel Name'] and (Data='Entra')]] </Select></Query></QueryList></Subscription> </EventTrigger> <EventTrigger> <Enabled>true</Enabled> <Subscription><QueryList><Query Id="0" Path="Microsoft-Windows-Global Secure Access Client-Operational"><Select Path="Microsoft-Windows-Global Secure Access Client-Operational"> *[System[(EventID=141)]] and *[EventData[Data[@Name='Channel Name'] and (Data='Internet')]] </Select></Query></QueryList></Subscription> </EventTrigger> <EventTrigger> <Enabled>true</Enabled> <Subscription><QueryList><Query Id="0" Path="Microsoft-Windows-Global Secure Access Client-Operational"><Select Path="Microsoft-Windows-Global Secure Access Client-Operational">*[System[Provider[@Name='Microsoft-Windows-Global Secure Access Client'] and EventID=106]]</Select></Query></QueryList></Subscription> </EventTrigger> <EventTrigger> <Enabled>true</Enabled> <Subscription><QueryList><Query Id="0" Path="Microsoft-Windows-Global Secure Access Client-Operational"><Select Path="Microsoft-Windows-Global Secure Access Client-Operational">*[System[Provider[@Name='Microsoft-Windows-Global Secure Access Client'] and EventID=206]]</Select></Query></QueryList></Subscription> </EventTrigger> <EventTrigger> <Enabled>true</Enabled> <Subscription><QueryList><Query Id="0" Path="Microsoft-Windows-Global Secure Access Client-Operational"><Select Path="Microsoft-Windows-Global Secure Access Client-Operational">*[System[Provider[@Name='Microsoft-Windows-Global Secure Access Client'] and EventID=406]]</Select></Query></QueryList></Subscription> </EventTrigger> <EventTrigger> <Enabled>true</Enabled> <Subscription><QueryList><Query Id="0" Path="Microsoft-Windows-Global Secure Access Client-Operational"><Select Path="Microsoft-Windows-Global Secure Access Client-Operational">*[System[Provider[@Name='Microsoft-Windows-Global Secure Access Client'] and EventID=705]]</Select></Query></QueryList></Subscription> </EventTrigger> <EventTrigger> <Enabled>true</Enabled> <Subscription><QueryList><Query Id="0" Path="Microsoft-Windows-Global Secure Access Client-Operational"><Select Path="Microsoft-Windows-Global Secure Access Client-Operational">*[System[Provider[@Name='Microsoft-Windows-Global Secure Access Client'] and EventID=638]]</Select></Query></QueryList></Subscription> </EventTrigger> <EventTrigger> <Enabled>true</Enabled> <Subscription><QueryList><Query Id="0" Path="Microsoft-Windows-Global Secure Access Client-Operational"><Select Path="Microsoft-Windows-Global Secure Access Client-Operational">*[System[Provider[@Name='Microsoft-Windows-Global Secure Access Client'] and EventID=701]]</Select></Query></QueryList></Subscription> </EventTrigger> </Triggers> <Principals> <Principal id="Author"> <UserId>S-1-5-18</UserId> <RunLevel>HighestAvailable</RunLevel> </Principal> </Principals> <Settings> <MultipleInstancesPolicy>IgnoreNew</MultipleInstancesPolicy> <DisallowStartIfOnBatteries>false</DisallowStartIfOnBatteries> <StopIfGoingOnBatteries>false</StopIfGoingOnBatteries> <AllowHardTerminate>true</AllowHardTerminate> <StartWhenAvailable>false</StartWhenAvailable> <RunOnlyIfNetworkAvailable>false</RunOnlyIfNetworkAvailable> <IdleSettings> <StopOnIdleEnd>true</StopOnIdleEnd> <RestartOnIdle>false</RestartOnIdle> </IdleSettings> <AllowStartOnDemand>true</AllowStartOnDemand> <Enabled>true</Enabled> <Hidden>false</Hidden> <RunOnlyIfIdle>false</RunOnlyIfIdle> <DisallowStartOnRemoteAppSession>false</DisallowStartOnRemoteAppSession> <UseUnifiedSchedulingEngine>true</UseUnifiedSchedulingEngine> <WakeToRun>false</WakeToRun> <ExecutionTimeLimit>PT1H</ExecutionTimeLimit> <Priority>7</Priority> </Settings> <Actions Context="Author"> <Exec> <Command>"C:\Windows\System32\WindowsPowerShell\v1.0\powershell.exe"</Command> <Arguments>-NoProfile -ExecutionPolicy Bypass -File "C:\Progra~1\GSA-NetDetection\Set-NetworkPublic.ps1"</Arguments> </Exec> </Actions> </Task> As soon as one of the Scheduled Tasks has been triggered, the corresponding PowerShell script (Set-NetworkPrivate.ps1 or Set-NetworkPublic.ps1) will be executed. Example content of Set-NetworkPrivate.ps1 $NetworkName = (Get-NetConnectionProfile).Name Set-NetConnectionProfile -Name $NetworkName -NetworkCategory Private Example content of Set-NetworkPublic.ps1 $NetworkName = (Get-NetConnectionProfile).Name Set-NetConnectionProfile -Name $NetworkName -NetworkCategory Public Platform scripts Install Microsoft Defender Antivirus updates during the device enrollment To leverage the AutoResolve dynamic keyword feature, Microsoft Defender Antivirus must be turned on and running with platform version 4.18.2209.7 or later (see reference here FQDN Feature requirements). Since the required version is not natively included in Windows yet, a Platform script is being used to install the required Defender updates (Use the command line to manage Microsoft Defender Antivirus) Example command to trigger Defender update: $MpCmdRun = "C:\Program Files\Windows Defender\MpCmdRun.exe" & $MpCmdRun -SignatureUpdate -MMPC Switch Defender Firewall profile to private during enrollment phase To avoid issues during the device enrollment phase, the Defender Firewall profile is being switched from the default Public profile to the unrestricted Private profile by using another Platform Script. Example code to switched the Firewall profile: $NetworkName = (Get-NetConnectionProfile).Name Set-NetConnectionProfile -Name $NetworkName -NetworkCategory Private Custom device compliance check A custom device compliance check is being used to validate if GSA is installed and if the services are running on the device. A custom device compliance check requires an underlying script to gather the required information. Example custom compliance script: # GSA services to check $Services = @( "GlobalSecureAccessClientManagerService" "GlobalSecureAccessEngineService" "GlobalSecureAccessForwardingProfileService" "GlobalSecureAccessTunnelingService" ) $GSAInstalled = $false $RunningGSAServices = 0 # Validate that all Services are present (GSA installed) if ((Get-Service $Services[0] -ErrorAction SilentlyContinue) -and (Get-Service $Services[1] -ErrorAction SilentlyContinue) -and (Get-Service $Services[2] -ErrorAction SilentlyContinue) -and (Get-Service $Services[3] -ErrorAction SilentlyContinue)) { $GSAInstalled = $true } else { $GSAInstalled = $false } # Validate Service State foreach ($Service in $Services) { if ((Get-Service -Name $Service -ErrorAction SilentlyContinue).Status -eq 'Running' ) { # Service running - increase number of running services by 1 $RunningGSAServices += 1 } else { # Service not running - will not increase number of running services $RunningGSAServices += 0 } } if (($RunningGSAServices -ne 4) -or ($GSAInstalled -eq $false)) { Set-NetConnectionProfile -NetworkCategory Public } # Create a hashtable with the collected data $hash = @{ "GSAinstalled" = $GSAInstalled "GSArunning" = $RunningGSAServices } return $hash | ConvertTo-Json -Compress The result of the custom compliance script will be evaluated against the custom compliance policy, which requires the custom compliance settings in a JSON format. Example custom compliance settings JSON: { "Rules": [ { "SettingName": "GSAinstalled", "Operator": "IsEquals", "DataType": "Boolean", "Operand": "true", "MoreInfoUrl": "https://learn.microsoft.com/en-us/entra/global-secure-access/overview-what-is-global-secure-access", "RemediationStrings": [ { "Language": "en_US", "Title": "Global Secure Access not detected", "Description": "Global Secure Access service not found on the device." } ] }, { "SettingName": "GSArunning", "Operator": "IsEquals", "DataType": "Int64", "Operand": "4", "MoreInfoUrl": "https://learn.microsoft.com/en-us/entra/global-secure-access/overview-what-is-global-secure-access", "RemediationStrings": [ { "Language": "en_US", "Title": "Global Secure Access services not running", "Description": "One or more Global Secure Access service is not running on the device." } ] } ] } Validating and monitoring How did we work out which rules and events mattered — and how do we confirm the solution keeps working? Two sources did the heavy lifting: The local security event log on the device, which is essential during enrollment and reset scenarios when the profile-switching lifecycle is first established; and Microsoft Defender advanced hunting, to surface blocked connection attempts while the device is in its restricted, fail-close state. For example, this advanced hunting query surfaces outbound connections from the PAW that were blocked while it was failing closed: DeviceNetworkEvents | where DeviceName == "paw" | where LocalIPType == "Private" and RemoteIPType == "Public" | where ActionType == "ConnectionFailed" | sort by Timestamp desc Reviewing these "ConnectionFailed" events tells you whether the restricted rule set is too tight (legitimate management traffic being blocked and needing an exemption) or working exactly as intended (unexpected destinations being denied while the device is locked down). Key takeaways Global Secure Access is the right tool for controlling PAW internet access — but its currently default fail-open behavior is unacceptable for a privileged workstation. You don’t need a new GSA client to fix it. Windows Defender Firewall network profiles, driven by GSA’s own event log, give you a reliable fail-close backstop. Defender Dynamic Keywords keep the locked-down state both minimal and maintainable, replacing brittle, unscalable allow-lists. Enforcement runs at two independent layers — network (Defender Firewall profiles) and identity (Intune custom compliance plus Conditional Access) — so a failure that evades one is still caught by the other. The compliance check specifically covers the case the firewall cannot see: GSA not installed or its services not running. The whole solution deploys through Intune — Win32 app, firewall profile and rules, and a custom compliance check — and is observable through the event log and Defender advanced hunting. The Fail-Close solution turns a gap into a safe default: the instant Global Secure Access stops protecting the workstation, the privileged access workstation stops trusting the internet. We hope this article gives you a practical pattern to harden your own privileged endpoints — and if you’d like to hear more about how we design and implement our Secure Privileged Access (SPA) strategy (for instance leveraging Global Secure Access to secure on-Premises management, secure access and management of Azure private resources, what Entra ID identity controls we are using to protect privileged access, or how we leverage Identity Governance to simplify governance for privileged users), feel free to reach out to us and stay tuned for more articles. I'd like to thank DagmarHeidecker for her review and help in getting my first blog post created. As well as, JamesNoyce who came up with the initial base concept which I built upon. Disclaimer The sample scripts are not supported under any Microsoft standard support program or service. The sample scripts are provided AS IS without warranty of any kind. Microsoft further disclaims all implied warranties including, without limitation, any implied warranties of merchantability or of fitness for a particular purpose. The entire risk arising out of the use or performance of the sample scripts and documentation remains with you. In no event shall Microsoft, its authors, or anyone else involved in the creation, production, or delivery of the scripts be liable for any damages whatsoever (including, without limitation, damages for loss of business profits, business interruption, loss of business information, or other pecuniary loss) arising out of the use of or inability to use the sample scripts or documentation, even if Microsoft has been advised of the possibility of such damages.Microsoft Defender for Endpoint (MDE) — Custom Role Design for Troubleshooting Mode–Only Access
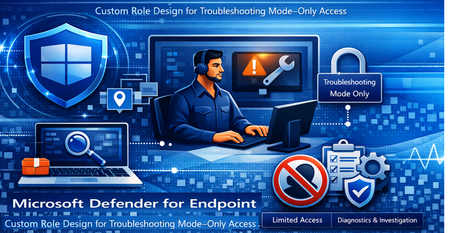
1) Introduction In customer environments, Security Operations (SOC) teams and Windows infrastructure teams frequently need to investigate endpoint issues in the Microsoft Defender for Endpoint portal—often under time pressure—while still preserving strong governance over who can change security controls. Because Troubleshooting Mode can enable temporary modification of Defender Antivirus settings even when devices are governed by organizational policies (for example, when policy protections are in place using Tamper protection settings), granting this capability broadly can introduce configuration drift, increase operational risk, and blur accountability. To address this, customers typically require a least‑privilege, scoped access model that enforces Segregation of Duties (SoD): Investigators (Security Reader) retain visibility and investigation capability but cannot create or modify MDE security policies. Only an explicitly authorized group is granted the minimum permissions required to enable Troubleshooting Mode, and that access is restricted to a defined device scope using device groups—supporting both risk reduction and clear governance. This approach ensures teams can perform required investigations and controlled troubleshooting while maintaining least privilege, SoD, and predictable operational impact across the customer’s environment. This document describes an approach to providing controlled access to Troubleshooting Mode on a scoped set of devices. - An Entra ID user group to collect eligible users - A custom Defender XDR role with only the minimum required permissions - Microsoft Defender for Endpoint device groups to scope where those permissions apply The goal is to enable safe troubleshooting while maintaining least privilege and preventing unintended policy changes. 2) Prerequisite & Coverage - An Entra ID user group to collect eligible users - A custom Defender XDR role with only the minimum required permissions - Microsoft Defender for Endpoint device groups to scope where those permissions apply The goal is to enable safe troubleshooting while maintaining least privilege and preventing unintended policy changes. This setup is necessary to: - Enforce least privilege (only the permissions needed for Troubleshooting Mode and limited operational actions) - Scope powerful actions to a defined device group instead of all devices - Support a split model where one Security Reader group gets Troubleshooting Mode access and another Security Reader group remains view/operate without TS Mode - Preserve governance: users can investigate and perform limited actions but cannot create or modify MDE policies - Improve auditability by ensuring key actions are observable via device telemetry and the Action Center (while acknowledging that some telemetry may not include the initiating username). 3) Implementation Steps for Troubleshooting Mode (TO BE PERFORMED IN MICROSOFT DEFENDER PORTAL / ENTRA ID) 3.1 Prepare Entra ID User Group Identify an existing Entra ID user group that contains users (IT Infra Team) with the Security Reader role or create a new dedicated Entra ID user group for this purpose. - This group will be used consistently for: - Assigning the custom Defender XDR role - Scoping access to Defender for Endpoint device groups 3.2 Create and Assign Custom Defender XDR Role Create a custom Defender XDR role with Microsoft Defender for Endpoint (MDE) Security Settings Management permissions. - While creating the custom role, select only the minimum required permissions to maintain a least-privilege model. - Assign this custom Defender XDR role to the Entra ID user group identified in Step 1. Reference: See screenshots below for role creation, permission selection, and Entra ID group assignment. 3.3: Assign Entra ID User Group to Device Group Assign the same Entra ID user group (used in Steps 1 and 2) to a Microsoft Defender for Endpoint device group. - Devices in the device group should be dynamically grouped using supported criteria such as: - Device tags - Device name patterns - Other supported device attributes - This scoping ensures that the custom role permissions apply only to the intended set of devices. Reference: See screenshot under below showing device group creation and Entra ID group-to-device group assignment. 3.4 Resulting User Experience and Permissions After completing Steps 3.1 through 3.3, users who sign in with: - Security Reader role, and - Custom Defender XDR role will observe the following behavior in the Microsoft Defender portal: - Troubleshooting Mode is available on the scoped devices - Users cannot create or modify MDE policies - Users have access only to a controlled set of operational and investigative actions, including: - Exclude - Go hunt - Download force release from isolation script - Ask Defender Experts This configuration enables safe troubleshooting while preventing configuration drift or unauthorized security policy changes. Reference: See screenshot under below illustrating the available actions and the absence of policy creation/modification options. Reference: See screenshot below where creation of AV policy failed as User will not have access to Intune to create policy. 4. In an alternate scenario, two separate Security Reader groups are maintained: one group requires access to Troubleshooting Mode, while the other should have no Troubleshooting Mode access. Users in the latter group (no TS Mode requirement) can continue to use standard Microsoft Defender for Endpoint (MDE) operational capabilities such as managing tags, setting device criticality, running antivirus scans, collecting an investigation package, reporting device inaccuracy, initiating advanced hunting (Go hunt), triggering policy sync, and running automated investigations. Users in the Troubleshooting Mode-enabled Security Reader group must also be assigned to the appropriate MDE device group to ensure their device-level access and workflows continue to function as expected. Reference: See the screenshot below, which illustrates the additional MDE capabilities available to users who also have access to the device group 5: Auditing and Event Visibility - Events related to Tamper Protection changes and Troubleshooting Mode enablement are captured in Microsoft Defender for Endpoint telemetry. - These events are logged and visible for audit and investigation purposes. - The username is not recorded in these specific event entries, which is expected behavior in the current Defender auditing model. However, the activation of Troubleshooting Mode is still logged and visible in the device Action Center, which allows confirmation that the mode was enabled on the device and the username. Reference: See screenshot under Step 6 showing the relevant audit and event records in Timeline of Device Page. Similarly ,correlate using KQL across two Event Tables (DeviceEvents & EntraIdSignInEvents). Below is the KQL query let TimeWindow = 10m; let Lookback = 7d; // Portal sign-ins (Security & Compliance Center) let DefenderPortalSignins = materialize( EntraIdSignInEvents | where Timestamp >= ago(Lookback) | where Application == "Microsoft 365 Security and Compliance Center" | project SignInTime = Timestamp, PortalUserUpn = AccountUpn, PortalUserObjectId = AccountObjectId, SignInIP = IPAddress, CorrelationId | extend TimeBucket = bin(SignInTime, TimeWindow) ); // Tamper-protection related events (broaden as needed) let TamperEvents = materialize( DeviceEvents | where Timestamp >= ago(Lookback) | where ActionType has "Tamper" or ActionType == "TamperingAttempt" | project TamperTime = Timestamp, DeviceId, DeviceName, ActionType, AdditionalFields | extend TimeBucket = bin(TamperTime, TimeWindow) ); // Output rows: (UPN, TamperTime) within +/- window TamperEvents | join kind=inner (DefenderPortalSignins) on TimeBucket | where abs(datetime_diff("minute", TamperTime, SignInTime)) <= toint(TimeWindow / 1m) | project PortalUserUpn, TamperTime, SignInTime, DeviceName, DeviceId, ActionType, SignInIP, CorrelationId, AdditionalFields | order by TamperTime desc This query correlates by time proximity. It indicates “user signed into the portal around the time a tamper event happened.” It does not prove that the portal user caused the tamper event (that requires audit telemetry for the action). If you later want attribution (“who enabled troubleshooting mode / changed settings”), we should pivot to Defender Action Center message and then confirm the user. The query can be used for generating alert using custom detection rule and take this alert to Security Operations center using API integration. Below is reference to the sample output of the query. 6) Summary Option 3 enables a controlled Troubleshooting Mode experience by combining Entra ID group-based user assignment, a custom Defender XDR role with minimal permissions, and device group scoping in MDE. With this approach, eligible users can troubleshoot only the intended devices and perform a limited, operationally safe set of actions, while policy creation/modification remains restricted. Audit and investigation are supported through MDE telemetry and device Action Center visibility, with the known limitation that certain telemetry entries may not include the initiating username.Using the Microsoft Defender for Endpoint Files API to Validate Malware Hashes
Introduction Security advisories frequently include file hashes (SHA-1 or SHA-256) as indicators of compromise (IoCs). Microsoft Defender for Endpoint (MDE) exposes a Files API that lets SecOps quickly look up Microsoft’s verdict and metadata for a given hash. This enables rapid assessment—whether a file is classified as Malicious, Suspicious, Clean, or Unknown—and helps analysts decide the next response action without needing to download or execute the sample. What is the Files API in MDE and why is it used in Security Operations? The Files API is part of the Defender for Endpoint REST APIs that returns a file profile by hash identifier. Analysts use it to: • Validate whether Microsoft has a global verdict for a hash named in an advisory. • Retrieve telemetry such as global prevalence and first/last observed times to gauge risk and spread. • Pivot to related alerts and devices when needed. This lookup shortens triage time and avoids unnecessary handling of potentially dangerous samples. Prerequisites To call the Files API using application (client credentials) context, you need: A Microsoft Entra ID App Registration (Web app / service). API permissions on the WindowsDefenderATP resource (Microsoft Defender for Endpoint). Minimum: File.Read.All (Application). Admin consent granted for the permissions. Network access to the MDE API endpoint (region-based base URL) and the Microsoft identity platform (OAuth 2.0). Tip: For interactive testing, you can also use the API Explorer in the Microsoft Defender portal under Partners & APIs, which runs requests under your user context and RBAC scope. How to use the Files API via PowerShell 1) Acquire an OAuth token from the Microsoft identity platform using your app’s client ID and secret with the .default scope for the Defender API. 2) Send an HTTP GET request to the Files endpoint with the hash (SHA-1 or SHA-256) as the identifier. 3) Inspect the JSON response field "fileClassification" and other metadata (globalPrevalence, first/last observed). 4) Use the verdict to decide next actions (e.g., create an Indicator to block, hunt in Advanced Hunting, or open related alerts). Actual Script ===== STEP 1: Get OAuth Token (MDE v1) ===== $tenantId = "xxxxxxxxxxxxxxxxxxxxxxxxxxxxxx" $appId = "xxxxxxxxxxxxxxxxxxxxxxxxxxx" $appSecret = "xxxxxxxxxxxxxxxxxxxxxxxxxxx" # update with your tenant and app values $tokenUri = "https://login.microsoftonline.com/$tenantId/oauth2/v2.0/token" $body = @{ client_id = $appId scope = "https://api.securitycenter.microsoft.com/.default" client_secret = $appSecret grant_type = "client_credentials" } $tokenResponse = Invoke-RestMethod -Uri $tokenUri -Method Post -Body $body -ContentType "application/x-www-form-urlencoded" $token = $tokenResponse.access_token # ===== STEP 2: Call MDE v1 Files API ===== $hash = "97bf5e1a903a978b2281496e0a897688e9d8e6f981238cf91e39bae20390defe" # Replace with your actual hash values. $uri = "https://api.securitycenter.microsoft.com/api/v1.0/files/$hash" try { $response = Invoke-RestMethod -Uri $uri -Headers @{ Authorization = "Bearer $token" Accept = "application/json" } -Method Get } catch { Write-Error "API call failed: $($_.Exception.Message)" if ($_.ErrorDetails.Message) { Write-Host $_.ErrorDetails.Message } return } switch ($response.fileClassification) { "Malicious" { Write-Host "MDE recognises this hash as MALICIOUS. Threat Name: $($response.threatName)" -ForegroundColor Red } "Suspicious" { Write-Host "MDE recognises this hash as SUSPICIOUS." -ForegroundColor Yellow } "Clean" { Write-Host "MDE recognises this hash as CLEAN." -ForegroundColor Green } default { Write-Host "MDE does NOT have a signature for this hash (Unknown)." -ForegroundColor Gray } } $response | ConvertTo-Json -Depth 5 Script Explanation Token acquisition: Uses OAuth 2.0 client credentials flow to obtain an access token; scope targets Defender for Endpoint API. Endpoint call: Builds a GET request to the Files endpoint with the hash identifier. Error handling: Catches HTTP errors and prints server-provided details if available. Verdict mapping: Reads the fileClassification field and prints a color-coded verdict (Malicious, Suspicious, Clean, Unknown). Response output: Prints the full JSON for deeper analysis and logging. Recommended Inputs The Files endpoint accepts SHA-1 or SHA-256 identifiers; ensure you pass the correct hash type. Consider using certificate credentials or managed identity instead of client secrets for production automation. Sample Output API Explorer - Other Option to query File API The Microsoft Defender for Endpoint API Explorer is a tool that helps you explore various Defender for Endpoint APIs interactively. The API Explorer makes it easy to construct and do API queries, test, and send requests for any available Defender for Endpoint API endpoint. Use the API Explorer to take actions or find data that might not yet be available through the user interface. The tool is useful during app development. It allows you to perform API queries that respect your user access settings, reducing the need to generate access tokens. You can also use the tool to explore the gallery of sample queries, copy result code samples, and generate debug information. With the API Explorer, you can: Run requests for any method and see responses in real-time. Quickly browse through the API samples and learn what parameters they support. Make API calls with ease; no need to authenticate beyond the management portal signin. Access API Explorer From the left navigation menu, select Partners & APIs > API Explorer. Supported APIs API Explorer supports all the APIs offered by Defender for Endpoint. The list of supported APIs is available in the APIs documentation. Get started with the API Explorer In the left pane, there's a list of sample requests that you can use. Follow the links and click Run query. Some of the samples may require specifying a parameter in the URL, for example, {File Hash}. Permissions Required You need to log in with an account that has appropriate RBAC roles in Microsoft Defender for Endpoint. API Explorer enforces the same role-based access control (RBAC) as the portal: Security Administrator or Global Administrator for high-privilege actions (e.g., offboarding a device, submitting indicators). Lower roles (e.g., Security Reader) can only run read-only queries like Get file information or Get alerts. No additional API permissions or app registration are needed because requests run under your user context. Conclusion The MDE Files API gives SecOps an immediate way to validate hashes from advisories and threat feeds, reducing time-to-triage and enabling consistent response. When a hash is classified as Malicious or Suspicious, teams can move directly to containment (e.g., creating an Indicator to block). When it is Clean or Unknown, analysts can pivot to hunting, sandboxing, or further intelligence before acting. Integrating this lookup into runbooks helps security operations quickly and safely respond to emerging threats. References Get file information API: https://learn.microsoft.com/en-us/defender-endpoint/api/get-file-information Supported MDE APIs (Endpoint URI & versioning): https://learn.microsoft.com/en-us/defender-endpoint/api/exposed-apis-list Access the Microsoft Defender for Endpoint APIs (intro & app context): https://learn.microsoft.com/en-us/defender-endpoint/api/apis-intro Create an app to access MDE without a user (app registration & permissions): https://learn.microsoft.com/en-us/defender-endpoint/api/exposed-apis-create-app-webapp API Explorer: https://learn.microsoft.com/en-us/defender-endpoint/api/api-explorerMDE for Non‑Persistent VDI — Implementation Guide & Best Practices.
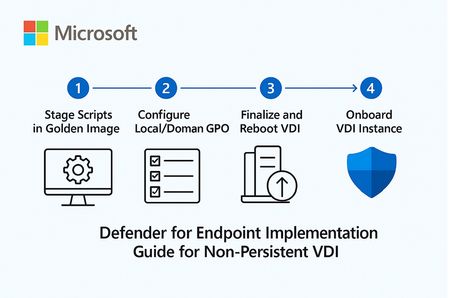
1. Overview: Microsoft Defender for Endpoint (MDE) for Non‑Persistent VDI Non‑persistent VDI instances are reset or reprovisioned frequently. To ensure immediate protection and clean device inventory, MDE provides a dedicated onboarding path that calculates a persistent device ID and onboard early in the boot process. Key considerations: Use the VDI onboarding package and choose the single‑entry method (recommended) to avoid duplicate devices when hosts are recreated with the same name. Place the onboarding script in the golden image but ensure it executes only on child VMs (first boot) after the final hostname is assigned and the last reboot completes. Never fully onboard or boot the golden/template/replica image into production; if it happens, offboard and clean registry artifacts before resealing. Consider enabling the portal feature “Hide potential duplicate device records” to reduce inventory noise during transition periods. 2. Stage the scripts in the Golden Image (do NOT onboard the image) Goal: Ensure early, reliable onboarding of pooled VDI instances without tattooing the master image. Download the Windows onboarding package (Deployment method: VDI onboarding scripts for non‑persistent endpoints). Extract and copy the files to: C\Windows\System32\GroupPolicy\Machine\Scripts\Startup Configure Local/Domain GPO to run the PowerShell script at startup (SYSTEM, highest privileges). For single‑entry, add Onboard-NonPersistentMachine.ps1 on the PowerShell Scripts tab. Ensure the script runs only after final hostname and the last reboot in your provisioning flow to prevent duplicate objects. Example (Domain GPO scheduled task at startup as SYSTEM): Program/Script: C\Windows\System32\WindowsPowerShell\v1.0\powershell.exe Arguments: -ExecutionPolicy Bypass -File \srvshare\onboard\Onboard-NonPersistentMachine.ps1 3. Never Onboard the Golden/Template/Replica VM If the golden image was accidentally onboarded (Sense service started), you must offboard and clean before resealing: sc query sense del "C:\ProgramData\Microsoft\Windows Defender Advanced Threat Protection\Cyber\*.*" /f /s /q reg delete "HKLM\SOFTWARE\Microsoft\Windows Advanced Threat Protection" /v senseGuid /f Run the official offboarding script for your tenant before cleanup, when available. 4. (Optional) Tag Devices Automatically from the Image Tags simplify scoping of device groups and policies. Add a DeviceTagging registry value during image build: reg add "HKLM\SOFTWARE\Policies\Microsoft\Windows Advanced Threat Protection\DeviceTagging" /v Group /t REG_SZ /d "VDI-NonPersistent" /f Tag appears after device info refresh; a reboot accelerates reporting. 5. Performance & AV Configuration for VDI (Important) 5.1 Shared Security Intelligence & Cache Maintenance Purpose: Reduce CPU and disk spikes at sign‑in by offloading unpackaging of definitions to a shared source and by pre‑running cache maintenance on the master image. Step‑by‑step GPO configuration: Create a secure UNC share for definition packages (e.g., \srvshare\WDAV-Update) and grant read to VDI computer accounts. GPO → Computer Configuration → Administrative Templates → Windows Components → Microsoft Defender Antivirus → Security Intelligence Updates → Enable “Define security intelligence location for VDI clients” and set \srvshare\WDAV-Update. In the same node, set update cadence (daily time) and enable randomization to avoid I/O storms. PowerShell examples: Set-MpPreference -SignatureUpdateInterval 4 Set-MpPreference -SignatureFallbackOrder "InternalDefinitionUpdateServer|MicrosoftUpdateServer" Run Windows Defender Cache Maintenance on the golden image before sealing: schtasks /Run /TN "\Microsoft\Windows\Windows Defender\Windows Defender Cache Maintenance" 5.2 FSLogix Exclusions Why exclusions matter: FSLogix mounts user profiles as VHD/VHDX files. Scanning these at attach/detach causes logon delays, black screens, and app launch slowness. Paths and extensions to exclude: %TEMP%\*.VHD %TEMP%\*.VHDX %Windir%\TEMP\*.VHD %Windir%\TEMP\*.VHDX \\<storage>\<share>\*.VHD \\<storage>\<share>\*.VHDX \\<storage>\<share>\*.VHD.lock \\<storage>\<share>\*.VHD.meta \\<storage>\<share>\*.VHD.metadata \\<storage>\<share>\*.VHDX.lock \\<storage>\<share>\*.VHDX.meta \\<storage>\<share>\*.VHDX.metadata GPO: Computer Configuration → Administrative Templates → Windows Components → Microsoft Defender Antivirus → Exclusions (File/Folder and Extension). PowerShell examples: Add-MpPreference -ExclusionExtension VHD,VHDX Add-MpPreference -ExclusionPath "C:\ProgramData\FSLogix","\\storage\fslogix-share\*.VHD*" 5.3 General Scan Posture Real‑time & cloud‑delivered protection (GPO): Enable Real‑time protection, Cloud‑delivered protection, Join MAPS, and “Block at first sight.” Scheduled scans (GPO): Daily Quick Scan (e.g., 02:00) with randomization window. Weekly Full Scan (e.g., Sunday 03:00). Consider “Start the scheduled scan only when computer is on but not in use” to reduce user impact. CPU throttling settings: Set-MpPreference -ScanAvgCPULoadFactor 30 # 5..100 (0 = no throttling) Additional scheduling/throttling options (Intune/Policy CSP as applicable): ScanOnlyIfIdleEnabled = True DisableCpuThrottleOnIdleScans = True ThrottleForScheduledScanOnly = True EnableLowCPUPriority = True Validation commands: Get-MpPreference | fl ScanAvgCPULoadFactor,ScanScheduleQuickScanTime,SignatureUpdateInterval Get-MpComputerStatus | fl AMServiceEnabled,AntivirusSignatureVersion,RealTimeProtectionEnabled 6. Validate Onboarding After first boot of a pooled VM, verify device appears in Defender portal (Assets → Devices). For single‑entry method, reboot/redeploy a few instances with the same hostname and confirm one device object is reused. Optionally enable “Hide potential duplicate device records” (Settings → Endpoints → Advanced features). This is like only filtering the view of Devices list does actual remove the records from the MDE portal. Run a detection test if needed (per Microsoft guidance) to verify sensor connectivity. 7. Quick Checklist — Build Step Download VDI onboarding package from Defender portal. Copy scripts to Startup folder in golden image; configure GPO/Task to run PS1 at boot as SYSTEM. Do NOT onboard/boot the golden image into production; if it happens, offboard + clean senseGuid & Cyber cache. (Optional) Set DeviceTagging registry value for scoping (e.g., VDI-NonPersistent). Configure Shared Security Intelligence path; schedule updates; run Cache Maintenance on master image. Apply FSLogix AV exclusions (paths + extensions). Set scan posture (RTP + cloud, schedules, CPU throttling). Validate onboarding behavior and inventory cleanliness. 8. Summary & Best Practices Checklist for golden image: Script staged, not executed on master; executes only on child VMs at final boot stage. Shared Security Intelligence path configured; cache maintenance pre-run. FSLogix exclusions present prior to first user logon. RTP and cloud protection enabled; scans scheduled with randomization; CPU load factor tuned. Common pitfalls & fixes: Golden image onboarded → Offboard + clean registry/cache; reseal. Script runs before final hostname → Duplicate device records. Delay script until last reboot/final rename. No exclusions for FSLogix → Long logons/black screens. Add VHD/VHDX exclusions and share paths. Simultaneous scans across hosts → Enable randomization; schedule during off‑hours. References Onboard non‑persistent VDI devices: https://learn.microsoft.com/en-us/defender-endpoint/configure-endpoints-vdi Onboard Windows devices in Azure Virtual Desktop: https://learn.microsoft.com/en-us/defender-endpoint/onboard-windows-multi-session-device Configure Microsoft Defender Antivirus on RDS/VDI: https://learn.microsoft.com/en-us/defender-endpoint/deployment-vdi-microsoft-defender-antivirus FSLogix prerequisites (AV exclusions): https://learn.microsoft.com/en-us/fslogix/overview-prerequisites Configure AV exclusions (file/extension/folder): https://learn.microsoft.com/en-us/defender-endpoint/configure-extension-file-exclusions-microsoft-defender-antivirus Create and manage device tags: https://learn.microsoft.com/en-us/defender-endpoint/machine-tags Advanced features (hide duplicate records): https://learn.microsoft.com/en-us/defender-endpoint/advanced-features Schedule antivirus scans using Group Policy: https://learn.microsoft.com/en-us/defender-endpoint/schedule-antivirus-scans-group-policy Troubleshoot MDAV scan issues (CPU throttling, idle scans): https://learn.microsoft.com/en-us/defender-endpoint/troubleshoot-mdav-scan-issuesUpdate Coverage Workbook in Microsoft Defender for Cloud to Include Defender for AI Plan status
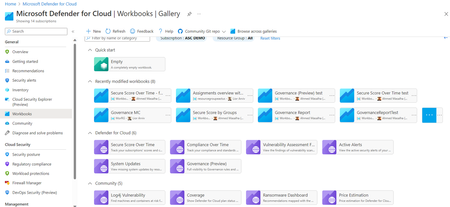
Option 1: Update the Existing Coverage Workbook Enhance the current workbook by adding a query that checks Defender for AI plan enablement across subscriptions. Steps Open the Coverage Workbook in Defender for Cloud. Edit the workbook and update the query section to include the line below. AIServices = defenderPlans.AI Display the results in a table or chart alongside other Defender plans. Save and publish the updated workbook for organization-wide visibility. Pros Single pane of glass for all Defender coverage. Easy for SOC teams already using the workbook. Cons Requires manual customization and maintenance. Updates may be overwritten during workbook template refresh. Option 2: Use Azure Resource Graph Explorer Run a Resource Graph query to check Defender for AI enablement status across multiple subscriptions without modifying the workbook. Steps Go to Azure Resource Graph Explorer in the Azure portal. Run the following query: __________________________________________________________________________________ securityresources | where type =~ "microsoft.security/pricings" | extend pricingTier = properties.pricingTier, subPlan = properties.subPlan | extend planSet = pack(name, level = case(isnotempty(subPlan),subPlan,pricingTier)) | summarize defenderPlans = make_bag(planSet) by subscriptionId | project subscriptionId, CloudPosture = defenderPlans.CloudPosture, VirtualMachines = defenderPlans.VirtualMachines, AppServices = defenderPlans.AppServices, AIServices = defenderPlans.AI, SqlServers = defenderPlans.SqlServers, SqlServerVirtualMachines = defenderPlans.SqlServerVirtualMachines, OpenSourceRelationalDatabases = defenderPlans.OpenSourceRelationalDatabases, CosmosDB = defenderPlans.CosmosDbs, StorageAccounts = defenderPlans.StorageAccounts, Containers = defenderPlans.Containers, KeyVaults = defenderPlans.KeyVaults, Arm = defenderPlans.Arm, DNS = defenderPlans.Dns, KubernetesService = defenderPlans.KubernetesService, ContainerRegistry = defenderPlans.ContainerRegistry The output appears as shown below. Export results to CSV or Power BI for reporting. Optionally, schedule the query using Azure Automation or Logic Apps for periodic checks. Pros No dependency on workbook customization. Flexible for ad hoc queries and automation. Cons Separate reporting interface from the Coverage Workbook. Requires manual execution or automation setup. Recommendation If your organization prefers a centralized dashboard, choose Option 1 and update the Coverage Workbook. For quick checks or automation, Option 2 using Resource Graph Explorer is simpler and more scalable.