cloud security posture management
175 Topics
Automate SecOps to Developer Communication with DevOps Security in Defender for Cloud
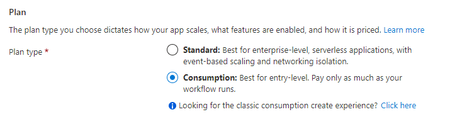
Automate SecOps to Developer Communication with DevOps Security in Defender for Cloud Logic Apps are a workflow automation feature of Microsoft Defender for Cloud (MDC) in which you can create and run automated workflows that integrate your apps, data, services, and systems. Customer feedback has been loud and clear—Security Teams need more efficient and effective ways to communicate directly with Development Teams about discovered security findings. This blog walks through creating a Logic App that Security Teams can use to automate communication of discovered security issues to Development Teams. The Logic App creates a Work Item in Azure DevOps (ADO) containing repository location, description, and remediation information from DevOps security in Defender for Cloud Recommendations that Developers can use to remediate the discovered security issue. Security Operators will find this Logic App particularly useful because they do not need to be familiar with Azure DevOps or even to login to Azure DevOps to create a Work Item for their Developers. Instead, SecOps can trigger a Logic App on an affected repository and create a Work Item for a Development Team to triage and remediate. Objectives: Create a Logic App to create an Azure DevOps work item from an MDC Recommendation Test the Logic App Prerequisite: Connector provisioned in MDC to your Source Code Management System (such as Azure DevOps or GitHub) Create a Logic App to Create an ADO Work Item Login to Azure and search for or click Logic Apps Click + Add Choose a Subscription and Resource group Enter a name for your Logic App Under Plan, choose Consumption Click Review + create Click Create Go to the Logic App you created and click Logic app designer in the left menu Click Blank Logic App In the search box, type Recommendation Choose When a Microsoft Defender for Cloud Recommendation is created or triggered Click + New step Type variable in the search box Choose Initialize variable For Name, type org_name For Type, choose String Click + New step Type variable in the search box Choose Initialize variable For Name, type project_name For Type, choose String Click + New step Type variable in the search box Choose Initialize variable For Name, type repo_name For Type, choose String Click + New step Type variable in the search box Choose Set variable For Name, choose org_name from the dropdown menu For Value, click in the empty box In the Add dynamic content flyout, click Expression and type the following: first(skip(split(triggerBody()?['properties']?['resourceDetails']?['id'],'/'),10)) and click OK Click + New step Type variable in the search box Choose Set variable For Name, choose project_name from the dropdown menu For Value, click in the empty box In the Add dynamic content flyout, click Expression and type the following: first(skip(split(triggerBody()?['properties']?['resourceDetails']?['id'],'/'),12)) and click OK Click + New step Type variable in the search box Choose Set variable For Name, choose repo_name from the dropdown menu For Value, click in the empty box In the Add dynamic content flyout, click Expression and type the following: first(skip(split(triggerBody()?['properties']?['resourceDetails']?['id'],'/'),14)) and click OK Click + New step Type azure devops in the search box Click Create a work item Click Sign in Click Accept to allow the App request for the Logic App to write to Azure DevOps For Organization Name, click in the box, click Enter custom value In the Add dynamic content flyout, click org_name For Project name, click Enter custom value In the Add dynamic content flyout, click project_name For Work Item Type, type task For Title, click in the box, type the title of the work item you want to create for your Developers, such as: A security issue needs to be remediated from the following repo: In the Add dynamic content flyout, click repo_name For Description, type Description: In the Add dynamic content flyout, click Properties Metadata Description, then hit enter twice Type Remediation steps: then hit enter In the Add dynamic content flyout, click Properties Metadata Remediation Description Your Logic App should now look like the following: Your no code Logic App is now complete and needs to be tested. Test the Logic App Navigate to Microsoft Defender for Cloud Click Recommendations Expand Remediate vulnerabilities, click Code repositories should have secret scanning findings resolved Expand Affected resources, tick an Azure DevOps repository Click Trigger logic app In the Selected subscription dropdown, choose the Subscription that contains the Logic App Tick the box next to the Logic app Click Trigger Now let’s verify that your work item has been created Login to Azure DevOps and navigate to the Project with the repository you tested Click Boards, then click Work items to see the work item that you created Your work item should look similar to the following work item: Conclusion To review, we’ve walked through creating a Logic App that creates a Work Item in Azure DevOps to communicate with Developers so they can remediate security findings discovered by Microsoft Defender for Cloud. This Logic App can be executed on any Azure DevOps repository. It injects the location, description, and remediation steps in the Work Item description body so that Developers can quickly find and fix the security issue. This helps Security Operators automate communication with Developers by creating a Work Item that the Development Team can then prioritize in their Sprint Planning sessions. Additional Resources To learn more about DevOps security in Defender for Cloud, read this documentation Download (free) a special Appendix about DevOps security in Defender for Cloud from the latest Microsoft Defender for Cloud book published by Microsoft Press To learn how to onboard your Azure DevOps Source Code Management System to Defender for Cloud, read this documentation for Azure DevOps
Microsoft Defender for Cloud - strategy and plan towards Log Analytics Agent (MMA) deprecation
Log Analytics agent (also known as MMA) is on a deprecation path and will be retired in Aug 2024. The purpose of this blogpost is to clarify how Microsoft Defender for Cloud will align with this plan and what is the impact on customers.108KViews2likes28CommentsHow to Effectively Perform a Microsoft Defender for Cloud PoC
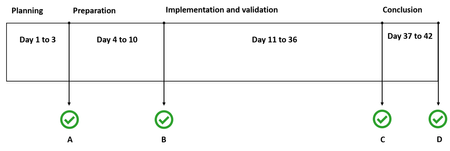
[Post updated on 06/27/2024] Introduction Organizations are starting to realize that they need to closely monitor their cloud security posture and protect cloud workloads against threats. At the same time, they need to do this without creating silos across different solutions. Cloud Native Application Protection Platform (CNAPP) bring the capabilities from Cloud Security Posture Management (CSPM), Cloud Workload Protection (CWP), in addition to many other platforms in a single place. To learn more about Defender for Cloud as your CNAPP solution, we recommend you use the resources below: Improving Your Multi-Cloud Security with a CNAPP - a vendor agnostic approach Microsoft CNAPP Solution Planning and Operationalizing Microsoft CNAPP Understanding Cloud Native Application Protection Platforms (CNAPP) Cloud Native Applications Protection Platform (CNAPP) Microsoft CNAPP eBook Understanding CNAPP To effectively determine the benefits of adopting Microsoft Defender for Cloud, you should perform a Proof of Concept (PoC). Even before enabling enable Microsoft Defender for Cloud in your subscription and start validating your scenarios, you should go through a planning process to determine a series of tasks that must be accomplished in this PoC. Planning Each Phase Use following schedule to perform their Microsoft Defender for Cloud PoC. Keep in mind that this is an example, and each organization may adequate this according to their needs. The sections that follow will explain each phase in more details. Planning During the planning phase you will organize a meeting with key stakeholders of this PoC. At minimum, you should have representatives from IT (mainly the ones that are responsible for your Cloud workloads), Security Operations, and Security Governance. The intent of this phase is to determine the answers for the following items: Scope of the PoC: what are you going to validate on this PoC? What scenarios do you want to test? Requirements: based on the scope, you can start determining the requirements for this PoC. This includes at least the following items: Determine if the type of deployment: single cloud (Azure) or multi-cloud. For AWS considerations, read this article. For GCP considerations, read this article. Determine which users should have administrative and read access to the subscriptions that Microsoft Defender for Cloud will be enabled. Use this article as a reference to review the roles (RBAC) available for Microsoft Defender for Cloud. Determine if you need policy centralized management for Microsoft Defender for Cloud, and use the best practices from this article. If you are going to use multiple subscriptions, define the workspace model (centralized or distributed). In Microsoft Defender for Cloud, this is defined using the Data Collection tier, visit this article for more information about the options available. In the same Data Collection option, define if you are going to use Auto Provision or not. By using auto provision, the MMA agent will be automatically installed in the VMs that are under the selected subscription (preferred option). If you are going to use multiple subscriptions, consider using Management Group to manage Security Policy across all subscriptions. For more information about this, read this article. If you are going to use multiple subscriptions and want to automate the onboarding process, use the PowerShell examples described in this article. If you need to prioritize security recommendations based on risk factors, and disrupt potential attack before it happens, consider enabling Defender CSPM. If you need to create governance rules to assign to workload owners and establish SLA to remediate recommendations, consider enabling Defender CSPM and use the governance feature. Define which resources will be monitored during the PoC to define which Microsoft Defender for Cloud plans you need to enable: Note: you can enable any of the Microsoft Defender for Cloud plans for 30 days free trial. Determine which PaaS workloads will be tested. Use this article to determine which PaaS workloads are supported by Microsoft Defender for Cloud. Define which VMs will be available through the Internet (via RDP or SSH) to test functionalities such as JIT VM Access, Network Map and Network Hardening. Determine the Operating System for the VMs that will be deployed for this PoC. Use this article to obtain the list of supported operating systems. These VMs can be in Azure, or on-premises. Take in considerations different scenarios for recommendations, such as: Validate scenarios where you need to exempt resources from recommendations. Use this article to learn how to create exemptions. Validate scenarios where you need to disable a recommendation that is not applicable to your scenario. Read this article for more information on how to perform this task. Validate scenarios where you need to automate a response for a recommendation. You can use the Workflow Automation feature to accomplish that. Measure success: this is something very important to establish before starting your PoC, because this will help you to set the right expectation and based on that expectation, measure if your PoC was a success or not. At the end of this phase you have the first checkpoint (A). On this checkpoint you should document the following items: Scope of the PoC, the requirements, timeline and the decision of how you will measure success. Next steps of the PoC If there are requirements that needs to be in place before the implementation, these requirements must be listed and planned for implementation The timeline for implementation of those requirements needs to be established Preparation This phase will focus on the implementation of the requirements. When going through those requirements, make sure to document everything that needs to be changed in the environment. One classic example is when the members of the Team that are implementing Microsoft Defender for Cloud don’t have the right level of permission in all subscriptions. This can cause delays if the team that is implementing Microsoft Defender for Cloud is not the same team that manages Azure Identity. For this reason, it becomes critical to involve the right stakeholders since the planning phase. At the end of this phase, you have the second checkpoint (B). On this checkpoint you should document the following items: Changes that were performed in the environment to adequate with the PoC requirements. Define when the implementation phase will start This is critical because once you enable Microsoft Defender for Cloud, you have 30 days free trial, and you should ensure that you utilize those days to validate all scenarios. You can also use the cost estimation workbook to estimate how much each plan will cost based on the resources you have in the subscription. Define who the workload owners are. Many times, the team that manage Microsoft Defender for Cloud do not have privileges to remediate recommendations in different workloads. For example, recommendations to remediate vulnerabilities in SQL Database might be something that the team that manages Microsoft Defender for Cloud can't do it, therefore it is imperative to involve the workload owners. Implementation and validation Now you can enable the Defender for Cloud enhanced security features, and once you do that the next step is the implementation of the scenarios that you established during the planning phase. Here are the most common scenarios that are covered during a PoC: Scenario 1: Security Posture Management If you decide to try the Foundational CSPM (free tier) you can immediately start testing the following scenarios: Ensure that you are driving your secure score up by addressing the recommendations raised by Microsoft Defender for Cloud. Use this article for more information about Secure Score. To drive your secure score up, you need to review security recommendations for the different workloads and follow the remediation steps to address them. Use the Workflow Automation feature to create automations for recommendations. You can test to send recommendation to workload owners using instructions from this article. If you want to validate advanced cloud security posture management feature, you will need to enable Defender CSPM. If that's the case, use this DCSPM POC article. Scenario 2: Reducing the Attack Surface Enable JIT VM access for Internet facing VMs and test the functionality. Use this article as a reference to perform the configuration/validation and watch this video to understand how JIT helps to reduce the attack surface. Use Adaptive Application Control to review the list of apps that should be allowed. Use this article as a reference to understand and implement this feature. Scenario 3: Threat Detection & Response Enable File Integrity Monitoring in your workspace to track changes to files and registry keys. Use this article as a reference to configure this feature. You can use the following guides to simulate attacks against the VMs and see how Microsoft Defender for Server will trigger Security Alerts: For Windows For Linux If you are validating threat detection for PaaS workloads such as Containers, Azure Key Vault, Storage and SQL, visit this page and select the scenario that you want to validate. Try to suppress alerts that are considered false positive for your environment using the Alert Suppression feature. Validate the integration of Microsoft Defender for Cloud with Microsoft Defender for Endpoint (MDE) using the instructions from this article. Configure SIEM integration (optional): if you need to validate SIEM integration, visit this site for more information about supported SIEM platforms. Create workflow automation using Playbooks to run once you receive an alert. You can use the examples below as a reference: Automate Microsoft Defender for Cloud actions with Playbooks and ServiceNow Microsoft Defender for Cloud & automatic creation of an incident in ServiceNow At the end of this phase, you have the third checkpoint (C). On this checkpoint you should document the following items: Each scenario that was tested and its results The learnings from each scenario. These learning can be used to determine if you foresee any roadblock that can delay the Microsoft Defender for Cloud adoption in the production environment and how to overcome those If you need a deeper plan to perform a PoC for each Microsoft Defender for Cloud Plan, please access them from here: Microsoft Defender for Kubernetes Microsoft Defender for Resource Manager Microsoft Defender for Storage Microsoft Defender for Key Vault Microsoft Defender for DNS Microsoft Defender for App Service Microsoft Defender for Container Registries Microsoft Defender for SQL Microsoft Defender for Servers Microsoft Defender CSPM Conclusion This is the final phase of the PoC, and it is strategically done 5 days before you reach the 30 days trial, and the reason for that is because you want to have a spare time to make your final decision if you want to keep using Microsoft Defender for Cloud or not, and if not you can disable Microsoft Defender for Cloud. This is the time to re-engage the stakeholders, present the results, and the benefits of adopting Microsoft Defender for Cloud in production. At the end of this phase, you have the last checkpoint (D). On this checkpoint you should document the following items: Final PoC report Final decision regarding Microsoft Defender for Cloud adoption Summary of the next steps, which needs to include the final considerations of Microsoft Defender for Cloud adoption in production and across all subscriptions Additional Resources Microsoft Defender for Cloud Documentation http://aka.ms/ascdocs Videos https://aka.ms/MDFCInTheField Training Roadmap https://aka.ms/MDFCNinja Microsoft Defender for Cloud Lab http://aka.ms/MDFCLabs47KViews11likes16CommentsMicrosoft Defender for Cloud Cost Estimation Dashboard
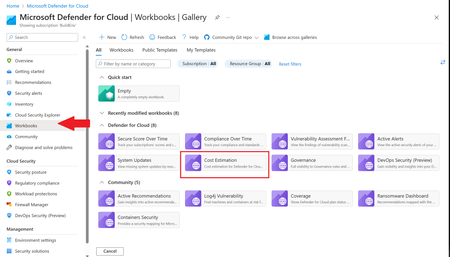
This blog was updated on April 16 th , 2023 to reflect the latest version of the Cost Estimation workbook. Microsoft Defender for Cloud provides advanced threat detection capabilities across your cloud workloads. This includes comprehensive coverage plans for compute, PaaS and data resources in your environment. Before enabling Defender for Cloud across subscriptions, customers are often interested in having a cost estimation to make sure the cost aligns with the team’s budget. We previously released the Microsoft Defender for Storage Price Estimation Workbook, which was widely and positively received by customers. Based on customer feedback, we have extended this offering by creating one comprehensive workbook that covers most Microsoft Defender for Cloud plans. This includes Defender for Containers, App Service, Servers, Storage, Cloud Security Posture Management and Databases. The Cost Estimation workbook is out-of-the box and can be found in the Defender for Cloud portal. After reading this blog and using the workbook, be sure to leave your feedback to be considered for future enhancements. Please remember these numbers are only estimated based on retail prices and do not provide actual billing data. For reference on how these prices are calculated, visit the Pricing—Microsoft Defender | Microsoft Azure. Overview The cost estimation workbook provides a consolidated price estimation for Microsoft Defender for Cloud plans based on the resource telemetry in your organization’s environment. The workbook allows you to select which subscriptions you would like to estimate the price for as well as the Defender Plans. In a single pane of glass, organizations can see the estimated cost per plan on each subscription as well as the grand total for all the selected subscriptions and plans. To see which plans are currently being used on the subscription, consider using the coverage workbook. Defender Cloud Security Posture Management (CSPM) Defender CSPM protects all resources across your subscriptions, but billing only applies to Compute, Databases and Storage accounts. Billable workloads include VMs, Storage accounts, open-source relational databases and SQL PaaS & Servers on machines. See here for more information regarding pricing. On the backend, the workbook checks to see how many billable resources were detected and if any of the above plans are enabled on the subscription. It then takes the number of billable resources and multiplies it by the Defender CSPM price. Defender for App Service The estimation for Defender for App Services is based on the retail price of $14.60 USD per App Service per month. Check out the Defender for App Service Price Estimation Dashboard for a more detailed view on estimated pricing with information such as CPU time and a list of App Services detected. Defender for Containers The estimation for Defender for Containers is calculated based on the average number of worker nodes in the cluster during the past 30 days. For a more detailed view on containers pricing such as average vCores detected and the number of image scans included, consider also viewing the stand-alone Defender for Containers Cost Estimation Workbook. Defender for Databases Pricing for Defender for Databases includes Defender for SQL Databases and Defender for open-source relational databases (OSS DBs). This includes PostgreSQL, MySQL and MariaDB. All estimations are based on the retail price of $15 USD per resource per month. On the backend, the workbook runs a query to find all SQL databases and OSS DBs in the selected subscriptions and multiplies the total amount by 15 to get the estimated monthly cost. Defender for Key Vault Defender for Key Vault cost estimation is not included in the out of the box workbook, however, a stand-alone workbook is available in the Defender for Cloud GitHub. The Defender for Key Vault dashboard considers all Key Vaults with or without Defender for Key Vault enabled on the selected subscriptions. The calculations are based on the retail price of $0.02 USD per 10k transactions. The “Estimated Cost (7 days)” column takes the total Key Vault transactions of the last 7 days, divides them by 10K and multiples them by 0.02. In “Estimated Monthly Price”, the results of “Estimated Cost (7 days)” are multiplied by 4.35 to get the monthly estimate. Defender for Servers Defender for Servers includes two plan options, Plan 1 and Plan 2. The workbook gives you the option to toggle between the two plans to see the difference in how they would effect pricing. Plan 1 is currently charged at $5 per month where as Plan 2 is currently charged at $15. Defender for Storage The Defender for Storage workbook allows you to estimate the cost of the two pricing plans: the legacy per-transaction plan and the new per-storage plan. The workbook looks at historical file and blob transaction data on supported storage types such as Blob Storage, Azure Files, and Azure Data Lake Storage Gen 2. We have released a new version of this workbook, and you can find it here: Microsoft-Defender-for-Cloud/Workbooks/Microsoft Defender for Storage Price Estimation and learn more about the storage workbook in Microsoft Defender for Storage – Price Estimation blog post. Limitations Azure Monitor Metrics data backends have limits and the number of requests to fetch data might time out. To solve this, narrow your scope by reducing the selected subscriptions and Defender plans. The workbook currently only includes Azure resources. Acknowledgements Special thanks to everyone who contributed to different versions of this workbook: Fernanda Vela, Helder Pinto, Lili Davoudian, Sarah Kriwet, Safeena Begum Lepakshi, Tom Janetscheck, Amit Biton, Ahmed Masalha, Keren Damari, Nir Sela, Mark Kendrick, Yaniv Shasha, Mauricio Zaragoza, Kafeel Tahir, Mary Lieb, Chris Tucci, Brian Roosevelt References: What is Microsoft Defender for Cloud? - Microsoft Defender for Cloud | Microsoft Learn Pricing—Microsoft Defender | Microsoft Azure Workbooks gallery in Microsoft Defender for Cloud | Microsoft Docs Pricing Calculator | Microsoft Azure Microsoft Defender for Key Vault Price Estimation Workbook Microsoft Defender for App Services Price Estimation Workbook Microsoft Defender for Containers Cost Estimation Workbook Coverage Workbook
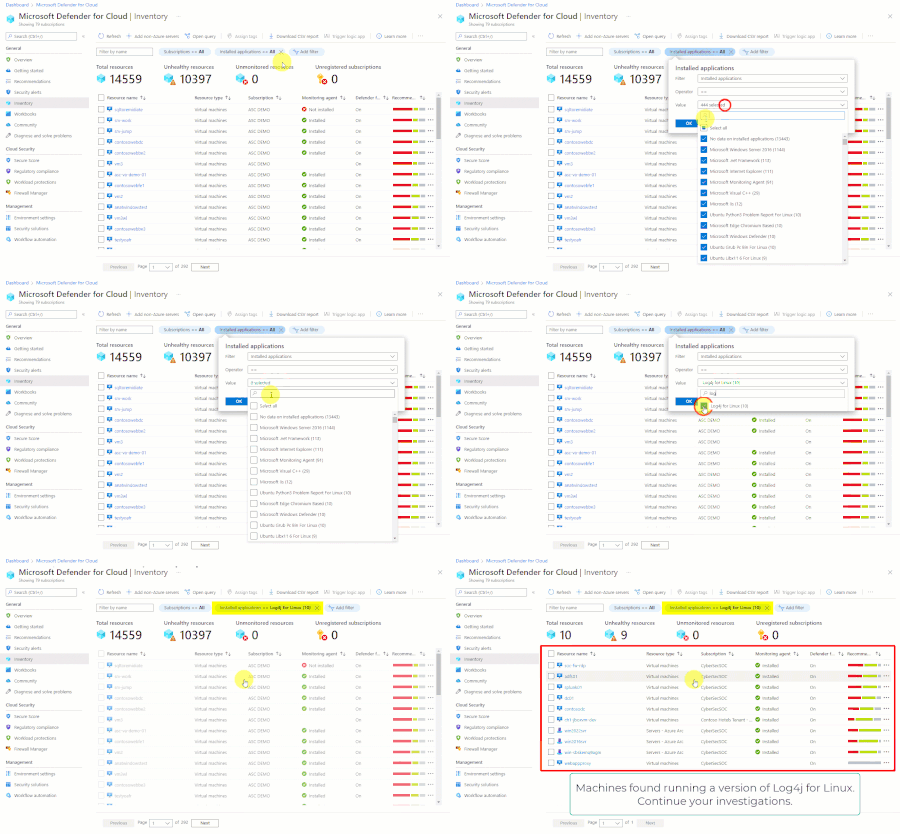
How Defender for Cloud displays machines affected by Log4j vulnerabilities
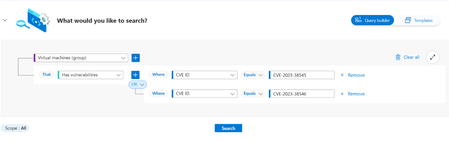
Microsoft Defender for Cloud's inventory filters can easily and quickly help you find all machines with a specific piece of software, or that are vulnerable to a specific CVE. In this case, we show how to find machines running Log4j or with the security finding CVE-2021-44228.
Protecting Your Azure Key Vault: Why Azure RBAC Is Critical for Security
Introduction In today’s cloud-centric landscape, misconfigured access controls remain one of the most critical weaknesses in the cyber kill chain. When access policies are overly permissive, they create opportunities for adversaries to gain unauthorized access to sensitive secrets, keys, and certificates. These credentials can be leveraged for lateral movement, privilege escalation, and establishing persistent footholds across cloud environments. A compromised Azure Key Vault doesn’t just expose isolated assets it can act as a pivot point to breach broader Azure resources, potentially leading to widespread security incidents, data exfiltration, and regulatory compliance failures. Without granular permissioning and centralized access governance, organizations face elevated risks of supply chain compromise, ransomware propagation, and significant operational disruption. The Role of Azure Key Vault in Security Azure Key Vault plays a crucial role in securely storing and managing sensitive information, making it a prime target for attackers. Effective access control is essential to prevent unauthorized access, maintain compliance, and ensure operational efficiency. Historically, Azure Key Vault used Access Policies for managing permissions. However, Azure Role-Based Access Control (RBAC) has emerged as the recommended and more secure approach. RBAC provides granular permissions, centralized management, and improved security, significantly reducing risks associated with misconfigurations and privilege misuse. In this blog, we’ll highlight the security risks of a misconfigured key vault, explain why RBAC is superior to legacy Access Policies and provide RBAC best practices, and how to migrate from access policies to RBAC. Security Risks of Misconfigured Azure Key Vault Access Overexposed Key Vaults create significant security vulnerabilities, including: Unauthorized access to API tokens, database credentials, and encryption keys. Compromise of dependent Azure services such as Virtual Machines, App Services, Storage Accounts, and Azure SQL databases. Privilege escalation via managed identity tokens, enabling further attacks within your environment. Indirect permission inheritance through Azure AD (AAD) group memberships, making it harder to track and control access. Nested AAD group access, which increases the risk of unintended privilege propagation and complicates auditing and governance. Consider this real-world example of the risks posed by overly permissive access policies: A global fintech company suffered a severe breach due to an overly permissive Key Vault configuration, including public network access and excessive permissions via legacy access policies. Attackers accessed sensitive Azure SQL databases, achieved lateral movement across resources, and escalated privileges using embedded tokens. The critical lesson: protect Key Vaults using strict RBAC permissions, network restrictions, and continuous security monitoring. Why Azure RBAC is Superior to Legacy Access Policies Azure RBAC enables centralized, scalable, and auditable access management. It integrates with Microsoft Entra, supports hierarchical role assignments, and works seamlessly with advanced security controls like Conditional Access and Defender for Cloud. Access Policies, on the other hand, were designed for simpler, resource-specific use cases and lack the flexibility and control required for modern cloud environments. For a deeper comparison, see Azure RBAC vs. access policies. Best Practices for Implementing Azure RBAC with Azure Key Vault To effectively secure your Key Vault, follow these RBAC best practices: Use Managed Identities: Eliminate secrets by authenticating applications through Microsoft Entra. Enforce Least Privilege: Precisely control permissions, granting each user or application only minimal required access. Centralize and Scale Role Management: Assign roles at subscription or resource group levels to reduce complexity and improve manageability. Leverage Privileged Identity Management (PIM): Implement just-in-time, temporary access for high-privilege roles. Regularly Audit Permissions: Periodically review and prune RBAC role assignments. Detailed Microsoft Entra logging enhances auditability and simplifies compliance reporting. Integrate Security Controls: Strengthen RBAC by integrating with Microsoft Entra Conditional Access, Defender for Cloud, and Azure Policy. For more on the Azure RBAC features specific to AKV, see the Azure Key Vault RBAC Guide. For a comprehensive security checklist, see Secure your Azure Key Vault. Migrating from Access Policies to RBAC To transition your Key Vault from legacy access policies to RBAC, follow these steps: Prepare: Confirm you have the necessary administrative permissions and gather an inventory of applications and users accessing the vault. Conduct inventory: Document all current access policies, including the specific permissions granted to each identity. Assign RBAC Roles: Map each identity to an appropriate RBAC role (e.g., Reader, Contributor, Administrator) based on the principle of least privilege. Enable RBAC: Switch the Key Vault to the RBAC authorization model. Validate: Test all application and user access paths to ensure nothing is inadvertently broken. Monitor: Implement monitoring and alerting to detect and respond to access issues or misconfigurations. For detailed, step-by-step instructions—including examples in CLI and PowerShell—see Migrate from access policies to RBAC. Conclusion Now is the time to modernize access control strategies. Adopting Role-Based Access Control (RBAC) not only eliminates configuration drift and overly broad permissions but also enhances operational efficiency and strengthens your defense against evolving threat landscapes. Transitioning to RBAC is a proactive step toward building a resilient and future-ready security framework for your Azure environment. Overexposed Azure Key Vaults aren’t just isolated risks — they act as breach multipliers. Treat them as Tier-0 assets, on par with domain controllers and enterprise credential stores. Protecting them requires the same level of rigor and strategic prioritization. By enforcing network segmentation, applying least-privilege access through RBAC, and integrating continuous monitoring, organizations can dramatically reduce the blast radius of a potential compromise and ensure stronger containment in the face of advanced threats. Want to learn more? Explore Microsoft's RBAC Documentation for additional details.