cli
12 TopicsCopilot Managed Runtime is now generally available, with additional new preview features
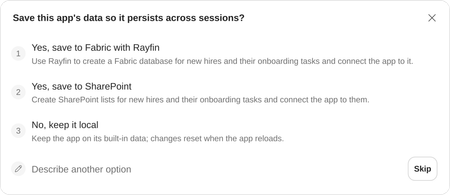
AI is making it easier to turn ideas into working apps in Copilot Cowork, Copilot Code, Copilot Studio and the dev tools you already use. Running those apps for work still requires security, governance and ongoing operations. In September we introduced Microsoft Copilot Managed Runtime in public preview to bring those requirements together. Today at Microsoft Ignite, we’re announcing that Microsoft Copilot Managed Runtime is generally available and beginning to roll out to tenants. Copilot Managed Runtime brings Microsoft-operated hosting together with identity, governed data access, and app lifecycle management, giving teams the foundation for turning the apps they create into managed apps they can use for enterprise work and IT can trust. Build in the tools that fit your team Makers can start in Copilot Code, Copilot Cowork, Copilot Studio, GitHub Copilot, VS Code or third-party development platforms and tools. Copilot Managed Runtime provides Microsoft-managed hosting and execution for published apps across these paths. That gives teams room to choose how they build, and open collaboration opportunities across products all while bringing their published apps onto a common operating foundation. “AI agents can now build many of the web apps enterprise teams need, and many organizations want those apps to run in their own environment. With Copilot Managed Runtime, apps built with Manus will run in an organization’s own Microsoft environment and automatically inherit existing security and compliance policies, giving teams the capability and speed of an AI agent with enterprise-grade control.” Tao Zhang, Co-founder and Chief Product Officer at Manus Microsoft operates the platform, hosting, scaling and availability are handled for you, with no cloud services to configure, so teams can focus on the app and the work it needs to do. Entra sign-in and sharing make it easier to put that app in colleagues’ hands. Governed connections give the app access to the organizational data and services it needs within the boundaries set by IT. The governance controls exist in the platform to allow IT to federate and scale development and operations, all guided by IT. Regardless of the entry point, Copilot or third-party tools, the code stays editable and Git-backed. This allows makers to keep iterating on the app, while the published app stays live, then promote changes when they're ready. Organizations using GitHub Enterprise can connect their own repositories, so apps follow the same branching, review and release practices as the rest of their software. Give IT one place to see and govern every app For apps on Copilot Managed Runtime, Entra identity, sharing and access sit alongside policy enforcement and audit logging. Organizational policies govern connector, data and endpoint access. These capabilities bring the operating requirements of an app into its managed foundation, so makers and IT can work from the same boundaries. App inventory and monitoring in Microsoft 365 admin center give administrators a central view of the apps teams have published. That visibility helps IT oversee apps created through different tools without organizing its inventory around each authoring experience. Makers retain flexibility in how they create, and administrators have a common place to see and manage those apps. Give apps a place for their own business records Moving onto our preview features, some apps also need to keep data of their own, such as the owners, dates and status updates behind a team’s launch tracker. A new frontier public preview of Microsoft Fabric integration adds an out-of-the-box option for persistent app storage and backend capabilities for those business records; this is in addition to existing connectivity with SharePoint and Dataverse. Teams can choose this data layer when an app needs it, alongside the hosting and execution provided by Copilot Managed Runtime. Now supporting agents and additional artifacts Create Copilot Studio agents and workflows locally Now in public preview, Copilot Managed Runtime dev tooling will allow users to build custom Copilot Studio agents and workflows locally, make modifications with their developer tool of choice and then publish to Copilot Studio using the CLI. This enables makers and developers using Copilot Studio to easily work with other members of their team, some who may be using the browser based UX or those working locally on their machine. Developers can continue using their developer tools and pushing changes directly from their machine, working together on a single source of truth integrated into their existing version control platforms such as GitHub. For organizations like Qualcomm, this approach brings together familiar developer workflows with new ways to build and manage agents: "What excites us about the CLI is bringing code-first development to Copilot Studio. For Qualcomm users and engineers, the combination of the CLI and coding agents offers a fast and natural way to build and test agents, while also supporting more mature ALM practices and complementing the Copilot Studio UI experience. Together, these approaches give teams the flexibility to build and manage agents in the way that works best for them” - Paulo Joaquim, IT Architect, Principal, Qualcomm Incorporated Get started with the CLI here: https://aka.ms/msagent-cli Create custom agents in code For makers and developers who want to author an agent directly in code, we’re introducing Code Agents in early-access preview (this will require signing up and being accepted). Coming soon, these custom agents are created and hosted on Copilot Managed Runtime, with a choice of model, orchestrator or harness within the preview’s supported scope. This lets teams reuse the AI stack, developer tools and workflows they already have, while Microsoft provides hosting, Microsoft Entra identity, channels, monitoring and lifecycle management. Customers and partners can sign up at aka.ms/cmrcodeagents-signup. From idea to the show floor Consider an event team creating a show-floor operations app in Copilot Cowork. In this illustrative scenario, an interactive 3D map shows booth readiness and open help requests. The team reviews and publishes the app for colleagues with Microsoft Entra identity access, governed connections, IT control and hosting all through Copilot Managed Runtime. The team chooses to use the new Fabric integration to store the app's records. A developer could clone the code locally with Git and improve it using their preferred tools while colleagues continue using the published app. For an agent project, the developer could edit Copilot Studio agent definitions locally, keep changes in source control and push the updated project back to Copilot Studio, keeping the agent and associated workflows together. These paths support collaboration across Copilot Code, Copilot Cowork, Copilot Studio and third-party tools as teams create, publish and maintain solutions. Start with the artifact your team needs today Start with a business process your team wants to improve. Consider who will use the artifact, what information it needs, and how your team will maintain it. Choose the authoring experience that fits the work, then use Copilot Managed Runtime to bring the result to your colleagues, with a foundation for building more connected solutions over time. Already have an app created and want to use it with your enterprise business? Then use Copilot Managed Runtime and check out the Copilot Managed Runtime CLI to get started: https://aka.ms/cmrrepo General availability makes Copilot Managed Runtime a foundation for the apps teams put to work. The new previews expand the options for local agent development and custom app data. Together, these steps give makers more ways to create useful tools, collaborate more than ever, all while keeping app and agent operations secured and governed for your enterprise.594Views0likes0Comments
Azure CLI to create the budget Alert
Hello All, I am new to Azure CLI and trying to create the Budget alert. While using below commands i am keep getting the error. Please assist me to fix the issue. Syntax- az consumption budget create --budget-name "MonthlyAlert" --amount 10.0 --time-grain "Monthly" --start-date "2026-11-01" --end-date "2027-11-01" --resource-group "LearnRG" --category "cost" I also tried az consumption budget create --budget-name MonthlyAlert --amount 10.0 --time-grain Monthly -s 2026-11-01 -e 2027-11-01 --resource-group LearnRG --category cost Command group 'consumption' is in preview and under development. Reference and support levels: https://aka.ms/CLI_refstatus (400) Invalid budget configuration, please use filter interface with 2019-05-01-preview version (Request ID: 8726e67e-4c5b-4830-8318-0da1c5a688fb) Code: 400 Message: Invalid budget configuration, please use filter interface with 2019-05-01-preview version (Request ID: 8726e67e-4c5b-4830-8318-0da1c5a688fb)115Views0likes2CommentsFrom Zero to 16 Games in 2 Hours
From Zero to 16 Games in 2 Hours: Teaching Prompt Engineering to Students with GitHub Copilot CLI Introduction What happens when you give a room full of 14-year-olds access to AI-powered development tools and challenge them to build games? You might expect chaos, confusion, or at best, a few half-working prototypes. Instead, we witnessed something remarkable: 16 fully functional HTML5 games created in under two hours, all from students with varying programming experience. This wasn't magic, it was the power of GitHub Copilot CLI combined with effective prompt engineering. By teaching students to communicate clearly with AI, we transformed a traditional coding workshop into a rapid prototyping session that exceeded everyone's expectations. The secret weapon? A technique called "one-shot prompting" that enables anyone to generate complete, working applications from a single, well-crafted prompt. In this article, we'll explore how we structured this workshop using CopilotCLI-OneShotPromptGameDev, a methodology designed to teach prompt engineering fundamentals while producing tangible, exciting results. Whether you're an educator planning STEM workshops, a developer exploring AI-assisted coding, or simply curious about how young people can leverage AI tools effectively, this guide provides a practical blueprint you can replicate. What is GitHub Copilot CLI? GitHub Copilot CLI extends the familiar Copilot experience beyond your code editor into the command line. While Copilot in VS Code suggests code completions as you type, Copilot CLI allows you to have conversational interactions with AI directly in your terminal. You describe what you want to accomplish in natural language, and the AI responds with shell commands, explanations, or in our case, complete code files. This terminal-based approach offers several advantages for learning and rapid prototyping. Students don't need to configure complex IDE settings or navigate unfamiliar interfaces. They simply type their request, review the AI's output, and iterate. The command line provides a transparent view of exactly what's happening, no hidden abstractions or magical "autocomplete" that obscures the learning process. For our workshop, Copilot CLI served as a bridge between students' creative ideas and working code. They could describe a game concept in plain English, watch the AI generate HTML, CSS, and JavaScript, then immediately test the result in a browser. This rapid feedback loop kept engagement high and made the connection between language and code tangible. Installing GitHub Copilot CLI Setting up Copilot CLI requires a few straightforward steps. Before the workshop, we ensured all machines were pre-configured, but students also learned the installation process as part of understanding how developer tools work. First, you'll need Node.js installed on your system. Copilot CLI runs as a Node package, so this is a prerequisite: # Check if Node.js is installed node --version # If not installed, download from https://nodejs.org/ # Or use a package manager: # Windows (winget) winget install OpenJS.NodeJS.LTS # macOS (Homebrew) brew install node # Linux (apt) sudo apt install nodejs npm These commands verify your Node.js installation or guide you through installing it using your operating system's preferred package manager. Next, install the GitHub CLI, which provides the foundation for Copilot CLI: # Windows winget install GitHub.cli # macOS brew install gh # Linux sudo apt install gh This installs the GitHub command-line interface, which handles authentication and provides the framework for Copilot integration. With GitHub CLI installed, authenticate with your GitHub account: gh auth login This command initiates an interactive authentication flow that connects your terminal to your GitHub account, enabling access to Copilot features. Finally, install the Copilot CLI extension: gh extension install github/gh-copilot This adds Copilot capabilities to your GitHub CLI installation, enabling the conversational AI features we'll use for game development. Verify the installation by running: gh copilot --help If you see the help output with available commands, you're ready to start prompting. The entire setup takes about 5-10 minutes on a fresh machine, making it practical for classroom environments. Understanding One-Shot Prompting Traditional programming education follows an incremental approach: learn syntax, understand concepts, build small programs, gradually tackle larger projects. This method is thorough but slow. One-shot prompting inverts this model—you start with the complete vision and let AI handle the implementation details. A one-shot prompt provides the AI with all the context it needs to generate a complete, working solution in a single response. Instead of iteratively refining code through multiple exchanges, you craft one comprehensive prompt that specifies requirements, constraints, styling preferences, and technical specifications. The AI then produces complete, functional code. This approach teaches a crucial skill: clear communication of technical requirements. Students must think through their entire game concept before typing. What does the game look like? How does the player interact with it? What happens when they win or lose? By forcing this upfront thinking, one-shot prompting develops the same analytical skills that professional developers use when writing specifications or planning architectures. The technique also demonstrates a powerful principle: with sufficient context, AI can handle implementation complexity while humans focus on creativity and design. Students learned they could create sophisticated games without memorizing JavaScript syntax—they just needed to describe their vision clearly enough for the AI to understand. Crafting Effective Prompts for Game Development The difference between a vague prompt and an effective one-shot prompt is the difference between frustration and success. We taught students a structured approach to prompt construction that consistently produced working games. Start with the game type and core mechanic. Don't just say "make a game"—specify what kind: Create a complete HTML5 game where the player controls a spaceship that must dodge falling asteroids. This opening establishes the fundamental gameplay loop: control a spaceship, avoid obstacles. The AI now has a clear mental model to work from. Add visual and interaction details. Games are visual experiences, so specify how things should look and respond: Create a complete HTML5 game where the player controls a spaceship that must dodge falling asteroids. The spaceship should be a blue triangle at the bottom of the screen, controlled by left and right arrow keys. Asteroids are brown circles that fall from the top at random positions and increasing speeds. These additions provide concrete visual targets and define the input mechanism. The AI can now generate specific CSS colors and event handlers. Define win/lose conditions and scoring: Create a complete HTML5 game where the player controls a spaceship that must dodge falling asteroids. The spaceship should be a blue triangle at the bottom of the screen, controlled by left and right arrow keys. Asteroids are brown circles that fall from the top at random positions and increasing speeds. Display a score that increases every second the player survives. The game ends when an asteroid hits the spaceship, showing a "Game Over" screen with the final score and a "Play Again" button. This complete prompt now specifies the entire game loop: gameplay, scoring, losing, and restarting. The AI has everything needed to generate a fully playable game. The formula students learned: Game Type + Visual Description + Controls + Rules + Win/Lose + Score = Complete Game Prompt. Running the Workshop: Structure and Approach Our two-hour workshop followed a carefully designed structure that balanced instruction with hands-on creation. We partnered with University College London and students access to GitHub Education to access resources specifically designed for classroom settings, including student accounts with Copilot access and amazing tools like VSCode and Azure for Students and for Schools VSCode Education. The first 20 minutes covered fundamentals: what is AI, how does Copilot work, and why does prompt quality matter? We demonstrated this with a live example, showing how "make a game" produces confused output while a detailed prompt generates playable code. This contrast immediately captured students' attention, they could see the direct relationship between their words and the AI's output. The next 15 minutes focused on the prompt formula. We broke down several example prompts, highlighting each component: game type, visuals, controls, rules, scoring. Students practiced identifying these elements in prompts before writing their own. This analysis phase prepared them to construct effective prompts independently. The remaining 85 minutes were dedicated to creation. Students worked individually or in pairs, brainstorming game concepts, writing prompts, generating code, testing in browsers, and iterating. Instructors circulated to help debug prompts (not code an important distinction) and encourage experimentation. We deliberately avoided teaching JavaScript syntax. When students encountered bugs, we guided them to refine their prompts rather than manually fix code. This maintained focus on the core skill: communicating with AI effectively. Surprisingly, this approach resulted in fewer bugs overall because students learned to be more precise in their initial descriptions. Student Projects: The Games They Created The diversity of games produced in 85 minutes of building time amazed everyone present. Students didn't just follow a template, they invented entirely new concepts and successfully communicated them to Copilot CLI. One student created a "Fruit Ninja" clone where players clicked falling fruit to slice it before it hit the ground. Another built a typing speed game that challenged players to correctly type increasingly difficult words against a countdown timer. A pair of collaborators produced a two-player tank battle where each player controlled their tank with different keyboard keys. Several students explored educational games: a math challenge where players solve equations to destroy incoming meteors, a geography quiz with animated maps, and a vocabulary builder where correct definitions unlock new levels. These projects demonstrated that one-shot prompting isn't limited to entertainment, students naturally gravitated toward useful applications. The most complex project was a procedurally generated maze game with fog-of-war mechanics. The student spent extra time on their prompt, specifying exactly how visibility should work around the player character. Their detailed approach paid off with a surprisingly sophisticated result that would typically require hours of manual coding. By the session's end, we had 16 complete, playable HTML5 games. Every student who participated produced something they could share with friends and family a tangible achievement that transformed an abstract "coding workshop" into a genuine creative accomplishment. Key Benefits of Copilot CLI for Rapid Prototyping Our workshop revealed several advantages that make Copilot CLI particularly valuable for rapid prototyping scenarios, whether in educational settings or professional development. Speed of iteration fundamentally changes what's possible. Traditional game development requires hours to produce even simple prototypes. With Copilot CLI, students went from concept to playable game in minutes. This compressed timeline enables experimentation, if your first idea doesn't work, try another. This psychological freedom to fail fast and try again proved more valuable than any technical instruction. Accessibility removes barriers to entry. Students with no prior coding experience produced results comparable to those who had taken programming classes. The playing field leveled because success depended on creativity and communication rather than memorized syntax. This democratization of development opens doors for students who might otherwise feel excluded from technical fields. Focus on design over implementation teaches transferable skills. Whether students eventually become programmers, designers, product managers, or pursue entirely different careers, the ability to clearly specify requirements and think through complete systems applies universally. They learned to think like system designers, not just coders. The feedback loop keeps engagement high. Seeing your words transform into working software within seconds creates an addictive cycle of creation and testing. Students who typically struggle with attention during lectures remained focused throughout the building session. The immediate gratification of seeing their games work motivated continuous refinement. Debugging through prompts teaches root cause analysis. When games didn't work as expected, students had to analyze what they'd asked for versus what they received. This comparison exercise developed critical thinking about specifications a skill that serves developers throughout their careers. Tips for Educators: Running Your Own Workshop If you're planning to replicate this workshop, several lessons from our experience will help ensure success. Pre-configure machines whenever possible. While installation is straightforward, classroom time is precious. Having Copilot CLI ready on all devices lets you dive into content immediately. If pre-configuration isn't possible, allocate the first 15-20 minutes specifically for setup and troubleshoot as a group. Prepare example prompts across difficulty levels. Some students will grasp one-shot prompting immediately; others will need more scaffolding. Having templates ranging from simple ("Create Pong") to complex (the spaceship example above) lets you meet students where they are. Emphasize that "prompt debugging" is the goal. When students ask for help fixing broken code, redirect them to examine their prompt. What did they ask for? What did they get? Where's the gap? This redirection reinforces the workshop's core learning objective and builds self-sufficiency. Celebrate and share widely. Build in time at the end for students to demonstrate their games. This showcase moment validates their work and often inspires classmates to try new approaches in future sessions. Consider creating a shared folder or simple website where all games can be accessed after the workshop. Access GitHub Education resources at education.github.com before your workshop. The GitHub Education program provides free access to developer tools for students and educators, including Copilot. The resources there include curriculum materials, teaching guides, and community support that can enhance your workshop. Beyond Games: Where This Leads The techniques students learned extend far beyond game development. One-shot prompting with Copilot CLI works for any development task: creating web pages, building utilities, generating data processing scripts, or prototyping application interfaces. The fundamental skill, communicating requirements clearly to AI applies wherever AI-assisted development tools are used. Several students have continued exploring after the workshop. Some discovered they enjoy the creative aspects of game design and are learning traditional programming to gain more control. Others found that prompt engineering itself interests them, they're exploring how different phrasings affect AI outputs across various domains. For professional developers, the workshop's lessons apply directly to working with Copilot, ChatGPT, and other AI coding assistants. The ability to craft precise, complete prompts determines whether these tools save time or create confusion. Investing in prompt engineering skills yields returns across every AI-assisted workflow. Key Takeaways Clear prompts produce working code: The one-shot prompting formula (Game Type + Visuals + Controls + Rules + Win/Lose + Score) reliably generates playable games from single prompts Copilot CLI democratizes development: Students with no coding experience created functional applications by focusing on communication rather than syntax Rapid iteration enables experimentation: Minutes-per-prototype timelines encourage creative risk-taking and learning from failures Prompt debugging builds analytical skills: Comparing intended versus actual results teaches specification writing and root cause analysis Sixteen games in two hours is achievable: With proper structure and preparation, young students can produce impressive results using AI-assisted development Conclusion and Next Steps Our workshop demonstrated that AI-assisted development tools like GitHub Copilot CLI aren't just productivity boosters for experienced programmers, they're powerful educational instruments that make software creation accessible to beginners. By focusing on prompt engineering rather than traditional syntax instruction, we enabled 14-year-old students to produce complete, functional games in a fraction of the time traditional methods would require. The sixteen games created during those two hours represent more than just workshop outputs. They represent a shift in how we might teach technical creativity: start with vision, communicate clearly, iterate quickly. Whether students pursue programming careers or not, they've gained experience in thinking systematically about requirements and translating ideas into specifications that produce real results. To explore this approach yourself, visit the CopilotCLI-OneShotPromptGameDev repository for prompt templates, workshop materials, and example games. For educational resources and student access to GitHub tools including Copilot, explore GitHub Education. And most importantly, start experimenting. Write a prompt, generate some code, and see what you can create in the next few minutes. Resources CopilotCLI-OneShotPromptGameDev Repository - Workshop materials, prompt templates, and example games GitHub Education - Free developer tools and resources for students and educators GitHub Copilot CLI Documentation - Official installation and usage guide GitHub CLI - Foundation tool required for Copilot CLI GitHub Copilot - Overview of Copilot features and pricing1KViews2likes3CommentsAzure CLI create VM and assign it a password AND a ssh key for login?
How do I create a VM using Azure CLI and assign it a password AND a ssh key for login? Here is the command I want to use but it just creates the ssh key and ignores creating the password. az vm create --resource-group VMResourceGroup --name ubuntuVM --image Canonical:0001-com-ubuntu-server-impish:21_10-gen2:21.10.202202010 --size Standard_B1s --os-disk-size-gb 64 --public-ip-sku Basic --admin-username xman --admin-password 'mypassword*1' Thanks Regards DanielSolved7.8KViews0likes4CommentsMastering the Command Line: A Beginner's Guide to Bash for Students
Bash is considered a universal language when it comes to cloud computing and programming. Many languages support Bash commands to pass data and information and when it comes to the Cloud, all platforms support using it to interact with your environment. Even though we won't cover everything there is to know about this language in the course, we want to make sure we give you the foundation on scripting in Bash. At the end of the course, you'll be able to create your own scripts and automate tasks with the help of Bash.9.7KViews2likes1CommentCreate Your Azure Infrastructure with Cloud Development Kit for Terraform - LIVE SESSION 15th Sept
This series will teach you how to use Cloud Development Kit for Terraform (CDK-TF) and Microsoft Azure serverless services. First, you will learn how to build everything as code, and we will teach you how to solve several real-world problems with just Azure Functions and short-lived Azure container instance. All projects covered in the series are opensource.6.2KViews1like0CommentsAzure Developer Command Line Interface open-source tool to accelerate the time it takes to deploy
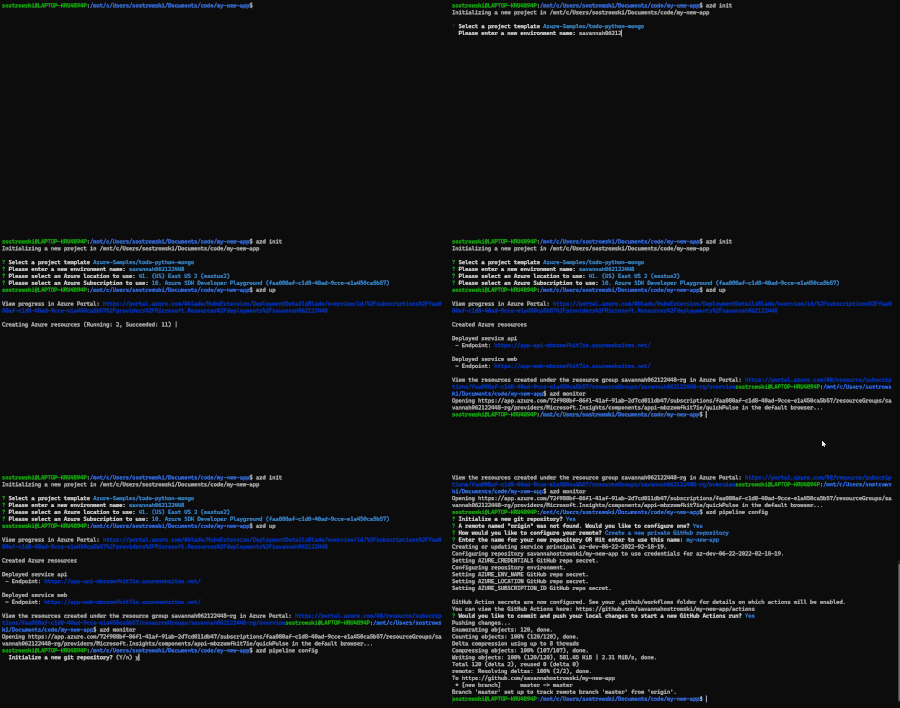
Azure Developer CLI ( azd) a open-source tool that accelerates the time it takes to get started on Azure. The Azure Developer CLI provides developer-friendly commands that map to key stages in your workflow: code, build, deploy, monitor, repeat. To create, provision, and deploy a new application in one step, it’s as easy as: azd up --template todo-nodejs-mongo3.6KViews1like0Comments
Login to Azure in GitHub Actions
If you need to use GitHub Actions and interact with Azure resources, you'll need to authenticate properly. Authenticating is made easy by direct Action support in a workflow, but it requires a Service Principal created in a specific way that produces output that is required to go into a GitHub Secret.2.6KViews1like0Comments