azure deployment environments
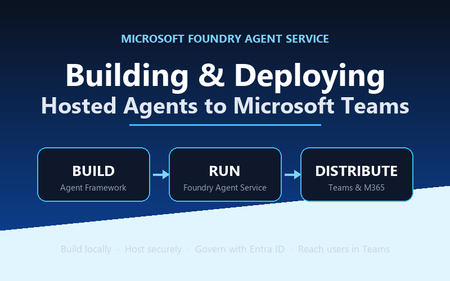
25 TopicsBuilding and Deploying Microsoft Hosted Agents to Microsoft Teams
A practical, engineer-to-engineer guide to taking an AI agent from a developer laptop, into Microsoft Foundry Agent Service, and out to end users inside Microsoft Teams and Microsoft 365 — using the BRK241 FibreOps reference implementation as a worked example. Introduction: the hard part is no longer building the agent Two years ago, wiring an LLM to a couple of tools felt like the summit. It isn't any more. Frameworks, hosted models, and function-calling have made the build step almost routine. The problem has quietly moved downstream. The genuinely hard questions today are operational: Where does the agent run when it's no longer on your machine? What identity does it use to call enterprise systems, and who granted it? How does a platform team scale, monitor, and roll it back? How do business users actually reach it without learning a new tool? Who signed off on it touching production data? A prototype answers none of these. A production agent platform answers all of them, repeatably, for every agent an organisation ships. That shift — from a clever notebook to a governed, observable service that lands in the tools people already use — is the subject of this article. We'll use a single narrative to keep it concrete: FibreOps, the BRK241 "Autonomous Fibre Outage Response" system. It ingests optical line terminal (OLT) telemetry, analyses incidents, files tickets in Dynamics 365 Field Service, posts Adaptive Cards to Microsoft Teams, and dispatches engineers — all through role-specialised agents. The full source is on GitHub. The story runs on three verbs: Build → Run → Distribute. Section 1: Building the agent An agent is not one mega-prompt. FibreOps is deliberately factored into three role-specialised agents behind a single orchestrator, each with its own tool surface, its own system instructions, and a strict output contract: IncidentAnalysisAgent — classifies severity, finds probable cause, and pulls the correct standard operating procedure (SOP). NetOpsCoordinatorAgent — files the D365 incident and posts the Teams outage notice. FieldDispatchAgent — selects the best engineer by skill, region and shift, books the resource, and updates Teams. The Coordinator hands off to Dispatch with a literal HANDOFF:DISPATCH token rather than a fuzzy "I think we should…". Hard contracts between agents are how you stop them inventing work. Microsoft Agent Framework The agents are built with the Microsoft Agent Framework (MAF). The key design decision in the reference implementation is that all three backends honour one contract — await agent.run(prompt) -> response — so the orchestrator never knows or cares where reasoning actually happens: local — a deterministic LocalAgent shim with no LLM, so the demo runs with zero Azure credentials. foundry — agent_framework.Agent + FoundryChatClient , definition resolved locally. Ideal while iterating on prompts. hosted — agent_framework_foundry.FoundryAgent bound to a Prompt Agent published to Foundry Agent Service. This is the production path. Building a Foundry-backed agent is just a client plus instructions plus typed tools: from agent_framework import Agent from agent_framework_foundry import FoundryChatClient from azure.identity import DefaultAzureCredential client = FoundryChatClient( project_endpoint=settings.azure_ai_project_endpoint, model=settings.azure_ai_model_deployment, # e.g. gpt-4.1-mini credential=DefaultAzureCredential(), # no connection strings, ever ) agent = Agent( client=client, instructions=INCIDENT_ANALYSIS_INSTRUCTIONS_V1, name="IncidentAnalysisAgent", tools=[lookup_sop, recall, remember, web_iq_search, work_iq_search], ) Note the DefaultAzureCredential . There are no keys or connection strings anywhere in the reasoning path — identity flows from Microsoft Entra ID. Keep that in mind; it becomes the backbone of the governance story later. Tool calling and MCP Every tool is a typed Python function. Foundry sees the JSON schema derived from the signature; the runtime executes the Python. That separation matters: the published agent definition stores only the model and instructions, while the implementations are supplied by the runtime on every call. The same in-process tools (Teams, D365, dispatch, knowledge, memory) run identically whether the agent is local or hosted. Beyond your own functions, Foundry agents can draw on hosted toolbox tools ( web_search , code_interpreter ) and Model Context Protocol (MCP) servers. MCP is the open standard for exposing tools, resources and prompts to agents over a uniform protocol, so an enterprise can stand up an MCP server once and let every agent consume it. In FibreOps this is config-gated — set FIBREOPS_FOUNDRY_TOOLBOX=1 and the incident analyst gains live web search alongside its Web IQ / Work IQ connectors, with no code change. Grounding strategies FibreOps grounds reasoning three ways, in layers: Retrieval over owned knowledge — SOPs (markdown) and the fibre-node topology graph, looked up by the analysis agent. Foundry IQ — Web IQ for public context (roadworks, weather, power) and Work IQ for enterprise context (site surveys, SLA tiers, competency matrix). Procedural memory — prior incidents for a node, recalled before analysis so the agent learns from history. Crucially, when the IQ endpoints are unset the tools fall back to deterministic fixtures so the agent always grounds. Grounding that silently fails is worse than no grounding; design your fallbacks explicitly. Local development, testing and evaluation The whole system runs from one command with no cloud dependency: # Deterministic local backend — no Azure credentials required python -m fibreops.demo --signals 3 --backend local Every run is persisted as a JSON document — the input signal, every agent step, every tool call, every output, every ticket. That single artefact shape feeds three consumers: structured logs, the local optimiser, and Foundry Evaluators. The optimiser scores each run against a five-criterion rubric (was the analysis complete, was severity consistent with customer impact, did a ticket land, did dispatch policy match severity, was an SOP cited) and writes back concrete improvement suggestions. That evaluation loop — not the first working demo — is what turns a prototype into a system you can keep improving. Section 2: Deploying to Microsoft Foundry Agent Service Microsoft Foundry Agent Service is the managed runtime that hosts your agents. It gives you a secure, isolated execution environment, an agent runtime that speaks the OpenAI-compatible Responses API, plus hosted memory, toolboxes, knowledge integrations, and observability — without you operating any of it. FibreOps demonstrates the two hosting shapes Foundry offers. Shape 1 — Prompt Agents A Prompt Agent stores a model deployment plus system instructions as an immutable, versioned definition in Foundry. Publishing is a one-time step per change: from azure.ai.projects import AIProjectClient from azure.ai.projects.models import PromptAgentDefinition from azure.identity import DefaultAzureCredential pc = AIProjectClient(endpoint=endpoint, credential=DefaultAzureCredential(), allow_preview=True) pc.agents.create_version( agent_name="fibreops-incident-analysis", definition=PromptAgentDefinition( model=model_deployment, instructions=INCIDENT_ANALYSIS_INSTRUCTIONS_V1, ), description="FibreOps incident analysis agent", ) At run time you bind to the published version with a FoundryAgent , and — as noted above — the runtime supplies the tool implementations. Prompt versioning ( instructions_v1 , _v2 , _v3 ) is where the optimiser's suggestions land, closing the improvement loop inside the platform. Shape 2 — Containerised hosted agents The BRK241 hero path packages the entire analyse → coordinate → dispatch flow as a single hosted agent: a container that serves the Responses /responses contract on port 8088, deployed straight into your Foundry project. The Agent Framework agent is wrapped by ResponsesHostServer : from agent_framework_foundry_hosting import ResponsesHostServer def main() -> None: server = ResponsesHostServer(build_system_agent()) # Foundry sets the reserved PORT env var inside the sandbox server.run(host="0.0.0.0", port=8088) The container is declared in agent.yaml — kind: hosted , the image reference, the per-session sandbox size (0.5/1 Gi, 1/2 Gi or 2/4 Gi), the protocol version, and only user-declared environment variables. You never hard-code FOUNDRY_* values or the Application Insights connection string; the platform injects those at run time. Deployment registers the image as an immutable version and polls until active : details = pc.agents.create_version( agent_name="fibreops-outage-response", definition=HostedAgentDefinition( protocol_versions=[ProtocolVersionRecord( protocol=AgentProtocol.RESPONSES, version="1.0.0")], cpu="1", memory="2Gi", container_configuration=ContainerConfiguration(image=image), environment_variables={"MODEL_DEPLOYMENT_NAME": model_deployment}, ), ) From local execution to managed hosting The migration path is deliberately gentle because the contract never changes. A developer iterates locally against LocalAgent , moves to the foundry backend to test real prompts, then publish es Prompt Agents or builds and deploy-hosted s the container. The orchestrator code is byte-for-byte identical across all three. That property — same code path local for dev, hosted in Foundry for prod — is the single most important thing to preserve when designing your own agents. Scaling, memory, toolboxes, knowledge and observability Scaling — Foundry provisions a per-session sandbox and a dedicated Entra agent identity per hosted-agent version; you size the sandbox in agent.yaml and let the platform handle isolation. Memory — set FOUNDRY_MEMORY_STORE_NAME and a FoundryMemoryProvider is attached as a context provider so agents read and write learned procedures in Foundry's hosted store; unset, they use local SQLite. No code change. Toolboxes & knowledge — hosted web_search , code interpreter, MCP, and Web/Work IQ connectors are curated per role and merged with your Python tools. Observability — the agent emits OpenTelemetry spans; set APPLICATIONINSIGHTS_CONNECTION_STRING (injected by the platform for hosted agents) and every agent decision, tool call and latency is queryable in Application Insights. Section 3: IT and development responsibilities Successful agent deployments need both developer velocity and platform governance. The failure mode at either extreme is familiar: developers who can't ship because every request routes through a ticket queue, or a free-for-all where nobody can say what identity an agent runs as. The workable model draws a clean line of responsibility. Concern Developer / Agent team IT / Platform team Identity Use DefaultAzureCredential ; never embed secrets; declare the scopes the agent needs Provision the managed / Entra agent identity; own the app registration and consent Access control Request least-privilege roles for the tools the agent calls Grant RBAC at the correct scope; run role-assignment scripts; enforce approvals Security Validate inputs, handle tool failures cleanly, avoid data exfiltration in prompts Disable ACR admin, enforce managed-identity pulls, network controls, Key Vault for secrets Compliance Keep decisions explainable and replayable (the JSON run record) Data-residency, retention, audit, Responsible AI review sign-off Monitoring Emit structured traces + OTel spans; define the rubric Own Application Insights / Log Analytics, alerting, dashboards, SLOs Cost Right-size the sandbox and model deployment; cache grounding Budgets, quota, token-consumption monitoring, chargeback Lifecycle Version prompts and images; feed the optimiser back into new versions Environment promotion (dev → test → prod), rollback, deprecation The reference implementation encodes this split honestly. The Bicep template does not create role assignments, because most deployers only hold Contributor . Instead a subscription Owner runs scripts/grant-mi-roles.ps1 once to grant the App Service's identity exactly the roles it needs — Event Hubs Data Owner, Key Vault Secrets User, AcrPull, Azure AI Developer, and Cognitive Services OpenAI User — and no more. That is least privilege made operational. Section 4: Publishing to Microsoft Teams and Microsoft 365 An agent nobody can reach has no value. The final verb — Distribute — puts the agent where users already work. FibreOps reaches Teams two ways. The lightweight path: Adaptive Cards via Incoming Webhook The NetOps coordinator posts outage notices and status updates to a Teams channel as Adaptive Cards through an Incoming Webhook. Any unconfigured channel is logged to state/teams_outbox.jsonl , so the same code runs in a demo and in production — you only change the webhook target. This is the fastest way to get agent output into Teams and is ideal for notifications and human-in-the-loop review. The rich path: a declarative agent for Microsoft 365 Copilot To make the agent conversational and discoverable across Teams, Microsoft 365 Copilot and copilot.microsoft.com, FibreOps ships as a declarative agent plus an API plugin action. One command builds the sideload-ready package: python -m fibreops.demo publish-m365 --out dist/m365 # wrote declarativeAgent.json (name, description, conversation starters) # wrote fibreops-action.json (API plugin -> {base_url}/openapi.json) # wrote manifest.json (Teams app manifest) # wrote color.png / outline.png (icons) # wrote fibreops-copilot.zip (upload this) The declarative agent declares metadata, conversation starters and a capability set; the action plugin proxies tool calls to the deployed FastAPI app via its OpenAPI document. Set M365_ACTION_BASE_URL to the app's public HTTPS root before publishing — the CLI warns when the placeholder is still in effect. That single environment variable is the only thing that flips the package from demo to production. The end-to-end distribution workflow Conceptually, the artefact travels a fixed pipeline: Developer laptop │ build + test (local backend) → publish Prompt Agent / deploy hosted container ▼ Microsoft Foundry Agent Service │ hosted agent, secure sandbox, Entra agent identity, observability ▼ Teams App package (fibreops-copilot.zip) │ Teams Admin Center → Manage apps → Upload (or M365 Admin Center → Integrated apps) ▼ Microsoft 365 tenant │ admin approval, availability policy, targeted rollout ▼ End user in Teams / M365 Copilot Enterprise rollout is rarely "publish to everyone". The realistic pattern is a staged one: sideload to a pilot group, gather feedback and optimiser scores, then widen availability through Teams app-permission and app-setup policies to department, then tenant. Because the package carries publisher metadata and the declarative schema, IT can review it exactly like any other line-of-business app. Section 5: Enterprise governance Governance is not a bolt-on; in this architecture it's a property of the platform. The pillars: Entra ID integration and agent identity — every hosted agent version gets a dedicated Entra agent identity. Nothing authenticates with a shared key. DefaultAzureCredential means the same code picks up a developer's identity locally and the managed identity in production. RBAC at the right scope — roles are granted to identities, not baked into images. Deploying a hosted agent requires Azure AI Project Manager at project scope; the Foundry project identity needs AcrPull on the registry to pull the container. Least privilege is enforced, not assumed. Auditability — the JSON run record plus OpenTelemetry spans in Application Insights give you a replayable, per-incident audit trail. You can reconstruct exactly which SOP was cited, which engineer was chosen, and why severity was escalated. Data boundaries — the mock D365 is a drop-in for a real Dataverse environment; grounding sources are enterprise connectors (Work IQ) kept inside the tenant boundary. Nothing leaves the subscription without an explicit connector. Responsible AI — the Adaptive Card JSON can be pasted into the Adaptive Cards designer for governance review; the evaluation rubric makes quality measurable; explicit grounding fallbacks prevent silent failure. Production readiness — immutable versioning, one-command rollback (delete a version), managed-identity-only image pulls, and disabled ACR admin credentials are all first-class in the reference deployment. Section 6: Reference architecture The following diagram shows the production topology — users on the left, enterprise systems and controls on the right, with Foundry Agent Service at the centre hosting the agent. flowchart LR User["NOC operator / business user"] subgraph M365["Microsoft 365 tenant"] Teams["Microsoft Teams(Adaptive Cards + declarative agent)"] Copilot["Microsoft 365 Copilot"] end subgraph Foundry["Microsoft Foundry Agent Service"] Hosted["Hosted AgentOutage Response System(secure per-session sandbox)"] Runtime["Agent runtime(Responses API)"] Memory["Hosted memory + toolboxes"] end subgraph Enterprise["Enterprise data & tools"] MCP["MCP servers / web_search"] D365["Dynamics 365 Field Service"] EventHub["Azure Event Hubs(OLT telemetry)"] Knowledge["SOPs + topology + Web/Work IQ"] end subgraph Ops["Cross-cutting"] Obs["ObservabilityApp Insights / OTel"] Gov["GovernanceEntra ID · RBAC · audit"] end User --> Teams User --> Copilot Teams --> Runtime Copilot --> Runtime Runtime --> Hosted Hosted --> Memory Hosted --> MCP Hosted --> Knowledge Hosted --> D365 EventHub --> Hosted Hosted -.->|Adaptive Cards| Teams Hosted --> Obs Gov -.->|identity & policy| Foundry Gov -.->|identity & policy| Enterprise Read the solid arrows as the control/orchestration flow and the dashed arrows as governance and outbound notifications. The point of the diagram is that governance (Entra ID, RBAC, audit) applies across every component, and observability captures every agent decision — neither is optional plumbing. Section 7: What production looks like Picture the FibreOps rollout at a national fibre operator, with the four personas doing their part: Developers build the three agents and the orchestrator on their laptops against the local backend — no cloud, no credentials, deterministic tests. They tune prompts against the foundry backend, watch the optimiser rubric climb from 0.90 to 1.0 as they add the ">5,000 customers ⇒ escalate to critical" rule, and commit a new instruction version. The platform team deploys the container to Foundry Agent Service via scripts/deploy-hosted-agent.ps1 , which builds the image in ACR, pushes it, and registers an immutable version. They provision the Event Hub, Key Vault, Log Analytics and Application Insights from Bicep, and size the sandbox at 1 vCPU / 2 GiB. IT approves the workload: a subscription Owner grants the managed identity its five least-privilege roles, hardens the App Service to pull via managed identity, disables ACR admin, and signs off the Responsible AI review using the replayable run records and the Adaptive Card previews. They sideload fibreops-copilot.zip to a pilot channel first. Business users consume it inside Teams. When an OLT in London loses light, an Adaptive Card appears in the NOC channel within seconds — severity, probable cause, ticket ID, and the dispatched engineer's ETA — with no human having read a dashboard, opened a ticket, or phoned a dispatcher. If Foundry ever wobbles, the same system falls back to the deterministic local agent with an identical trace shape. Every integration but D365 is live in the demo, and D365 is a one-variable swap to a real Dataverse endpoint. That is the whole point: the demo and production differ by configuration, not by code. Key takeaways Design for one contract. If agent.run(prompt) behaves identically local, foundry-backed and hosted, migration to production is configuration, not a rewrite. Factor agents by role with hard handoff contracts. Literal tokens like HANDOFF:DISPATCH beat fuzzy natural-language handoffs and stop agents inventing work. Never embed secrets. DefaultAzureCredential + Entra agent identities give you keyless auth that works the same everywhere. Make every run replayable. A single JSON artefact that feeds logs, evaluation and audit is worth more than any dashboard. Ground explicitly, and design your fallbacks. Grounding that fails silently is a liability; deterministic fixtures keep the agent honest. Split responsibility cleanly. Developers own velocity and quality; the platform team owns identity, scale, cost and promotion. Encode the split in scripts, not tribal knowledge. Version prompts and images immutably. Rollback should be "delete a version", and the optimiser's suggestions should land as the next version. Distribute where users already are. Adaptive Cards for notifications, a declarative agent for conversation and discovery across Teams and M365 Copilot. Roll out in stages. Pilot channel → department → tenant, gated by app policies and real optimiser scores. Resources Reference implementation: github.com/leestott/BRK241-frontier Microsoft Agent Framework overview Microsoft Foundry Agent Service Hosted agents in Foundry Agent Service · Deploy a hosted agent Microsoft Teams developer platform Declarative agents for Microsoft 365 Copilot Model Context Protocol GitHub Copilot Clone the repo, run python -m fibreops.demo --signals 3 --backend local , and watch the analyse → coordinate → dispatch loop close. Then wire in your own Foundry project and take it all the way to Teams. Go build something.Mastering Query Fields in Azure AI Document Intelligence with C#
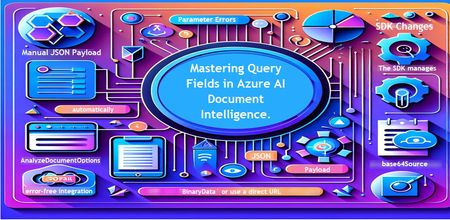
Introduction Azure AI Document Intelligence simplifies document data extraction, with features like query fields enabling targeted data retrieval. However, using these features with the C# SDK can be tricky. This guide highlights a real-world issue, provides a corrected implementation, and shares best practices for efficient usage. Use case scenario During the cause of Azure AI Document Intelligence software engineering code tasks or review, many developers encountered an error while trying to extract fields like "FullName," "CompanyName," and "JobTitle" using `AnalyzeDocumentAsync`: The error might be similar to Inner Error: The parameter urlSource or base64Source is required. This is a challenge referred to as parameter errors and SDK changes. Most problematic code are looks like below in C#: BinaryData data = BinaryData.FromBytes(Content); var queryFields = new List<string> { "FullName", "CompanyName", "JobTitle" }; var operation = await client.AnalyzeDocumentAsync( WaitUntil.Completed, modelId, data, "1-2", queryFields: queryFields, features: new List<DocumentAnalysisFeature> { DocumentAnalysisFeature.QueryFields } ); One of the reasons this failed was that the developer was using `Azure.AI.DocumentIntelligence v1.0.0`, where `base64Source` and `urlSource` must be handled internally. Because the older examples using `AnalyzeDocumentContent` no longer apply and leading to errors. Practical Solution Using AnalyzeDocumentOptions. Alternative Method using manual JSON Payload. Using AnalyzeDocumentOptions The correct method involves using AnalyzeDocumentOptions, which streamlines the request construction using the below steps: Prepare the document content: BinaryData data = BinaryData.FromBytes(Content); Create AnalyzeDocumentOptions: var analyzeOptions = new AnalyzeDocumentOptions(modelId, data) { Pages = "1-2", Features = { DocumentAnalysisFeature.QueryFields }, QueryFields = { "FullName", "CompanyName", "JobTitle" } }; - `modelId`: Your trained model’s ID. - `Pages`: Specify pages to analyze (e.g., "1-2"). - `Features`: Enable `QueryFields`. - `QueryFields`: Define which fields to extract. Run the analysis: Operation<AnalyzeResult> operation = await client.AnalyzeDocumentAsync( WaitUntil.Completed, analyzeOptions ); AnalyzeResult result = operation.Value; The reason this works: The SDK manages `base64Source` automatically. This approach matches the latest SDK standards. It results in cleaner, more maintainable code. Alternative method using manual JSON payload For advanced use cases where more control over the request is needed, you can manually create the JSON payload. For an example: var queriesPayload = new { queryFields = new[] { new { key = "FullName" }, new { key = "CompanyName" }, new { key = "JobTitle" } } }; string jsonPayload = JsonSerializer.Serialize(queriesPayload); BinaryData requestData = BinaryData.FromString(jsonPayload); var operation = await client.AnalyzeDocumentAsync( WaitUntil.Completed, modelId, requestData, "1-2", features: new List<DocumentAnalysisFeature> { DocumentAnalysisFeature.QueryFields } ); When to use the above: Custom request formats Non-standard data source integration Key points to remember Breaking changes exist between preview versions and v1.0.0 by checking the SDK version. Prefer `AnalyzeDocumentOptions` for simpler, error-free integration by using built-In classes. Ensure your content is wrapped in `BinaryData` or use a direct URL for correct document input: Conclusion Using AnalyzeDocumentOptions provides a cleaner and more reliable way to work with query fields in Azure AI Document Intelligence using C#. By aligning with the latest SDK approach, developers can simplify implementation, reduce common errors, and improve code maintainability. Keeping up with SDK enhancements and recommended practices ensures more accurate and efficient document data extraction. As Azure AI capabilities continue to evolve, adopting modern integration patterns will help you build scalable and future-ready document processing solutions with greater confidence. Reference Official AnalyzeDocumentAsync Documentation. Official Azure SDK documentation. Azure Document Intelligence C# SDK support add-on query field.569Views0likes0Comments
Microsoft Leads a New Era of Software Supply Chain Transparency
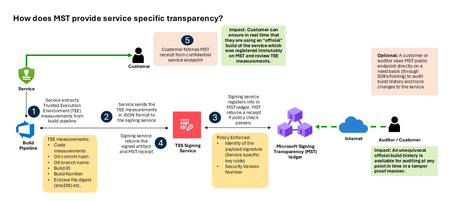
Microsoft announces the general availability of Microsoft’s Signing Transparency (MST) – a first-of-its-kind capability that brings unprecedented visibility and trust to our software supply chain. With this release, Microsoft is leading the industry by recording the build of critical cloud services into a publicly readable and verifiable SCITT standard (Supply Chain Integrity, Transparency, and Trust) compliant ledger. This means every production software build for in scope services like Azure Attestation and Azure Managed HSM (Hardware Security Module), Azure confidential ledger, Microsoft Signing Transparency itself (and others over time) – is now logged in an immutable, tamper-evident record. Only builds that are in the MST ledger are deployed to production; this gives customers confidence that the supply chain for these critical services can be audited at anytime. Notably, the MST ledger is fully open source and built to align with the emerging IETF SCITT standard. By embracing SCITT’s principles and open protocols, Microsoft ensures that MST not only secures our own ecosystem but also contributes to a broader industry movement toward standardized supply chain transparency. The open-source MST ledger serves as a verifiable trust anchor that any organization or researcher can inspect, audit, or even integrate with their own tooling. MST itself meets the highest levels of transparency, backed by a tamper-proof confidential ledger, open-source, and independently verified. Specifically, we are making the foundation of our trust model transparent and accessible to everyone – reinforcing that trust must be earned through proof, not just promises. This launch marks a major milestone in our commitment to Zero Trust principles, extending “never trust, always verify” all the way into the build itself. Building on a public preview introduced late last year, MST’s general availability delivers verifiable transparency at the software level. It transforms traditional code signing with an additive trust layer that is accessible via an open verification model. Every new software update is accompanied by a publicly auditable proof of integrity, enabling security teams to proactively confirm that each update is authentic and unaltered. To help organizations get the most out of this capability, we are also introducing a free tool to explore the contents – Ledger Explorer – an offline tool that allows security teams to examine MST ledger entries, verify cryptographic proofs, and even validate the ledger’s integrity independently. This tool, combined with MST’s open design, ensures that every Microsoft customer – and the broader community – can hold us accountable in real time for the software we run on their behalf. Key Benefits of Microsoft’s Signing Transparency (MST) Verified Code Integrity – Every software release is cryptographically logged in MST’s ledgers. This makes each build tamper-evident and traceable. If an attacker attempts to inject malicious code or sign an unauthorized update, it will be evident through the well-defined validation step built into the SCITT standard. Organizations gain the assurance that code integrity can be independently confirmed at any time. Independent Verification & Zero Trust – MST enables customers and auditors to verify software authenticity on their own, without having to solely rely on vendor attestations. For each update, Microsoft provides a transparency “receipt” (proof of logging) that you can use to prove the update was officially published and unaltered. This fosters a “don’t just trust, verify” approach, empowering security teams to double-check everything running in their environment aligns with what Microsoft intended. Audit-Trail & Compliance – The transparency ledger creates a permanent, auditable timeline of code deployments. Every entry is a record of what was released and when, backed by cryptographic proofs. This simplifies compliance reporting and accelerates forensic analysis. In the event of an incident, you can quickly audit the ledger to see if any unexpected code was introduced. For highly regulated industries, MST offers concrete evidence of software integrity and policy compliance over time. Leadership & Open Standards – We are delivering real transparency now, encouraging a future where all critical software is released with verifiable integrity. MST’s open source implementation and SCITT-compliant design exemplify our commitment to openness and collaboration. We believe widespread adoption of these standards will strengthen supply chain security for everyone, making trust verification a universal practice. Next Steps Microsoft’s Signing Transparency is more than a new security feature and shapes the advances in trust technology. As threats grow more sophisticated, we must evolve the way we assure our customers about the software they depend on. With MST now generally available, we are leading by example: proving that it is possible to open up the traditionally opaque process of software deployment and turn it into a source of strength and trust, i.e. empowering each person with verifiable transparency. We invite the industry to join us on this journey and get started by reading the documentation and exploring Ledger Explorer today! Together, by embracing transparency and open standards, we can turn “trust but verify” from a slogan into an everyday reality for digital infrastructure.Enhancing Data Security and Digital Trust in the Cloud using Azure Services.
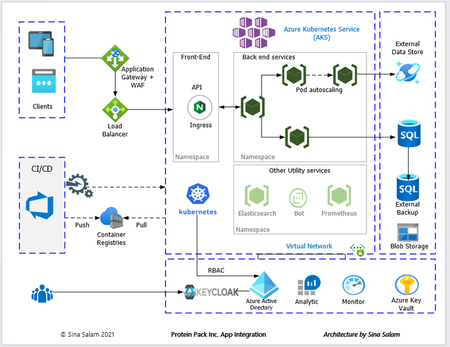
Enhancing Data Security and Digital Trust in the Cloud by Implementing Client-Side Encryption (CSE) using Azure Apps, Azure Storage and Azure Key Vault. Think of Client-Side Encryption (CSE) as a strategy that has proven to be most effective in augmenting data security and modern precursor to traditional approaches. CSE can provide superior protection for your data, particularly if an authentication and authorization account is compromised.3.1KViews0likes0CommentsWe Gave Ourselves 20 Minutes to Build an AI Agent for a Lumber Company. The Timer's Still on Screen.
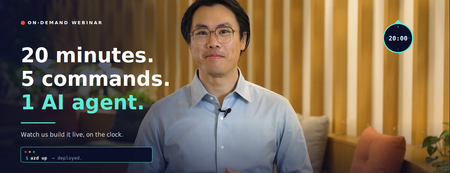
Here's a confession: most "build with AI" webinars are 60 minutes of slides, 5 minutes of a polished demo someone rehearsed for a week, and a closing CTA. You leave inspired but not really sure what you saw. So we tried something different. We put a visible countdown timer on the screen and gave ourselves 20 minutes to do two things, live: Build an AI agent that solves a real business problem Deploy a working AI application to Azure No edits to hide the awkward parts. No "and here's one I prepared earlier." Just the timer, the screen, and a working app at the end. The on-demand recording is up now. Here's what's in it and why you should carve out 20 minutes for it this week. The setup: why lumber? 🏘️ We needed a real business problem, not a toy one. So for the demo, we role-play as the owner of Contoso Lumber — a regional lumber business with a very specific, very real headache: Should we sell our inventory now, or hold it longer? Sell too early, miss a better price. Hold too long, eat storage costs. Lumber prices fluctuate with global competition, macro shifts, even the weather. In the past, decisions like this came from morning meetings and gut instinct, or maybe the occasional ad-hoc spreadsheet that nobody could reuse a month later. It's the kind of decision that should have an analyst behind it — except most growing businesses can't afford to hire one full-time. So we build the AI agent that does. (Yes, lumber. We know. Stick with us — the boring industry is exactly the point. If it works here, it works for your business too.) What we actually build (in 20 minutes flat) The webinar walks through the entire flow, end to end: Part 1 — The agent. We open Microsoft Foundry at ai.azure.com, browse the model leaderboard (there are over 11,000 models to choose from — we compare a few on the cost-vs-quality chart), pick one, write a plain-English instruction for the agent, upload a CSV of historical lumber pricing, and ask it a real question: "If I cannot sell one of my products today unless I offer my clients a 35% discount, and knowing the historical pricing data, should I still sell it?" The agent runs a break-even analysis and comes back with a reasoned recommendation — hold for 3–6 months, here's the math on why, here's where storage costs start eating the upside. Then we add voice mode (now you can ask the agent for pricing recs from a coffee shop on your phone), and lock down guardrails to block jailbreaks, prompt injection, data leakage, and — because we're feeling fancy — profanity in responses. Part 2 — The app. With the agent done, we pivot to deploying a full AI chat application to Azure. From scratch. Using exactly five commands in Azure Cloud Shell: azd auth login git clone <repo> cd <folder> azd up azd down # (this one's for when you're done — kills everything to avoid surprise bills) That's it. The template handles the Container Apps setup, the architecture-aligned-to-Well-Architected-Framework stuff, all the boilerplate that usually eats half a sprint. By the end of the segment, there's a working AI chatbot running on a real Azure URL. We even pause the timer when we're just explaining things, so you know the 20-minute clock is honest about build time, not talk time. Why this format is more useful than another slide deck A few things this webinar shows that a written tutorial can't: The Foundry UI is super navigable. You watch someone do it. You see where the buttons are. You see what the leaderboard looks like when you're comparing GPT-5.3 Codex against Kimi K2.5 on a cost-to-quality chart. (Spoiler: Kimi wins this particular trio. Your mileage will vary depending on your workload.) The "no-stitching" claim is real. Models, data, agents, guardrails, deployment — all in one place. You don't need to leave Foundry to wire seven products together. The webinar makes that concrete by showing you the actual flow without cutting. Five commands really is five commands. This is the part people are most skeptical about until they see it. azd up does the work. The infrastructure provisioning, the container app, the AI service hookup — all of it. You can delete it just as fast. azd down tears everything back down. Useful when you're experimenting and don't want a $40 surprise on your Azure bill next month. What's on screen at the end By the 20-minute mark: A published AI agent named for the lumber business, with guardrails, voice mode enabled, ready to be called from Teams, Microsoft 365 Copilot, or any application via endpoint A separate AI chat application deployed to Azure Container Apps, with a live URL Logs, observability, the full Foundry control plane — all available out of the box And in the closing minutes, four very concrete next steps for what you do next if this sparked an idea for your own business — including Azure Accelerate (if you want Microsoft experts in the room with you), the partner network, and the Microsoft marketplace if you'd rather buy than build. Watch the recording The on-demand recording is available now. Block 20 minutes — that's literally all it takes — and ideally watch with your Azure portal open in another tab so you can follow along. If you're the kind of person who learns by doing, pause at the agent-building section and try it yourself in parallel. Foundry is free to explore; the agent we build in the webinar costs cents to run. → Watch the on-demand webinar A few things we'd love feedback on If you watch it, we'd genuinely love to know: Did the timer help or distract? (We thought it would feel gimmicky. It turned out to be the most-mentioned thing in early feedback.) What use case from your business would you want to see in the next one? We're picking the next demo problem from comments. Was the lumber thing weirdly compelling or were you just here for the Azure parts? Drop a comment, tag us, or grab a partner and try building your own version this week. The timer's reset. Your 20 minutes start whenever you press play. Want to go deeper than the webinar? Two companion reads: From Idea to Impact: How Growing Businesses Scale with Azure (five real customer stories with the full architectures) and AI Made Simple: 3 Practical Moves for Growing Businesses (the structured playbook for figuring out what to build first).Infrastructure as Code for AI: Building and Deploying Microsoft Hosted Agents with Terraform
AI agents are no longer experimental. Teams are shipping production-grade agents that retrieve information, call APIs, reason over documents, and orchestrate multi-step workflows at scale. Microsoft Foundry's Hosted Agents service gives you a fully managed runtime for those agents, built on top of the Microsoft Foundry Agent Service, with Microsoft handling the infrastructure, scaling, and runtime lifecycle. The challenge is that provisioning this infrastructure by hand or clicking through the portal, running one-off CLI commands, or relying on undocumented shell scripts, simply does not scale. It introduces configuration drift, makes reproducing environments painful, and creates real governance risk as teams grow. This post walks through how to provision and manage the Azure infrastructure required to run Microsoft Hosted Agents using Terraform. You will leave with working configuration, a clear understanding of the resource model, and practical guidance on where Terraform can take you all the way and where you will need to supplement with the Azure CLI or the Microsoft Foundry Agent Service SDK. What Are Microsoft Hosted Agents? Microsoft Hosted Agents are AI agents deployed and managed within Microsoft Foundry. Microsoft Foundry is Microsoft's unified platform for building, evaluating, and deploying AI applications and agents. It provides: A managed compute runtime — Microsoft provisions and scales the infrastructure so you do not manage VMs or containers. An agent execution environment — agents are defined with instructions, tools (code interpreter, Bing grounding, Azure AI Search, function calling), and a backing model endpoint. Deep Azure integration — identity via Microsoft Entra ID, secrets via Azure Key Vault, storage via Azure Blob, tracing via Azure Monitor and Application Insights. A project-scoped model — each Microsoft Foundry project encapsulates an agent's resources, connections, and deployments within a logical boundary. The "Hosted" distinction matters. You are not running agent code on your own Kubernetes cluster or App Service. Microsoft manages the runtime. Your responsibility is to provision the surrounding infrastructure correctly: the Microsoft Foundry resource, the project, the model deployment, the identity configuration, and the monitoring resources that back it all. That boundary — the infrastructure you own — is exactly what Terraform manages well. Why Terraform for Hosted Agent Deployments? Infrastructure as Code (IaC) is not a new idea, but its importance grows as AI deployments become more complex. Here is why Terraform is a strong choice for Microsoft Foundry deployments specifically: Repeatability: A Terraform configuration produces the same infrastructure every time. Staging mirrors production. Disaster recovery is a terraform apply away. Governance: Infrastructure definitions live in version control alongside application code. Changes are reviewable, auditable, and reversible. This satisfies most enterprise change-management requirements. Scale: Spinning up per-customer or per-team agent environments using Terraform workspaces or module instantiation is far more manageable than manual provisioning. State management: Terraform tracks the actual state of your Azure resources. It detects drift and reconciles it declaratively. Ecosystem: The AzureRM provider is mature, actively maintained by HashiCorp and Microsoft, and covers the majority of Azure services including the Microsoft Foundry resources. Architecture Overview Before writing any Terraform, it helps to understand the resource hierarchy in Microsoft Foundry and how each layer maps to an Azure resource type. The Foundry Resource Hierarchy Microsoft Foundry uses a two-level hierarchy: 1. Foundry Account ( azurerm_cognitive_account , kind: AIServices ) — The top-level AI Services resource. It provides the model endpoint, manages agent execution, and acts as the logical boundary for all projects beneath it. You must set project_management_enabled = true and provide a custom_subdomain_name to enable project creation. In ARM terms this is a Microsoft.CognitiveServices/accounts resource. 2. Foundry Project ( azurerm_cognitive_account_project ) — A child resource scoped within the Foundry Account. Each project has its own agents, model deployments, connections, and data assets. In production, you typically have one project per application, product team, or environment. Figure 1: The Microsoft Foundry resource hierarchy. A single Foundry Account (Cognitive Services, kind AIServices) acts as the top-level container, with Projects scoped beneath it — one per application, team, or environment. Supporting Resources The following Azure resources make up a complete Hosted Agents deployment: Microsoft Foundry Account (AI Services): A single azurerm_cognitive_account of kind AIServices serves as both the Foundry Account and the model endpoint host. Model deployments (e.g. gpt-4.1 ) are provisioned via azurerm_cognitive_deployment within this account. Log Analytics Workspace + Application Insights: Provides observability for agent traces, request logs, and metrics. User-Assigned Managed Identity: Grants the Foundry Account and Projects access to Azure resources without stored credentials. Role Assignments (RBAC): Wires the managed identity to the Foundry Account with least-privilege Cognitive Services permissions. Figure 2: Supporting infrastructure map. The managed identity holds least-privilege RBAC grants to the Microsoft Foundry Account (AI Services) — enabling model access and project management — all within the same resource group. Reference Architecture (Described) A production-ready layout separates concerns across two resource groups: one for shared infrastructure (networking, monitoring) and one for the Microsoft Foundry Account and its projects. The Foundry resource group houses the azurerm_cognitive_account (kind: AIServices) resource and the azurerm_cognitive_account_project instances. The shared resource group holds Log Analytics and Application Insights. A user-assigned managed identity spans both, holding RBAC grants to each backing service. For a dev/test environment you can collapse both into a single resource group. For production, the separation makes cost attribution, access control, and lifecycle management cleaner. Prerequisites Accounts and Permissions An active Azure subscription with the Owner or Contributor + User Access Administrator roles at the subscription or resource group level (role assignments require elevated permission). Foundry access enabled in your subscription. In some tenants you may need to accept terms or request quota for Azure OpenAI. Azure OpenAI quota for the model you intend to deploy (e.g. gpt-4.1 ). Request this via the Azure portal under Quotas in Azure OpenAI Studio. Local Tools Terraform CLI ≥ 1.9 — Install guide Azure CLI ≥ 2.60 — Install guide A code editor (VS Code with the HashiCorp Terraform extension and the Azure Terraform extension is a strong combination). Authentication For local development, authenticate via the Azure CLI. The AzureRM Terraform provider picks this up automatically: az login az account set --subscription "<your-subscription-id>" For CI/CD pipelines, use a service principal with AZURE_CLIENT_ID , AZURE_CLIENT_SECRET , AZURE_TENANT_ID , and AZURE_SUBSCRIPTION_ID environment variables, or — preferably — a workload identity federation (federated credentials) to avoid storing long-lived secrets. GitHub Actions supports OIDC-based workload identity natively. Terraform Fundamentals for Hosted Agents Provider Configuration The hashicorp/azurerm provider is your primary dependency. The new Microsoft Foundry resources ( azurerm_cognitive_account with kind = "AIServices" and azurerm_cognitive_account_project ) require version 4.x of the provider. Pin your version to avoid unexpected breaking changes: terraform { required_version = ">= 1.9" required_providers { azurerm = { source = "hashicorp/azurerm" version = "~> 4.0" } } } provider "azurerm" { features { key_vault { purge_soft_delete_on_destroy = false } resource_group { prevent_deletion_if_contains_resources = true } } subscription_id = var.subscription_id } The features block is required even when empty. The Key Vault setting prevents accidental secret loss during terraform destroy . The resource group setting adds an extra safety net in production. State Management Never use local state for shared or production environments. Store state in Azure Blob Storage with state locking via Azure Blob lease: terraform { backend "azurerm" { resource_group_name = "rg-terraform-state" storage_account_name = "sttfstate<unique>" container_name = "tfstate" key = "ai-agents/prod.tfstate" } } Create the state storage account and container before running terraform init . A bootstrap script or a separate Terraform workspace dedicated to state management are both valid approaches. Known Limitations and Workarounds Terraform coverage of Foundry is improving rapidly but is not yet complete. You should be aware of the following gaps as of mid-2025: Agent definitions are not in Terraform: The actual agent (its system prompt, instructions, tool configuration, and model binding) is created via the Azure AI Agent Service SDK or the Foundry portal, not via Terraform. Terraform provisions the infrastructure; your application code or a post-provisioning script creates the agent. Connections: Some connection types within a Foundry Project (e.g. Azure AI Search, custom connections) may require the Azure CLI or the Foundry SDK. Verify coverage in the AzureRM provider docs before assuming Terraform handles them. Model deployments: azurerm_cognitive_deployment covers OpenAI model deployments and is well-supported. Use this to deploy your model before referencing it from the agent. Private networking: If you need private endpoints for your Foundry Account, additional VNet, subnet, and DNS zone resources are required. This post focuses on the public networking path; private networking is a follow-on topic. Step-by-Step Implementation The following sections build up a complete Terraform configuration. The recommended project structure is a flat module layout for a single environment, with a separate modules/ai-foundry/ directory when you need to reuse the pattern across environments. ai-agents-infra/ ├── main.tf ├── variables.tf ├── outputs.tf ├── versions.tf └── terraform.tfvars 1. Variables Define variables first. Parameterising from the start avoids hard-coded values that create technical debt when you replicate the configuration for staging or production: # variables.tf variable "subscription_id" { type = string description = "Azure subscription ID." } variable "location" { type = string default = "eastus" description = "Azure region for all resources." } variable "environment" { type = string default = "dev" description = "Environment label (dev, staging, prod)." } variable "project_name" { type = string description = "Short name for the project. Used in resource naming." } variable "openai_model_name" { type = string default = "gpt-4.1" description = "Azure OpenAI model to deploy for the agent." } variable "openai_model_version" { type = string default = "2025-04-14" description = "Model version to deploy." } variable "openai_sku_capacity" { type = number default = 10 description = "Tokens-per-minute capacity (in thousands) for the deployment." } 2. Resource Group and Core Infrastructure A single resource group keeps things simple for dev. In production, consider splitting as described in the architecture section above. # main.tf — Resource group and naming locals locals { name_prefix = "${var.project_name}-${var.environment}" tags = { environment = var.environment project = var.project_name managed_by = "terraform" } } resource "azurerm_resource_group" "main" { name = "rg-${local.name_prefix}" location = var.location tags = local.tags } 3. Supporting Services Provision Log Analytics and Application Insights for agent observability and diagnostics. Unlike the legacy Hub-based architecture, the azurerm_cognitive_account (kind AIServices ) does not require a dedicated Storage Account or Key Vault as provisioning dependencies. # main.tf — Monitoring infrastructure data "azurerm_client_config" "current" {} # Log Analytics Workspace (required by Application Insights) resource "azurerm_log_analytics_workspace" "main" { name = "law-${local.name_prefix}" resource_group_name = azurerm_resource_group.main.name location = azurerm_resource_group.main.location sku = "PerGB2018" retention_in_days = 30 tags = local.tags } # Application Insights for agent observability resource "azurerm_application_insights" "main" { name = "appi-${local.name_prefix}" resource_group_name = azurerm_resource_group.main.name location = azurerm_resource_group.main.location workspace_id = azurerm_log_analytics_workspace.main.id application_type = "web" tags = local.tags } 4. User-Assigned Managed Identity A managed identity allows the Foundry Account and its projects to authenticate to Azure services without stored credentials. This is a security best practice and is required for several Microsoft Foundry features. # main.tf — Managed identity for the Microsoft Foundry Account resource "azurerm_user_assigned_identity" "foundry" { name = "id-${local.name_prefix}-foundry" resource_group_name = azurerm_resource_group.main.name location = azurerm_resource_group.main.location tags = local.tags } 5. Microsoft Foundry Account and Model Deployment In the current Microsoft Foundry architecture, a single azurerm_cognitive_account of kind AIServices serves as both the Foundry Account and the model endpoint host. Set project_management_enabled = true and provide a globally unique custom_subdomain_name to enable Foundry Project creation beneath it. # main.tf — Microsoft Foundry Account (AI Services) resource "azurerm_cognitive_account" "foundry" { name = "aisa-${local.name_prefix}" resource_group_name = azurerm_resource_group.main.name location = azurerm_resource_group.main.location kind = "AIServices" sku_name = "S0" project_management_enabled = true custom_subdomain_name = "${replace(local.name_prefix, "-", "")}foundry" tags = local.tags identity { type = "UserAssigned" identity_ids = [azurerm_user_assigned_identity.foundry.id] } } # Deploy the model within the Foundry Account resource "azurerm_cognitive_deployment" "agent_model" { name = var.openai_model_name cognitive_account_id = azurerm_cognitive_account.foundry.id model { format = "OpenAI" name = var.openai_model_name version = var.openai_model_version } sku { name = "Standard" capacity = var.openai_sku_capacity } } Note on quota: The capacity value is in thousands of tokens per minute. A value of 10 means 10,000 TPM. If terraform apply fails with a quota error, reduce this value or request a quota increase via the Azure portal. Note on custom_subdomain_name : This must be globally unique across all Azure AI Services accounts. If provisioning fails with a conflict error, adjust the suffix (e.g. append a random string using the random_string resource). 6. Foundry Project Create a Foundry Project beneath the Foundry Account provisioned in Step 5. Each project scopes its own agents, model connections, and data assets. Use one project per application or team. # main.tf — Microsoft Foundry Project resource "azurerm_cognitive_account_project" "agent_project" { name = "proj-${local.name_prefix}-agents" cognitive_account_id = azurerm_cognitive_account.foundry.id location = azurerm_resource_group.main.location display_name = "Agent Project - ${var.project_name}" description = "Hosted agents project for ${var.project_name}" identity { type = "UserAssigned" identity_ids = [azurerm_user_assigned_identity.foundry.id] } tags = local.tags } 7. RBAC Role Assignments Grant the managed identity the permissions it needs. This is the area most commonly misconfigured in manual deployments. Terraform makes it explicit and auditable. # main.tf — RBAC assignments # AI Services: Foundry identity needs Cognitive Services OpenAI User to call model endpoints resource "azurerm_role_assignment" "foundry_openai" { scope = azurerm_cognitive_account.foundry.id role_definition_name = "Cognitive Services OpenAI User" principal_id = azurerm_user_assigned_identity.foundry.principal_id } # AI Services: Foundry identity needs Cognitive Services Contributor to manage projects resource "azurerm_role_assignment" "foundry_contributor" { scope = azurerm_cognitive_account.foundry.id role_definition_name = "Cognitive Services Contributor" principal_id = azurerm_user_assigned_identity.foundry.principal_id } # Optional: grant your own principal the Azure AI Developer role on the Foundry Account # so you can create and manage agents from your local machine or CI pipeline resource "azurerm_role_assignment" "developer_account" { scope = azurerm_cognitive_account.foundry.id role_definition_name = "Azure AI Developer" principal_id = data.azurerm_client_config.current.object_id } 8. Outputs Export the values your application and post-provisioning scripts will need: # outputs.tf output "resource_group_name" { value = azurerm_resource_group.main.name } output "foundry_account_id" { value = azurerm_cognitive_account.foundry.id } output "ai_foundry_project_id" { value = azurerm_cognitive_account_project.agent_project.id } output "foundry_endpoint" { value = azurerm_cognitive_account.foundry.endpoint } output "openai_deployment_name" { value = azurerm_cognitive_deployment.agent_model.name } output "managed_identity_client_id" { value = azurerm_user_assigned_identity.foundry.client_id } 10. Example terraform.tfvars # terraform.tfvars — do NOT commit this file if it contains sensitive values subscription_id = "xxxxxxxx-xxxx-xxxx-xxxx-xxxxxxxxxxxx" location = "eastus" environment = "dev" project_name = "contoso-agents" openai_model_name = "gpt-4.1" openai_model_version = "2025-04-14" openai_sku_capacity = 10 Figure 3: Terraform deployment workflow. State is stored in an Azure Blob Storage backend, enabling team collaboration and preventing concurrent apply conflicts. Deploying and Validating the Agent Infrastructure Running the Deployment # 1. Initialise — downloads provider plugins and configures the backend terraform init # 2. Validate syntax and configuration terraform validate # 3. Preview what will be created (review carefully before applying) terraform plan -out=tfplan # 4. Apply the plan terraform apply tfplan A full initial apply typically takes 8–15 minutes. The Foundry Account (AI Services) provisioning is the longest step. The model deployment may also take a few minutes to reach a ready state — Terraform handles this with implicit dependency ordering, but you may see brief retries in the output. Verifying the Deployment After apply completes, verify each resource is in a healthy state: # Confirm the resource group and its resources exist az resource list --resource-group "rg-contoso-agents-dev" --output table # Check the Foundry Account (AI Services) is in a Succeeded state az cognitiveservices account show \ --name "aisacontosoagentsdevfoundry" \ --resource-group "rg-contoso-agents-dev" \ --query "properties.provisioningState" # Confirm the model deployment is ready az cognitiveservices account deployment show \ --resource-group "rg-contoso-agents-dev" \ --name "aisacontosoagentsdevfoundry" \ --deployment-name "gpt-4.1" \ --query "properties.provisioningState" Navigate to the Microsoft Foundry portal and confirm your Foundry Account and Project appear. At this point you can create an agent manually in the portal to validate that the model endpoint is reachable and the identity chain works correctly before automating agent creation. Common Deployment Issues Quota exceeded on model deployment: Reduce openai_sku_capacity or request a quota increase in the Azure portal under Azure OpenAI → Quotas. Resource name conflicts: The custom_subdomain_name on the Foundry Account must be globally unique. Use the random_string Terraform resource to append a unique suffix if needed. Role assignment propagation delay: RBAC changes can take 1–2 minutes to propagate. If the Foundry Account cannot access resources immediately after apply, wait a moment and retry. project_management_enabled not set: If azurerm_cognitive_account_project fails with an error about project management, ensure project_management_enabled = true and custom_subdomain_name are set on the parent azurerm_cognitive_account . azurerm_cognitive_account_project not found: Ensure your AzureRM provider version is ~> 4.0 or later. Run terraform init -upgrade if you previously initialised with an older version. Creating an Agent After Infrastructure Provisioning Terraform has provisioned the platform. Now you need to create the agent itself. This is done via the Azure AI Agents SDK (available for Python, C#, JavaScript, and Java) or the Foundry portal. The following Python snippet demonstrates creating a basic agent programmatically after Terraform apply. It uses the outputs from Terraform directly: import os from azure.ai.projects import AIProjectClient from azure.identity import DefaultAzureCredential # These values come from Terraform outputs project_connection_string = os.environ["AI_PROJECT_CONNECTION_STRING"] model_deployment = os.environ["OPENAI_DEPLOYMENT_NAME"] client = AIProjectClient.from_connection_string( credential=DefaultAzureCredential(), conn_str=project_connection_string, ) # Create the hosted agent agent = client.agents.create_agent( model=model_deployment, name="customer-support-agent", instructions=( "You are a helpful customer support assistant. " "Answer questions accurately and concisely. " "If you are unsure, say so rather than guessing." ), ) print(f"Agent created: {agent.id}") Figure 5: Agent runtime architecture. The Foundry Project hosts the Agent Service, which routes requests to the GPT-4.1 model endpoint and optionally invokes tool integrations (Code Interpreter, File Search, Azure Functions, or custom tools). The project connection string is available from the Foundry portal (Project → Overview → Project connection string) or can be constructed from Terraform outputs. Refer to the Azure AI Agents quickstart for the full SDK setup. Operational Considerations Lifecycle Management Terraform's declarative model means updates are incremental by default. To update the OpenAI model version, change openai_model_version in your .tfvars file and run terraform plan to confirm the change before applying. Terraform will delete and recreate the cognitive deployment in-place — be aware this causes brief downtime for the model endpoint. To destroy a complete environment: terraform destroy The prevent_deletion_if_contains_resources feature on the resource group will block destruction if any untracked resources exist, which is a useful safety net in production. Handling Configuration Drift Drift occurs when Azure resources are modified outside of Terraform (portal changes, CLI scripts, other automation). Detect drift with: terraform plan -refresh-only This reports the difference between the Terraform state and the actual resource state without making changes. Schedule this as a drift-detection job in CI to catch out-of-band changes early. Environment Isolation Use Terraform workspaces or separate state files per environment: # Create and switch to a staging workspace terraform workspace new staging terraform workspace select staging terraform apply -var-file="environments/staging.tfvars" Alternatively, use a directory-per-environment layout ( environments/dev/ , environments/prod/ ) with a shared module in modules/ai-foundry/ . The directory layout is more explicit and easier to navigate in a team setting. Cost Control Set a low openai_sku_capacity in dev (e.g. 1 = 1,000 TPM) to limit accidental spend. Tag all resources with environment and project tags (the locals.tags block handles this) to enable cost attribution in Azure Cost Management. Use the Azure Pricing Calculator to estimate monthly costs before deploying to production. The Azure AI Services account (model token usage), Log Analytics, and Application Insights are the primary cost drivers. Consider destroying dev environments overnight using a scheduled CI job that runs terraform destroy and terraform apply on a schedule. CI/CD Integration Automating Terraform via GitHub Actions is straightforward. The following workflow runs plan on pull requests and apply on merge to the main branch: # .github/workflows/terraform.yml name: Terraform Deploy on: push: branches: [main] pull_request: branches: [main] permissions: id-token: write # Required for OIDC workload identity federation contents: read pull-requests: write env: ARM_CLIENT_ID: ${{ secrets.AZURE_CLIENT_ID }} ARM_TENANT_ID: ${{ secrets.AZURE_TENANT_ID }} ARM_SUBSCRIPTION_ID: ${{ secrets.AZURE_SUBSCRIPTION_ID }} ARM_USE_OIDC: "true" jobs: terraform: runs-on: ubuntu-latest environment: ${{ github.ref == 'refs/heads/main' && 'production' || 'staging' }} steps: - uses: actions/checkout@v4 - uses: hashicorp/setup-terraform@v3 with: terraform_version: "~1.9" - name: Terraform Init run: terraform init - name: Terraform Plan run: terraform plan -out=tfplan -var-file="environments/dev.tfvars" - name: Terraform Apply if: github.ref == 'refs/heads/main' run: terraform apply -auto-approve tfplan Figure 4: CI/CD pipeline using GitHub Actions with OIDC workload identity federation. No long-lived secrets are stored — the runner exchanges a JWT for a short-lived Azure token before each Terraform run. Use OIDC workload identity federation to avoid storing long-lived service principal secrets in GitHub. This is the recommended authentication method for GitHub Actions deployments to Azure. Best Practices Modular Terraform Design Once you have a working flat configuration, extract the Foundry resources into a reusable module. A module boundary around the Hub, Project, OpenAI account, and RBAC assignments lets you stamp out new agent environments with a single module call and a new .tfvars file. # environments/staging/main.tf module "agent_platform" { source = "../../modules/ai-foundry" project_name = "contoso-agents" environment = "staging" location = "eastus" subscription_id = var.subscription_id openai_model_name = "gpt-4.1" openai_model_version = "2025-04-14" openai_sku_capacity = 30 } Parameterisation and Environment Configs Never hard-code subscription IDs, tenant IDs, or region names in main.tf . Keep environment-specific values in environments/<env>.tfvars files and commit them to source control (they are config, not secrets). Store actual secrets (service principal credentials, API keys for third-party connections) in Azure Key Vault or GitHub Secrets — not in .tfvars files. Versioning Models and Agent Configurations Treat your openai_model_version and agent instructions as versioned artefacts. When Microsoft releases a new model version, create a pull request that updates the variable value, runs a plan, and documents the expected change. This creates a clear history of when model versions changed and who approved the change. Logging and Monitoring Enable diagnostic settings on the Azure OpenAI account to route request logs and metrics to your Log Analytics workspace. Use Application Insights to capture agent traces from the Azure AI Agents SDK (it integrates with OpenTelemetry). Set up Azure Monitor alerts on OpenAI account errors (4xx/5xx rates) and Log Analytics ingestion failures. Responsible AI Considerations Enable Azure OpenAI content filtering on your deployment. Terraform supports this via the content_filter block in azurerm_cognitive_deployment where the policy allows. Define a clear system prompt that sets agent behaviour boundaries and instructs the agent to decline harmful requests. Log and review agent conversations during early deployment. Microsoft Foundry includes evaluation tools for assessing agent response quality and safety. Apply least-privilege RBAC throughout — the role assignments in this post follow that principle. Conclusion and Next Steps You now have a complete, repeatable Terraform configuration for provisioning the Azure infrastructure required to run Microsoft Hosted Agents via Microsoft Foundry. The key takeaways: Terraform manages the infrastructure layer effectively — the Foundry Account, Project, model deployment, identity, and RBAC. Agent definitions themselves are provisioned via the Azure AI Agents SDK or the Foundry portal as a post-Terraform step. State management, parameterisation, and modular design are non-negotiable for team environments. OIDC-based workload identity is the right authentication model for CI/CD pipelines. Drift detection, environment isolation, and cost tagging are operational necessities, not optional extras. Where to Go Next Add Azure AI Search: Extend the Foundry Project with an Azure AI Search connection and enable the Search tool on your agent for Retrieval-Augmented Generation (RAG). Private networking: Add private endpoints for the Foundry Hub and OpenAI account to lock down ingress to your VNet. Multi-region deployment: Instantiate the Terraform module twice with different regions and use Azure Traffic Manager or Front Door to route requests. GitOps for agents: Store agent definitions (system prompts, tool configurations) as YAML or JSON in your repository and use a CI pipeline to apply them via the Azure AI Agents SDK on every merge, creating a fully declarative agent deployment pipeline. Evaluation pipelines: Use Microsoft Foundry's built-in evaluation capabilities to run automated quality and safety assessments on every new model version or prompt change. References What is Microsoft Foundry? — Microsoft Learn Azure AI Agent Service overview — Microsoft Learn Azure AI Agents quickstart — Microsoft Learn azurerm_cognitive_account — Terraform Registry azurerm_cognitive_account_project — Terraform Registry azurerm_cognitive_deployment — Terraform Registry AzureRM backend — Terraform documentation OIDC workload identity federation with GitHub Actions — Microsoft Learn Azure OpenAI content filtering — Microsoft Learn Install Terraform — HashiCorp Microsoft Foundry portalBuilding and Operating a Microsoft Foundry Hosted Agent with GitOps and GitHub Tasks
The Gap Between Prototype and Production Most AI engineering teams can build a working agent in a day. The hard part is not building it; the hard part is operating it. Prompts drift. Tool configurations change without review. Deployments happen from someone's laptop. There is no audit trail, no rollback plan, and no consistent way to promote a change from a development environment to production. GitOps closes that gap. By treating your agent definition, configuration, and infrastructure as version-controlled source code, you get the same delivery discipline that software engineering teams have applied to application code for years. Every change is reviewed, every deployment is automated, and every environment state is traceable to a specific commit. This post shows you how to apply GitOps principles to a Microsoft Foundry Hosted Agent using GitHub as the source of truth and GitHub Tasks and Actions as the automation layer. The result is a repeatable, governed, production-ready delivery model for AI agents. What Is a Microsoft Foundry Hosted Agent? Microsoft Foundry is Microsoft's platform for building, deploying, and operating AI applications and agents. A Hosted Agent is an agent runtime managed by the Foundry platform rather than self-hosted by your team. You supply the agent logic, configuration, and tools; Foundry handles the runtime lifecycle, scaling, and managed infrastructure. In practical terms, a Foundry Hosted Agent is a containerised agent application. You package your agent code, prompt definitions, tool bindings, and environment configuration into a container image. Foundry deploys and manages that container within a Foundry project, connected to models, tools, and observability infrastructure that the platform provides. Teams choose Hosted Agents over self-hosting because: The platform manages runtime infrastructure, patching, and scaling Integration with Azure AI models, managed identity, and observability is built in You can focus engineering effort on agent logic rather than cluster management Foundry projects provide environment and resource isolation without requiring you to provision and manage separate Azure resources for each environment Hosted Agents are a good fit when your team wants strong operational support with minimal platform overhead, when you need clear separation between environments, and when your agents depend on Azure AI capabilities such as Azure OpenAI Service, Azure AI Search, or Model Context Protocol integrations. Why GitOps Matters Specifically for AI Agents GitOps is straightforward for stateless web services: the code changes, the pipeline runs, the container is deployed. AI agents are more complex because there are multiple distinct artefacts that all affect agent behaviour: System prompts and instruction files Tool definitions and external integrations Model selection and configuration (temperature, max tokens, safety settings) Model Context Protocol (MCP) server definitions Orchestration logic and agent workflow code Safety and policy settings Infrastructure and deployment configuration Any one of these can change the behaviour of your agent in ways that are difficult to detect without structured review. A prompt change that looks harmless can alter tone, scope, or factual grounding. A tool configuration change can expose data to unintended callers. A model upgrade can shift response quality unpredictably. Git gives you a single place to version, review, and approve all of these artefacts together. Pull requests give you a structured review gate. Workflow automation gives you validation before anything reaches a deployed environment. Tags and releases give you deployment markers you can roll back to. The discipline of GitOps turns what is often an ad-hoc AI delivery process into a repeatable engineering practice. Reference Architecture The following diagram shows a practical reference architecture for delivering a Microsoft Foundry Hosted Agent through a GitOps model using GitHub. +---------------------------+ | GitHub Repository | | /src /agents /tools | | /prompts /infra | | /.github/workflows | +---------------------------+ | | Pull Request / Push to main v +---------------------------+ | GitHub Actions | | 1. Validate agent config | | 2. Lint and scan code | | 3. Run unit tests | | 4. Build container image | | 5. Push to registry | +---------------------------+ | | Image tag (SHA or semver) v +---------------------------+ | Azure Container Registry | | myregistry.azurecr.io | | my-agent:<sha> | +---------------------------+ | +------+------+ | | v v +----------+ +----------+ | Foundry | | Foundry | | Dev | | Test | | Project | | Project | +----------+ +----------+ | Approval gate (GitHub env) | v +----------+ | Foundry | | Prod | | Project | +----------+ | v +---------------------------+ | Observability | | Azure Monitor / App | | Insights / Foundry Logs | +---------------------------+ Key design decisions in this architecture: The GitHub repository is the single source of truth for all agent artefacts No human deploys directly to any Foundry project; all changes flow through automation Environment promotion requires a GitHub environment approval, creating a governance gate The container image is built once and promoted across environments; the image is not rebuilt per environment Secrets are stored in Azure Key Vault and accessed by the Foundry agent at runtime via managed identity Figure: GitOps delivery pipeline stages from commit to production Repository Structure A well-structured repository separates agent logic from infrastructure and tooling from prompts. The following structure works well in practice: my-foundry-agent/ ├── .github/ │ ├── workflows/ │ │ ├── validate.yml # Runs on every PR │ │ ├── build-deploy.yml # Runs on merge to main │ │ └── rollback.yml # Manual trigger workflow │ └── CODEOWNERS # Review assignments by path ├── src/ │ ├── agents/ │ │ ├── agent.py # Agent entry point and orchestration │ │ └── agent_config.json # Agent metadata and settings │ ├── tools/ │ │ ├── search_tool.py # Tool implementations │ │ └── data_tool.py │ └── prompts/ │ ├── system.txt # System prompt (versioned as plain text) │ └── instructions.txt # Supplementary instructions ├── tests/ │ ├── unit/ # Unit tests for tools and logic │ ├── integration/ # Integration tests against a running agent │ └── smoke/ # Post-deployment smoke tests ├── infra/ │ ├── main.bicep # Foundry project and resource definitions │ └── environments/ │ ├── dev.parameters.json │ ├── test.parameters.json │ └── prod.parameters.json ├── scripts/ │ ├── validate_agent.py # Config validation script │ └── smoke_test.py # Smoke test runner ├── Dockerfile # Container image definition └── docs/ └── architecture.md # Architecture and runbook documentation What belongs where and why: /src/prompts - System prompts as plain text files. Versioning prompts as files means every change goes through a pull request with a diff review, just as code does. /src/agents - Agent orchestration logic and configuration. Keeps the entry point and agent metadata co-located. /src/tools - Tool implementations separated from agent logic. Tool logic changes independently and should be reviewable in isolation. /infra - Infrastructure as code with per-environment parameter files. Environment-specific values live here, never in source files. /tests - Three layers of testing: unit tests for tools, integration tests for the full agent, and smoke tests that run against a deployed environment. /.github/workflows - All automation defined as code. There should be no manual deployment steps that live outside this directory. GitHub Tasks Across the Delivery Lifecycle GitHub Tasks and Issues provide the work tracking layer on top of the GitOps delivery model. Used well, they connect the intention behind a change to its implementation and deployment history. Practical patterns for using GitHub Tasks with agent delivery: Prompt change task - Open an issue to describe why the system prompt is changing. The pull request that changes system.txt closes that issue, creating a permanent link between the rationale and the diff. Tool integration task - When adding a new MCP server or external tool integration, create a task that captures the design decision, security review outcome, and test evidence before the pull request is merged. Model upgrade task - When upgrading the underlying model version, create a task that includes evaluation results and comparison data. The task becomes part of your change audit trail. Rollback task - If a deployment causes quality regressions, create a task to track the rollback, root cause investigation, and corrective action. Automation can open this task automatically when a deployment fails health checks. Dependency on approval - GitHub Tasks can be linked to environment approvals in GitHub Actions. A task in a specific milestone or project column can gate a promotion workflow. The key insight is that GitHub Tasks are not just work management; they are part of your audit trail. A regulatory or security reviewer can follow the chain from a production deployment back through workflow runs, pull request reviews, and the original task that described the intent of the change. End-to-End GitOps Flow The following walk-through describes a realistic developer experience for changing an agent prompt and promoting it to production. A developer opens a GitHub Issue describing the prompt change required and the expected behaviour improvement. The developer creates a feature branch, edits src/prompts/system.txt , and updates any related unit tests. A pull request is opened. The validate workflow runs immediately, checking prompt length, configuration schema, and lint rules. Unit tests run against the changed files. A code reviewer approves the pull request. The CODEOWNERS file ensures that prompt changes require review from the AI engineering team, not just any contributor. On merge to main, the build workflow runs: the container image is built with the new prompt baked in, tagged with the commit SHA, and pushed to Azure Container Registry. The deployment workflow deploys the new image to the Foundry Dev project automatically. Integration and smoke tests run against the deployed dev agent. If tests pass, the workflow pauses at the Test environment gate and requests approval from a named reviewer. After approval, the same image is deployed to Foundry Test. Smoke tests run again. A second approval gate controls promotion to Foundry Prod. If at any point a health check or smoke test fails, the rollback workflow redeploys the previous image tag from the registry. The image tag of the last known-good deployment is stored as a GitHub environment variable. This flow means that no human ever deploys directly to any environment. Every environment state is traceable to a specific commit, image tag, and workflow run. Security and Governance AI agents often have access to sensitive data and external systems. Security and governance cannot be an afterthought. Identity and Access Use managed identity for the Foundry Hosted Agent to access Azure resources. Avoid service principal secrets where Microsoft Entra Workload Identity or managed identity is available. Apply the principle of least privilege: the agent identity should have read access to data sources and limited write access only where the use case requires it. Tool integrations that require API keys or external credentials should retrieve them from Azure Key Vault at runtime, never from environment variables baked into the image. Secrets and Configuration Store secrets in Azure Key Vault. Reference them in your Foundry project configuration using Key Vault references. Store GitHub Actions secrets using repository or environment-scoped secrets. Never echo secrets in workflow logs. Separate environment configuration (endpoints, resource names, capacity settings) from agent logic. Use the /infra/environments/ parameter files for this. Auditability and Review Enforce pull request reviews for all changes to /src/prompts , /src/agents , and /infra via CODEOWNERS. Require status checks to pass before merging. Blocked merges prevent untested changes reaching production. GitHub's workflow run history gives you a complete deployment audit trail. You can answer "what was deployed to prod on Tuesday and who approved it" in seconds. For regulated environments, consider branch protection rules that require signed commits. Safe Rollout Use canary or blue-green patterns where Foundry supports them for high-traffic agents. Always keep the previous image tag available in the registry. Do not delete images on deployment. Document and test your rollback procedure before you need it in production. Observability and Operational Readiness A deployed agent that you cannot observe is an agent you cannot operate. Build observability in from the start. What to Monitor Deployment health - Track whether each Foundry deployment succeeded and the agent is responding. Wire deployment outcomes back to GitHub workflow run status. Model and tool errors - Log tool call failures, model timeout errors, and safety filter activations. Aggregate these in Azure Monitor or Application Insights. Latency - Track end-to-end response latency per agent version. A latency increase after a model or prompt change is an early signal of a quality regression. Token consumption - Monitor token usage per request and per session. Unexpected increases can indicate prompt injection or runaway orchestration loops. Traceability - Log which agent version handled each request. Correlation between the image tag and request traces is essential for debugging production issues. Debugging and Alerting Use structured logging with a consistent schema. Include fields for agent version, session ID, tool called, and outcome. Set up alerts for error rate thresholds and latency percentiles. Alert before users notice the problem. For failed agent runs, ensure logs capture the full conversation context (within your data retention policy) so that developers can reproduce and diagnose the failure. Microsoft Foundry Toolboxes One of the most important additions to the Foundry platform is Toolboxes, currently in Public Preview. If you have ever seen an agent codebase where three different agents each wire the same search tool with their own credentials and slightly different configurations, you already understand the problem Toolboxes solve. A Toolbox is a named, versioned bundle of tools managed centrally in Microsoft Foundry. You define the tools once, configure authentication and access centrally, and publish a single MCP-compatible endpoint. Any agent in any runtime consumes that endpoint without per-tool wiring, custom SDK integration, or duplicated credential management. Figure: Before and after Foundry Toolboxes. Each agent previously managed its own tool connections. With Toolboxes, agents connect to one governed endpoint. The Four Pillars Discover (coming soon) - Find approved tools without browsing long catalogues. Reduces duplication by surfacing what already exists before developers build something new. Build (available today) - Select tools into a named toolbox. Supported types include built-in tools (Web Search, Code Interpreter, File Search, Azure AI Search), MCP servers, Agent-to-Agent (A2A) endpoints, and OpenAPI-defined services. Consume (available today) - A single MCP-compatible endpoint exposes every tool in the toolbox to any agent runtime. Agents that can speak MCP can use a Foundry Toolbox without any Foundry-specific SDK dependency. Govern (coming soon) - Centralised authentication and observability applied to every tool call flowing through the toolbox. Security and platform teams get consistent controls without asking developers to bolt governance onto every agent individually. Toolboxes and GitOps: A Natural Fit Toolboxes are particularly well-suited to a GitOps delivery model because the toolbox definition is a discrete, versioned artefact. Instead of credentials and tool configuration scattered across agent codebases, the toolbox becomes its own managed entity with its own version history. The key design property is that the toolbox endpoint URL is stable. When you promote a new toolbox version to be the default, agents consuming the endpoint pick up the update without any code changes. This means you can update tool configuration, add a new MCP server, or rotate credentials in the toolbox without redeploying every agent that uses it. Figure: Toolbox versioning in a GitOps model. Commits trigger CI validation and deployment of new toolbox versions. The stable endpoint URL allows agents to consume updates without redeployment. Adding a Toolbox to Your Repository In your GitOps repository, toolbox definitions belong in /src/tools/toolbox_config.py or as a declarative configuration file checked into version control. The following example creates a toolbox that combines web search, Azure AI Search over internal documentation, and a GitHub MCP server: # src/tools/toolbox_config.py # Run this via CI to create or update a toolbox version in Foundry. from azure.identity import DefaultAzureCredential from azure.ai.projects import AIProjectClient import os client = AIProjectClient( endpoint=os.environ["FOUNDRY_PROJECT_ENDPOINT"], credential=DefaultAzureCredential() ) toolbox_version = client.beta.toolboxes.create_toolbox_version( toolbox_name="customer-feedback-toolbox", description="Tools for triaging customer feedback: search, docs, and GitHub.", tools=[ { "type": "web_search", "description": "Search approved public documentation sites.", "custom_search_configuration": { "project_connection_id": os.environ["BING_CONNECTION_NAME"], "instance_name": os.environ["BING_INSTANCE_NAME"] } }, { "type": "azure_ai_search", "name": "product-manuals-search", "description": "Search internal product documentation.", "azure_ai_search": { "indexes": [ { "index_name": os.environ["SEARCH_INDEX_NAME"], "project_connection_id": os.environ["SEARCH_CONNECTION_ID"] } ] } }, { "type": "mcp", "server_label": "github", "server_url": "https://api.githubcopilot.com/mcp", "project_connection_id": os.environ["GITHUB_CONNECTION_ID"] } ], ) print(f"Toolbox version created: {toolbox_version.version}") print(f"MCP endpoint: {toolbox_version.mcp_endpoint}") To promote a toolbox version to be the default (the endpoint agents use without specifying a version), add this to your deployment workflow: # Promote toolbox version to default after validation toolbox = client.beta.toolboxes.update( toolbox_name="customer-feedback-toolbox", default_version=toolbox_version.version, ) print(f"Default version is now: {toolbox.default_version}") The stable endpoint for agents consuming this toolbox is: https://<your-project>.services.ai.azure.com/api/projects/<project>/toolbox/customer-feedback-toolbox/mcp?api-version=v1 Attaching the Toolbox to Your Hosted Agent In your agent code, connect to the toolbox via a single MCP tool definition. The agent gains access to every tool in the toolbox without knowing their individual configurations: # src/agents/agent.py (relevant excerpt) from agent_framework import MCPStreamableHTTPTool import httpx, os toolbox_endpoint = os.environ["FOUNDRY_TOOLBOX_ENDPOINT"] http_client = httpx.AsyncClient( auth=_ToolboxAuth(token_provider), # Microsoft Entra bearer token timeout=120.0, ) mcp_tool = MCPStreamableHTTPTool( name="toolbox", url=toolbox_endpoint, http_client=http_client, load_prompts=False, ) # Agent now has access to web search, AI Search, and GitHub MCP # through one tool definition and one authenticated connection. GitOps Workflow Extension for Toolboxes Add a dedicated job to your build-deploy workflow to create and promote toolbox versions as part of the same CI/CD pipeline: deploy-toolbox: name: Deploy Toolbox Version needs: validate runs-on: ubuntu-latest environment: dev permissions: id-token: write contents: read steps: - uses: actions/checkout@v4 - name: Azure login (OIDC) uses: azure/login@v3 with: client-id: ${{ secrets.AZURE_CLIENT_ID_DEV }} tenant-id: ${{ secrets.AZURE_TENANT_ID }} subscription-id: ${{ secrets.AZURE_SUBSCRIPTION_ID }} - name: Create toolbox version in Foundry env: FOUNDRY_PROJECT_ENDPOINT: ${{ vars.FOUNDRY_PROJECT_ENDPOINT_DEV }} BING_CONNECTION_NAME: ${{ vars.BING_CONNECTION_NAME }} BING_INSTANCE_NAME: ${{ vars.BING_INSTANCE_NAME }} SEARCH_INDEX_NAME: ${{ vars.SEARCH_INDEX_NAME }} SEARCH_CONNECTION_ID: ${{ vars.SEARCH_CONNECTION_ID }} GITHUB_CONNECTION_ID: ${{ vars.GITHUB_CONNECTION_ID }} run: python src/tools/toolbox_config.py Key points to note: Toolbox configuration is Python code in source control, reviewed through pull requests like any other change Connection IDs and index names are environment variables from GitHub Actions variables, not hardcoded in the script The same script runs for dev, test, and prod with different environment variable bindings Toolbox version promotion is a separate step from agent deployment, so you can update tools independently of the agent container Because the toolbox endpoint is stable, rolling back a toolbox version does not require rolling back the agent image Common Pitfalls Teams adopting this pattern commonly make the following mistakes. Identifying them early saves significant operational pain later. Treating prompts as unmanaged text. If your system prompt lives in a portal text box rather than a versioned file, you have no history, no review process, and no rollback capability. Move prompts into source control on day one. Deploying manually from the portal. Even one manual deployment breaks the GitOps contract. Your repository no longer reflects the true state of the environment. Automate everything and remove portal deployment permissions from individuals. Mixing environment configuration into source files. Hardcoded endpoint URLs or model deployment names in agent_config.json mean your dev and prod configurations diverge at the source level. Use parameter files and environment variables resolved at deployment time. Poor separation between agent logic and tool logic. When agents and tools are tightly coupled in a single file, a tool change requires a full agent review and redeployment. Keep them separate so they can evolve independently. Not versioning your Toolbox definition. Defining a Foundry Toolbox interactively through the portal gives you no audit trail and no rollback path. The toolbox configuration script belongs in source control alongside your agent code. Skipping evaluation before promotion. Deploying a prompt change without running a structured evaluation against a representative test set is how regressions reach production. Build evaluation into the pull request workflow, not just the deployment workflow. No rollback plan. If your first rollback is unplanned and urgent, it will be slow and stressful. Test your rollback procedure in a non-production environment and document the steps. Ignoring token and cost signals. AI workloads have variable cost profiles. A change that doubles average token consumption per request may be functionally correct but economically unsustainable. Monitor consumption as a first-class signal. Example GitHub Actions Workflow The following workflow runs on pull request validation and on merge to main. It covers the core delivery lifecycle: validate, build, deploy to dev, and smoke test. # .github/workflows/build-deploy.yml name: Build and Deploy Foundry Hosted Agent on: push: branches: - main pull_request: branches: - main env: REGISTRY: myregistry.azurecr.io IMAGE_NAME: my-foundry-agent jobs: validate: name: Validate Agent Configuration runs-on: ubuntu-latest steps: - uses: actions/checkout@v4 - name: Set up Python uses: actions/setup-python@v5 with: python-version: "3.12" - name: Install dependencies run: pip install -r requirements.txt - name: Validate agent config schema run: python scripts/validate_agent.py - name: Run unit tests run: pytest tests/unit/ -v - name: Lint code run: ruff check src/ build: name: Build and Push Container Image needs: validate runs-on: ubuntu-latest if: github.ref == 'refs/heads/main' permissions: id-token: write contents: read outputs: image_tag: ${{ steps.meta.outputs.version }} steps: - uses: actions/checkout@v4 - name: Azure login (OIDC) uses: azure/login@v3 with: client-id: ${{ secrets.AZURE_CLIENT_ID }} tenant-id: ${{ secrets.AZURE_TENANT_ID }} subscription-id: ${{ secrets.AZURE_SUBSCRIPTION_ID }} - name: Log in to Azure Container Registry run: az acr login --name ${{ env.REGISTRY }} - name: Extract metadata id: meta uses: docker/metadata-action@v5 with: images: ${{ env.REGISTRY }}/${{ env.IMAGE_NAME }} tags: | type=sha,format=short - name: Build and push image uses: docker/build-push-action@v7 with: context: . push: true tags: ${{ steps.meta.outputs.tags }} deploy-dev: name: Deploy to Foundry Dev needs: build runs-on: ubuntu-latest environment: dev permissions: id-token: write contents: read steps: - uses: actions/checkout@v4 - name: Azure login (OIDC) uses: azure/login@v3 with: client-id: ${{ secrets.AZURE_CLIENT_ID_DEV }} tenant-id: ${{ secrets.AZURE_TENANT_ID }} subscription-id: ${{ secrets.AZURE_SUBSCRIPTION_ID }} - name: Deploy agent to Foundry Dev project run: | az ai foundry agent deploy \ --project ${{ vars.FOUNDRY_PROJECT_DEV }} \ --image ${{ env.REGISTRY }}/${{ env.IMAGE_NAME }}:${{ needs.build.outputs.image_tag }} \ --environment dev - name: Run smoke tests against dev run: pytest tests/smoke/ -v --base-url ${{ vars.AGENT_URL_DEV }} deploy-test: name: Deploy to Foundry Test needs: deploy-dev runs-on: ubuntu-latest environment: test permissions: id-token: write contents: read steps: - uses: actions/checkout@v4 - name: Azure login (OIDC) uses: azure/login@v3 with: client-id: ${{ secrets.AZURE_CLIENT_ID_TEST }} tenant-id: ${{ secrets.AZURE_TENANT_ID }} subscription-id: ${{ secrets.AZURE_SUBSCRIPTION_ID }} - name: Deploy agent to Foundry Test project run: | az ai foundry agent deploy \ --project ${{ vars.FOUNDRY_PROJECT_TEST }} \ --image ${{ env.REGISTRY }}/${{ env.IMAGE_NAME }}:${{ needs.build.outputs.image_tag }} \ --environment test - name: Run smoke tests against test run: pytest tests/smoke/ -v --base-url ${{ vars.AGENT_URL_TEST }} Key decisions in this workflow: Validation runs on every pull request, not just on merge. Fast feedback catches problems before review. The container image is built once and the image tag is passed forward to deployment jobs. The same artefact is promoted across environments. Authentication uses OIDC federated credentials via azure/login@v3 with id-token: write permissions. No long-lived secrets are stored in GitHub for Azure authentication. The environment: test directive in the deploy-test job triggers a GitHub environment approval gate. A named reviewer must approve before the job runs. Smoke tests run after every deployment. A failed smoke test prevents further promotion. Best Practices Checklist Use this checklist when adopting the GitOps pattern for a Microsoft Foundry Hosted Agent: All agent artefacts, including prompts, tool definitions, model configuration, and Toolbox configuration scripts, are committed to source control No manual deployments to any environment; all changes flow through GitHub Actions workflows Pull request reviews are enforced for all changes to agent logic, prompts, and infrastructure via CODEOWNERS Unit tests cover tool logic; integration tests cover end-to-end agent behaviour; smoke tests cover deployed environments Container images are built once per commit and promoted across environments; images are not rebuilt per environment Environment configuration (endpoints, resource names) lives in parameter files, never in source code Secrets are stored in Azure Key Vault and accessed via managed identity at runtime GitHub environment approval gates control promotion from dev to test to prod Foundry Toolboxes are used to centralise tool definitions, credentials, and access governance across all agents; the toolbox configuration script is version-controlled and deployed through CI/CD Toolbox versions are promoted via the update default_version API step in the deployment workflow, not manually through the portal Latency, error rate, and token consumption are monitored with alerting thresholds The rollback procedure is documented, automated, and has been tested in a non-production environment GitHub Issues are used to record the intent behind significant changes and link to the pull requests that implement them Branch protection rules prevent direct pushes to main and require status checks to pass before merge The previous image tag is retained in the registry and stored as a GitHub environment variable for rollback Conclusion A Microsoft Foundry Hosted Agent is not something you deploy once and forget. Prompts evolve, tools change, models are upgraded, and policy requirements shift. Every one of those changes has the potential to alter agent behaviour in ways that affect users, costs, and compliance posture. GitOps, implemented through GitHub and GitHub Tasks, gives you the operational discipline to manage that complexity. Source control for all artefacts. Pull request review for every change. Automated validation, build, and deployment. Environment promotion gates. A complete audit trail from task to production. These are not bureaucratic overhead; they are the foundation of reliable, trustworthy AI agent operations. The teams that operate AI agents well are the ones that treat them like production software from the start. The investment in pipeline, structure, and governance pays back every time a change goes smoothly, every time a rollback takes minutes rather than hours, and every time a security or compliance reviewer can answer their question from a pull request history rather than a support ticket. Build the discipline in early. Your future self, and your production environment, will benefit from it. References Microsoft Foundry documentation Microsoft Foundry Agent Service documentation Microsoft Foundry Toolboxes documentation Introducing Toolboxes in Foundry (Microsoft Developer Blog) GitHub Actions documentation GitHub Projects and Tasks documentation Azure Container Registry documentation Azure Key Vault documentation Microsoft Entra Managed Identities documentation OpenGitOps PrinciplesSix Coding Agents, One Production System: A Field Guide to AgenticOps with AKS-Lab-GitHubCopilot
The shift: from "AI helps me code" to "AI authors my repo" For two years we've been talking about GitHub Copilot as an inline pair programmer — a clever autocomplete that lives in your editor. That framing is officially out of date. The new reality is agentic delivery: a team of named, scoped AI agents owns slices of your repository, each with its own tools, skills, and refusal rules. They produce pull requests. They run tests. They roll deployments. And when one finishes its turn, it hands off to the next. The microsoft/AKS-Lab-GitHubCopilot's five labs you ship ZavaShop — a multi-agent retail supply-chain control plane running on AKS + Azure Container Apps — and along the way you internalize an operating model you can carry to any project. Everything in the repo (specs, agents, MCP servers, tests, Bicep, Helm, GitHub Actions) is authored by six GitHub Copilot Custom Coding Agents working from your IDE, plus the remote GitHub Copilot Coding Agent that closes the PR loop on GitHub. This is what AgenticOps looks like in practice. Two layers of agents — don't confuse them The first cognitive hurdle in this lab is keeping two very different agent populations straight: Layer What it is When it lives Examples Application agents The product you ship — the runtime ZavaShop fleet that solves a business problem Production (AKS + ACA) InventoryAgent, SupplierAgent, LogisticsAgent, PricingAgent, OrchestratorAgent Coding agents The dev-time team that writes the application agents Your IDE + GitHub requirements-analyst, mcp-builder, agent-builder, orchestrator-architect, test-author, deploy-engineer Both are built with the Microsoft Agent Framework (MAF). Both use the GitHub Copilot SDK as their model provider. But they exist at different layers of the development lifecycle, and the entire lab is structured around that distinction. If you only remember one thing from this post: the coding agents are how you build the application agents. That is the whole AgenticOps loop, compressed into one sentence. GitHub Copilot Coding Agent vs. Custom Coding Agents There are two flavors of "coding agent" in the GitHub Copilot ecosystem, and this lab uses both. 1. The remote GitHub Copilot Coding Agent This is the GitHub-side, asynchronous, PR-driven agent. You assign it an issue, it spins up a sandboxed environment, writes the code, runs the tests, and opens a PR for human review. You don't watch it work — you review what it produces. In ZavaShop, Lab 04 (Testing) explicitly uses this agent: you take a failing eval scenario, file it as an issue, assign it to Copilot, and the agent comes back with a PR. Your job is the human bar, not the keystrokes. Important governance choice from AGENTS.md: the remote Coding Agent is allowed to open PRs against src/ and tests/ only — never against infra/ without human review. That single rule is a textbook example of agent-aware policy. 2. The local Custom Coding Agents These are scoped, in-IDE specialist agents you select <agent name> in Copilot Chat. They live as *.agent.md files inside .github/agents/ and are discovered by VS Code on reload. Each one owns exactly one slice of the repository. Six of them ship in this lab: Phase Agent Owns Refusal rule Requirements requirements-analyst specs/*.md Refuses to write code MCP tools mcp-builder src/mcp_servers/* One server per turn Specialist agents agent-builder src/agents/<specialist>/* One specialist per turn Orchestration orchestrator-architect src/agents/orchestrator/*, src/shared/*, docker-compose.yml Owns wiring, not business logic Tests test-author tests/** Never edits src/ Deploy deploy-engineer infra/**, .github/workflows/** Won't touch application code The pattern that matters here isn't just "we made some custom agents." It's that every agent declares what it owns and what it refuses to do. That refusal envelope is what makes the system safe to delegate to. Without it, you'd just have a noisier autocomplete. Three workflow prompts in .github/prompts/ chain the agents together so you don't have to remember the sequence: /feature-from-issue — issue → spec → code → tests → PR → deploy /spec-to-code — drive an existing spec through code + tests /ship-it — quality gate → build → push → ACR/ACA/AKS rollout → smoke + evals This is the closest thing I've seen to a programmable software development lifecycle. Where AgenticOps fits in DevOps gave us repeatable infrastructure. MLOps gave us repeatable model lifecycles. AgenticOps is what you need when the thing you're operating is itself a fleet of autonomous agents — both at build time and at runtime. The lab makes the four pillars of AgenticOps concrete: Specs as the contract. /requirements-analyst produces specs/<slug>.md files with goals, contracts, and eval scenarios. Nothing else in the repo is built until that spec exists. Specs are the source of truth that human reviewers actually read. Skills as living documentation. .github/skills/<skill>/SKILL.md files hold shared, agent-agnostic knowledge — Python conventions, Kubernetes patterns, MAF idioms. Every coding agent declares which skills it must consult before writing code. This is how you stop drift: knowledge lives in one place and is pulled in on demand. Evals as the quality gate. The repo runs a four-layer test pyramid plus five golden eval scenarios (S1–S5). uv run poe check runs locally and in GitHub Actions. Copilot-authored PRs must pass the same bar a human does — no exceptions. Observability tied to agent identity. Every agent emits agent.name, agent.run_id, and agent.span_id through structlog. When something misbehaves in production, you can trace the line from "this evaluation failed" all the way back to "this version of this agent, on this run, called this tool with these arguments." These four pillars aren't ZavaShop-specific. They're the contract for any AgenticOps system: scoped ownership, contracts as code, evals as gates, identity in every span. Walking through the workshop: which agent does what, when The five labs are five chapters of one story — ZavaShop going from an empty Azure subscription to a live retail control plane. Each lab activates a different subset of coding agents. Lab 01 — Environment Setup (no coding agents yet) You provision the platform: AKS cluster, ACA environment, Azure Container Registry, Key Vault, and the Workload Identity that every agent will wear. Then you install the six Custom Coding Agents into your IDE. Think of this as hiring the development team and giving them their badges. Lab 02 — Agent Creation (four agents in play) This is where it clicks. You start by requirements-analyst in Copilot Chat to produce the spec for each ZavaShop application agent. Then mcp-builder is invoked four times to scaffold the four MCP servers — one per domain (inventory DB, supplier API, shipping API, pricing API). Then agent-builder runs four more times to build the typed ChatAgent specialists. Finally orchestrator-architect wires them together with a MAF Workflow. What's stunning about this lab is the handoff discipline. Every coding agent ends its turn with a line naming the next agent to invoke. You're not orchestrating the work — the agents are. Lab 03 — Multi-Agent Orchestration & Config (two agents) The orchestrator stops being a one-shot LLM call and becomes a deterministic Workflow. Secrets move from .env to Key Vault. The whole fleet boots locally with Docker Compose. This is orchestrator-architect's star turn — wiring A2A endpoints, MCP tool registration, Key Vault hydration, OpenTelemetry. Specs come from requirements-analyst; the rest is orchestration. Lab 04 — Testing (both coding agent flavors) /test-author writes the four-layer pyramid (unit, MCP contract, integration, eval). Then you switch gears: take a failing eval scenario, file it as a GitHub issue, and assign it to the remote GitHub Copilot Coding Agent. The agent works asynchronously, opens a PR, and uv run poe check decides whether it passes. This is the lab where the local-vs-remote distinction stops being abstract and starts being operational. Lab 05 — Deployment & Run (deployment specialist) /deploy-engineer writes the Helm chart for the AKS orchestrator and the Bicep modules for the ACA specialists. The /ship-it workflow prompt then runs the full pipeline: quality gate → ACR build → ACA deploy → AKS rollout → smoke tests → evals. GitHub Actions OIDC re-runs the same pipeline on every main push. Notice the pattern across all five labs: at no point does a human write production code from scratch. Humans set goals, review specs, approve PRs, and run quality gates. The keystrokes belong to agents. How Coding Agents transform the DevOps pipeline Take a step back from the lab and ask: what actually changes in your DevOps flow when you adopt this model? The atomic unit of work shifts. In classic DevOps the unit is the commit. In AgenticOps the unit is the spec. A spec drives one or more agents; agents produce commits; commits trigger CI; CI gates promotion. The commit becomes a derived artifact, not the starting point. Code review changes shape. You're no longer reviewing "did this human understand the codebase?" — you're reviewing "did this agent follow its refusal rules, consult its skills, and produce something that passes the evals?" Reviewers spend less time on style and more time on intent. The diff is often less interesting than the spec it came from. Governance becomes structural, not procedural. Instead of writing a wiki page that says "don't touch infra without review," you encode that rule in AGENTS.md and refuse to let the agent's tool set include infra paths. Policy becomes part of the agent definition, not a checklist humans hopefully remember. The CI pipeline expands. Beyond build/test/deploy, you now have an eval stage that asks "does the system still behave correctly on the golden scenarios?" — and a Copilot-authored PR has to pass the same eval stage as a human-authored one. The pipeline is the great equalizer. Onboarding compresses. A new engineer doesn't need to read 50 wiki pages to be productive. They read AGENTS.md, select the relevant agent walks them through. Institutional knowledge lives in .agent.md and SKILL.md files instead of senior engineers' heads. The net effect is a pipeline that's faster, more uniform, and easier to audit. Faster because agents parallelize what humans serialize. More uniform because every change goes through the same six-agent template. Easier to audit because every artifact has a named author and a refusal rule it had to respect. What to take away The AKS-Lab-GitHubCopilot workshop teaches three things at once. The surface lesson is "how to build a multi-agent retail system on AKS." The middle lesson is "how to use GitHub Copilot Custom Agents and the remote Coding Agent." The deepest lesson — and the one I'd argue matters most — is how to design a development process where AI agents are first-class citizens with bounded responsibilities, not free-form copilots. If you take the model and walk away from the lab, three patterns are worth keeping: Scope before capability. Don't give an agent every tool; give it the smallest surface that makes it useful. Specs are the API between humans and agents. Invest in requirements-analyst-style flows even if the rest of your stack isn't there yet. Evals are non-negotiable. The moment an agent can open a PR, you need a quality gate that doesn't care who the author is. Clone the repo microsoft/AKS-Lab-GitHubCopilot , hit Developer: Reload Window, select agents in Copilot Chat, and watch six teammates show up. That's the future of the DevOps pipeline — and it's already shipping. Resources microsoft/AKS-Lab-GitHubCopilot — The repository this post is built on. Best practices for using Copilot to work on tasks — Governance patterns for delegating issues to Copilot. GitHub Copilot SDK (Python) — The provider used by every agent in this lab.807Views0likes0CommentsGiving the Copilot SDK Agent a "hardware-level helmet" using Kata microVM on AKS
A Moment That Made Me Pause I was recently building an Agent service with the GitHub Copilot SDK. After getting it up and running, I went back through the execution logs and something jumped out at me: In a single conversation turn, the Agent had executed a shell command, read several files, and pulled down a third-party MCP server from npm via npx — all on its own. I didn't hard-code any of that. The model decided at runtime to run those commands, read those files, and install that package. That's when it hit me: a significant chunk of the code running inside this container was written on the fly — by the model, not by me. This is fundamentally different from a traditional web service. With a regular app, every line of code is written by a human, reviewed, and tested before it reaches production. But an AI Agent? Part of its behavior is generated at runtime. You don't know in advance what it's going to execute. So the question becomes: is the container we put it in actually strong enough? How Container Isolation Actually Works (And Where It Falls Short) Let me use an analogy. Think of a traditional container as an apartment in a building. Each apartment has its own walls — namespaces and cgroups keep things separated. From the inside, it feels like you have your own place. But every apartment shares the same roof — the host Linux kernel. Most of the time, this is fine. But if someone finds a crack in the roof — a kernel vulnerability — they can climb up from their apartment, walk across the roof, and drop into any other apartment in the building. That's a container escape. For a standard web service, this risk is manageable — the code inside your container is predictable. But an AI Agent is different. The code running inside the container is inherently unpredictable — it's not an external attacker you're worried about, it's the tenant itself. Docker laid this out clearly in Comparing Sandboxing Approaches for AI Agents: AI Agents are a class of workload that inherently requires stronger sandboxing. The shared-kernel model of traditional containers isn't enough. So what is enough? Meet the microVM: A Private Roof for Every Apartment Sticking with the building analogy — if the problem is a shared roof, the fix is obvious: give every apartment its own roof. You still live in an apartment (container). The building is still managed the same way (Kubernetes). But the ceiling above your head is now yours alone. Even if you punch through it, you only reach your own roof — not your neighbor's. That's the core idea behind a microVM. Koyeb published a great explainer called What Is a microVM. Here's the essence: It's a virtual machine — with its own independent guest kernel, fully isolated from the host kernel. This is where the security comes from. But it's a stripped-down VM — only the bare essentials: CPU, memory, network, block storage. No USB controllers, no sound cards, no GPU passthrough. So it's fast and light — millisecond boot times, small memory footprint, close to the container experience. One line summary: microVM = VM-grade isolation + near-container-grade lightness. How Does Kubernetes Use microVMs? Enter Kata Containers Knowing microVMs are great is one thing — but Kubernetes schedules Pods and containers, not VMs. How do you bridge these two worlds? That's exactly what Kata Containers does. Their tagline nails it: "The speed of containers, the security of VMs." Kata acts as a translation layer between Kubernetes and microVMs: From Kubernetes' perspective, it's still a standard Pod — scheduled, managed, and monitored normally. Under the hood, that Pod is actually running inside a lightweight VM with its own kernel. You don't change your application code. You don't change your CI/CD pipeline. You just tell Kubernetes: "Run this Pod with Kata's RuntimeClass." Kata handles the rest. On AKS, Microsoft has integrated Kata out of the box under the name Pod Sandboxing. The hypervisor is Microsoft Hyper-V (not QEMU), and the RuntimeClass is called kata-vm-isolation. You create a special node pool, and AKS sets everything up automatically. Now Let's Look at a Real Example Enough theory — let me walk you through something concrete. I built a sample called AKS_MicroVM that does one thing: Run a GitHub Copilot SDK Agent service on AKS, enforced to run inside kata-vm-isolation — a microVM sandbox. Here's the architecture: HTTPS request comes in └─ AKS Node Pool (KataVmIsolation enabled) └─ Pod (runtimeClassName: kata-vm-isolation) └─ Dedicated Hyper-V microVM └─ FastAPI service (Python / uvicorn) └─ GitHubCopilotAgent └─ Copilot CLI (Node.js) └─ MCP servers / tools Isolated guest kernel + seccomp + cgroup Egress restricted by NetworkPolicy From the outside, it's just an ordinary AKS Pod. On the inside, the app runs in its own micro virtual machine with a dedicated kernel. Project Structure The entire sample is just these files: app/ ← Agent service (Python) main.py ← FastAPI endpoints agent.py ← Copilot Agent wrapper tools.py ← Example function tools requirements.txt Dockerfile ← Python 3.12 + Node 20 + Copilot CLI k8s/ ← Kubernetes manifests namespace.yaml runtimeclass.yaml ← Reference (AKS auto-creates this) secret.example.yaml ← Token placeholder deployment.yaml ← The key file: enforces kata-vm-isolation service.yaml networkpolicy.yaml ← Locks down ingress/egress infra/ ← Infrastructure scripts 01-create-aks.sh ← Create the cluster 02-build-push.sh ← Build image, push to ACR 03-deploy.sh ← Deploy everything Three shell scripts to set up infrastructure, six YAML files to deploy the service. That's it. Not Just a microVM: Five Layers of Defense I want to emphasize this: the sample doesn't just slap on a microVM and call it a day. It stacks five layers of protection: What you're worried about How this layer addresses it Malicious code escaping the container kata-vm-isolation → dedicated microVM with its own kernel Privilege escalation inside the container runAsNonRoot + drop ALL caps + read-only filesystem + seccomp Agent phoning home to unauthorized endpoints NetworkPolicy allowlist — only Copilot/GitHub/MCP egress permitted Token leakage K8s Secret injection (upgradeable to Key Vault via CSI) Model instructing the Agent to do something dangerous on_permission_request defaults to deny; only allowlisted operations proceed The microVM is the outermost wall — hardware-grade isolation. But inside that wall, there are still guards, access controls, and surveillance cameras. You need all of them. Six Steps to Deploy # ① Create an AKS cluster with Kata support bash infra/01-create-aks.sh # ② Verify the RuntimeClass is ready kubectl get runtimeclass kata-vm-isolation # ③ Build the image and push to ACR (script auto-detects your ACR) bash infra/02-build-push.sh # ④ Add your GitHub Copilot token # Edit k8s/secret.example.yaml → rename to secret.yaml (don't commit it!) # ⑤ Deploy everything bash infra/03-deploy.sh # ⑥ Access via API server proxy kubectl proxy --port=8001 Then chat with the Agent: curl -s -X POST \ http://localhost:8001/api/v1/namespaces/copilot-agent/services/copilot-agent:80/proxy/chat \ -H 'content-type: application/json' \ -d '{"message":"Briefly introduce Kata Containers."}' Want streaming output? Use the stream endpoint: curl -N -X POST \ http://localhost:8001/api/v1/namespaces/copilot-agent/services/copilot-agent:80/proxy/chat/stream \ -H 'content-type: application/json' \ -d '{"message":"List 3 Linux kernel hardening tips","stream":true}' How to Verify It's Actually Running in a microVM One command: kubectl -n copilot-agent exec deploy/copilot-agent -- uname -r If the kernel version differs from the node's kernel — your Pod is running in its own guest kernel, not sharing the host's. Proof done. Gotchas I Hit So You Don't Have To kubectl port-forward doesn't work with Kata Pods. This is the easiest trap to fall into. The app listener runs inside the microVM, but port-forward connects to the empty sandbox netns on the host — you'll get connection refused. Use kubectl proxy instead. Token environment variable names. The Copilot CLI expects GH_TOKEN or GITHUB_TOKEN — not a custom name. The Deployment already injects both from the same Secret. Read-only filesystem needs emptyDir mounts. The container runs with readOnlyRootFilesystem: true, but the Copilot CLI needs to write to /home/agent/.cache at startup. The Deployment mounts emptyDir volumes at .cache, .copilot, and /tmp — miss one and the CLI won't start. Keep on_permission_request on deny-by-default. The Agent's tool calls go through a permission gate that defaults to deny, with an allowlist for approved operations. Don't switch this to approve-all in production — ever. Wrapping Up: The Thread That Ties It All Together Let me trace the logic one more time: ① Scenario: AI Agents inherently run model-generated, untrusted code inside containers ② Problem: Traditional containers share the host kernel — one escape compromises the entire node ③ Insight: We need hardware-grade isolation, stronger than namespaces alone ④ Solution: microVMs — a dedicated guest kernel for every Pod ⑤ Integration: Kata Containers brings microVM support to Kubernetes natively; AKS Pod Sandboxing makes it turnkey ⑥ Practice: The AKS_MicroVM sample — six steps to deploy, five layers of defense In the age of AI Agents, a container isn't just a box for your application — it's a box for uncertainty. It needs a stronger shell. The microVM is that shell. Full source code: https://github.com/kinfey/Multi-AI-Agents-Cloud-Native/tree/main/code/AKS_MicroVM Further reading: What is a microVM? — Koyeb Comparing Sandboxing Approaches for AI Agents — Docker Kata Containers425Views0likes0CommentsIf You're Building AI on Azure, ECS 2026 is Where You Need to Be
Let me be direct: there's a lot of noise in the conference calendar. Generic cloud events. Vendor showcases dressed up as technical content. Sessions that look great on paper but leave you with nothing you can actually ship on Monday. ECS 2026 isn't that. As someone who will be on stage at Cologne this May, I can tell you the European Collaboration Summit combined with the European AI & Cloud Summit and European Biz Apps Summit is one of the few events I've seen where engineers leave with real, production-applicable knowledge. Three days. Three summits. 3,000+ attendees. One of the largest Microsoft-focused events in Europe, and it keeps getting better. If you're building AI systems on Azure, designing cloud-native architectures, or trying to figure out how to take your AI experiments to production — this is where the conversation is happening. What ECS 2026 Actually Is ECS 2026 runs May 5–7 at Confex in Cologne, Germany. It brings together three co-located summits under one roof: European Collaboration Summit — Microsoft 365, Teams, Copilot, and governance European AI & Cloud Summit — Azure architecture, AI agents, cloud security, responsible AI European BizApps Summit — Power Platform, Microsoft Fabric, Dynamics For Azure engineers and AI developers, the European AI & Cloud Summit is your primary destination. But don't ignore the overlap, some of the most interesting AI conversations happen at the intersection of collaboration tooling and cloud infrastructure. The scale matters here: 3,000+ attendees, 100+ sessions, multiple deep-dive tracks, and a speaker lineup that includes Microsoft executives, Regional Directors, and MVPs who have built, broken, and rebuilt production systems. The Azure + AI Track - What's Actually On the Agenda The AI & Cloud Summit agenda is built around real technical depth. Not "intro to AI" content, actual architecture decisions, patterns that work, and lessons from things that didn't. Here's what you can expect: AI Agents and Agentic Systems This is where the energy is right now, and ECS is leaning in. Expect sessions covering how to design agent workflows, chain reasoning steps, handle memory and state, and integrate with Azure AI services. Marco Casalaina, VP of Products for Azure AI at Microsoft, is speaking if you want to understand the direction of the Azure AI platform from the people building it, this is a direct line. Azure Architecture at Scale Cloud-native patterns, microservices, containers, and the architectural decisions that determine whether your system holds up under real load. These sessions go beyond theory you'll hear from engineers who've shipped these designs at enterprise scale. Observability, DevOps, and Production AI Getting AI to production is harder than the demos suggest. Sessions here cover monitoring AI systems, integrating LLMs into CI/CD pipelines, and building the operational practices that keep AI in production reliable and governable. Cloud Security and Compliance Security isn't optional when you're putting AI in front of users or connecting it to enterprise data. Tracks cover identity, access patterns, responsible AI governance, and how to design systems that satisfy compliance requirements without becoming unmaintainable. Pre-Conference Deep Dives One underrated part of ECS: the pre-conference workshops. These are extended, hands-on sessions typically 3–6 hours that let you go deep on a single topic with an expert. Think of them as intensive short courses where you can actually work through the material, not just watch slides. If you're newer to a particular area of Azure AI, or you want to build fluency in a specific pattern before the main conference sessions, these are worth the early travel. The Speaker Quality Is Different Here The ECS speaker roster includes Microsoft executives, Microsoft MVPs, and Regional Directors, people who have real accountability for the products and patterns they're presenting. You'll hear from over 20 Microsoft speakers: Marco Casalaina — VP of Products, Azure AI at Microsoft Adam Harmetz — VP of Product at Microsoft, Enterprise Agent And dozens of MVPs and Regional Directors who are in the field every day, solving the same problems you are. These aren't keynote-only speakers — they're in the session rooms, at the hallway track, available for real conversations. The Hallway Track Is Not a Cliché I know "networking" sounds like a corporate afterthought. At ECS it genuinely isn't. When you put 3,000 practitioners, engineers, architects, DevOps leads, security specialists in one venue for three days, the conversations between sessions are often more valuable than the sessions themselves. You get candid answers to "how are you actually handling X in production?" that you won't find in documentation. The European Microsoft community is tight-knit and collaborative. ECS is where that community concentrates. Why This Matters Right Now We're in a period where AI development is moving fast but the engineering discipline around it is still maturing. Most teams are figuring out: How to move from AI prototype to production system How to instrument and observe AI behaviour reliably How to design agent systems that don't become unmaintainable How to satisfy security and compliance requirements in AI-integrated architectures ECS 2026 is one of the few places where you can get direct answers to these questions from people who've solved them — not theoretically, but in production, on Azure, in the last 12 months. If you go, you'll come back with practical patterns you can apply immediately. That's the bar I hold events to. ECS consistently clears it. Register and Explore the Agenda Register for ECS 2026: ecs.events Explore the AI & Cloud Summit agenda: cloudsummit.eu/en/agenda Dates: May 5–7, 2026 | Location: Confex, Cologne, Germany Early registration is worth it the pre-conference workshops fill up. And if you're coming, find me, I'll be the one talking too much about AI agents and Azure deployments. See you in Cologne.