application modernization
119 TopicsRun an Ollaya decision model on Azure Container Apps
Many AI calls are not really conversations. A support message needs an intent. A workflow needs a route. A policy check needs a yes or no. An agent needs to select its next action from a known list. These are bounded decisions, but they are often sent to a general-purpose LLM. The LLM reads the request, generates an answer token by token, and then the application validates and parses the response. That is useful when the task needs reasoning or language generation. It is more machinery than necessary when the only valid answer is one of 60 labels. On September 15, 2026, TypeSafe released Jev, its first public System One Model, in early access. Jev has helped bring attention to models built specifically for decisions: structured state goes in, and typed choices with probabilities come out. Ollaya approaches the same problem from a self-hosted direction. It is a model runtime that can serve open decision models, including the winnow:e4b model used here. Jev and Ollaya are not connected products. Jev is a hosted model from TypeSafe; Ollaya provides a way to run decision models in infrastructure you control. They are related by the kind of work they target. What decision models are good at A decision model scores predefined options rather than generating open-ended text: Decision model Traditional LLM Selects from allowed choices Generates text Returns a probability for each decision Usually returns one generated answer Has a bounded, typed output Needs schema constraints and validation Supports confidence thresholds Often needs a separate confidence strategy Fits classification, routing, scoring, policy, and prioritization Fits generation, summarization, coding, and open-ended reasoning That narrower interface creates several practical benefits: Predictable outputs: the application receives an allowed value rather than text that must be repaired or parsed. Lower decision latency: there is no autoregressive output sequence to generate. Token savings: a decision can be returned without generating output tokens. Useful uncertainty: calibrated probabilities let the application act, reject, or escalate. Smaller infrastructure: a specialized model can fit on hardware that would be modest for a general LLM. Decision models are not replacements for every LLM call. They make sense when the possible outcomes are known before the request arrives. An LLM remains the better tool when the output itself is language, code, or open-ended reasoning. Why Azure Container Apps serverless GPU Azure Container Apps serverless GPUs make self-hosted inference feel much closer to consuming a managed API. You bring the container and model; Azure manages the underlying GPU infrastructure. The Consumption GPU profile provides: NVIDIA T4 or A100 GPUs without managing GPU nodes or a Kubernetes cluster. Automatic scaling with the option to scale to zero. Per-second GPU billing while replicas are running. Container Apps networking, identity, ingress, logging, and revision management. A private inference path where the model and request data stay inside your Azure environment. That last point matters for data-sensitive decisions. In the Ollaya-only configuration, text is sent to an internal Ollaya endpoint rather than an external model API. The model, API, persistent cache, and operational controls remain in the application's Azure environment. Serverless does not remove the need to think about cold starts. A model still needs to be loaded into VRAM. For low or sporadic traffic, scaling to zero can avoid idle GPU cost. For latency-sensitive traffic, a warm minimum replica avoids making a user wait for the model to load. Azure Files can retain the model layers across revisions so a new deployment does not download the full model again. The T4 is also an important part of this experiment. It is not the largest GPU available, but the goal is not to run the largest model. The goal is to match the hardware to a model designed for the task. A focused decision model on a T4 can compete with a hosted API when the workload is a bounded classification rather than text generation. The experiment I deployed winnow:e4b through Ollaya on an Azure Container Apps Consumption-GPU-NC8as-T4 workload profile. An authenticated API exposed the classifier while Ollaya remained on internal-only ingress. A second path sent the same requests to GPT-5.4 Nano through Azure OpenAI using managed identity. The evaluation used the complete 2,974-record test partition from Amazon MASSIVE 1.1. It contains 18 scenarios and 60 intents. Both providers received the same records, labels, and descriptions. The benchmark measured latency at concurrency 1 and throughput at concurrency 8. Providers and modes ran sequentially so one measurement did not load the service used by another. This was not a direct benchmark of Jev; it tested the same decision-model pattern with an open model that could run inside the Azure environment. What the results showed The benchmark ran on September 30, 2026. Provider Successful Intent accuracy Macro-F1 p50 p95 Winnow on T4 2,974 / 2,974 75.59% 76.40% 946 ms 960 ms GPT-5.4 Nano 2,974 / 2,974 79.12% 78.07% 1,369 ms 2,489 ms Nano led intent accuracy by 3.53 percentage points. Winnow was 30.9% faster at p50 and 61.4% faster at p95. This is the useful T4 result: a smaller GPU running the right specialized model matched and beat the hosted endpoint on response latency, though not on accuracy. At concurrency 8, Nano delivered 1.367 requests per second compared with Winnow's 1.120. Nano also had 25 requests fail after eight retries because the deployment exceeded its token-rate limit. Winnow completed all 2,974 requests, but its single loaded runner serialized work and increased queue time. The token comparison shows what the decision-only path removes: Provider, both benchmark passes Input tokens Cached input tokens Output tokens Winnow on T4 9,252,872 0 0 GPT-5.4 Nano 8,501,200 7,564,800 122,759 Winnow returned every decision without generating output tokens. Nano generated 122,759 output tokens across the latency and throughput passes. The rows do not represent equivalent billing models: Winnow consumes self-hosted GPU time, while Nano is metered by hosted token usage. The comparison isolates the generated tokens that a bounded decision did not need. Winnow also returned calibrated probabilities. At a 0.90 threshold, it accepted 53.73% of the records and was correct on 94.43% of those accepted decisions. An application could handle that high-confidence group locally and send only the uncertain remainder to an LLM or human reviewer. In brief A decision model is useful when software needs a bounded answer rather than generated language. In this experiment, Winnow on a serverless T4 traded some accuracy for lower latency, zero generated output tokens, private inference, and an explicit confidence signal. The practical design is often a combination: use the decision model for fast, high-confidence choices and reserve LLM calls for uncertain or open-ended work. Try it with the template The Azure Developer CLI template packages the Container Apps environment, T4 workload profile, authenticated API, internal Ollaya service, persistent model cache, GPU readiness checks, and benchmark. It supports two deployment modes: Mode What it deploys ollaya-only Private Winnow inference on a serverless T4 plus the authenticated API full The Ollaya deployment, GPT-5.4 Nano, and the comparison benchmark Read the deployment guide Inspect every benchmark prediction and retry Review the shared MASSIVE taxonomy531Views0likes0CommentsAzure Container Apps Express is now Generally Available
For many web apps and APIs, a container image should be enough to get started. Developers should not have to choose and configure an environment before the first deployment. Today, Azure Container Apps Express reaches general availability. It is the fastest way to go from a container image to a production-ready app on Azure, with instant provisioning, startup optimized for sub-second performance, and scale-from-zero. Customers created many thousands of Express apps during public preview and told us, clearly and often, what was missing. That feedback set the priorities for general availability, and it continues to guide what comes next. From container image to running app Express starts with the application. Bring a container image, choose a region, add the configuration your app needs, and deploy. In the Express experience, there is no environment to stand up first. Azure provisions the underlying compute, ingress, and scaling. That shorter path matters when you are shipping a web app or API. It matters even more when the thing doing the shipping is an agent: AI-assisted workflows can create and update apps far faster than anyone can configure infrastructure by hand. Speed continues after deployment. Express apps can scale to zero when idle and are optimized for sub-second startup when traffic returns. For a measured look at that experience, see Express scale from zero. Broad regional availability At general availability, Express is available in more than 40 Azure regions, covering almost every public region where Azure Container Apps is offered. You get the same direct deployment experience while placing applications close to users and data. See the current list in the Express region availability documentation. Built on Azure Container Apps Sandboxes Azure Container Apps Express runs on Azure Container Apps Sandboxes, the isolated compute layer behind its provisioning and startup speed. Developers can also use Sandboxes directly to build agent platforms, secure code-execution services, and other systems that need isolated compute on demand. The Azure Container Apps Sandboxes announcement covers the compute platform underneath Express. Where Express goes next We launched Express in public preview while its focused feature set was still taking shape. That gave customers access sooner and let real usage shape the work that followed. Since preview, we have expanded regional availability, strengthened Express for production workloads, and added capabilities that fit its direct application model. General availability makes Express ready for production use. We will continue adding features while preserving its focus on fast, simple deployment. Express offers a focused subset of Azure Container Apps capabilities. Choose Express when speed and simplicity matter most. Choose a standard Container Apps environment when you need greater control over networking, GPU compute, advanced configuration, or environment-level capabilities such as Dapr. Deploy your first Express app Ready to try it? Create an Azure Container Apps Express app. Then read the Express documentation, see Express scale from zero, or learn about Azure Container Apps Sandboxes.1.3KViews0likes0CommentsVirtual nodes on Azure Container Instances: a new compute layer for AKS
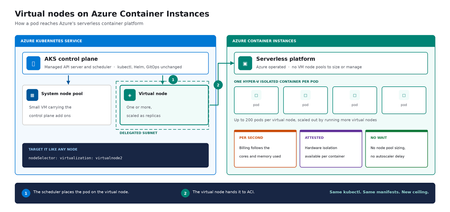
Meet virtual nodes on ACI Azure Kubernetes Service (AKS) gives you managed Kubernetes: the full Kubernetes API without operating the control plane yourself. Virtual nodes on Azure Container Instances go a step further, letting your pods run directly on Azure's serverless container platform, with the elasticity and with no capacity planning and no waiting for machines. Whether you already run AKS or want a managed Kubernetes that bursts without node management, this is for you. In short: virtual nodes on ACI attach Azure's serverless container platform to your cluster as Kubernetes nodes. Pods run as Hyper-V isolated containers, sized per pod rather than packed onto a fixed VM, up to 200 pods per virtual node. Run multiple virtual nodes, scaled as replicas, for more. They behave like any other pod: same kubectl, Helm, and GitOps. Kubernetes has always assumed a fixed set of machines underneath it. That assumption shapes everything above it: you size a node pool for a specific VM type in a specific region, you plan for peak rather than for average, and every workload on a node shares the same kernel and the same security boundary. Virtual nodes on ACI relaxs that assumption, which is what makes both elastic capacity and per container isolation possible without a different Kubernetes. If you've used the original AKS virtual nodes add-on (Virtual Kubelet based), this is not a rebrand. It is a new implementation that integrates far more deeply with Kubernetes, lifts most prior limitations (init containers, persistent volumes, managed identity, richer networking), and adds confidential containers as a first-class capability. The migration guide can be found here. Two capabilities carry the rest of this post: effortless burst capacity, and confidential containers. How virtual nodes on ACI work ACI runs every container as a Hyper-V isolated container, which means each one gets its own lightweight virtual machine boundary rather than sharing a kernel with its neighbors. Azure operates that platform. A virtual node connects it to your cluster. The cluster's control plane, the component that decides where each container runs, sees two kinds of destination: a small pool of virtual machines carrying cluster services, and one or more virtual nodes. From the application manifest's perspective, nothing changes. The pod lands on a virtual node; the virtual node hands it off to ACI. See Microsoft Learn: virtual nodes on ACI for the official capability and current limits. Virtual nodes on ACI in practice The rest of this post is hands on. You do not need to be a Kubernetes expert to follow it. kubectl is the command line tool for talking to a cluster, Helm installs packaged software into one, and a manifest is a text file describing what you want to run. If you have a cluster, everything below runs against it as written. The manifests behind the examples live in a companion demo repo. Setup is documented officially, and you can reproduce this end to end from the ACI virtual nodes documentation and the microsoft/virtualnodesOnAzureContainerInstances Helm repo. One requirement before you start: deploy into a delegated ACI subnet, meaning a subnet in your virtual network set aside for the ACI platform to place containers in. Size it for peak pod count plus headroom, since every pod consumes an address from it for its lifetime. Demo manifest files can be found in this repo, a personal sample repo provided as is and not a supported Microsoft artifact. Enable virtual nodes on ACI The virtual node is deployed via Helm. The Microsoft GitHub repo is itself a Helm repository, so a single helm install is all you strictly need. Cloning first, shown here, just makes it easier to customize values. Running kubectl get nodes afterward confirms the node registered. git clone https://github.com/microsoft/virtualnodesOnAzureContainerInstances.git helm install <yourReleaseName> ./virtualnodesOnAzureContainerInstances/Helm/virtualnode kubectl get nodes The virtual node appears alongside any existing capacity, ready to accept work. A virtual node is a Kubernetes node You target it the same way you would target any node. These few lines in a manifest say "run this on the virtual node": nodeSelector: virtualization: virtualnode2 kubernetes.io/os: linux tolerations: - key: virtual-kubelet.io/provider operator: Exists effect: NoSchedule That is the entire integration surface. No new API to learn, no separate deployment pipeline, no application changes. kubectl describe, kubectl logs, and kubectl exec, the standard commands for inspecting and troubleshooting, all work as they would anywhere else, including opening a shell inside a container running in a Hyper-V isolated boundary. Scaling stays trivial. kubectl scale deployment demo-deployment --replicas=10 lands every replica on the same virtual node, with no VMSS scale event, no provisioning latency, no climbing node-count chart. The same flow scales just as cleanly to hundreds. Cost follows the same shape. Each pod is billed per second against the cores and memory it requests, at ACI rates, and billing stops when the pod stops. Logs and metrics flow through the same path you already use, so existing dashboards and alerts keep working. One annotation makes a pod confidential Turning a regular container into a confidential one takes a single addition to its manifest: a policy that pins exactly which images, commands, environment variables, mounts, and capabilities are permitted inside the Trusted Execution Environment. The format is a base64 encoded Rego document, called a CCE (Container Confidential Enforcement) policy. You do not write that policy by hand. A tool generates it from the manifest you already have: az extension add -n confcom az confcom acipolicygen --virtual-node-yaml ./hello-world-deployment.yaml The tool pulls each image, hashes its layers, builds the allow-list, and injects the annotation back into the manifest. kubectl apply, and you're done. (acipolicygen has prerequisites of its own, including a working Docker installation; see the confcom documentation.) Here is why this is a genuinely new isolation primitive rather than a stronger version of an existing one. Most container security policy is enforced by software in the cluster, which means an attacker who compromises the host can potentially bypass it. This policy is enforced by the guest operating system inside the TEE instead. The underlying hardware, AMD SEV-SNP, also produces an attestation report, retrievable from inside the container, which is a cryptographic proof that the workload running is the workload you specified and nothing tampered with it. That is the guarantee regulated industries have been asking for, and increasingly the one AI workloads running untrusted code need too. The same per pod boundary is also what makes multi-tenancy on a single cluster realistic, though multi-tenancy in production still depends on your network and identity boundaries, which sit outside what the isolation layer itself provides. Background: Microsoft Learn: confidential containers on ACI. Wrapping up Virtual nodes on ACI give containers on Azure two things that were previously hard to deliver cleanly on Kubernetes: Effortless burst capacity on Azure's serverless container platform, billed per second for the cores and memory used, with no capacity planning and no waiting for machines. Confidential containers with hardware attested, per container isolation inside a Trusted Execution Environment. Virtual nodes are additive, not a replacement. Traditional node pools remain the right home for steady state, DaemonSet, and persistent volume workloads, and AKS features such as Node Auto Provisioning and Virtual Machine Node Pools already make that baseline more flexible. Virtual nodes on ACI absorb the spikes, the short-lived jobs, and the specialized isolation work on top. Where to start New to containers on Azure? Start with a small AKS cluster and add a virtual node from day one. You get a managed Kubernetes environment without having to guess your peak capacity in advance, and the elastic layer is there the first time you need it. Already running AKS? Add a virtual node to an existing cluster and move one bursty or short lived workload to it. Nothing else changes, and the comparison is immediate. Evaluating platforms? The capability that is hard to find elsewhere is the confidential containers path: hardware attested isolation per container, reachable through a standard Kubernetes manifest. The result: virtual nodes on ACI expand what AKS can run, with more capacity and stronger isolation, without changing the Kubernetes operating model you already use. Same kubectl, same manifests, same GitOps. New ceiling. For the high-level overview, official documentation, and Helm details, the Microsoft Learn is the source of truth. The companion repo holds the demo manifests used in this post. Acknowledgements I'd like to thank Gurpreet Virdi, Partner Group Engineering Manager, whose guidance shaped this post from the first outline through to publication. Her product leadership ensured this post reflects both the technical depth and the customer value of virtual nodes on ACI. Thanks to Gabriel Fuhrman, Senior Software Engineer, for his detailed technical review. His feedback refined the technical content and significantly improved the accuracy and depth of this post. Christopher Little, Principal CSA, shaped the enterprise adoption perspective, and Adam Sharif, CSA, reviewed the post from the earliest draft. Thanks also to Kirthi Maguluri, Senior Product Manager, and Varun Shandilya, Principal Product Manager, for their review of the blog.707Views1like0CommentsAzure Red Hat OpenShift with hosted control planes now available in public preview
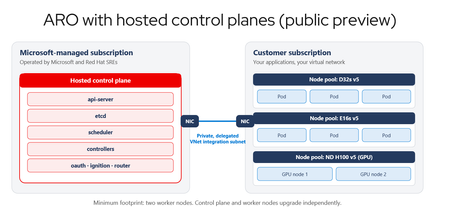
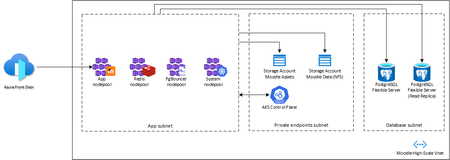
Red Hat OpenShift momentum on Azure keeps building, driven by teams standardizing on Kubernetes for application modernization and, increasingly, by AI-enabled applications that need a consistent platform for the services around them. Azure Red Hat OpenShift gives those teams a jointly engineered, first-party Azure service, and today's announcement adds a new way to run it. Today we are excited to announce the public preview of Azure Red Hat OpenShift with hosted control planes. Hosted control planes is a new deployment option that runs the OpenShift control plane as a fully managed service in a Microsoft-managed Azure subscription, operated by Microsoft and Red Hat site reliability engineers (SREs), separate from the worker nodes that run your applications. This deployment option helps organizations accelerate application modernization, increase developer velocity, streamline operations, and strengthen security while maintaining the familiar OpenShift experience jointly engineered and supported by Microsoft and Red Hat. Azure Red Hat OpenShift with standard architecture remains fully supported and actively developed. Azure Red Hat OpenShift provides a unified platform for managing different workloads such as AI-enabled applications alongside VMs and containers, offloading ongoing infrastructure management to a team of Red Hat SREs, giving you a robust foundation to build, deploy and manage applications at scale. One service, two places the control plane can live The two deployment models compare like this: Dimension Control plane in your subscription Hosted control plane Control-plane location Your Azure subscription Microsoft-managed Azure subscription Who operates it Red Hat SREs, in a single-tenant control plane. You pay for control-plane nodes on every cluster Red Hat SREs, in a multi-tenant hosted control plane Upgrade coupling Control plane and workers move as one Independent; Control plane can run on 2 minor versions ahead of worker node pools. Nodepools can also be on different versions with each other. Minimum cluster footprint 3 Control-plane nodes plus 3 worker nodes Two worker nodes Figure 1. Today the control plane runs in your subscription alongside your workers. With a hosted control plane, it moves into a Microsoft-managed Azure subscription operated by Red Hat SREs, and the two planes meet through a delegated VNet integration subnet. Key benefits of Azure Red Hat Openshift with hosted control planes Organizations can modernize at their own pace and run virtual machines, containers, and cloud-native applications on a single platform while extending existing applications for AI-ready workloads. Hosted control planes also help developers move faster. Clusters provision in minutes, and development and test environments can scale down during idle periods and scale back up when needed. This enables teams to accelerate experimentation, shorten testing cycles, and bring applications to production more quickly while optimizing infrastructure spend. To support growing multi-cluster environments, hosted control planes simplify platform operations and provide greater flexibility and control. Independent control plane and worker node lifecycles give organizations more control over application upgrade timing while Microsoft and Red Hat manage the underlying platform. Organizations can scale clusters across teams, environments, and regions, customize networking with bring-your-own container network interface (CNI), and maintain operational consistency without increasing management complexity. What the Azure platform adds What sets Azure Red Hat OpenShift apart is how deeply it integrates with the broader Azure platform, helping organizations simplify operations, accelerate adoption of OpenShift, and reduce the complexity of running cloud-native applications at scale. Customers gain access to Azure's global infrastructure, enterprise security capabilities, and rich portfolio of data and AI services, accelerating modernization and innovation without requiring changes to familiar OpenShift tools and workflows. For organizations already invested in Azure, Azure Red Hat OpenShift operates as a first-party Azure service that fits naturally into existing cloud operations. Clusters can be managed, governed, secured, and monitored using the same Azure tools, policies, and automation practices already used across the broader Azure estate. Customers also benefit from a unified commercial model, integrated billing, and Azure-native management experience, while Azure Red Hat OpenShift consumption contributes toward Microsoft Azure Consumption Commitment, helping maximize the value of existing cloud investments. Customers are already building on that foundation. Banco Bradesco, one of the largest financial institutions in Latin America, runs its enterprise AI platform on Azure Red Hat OpenShift, using integration with Azure identity, security, and policy capabilities to unify governance across more than 200 AI initiatives in a highly regulated environment. Topicus runs its Akkuro lending platform on Azure Red Hat OpenShift and deploys in Switzerland North to keep financial data in-country, using the same Azure-native controls to maintain a repeatable deployment model across regions. Both illustrate what the Azure platform adds: a consistent operating model, enterprise-grade security and compliance, and native access to Azure data and AI services on a service jointly operated by Microsoft and Red Hat. Figure 2. The Azure platform around the service: Microsoft Entra ID managed and workload identities, a customer-managed key in Azure Key Vault for etcd encryption, Azure Monitor diagnostic settings for control-plane logs, Customer Lockbox for Microsoft Azure for support-access approval, portal (upcoming), CLI, REST API and Bicep self-service, and native integration with Azure compute, database, analytics, and machine learning services. Secure by design Azure Red Hat OpenShift with hosted control planes is secure by design, helping you run sensitive and regulated workloads with confidence without adding operational complexity. By running the control plane in a Microsoft-managed subscription, the platform reduces infrastructure exposure while maintaining secure access to applications through managed ingress. Identity management is seamless. Cluster operators and applications use managed identities and workload identities that authenticate with short-lived, automatically rotated tokens, eliminating the need to manage service principals or long-lived credentials. Organizations can also integrate with their existing identity providers, preserving established authentication and access management practices. Azure-native protections help safeguard data and support compliance requirements. Data is encrypted by default with etcd encryption, with the option to use customer-managed keys through Azure Key Vault for additional control. Confidential and sandboxed containers provide additional protection for data in use, helping organizations address stringent security, data residency, and digital sovereignty requirements without deploying a separate cloud environment. The platform is backed by enterprise-grade compliance and support. Azure Red Hat OpenShift (with standard architecture) is pre-certified for HIPAA, FedRAMP, DoD IL4, PCI-DSS, ISO, and SOC standards, supported by joint Microsoft and Red Hat incident response. Customer Lockbox for Microsoft Azure adds another layer of control by requiring explicit customer approval before Microsoft support personnel can access cluster resources. Get started now Availability is expanding, with UK South, Canada Central, Australia East, Switzerland North, Brazil South, Central India, US East 2, and West Europe among the regions supported at public preview launch. The fastest way to get started is to create three resources: a cluster, a node pool, and an external authentication provider, using either the Azure CLI extension or a Bicep template. From there, deploy a single application using workload identity to see the full flow end to end, signing in with your existing identity provider, and an application reaching Azure services with no stored credentials. See the Azure Red Hat OpenShift documentation for the current region list, supported versions, and the deployment reference, and tell us in the comments what you would like covered next. What it costs Component Price Purchasing Options OpenShift license (per worker core) $0.171 per hour per 4 worker vCPUs. The same flat rate applies to every VM series, size, and generation. Pay-as-you-go, or a 1- or 3-year reservation on the OpenShift license (available at GA) Azure infrastructure (worker VMs, storage, networking, plus control-plane nodes) Billed separately at standard Azure rates for Linux VMs. Standard clusters are also billed for the control-plane deployment; clusters with a hosted control plane are not. Pay-as-you-go, reservations, or Azure savings plan for compute Cluster management (only applicable to Azure Red Openshift with hosted control planes) A flat $0.25 per cluster per hour. Applies only to clusters with a hosted control plane. Pay-as-you-go A hosted control plane takes control-plane node cost off your bill and replaces it with a single, predictable cluster management fee. Pricing for hosted control planes is not yet reflected on the Azure Red Hat OpenShift pricing page; pricing calculator support is coming soon. Azure Red Hat OpenShift with hosted control planes is in public preview, and this pricing is preliminary and subject to change prior to general availability.1.2KViews2likes0CommentsAzure App Service is now a trigger destination for Azure Managed Connectors
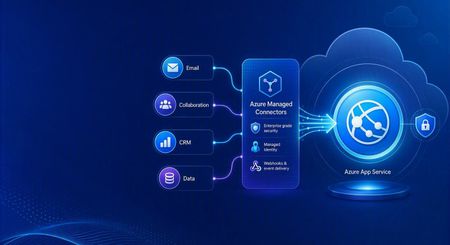
Azure Managed Connectors, currently in public preview, now lets you choose Azure App Service as a trigger destination. Connector events can be delivered directly to applications running on App Service, including ASP.NET Core, Java, Node.js, and Python applications. This is a new capability in the Managed Connectors public preview. It is not the announcement of a separate App Service preview. What's new When you create a trigger in the Managed Connectors portal, App Service now appears as a first-class destination alongside Azure Functions and the generic HTTP endpoint option. After selecting an existing App Service app, you configure: The application route that receives the event. New triggers default to POST /api/webhook , and the route can be edited. The Connector Namespace managed identity used to authenticate the callback. The Microsoft Entra audience expected by the receiving application. Managed Connectors then records the selected App Service resource, route, managed identity, and audience as part of the trigger configuration. You no longer need to select the generic HTTP destination and manually assemble the App Service callback URL. What are managed connectors? Managed connectors provide a consistent way for applications to integrate with services such as Office 365, SharePoint, Teams, Dataverse, and Salesforce. A Connector Namespace manages connections and connector operations so developers do not need to build a separate OAuth flow and service-specific client for every integration. Managed connectors support both directions: Triggers deliver events to your application, such as a new Outlook email or a file added to SharePoint. Actions let your application call operations such as posting a Teams message, flagging an email, or creating a list item. The App Service destination makes the trigger side a first-class option for existing web applications and APIs. How it works In the Managed Connectors portal, create a trigger and select App Service as its destination. Select the web app, callback route, Connector Namespace managed identity, and Microsoft Entra audience. When the source event occurs, Managed Connectors requests a token using the selected managed identity and sends the event to the App Service route. App Service built-in authentication validates the token before the request reaches application code. The application processes the event and can use Managed Connectors actions to continue the workflow. The callback is an ordinary authenticated HTTP request, so the application can use its normal framework, routing, dependency injection, logging, monitoring, and deployment practices. Configure receiving-app authentication The App Service destination configures the Managed Connectors side of the callback. The receiving application must still be configured to trust it. The reference sample uses App Service built-in authentication, also known as Easy Auth, with: A Microsoft Entra application that identifies the receiving application and its audience. A secretless federated credential configuration. The Connector Namespace managed identity pinned as an allowed principal. Authentication required for requests reaching the application. This configuration rejects unauthenticated requests and allows callbacks carrying the expected managed-identity token. The Managed Connectors trigger wizard does not currently create or update the App Service authentication configuration automatically. Try the end-to-end sample The Managed Connectors on Azure App Service email-triage sample demonstrates a complete workflow: An Office 365 Outlook trigger delivers a new email to an ASP.NET Core application on App Service. App Service built-in authentication validates the managed-identity callback. The application classifies the message and enriches the sender through the Office 365 Users connector. Important mail produces a Microsoft Teams triage card. The application flags the source email in Outlook. The repository includes the application, Bicep infrastructure, App Service authentication configuration, Connector Namespace connections, and an Azure Developer CLI deployment flow. We validated the complete workflow end to end: the authenticated callback reached POST /api/webhook , the application processed the event, a Teams card was posted, and the source Outlook message was flagged. Current limitations The capability is configured through the Managed Connectors portal, not the App Service portal. The wizard configures the Managed Connectors trigger but does not configure App Service built-in authentication on the selected web app. The current sample authentication setup requires a Microsoft Entra application, audience configuration, federated credential, and allowed-principal configuration. Depending on the application's Easy Auth configuration, authentication can apply to the whole application rather than only the connector callback route. The reference sample validates one push-trigger scenario; it is not a compatibility statement for every connector and operation. What's next The first-class App Service destination removes the generic callback URL step and provides an App Service-aware trigger experience in Azure Managed Connectors. We are also exploring ways to simplify receiving-side authentication so applications can establish connector-scoped trust without manually assembling the App Service authentication configuration. Try the reference sample and share feedback on the connectors and App Service scenarios you want to use.501Views0likes0CommentsAnnouncing public preview: Markdown for Agents in Azure App Service
Why Markdown for Agents? Web pages often contain scripts, styles, and HTML markup that are useful to browsers but add noise when the content is sent to an AI model. Markdown for Agents removes that extra markup and returns a smaller, text-focused response that is easier for agents to process and can reduce token usage. In internal testing across more than 637,000 pages, converted Markdown responses were 97 percent smaller at the median than the source HTML, with a median conversion time of 2 milliseconds. Results vary based on the page and its content. Public preview availability Markdown for Agents is available in public preview for Windows apps on Azure App Service in all public regions. The app must use an App Service plan in the Basic tier or higher. No additional authentication setup is required for Markdown conversion. Your app's existing authentication, authorization, and network access controls continue to apply. This feature is only supported on Windows App Service at this time. Support for Linux apps will come later this year. Enable Markdown for Agents During the public preview, you can enable the feature through the REST API, ARM/Bicep template, or the Azure CLI using az rest . Dedicated Azure CLI commands and portal support are planned for a future update. Azure CLI with az rest Replace the placeholders with your subscription ID, resource group, and app name: az rest --method patch --url "https://management.azure.com/subscriptions/<SUBSCRIPTION_ID>/resourceGroups/<RESOURCE_GROUP>/providers/Microsoft.Web/sites/<APP_NAME>?api-version=2026-03-15" --headers "Content-Type=application/json" --body '{"properties":{"aiIntegration":{"markdown":{"enabled":true}}}}' Verify the setting: az rest --method get --url "https://management.azure.com/subscriptions/<SUBSCRIPTION_ID>/resourceGroups/<RESOURCE_GROUP>/providers/Microsoft.Web/sites/<APP_NAME>?api-version=2026-03-15" --query "properties.aiIntegration.markdown" To disable the feature, send the same PATCH request with enabled set to false . ARM template Add the following property to your Microsoft.Web/sites resource using API version 2026-03-15 : "properties": { "aiIntegration": { "markdown": { "enabled": true } } } Bicep resource webApp 'Microsoft.Web/sites@2026-03-15' = { name: appName location: location properties: { serverFarmId: appServicePlanResourceId aiIntegration: { markdown: { enabled: true } } } } Request a Markdown response After enabling the feature, request an HTML page from your app with the Accept: text/markdown header: curl -i -H "Accept: text/markdown" "https://<APP_NAME>.azurewebsites.net/" A successfully converted response includes these headers: Content-Type: text/markdown; charset=utf-8 x-markdown-source: easy-markdown The response body contains Markdown generated from the page's HTML. Common content such as headings, paragraphs, links, lists, images, emphasis, and code is preserved, while script and style content is removed. Pages that cannot be safely converted may return their original HTML. Clients should check the Content-Type and x-markdown-source response headers before processing the response as Markdown. What's next Linux support is planned before the feature reaches general availability. We also plan to add dedicated Azure CLI commands and a portal experience in future updates. Share your feedback Try Markdown for Agents with your Windows App Service apps and let us know how it works for your agent scenarios. Share feedback, questions, and feature requests in the comments below.1.3KViews0likes0CommentsAzure Container Apps Sandboxes (Preview): Giving AI Agents a Safe Place to Work
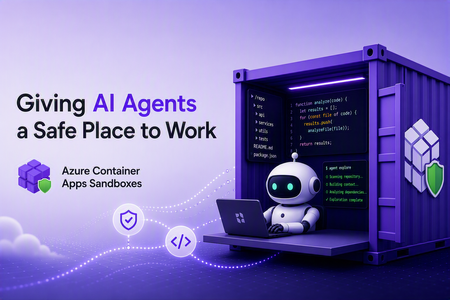
Co-written by Nikoloz Buligini, Front End Developer at Templafy, and Jan Kalis, Azure Container Apps Sandboxes, Core AI, Microsoft Every team building with multi-tenant AI agent platforms hits the same wall. The agent is smart enough to read your code, reason about a bug, and propose a fix. But the moment it needs to take an action - clone a repo, install tooling, run a command, hit an internal endpoint - you have to answer some uncomfortable questions: where does it run, what permissions does it have and what can it access? Run it on your own infrastructure and inherit the blast radius. Give it broad network access and you have handed an autonomous process the keys to your environment. Lock it down too hard and the agent cannot do its job. This is exactly the problem Azure Container Apps Sandboxes was built to solve. And it is exactly the problem the team at Templafy solved in production. This post walks through what Sandboxes are, the features that make them a good fit for agentic workloads and how Templafy put ACA Sandboxes to work. What are Azure Container Apps Sandboxes? Azure Container Apps Sandboxes (Preview) are secure, isolated compute environments that start in seconds, scale to thousands, and do not charge you for compute while stopped. Each sandbox runs inside its own hardware-isolated microVM, fully separated from the host, the platform, and every other sandbox. Bring your own container image or use an included one, and Sandboxes handle provisioning, isolation, and lifecycle. This is the same compute fabric behind products like Cloud sandboxes in GitHub Copilot, Foundry Hosted Agents, and Azure Container Apps Express, and now you can build directly on it. For platform builders, that means enterprise-grade, multi-tenant isolation as a building block you would otherwise spend years creating. For AI agents, a sandbox becomes a self-configurable tool: spin up a fresh environment in seconds, run untrusted code, compile a project, or explore a codebase, then throw it away. On one side you empower humans to build platforms. On the other you empower agents to extend their own capabilities. The features that make Sandboxes fit agentic work A fast microVM is table stakes. What makes Sandboxes practical for real agent workloads is the control around them. Snapshots capture a fully configured environment and resume from it, ideal for long-running tasks or cloning setups. Egress controls declare exactly what a sandbox may reach, so an agent can pull from source control and package registries but nothing you did not approve. Managed identities authenticate to Azure with no secrets in the image. Automatic suspend and resume map cleanly onto how conversational agents behave, warming back up with full context when a conversation continues. Ports give your orchestrator a channel to a long-running agent process inside the sandbox. Two newer capabilities go further: virtual network integration puts an agent workspace inside your own Azure VNet with access to private endpoints, and bring your own storage lets data and artifacts outlive a session under your compliance rules. Together these turn a fast disposable VM into something you can hand to an autonomous agent in production. Which brings us to Templafy. How Templafy uses Sandboxes, in their own words The following section is written by Nikoloz, Front End Developer at Templafy. At Templafy we built an AI agent that helps our teams by doing longer-running source-code exploration on their behalf. Someone asks a question in a Slack thread, and behind the scenes the agent needs a real, isolated workspace where it can clone repositories, run tooling, and dig through code without touching anything it should not. It started as an engineer-facing tool for deep technical questions, but we recently opened it up to our product team for questions about undocumented product behavior. There, the agent first checks our Help Center through Azure AI Search with no sandbox required and only spins up a sandbox to explore the code when the docs come up short. Since these users aren't engineers, we summarize what the exploration finds into something more approachable. Funnily enough, the product team has been using it more than engineering does, and the feedback since launch has been great. We needed strong isolation, fast startup, and tight control over what each workspace could reach. Azure Container Apps Sandboxes gave us exactly that. We were sold on the model early enough that we built our own TypeScript SDK for Sandboxes before there was an official one, so we could drive the whole lifecycle from our Node stack. Here is what happens when the AI decides to start a workflow for a Slack thread: Create a sandbox from the public node-24 image. Install Git and other development tools. Clone our repositories and configure OpenCode. Restrict egress to only the Azure DevOps, package registry, and service endpoints the agent actually needs. Expose a port used to communicate with the agent runtime. Create and reuse snapshots so we do not repeat the bootstrap process on every run. Associate successful sessions with their Slack threads for a short period, so users can make follow-up requests against the same warm workspace. Stop or suspend idle sandboxes and resume them when a conversation continues. Delete failed or expired sessions. To do all of this we lean on the SDK for the full surface area: sandbox lifecycle operations, command execution, files, snapshots, ports, egress policies, public disk-image inspection, and sandbox state. Two features carry most of the weight for us. The first is restricted egress. Our agent is autonomous and works with our source code, so we are not comfortable letting it talk to the open internet. Declaring a narrow allow-list of endpoints means the workspace can do its job and nothing more, and that control is what let us ship this with confidence. The second is snapshots. Cloning repositories and configuring the toolchain is not free and doing it on every Slack message would make the agent feel slow. With snapshots we pay that cost once and resume from a ready-to-work state, so follow-ups in a thread start fast. This is only the first workflow. We are already looking at background investigations using Application Insights and eventually letting the agent open pull requests for quick bug fixes. The same isolated-workspace pattern extends cleanly to all of it. Who this is for If you are building an AI agent that needs to run code, explore a repository, or reach into your systems, and you have been nervous about where that runs, ACA Sandboxes is for you. You do not have to choose between a capable agent and a safe one. Give it a hardware-isolated workspace, declare exactly what it can touch, snapshot the setup, and let it work. Templafy went from "how do we let an agent safely explore our source code" to a production workflow running out of Slack threads, on infrastructure they controlled end to end. The building blocks are the same ones you can pick up today. Next steps Create your first sandbox - https://sandboxes.azure.com/ Explore Azure Container Apps Sandboxes documentation - https://sandboxes.azure.com/docs/sandboxes/ Start with Azure Container Apps Sandboxes samples - https://github.com/azure-samples/azure-container-apps-sandboxes/1.6KViews3likes0CommentsZero Ops: Agents Operate, Humans Govern
How to design, build, and grow an agentic operations practice — and what becomes possible once you do. A note on scope: the patterns in this guide apply to any agentic operations platform. The specifics — the pricing model, the built-in capabilities, the primitives named throughout — are Azure SRE Agent. Where something is a property of the product rather than a universal truth, it’s called out. Remember when? Remember the 3am page? The one where you sat on the edge of the bed with a laptop balanced on your knees, hunting through six dashboards to work out whether the thing that woke you was even real. Half the time it wasn’t. Remember the cost review? Somebody exports a month of billing to a spreadsheet, three engineers spend a fortnight arguing about which resources are actually orphaned, and by the time you’ve agreed on a plan the next month’s bill has already landed. Remember the zero-day? The all-hands marathon. Two days of people cancelling everything, tracing which services pulled the affected package, hand-patching in an order nobody had time to write down. And remember the CVE backlog — the one everyone knows about, the one that only ever grows, because triaging it properly would take a team you don’t have? None of that was a failure of effort. It was the operating model. For decades it looked like this: humans operated, software assisted. We built dashboards, alerts, runbooks, automation scripts, and eventually copilots — and through every one of those advances, the human was still the operator. That’s the part that’s changing. And it’s genuinely good news. Agents operate. Humans govern. That’s Zero Ops. And the best part is you don’t have to invent it — the path is already well-worn. The five things worth knowing before you start Everything below comes from building and running agentic operations at scale. If you read nothing else, read these. 1. Zero Ops is the destination — and it doesn’t mean zero humans. It means removing operations from humans. People don’t disappear; they move up the stack. They set the intent, govern the system, and validate outcomes. Nobody’s job becomes “watch the dashboard” ever again. 2. The model is not the moat. This was the biggest surprise. The model matters less every year. You can swap models. What you cannot swap is the context and governance wrapped around them. That’s the durable asset you’re building. 3. Context creates intelligence. Agents become genuinely useful the moment they’re grounded in reality — your source code, your live telemetry, your institutional knowledge, your incident history, and the skills and tools to act on all of it. Swap the model and the system still works. Swap the context and it stops being useful. 4. Governance creates trust. Enterprises don’t trust intelligence. Enterprises trust controls. Identity, audit, evals, rollback, evidence. Governance is what earns the right to automate — and it’s liberating rather than restricting, because it’s what lets you say yes. 5. Metrics create permission. Nobody should trust an agent because a demo looked impressive. Trust comes from numbers you can run yourself. If only the vendor can produce the number, it’s marketing. If you can query it, it’s a metric. The climb, and the one thing that changes at each rung Here’s the elegant part. As an agent matures, the thing that changes isn’t how clever it is. It’s what the human reviews. Rung What the agent does What the human reviews Crawl Suggests. A human still does the work. Their own work Walk Does the work one step at a time, asking before each action. Every step Run Completes whole tasks and hands back a change to approve. The diff Fly Fixes, deploys to test, validates the outcome itself, posts the evidence. The outcome And between Run and Fly sits the review wall. When an agent produces hundreds of changes a month, reviewing someone else’s diff is nearly as hard as writing it yourself. That’s where teams plateau — not because the agent isn’t capable, but because the humans became the bottleneck. Fly is how you get past it: you move the unit of human review from the diff to the outcome. Hold that thought — we’ll come back to it, because it’s the most exciting part of the whole journey. Getting there is a design problem before it’s a technology one. Agents that climb were built to climb. So let’s start where every one of them starts — how you scope it, what you teach it, and what you connect it to. Part One — Designing your agent Before you start: what you’ll want in place The good news is that this list is short, and you almost certainly have most of it already. There’s no platform to stand up first. Diagnostic logs turned on for the services you care about. An agent can only reason about what your system actually emits. Telemetry the agent can query. It doesn’t need to live in one place — most estates have it spread across several platforms, and that’s completely fine. What matters is that each of those places is reachable and queryable. This is what turns “something is wrong” into “here’s why.” Read access to the sources that hold the answers — your subscriptions, your repositories, your incident history, your ticketing system. An identity for the agent, with permissions scoped the way you’d scope a new team member’s on day one. A repository for agent artifacts. Skills, custom agents and tool definitions are production code. They deserve version control from the first one. That’s it. Nothing here is agent-specific — it’s the same hygiene that makes a system operable by humans. If your on-call engineer can answer a question at 3am, your agent can too. Step 1: Scope it — how many agents do you actually need? Good news first: fewer than you think. Teams often assume one agent per team, and that’s usually wrong. Five considerations decide it: 1. Fixed cost. Every Azure SRE Agent carries a small baseline charge just for existing — think of it as keeping the lights on so the agent is ready the instant something happens. That means consolidating where you can is genuinely good hygiene: fewer agents, each with a clear job, means every dollar goes toward outcomes rather than idle capacity. 2. Context. This is the big one. An agent is powerful because it holds a complete picture of a system. Split one application’s context across two agents and you’ve halved what each of them knows — usually the half that mattered. Don’t split an app’s context. 3. Data residency at rest. If data legally cannot leave a geography, that’s a boundary, and it’s a real one. Separate agent, separate region. 4. Team and organisational access boundaries. Genuinely different permission sets and genuinely different blast radius deserve genuinely different agents — each with its own identity, so least-privilege actually means something. 5. At least one dev agent. Always keep a non-production agent to test changes before they touch prod. Same reason you have a staging environment. That’s the whole list. Everything else, consolidate. Ideally, this is what it looks like. A single agent per application or product module — never splitting one across two. Explicit production and test agents. A regional agent wherever residency genuinely demands one. Every split maps to one of the five considerations above. The one thing to protect in every split decision is context. When two agents need to reason about the same problem, each one only has half the picture. If you absolutely must split context — say your org structure or access boundaries require it — plan for those agents to talk to each other so the full context is still reachable. Multiple patterns work. A dedicated infrastructure team that manages AKS clusters and only cares about the upkeep of that infrastructure? A single agent scoped to those resources makes perfect sense — they have a clear domain, a clear boundary, and a clear job. An application team whose service depends on a database? Give that application’s agent access to the database rather than standing up a second agent and splitting the problem’s context across two. There’s no single right layout — the principle is: keep the context of the problems you’re trying to solve together. Step 2: Teach it — context is king This is where the magic actually comes from, and it’s the step most worth over-investing in. Your agent needs five kinds of context: Source code — what the system actually does Production telemetry — what it’s doing right now Institutional knowledge — how your team really operates Previous incidents — what broke before, and why Skills and tools — how to act on any of it Connect the first two and you have a competent log reader. Add the middle two and it starts sounding like someone who’s worked on your team for a year. How you actually bring context in: Connect the real sources — subscriptions and their telemetry, your repositories, your incident history, your ticketing system. Knowledge as markdown in a repo. This is the pattern that works best. LLMs are exceptionally good with markdown files, and putting your knowledge in a connected repository means it’s version-controlled, reviewable, and — critically — updatable by the agent itself. Your scheduled tasks can automatically improve these files as the agent learns, closing the loop between insight and artifact. Connect external knowledge via MCP. If your team’s knowledge lives in Confluence, SharePoint, or another platform, connect it as an MCP server rather than migrating it. The agent queries it at runtime. Upload documents. Architecture diagrams, architecture decision records, design docs, onboarding guides. It reads all of it. Just talk to it. This is the underrated one. Tell it how your system works. Explain that “the blue cluster” means the EU stamp, that Tuesday deploys are riskier, that this alert is always noise before 8am. Ask it to summarise your architecture back to you — where it’s wrong, you’ve found a context gap, and you can fill it on the spot. One thing to be deliberate about: don’t dump everything. If you’ve accumulated years of documentation, runbooks, and tribal knowledge, resist the urge to pour all of it in on day one. Garbage in, garbage out. The agent will work with whatever you give it, and outdated or contradictory knowledge makes it worse, not better. Curate intentionally. Start with the knowledge that matters for the scenarios you’re tackling first, make sure it’s current, and grow from there. Teaching an agent feels remarkably like onboarding a sharp new hire. The difference is it reads everything you give it, overnight, and never forgets. And you don’t have to teach it everything at once. This is the part worth saying plainly, because the size of an estate can feel paralysing. You are not trying to pour your entire organisation into an agent before it becomes useful. You teach it the parts that matter, and you do it organically — one solution at a time. Start from your toil. Write down the things that actually wake your engineers up, the tasks your team does over and over, the investigation everyone dreads because it takes four hours and always ends the same way. Pick the top one. Coach the agent through that single scenario the way you’d coach a new engineer through their first on-call shift — the context it needs, the sources it should check, the judgement calls that aren’t written down anywhere. Then do the next one. Each scenario you teach is narrow, which means it’s cheap and fast to get right. And each one compounds: the context you gave it for scenario one is already there when you start scenario three. Six weeks in, you’ll notice it knows your system well enough to help with things you never explicitly taught it. Don’t boil the ocean. Boil the thing that’s burning you. Step 3: Create the artifacts — understand the primitives, then build Before you build anything, it helps to understand the three primitives you’re building with — because the difference between them is what gives you consistency. The meta agent is your agent out of the box. It has the LLM’s world knowledge plus all the context you’ve connected — your code, your telemetry, your documents, your memory. It’s versatile: it can investigate, reason, plan, and act. But it’s non-deterministic. Ask it the same question twice and it might take different steps, in a different order, and format its findings differently. That’s fine for exploration. It’s not fine for the 3am incident that needs to run the same way every time. Custom agents give you that consistency. A custom agent is a specialist with its own instructions, its own tools, and its own scope. Think of it as the what — the plan. The Zava learning lab’s learning-ops agent is a good example: it tells the agent exactly how to handle an incident — what to check, in what order, what to post, how to format the report. Every run follows that plan. Custom agents are scoped — they’re only invoked when you specifically ask for them (via /agent in chat, or via a response plan or scheduled task). That scoping is itself a governance lever, which we’ll come back to in Step 5. Skills are the how. They’re reusable procedures that teach the agent how to do a specific thing — query your Kusto cluster, restart a container app, read an IcM incident, run a particular diagnostic sequence. Skills are universal: both the meta agent and any custom agent can use them. A single skill written once is available everywhere. The key insight: the meta agent alone will get you far, but it won’t do the same ten steps next time, or in the same order, or produce the same kind of report. Custom agents and skills give you that repeatability — and repeatability is what you need for automation you trust. Now — how you actually create them. There are exactly two on-ramps, and which one you take depends on whether you already know the answer. Path A — you have a runbook (a known problem). Throw the runbook at the agent and ask it to build the artifacts: the skill, the custom agent, the tool definitions. Review what it produces, refine it, and have it cut a pull request into your repository. A procedure you’d have hand-written over a week arrives in an afternoon. Path B — you don’t (a complex or unknown problem). Work it interactively. Hand the agent the live problem and investigate together. Let it dig, watch it waver, correct its wrong turns, point it at the source it didn’t know about. When you finally crack it — that’s the moment. Ask it to turn what just happened into a custom agent, a skill, a tool. The next time that problem appears, it’s automatic. Path B is the one people don’t expect, and it’s the more valuable of the two. Your best artifacts aren’t written at a desk. They’re precipitated out of real investigations that worked. Every hard incident you solve together becomes an incident you never have to solve again. This isn’t unusual, either — teams everywhere now run skill-creating skills, agent-building skills, and MCP-server-building skills. Using the agent to build more of the agent is simply how this works now. Step 4: Test it — playground first, then non-prod Treat agent artifacts like code, because they are. Start in the playground — a safe space to exercise a skill against realistic inputs without touching anything. Then promote to a non-production system where the agent can act for real against resources that don’t matter. You won’t get everything right before production, and you don’t need to. Get the critical parts right — the core logic, the safety boundaries, the happy path — and then put it on real work. That’s where you find out what it’s actually like. From there, use evals to improve continuously. Every real run produces one, and reading them is how you find out whether the artifact holds up outside the playground. Part Two covers what to do with that signal — including how to wire it back into the artifacts automatically. And because these are production artifacts, they belong in source control from the beginning — with review, diffs, and rollback. Step 5: Govern it — earn the right to automate Remember principle four: governance creates trust. This is where you make it concrete. Before anything touches production, you decide who the agent is, what it’s allowed to do, what rules gate its actions, and what checks run in context. These controls layer on top of each other, and together they’re what lets you say yes to autonomy with confidence. Identity and access Your agent authenticates as a managed identity — system-assigned or user-assigned — and you scope it with normal Azure RBAC at the subscription, resource group, or management group level. Out of the box, Azure SRE Agent offers two access tiers: Reader — read-only access to your resources. This is all your agent needs for investigation, root-cause analysis, and reporting. It’s the right starting point. Privileged — adds resource-type-specific contributor roles (like Container App Contributor) based on what’s detected in your environment. This is what the agent needs for actions: restart, scale, rollback, configuration changes. Most teams start with Reader and add Privileged only on the resource groups where they want the agent to act. If neither tier fits — maybe you want the agent to restart App Services but never touch network rules — create a custom RBAC role with exactly the permissions you need and assign it to the agent’s managed identity. The agent’s identity is its security boundary; treat it the way you’d treat any other service principal. Run mode This is the single biggest lever. In Review mode, the agent proposes actions and waits for a human to approve each one. In Autonomous mode, it acts on its own within the bounds you’ve set. Most teams start every scenario in Review, watch it work for a few weeks, and then selectively move well-understood scenarios to Autonomous. That graduation is the Crawl-to-Run climb in practice. There’s a third thing worth understanding: what happens when the agent doesn’t have the privileges to act. If the agent’s managed identity lacks the RBAC permission for an action, it doesn’t fail silently — it asks. An Administrator can grant temporary elevation via on-behalf-of (OBO), which lets the action execute using the human’s credentials rather than the agent’s identity. This is the human-in-the-loop pattern at its most precise: the agent does the investigation, proposes the action, and a human with the right privileges authorises it in context. The agent never accumulates permissions it doesn’t need permanently, and the audit trail shows exactly who approved what. Tool controls Every tool the agent has access to can be set to one of three states: Allow — the tool executes without asking. Good for safe read operations you’re confident about. Ask — the tool pauses for human approval before running. Good for actions you trust but want to see before they happen. Off — the tool is completely disabled. The agent can’t use it at all. This is the first governance layer — simple, per-tool toggles. Need the agent to query your Kusto cluster but never write to it? Allow the read tool, turn the write tool off. Need it to restart an App Service but never delete one? Allow the restart, turn delete off. This is how you define the agent’s basic operational envelope. Some actions — like restarting a healthy service or scaling up a container app — may not need any gating at all. Others — like modifying a network security group or changing a database configuration — absolutely do. The right setting depends on how much autonomy you want the agent to have and how much you want a human involved. There’s no single right answer; there’s the answer that fits your comfort level today, and it can change tomorrow. Tool access policies Tool controls are per-tool on/off switches. Tool access policies go deeper: they let you write pattern-based rules that match tool names and even command arguments. Examples: - “Deny any command containing delete “ — bash(az * delete *) matches any az ... delete ... command regardless of which tool executes it. - “Allow all monitoring queries without approval” — so your read-only investigation flow runs uninterrupted. - “Ask before any deployment command” — so deploys always pause for a human. Policies apply at three scopes: Scope Who sets it What it can do Global Admin Allow, Ask, or Deny — across the entire agent Custom agent Admin or author Allow only — widen access within global boundaries for a specific custom agent Thread Any user Allow only — temporary override for one conversation The key principle: a global deny cannot be overridden by a lower scope. A custom agent or thread can widen access but never weaken a global deny. This means an admin can set a floor — “nobody, human or agent, can run a delete command” — and know it holds. Hooks Policies match patterns. Hooks evaluate context. This is the layer that handles the cases patterns can’t express. Four hook events: Event When it fires What you’d use it for Start A new thread begins Seed context, validate the trigger, tag the conversation PreToolUse The agent is about to call a tool Inspect the arguments, allow/deny/ask based on what you see PostToolUse A tool just returned Audit the result, flag sensitive output, trigger follow-up Stop The agent is about to finish Validate that the work is complete, reject and keep the loop running if it’s not Hooks can be prompt-based (an LLM judge evaluates the situation) or command-based (a bash or Python script runs deterministically). They sit at the highest priority in the decision chain — a hook allow overrides everything below it, and a hook deny blocks immediately. Here’s where it gets practical. Say the agent is investigating a performance issue and discovers a corrupt database index. It decides to drop and rebuild the index — exactly what a DBA would do. But you don’t want the agent to ever drop a table. How do you allow one and prevent the other? Three layers, working together: Tool access policy: a global deny on any command matching *DROP TABLE* . Pattern-based, unconditional, always enforced. Custom agent scoping: create a database-maintenance custom agent with instructions that explicitly say “you may drop and rebuild indexes; you may never drop tables.” The custom agent only has the database tools it needs — nothing else. The blast radius is contained by design. PreToolUse hook: a script that inspects the actual SQL command. It allows DROP INDEX , denies DROP TABLE , and can require approval for any DDL command above a risk threshold you define. The policy catches the obvious pattern. The custom agent constrains the scope. The hook handles the edge cases that patterns miss. This is the full stack working together. Scoping automations to a custom agent is one of the most powerful governance levers you have. Instead of giving the meta agent broad database access, you create a specialist with its own tools, its own instructions, its own tool access policies, and its own hooks. The meta agent can investigate and recommend. Actual database changes only happen through the custom agent, with guardrails purpose-built for that domain. Who can configure the agent RBAC extends to the agent itself. Four built-in roles govern who can do what: Role What they can do Administrator Full control — approve actions, manage connectors, configure hooks and policies, change run mode, deploy artifacts Author Create custom agents and tools, upload knowledge, author response plans and incident configurations, manage connectors Standard User Chat, run diagnostics, request actions, create scheduled tasks Reader View conversations and configuration — read-only Separation of duties applies here the same way it applies everywhere else: the person who builds a skill shouldn’t necessarily be the person who promotes it to Autonomous. Only Administrators can approve infrastructure actions — Standard Users and Authors cannot. And only Administrators can create hooks and tool access policies, because those controls govern what every other role can do. How it all fits together These controls layer: identity sets the boundary, run mode sets the default posture, tool controls set the envelope, policies set the rules, and hooks handle the judgement calls. They’re not restrictions — they’re what lets you say yes to progressively more autonomy, with evidence that each step is safe. A useful mental model: governance isn’t a gate you pass through once. It’s the dial you turn up gradually, scenario by scenario, as each one proves itself. The agent that’s fully autonomous for certificate renewals and fully gated for database changes isn’t half-governed — it’s precisely governed. Step 6: Promote to production — your agent configuration is code This is the step that turns your dev agent into a repeatable, auditable production system. Your dev agent is your workshop — the place where you experiment, teach, build artifacts, and iterate until things work. Once they do, the configuration you’ve built there becomes your golden state: the skills, custom agents, tool definitions, knowledge base, response plans, scheduled tasks, and memory that together define how this agent operates. All of it can be declared, versioned, and deployed programmatically: Infrastructure as Code — define agents and their configuration in Bicep or Terraform, same as any other Azure resource. Your agent’s entire shape lives in a template. CLI and REST API — create, update, and configure agents with az commands or direct API calls. Useful for CI/CD pipelines that promote artifacts from dev to prod as part of a normal release. Artifact repositories — skills, custom agents, and tool definitions are files in your repo. Push them to your production agent the same way you push code: through a pipeline, with review, with rollback. This means everything your dev agent learned can flow to production through your existing change process. A new skill gets built and tested in dev, reviewed in a PR, merged, and deployed to the production agent by the pipeline — no portal clicking, no manual replication, no drift. It also means consistency across a fleet. If you run multiple agents — per module, per region, per environment — they can all be powered from the same artifact repository. Update the skill once, deploy it everywhere. The agent-per-module pattern from Step 1 works precisely because IaC makes it cheap to keep them consistent. And when something goes wrong, you roll back the same way you roll back anything else: revert the commit, redeploy the template, and the agent is back to its last known-good state. Step 7: Wire it up — an artifact does nothing until something calls it A skill sitting in your repository doesn’t do anything until it’s bound to a trigger — something in your world that fires it without a human deciding to. It’s an easy step to skip, and worth not skipping. There are three you’ll use constantly: Incident response plans. Attach the artifact to an alert class, so that when that alert fires, that skill runs. This is the single highest-value wiring you can do. Scheduled tasks. For work that should happen on a rhythm rather than in response to a signal — the nightly sweep, the weekly review, the monthly audit. HTTP triggers. For everything else in your ecosystem that wants to start agent work: a pipeline stage, a webhook, a work item transitioning to Ready. Here’s why this matters more than it looks. Remember the climb — Crawl, Walk, Run, Fly. Teams often assume they’ll graduate by making the agent smarter. They won’t. A brilliantly capable agent that only ever runs when someone opens a chat window is still at Walk, permanently, because a human is still initiating every piece of work. Capability doesn’t promote you. Triggers do. Wiring is the actual line between Walk and Run. Cross it deliberately. Step 8: Mimic your production process Here’s the step that turns a clever assistant into an operations teammate: the agent should follow the process your humans already follow. Not a parallel workflow. The workflow. An incident arrives → the agent acknowledges it, so everyone can see it’s owned → it investigates, pulling telemetry, correlating recent deploys, checking dependencies → it posts its findings to the incident, where the on-call already lives → it proposes or applies the mitigation → it updates status → it documents the root cause → it resolves. That’s end-to-end incident investigation and remediation, in the same lifecycle, the same ticket, the same channel your team already watches. No new tool to learn. The on-call engineer just notices the work is already done. And this covers more ground than people expect. Most teams think of incidents in three flavours: outages, where something is down; performance issues, where something is slow or degrading; and manual errors — the config change somebody made by hand at the end of a long day, the setting that got flipped in the portal and never made it back into source control. That third category is the one teams under-count and the one agents are unusually good at, because catching it is mostly a matter of comparing what’s running against what was declared — patient, unglamorous work that nobody wants to do at 2am. A worked example. The Zava learning lab agent runs exactly this loop — incident-triggered investigation and remediation across a live estate. Looking at its real runs: a typical end-to-end run takes about 32 tool calls and lands in a 5-to-12-minute band, with a median around 8.6 minutes from signal to finished work. Roughly five minutes to a mitigation, ten to a full resolution. Compare that with what it replaces: a page, someone waking up, ten minutes to orient, a scramble across dashboards, a colleague pulled in for a second opinion. Ninety minutes and two engineers, on a good night. A second example, from the other end of the lifecycle. A large software vendor running a multi-region estate — dozens of subscriptions, tens of thousands of resources — wired their agents into delivery rather than just incidents. A work item moves to Ready, and that’s the trigger. A custom agent picks it up, writes the code, opens the pull request, deploys the change to a test environment, and runs the validation suite against it — synthetic checks and browser-driven tests, the same ones a human would have run. Then it posts the result on the original work item. The engineer’s first involvement is reading an outcome that already has evidence attached. Same five design considerations from Step 1 govern their fleet: one agent per product module, explicit prod and test agents, and one extra agent in-region purely for data residency. These two examples bookend the same idea. One agent closes incidents; the other closes work items. Both were built the same way — context first, artifacts second, triggers third. Beyond incidents — the agent as a proactive partner It’s easy to think of agents as incident responders, because that’s where the value is most visible. But the best teams use them just as heavily when nothing is broken. Understand your system better. Ask the agent to explain your architecture back to you. Ask it what depends on what. Ask it to map the blast radius of a change you haven’t made yet. Ask it to find every resource in your estate that hasn’t been touched in six months, or every configuration that drifts from what’s declared in code. These aren’t investigations — they’re conversations. And the answers come grounded in your actual telemetry and source code, not a wiki page that was last updated in 2023. Get recommendations you didn’t ask for. Set up a scheduled task that reviews your infrastructure weekly and surfaces opportunities: resources that could be right-sized, SKUs that could be downgraded, replicas that could be consolidated, regions where you’re paying for redundancy you’re not using. The same task can check for reliability gaps: services without health probes configured, storage accounts without soft-delete enabled, deployments running without a rollback path. The agent sees all of it because it already has the context — it just needs a reason to look. Run proactive reliability reviews. Ask the agent to evaluate your service against the Azure Well-Architected Framework, or against your own best practices checklist. Ask it to compare your production configuration against your staging configuration and tell you what’s different — and whether the difference is intentional. Ask it to trace a customer-facing flow end to end and identify the single points of failure. Shift from reactive to preventive. This is the compounding value of the platform. Every incident the agent resolves teaches it something about your system. Over time, the agent that started as an incident responder becomes the thing that prevents incidents — because it’s seen enough of your system to spot the preconditions before they become symptoms. The cost analysis that catches the runaway resource before finance does. The capacity check that raises the quota before the 429s start. The configuration audit that catches the drift before it becomes an outage. The agent that only responds to incidents is useful. The agent that also prevents them is transformative. Part Two — Running it well Two loops, not one queue Once agents are working real incidents, the question stops being can it and becomes which ones. Make that a routing decision rather than a judgement call. Run two loops: an agent loop and a human loop. Every incident class is registered to one of them, so where an incident lands is a property of the class, decided in advance — not something someone works out at 3am. Promotion between loops is deliberate. Moving a class into the agent loop is a reviewable change with a written gate, and a written demotion trigger for when it stops earning its place. The safety net belongs to the incident system, not the agent. Define the conditions your process cares about — not acknowledged within x minutes, not mitigated, not handed off — and let the incident system escalate to the human loop when they’re breached. An agent that has stalled can’t be relied on to report that it has stalled; something outside it has to notice. And escalation should carry the work with it, so the human arrives to evidence already gathered rather than a blank page. Cost: know what an outcome costs One of the quietly wonderful things about agentic operations is that you can finally price an outcome. Agents consume metered units, and every unit maps to work. So instead of “what does our on-call cost?” — a question nobody has ever answered honestly — you get: this incident, end to end, cost this much. For the loop above: an entire incident investigated, mitigated, documented and resolved, in minutes, for under $30. Now price the alternative. Two engineers, ninety minutes, out of hours, plus the context-switch tax on whatever they were doing, plus the meeting the next morning to explain what happened. You’re comparing tens of dollars against hundreds — and that’s before you count the ninety minutes of customer impact that didn’t happen because the fix landed in eight minutes instead of an hour and a half. Multiply by your monthly incident volume and it stops being a cost conversation and starts being a capacity one. The question isn’t “can we afford this?” — it’s “what do we do with the engineering time we just got back?” But be careful not to measure the return only in money and minutes, because the larger part of it never shows up on an invoice. It’s the engineer who slept through the night. It’s the on-call rotation people stop quietly dreading, and the weekend that stayed a weekend. It’s the postmortem that never had to be written — and with it, the whole uncomfortable ritual of working out whose change it was — because the problem was caught and fixed while it was still one degraded instance rather than a customer-visible outage. Teams feel that long before finance notices the bill. Morale has always been a reliability metric; it just never had a dashboard. A few practical habits: - Set a consumption budget deliberately, and know who can raise it and how fast before you need them. - Watch cost per resolved outcome, not total spend. Total spend rising while cost-per-outcome falls is exactly what success looks like. - Use the right trigger for the job. Incident response plans and HTTP triggers bring the work to the agent the instant it matters. Scheduled tasks handle the work that belongs on a rhythm — the nightly sweep, the weekly review. Both have a place; the key is matching each scenario to the trigger that fits it. Live Reports — the UI beyond chat Most people first encounter their agent in a chat window, and chat is genuinely good for investigation and conversation. But it’s not the only surface — and for a lot of operational work, it’s not the best one. Live Reports are interactive HTML applications built by the agent and hosted on the platform. They call the same tools the agent uses — Kusto queries, Azure CLI, incident APIs, connector tools — and render the results as charts, tables, grids, and interactive controls. They’re not screenshots of a past conversation. They’re live applications that re-fetch data every time you open them. Here’s the part worth understanding from a cost perspective: the agent spends tokens when it builds the report — the conversation where you describe what you want. After that, opening the report calls the tools directly. No LLM is involved, so there’s no ongoing token consumption. Build it once, open it a hundred times, share it with your team — the investment is in the creation, and it pays off every time someone opens it. Think of Live Reports as the place where your agent’s intelligence becomes a permanent, shareable surface rather than a conversation that scrolls away. Scenarios where Live Reports shine: Morning triage view. What happened overnight? Which incidents are open, which were resolved autonomously, which need human attention? A single page your on-call opens at the start of every shift — always current, no queries to run. Agent fleet health. Across all your agents: which are healthy, which have degraded tool reliability, which haven’t run in a week? Per-tool success rates, outcome counts, cost-per-resolution trending. The monitoring dashboard you’d otherwise build in Grafana, except it’s already wired to the data. Governance and compliance. NSG audit results, CVE exposure by service, resource compliance against your policy baseline. The report that used to take two engineers a day to compile — now it’s a page that’s always current. Cost analysis. Per-agent spend, per-outcome cost, consumption trending with visual charts. The data that makes the cost conversation in Part Two actually work. On-call handover. A shift handoff report: what happened during this rotation, what’s still pending, what to watch. Built once, regenerated for every handover. Stakeholder status pages. Service health for leadership or customers — uptime, incident summary, SLA adherence — without exposing the underlying tools or conversations. Interactive explorers. Not just viewing data but acting on it. A compliance report where you can drill into a finding and ask the agent to open a remediation PR, right from the report surface. The pattern is the same every time: you tell the agent what you want to see, it builds the report, and from that point forward the report is a zero-cost, always-current application that anyone on your team can open. It’s the agent’s intelligence crystallised into a surface that doesn’t need the agent to be running. Monitor the agent You’ll want a few different lenses, because each sees something the others can’t: Layer What it gives you Live reports Your measurement dashboard — autonomy by scenario, throughput, tool reliability — refreshed from your own connectors every time you open it Scheduled tasks The agent reporting on itself: a weekly health narrative, and the loops that keep artifacts current Your own observability platform Independent health and reliability monitoring outside the agent — the layer that still works when the agent doesn’t Foundry Control Plane Auto-discovers your SRE agents across the subscription: status, error rate, run counts, plus start/stop/block lifecycle control, governed by normal Azure RBAC Agent 365 Organisation-wide registry, governance and security posture across every agent platform you run. Agent 365 is generally available; SRE Agent integration into it is on the roadmap One field-tested tip: track tool failure rate per tool, not in aggregate. The overall success rate in large estates typically sits above 98%, which is reassuring — but it can mask a single connector that needs a configuration fix. Watching each tool individually lets you catch those early, and the fix is usually straightforward: a stale token, a permission gap, a connector that needs reconnecting. Knowledge, evals and learning — insist on these Context isn’t a one-time setup. It’s a living asset, and it’s the thing that compounds — but only if your platform is built to let it. This is the section where what you’re running starts to matter a great deal, so it’s worth being direct about what to demand. Insist on an agent that learns without being told to. The common failure mode of agentic tooling is that all the good material stays in the chat thread. Someone works a hard problem with the agent at midnight, finally cracks it, and the reasoning evaporates when the tab closes. What you want instead is derived learning: the agent distils what it just worked out — the query that got there, the dead end worth avoiding, the service that behaves nothing like its documentation — and files it as durable, structured knowledge on its own, without anyone remembering to write it down. Azure SRE Agent does this automatically. Every investigation deposits something. What still needs your attention is the round trip to the original source of truth. Derived learning lives with the agent. Your runbook, your architecture note, your alert definition lives in your repository — and that’s the copy your humans read. Wire the automation that pushes a learning back into the original artifact as a pull request, so the knowledge doesn’t quietly fork into two versions. This is the single most valuable piece of plumbing most teams haven’t built yet. Insist on evals that run forever, not once. Evals get widely misread as a pre-production gate: test the skill, it passes, it ships, done. That’s the smaller half of the value. The bigger half is relentless — continuously evaluating the agent’s real runs in production. Did it stay in scope? Did it reach the right conclusion? Did it stop and ask when it should have? Did that skill quietly start failing at step four last Tuesday? Real traffic finds things no test suite will, and it finds them on your actual estate rather than on a fixture. Then close the loop, so eval results become work rather than a report nobody opens. Azure SRE Agent ships this as a first-class loop: scheduled tasks that watch the eval signal, notice the degradation, and act on it. Self-improvement — where it gets fun Which is where something rather lovely happens: the agent starts improving itself. It notices a runbook is out of date and updates it. It sees a skill failing at the same step and rewrites that step. It spots a recurring investigation and proposes a new custom agent to own it. It watches its own eval scores and opens a pull request against the artifact that slipped. Teams run learning-loop agents alongside their fleets, and watchdog agents that review other agents’ work. Every completed task should make the next task easier. That’s the flywheel — and it only turns when all three pieces are present: knowledge that accumulates by itself, evals that keep scoring real work, and automation wired to act on both. Put them together and the system stops being something you maintain and starts being something that maintains itself. Part Three — The Zero Ops journey: the art of the possible Now the fun part. Here’s what each rung actually feels like, across the scenarios teams really run. Crawl — the agent suggests, you do the work You’ve connected context and you’re asking questions. It’s already useful: “Which of these 40 alerts overnight actually mattered?” — and it tells you, with reasoning. At this rung the governance sweep produces its first report: here are your idle resources, here are the network rules that don’t match policy, here are the CVEs you’re exposed to. Just a list — but it’s a list nobody had time to produce before, and it took four minutes. The certificate scan tells you what expires in the next 90 days. The cost analysis names your top ten spenders and why they moved. The change reviewer reads an incoming change request and tells you, in plain language, what it actually touches and what depends on it — the blast-radius analysis somebody used to do by hand in a change advisory board meeting. You still do all the work. But for the first time, you can see everything. Walk — the agent does the work, one step at a time Now it acts, asking before each step. This is where investigation and root-cause analysis come alive. An alert fires and the agent has already pulled the telemetry, correlated the recent deployment, checked the dependency, and posted a probable cause on the incident — before the on-call has finished reading the title. The question responder starts answering “is the EU region healthy?” in your team channel, with evidence. The governance sweep grows a spine: it doesn’t just list the orphaned resources, it recommends what to do about each. The CVE report becomes a prioritised remediation plan. The change reviewer stops describing the change and starts drafting it — the implementation plan, the validation steps, and the rollback procedure, written before anyone approves anything. You approve every step. It feels slow. It is also where you discover exactly what your agent is good at — and every gap you find becomes tomorrow’s artifact. Run — the agent completes whole tasks; you review the change Triggers are wired now — incidents, webhooks, schedules — and work starts without you. This is the rung where the 3am page stops arriving. The alert-class handler takes a whole class end to end: fires on arrival, investigates, applies the safe mitigation — restart, scale up, roll back the release — documents it, resolves it. You read about it in the morning. This is the rung where the word self-healing finally earns its place. It’s worth being precise about what it means, because it’s a phrase that gets stretched: self-healing is when the agent detects a known failure class, decides on the response, and acts on it within bounds you pre-approved. Not “the agent does whatever it thinks best.” The class is chosen by you. The safe actions are enumerated by you. The agent’s contribution is that it does the work at 3am, correctly, without waking anyone — and tells you exactly what it did. And notice that this is granted per alert class, never per service. It’s completely normal for one fleet to run some classes at near-total autonomy while other classes sit at a deliberate zero, because nobody’s ready yet. That’s not inconsistency. That’s the control working. The capacity agent sees the quota curve heading for a wall and raises it before anything breaks. The certificate agent opens the renewal PR on schedule. The maintenance agent handles the planned work that used to eat somebody’s weekend — the scheduled patching round, the index rebuild, the node pool rotation — running it in the window, verifying it landed, and reporting on it. The change agent executes the approved change in non-production, validates it, and raises the pull request and the change record together. The governance sweep stops recommending and starts acting — opening pull requests against your infrastructure-as-code to close the findings it used to just report. The CVE backlog that only ever grew? It starts going down, because something is working it every single day. And the work-item loop appears: a backlog item goes in, a custom agent writes the code and opens a pull request. You review the diff. Which is exactly when you meet the review wall. Fly — the agent proves the outcome, and improves the system Fly is not “the agent can execute.” It’s two much better things. Fly, part one: the agent can prove the outcome is correct. It builds the fix. It deploys it to a test environment. It runs the validation itself — synthetic checks, browser tests, the full suite. Then it posts the evidence. You stop reviewing the diff and start reviewing the outcome. That’s how the wall comes down. Now the work-item loop closes completely: backlog item → code → deploy → tested → evidence posted. The release-safety agent doesn’t just roll back after an incident, it gates the deploy beforehand — validating in test and blocking the bad one. The governance sweep pushes its own fix to production, having proven in test that it works. And your standard changes — the well-understood, pre-approved, thousand-times-executed ones — get carried out in production end to end, validated, and the change record closed with the evidence attached. The change advisory board stops reviewing procedure and starts reviewing outcomes, which is what it always wanted to be doing. Fly, part two: the agent improves the system. It learns from every incident. It improves knowledge, artifacts, runbooks, skills — and its own custom agents. The alert-quality loop turns inward: it notices which of your alerts are chronic false positives and opens PRs to fix the alert rules themselves. Your monitoring gets better while you sleep. The system gets better without a human editing it. And back to where we started That 3am page? A whole class of them doesn’t reach a person anymore. The fortnight-long cost review? A standing job that finds the waste and opens the PR. The zero-day marathon? The agent maps exposure across every service in minutes, patches in test, proves it works, and hands you evidence. The CVE backlog that only grew? Something works it every day, and it shrinks. That’s Zero Ops. Not zero humans — zero operations for humans. Your people set intent, govern the system, and validate outcomes. Everything below that line takes care of itself. The proof We run Microsoft this way. Every number here is queryable — these aren’t product metrics, they’re trust metrics. Today: - 2,500+ Microsoft engineering teams - 5,400+ agents running in production - Median time from alert to mitigation: 4 minutes To date: - 1.47M incidents processed - 221K mitigated autonomously - 1.25M enriched for the on-call engineer - ~1M developer hours saved* In the last month alone: - 480K incidents handled - 91K mitigated autonomously - 32M agent actions executed - 60K deploy-and-validate runs - 97.9% of agent work ran autonomously That last number is the one worth sitting with. Ninety-eight percent of the work happens with no human in the conversation — and the two percent that does reach a person is the two percent that genuinely needs judgement. In closing It isn’t about building a better agent. It’s about building a system that deserves autonomy. Context makes it intelligent. Governance makes it trustworthy. Metrics make it provable. When those three come together — agents operate, and humans govern. And the best news: you don’t have to build this from the ground up. Azure SRE Agent already carries these learnings — the context, the governance, the evidence, and the metrics — so your team can start today. Pick one scenario. Give it context. Teach it your system. Work a real problem with it, and turn what you learn into something that persists. Then do it again next week. Start your Zero Ops journey: aka.ms/sreagent · Resources and community: aka.ms/sreagent/links *AI-calculated estimate, based on a conservative earlier baseline.2.8KViews6likes0CommentsReference Architecture for a High Scale Moodle Environment on Azure
Introduction Moodle is an open-source learning platform that was developed in 1999 by Martin Dougiamas, a computer scientist and educator from Australia. Moodle stands for Modular Object-Oriented Dynamic Learning Environment, and it is written in PHP, a popular web programming language. Moodle aims to provide educators and learners with a flexible and customizable online environment for teaching and learning, where they can create and access courses, activities, resources, and assessments. Moodle also supports collaboration, communication, and feedback among users, as well as various plugins and integrations with other systems and tools. Moodle is widely used around the world by schools, universities, businesses, and other organizations, with over 100 million registered users and 250,000 registered sites as of 2020. Moodle is also supported by a large and active community of developers, educators, and users, who contribute to its development, documentation, translation, and support. [URL] is the official website of the Moodle project, where anyone can download the software, join the forums, access the documentation, participate in events, and find out more about Moodle. Goal The goal for this architecture is to have a Moodle environment that can handle 400k concurrent users and scale in and out its application resources according to usage. Using Azure managed services to minimize operational burden was a design premise because standard Moodle reference architectures are based on Virtual Machines that comes with a heavy operational cost. Challenges Being a monolith application, scaling Moodle in a modern cloud native environment is challenging. We choose to use Kubernetes as its computing provider due to the fact that it allow us to build a Moodle artifact in an immutable way that allows it to scale out and in when needed in a fast and automatic way and also recover from potential failures by simply recreating its Deployments without the need to maintain Virtual Machine resources, introducing the concept of pets vs cattle[1] to a scenario that at first glance wouldn't be feasible. Since Moodle is written in PHP it has no concept of database polling, creating a scenario where its underlying database is heavily impacted by new client requests, making it necessary to use an external database pooling solution that had to be custom tailored in order to handle the amount of connections for a heavy-traffic setup like this instead of using Azure Database for PostgreSQL's built-in pgbouncer. The same effect is also observed in its Redis implementation, where a custom Redis cluster had to be created, whereas using Azure Cache for Redis would incur prohibitive costs due to the way it is set up for a more general usage. 1 - https://learn.microsoft.com/en-us/dotnet/architecture/cloud-native/definition#the-cloud Architecture This architecture uses Azure managed (PaaS) components to minimize operational burden by using Azure Kubernetes Service to run Moodle, Azure Storage Account to host course content, Azure Database for PostgreSQL Flexible Server as its database and Azure Front Door to expose the application to the public as well as caching commonly used assets. The solution also leverages Azure Availability Zones to distribute its component across different zones in the region to optimize its availability. Provisioning the solution The provisioning has two parts: setting up the infrastructure and the application. The first part uses Terraform to deploy easily. The second part involves creating Moodle's database and configuring the application for optimal performance based on the templates, number of users, etc. and installing templates, courses, plugins etc. The following steps walk you through all tasks needed to have this job done. Clone the repository $ git clone https://github.com/Azure-Samples/moodle-high-scale Provision the infrastructure $ cd infra/ $ az login $ az group create --name moodle-high-scale --location <region> $ terraform init $ terraform plan -var moodle-environment=production $ terraform apply -var moodle-environment=production $ az aks get-credentials --name moodle-high-scale --resource-group moodle-high-scale Provision the Redis Cluster $ cd ../manifests/redis-cluster $ kubectl apply -f redis-configmap.yaml $ kubectl apply -f redis-cluster.yaml $ kubectl apply -f redis-service.yaml Wait for all the replicas to be running $ ./init.sh Type 'yes' when prompted. Deploy Moodle and its services Change image in moodle-service.yaml and also adjust the moodle data storage account name in the nfs-pv.yaml (see commented lines in the files) $ cd ../../images/moodle $ az acr build --registry moodlehighscale<suffix> -t moodle:v0.1 --file Dockerfile . $ cd ../../manifests $ kubectl apply -f pgbouncer-deployment.yaml $ kubectl apply -f nfs-pv.yaml $ kubectl apply -f nfs-pvc.yaml $ kubectl apply -f moodle-service.yaml $ kubectl -n moodle get svc –watch Provision the frontend configuration that will be used to expose Moodle and its assets publicly $ cd ../frontend $ terraform init $ terraform plan $ terraform apply Approve the private endpoint connection request from Frontdoor in moodle-svc-pls resource. Private Link Services > moodle-svc-pls > Private Endpoint Connections > Select the request from Front Door and click on Approve. Install database $ kubectl -n moodle exec -it deployment/moodle-deployment -- /bin/bash $ php /var/www/html/admin/cli/install_database.php --adminuser=admin_user --adminpass=admin_pass --agree-license Deploy Moodle Cron Change image in moodle-cron.yaml $ cd ../manifests $ kubectl apply -f moodle-cron.yaml Your Moodle installation is now ready to use! Conclusion You can create a Moodle environment that is scalable and reliable in minutes with a very simple approach, without having to deal with the hassle of operating its parts that normally comes with standard Moodle installations.2.1KViews8likes1CommentWhat's new in Azure App Service at #MSBuild 2026
At Microsoft Build 2026, Azure App Service introduced a powerful set of updates designed to help organizations accelerate their journey into AI, without increasing complexity or cost. These innovations focus on one clear business outcome: enabling teams to build, deploy, and scale AI-powered applications and agents faster, more securely, and with greater operational efficiency. A key highlight is the new Easy AI experience, which allows existing web apps to become AI-ready with no rearchitecting required. With capabilities like built-in Model Context Protocol (MCP), developers can instantly expose app functionality as agent-ready endpoints, enabling AI agents to interact with business logic securely and seamlessly. This dramatically reduces development time, allowing teams to move from idea to intelligent application in a fraction of the usual effort. Security and compliance are also strengthened with the general availability of Isolated v4 for Azure App Service Environments, delivering improved performance for customers that need single-tenant isolation and strong data residency guarantees. For enterprises operating in regulated industries, this ensures AI applications meet strict governance requirements without sacrificing scalability or speed. For modernization scenarios, Managed Instance on Azure App Service simplifies the migration of legacy applications, including those with OS-level dependencies. Faster restarts, enhanced diagnostics, and AI-assisted migration workflows help organizations modernize existing systems cost-effectively—avoiding expensive rewrites while unlocking AI capabilities. Recent updates include an AI-assisted approach to migrating legacy IIS applications using a multi-agent workflow powered by MCP. Managed Instance is supported on both Premium v4 and Isolated v4, laying the foundation for a modern compute infrastructure across the board. Operational efficiency is further enhanced through platform and CLI improvements designed for the “agent era.” From structured deployment diagnostics to optimized Python pipelines delivering faster deployments, these updates reduce friction and infrastructure overhead, lowering total cost of ownership. Together, these innovations position Azure App Service as a future-ready platform where businesses can rapidly build intelligent, agent-driven applications securely, efficiently, and at scale. 👉 Learn more in the full announcement: Deep dive into Azure App Service Build 2026 updates1.7KViews0likes0Comments